TOYOTA RAV4 2006 Service Repair Manual
Manufacturer: TOYOTA, Model Year: 2006, Model line: RAV4, Model: TOYOTA RAV4 2006Pages: 2000, PDF Size: 45.84 MB
Page 621 of 2000
2AZ-FE ENGINE MECHANICAL – CYLINDER HEADEM–77
EM
Standard valve guide bush diameter
If the bushing bore diameter of the cylinder head is
greater than 10.394 mm (0.4092 in.), replace the
cylinder head.
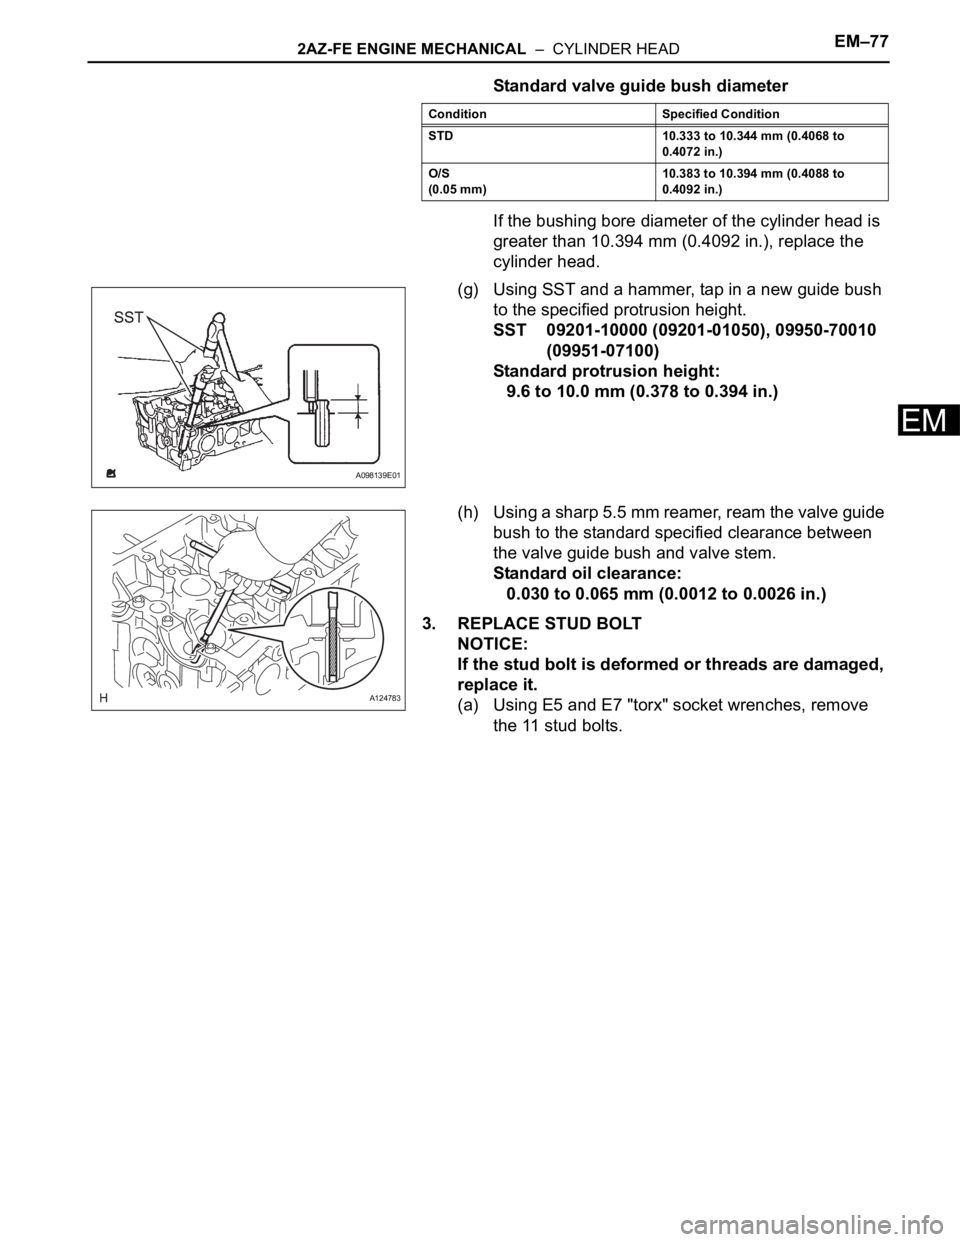
(g) Using SST and a hammer, tap in a new guide bush
to the specified protrusion height.
SST 09201-10000 (09201-01050), 09950-70010
(09951-07100)
Standard protrusion height:
9.6 to 10.0 mm (0.378 to 0.394 in.)
(h) Using a sharp 5.5 mm reamer, ream the valve guide
bush to the standard specified clearance between
the valve guide bush and valve stem.
Standard oil clearance:
0.030 to 0.065 mm (0.0012 to 0.0026 in.)
3. REPLACE STUD BOLT
NOTICE:
If the stud bolt is deformed or threads are damaged,
replace it.
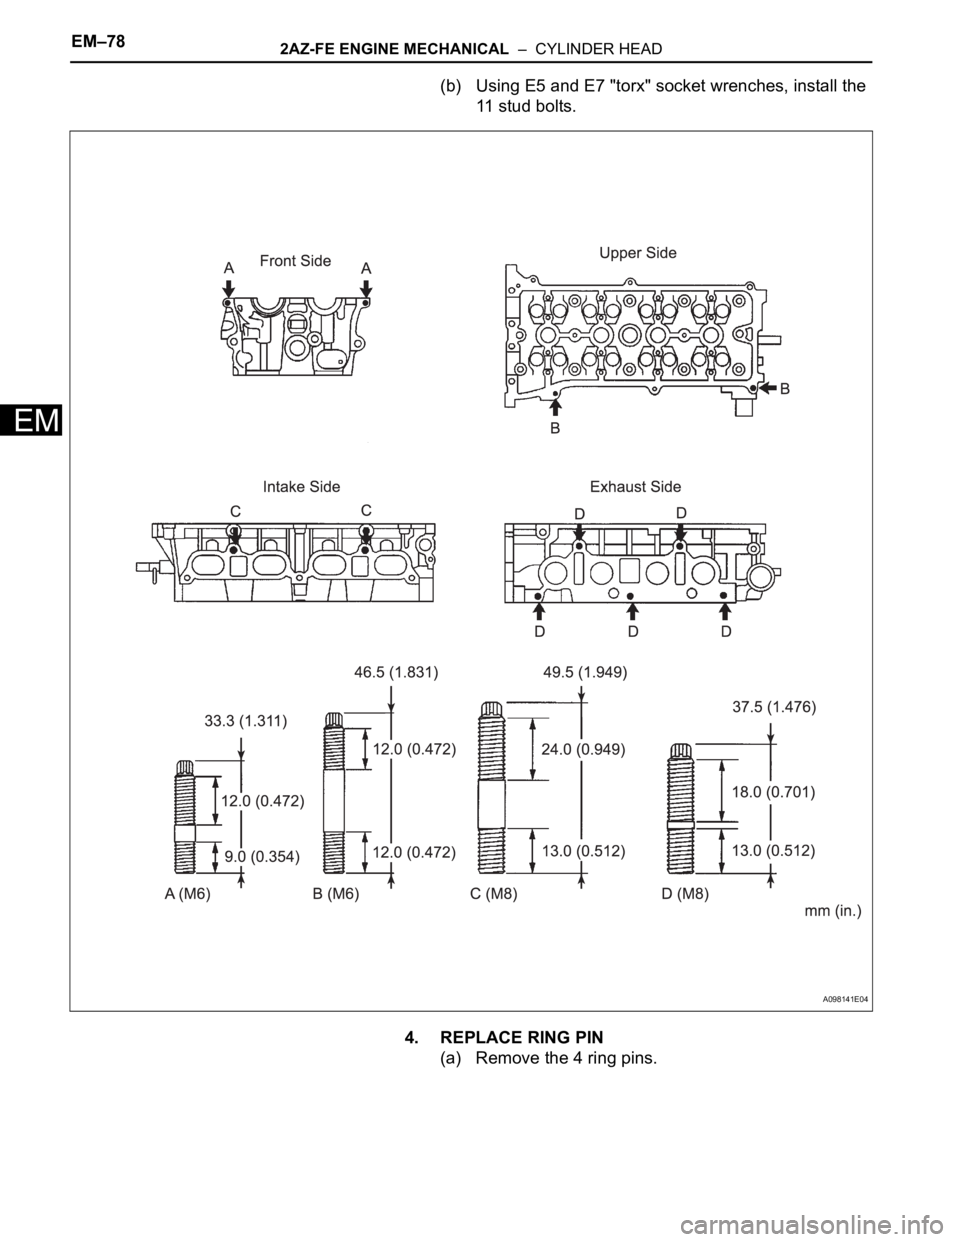
(a) Using E5 and E7 "torx" socket wrenches, remove
the 11 stud bolts.
Condition Specified Condition
STD 10.333 to 10.344 mm (0.4068 to
0.4072 in.)
O/S
(0.05 mm)10.383 to 10.394 mm (0.4088 to
0.4092 in.)
A098139E01
A124783
Page 622 of 2000
EM–782AZ-FE ENGINE MECHANICAL – CYLINDER HEAD
EM
(b) Using E5 and E7 "torx" socket wrenches, install the
11 stud bolts.
4. REPLACE RING PIN
(a) Remove the 4 ring pins.
A098141E04
Page 623 of 2000
2AZ-FE ENGINE MECHANICAL – CYLINDER HEADEM–79
EM
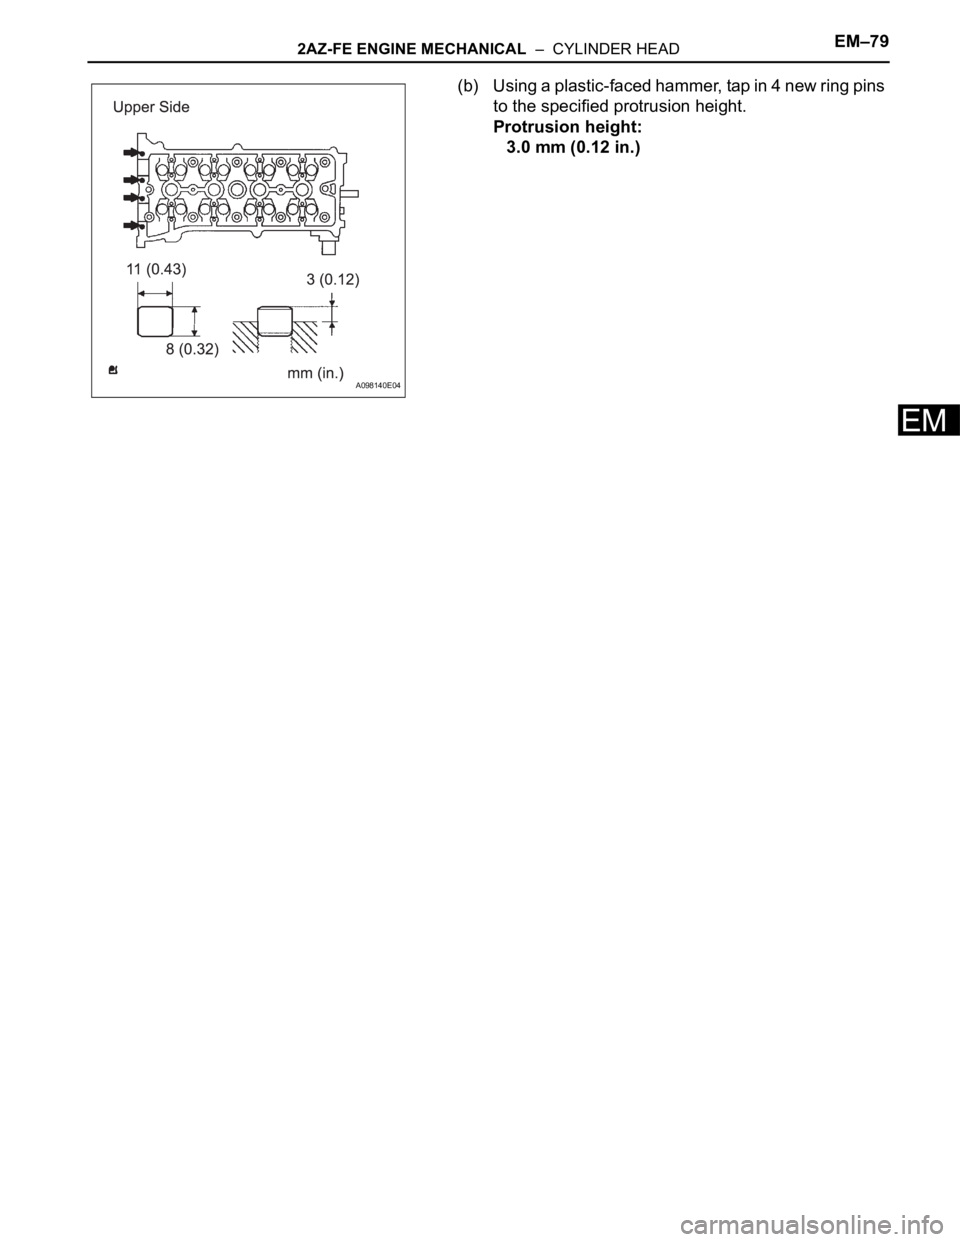
(b) Using a plastic-faced hammer, tap in 4 new ring pins
to the specified protrusion height.
Protrusion height:
3.0 mm (0.12 in.)
A098140E04
Page 624 of 2000
EM–802AZ-FE ENGINE MECHANICAL – CYLINDER HEAD
EM
REASSEMBLY
HINT:
• Thoroughly clean all parts to be assembled.
• Before installing the parts, apply fresh engine oil to all
sliding and rotating surfaces.
• Replace oil seals with new ones.
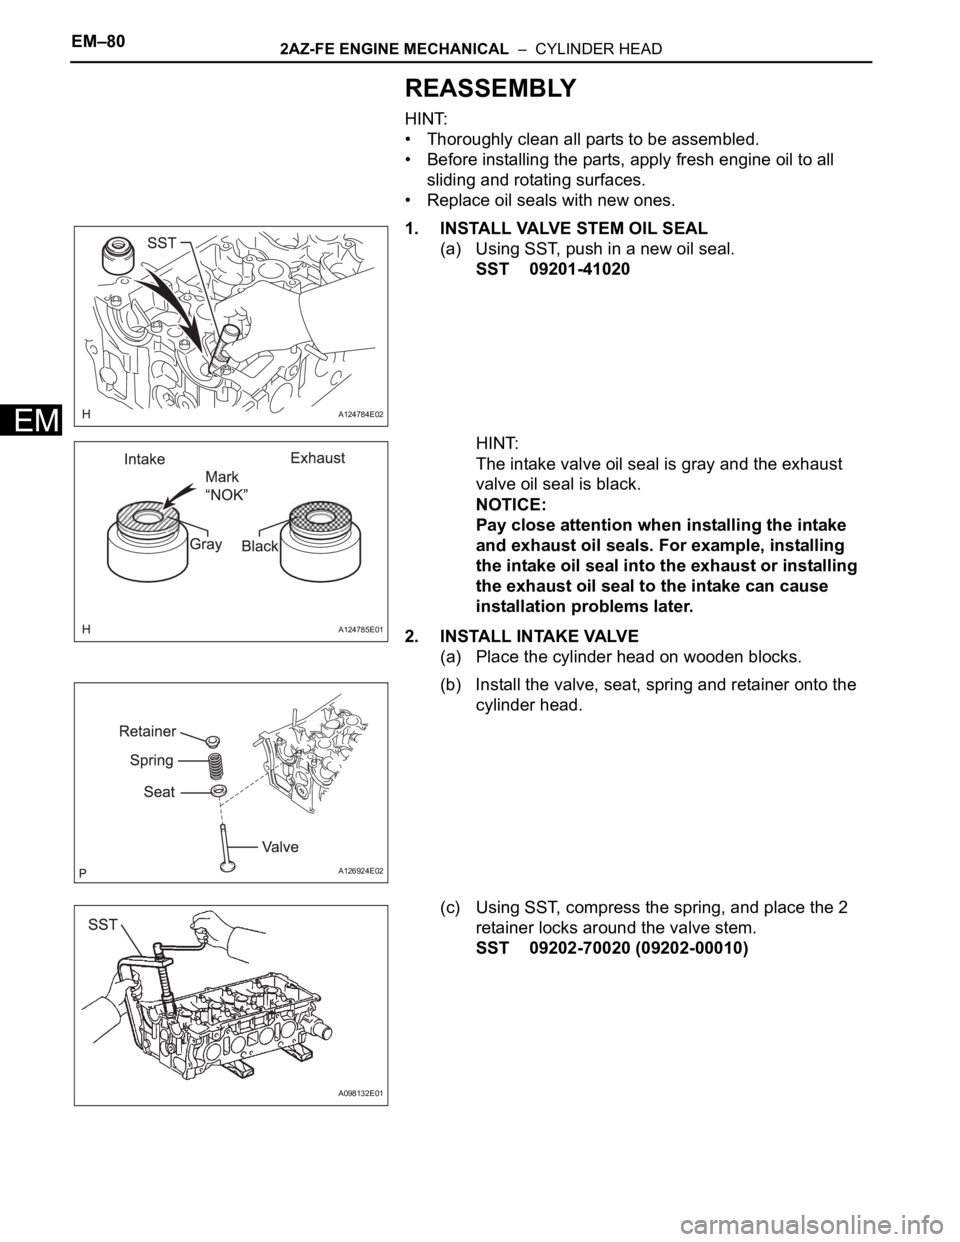
1. INSTALL VALVE STEM OIL SEAL
(a) Using SST, push in a new oil seal.
SST 09201-41020
HINT:
The intake valve oil seal is gray and the exhaust
valve oil seal is black.
NOTICE:
Pay close attention when installing the intake
and exhaust oil seals. For example, installing
the intake oil seal into the exhaust or installing
the exhaust oil seal to the intake can cause
installation problems later.
2. INSTALL INTAKE VALVE
(a) Place the cylinder head on wooden blocks.
(b) Install the valve, seat, spring and retainer onto the
cylinder head.
(c) Using SST, compress the spring, and place the 2
retainer locks around the valve stem.
SST 09202-70020 (09202-00010)
A124784E02
A124785E01
A126924E02
A098132E01
Page 625 of 2000

2AZ-FE ENGINE MECHANICAL – CYLINDER HEADEM–81
EM
(d) Using a plastic-faced hammer and discarded valve
(with its tip wrapped with tape), lightly tap the
installed valve to fit it into place.
NOTICE:
Be careful not to damage the valve stem tip.
3. INSTALL EXHAUST VALVE
(a) Place the cylinder head on wooden blocks.
(b) Install the valve, seat, spring and retainer onto the
cylinder head.
(c) Using SST, compress the spring, and place the 2
retainer locks around the valve stem.
SST 09202-70020 (09202-00010)
(d) Using a plastic-faced hammer and discarded valve
(with its tip wrapped with tape), lightly tap the
installed valve to fit it into place.
NOTICE:
Be careful not to damage the valve stem tip.
4. INSTALL VALVE LIFTER
(a) Assemble the valve lifter and the tip of the valve
stem with a light coat of engine oil applied.
NOTICE:
Install the valve lifters in their original places.
5. INSTALL NO. 1 CAMSHAFT BEARING
(a) Clean the contact surface of the bearing and the
bearing cap.
NOTICE:
Do not apply engine oil to the contact surfaces
of the camshaft bearing and bearing cap.
A112168E04
A126925E02
A098133E01
A098144E07
Page 626 of 2000

EM–822AZ-FE ENGINE MECHANICAL – CYLINDER HEAD
EM
(b) Align the bearing claw with the claw groove of No. 1
and No. 2 bearing cap, and push in the No. 1
camshaft bearing.
6. INSTALL NO. 2 CAMSHAFT BEARING
(a) Clean the contact surface of the bearing and the
bearing cap.
NOTICE:
Do not apply engine oil to the contact surfaces
of the camshaft bearing and cylinder block.
(b) Install the No. 2 camshaft bearing onto the cylinder
head.
7. INSTALL CAMSHAFT POSITION SENSOR
(a) Install the camshaft position sensor with the bolt.
Torque: 9.0 N*m (92 kgf*cm, 80 in.*lbf)
8. INSTALL ENGINE COOLANT TEMPERATURE
SENSOR
(a) Using SST, install a new gasket and the ECT
sensor.
SST 09817-33190
Torque: 20 N*m (204 kgf*cm, 15 ft.*lbf)
A124773
A013383E01
A114368
A114367E01
Page 627 of 2000
2AZ-FE ENGINE MECHANICAL – CYLINDER HEADEM–83
EM
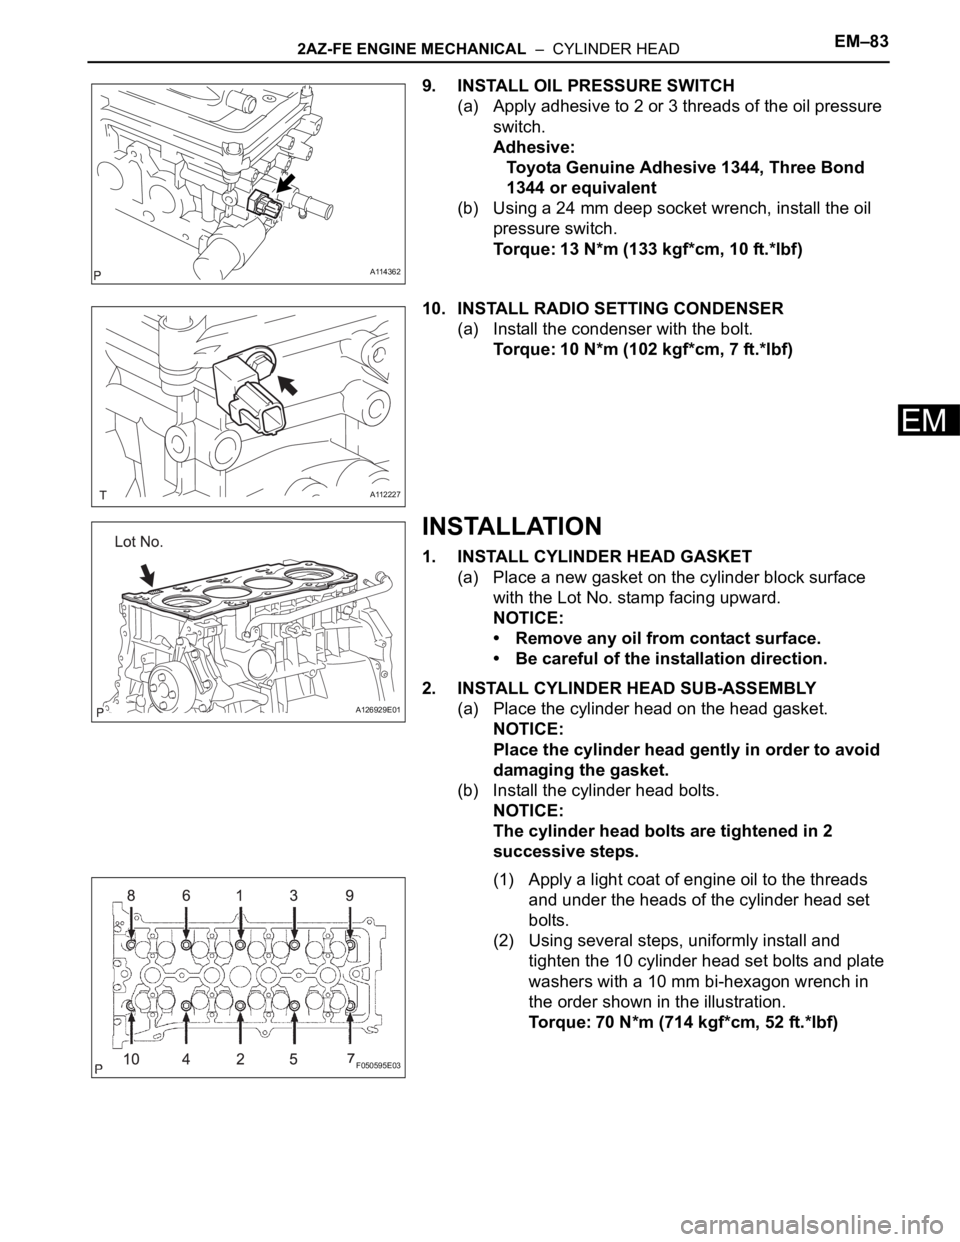
9. INSTALL OIL PRESSURE SWITCH
(a) Apply adhesive to 2 or 3 threads of the oil pressure
switch.
Adhesive:
Toyota Genuine Adhesive 1344, Three Bond
1344 or equivalent
(b) Using a 24 mm deep socket wrench, install the oil
pressure switch.
Torque: 13 N*m (133 kgf*cm, 10 ft.*lbf)
10. INSTALL RADIO SETTING CONDENSER
(a) Install the condenser with the bolt.
Torque: 10 N*m (102 kgf*cm, 7 ft.*lbf)
INSTALLATION
1. INSTALL CYLINDER HEAD GASKET
(a) Place a new gasket on the cylinder block surface
with the Lot No. stamp facing upward.
NOTICE:
• Remove any oil from contact surface.
• Be careful of the installation direction.
2. INSTALL CYLINDER HEAD SUB-ASSEMBLY
(a) Place the cylinder head on the head gasket.
NOTICE:
Place the cylinder head gently in order to avoid
damaging the gasket.
(b) Install the cylinder head bolts.
NOTICE:
The cylinder head bolts are tightened in 2
successive steps.
(1) Apply a light coat of engine oil to the threads
and under the heads of the cylinder head set
bolts.
(2) Using several steps, uniformly install and
tighten the 10 cylinder head set bolts and plate
washers with a 10 mm bi-hexagon wrench in
the order shown in the illustration.
Torque: 70 N*m (714 kgf*cm, 52 ft.*lbf)
A114362
A112227
A126929E01
F050595E03
Page 628 of 2000
EM–842AZ-FE ENGINE MECHANICAL – CYLINDER HEAD
EM
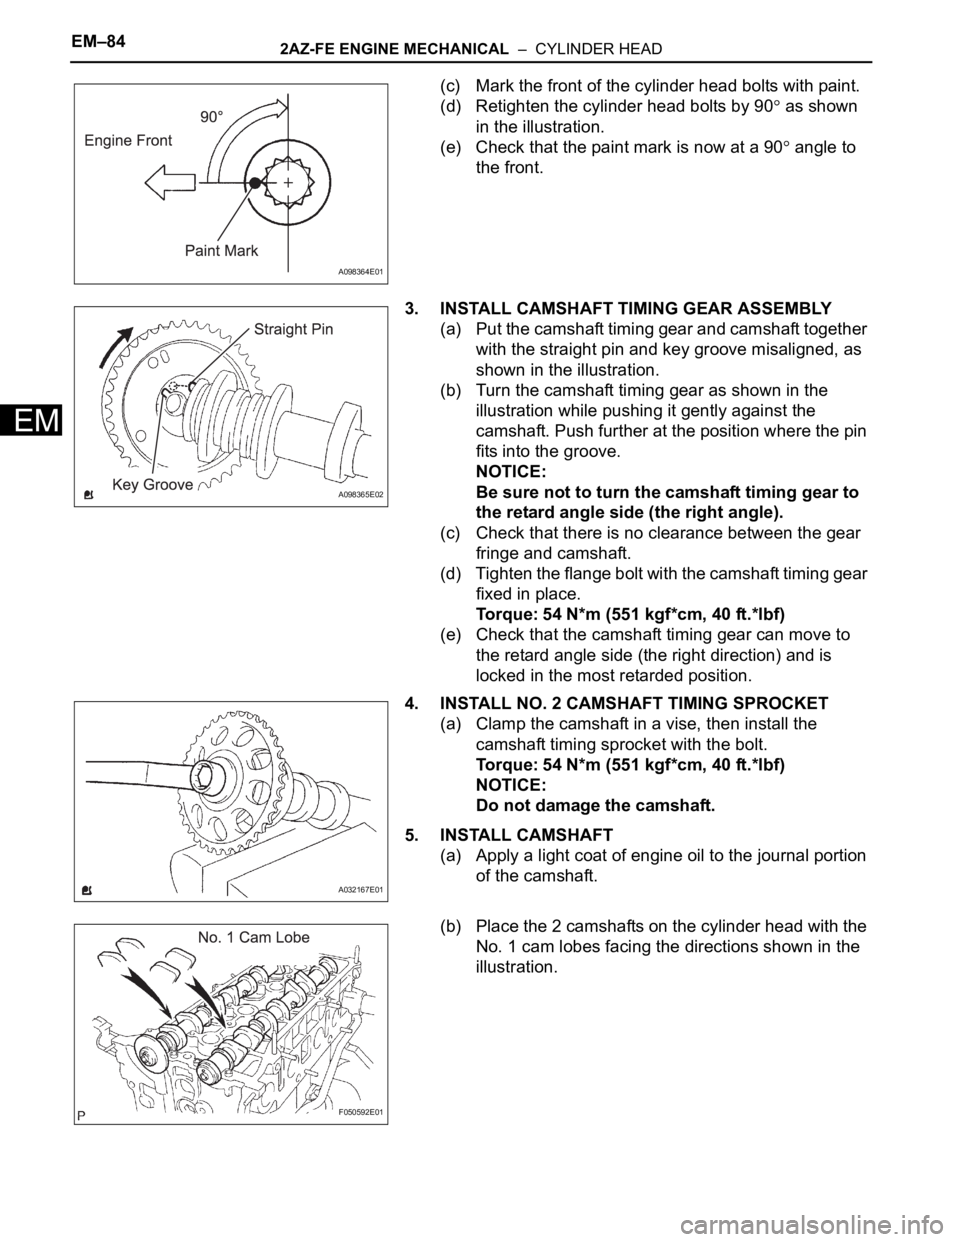
(c) Mark the front of the cylinder head bolts with paint.
(d) Retighten the cylinder head bolts by 90
as shown
in the illustration.
(e) Check that the paint mark is now at a 90
angle to
the front.
3. INSTALL CAMSHAFT TIMING GEAR ASSEMBLY
(a) Put the camshaft timing gear and camshaft together
with the straight pin and key groove misaligned, as
shown in the illustration.
(b) Turn the camshaft timing gear as shown in the
illustration while pushing it gently against the
camshaft. Push further at the position where the pin
fits into the groove.
NOTICE:
Be sure not to turn the camshaft timing gear to
the retard angle side (the right angle).
(c) Check that there is no clearance between the gear
fringe and camshaft.
(d) Tighten the flange bolt with the camshaft timing gear
fixed in place.
Torque: 54 N*m (551 kgf*cm, 40 ft.*lbf)
(e) Check that the camshaft timing gear can move to
the retard angle side (the right direction) and is
locked in the most retarded position.
4. INSTALL NO. 2 CAMSHAFT TIMING SPROCKET
(a) Clamp the camshaft in a vise, then install the
camshaft timing sprocket with the bolt.
Torque: 54 N*m (551 kgf*cm, 40 ft.*lbf)
NOTICE:
Do not damage the camshaft.
5. INSTALL CAMSHAFT
(a) Apply a light coat of engine oil to the journal portion
of the camshaft.
(b) Place the 2 camshafts on the cylinder head with the
No. 1 cam lobes facing the directions shown in the
illustration.
A098364E01
A098365E02
A032167E01
F050592E01
Page 629 of 2000
2AZ-FE ENGINE MECHANICAL – CYLINDER HEADEM–85
EM
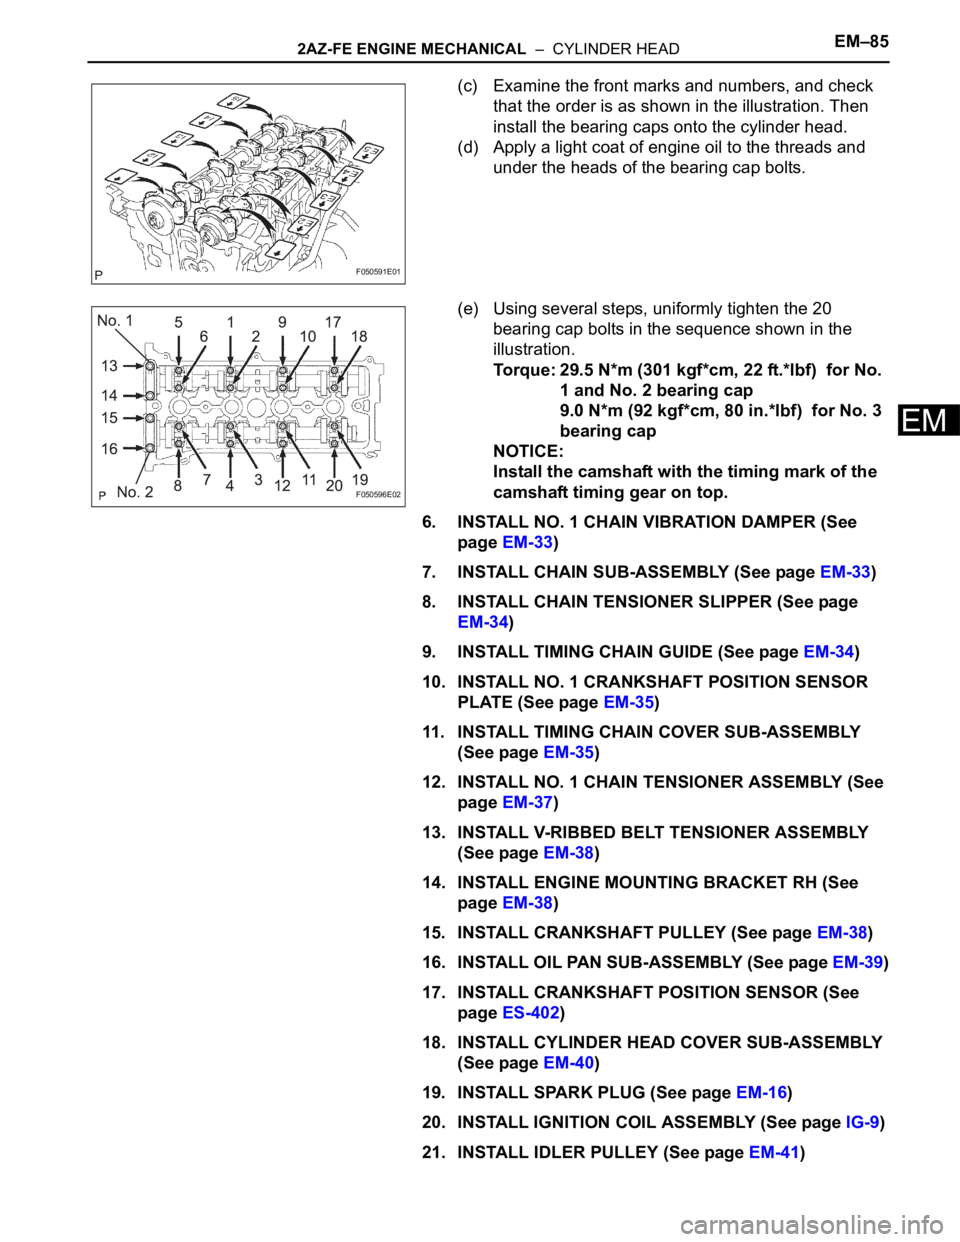
(c) Examine the front marks and numbers, and check
that the order is as shown in the illustration. Then
install the bearing caps onto the cylinder head.
(d) Apply a light coat of engine oil to the threads and
under the heads of the bearing cap bolts.
(e) Using several steps, uniformly tighten the 20
bearing cap bolts in the sequence shown in the
illustration.
Torque: 29.5 N*m (301 kgf*cm, 22 ft.*lbf) for No.
1 and No. 2 bearing cap
9.0 N*m (92 kgf*cm, 80 in.*lbf) for No. 3
bearing cap
NOTICE:
Install the camshaft with the timing mark of the
camshaft timing gear on top.
6. INSTALL NO. 1 CHAIN VIBRATION DAMPER (See
page EM-33)
7. INSTALL CHAIN SUB-ASSEMBLY (See page EM-33)
8. INSTALL CHAIN TENSIONER SLIPPER (See page
EM-34)
9. INSTALL TIMING CHAIN GUIDE (See page EM-34)
10. INSTALL NO. 1 CRANKSHAFT POSITION SENSOR
PLATE (See page EM-35)
11. INSTALL TIMING CHAIN COVER SUB-ASSEMBLY
(See page EM-35)
12. INSTALL NO. 1 CHAIN TENSIONER ASSEMBLY (See
page EM-37)
13. INSTALL V-RIBBED BELT TENSIONER ASSEMBLY
(See page EM-38)
14. INSTALL ENGINE MOUNTING BRACKET RH (See
page EM-38)
15. INSTALL CRANKSHAFT PULLEY (See page EM-38)
16. INSTALL OIL PAN SUB-ASSEMBLY (See page EM-39)
17. INSTALL CRANKSHAFT POSITION SENSOR (See
page ES-402)
18. INSTALL CYLINDER HEAD COVER SUB-ASSEMBLY
(See page EM-40)
19. INSTALL SPARK PLUG (See page EM-16)
20. INSTALL IGNITION COIL ASSEMBLY (See page IG-9)
21. INSTALL IDLER PULLEY (See page EM-41)
F050591E01
F050596E02
Page 630 of 2000
EM–862AZ-FE ENGINE MECHANICAL – CYLINDER HEAD
EM
22. INSTALL ENGINE MOUNTING INSULATOR RH (See
page EM-41)
23. INSTALL RADIATOR RESERVOIR (See page EM-112)
24. INSTALL GENERATOR ASSEMBLY (See page CH-15)
25. INSTALL FAN AND GENERATOR V BELT (See page
EM-7)
26. INSTALL FRONT SUSPENSION MEMBER
REINFORCEMENT RH (See page EM-7)
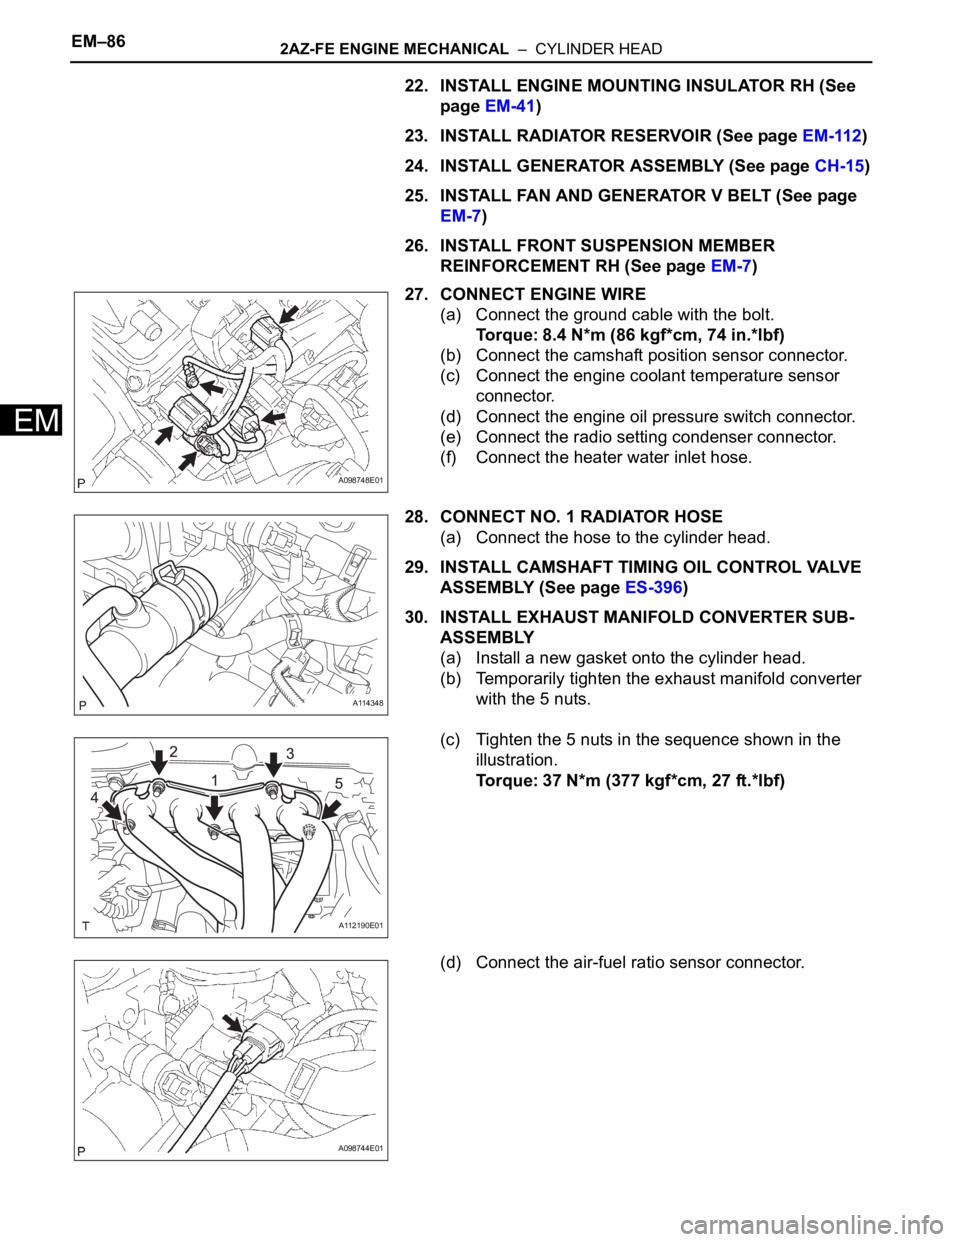
27. CONNECT ENGINE WIRE
(a) Connect the ground cable with the bolt.
Torque: 8.4 N*m (86 kgf*cm, 74 in.*lbf)
(b) Connect the camshaft position sensor connector.
(c) Connect the engine coolant temperature sensor
connector.
(d) Connect the engine oil pressure switch connector.
(e) Connect the radio setting condenser connector.
(f) Connect the heater water inlet hose.
28. CONNECT NO. 1 RADIATOR HOSE
(a) Connect the hose to the cylinder head.
29. INSTALL CAMSHAFT TIMING OIL CONTROL VALVE
ASSEMBLY (See page ES-396)
30. INSTALL EXHAUST MANIFOLD CONVERTER SUB-
ASSEMBLY
(a) Install a new gasket onto the cylinder head.
(b) Temporarily tighten the exhaust manifold converter
with the 5 nuts.
(c) Tighten the 5 nuts in the sequence shown in the
illustration.
Torque: 37 N*m (377 kgf*cm, 27 ft.*lbf)
(d) Connect the air-fuel ratio sensor connector.
A098748E01
A114348
A112190E01
A098744E01