TOYOTA RAV4 2006 Service Repair Manual
Manufacturer: TOYOTA, Model Year: 2006, Model line: RAV4, Model: TOYOTA RAV4 2006Pages: 2000, PDF Size: 45.84 MB
Page 831 of 2000
EC–222AZ-FE EMISSION CONTROL – AIR FUEL RATIO SENSOR
EC
REMOVAL
1. DISCONNECT CABLE FROM NEGATIVE BATTERY
TERMINAL
CAUTION:
Wait at least 90 seconds after disconnecting the
cable from the negative (-) battery terminal to
prevent airbag and seat belt pretensioner activation.
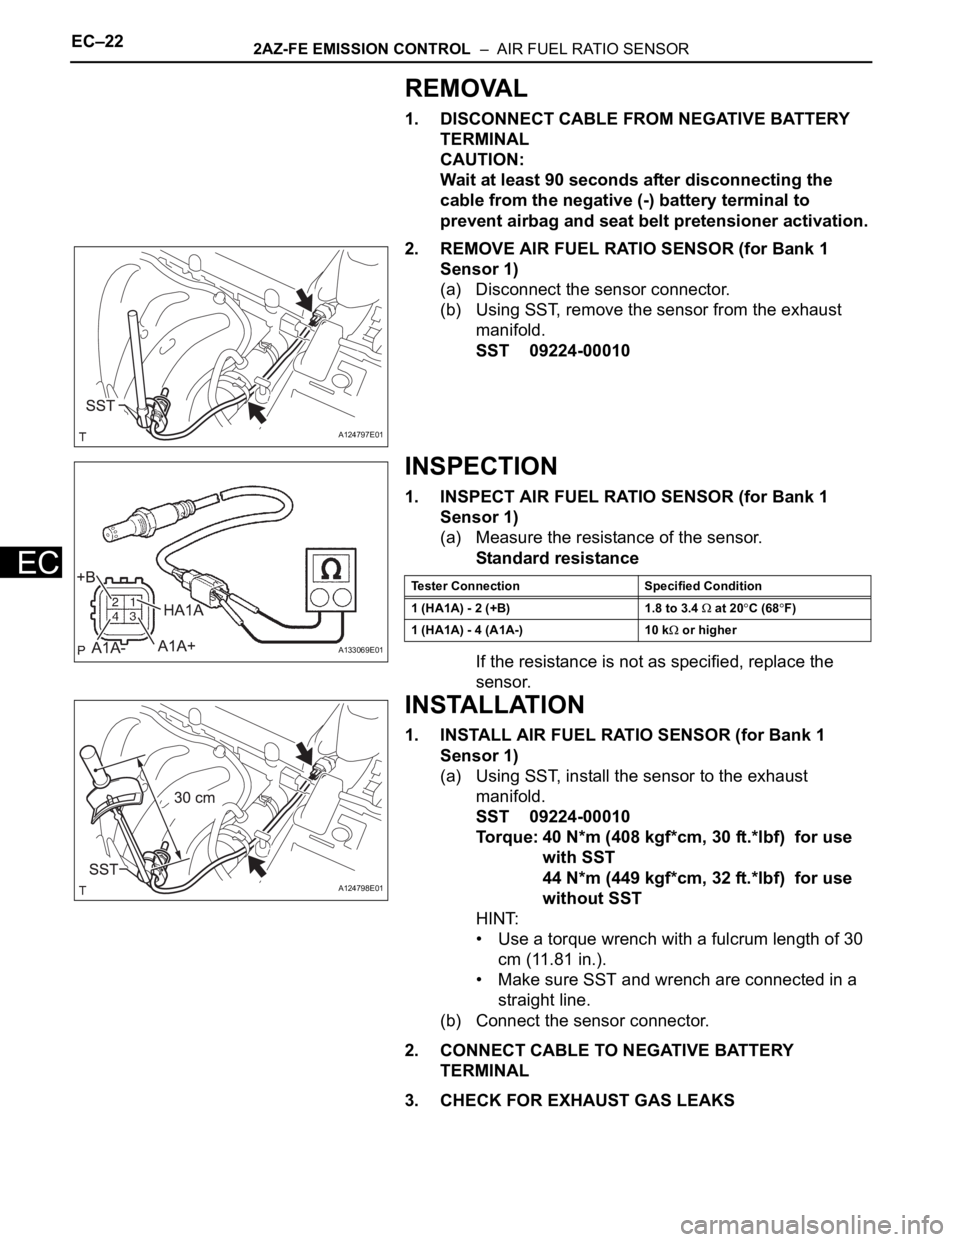
2. REMOVE AIR FUEL RATIO SENSOR (for Bank 1
Sensor 1)
(a) Disconnect the sensor connector.
(b) Using SST, remove the sensor from the exhaust
manifold.
SST 09224-00010
INSPECTION
1. INSPECT AIR FUEL RATIO SENSOR (for Bank 1
Sensor 1)
(a) Measure the resistance of the sensor.
Standard resistance
If the resistance is not as specified, replace the
sensor.
INSTALLATION
1. INSTALL AIR FUEL RATIO SENSOR (for Bank 1
Sensor 1)
(a) Using SST, install the sensor to the exhaust
manifold.
SST 09224-00010
Torque: 40 N*m (408 kgf*cm, 30 ft.*lbf) for use
with SST
44 N*m (449 kgf*cm, 32 ft.*lbf) for use
without SST
HINT:
• Use a torque wrench with a fulcrum length of 30
cm (11.81 in.).
• Make sure SST and wrench are connected in a
straight line.
(b) Connect the sensor connector.
2. CONNECT CABLE TO NEGATIVE BATTERY
TERMINAL
3. CHECK FOR EXHAUST GAS LEAKS
A124797E01
A133069E01
Tester Connection Specified Condition
1 (HA1A) - 2 (+B) 1.8 to 3.4
at 20C (68F)
1 (HA1A) - 4 (A1A-) 10 k
or higher
A124798E01
Page 832 of 2000
EC–82GR-FE EMISSION CONTROL – EMISSION CONTROL SYSTEM
EC
ON-VEHICLE INSPECTION
1. CHECK FUEL CUT RPM
(a) Increase the engine speed to at least 3,500 rpm.
(b) Use a sound scope to check for injector operating
noise.
(c) Check that the operating sounds stop momentarily
and then resume when the throttle lever is released.
HINT:
Measure with the A/C OFF.
Fuel return rpm:
1,400 rpm
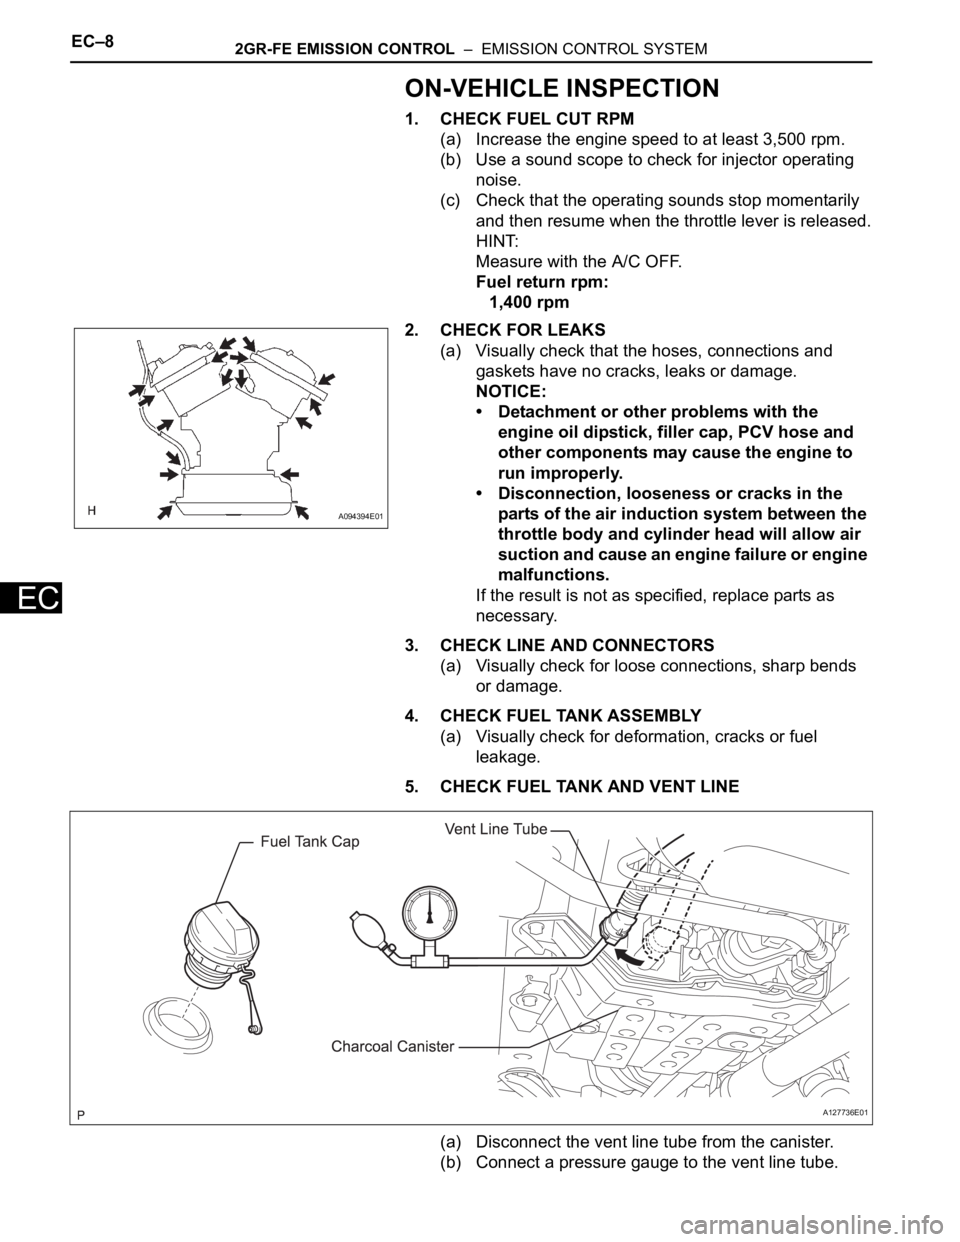
2. CHECK FOR LEAKS
(a) Visually check that the hoses, connections and
gaskets have no cracks, leaks or damage.
NOTICE:
• Detachment or other problems with the
engine oil dipstick, filler cap, PCV hose and
other components may cause the engine to
run improperly.
• Disconnection, looseness or cracks in the
parts of the air induction system between the
throttle body and cylinder head will allow air
suction and cause an engine failure or engine
malfunctions.
If the result is not as specified, replace parts as
necessary.
3. CHECK LINE AND CONNECTORS
(a) Visually check for loose connections, sharp bends
or damage.
4. CHECK FUEL TANK ASSEMBLY
(a) Visually check for deformation, cracks or fuel
leakage.
5. CHECK FUEL TANK AND VENT LINE
(a) Disconnect the vent line tube from the canister.
(b) Connect a pressure gauge to the vent line tube.
A094394E01
A127736E01
Page 833 of 2000

2GR-FE EMISSION CONTROL – EMISSION CONTROL SYSTEMEC–9
EC
(c) Apply 4 kPa (41 kgf/cm2, 30 mmHg) of pressure to
the vent line of the fuel tank.
HINT:
Perform this inspection with the fuel tank less than
90% full. When the fuel tank is full, the fuel cutoff
valve closes and pressure is released through the
1.5 mm orifice. As a result, when the fuel tank cap is
removed, the pressure does not decrease smoothly.
(d) Check that the fuel tank pressure is maintained for
some time, and does not decrease immediately.
HINT:
If the pressure decreases immediately, one of the
following may be the cause:
• The fuel tank cap is not completely tightened.
• The fuel tank cap is damaged.
• Air is leaking from the vent line.
• The fuel tank is damaged.
(e) When the fuel tank cap is removed, check that
pressure is released smoothly.
HINT:
If the pressure does not drop, replace the fuel tank
assembly.
(f) Reconnect the vent line tube to the canister.
6. CHECK AIR INLET LINE
(a) Disconnect the air inlet line hose from the charcoal
canister.
(b) Check that air flows freely into the air inlet line.
HINT:
If air does not flow freely into the air inlet line, repair
or replace it.
(c) Reconnect the air inlet line hose to the charcoal
canister.
Page 834 of 2000
EC–122GR-FE EMISSION CONTROL – CANISTER
EC
INSPECTION
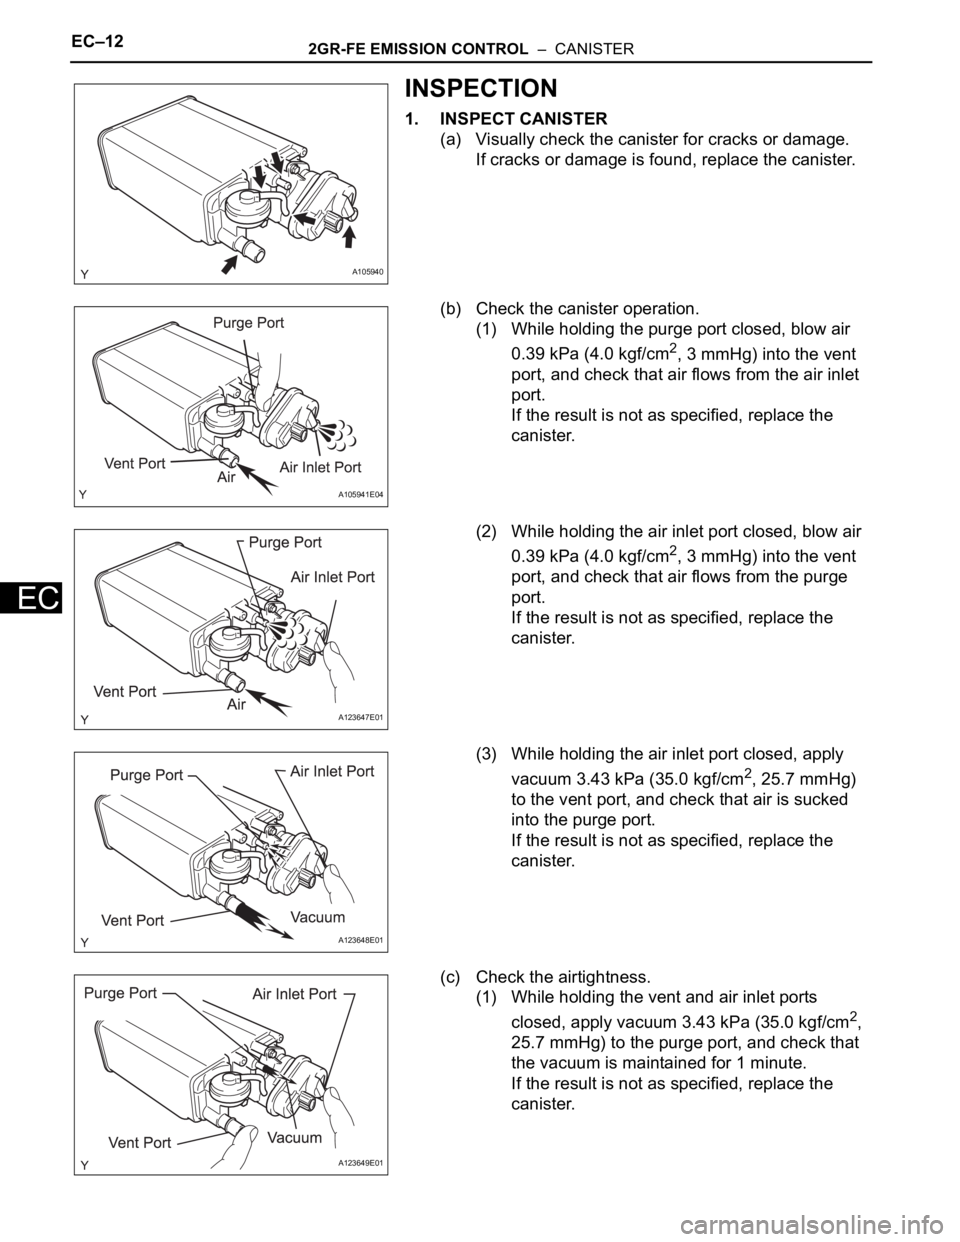
1. INSPECT CANISTER
(a) Visually check the canister for cracks or damage.
If cracks or damage is found, replace the canister.
(b) Check the canister operation.
(1) While holding the purge port closed, blow air
0.39 kPa (4.0 kgf/cm
2, 3 mmHg) into the vent
port, and check that air flows from the air inlet
port.
If the result is not as specified, replace the
canister.
(2) While holding the air inlet port closed, blow air
0.39 kPa (4.0 kgf/cm
2, 3 mmHg) into the vent
port, and check that air flows from the purge
port.
If the result is not as specified, replace the
canister.
(3) While holding the air inlet port closed, apply
vacuum 3.43 kPa (35.0 kgf/cm
2, 25.7 mmHg)
to the vent port, and check that air is sucked
into the purge port.
If the result is not as specified, replace the
canister.
(c) Check the airtightness.
(1) While holding the vent and air inlet ports
closed, apply vacuum 3.43 kPa (35.0 kgf/cm
2,
25.7 mmHg) to the purge port, and check that
the vacuum is maintained for 1 minute.
If the result is not as specified, replace the
canister.
A105940
A105941E04
A123647E01
A123648E01
A123649E01
Page 835 of 2000
2GR-FE EMISSION CONTROL – CANISTEREC–13
EC
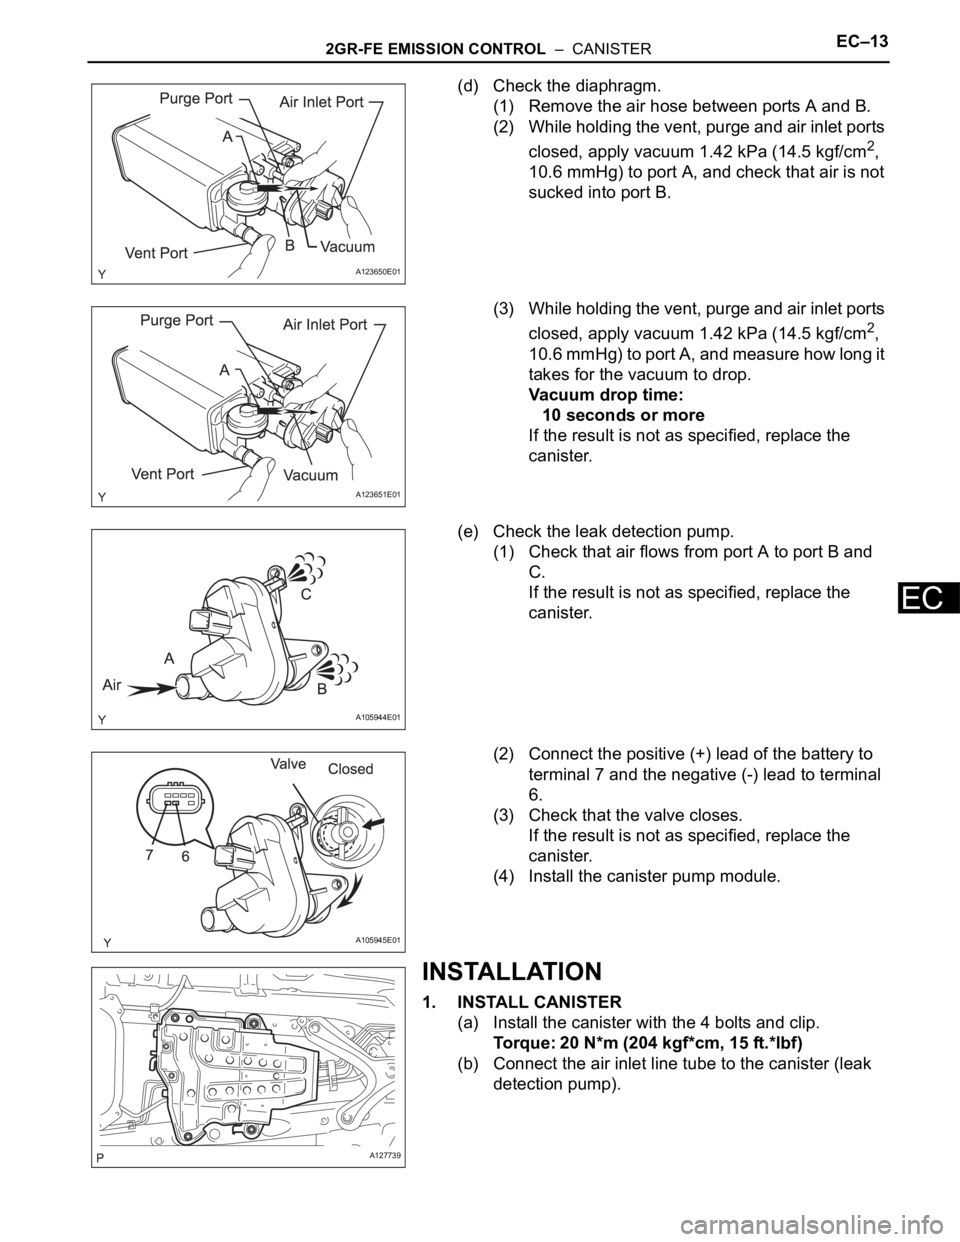
(d) Check the diaphragm.
(1) Remove the air hose between ports A and B.
(2) While holding the vent, purge and air inlet ports
closed, apply vacuum 1.42 kPa (14.5 kgf/cm
2,
10.6 mmHg) to port A, and check that air is not
sucked into port B.
(3) While holding the vent, purge and air inlet ports
closed, apply vacuum 1.42 kPa (14.5 kgf/cm
2,
10.6 mmHg) to port A, and measure how long it
takes for the vacuum to drop.
Vacuum drop time:
10 seconds or more
If the result is not as specified, replace the
canister.
(e) Check the leak detection pump.
(1) Check that air flows from port A to port B and
C.
If the result is not as specified, replace the
canister.
(2) Connect the positive (+) lead of the battery to
terminal 7 and the negative (-) lead to terminal
6.
(3) Check that the valve closes.
If the result is not as specified, replace the
canister.
(4) Install the canister pump module.
INSTALLATION
1. INSTALL CANISTER
(a) Install the canister with the 4 bolts and clip.
Torque: 20 N*m (204 kgf*cm, 15 ft.*lbf)
(b) Connect the air inlet line tube to the canister (leak
detection pump).
A123650E01
A123651E01
A105944E01
A105945E01
A127739
Page 836 of 2000
EC–142GR-FE EMISSION CONTROL – CANISTER
EC
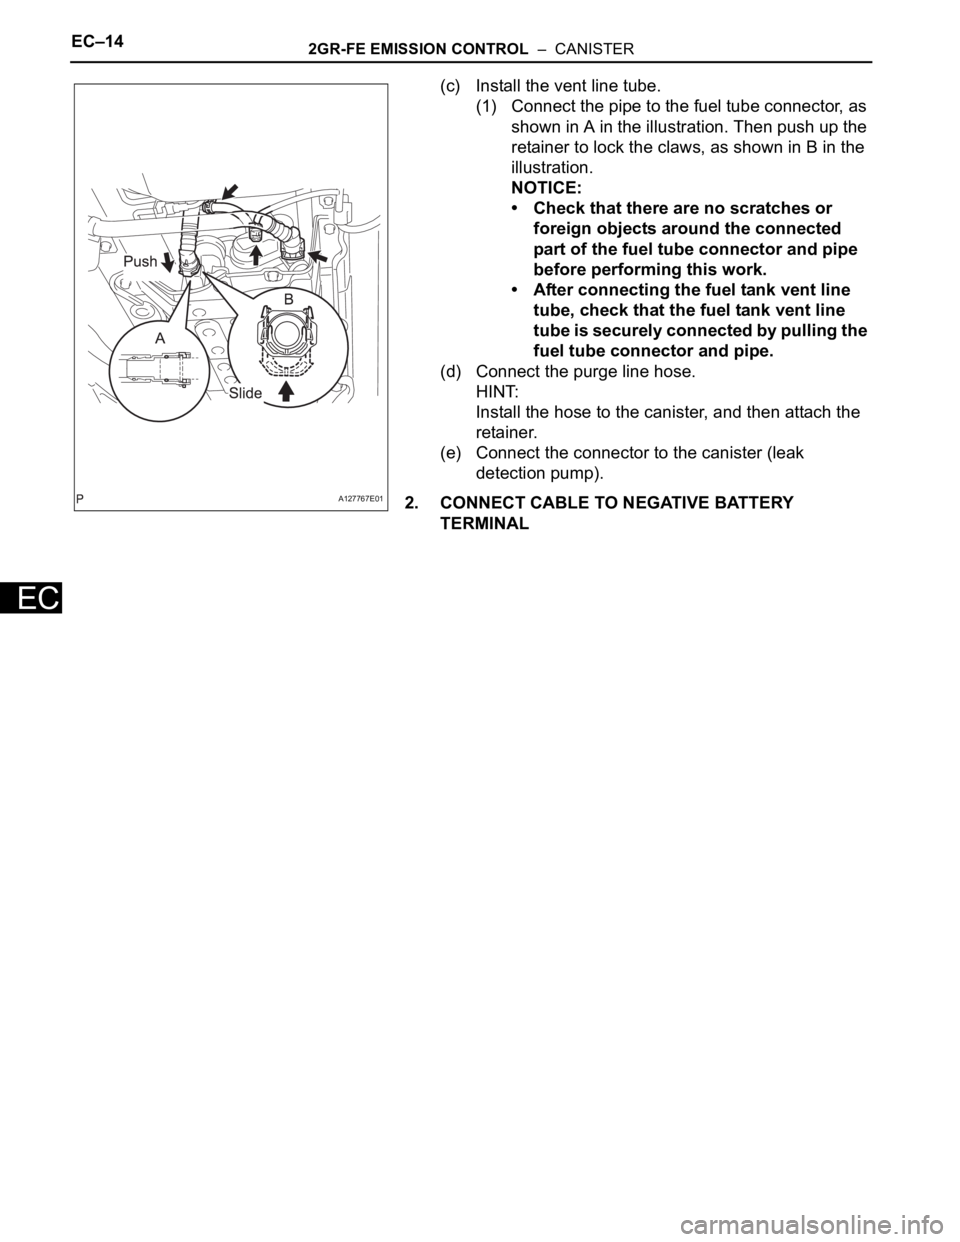
(c) Install the vent line tube.
(1) Connect the pipe to the fuel tube connector, as
shown in A in the illustration. Then push up the
retainer to lock the claws, as shown in B in the
illustration.
NOTICE:
• Check that there are no scratches or
foreign objects around the connected
part of the fuel tube connector and pipe
before performing this work.
• After connecting the fuel tank vent line
tube, check that the fuel tank vent line
tube is securely connected by pulling the
fuel tube connector and pipe.
(d) Connect the purge line hose.
HINT:
Install the hose to the canister, and then attach the
retainer.
(e) Connect the connector to the canister (leak
detection pump).
2. CONNECT CABLE TO NEGATIVE BATTERY
TERMINAL
A127767E01
Page 837 of 2000
EC–202GR-FE EMISSION CONTROL – VENTILATION VALVE
EC
INSTALLATION
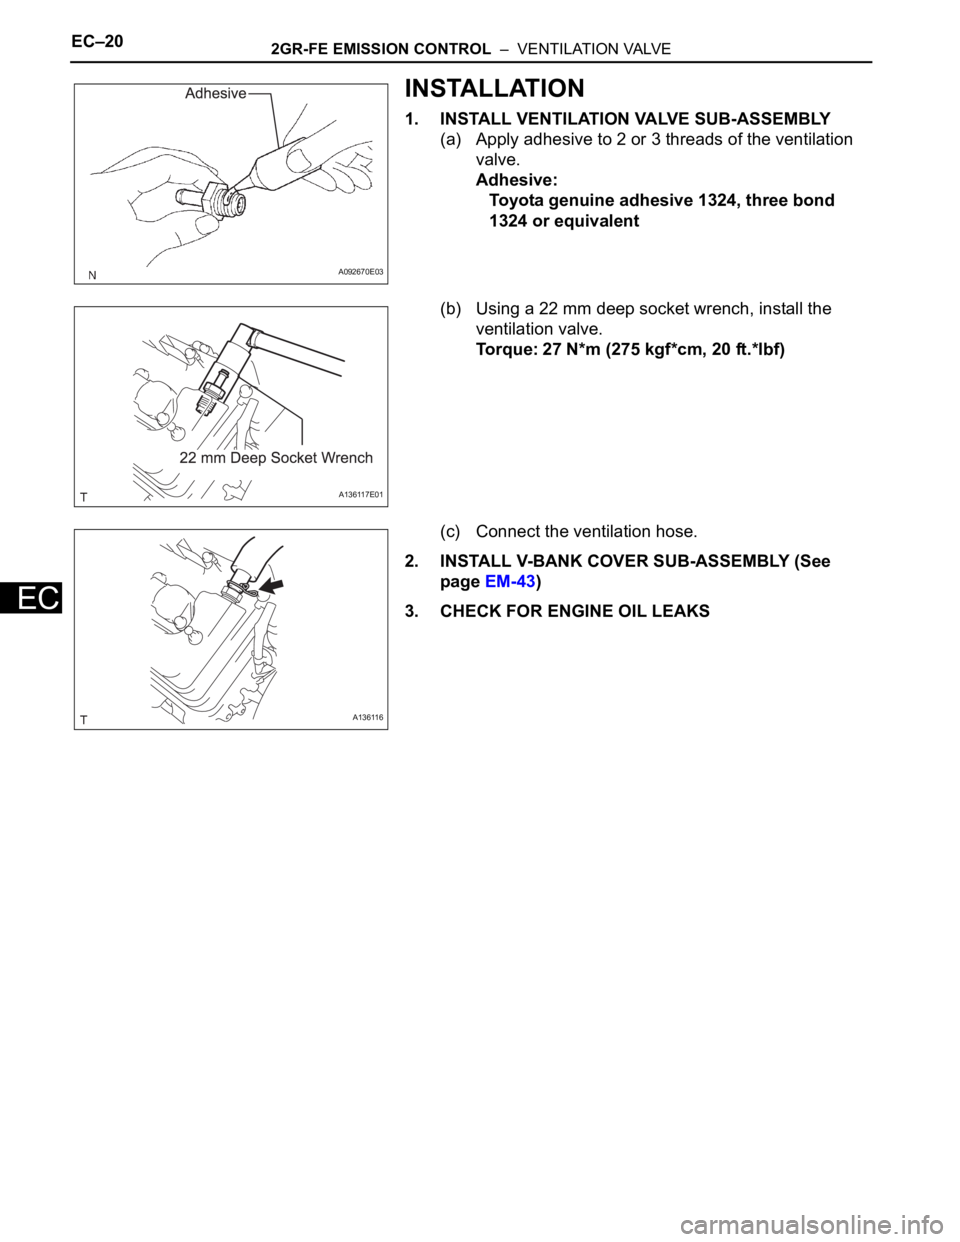
1. INSTALL VENTILATION VALVE SUB-ASSEMBLY
(a) Apply adhesive to 2 or 3 threads of the ventilation
valve.
Adhesive:
Toyota genuine adhesive 1324, three bond
1324 or equivalent
(b) Using a 22 mm deep socket wrench, install the
ventilation valve.
Torque: 27 N*m (275 kgf*cm, 20 ft.*lbf)
(c) Connect the ventilation hose.
2. INSTALL V-BANK COVER SUB-ASSEMBLY (See
page EM-43)
3. CHECK FOR ENGINE OIL LEAKS
A092670E03
A136117E01
A136116
Page 838 of 2000
EC–242GR-FE EMISSION CONTROL – AIR FUEL RATIO SENSOR
EC
INSTALLATION
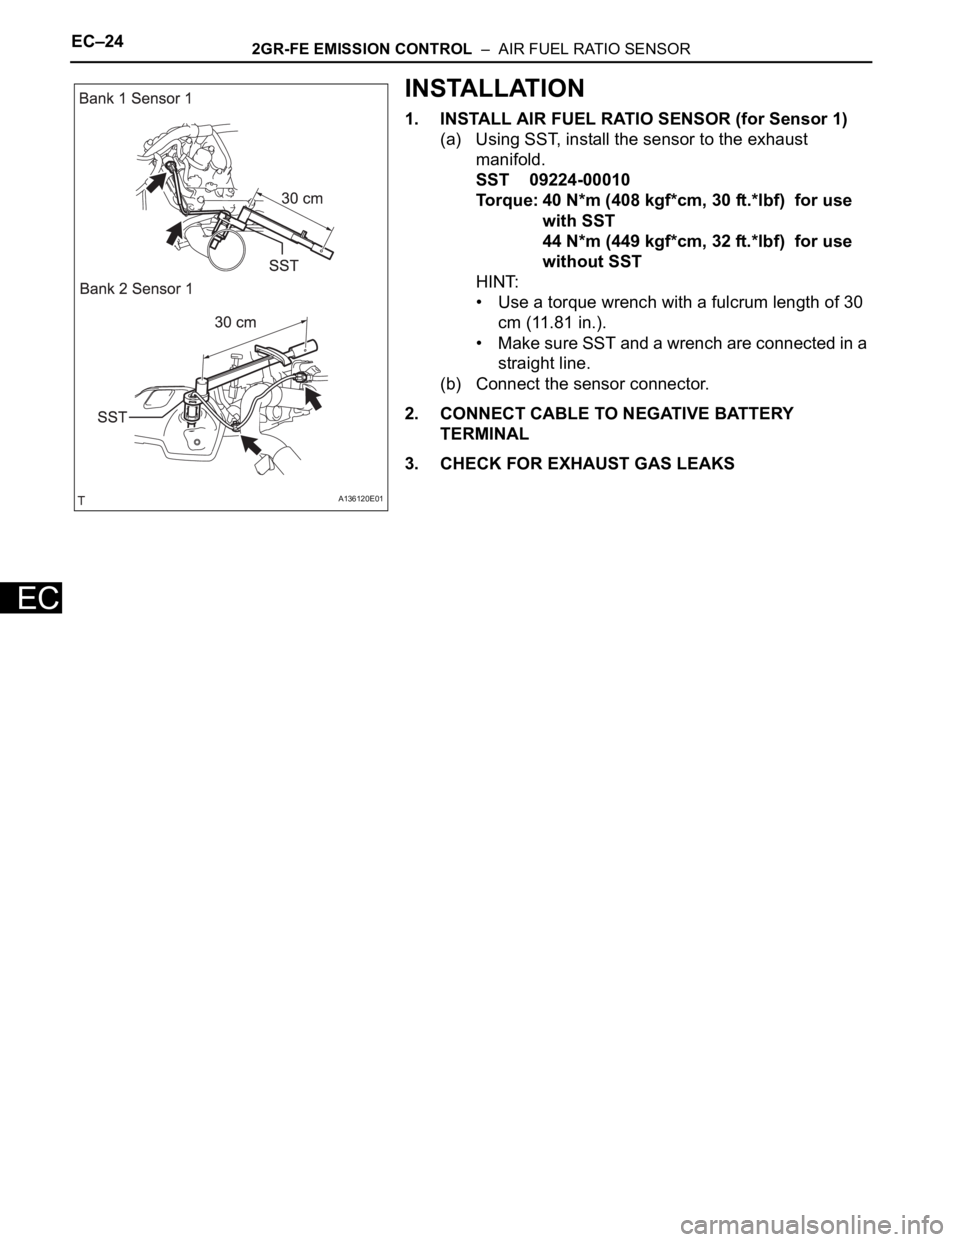
1. INSTALL AIR FUEL RATIO SENSOR (for Sensor 1)
(a) Using SST, install the sensor to the exhaust
manifold.
SST 09224-00010
Torque: 40 N*m (408 kgf*cm, 30 ft.*lbf) for use
with SST
44 N*m (449 kgf*cm, 32 ft.*lbf) for use
without SST
HINT:
• Use a torque wrench with a fulcrum length of 30
cm (11.81 in.).
• Make sure SST and a wrench are connected in a
straight line.
(b) Connect the sensor connector.
2. CONNECT CABLE TO NEGATIVE BATTERY
TERMINAL
3. CHECK FOR EXHAUST GAS LEAKS
A136120E01
Page 839 of 2000
EC–262GR-FE EMISSION CONTROL – HEATED OXYGEN SENSOR
EC
REMOVAL
1. DISCONNECT CABLE FROM NEGATIVE BATTERY
TERMINAL
CAUTION:
Wait at least 90 seconds after disconnecting the
cable from the negative (-) battery terminal to
prevent airbag and seat belt pretensioner activation.
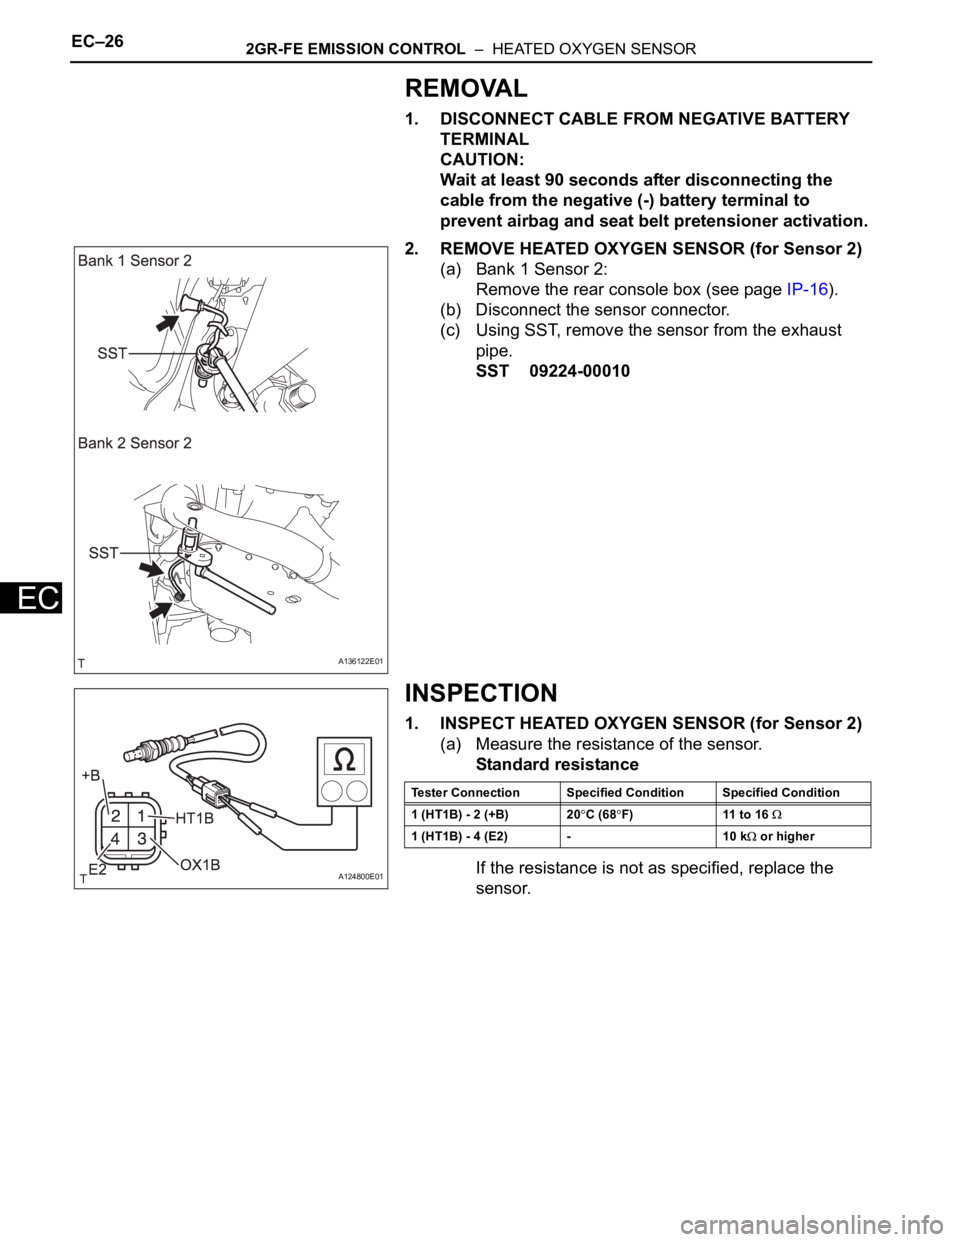
2. REMOVE HEATED OXYGEN SENSOR (for Sensor 2)
(a) Bank 1 Sensor 2:
Remove the rear console box (see page IP-16).
(b) Disconnect the sensor connector.
(c) Using SST, remove the sensor from the exhaust
pipe.
SST 09224-00010
INSPECTION
1. INSPECT HEATED OXYGEN SENSOR (for Sensor 2)
(a) Measure the resistance of the sensor.
Standard resistance
If the resistance is not as specified, replace the
sensor.
A136122E01
A124800E01
Tester Connection Specified Condition Specified Condition
1 (HT1B) - 2 (+B) 20
C (68F) 11 to 16
1 (HT1B) - 4 (E2) - 10 k or higher
Page 840 of 2000
2GR-FE EMISSION CONTROL – HEATED OXYGEN SENSOREC–27
EC
INSTALLATION
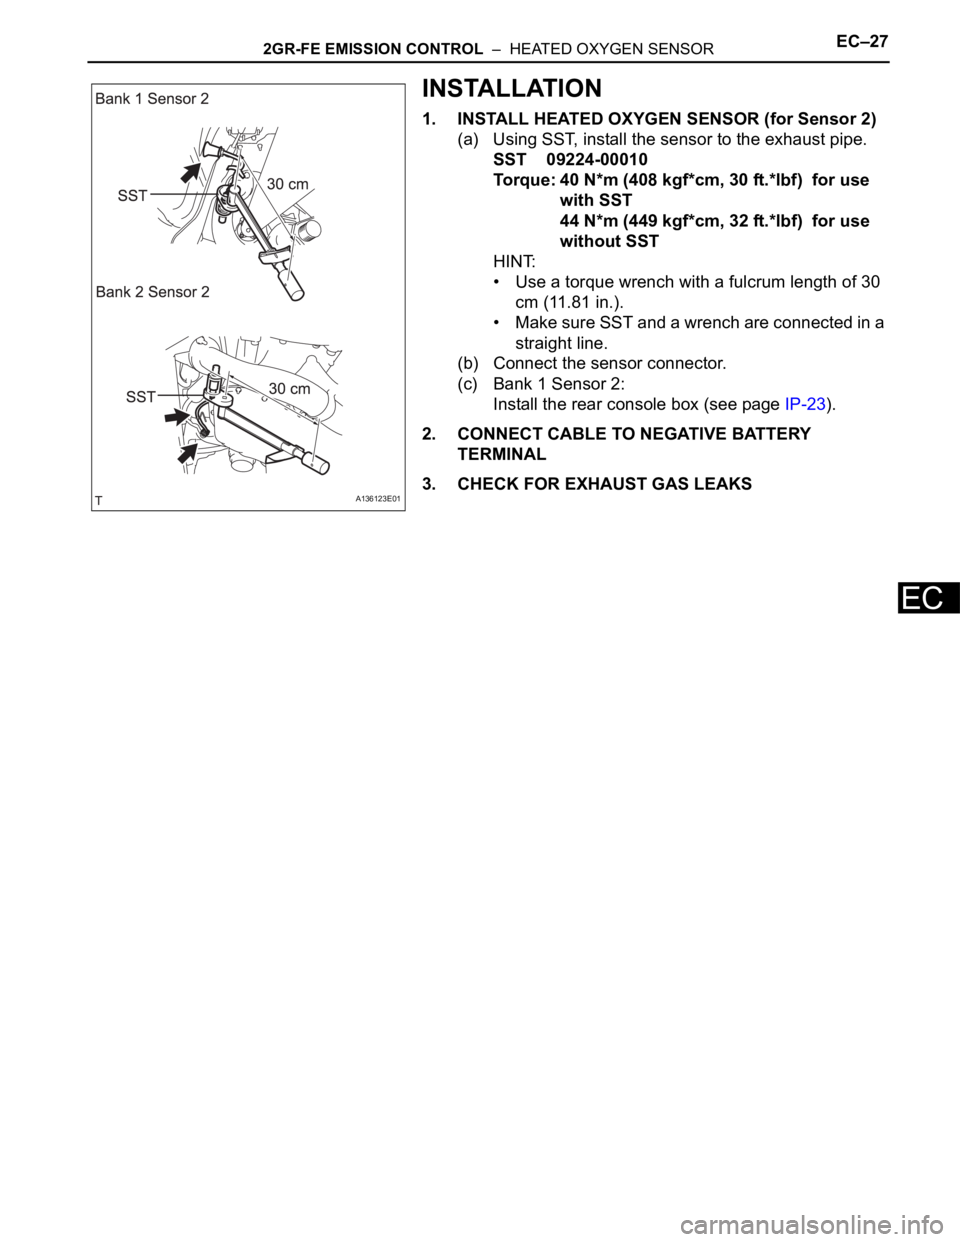
1. INSTALL HEATED OXYGEN SENSOR (for Sensor 2)
(a) Using SST, install the sensor to the exhaust pipe.
SST 09224-00010
Torque: 40 N*m (408 kgf*cm, 30 ft.*lbf) for use
with SST
44 N*m (449 kgf*cm, 32 ft.*lbf) for use
without SST
HINT:
• Use a torque wrench with a fulcrum length of 30
cm (11.81 in.).
• Make sure SST and a wrench are connected in a
straight line.
(b) Connect the sensor connector.
(c) Bank 1 Sensor 2:
Install the rear console box (see page IP-23).
2. CONNECT CABLE TO NEGATIVE BATTERY
TERMINAL
3. CHECK FOR EXHAUST GAS LEAKS
A136123E01