TOYOTA RAV4 2016 XA40 / 4.G Owners Manual
Manufacturer: TOYOTA, Model Year: 2016, Model line: RAV4, Model: TOYOTA RAV4 2016 XA40 / 4.GPages: 741, PDF Size: 14.31 MB
Page 391 of 741
390
RAV4_OM_OM42A41U_(U)
5-11. Using the audio system (Entune Audio)
WARNING
■Laser product
This product is a class 1 laser product.
Do not open the cover of the player or attempt to repair the unit yourself.
Refer servicing to qualified personnel.
● Laser products
• Do not take this unit apart or attempt to make any changes yourself.
This is an intricate unit that uses a laser pickup to retrieve information
from the surface of compact discs. The laser is carefully shielded so
that its rays remain inside the cabinet. Therefore, never try to disassem-
ble the player or alter any of its parts since you may be exposed to laser
rays and dangerous voltages.
• This product utilizes a laser. Use of controls or adjustments or performance of procedures other than
those specified herein may result in hazardous radiation exposure.
THE USE OF OPTICAL INSTRUMENTS WITH THIS PRODUCT WILL
INCREASE EYE HAZARD.
NOTICE
■To prevent battery discharge
Do not leave the audio system on longer than necessary when the engine is
not running.
■ To avoid damaging the audio system
Take care not to spill drinks or other fluids on the audio system.
Page 392 of 741
391
RAV4_OM_OM42A41U_(U)
5-12. Basic Operations
5
Audio system
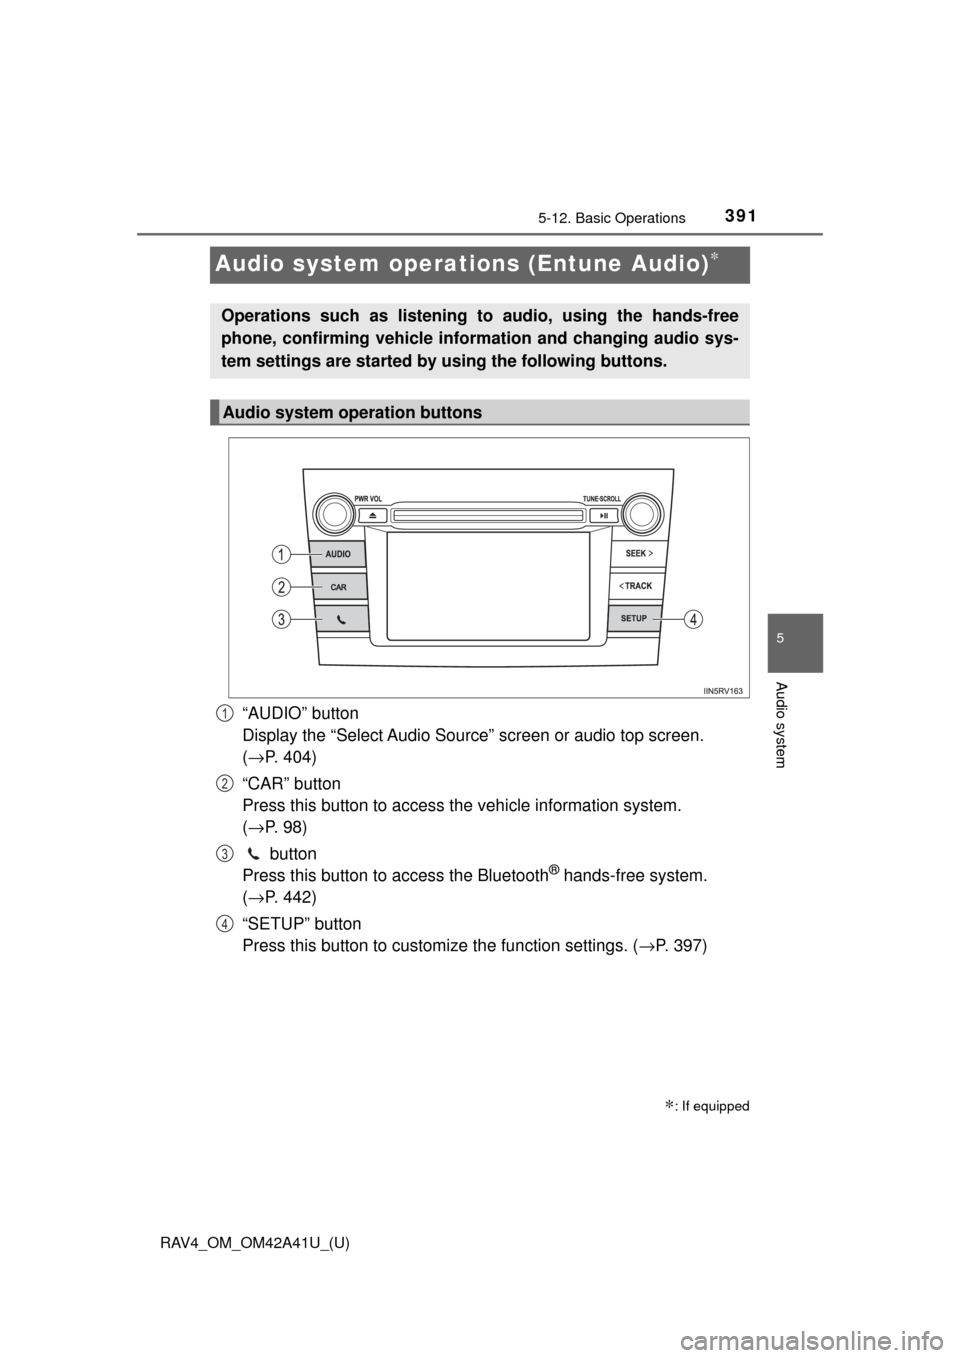
Audio system operations (Entune Audio)∗
“AUDIO” button
Display the “Select Audio Source” screen or audio top screen.
(→ P. 404)
“CAR” button
Press this button to access th e vehicle information system.
( → P. 98)
button
Press this button to access the Bluetooth
® hands-free system.
( → P. 442)
“SETUP” button
Press this button to customize the function settings. ( →P. 397)
∗: If equipped
Operations such as listening to audio, using the hands-free
phone, confirming vehicle inform ation and changing audio sys-
tem settings are started by using the following buttons.
Audio system operation buttons
1
2
3
4
Page 393 of 741
392
RAV4_OM_OM42A41U_(U)
5-12. Basic Operations
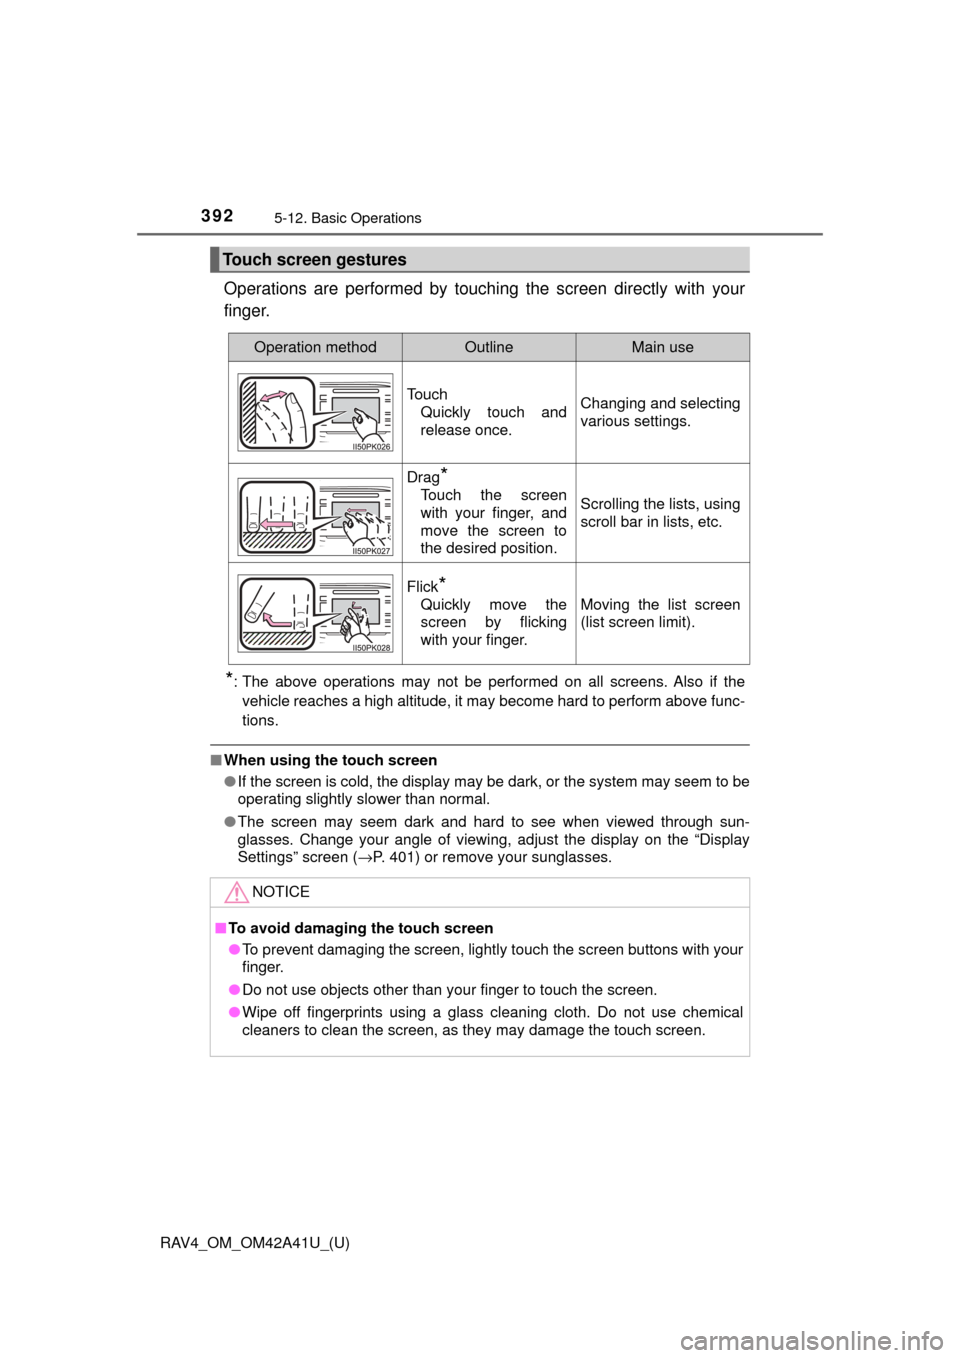
Operations are performed by touching the screen directly with your
finger.
*: The above operations may not be performed on all screens. Also if the vehicle reaches a high altitude, it may become hard to perform above func-
tions.
■ When using the touch screen
●If the screen is cold, the display may be dark, or the system may seem to be
operating slightly slower than normal.
● The screen may seem dark and hard to see when viewed through sun-
glasses. Change your angle of viewing, adjust the display on the “Display
Settings” screen ( →P. 401) or remove your sunglasses.
Touch screen gestures
Operation methodOutlineMain use
Touch
Quickly touch and
release once.Changing and selecting
various settings.
Drag*
Touch the screen
with your finger, and
move the screen to
the desired position.Scrolling the lists, using
scroll bar in lists, etc.
Flick*
Quickly move the
screen by flicking
with your finger.Moving the list screen
(list screen limit).
NOTICE
■To avoid damaging the touch screen
● To prevent damaging the screen, lightly touch the screen buttons with your
finger.
● Do not use objects other than your finger to touch the screen.
● Wipe off fingerprints using a glass cleaning cloth. Do not use chemical
cleaners to clean the screen, as they may damage the touch screen.
Page 394 of 741
393
RAV4_OM_OM42A41U_(U)
5-12. Basic Operations
5
Audio system
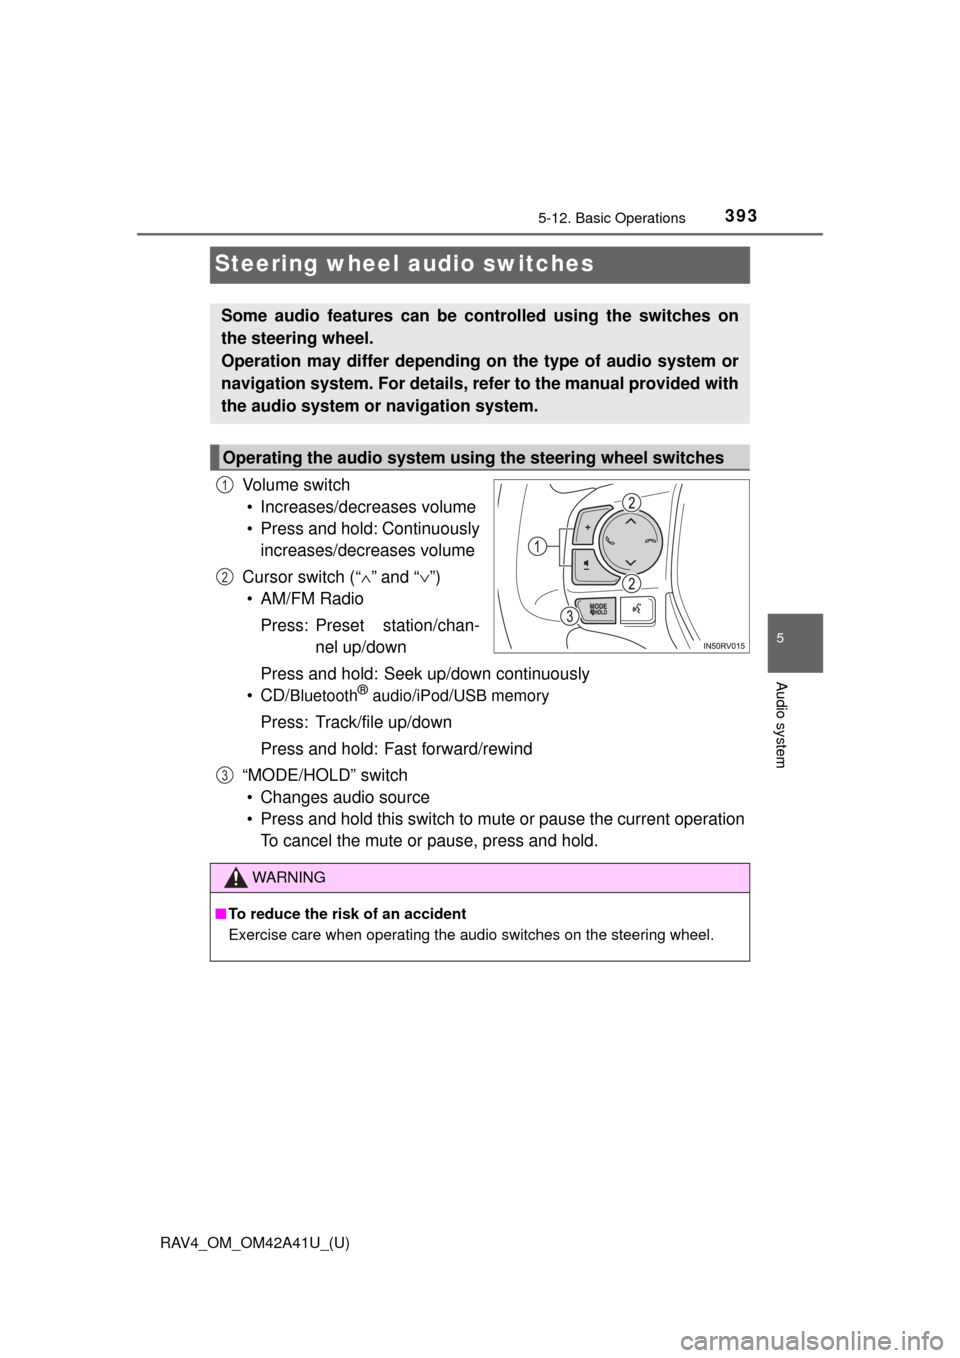
Steering wheel audio switches
Vo l u m e s w i t c h• Increases/decreases volume
• Press and hold: Continuously increases/decreases volume
Cursor switch (“ ∧” and “ ∨”)
• AM/FM Radio
Press: Preset station/chan- nel up/down
Press and hold: Seek up/down continuously
•CD/
Bluetooth® audio/iPod/USB memory
Press: Track/file up/down
Press and hold: Fast forward/rewind
“MODE/HOLD” switch • Changes audio source
• Press and hold this switch to mute or pause the current operation To cancel the mute or pause, press and hold.
Some audio features can be c ontrolled using the switches on
the steering wheel.
Operation may differ depending on the type of audio system or
navigation system. For details, refer to the manual provided with
the audio system or navigation system.
Operating the audio system using the steering wheel switches
1
2
3
WARNING
■ To reduce the risk of an accident
Exercise care when operating the audio switches on the steering wheel.
Page 395 of 741
394
RAV4_OM_OM42A41U_(U)
5-12. Basic Operations
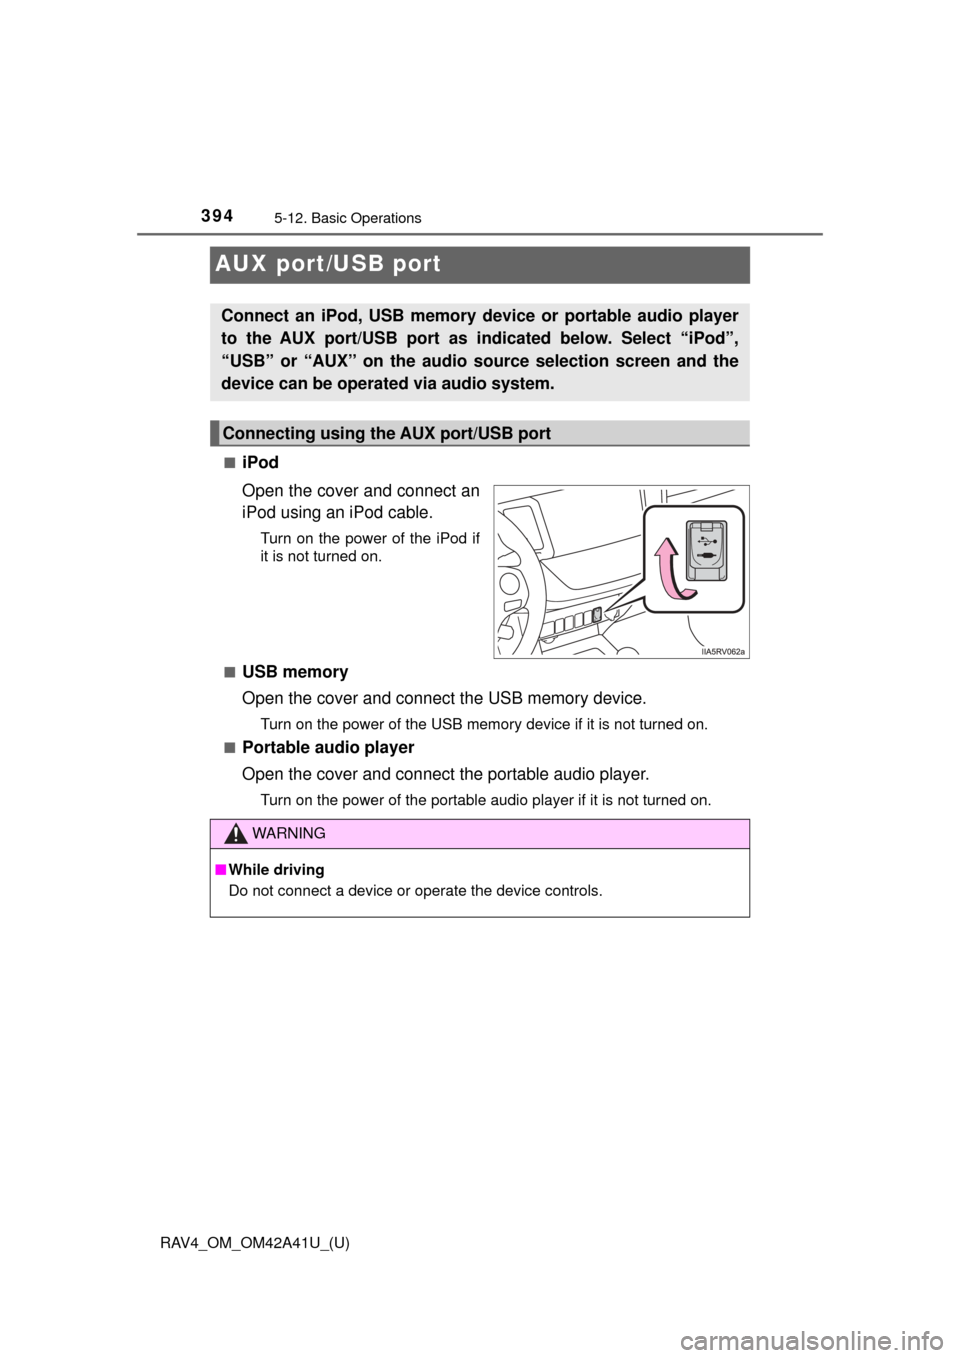
AUX port/USB port
■iPod
Open the cover and connect an
iPod using an iPod cable.
Turn on the power of the iPod if
it is not turned on.
■
USB memory
Open the cover and connect the USB memory device.
Turn on the power of the USB memory device if it is not turned on.
■
Portable audio player
Open the cover and connect the portable audio player.
Turn on the power of the portable audio player if it is not turned on.
Connect an iPod, USB memory device or portable audio player
to the AUX port/USB port as indicated below. Select “iPod”,
“USB” or “AUX” on the audio source selection screen and the
device can be operated via audio system.
Connecting using the AUX port/USB port
WARNING
■ While driving
Do not connect a device or operate the device controls.
Page 396 of 741
395
RAV4_OM_OM42A41U_(U)
5-12. Basic Operations
5
Audio system
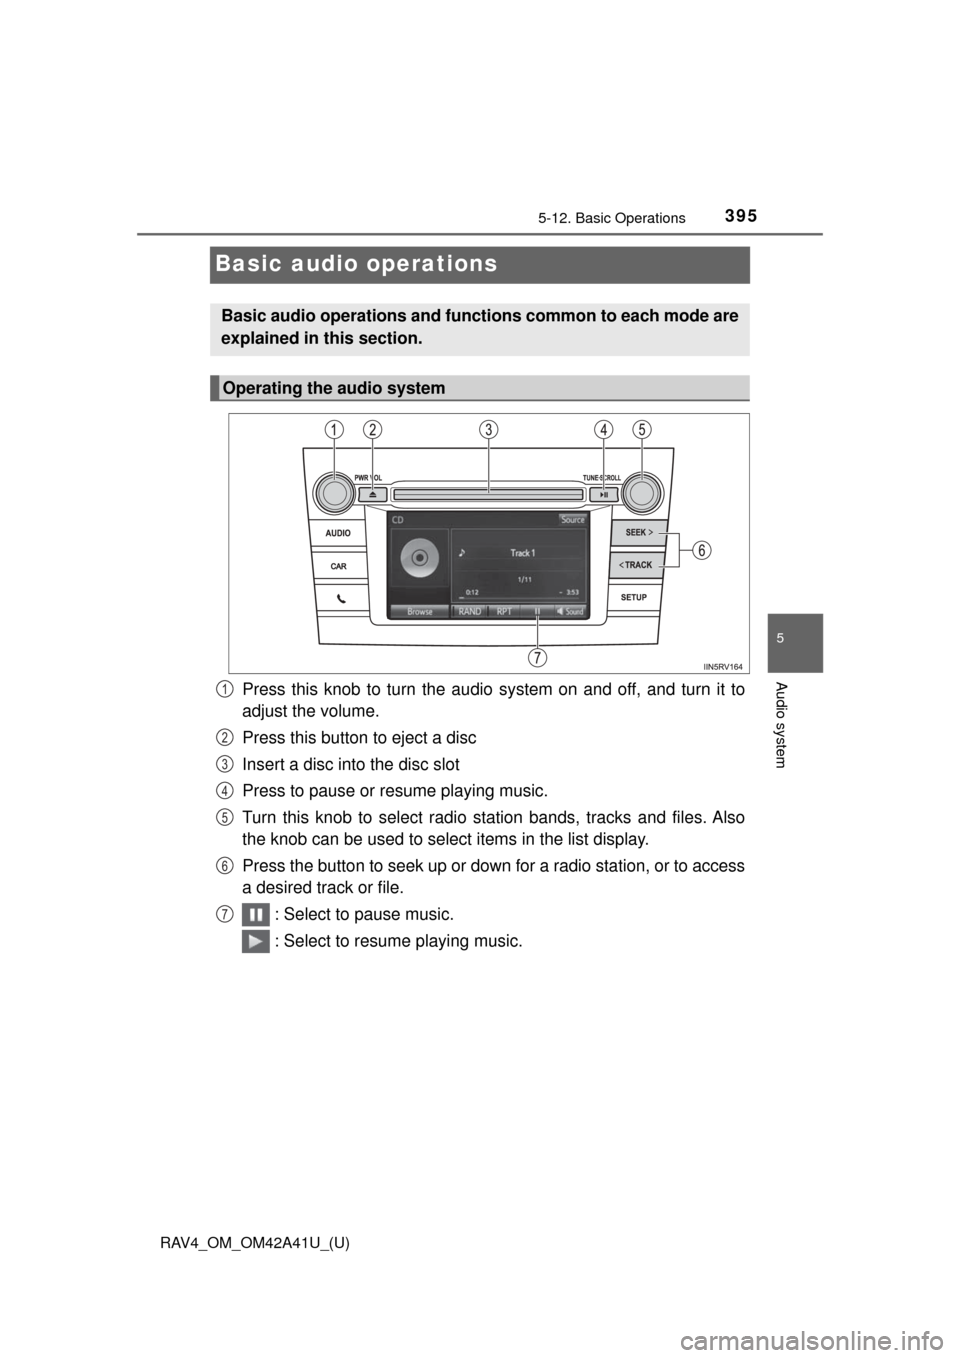
Basic audio operations
Press this knob to turn the audio system on and off, and turn it to
adjust the volume.
Press this button to eject a disc
Insert a disc into the disc slot
Press to pause or resume playing music.
Turn this knob to select radio station bands, tracks and files. Also
the knob can be used to select items in the list display.
Press the button to seek up or down for a radio station, or to access
a desired track or file. : Select to pause music.
: Select to resume playing music.
Basic audio operations and functi ons common to each mode are
explained in this section.
Operating the audio system
1
2
3
4
5
6
7
Page 397 of 741

396
RAV4_OM_OM42A41U_(U)
5-12. Basic Operations
Select to change on/off.
Select to change on/off.
■Using cellular phones
Interference may be heard through the audio system’s speakers if a cellular
phone is being used inside or close to the vehicle while the audio system is
operating.
Random playback
Repeat play
Page 398 of 741
397
RAV4_OM_OM42A41U_(U)
5-13. Setup
5
Audio system
Setup menu
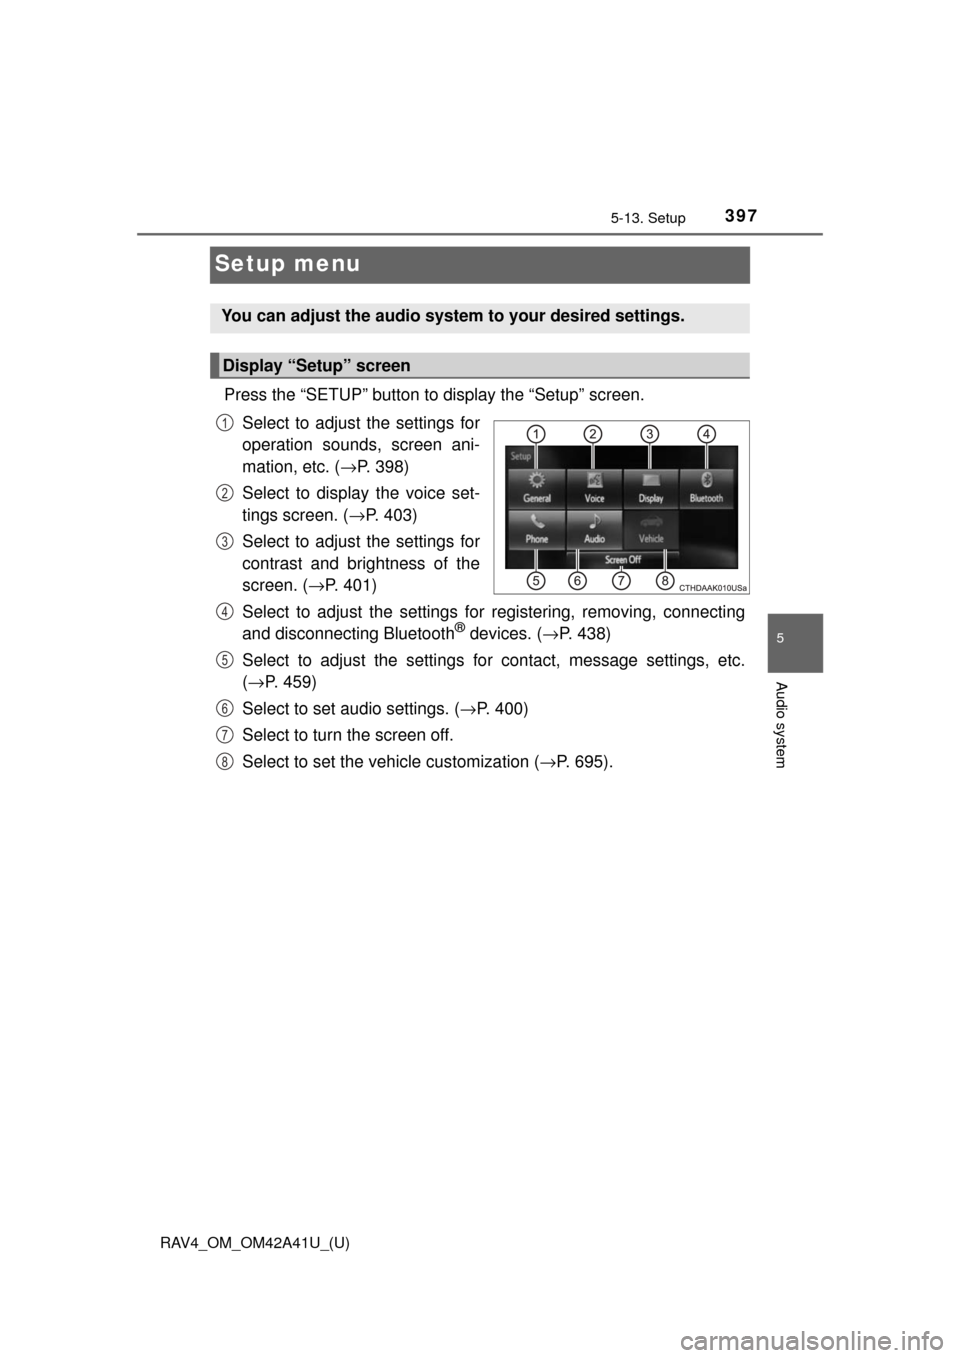
Press the “SETUP” button to display the “Setup” screen.Select to adjust the settings for
operation sounds, screen ani-
mation, etc. ( →P. 398)
Select to display the voice set-
tings screen. (→ P. 403)
Select to adjust the settings for
contrast and brightness of the
screen. ( →P. 401)
Select to adjust the settings for registering, removing, connecting
and disconnecting Bluetooth
® devices. ( →P. 438)
Select to adjust the settings for contact, message settings, etc.
( → P. 459)
Select to set audio settings. ( →P. 400)
Select to turn the screen off.
Select to set the vehicle customization ( →P. 695).
You can adjust the audio system to your desired settings.
Display “Setup” screen
1
2
3
4
5
6
7
8
Page 399 of 741
398
RAV4_OM_OM42A41U_(U)
5-13. Setup
General settings
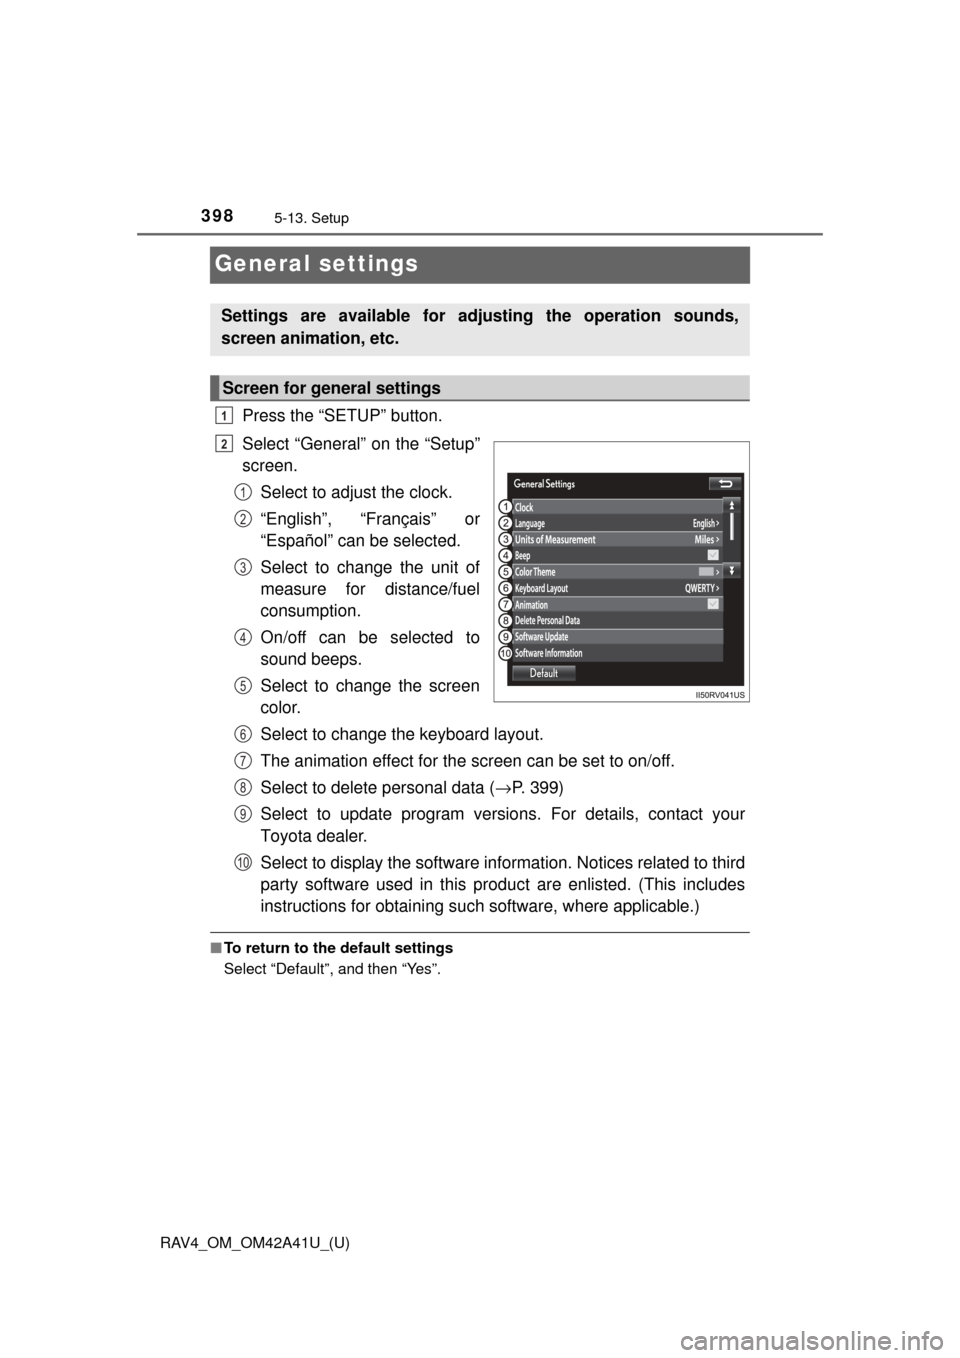
Press the “SETUP” button.
Select “General” on the “Setup”
screen.Select to adjust the clock.
“English”, “Français” or
“Español” can be selected.
Select to change the unit of
measure for distance/fuel
consumption.
On/off can be selected to
sound beeps.
Select to change the screen
color.
Select to change the keyboard layout.
The animation effect for the screen can be set to on/off.
Select to delete personal data ( →P. 399)
Select to update program versions. For details, contact your
Toyota dealer.
Select to display the software info rmation. Notices related to third
party software used in this produc t are enlisted. (This includes
instructions for obta ining such software, where applicable.)
■To return to the default settings
Select “Default”, and then “Yes”.
Settings are available for adjusting the operation sounds,
screen animation, etc.
Screen for general settings
1
2
1
2
3
4
5
6
7
8
9
10
Page 400 of 741
RAV4_OM_OM42A41U_(U)
3995-13. Setup
5
Audio system
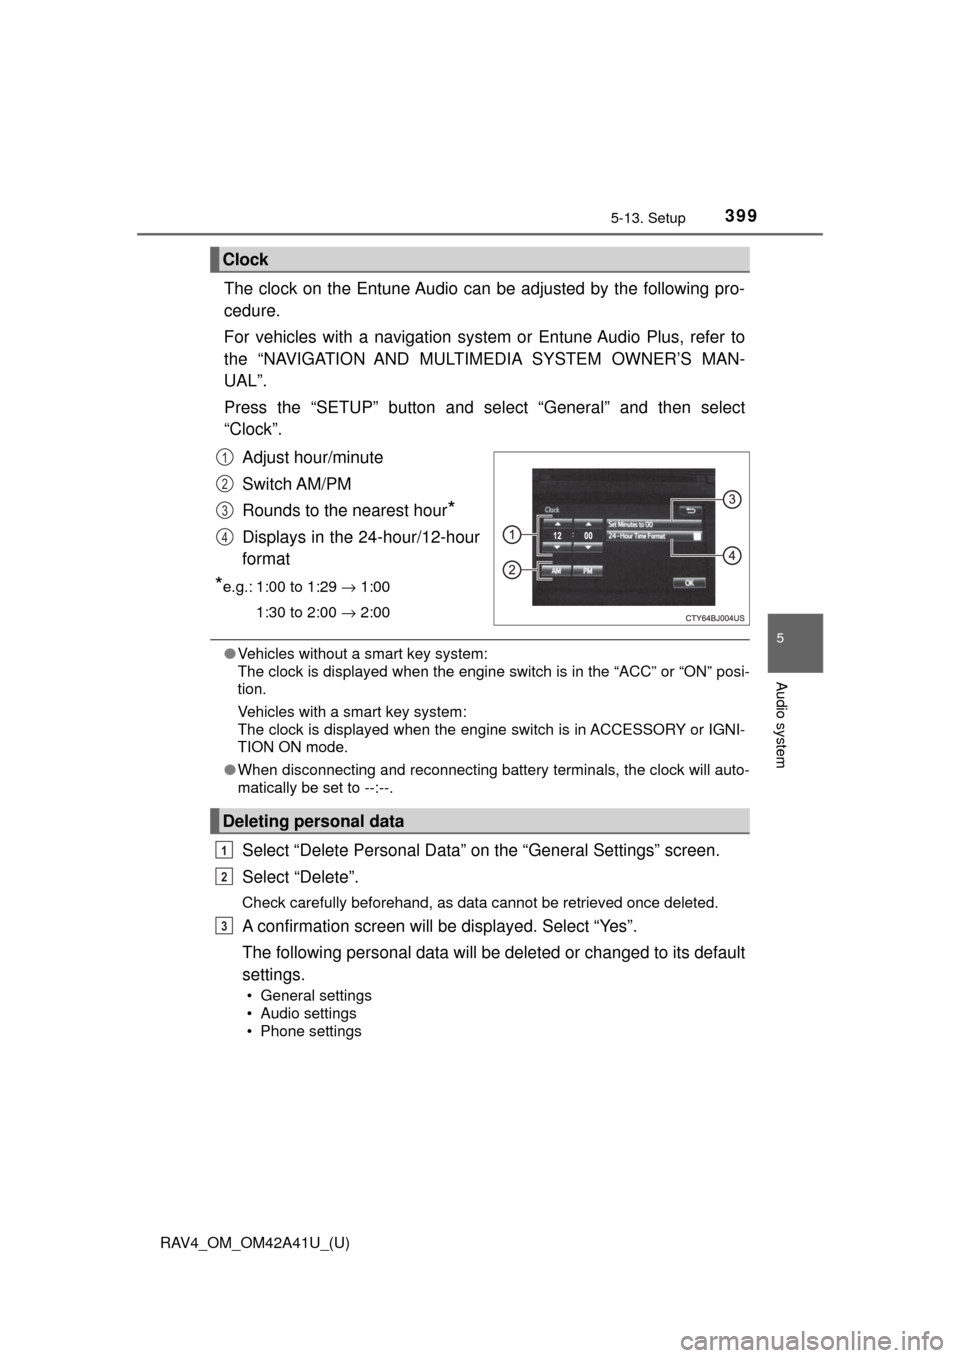
The clock on the Entune Audio can be adjusted by the following pro-
cedure.
For vehicles with a navigation system or Entune Audio Plus, refer to
the “NAVIGATION AND MULTIMEDIA SYSTEM OWNER’S MAN-
UAL”.
Press the “SETUP” button and select “General” and then select
“Clock”.
Adjust hour/minute
Switch AM/PM
Rounds to the nearest hour
*
Displays in the 24-hour/12-hour
format
*e.g.: 1:00 to 1:29 → 1:00
1:30 to 2:00 → 2:00
●Vehicles without a smart key system:
The clock is displayed when the engine switch is in the “ACC” or “ON” posi-
tion.
Vehicles with a smart key system:
The clock is displayed when the engine switch is in ACCESSORY or IGNI-
TION ON mode.
● When disconnecting and reconnecting battery terminals, the clock will auto-
matically be set to --:--.
Select “Delete Personal Data” on the “General Settings” screen.
Select “Delete”.
Check carefully beforehand, as data cannot be retrieved once deleted.
A confirmation screen will be displayed. Select “Yes”.
The following personal data will be deleted or changed to its default
settings.
• General settings
• Audio settings
• Phone settings
Clock
1
2
3
4
Deleting personal data
1
2
3