Camera TOYOTA RAV4 2019 Owners Manual (in English)
[x] Cancel search | Manufacturer: TOYOTA, Model Year: 2019, Model line: RAV4, Model: TOYOTA RAV4 2019Pages: 728, PDF Size: 21.09 MB
Page 9 of 728
9
Anti-lock brake system
SRS airbag system
Seat belt pretensioner system
Be sure to check with your Toy-
ota dealer for precautionary
measures or special instructions
regarding installation of a mobile
two-way radio system.
The vehicle is equipped with
sophisticated computers that will
record certain data, such as:
The recorded data varies
according to the vehicle grade
level and options with which it is
equipped. These computers do
not record conversations or
sounds, and only record images
outside of the vehicle in certain
situations.
• Engine speed/ Electric motor speed (traction motor speed)
• Accelerator status
• Brake status
• Vehicle speed
• Operation status of the driving assist systems, such as the
ABS and pre-collision system
• Images from the front camera (available only when certain
safety systems are activated,
which varies depending on
the vehicle specifications).
Data Transmission
Your vehicle may transmit the data
recorded in these computers to
Toyota without notification to you.
Data usage
Toyota may use the data recorded
in this computer to diagnose mal-
functions, conduct research and
development, and improve quality.
Toyota will not disclose the
recorded data to a third party
except:
• With the consen t of the vehicle
owner or with the consent of the
lessee if the vehicle is leased
• In response to an official request by the police, a court of law or a
government agency
• For use by Toyota in a lawsuit
• For research purposes where the data is not tied to a specific vehi-
cle or vehicle owner
Recorded image information
can be erased by your Toyota
dealer.
The image recording function can
be disabled.
However, if the function is disabled,
data from when t he pre-collision
system operates will not be avail-
able.
To learn more about the vehi-
cle data collected, used and
shared by Toyota, please visit
www.toyota.com/privacyvts/
.
If your Toyota has Safety Con-
nect and if you have subscribed
to those services, please refer to
the Safety Connect Telematics
Vehicle data recordings
Usage of data collected
through Safety Connect
(U.S.mainland only)
Page 19 of 728
19Pictorial index
■Switches
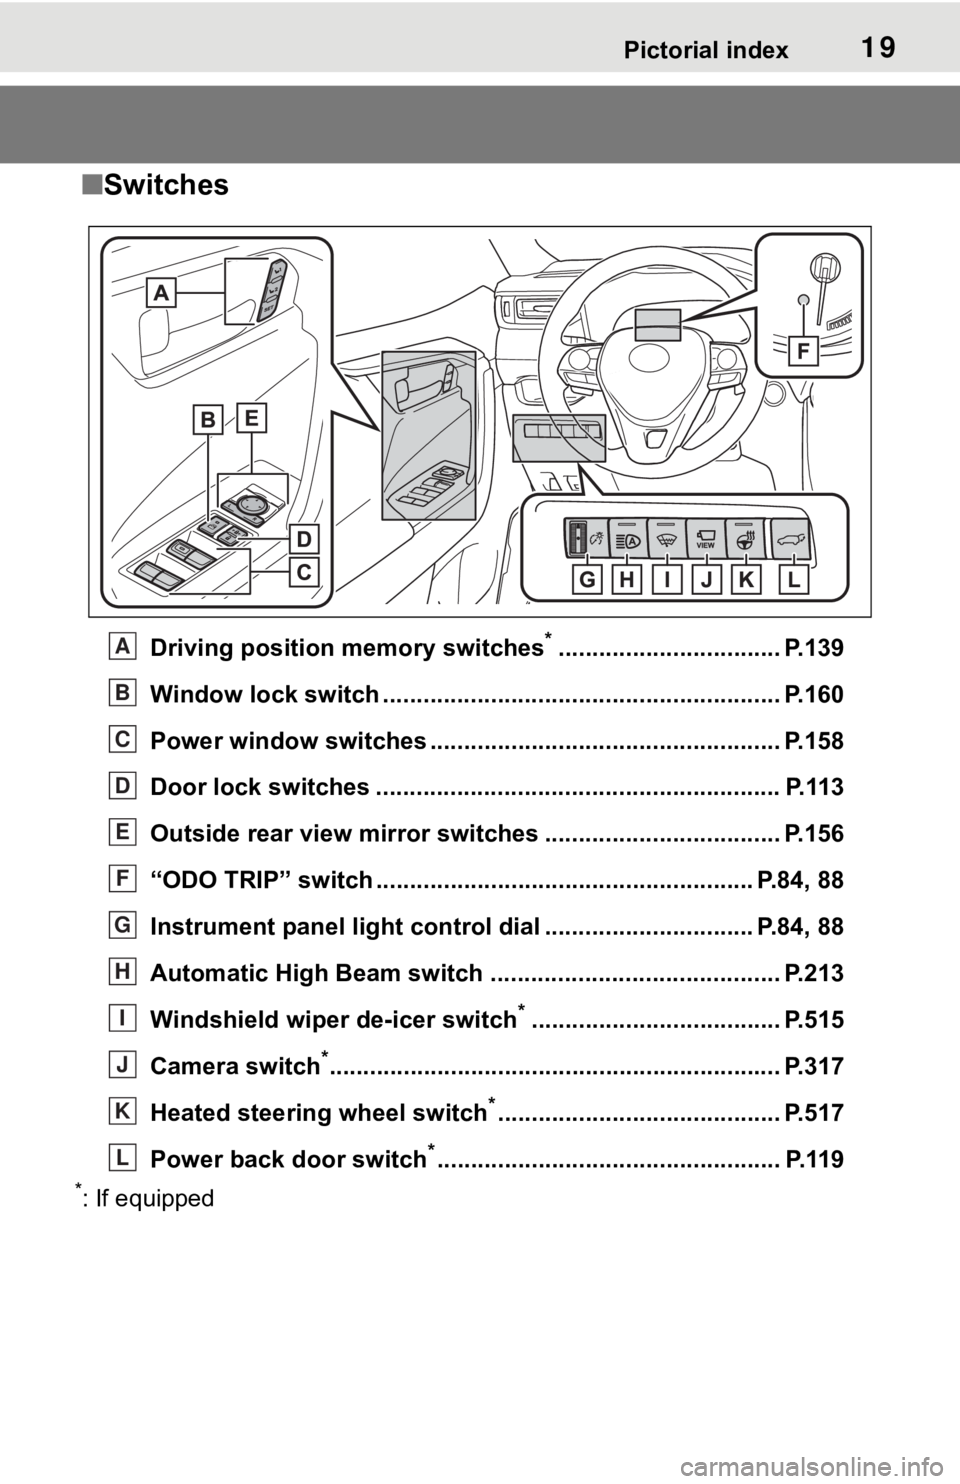
Driving position memory switches*................................. P.139
Window lock switch ............................................. .............. P.160
Power window switches ....... ............................................. P.158
Door lock switches ............................................................ P.113
Outside rear view mirror swi tches ................................... P.156
“ODO TRIP” switch .............................................. .......... P.84, 88
Instrument panel light cont rol dial ............................... P.84, 88
Automatic High Beam switch ..................................... ...... P.213
Windshield wiper de-icer switch
*..................................... P.515
Camera switch
*............................................................... .... P.317
Heated steering wheel switch
*.......................................... P.517
Power back door switch
*................................................... P.119
*: If equipped
A
B
C
D
E
F
G
H
I
J
K
L
Page 147 of 728
1473-4. Adjusting the steering wheel and mirrors
3
Before driving
*: If equipped
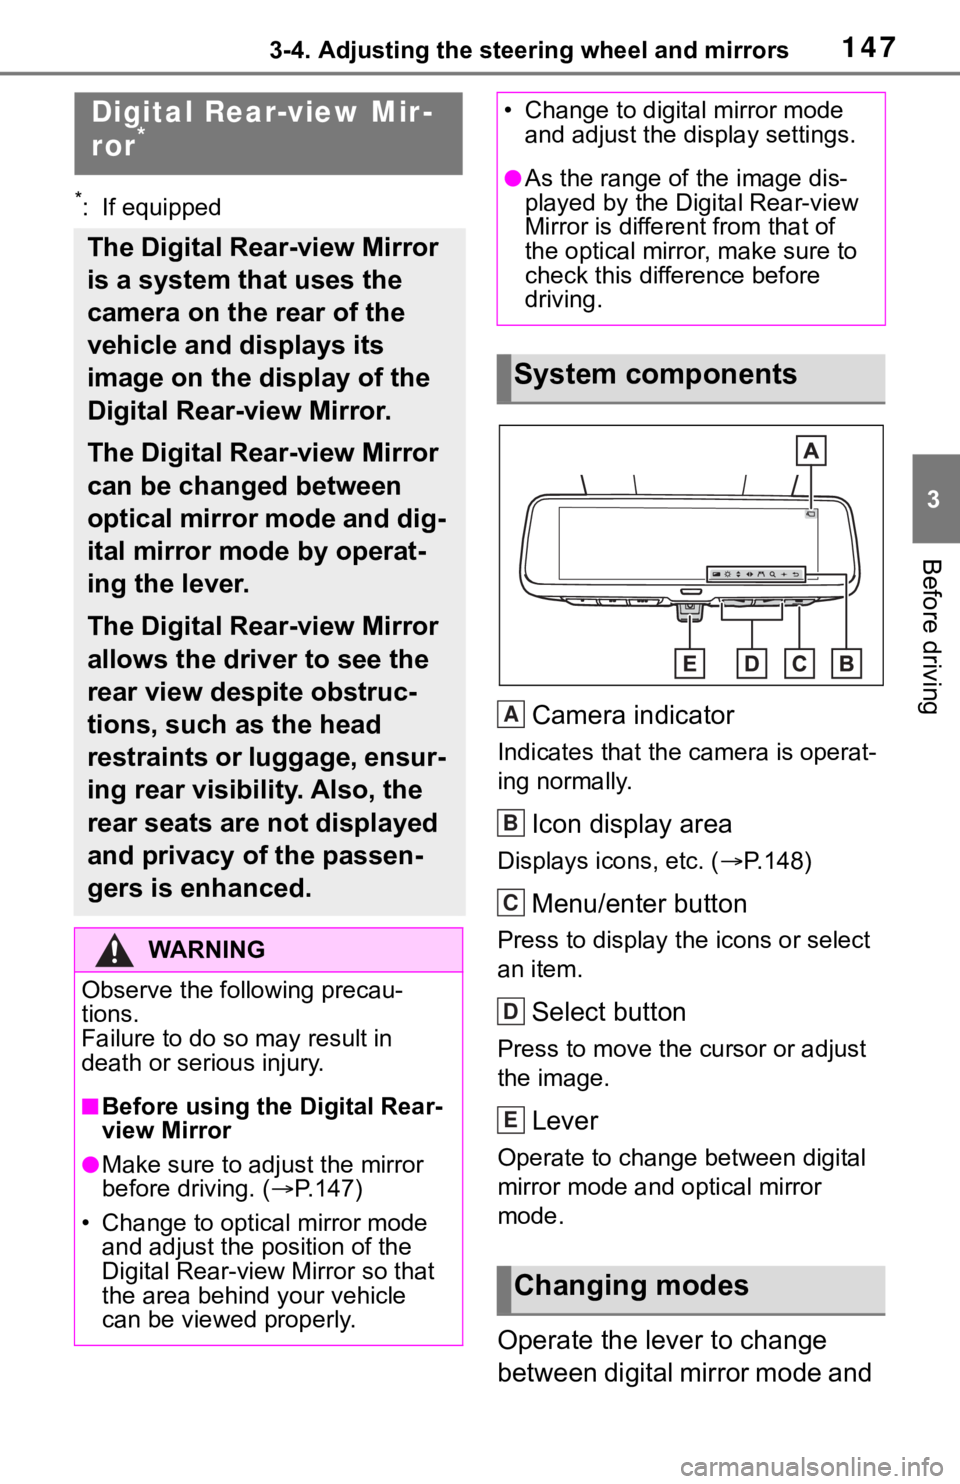
Camera indicator
Indicates that the camera is operat-
ing normally.
Icon display area
Displays icons, etc. (P.148)
Menu/enter button
Press to display t he icons or select
an item.
Select button
Press to move the cursor or adjust
the image.
Lever
Operate to change between digital
mirror mode and optical mirror
mode.
Operate the lever to change
between digital mirror mode and
Digital Rear-view Mir-
ror*
The Digital Rear-view Mirror
is a system that uses the
camera on the rear of the
vehicle and displays its
image on the display of the
Digital Rear-view Mirror.
The Digital Rear-view Mirror
can be changed between
optical mirror mode and dig-
ital mirror mode by operat-
ing the lever.
The Digital Rear-view Mirror
allows the driver to see the
rear view despite obstruc-
tions, such as the head
restraints or luggage, ensur-
ing rear visibility. Also, the
rear seats are not displayed
and privacy of the passen-
gers is enhanced.
WA R N I N G
Observe the following precau-
tions.
Failure to do so m ay result in
death or serious injury.
■Before using the Digital Rear-
view Mirror
●Make sure to adjust the mirror
before driving. ( P.147)
• Change to optical mirror mode and adjust the position of the
Digital Rear-view Mirror so that
the area behind your vehicle
can be viewed properly.
• Change to digital mirror mode and adjust the display settings.
●As the range of the image dis-
played by the Digital Rear-view
Mirror is different from that of
the optical mirror, make sure to
check this difference before
driving.
System components
Changing modes
A
B
C
D
E
Page 151 of 728
1513-4. Adjusting the steering wheel and mirrors
3
Before driving
■Cleaning the mirror surface
If the mirror surface is dirty, the
image on the display may be dif- ficult to see.
Clean the mirror surface gently
using a soft dry cloth.
■Cleaning the camera
If the camera lens is dirty, the
displayed image may not be
clear. In this case, clean it with a
soft cloth dampened with water.
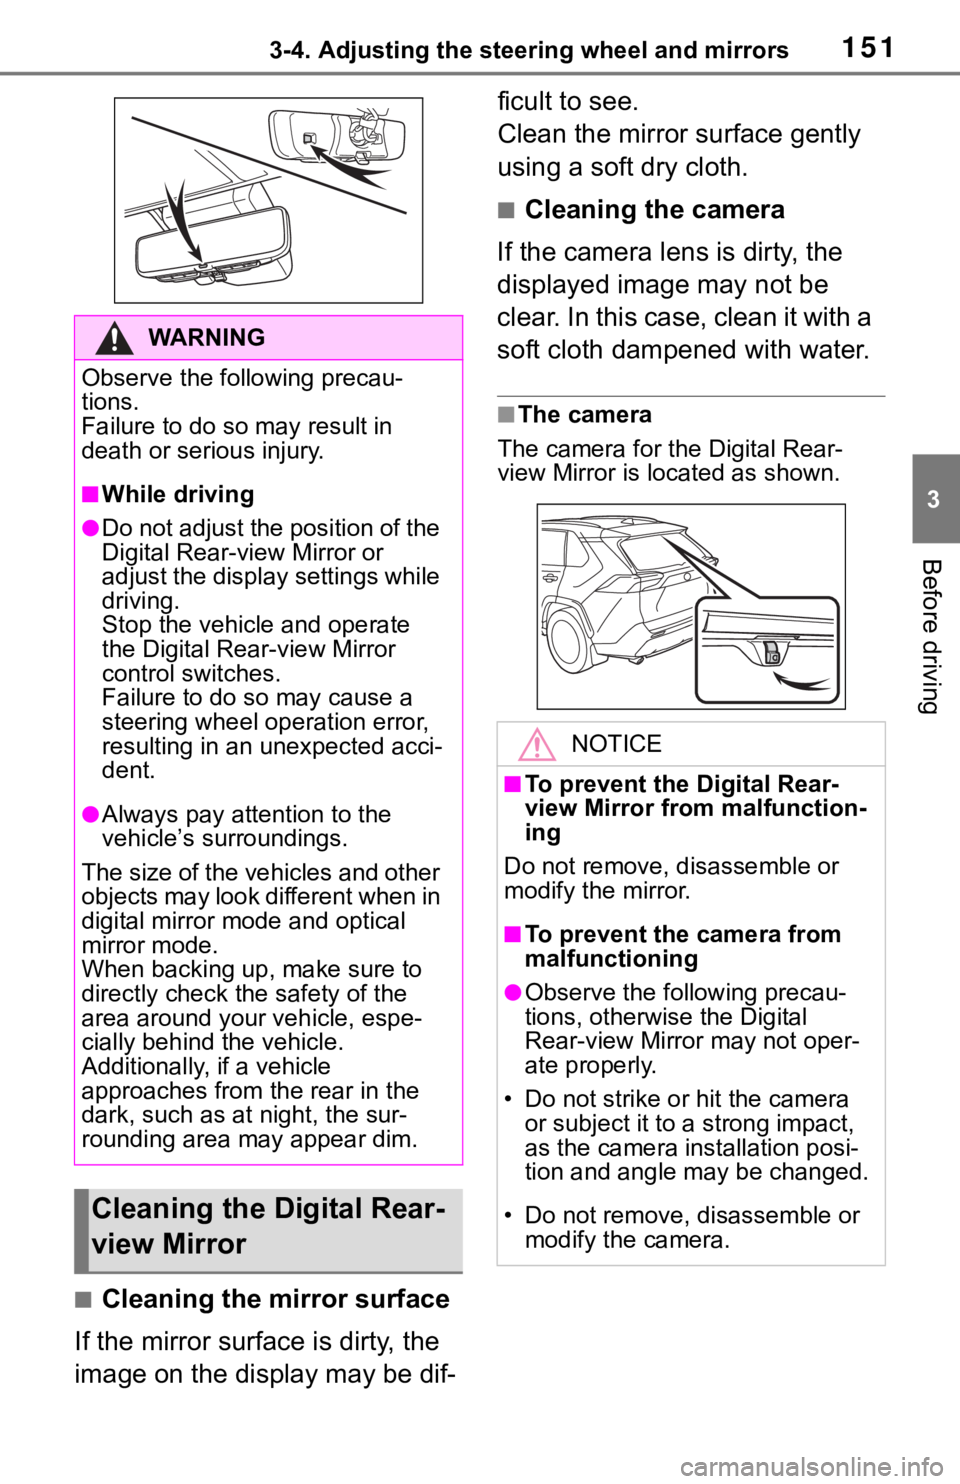
■The camera
The camera for the Digital Rear-
view Mirror is located as shown.
WA R N I N G
Observe the following precau-
tions.
Failure to do so m ay result in
death or serious injury.
■While driving
●Do not adjust the position of the
Digital Rear-v iew Mirror or
adjust the display settings while
driving.
Stop the vehicle and operate
the Digital Rear -view Mirror
control switches.
Failure to do so may cause a
steering wheel operation error,
resulting in an unexpected acci-
dent.
●Always pay attention to the
vehicle’s surroundings.
The size of the vehicles and other
objects may look different when in
digital mirror mode and optical
mirror mode.
When backing up, make sure to
directly check the safety of the
area around your vehicle, espe-
cially behind the vehicle.
Additionally, if a vehicle
approaches from the rear in the
dark, such as at night, the sur-
rounding area may appear dim.
Cleaning the D igital Rear-
view Mirror
NOTICE
■To prevent the Digital Rear-
view Mirror from malfunction-
ing
Do not remove, disassemble or
modify the mirror.
■To prevent the camera from
malfunctioning
●Observe the fo llowing precau-
tions, otherwise the Digital
Rear-view Mirror may not oper-
ate properly.
• Do not strike or hit the camera or subject it to a strong impact,
as the camera installation posi-
tion and angle may be changed.
• Do not remove, disassemble or modify the camera.
Page 152 of 728
1523-4. Adjusting the steering wheel and mirrors
If you notice any of the following symptoms, refer to the following
table for the likely cause and the solution.
If the symptom is not resolved by the solution, have the vehicl e
inspected by your Toyota dealer.
NOTICE
• When cleaning the camera lens, wipe the camera lens with a
damp soft cloth.
Do not strongly rub the camera
lens, as it may be scratched and
will not be able to transmit a
clear image.
• When applying colored film (including transparent film) to
the rear window glass, do not
apply it to the area in front of the
camera.
If film is applied to the area in
front of the camera, the image
from the camera may not dis-
play properly.
●Do not subject t he camera to a
strong impact as this could
cause a malfunction.
If this happens, have the vehicle
inspected by your Toyota dealer
as soon as possible.
If you notice any symptoms
Page 153 of 728
1533-4. Adjusting the steering wheel and mirrors
3
Before driving
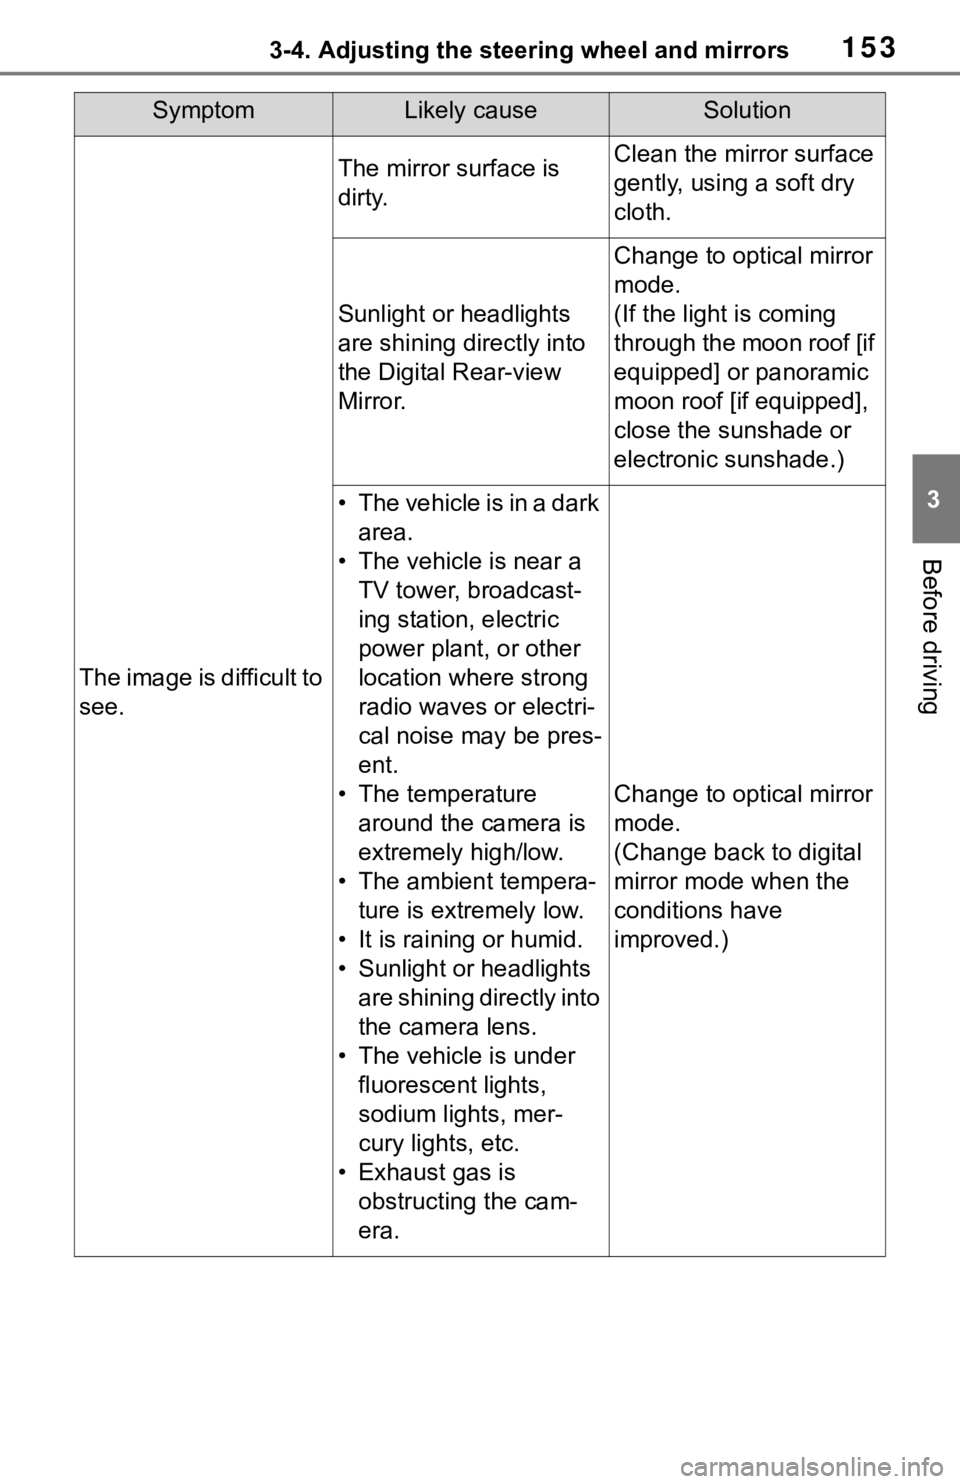
SymptomLikely causeSolution
The image is difficult to
see.
The mirror surface is
dirty.Clean the mirror surface
gently, using a soft dry
cloth.
Sunlight or headlights
are shining directly into
the Digital Rear-view
Mirror.
Change to optical mirror
mode.
(If the light is coming
through the moon roof [if
equipped] or panoramic
moon roof [if equipped],
close the sunshade or
electronic sunshade.)
• T h e v e h i c l e i s i n a d a r k area.
• The vehicle is near a TV tower, broadcast-
ing station, electric
power plant, or other
location where strong
radio waves or electri-
cal noise may be pres-
ent.
• The temperature around the camera is
extremely high/low.
• The ambient tempera- ture is extremely low.
• It is raining or humid.
• Sunlight or headlights are shining directly into
the camera lens.
• The vehicle is under fluorescent lights,
sodium lights, mer-
cury lights, etc.
• Exhaust gas is obstructing the cam-
era.
Change to optical mirror
mode.
(Change back to digital
mirror mode when the
conditions have
improved.)
Page 154 of 728
1543-4. Adjusting the steering wheel and mirrors
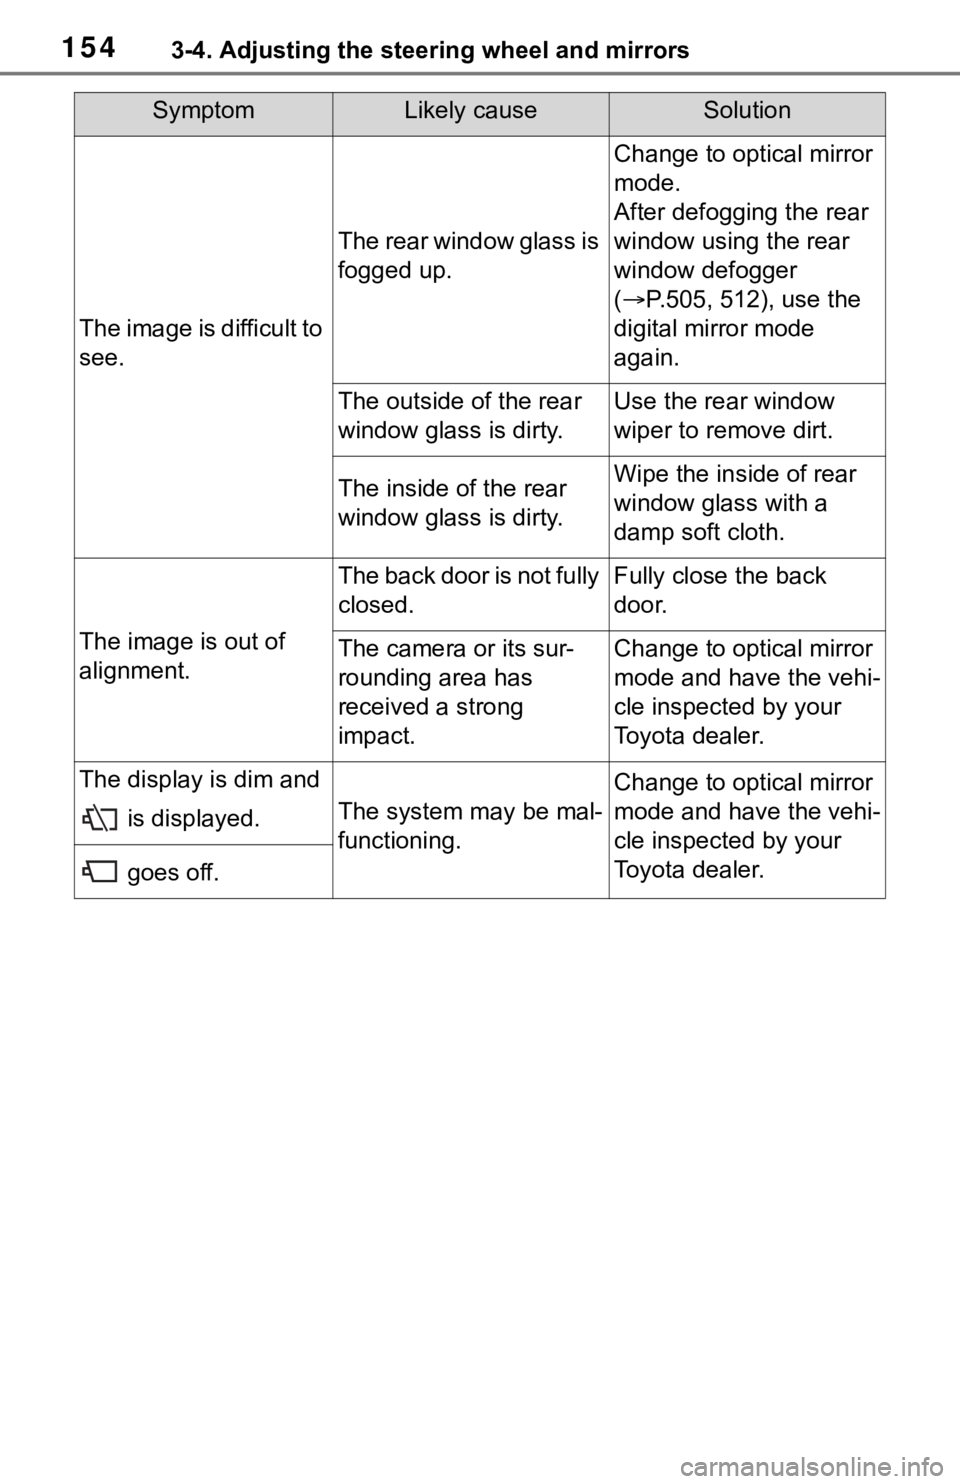
The image is difficult to
see.
The rear window glass is
fogged up.
Change to optical mirror
mode.
After defogging the rear
window using the rear
window defogger
( P.505, 512), use the
digital mirror mode
again.
The outside of the rear
window glass is dirty.Use the rear window
wiper to remove dirt.
The inside of the rear
window glass is dirty.Wipe the inside of rear
window glass with a
damp soft cloth.
The image is out of
alignment.
The back door is not fully
closed.Fully close the back
door.
The camera or its sur-
rounding area has
received a strong
impact.Change to optical mirror
mode and have the vehi-
cle inspected by your
Toyota dealer.
The display is dim and
is displayed.
The system may be mal-
functioning.
Change to optical mirror
mode and have the vehi-
cle inspected by your
Toyota dealer.
goes off.
SymptomLikely causeSolution
Page 213 of 728
2134-3. Operating the lights and wipers
4
Driving
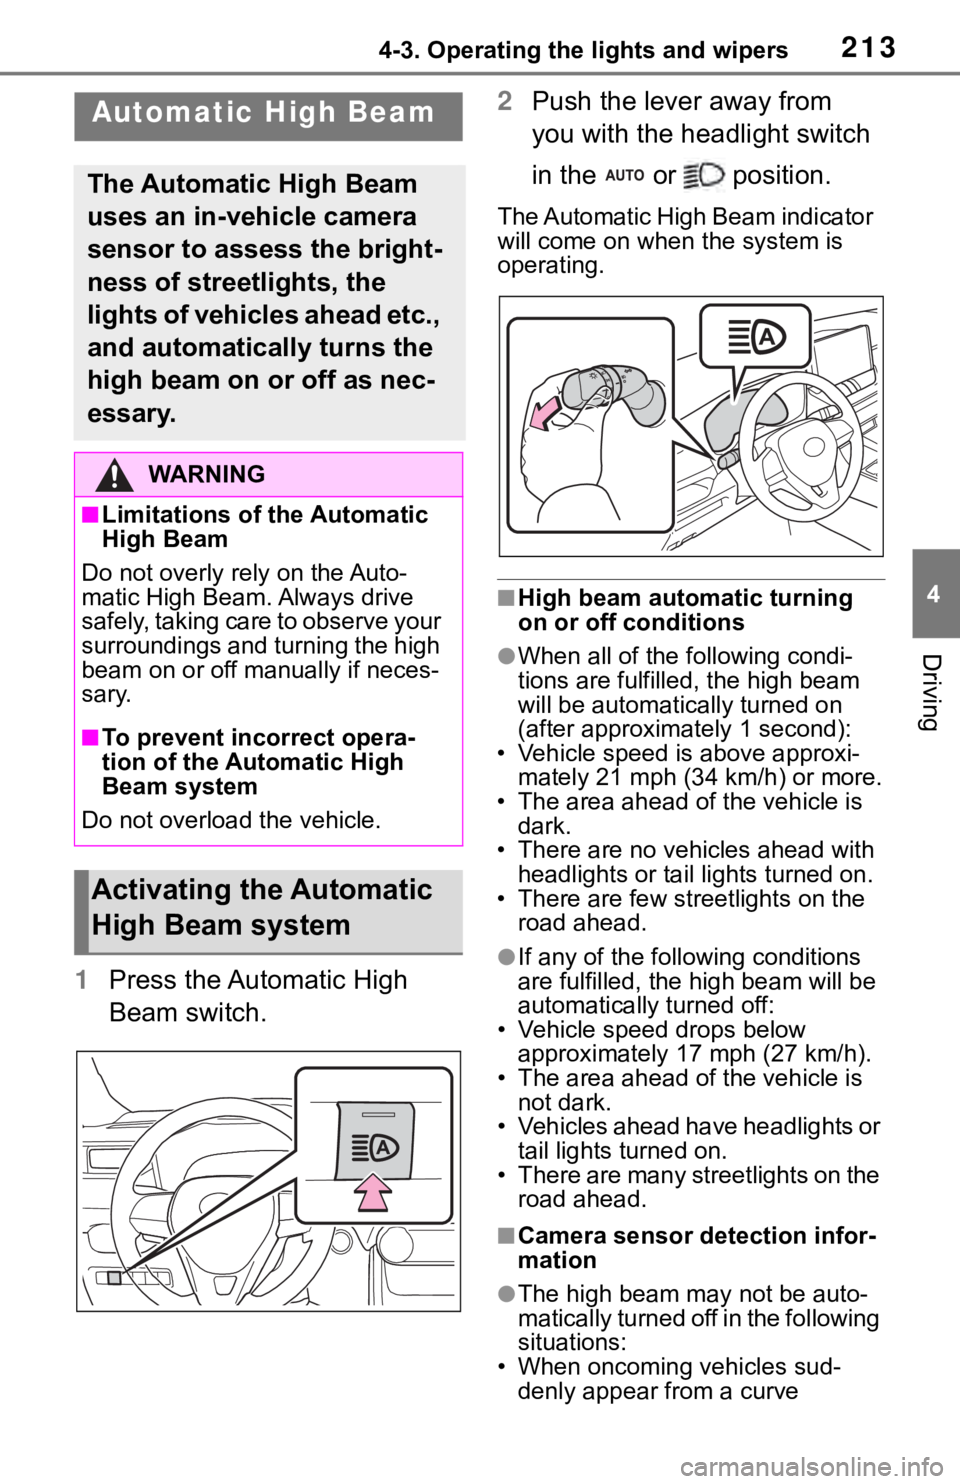
1Press the Automatic High
Beam switch. 2
Push the lever away from
you with the headlight switch
in the or position.
The Automatic High Beam indicator
will come on when the system is
operating.
■High beam automatic turning
on or off conditions
●When all of the f ollowing condi-
tions are fulfilled, the high beam
will be automatica lly turned on
(after approximately 1 second):
• Vehicle speed is above approxi- mately 21 mph (34 km/h) or more.
• The area ahead of the vehicle is
dark.
• There are no vehicles ahead with headlights or tail lights turned on.
• There are few str eetlights on the
road ahead.
●If any of the following conditions
are fulfille d, the high beam will be
automatically turned off:
• Vehicle speed drops below approximately 17 mph (27 km/h).
• The area ahead of the vehicle is
not dark.
• Vehicles ahead have headlights or tail lights turned on.
• There are many streetlights on the road ahead.
■Camera sensor detection infor-
mation
●The high beam ma y not be auto-
matically turned off in the following
situations:
• When oncoming vehicles sud- denly appear from a curve
Automatic High Beam
The Automatic High Beam
uses an in-vehicle camera
sensor to assess the bright-
ness of streetlights, the
lights of vehicles ahead etc.,
and automatically turns the
high beam on or off as nec-
essary.
WA R N I N G
■Limitations of the Automatic
High Beam
Do not overly rely on the Auto-
matic High Beam. Always drive
safely, taking care to observe your
surroundings and turning the high
beam on or off manually if neces-
sary.
■To prevent incorrect opera-
tion of the Automatic High
Beam system
Do not overload the vehicle.
Activating the Automatic
High Beam system
Page 214 of 728

2144-3. Operating the lights and wipers
• When the vehicle is cut in front of by another vehicle
• When vehicles ahead are hidden from sight due to repeated curves,
road dividers or roadside trees
• When vehicles ahead appear from the faraway lane on a wide road
• When vehicles ahead have no lights
●The high beam may be turned off
if a vehicle ahead that is using fog
lights without using the headlights
is detected.
●House lights, street lights, traffic
signals, and illumi nated billboards
or signs may cause the high beam
to switch to the low beams, or the
low beams to remain on.
●The following factors may affect
the amount of time taken to turn
the high beam on or off:
• The brightness of headlights, fog lights, and tail lig hts of vehicles
ahead
• The movement and direction of vehicles ahead
• When a vehicle ahead only has operational lights on one side
• When a vehicle ahead is a two-
wheeled vehicle
• The condition of the road (gradi-
ent, curve, condi tion of the road
surface etc.)
• The number of passengers and amount of luggage
●The high beam may be turned on
or off when the driver does not
expect it.
●Bicycles or similar objects may not
be detected.
●In the situations shown below, the
system may not be able to accu-
rately detect surrounding bright-
ness levels. This may cause the
low beams to remain on or the
high beams to cause problems for
pedestrians, vehicles ahead or
other parties. In these cases,
manually switch between the high
and low beams.
• In bad weather ( rain, snow, fog,
sandstorms, etc.) • The windshield is obscured by
fog, mist, i ce, dirt, etc.
• The windshield is cracked or dam- aged
• The camera sensor is deformed or dirty
• When the temperature of the cam-
era sensor is extremely high
• Surrounding brightness levels are equal to those of headlights, tail
lights or fog lights
• When headlights or tail lights of vehicles ahead are turned off,
dirty, changing color, or not aimed
properly
• When the vehicle is hit by water,
snow, dust, etc. from a preceding
vehicle
• When driving through an area of
intermittently changing brightness
and darkness
• When frequently and repeatedly driving ascending/descending
roads, or roads with rough, bumpy
or uneven surfaces (such as
stone-paved roads, gravel roads,
etc.)
• When frequently and repeatedly taking curves or driving on a wind-
ing road
• There is a highly reflective object ahead of the vehicle, such as a
sign or mirror
• The back of a vehicle ahead is highly reflective, such as a con-
tainer on a truck
• The vehicle’s headlights are dam- aged or dirty, or are not aimed
properly
• The vehicle is listing or titling due to a flat tire, a trailer being towed,
etc.
• The high beam and low beam are repeatedly being switched
between in an abnormal manner
• The driver believes that the high beam may be causing problems
or distress to other drivers or
pedestrians nearby
Page 224 of 728
2244-5. Using the driving support systems
4-5.Using the driving support systems
■PCS (Pre-Collision System)
P. 2 2 9
■LTA (Lane Tracing Assist)
P. 2 3 8
■Automatic High Beam
P. 2 1 2
■RSA (Road Sign Assist) (if
equipped)
P. 2 4 9
■Dynamic radar cruise con-
trol with full-speed range
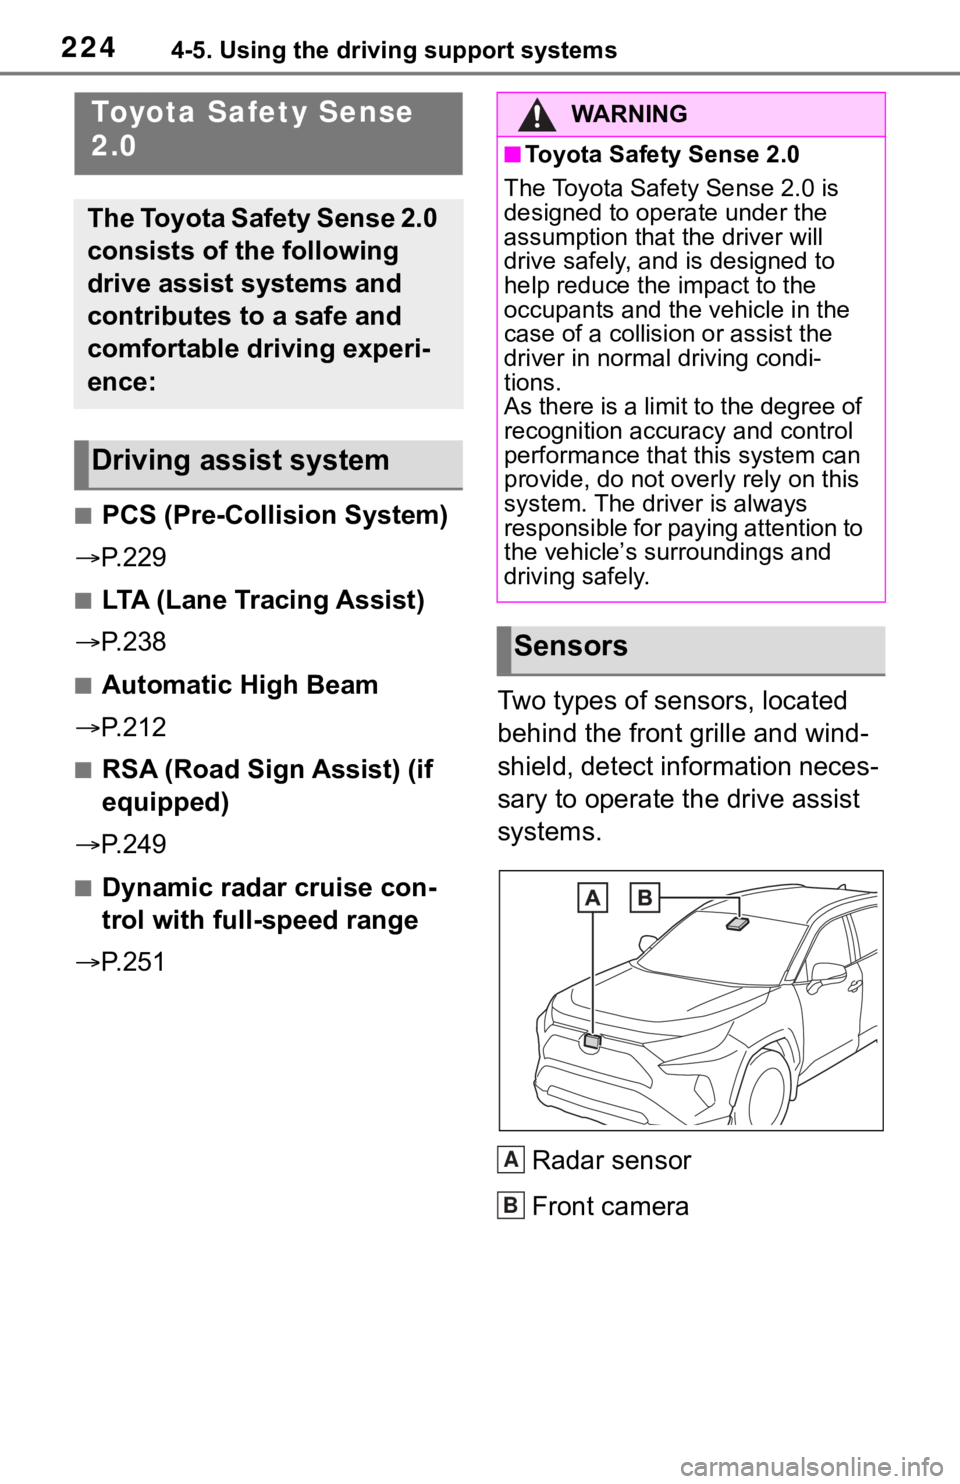
P. 2 5 1 Two types of sensors, located
behind the front grille and wind-
shield, detect information neces-
sary to operate the drive assist
systems.
Radar sensor
Front camera
Toyota Safety Sense
2.0
The Toyota Safety Sense 2.0
consists of the following
drive assist systems and
contributes to a safe and
comfortable driving experi-
ence:
Driving assist system
WA R N I N G
■Toyota Safety Sense 2.0
The Toyota Safety Sense 2.0 is
designed to operate under the
assumption that the driver will
drive safely, and is designed to
help reduce the impact to the
occupants and the vehicle in the
case of a collision or assist the
driver in normal driving condi-
tions.
As there is a limit to the degree of
recognition accuracy and control
performance that this system can
provide, do not overly rely on this
system. The driver is always
responsible for paying attention to
the vehicle’s su rroundings and
driving safely.
Sensors
A
B