clock TOYOTA RAV4 2019 (in English) User Guide
[x] Cancel search | Manufacturer: TOYOTA, Model Year: 2019, Model line: RAV4, Model: TOYOTA RAV4 2019Pages: 728, PDF Size: 21.09 MB
Page 504 of 728
5046-1. Using the air conditioning system and defogger
6-1.Using the air conditioning system and defogger
*: If equipped
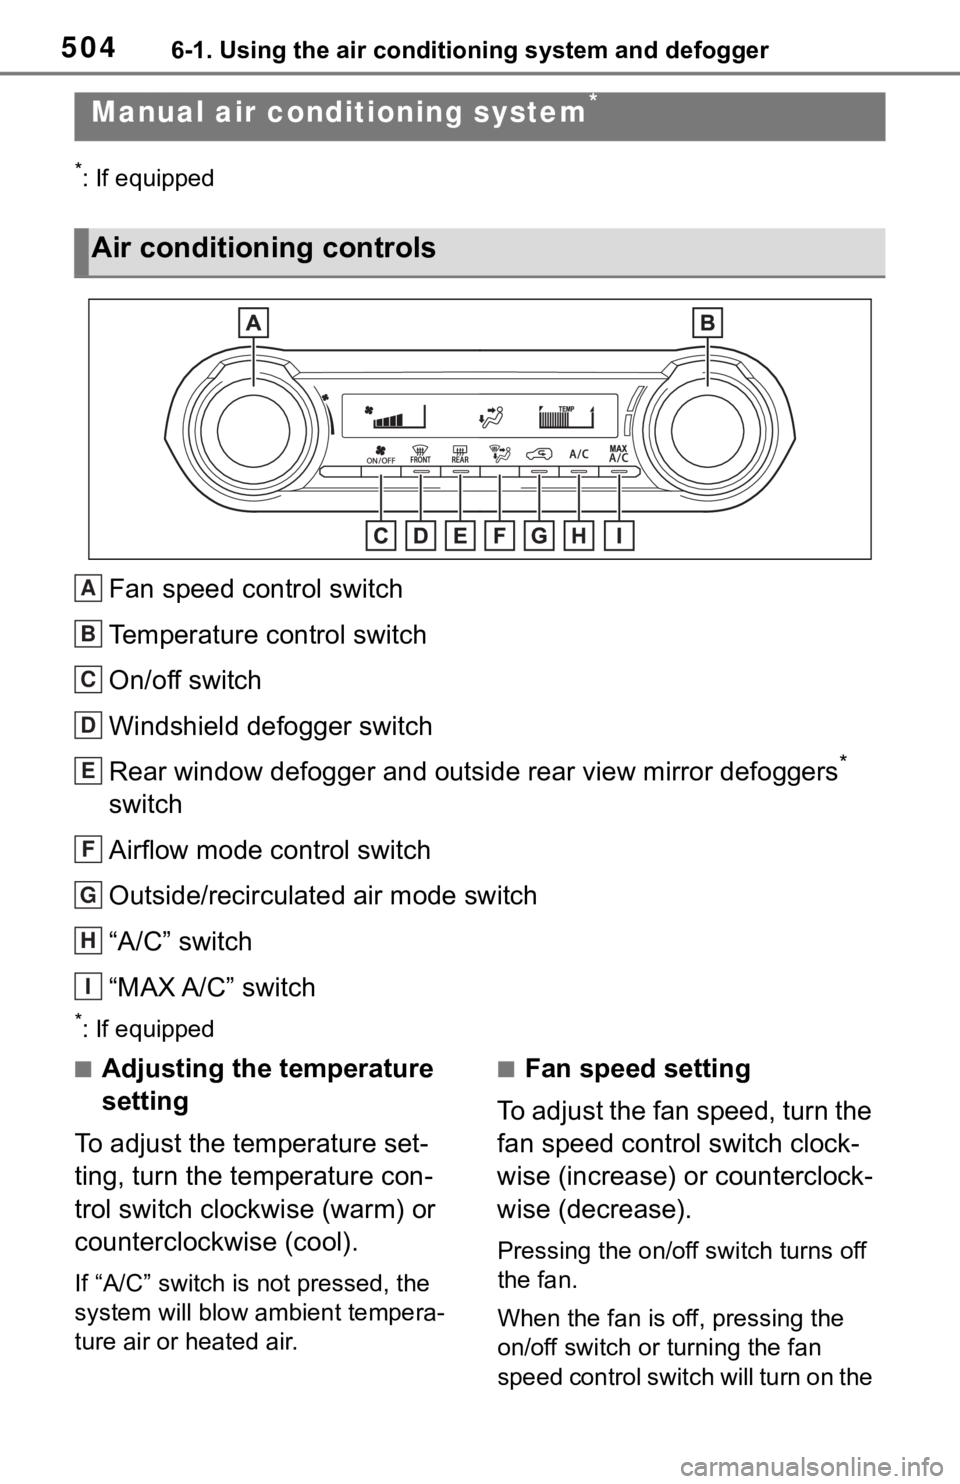
Fan speed control switch
Temperature control switch
On/off switch
Windshield defogger switch
Rear window defogger and outside rear view mirror defoggers
*
switch
Airflow mode control switch
Outside/recirculated air mode switch
“A/C” switch
“MAX A/C” switch
*: If equipped
■Adjusting the temperature
setting
To adjust the temperature set-
ting, turn the temperature con-
trol switch clockwise (warm) or
counterclockwise (cool).
If “A/C” switch is not pressed, the
system will blow a mbient tempera-
ture air or heated air.
■Fan speed setting
To adjust the fan speed, turn the
fan speed control switch clock-
wise (increase) or counterclock-
wise (decrease).
Pressing the on/off switch turns off
the fan.
When the fan is off, pressing the
on/off switch or turning the fan
speed control switch will turn on the
Manual air condi tioning system*
Air conditioning controls
A
B
C
D
E
F
G
H
I
Page 509 of 728
5096-1. Using the air conditioning system and defogger
6
Interior features
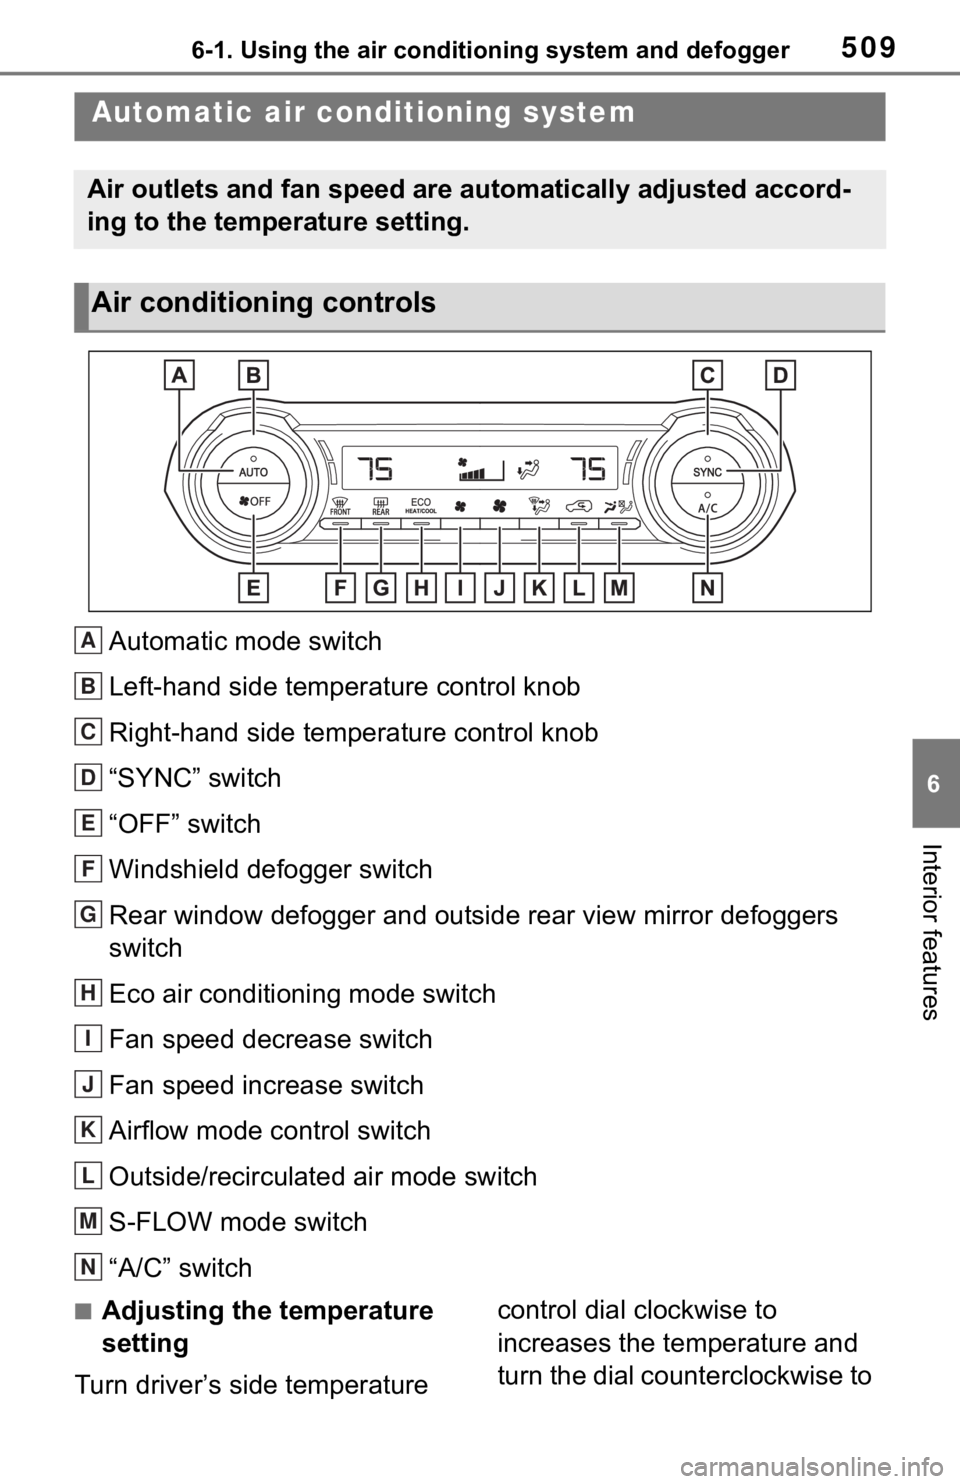
Automatic mode switch
Left-hand side temperature control knob
Right-hand side temperature control knob
“SYNC” switch
“OFF” switch
Windshield defogger switch
Rear window defogger and outside rear view mirror defoggers
switch
Eco air conditioning mode switch
Fan speed decrease switch
Fan speed increase switch
Airflow mode control switch
Outside/recirculated air mode switch
S-FLOW mode switch
“A/C” switch
■Adjusting the temperature
setting
Turn driver’s side temperature control dial clockwise to
increases the temperature and
turn the dial counterclockwise to
Automatic air conditioning system
Air outlets and fan speed are automatically adjusted accord-
ing to the temperature setting.
Air conditioning controls
A
B
C
D
E
F
G
H
I
J
K
L
M
N
Page 567 of 728
5677-3. Do-it-yourself maintenance
7
Maintenance and care
■Checking the engine oil
1 Park the vehicle on level
ground. After warming up the
engine and turning off the
engine, wait more than 5
minutes for the oil to drain
back into the bottom of the
engine.
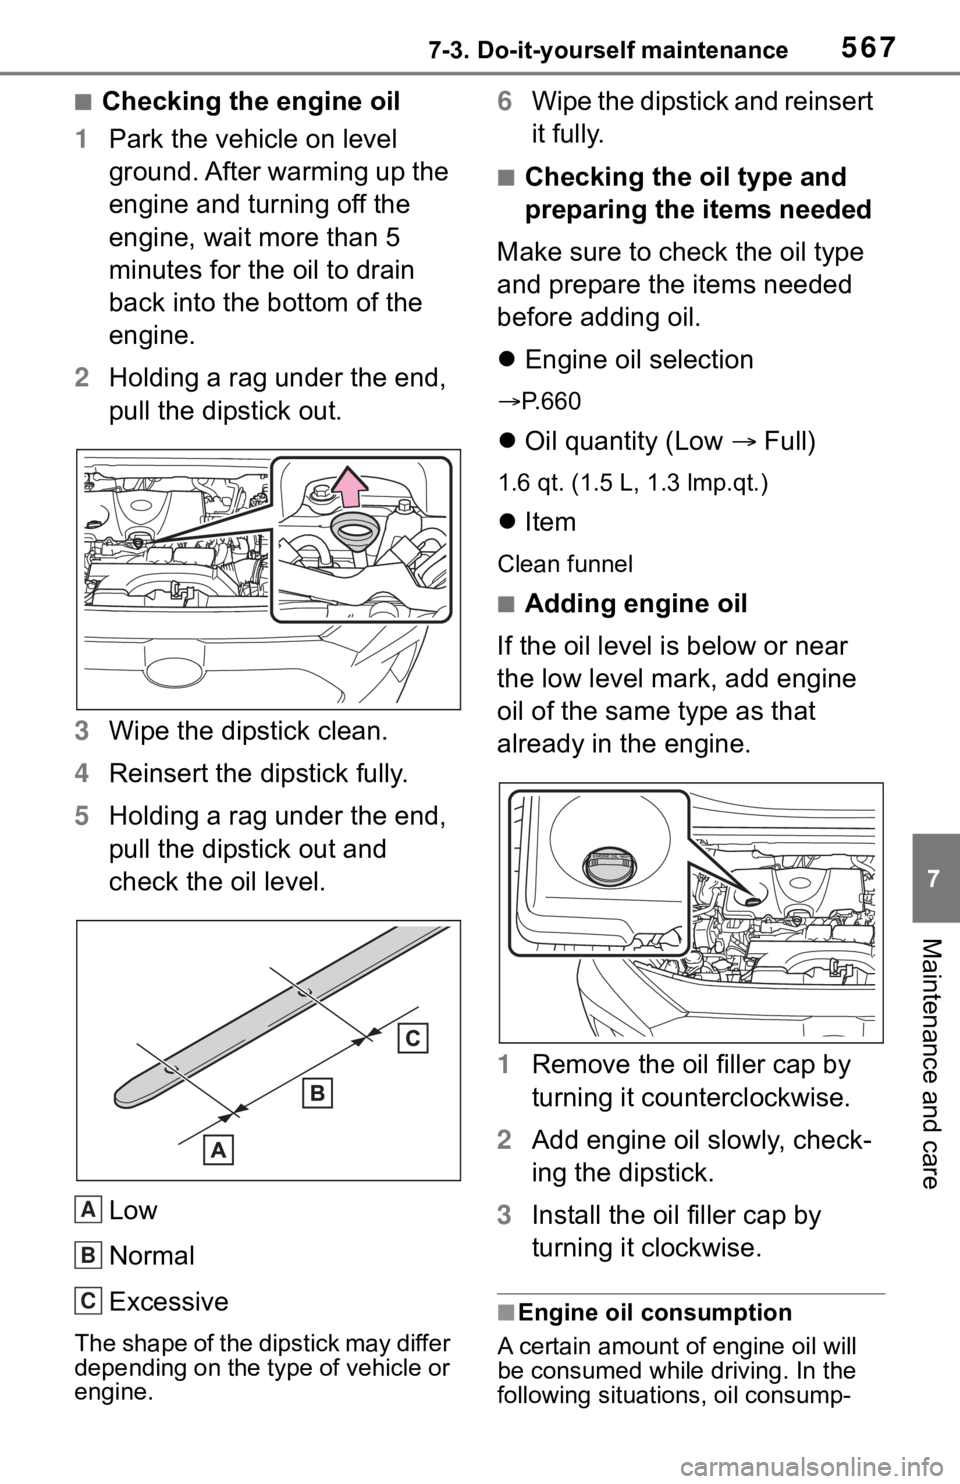
2 Holding a rag under the end,
pull the dipstick out.
3 Wipe the dipstick clean.
4 Reinsert the dipstick fully.
5 Holding a rag under the end,
pull the dipstick out and
check the oil level.
Low
Normal
Excessive
The shape of the dipstick may differ
depending on the type of vehicle or
engine.
6Wipe the dipstick and reinsert
it fully.
■Checking the oil type and
preparing the items needed
Make sure to check the oil type
and prepare the items needed
before adding oil.
Engine oil selection
P.660
Oil quantity (Low Full)
1.6 qt. (1.5 L, 1.3 lmp.qt.)
Item
Clean funnel
■Adding engine oil
If the oil level is below or near
the low level mark, add engine
oil of the same type as that
already in the engine.
1 Remove the oil filler cap by
turning it counterclockwise.
2 Add engine oil slowly, check-
ing the dipstick.
3 Install the oil filler cap by
turning it clockwise.
■Engine oil consumption
A certain amount of engine oil will
be consumed while driving. In the
following situatio ns, oil consump-
A
B
C
Page 601 of 728
6017-3. Do-it-yourself maintenance
7
Maintenance and care
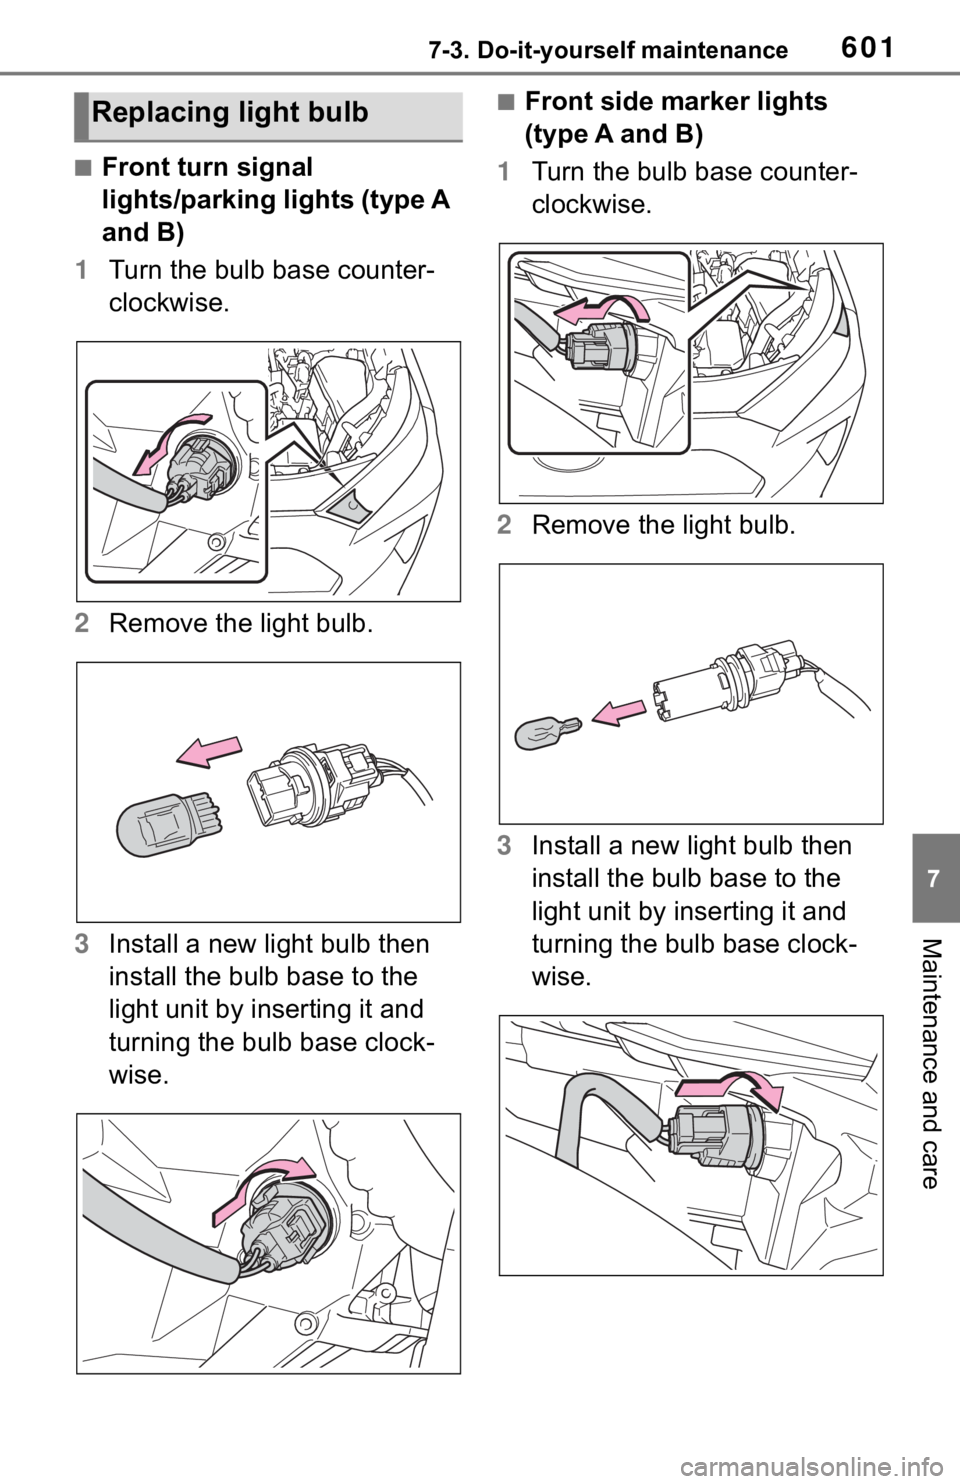
■Front turn signal
lights/parking lights (type A
and B)
1 Turn the bulb base counter-
clockwise.
2 Remove the light bulb.
3 Install a new light bulb then
install the bulb base to the
light unit by inserting it and
turning the bulb base clock-
wise.
■Front side marker lights
(type A and B)
1 Turn the bulb base counter-
clockwise.
2 Remove the light bulb.
3 Install a new light bulb then
install the bulb base to the
light unit by inserting it and
turning the bulb base clock-
wise.Replacing light bulb
Page 602 of 728
6027-3. Do-it-yourself maintenance
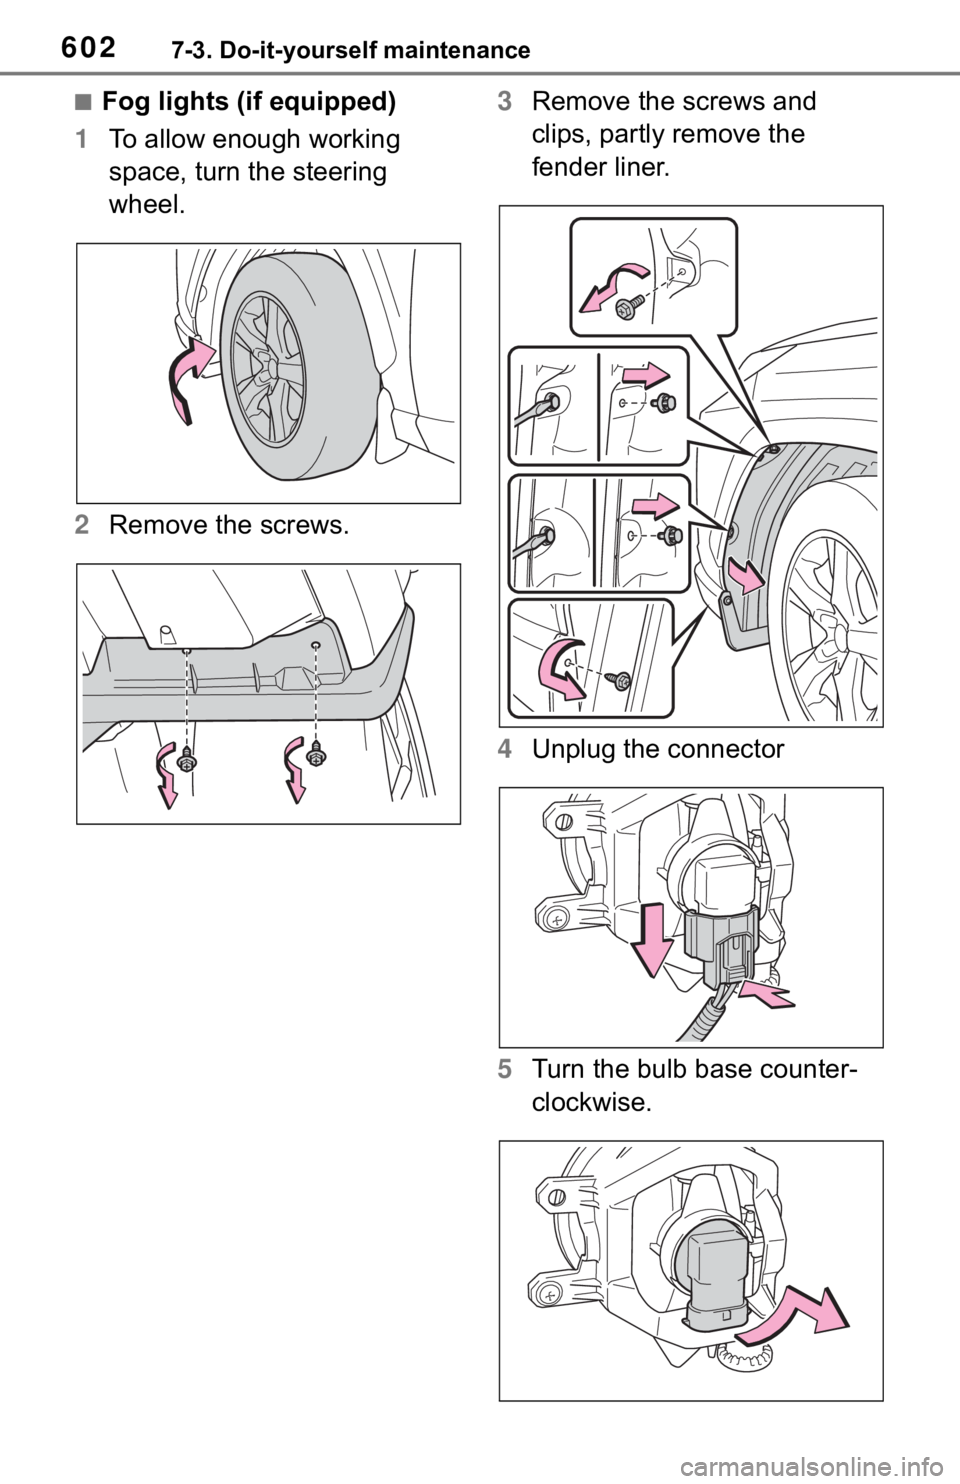
■Fog lights (if equipped)
1 To allow enough working
space, turn the steering
wheel.
2 Remove the screws. 3
Remove the screws and
clips, partly remove the
fender liner.
4 Unplug the connector
5 Turn the bulb base counter-
clockwise.
Page 603 of 728
6037-3. Do-it-yourself maintenance
7
Maintenance and care
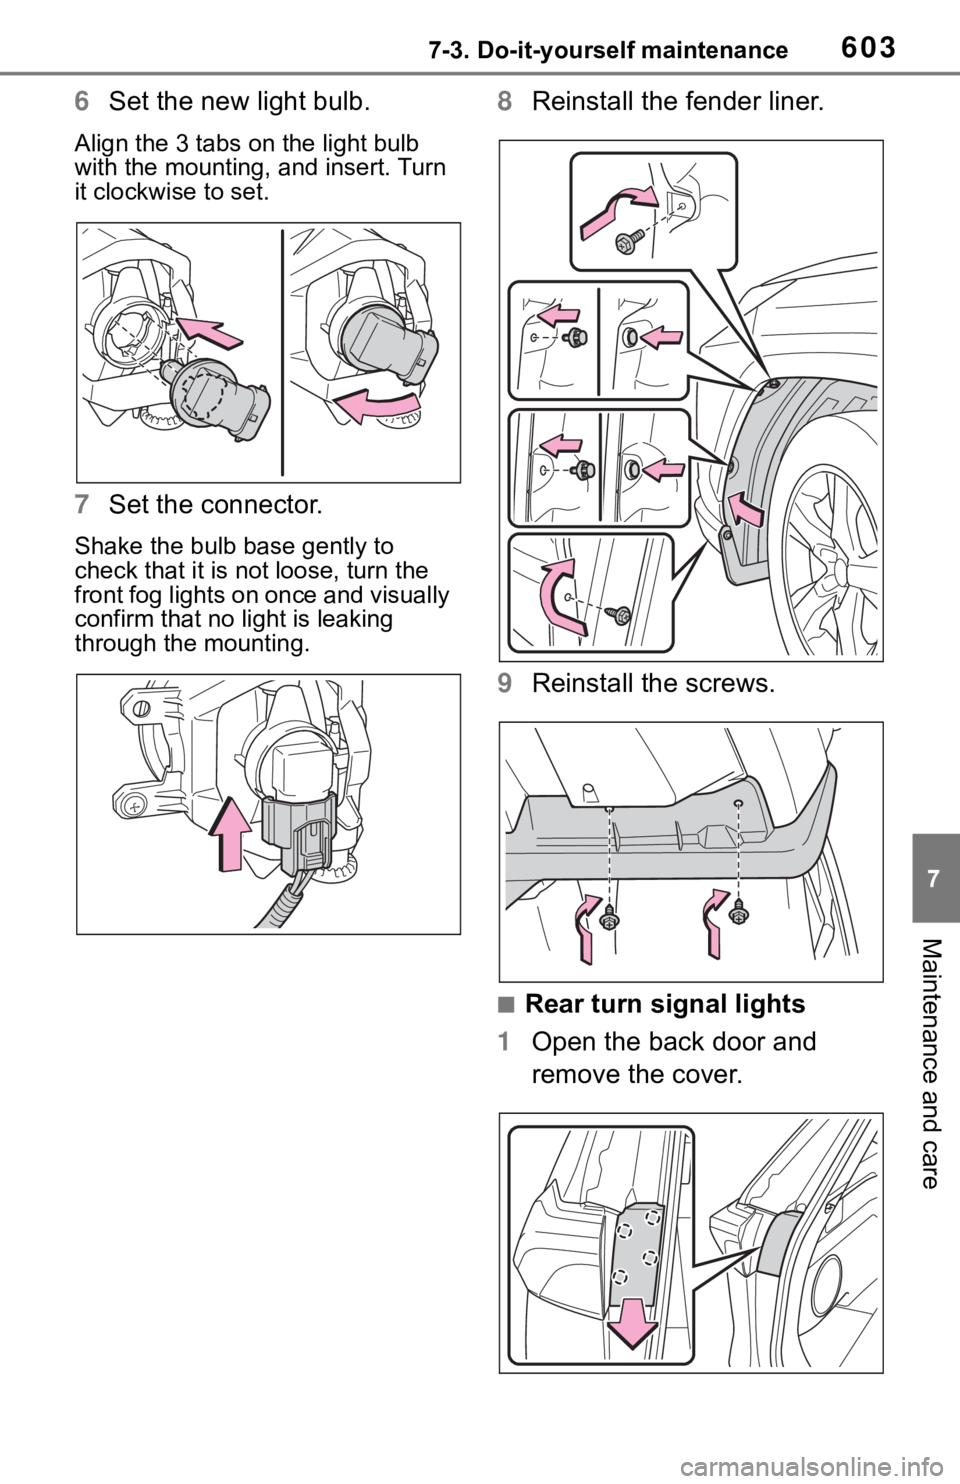
6Set the new light bulb.
Align the 3 tabs on the light bulb
with the mounting, and insert. Turn
it clockwise to set.
7 Set the connector.
Shake the bulb base gently to
check that it is not loose, turn the
front fog lights on once and visually
confirm that no light is leaking
through the mounting.
8Reinstall the fender liner.
9 Reinstall the screws.
■Rear turn signal lights
1 Open the back door and
remove the cover.
Page 604 of 728
6047-3. Do-it-yourself maintenance
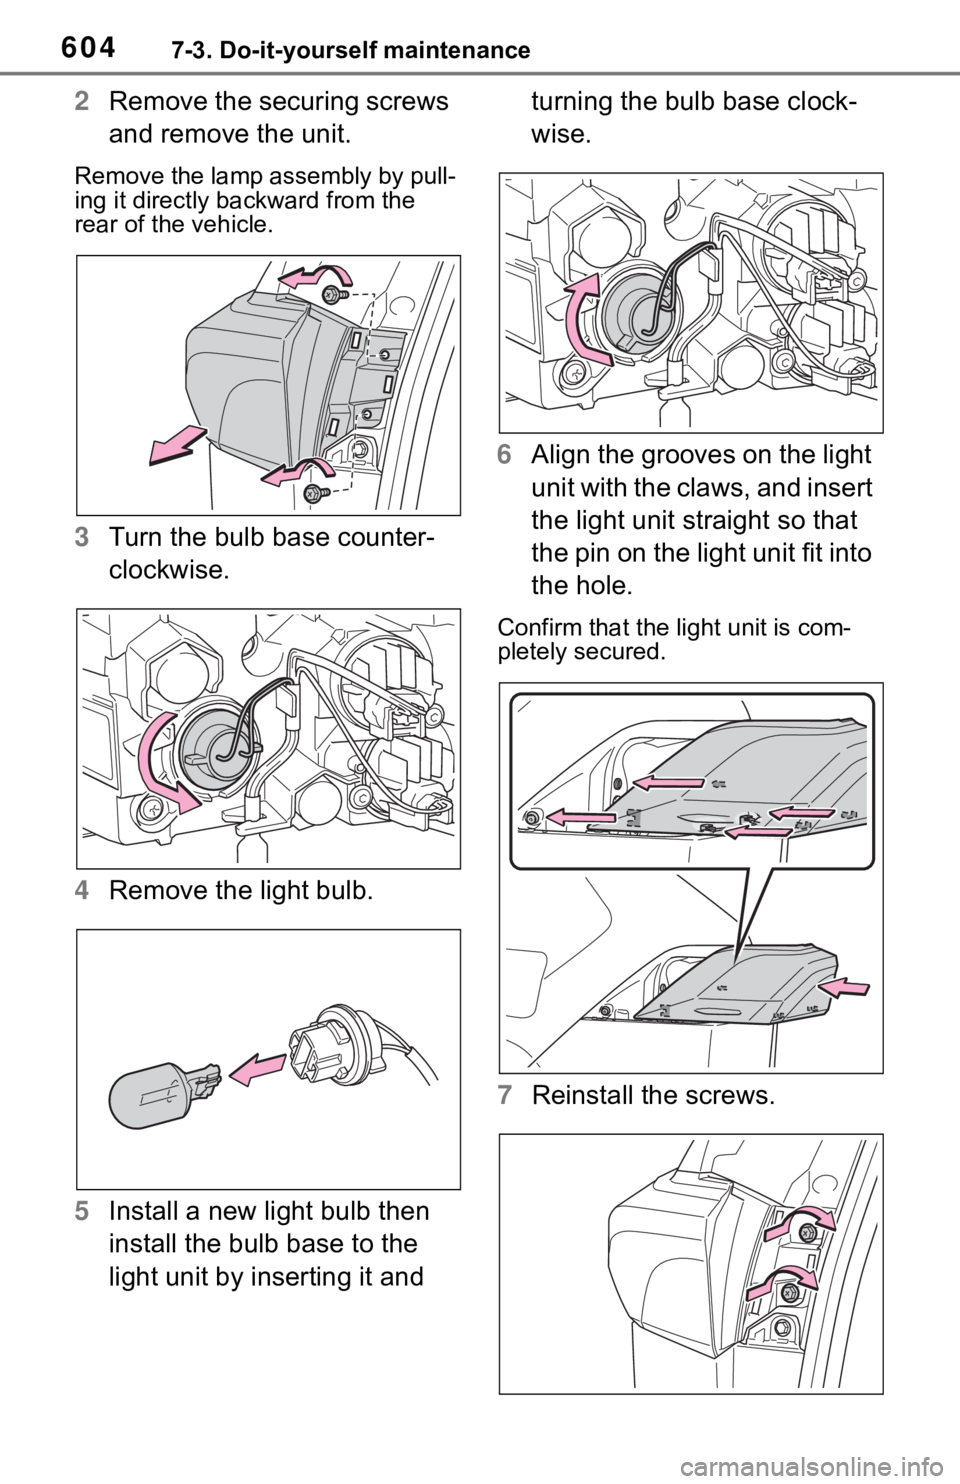
2Remove the securing screws
and remove the unit.
Remove the lamp assembly by pull-
ing it directly backward from the
rear of the vehicle.
3Turn the bulb base counter-
clockwise.
4 Remove the light bulb.
5 Install a new light bulb then
install the bulb base to the
light unit by inserting it and turning the bulb base clock-
wise.
6 Align the grooves on the light
unit with the claws, and insert
the light unit straight so that
the pin on the light unit fit into
the hole.
Confirm that the light unit is com-
pletely secured.
7Reinstall the screws.
Page 605 of 728
6057-3. Do-it-yourself maintenance
7
Maintenance and care
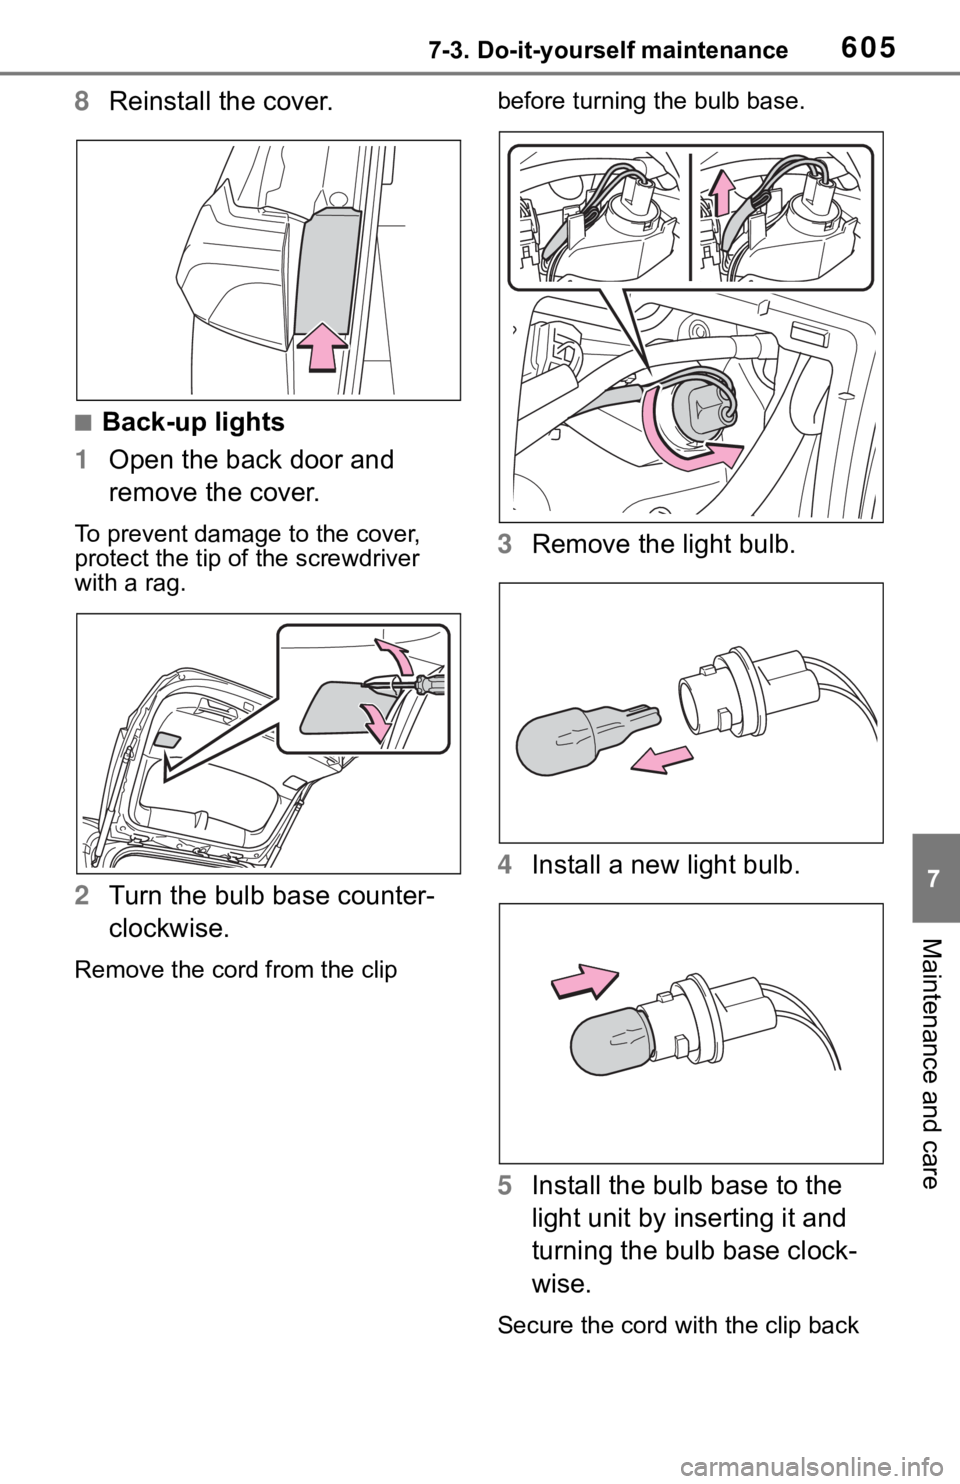
8Reinstall the cover.
■Back-up lights
1 Open the back door and
remove the cover.
To prevent damage to the cover,
protect the tip of the screwdriver
with a rag.
2Turn the bulb base counter-
clockwise.
Remove the cord from the clip before turning the bulb base.
3
Remove the light bulb.
4 Install a new light bulb.
5 Install the bulb base to the
light unit by inserting it and
turning the bulb base clock-
wise.
Secure the cord wit h the clip back
Page 607 of 728
6077-3. Do-it-yourself maintenance
7
Maintenance and care
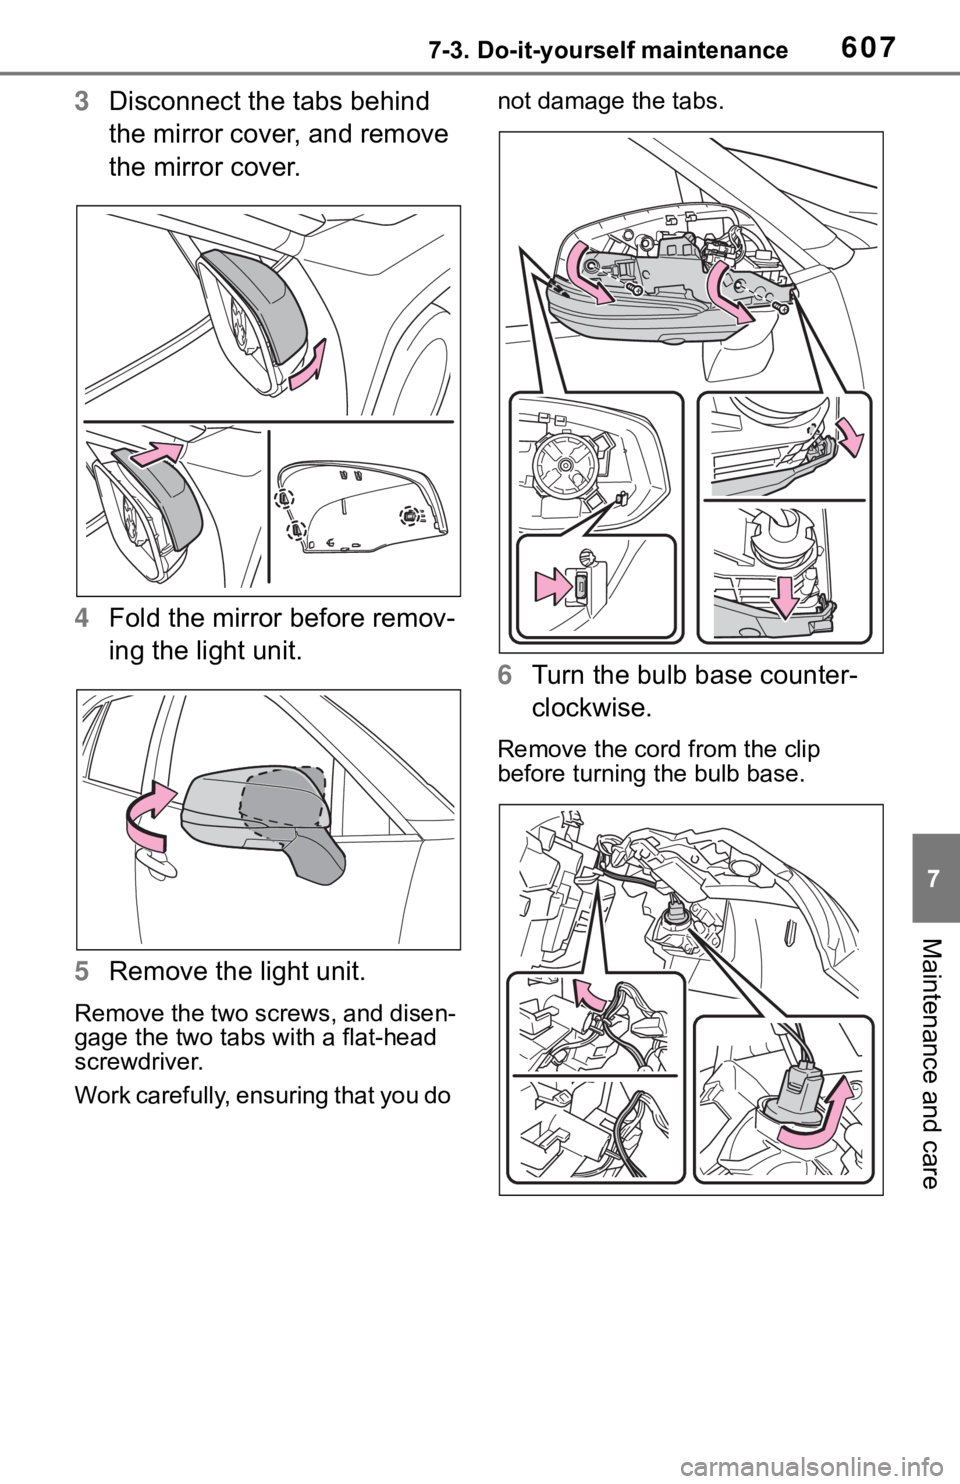
3Disconnect the tabs behind
the mirror cover, and remove
the mirror cover.
4 Fold the mirror before remov-
ing the light unit.
5 Remove the light unit.
Remove the two screws, and disen-
gage the two tabs with a flat-head
screwdriver.
Work carefully, ensuring that you do not damage the tabs.
6
Turn the bulb base counter-
clockwise.
Remove the cord from the clip
before turning the bulb base.
Page 608 of 728
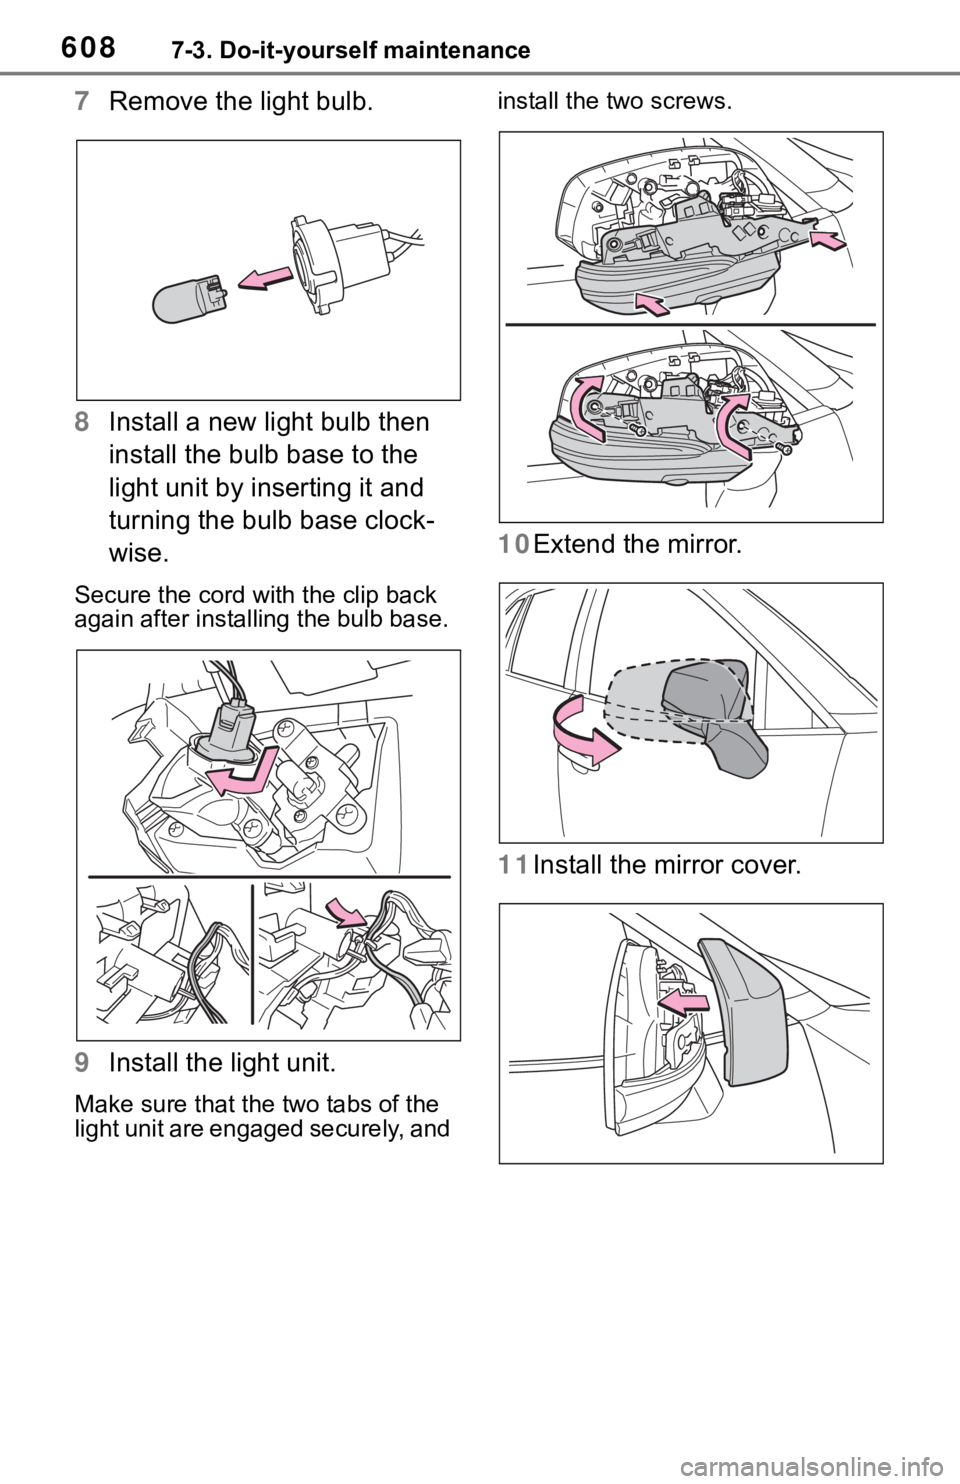
6087-3. Do-it-yourself maintenance
7Remove the light bulb.
8 Install a new light bulb then
install the bulb base to the
light unit by inserting it and
turning the bulb base clock-
wise.
Secure the cord wit h the clip back
again after installin g the bulb base.
9Install the light unit.
Make sure that the two tabs of the
light unit are engaged securely, and install the two screws.
10Extend the mirror.
11Install the mirror cover.