stop start TOYOTA RAV4 2019 (in English) User Guide
[x] Cancel search | Manufacturer: TOYOTA, Model Year: 2019, Model line: RAV4, Model: TOYOTA RAV4 2019Pages: 728, PDF Size: 21.09 MB
Page 91 of 728
912-1. Instrument cluster
2
Vehicle status information and indicators
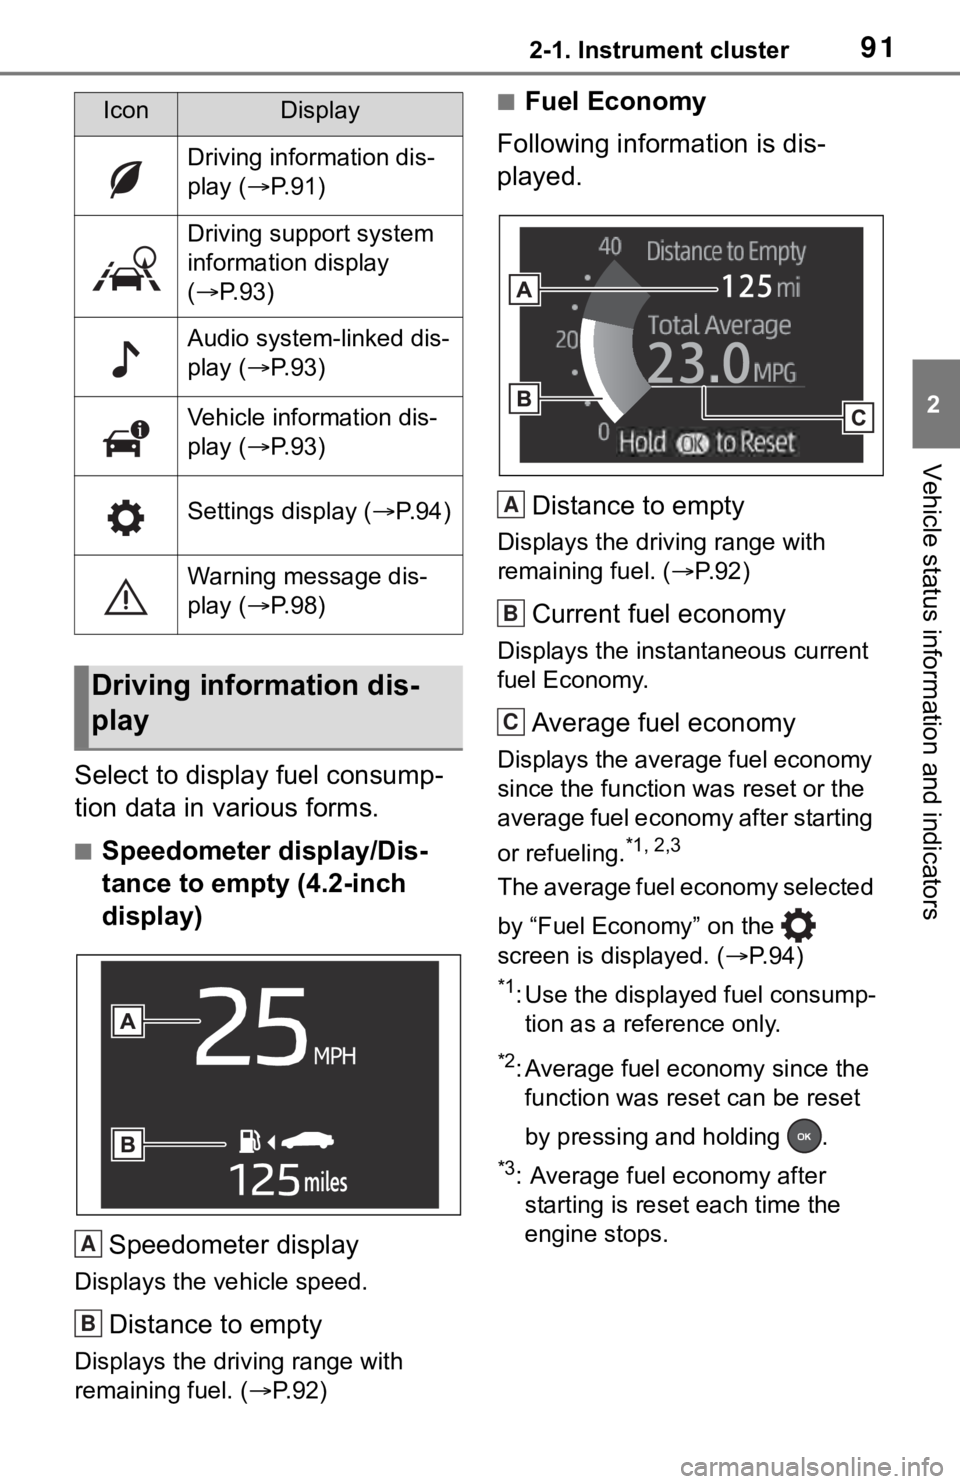
Select to display fuel consump-
tion data in various forms.
■Speedometer display/Dis-
tance to empty (4.2-inch
display)
Speedometer display
Displays the vehicle speed.
Distance to empty
Displays the driving range with
remaining fuel. ( P. 9 2 )
■Fuel Economy
Following information is dis-
played.
Distance to empty
Displays the driving range with
remaining fuel. ( P. 9 2 )
Current fuel economy
Displays the instantaneous current
fuel Economy.
Average fuel economy
Displays the average fuel economy
since the function was reset or the
average fuel economy after starting
or refueling.
*1, 2,3
The average fuel economy selected
by “Fuel Economy” on the
screen is displayed. ( P. 9 4 )
*1: Use the displayed fuel consump-
tion as a reference only.
*2: Average fuel economy since the function was res et can be reset
by pressing and holding .
*3: Average fuel economy after starting is reset each time the
engine stops.
IconDisplay
Driving information dis-
play ( P.91)
Driving support system
information display
( P.93)
Audio system-linked dis-
play ( P.93)
Vehicle information dis-
play ( P.93)
Settings display ( P.94)
Warning message dis-
play ( P.98)
Driving information dis-
play
A
B
A
B
C
Page 93 of 728
932-1. Instrument cluster
2
Vehicle status information and indicators
■Driving support system
information display
Select to display the operational
status of the following systems:
LTA (Lane Tracing Assist)
( P.238)
Dynamic radar cruise control
with full-speed range
( P.252)
■Navigation system-linked
display (if equipped)
Select to display the following
navigation system-linked infor-
mation.
Route guidance
Compass display (north-up
display/heading-up display)
Select to enable selection of an
audio source or track on the dis-
play.
■Drive information
2 items that are selected using
the “Drive Info Items” setting
(average speed, distance and
total time) can be displayed ver-
tically.
The displayed information changes according to the “Drive
Info Type” setting (since the sys-
tem was started or between
resets). (
P. 9 4 )
Use the displayed information as a
reference only.
Following items will be displayed.
“Trip”
• “Average Speed”: Displays the
average vehicle speed since
engine start
*
• “Distance”: Displ ays the distance
driven since engine start
*
• “Total Time”: Displays the elapsed time since engine start
*
*
: These items are r eset each time
the engine stops.
“Total”
• “Average Speed”: Displays the
average vehicle speed since the
display was reset
*
• “Distance”: Displ ays the distance
driven since the display was
reset
*
• “Total Time”: Displays the elapsed
time since the display was reset
*
*
: To reset, display the desired item and press and hold .
Driving support system
information display
Audio system-linked dis-
play
Vehicle information dis-
play
Page 96 of 728

962-1. Instrument cluster
Select to change each notification
method used to warn the driver
when the system recognizes
excess speed, no overtaking and
no-entry sign.
“Notification Level”
Select to change e ach notification
level used to warn the driver when
the system recognizes a speed limit
sign.
■ Vehicle Settings
PBD (Power Back Door)
(if equipped) ( P.119)
*1
Select to set up the following items.
• System settings
Select to enable/disable the power
back door system.
• “Kick Sensor”
*2
Select to enable/disable the kick
sensor.
• “Opening Adjustment”
Select the open position when
power back door is fully open.
•“Volume”
Select to set the volume of the
buzzer which sounds when the
power back door system operates.
*1: Vehicles with power back door
*2: Vehicles with hands free power
back door
(Stop & Start) (if
equipped) ( P.347)
Select to set the length of time the
Stop & Start system will operate
when the “A/C” switch of the air
conditioning system is on.
“TPWS” (Tire Pressure Warn- ing System) (if equipped)
(
P.576)
• “Set Pressure”
Select to initialize the tire pressure
warning system.
• “Change Wheel” (except for mod-
els made in Japan
* without tire
inflation pressure display func-
tion)
Select to register the ID codes of
the tire pressure se nsors to the tire
pressure warning system.
• “Change Wheel” (for models
made in Japan
* without tire infla-
tion pressure display function)
Select to change the tire pressure
warning system sen sor ID code set.
To enable this function, a second
set of tire pressure warning system
sensor ID codes must be registered
by a Toyota dealer. For information
regarding changing the registered
ID code set, contact your Toyota
dealer.
*: The country of production is writ- ten on the Certification Regula-
tion label. ( P.659)
“Scheduled Maintenance”
( P.557)
Select to reset the scheduled main-
tenance information (message indi-
cating maintenance is required and
distance until the next mainte-
nance) after all ma intenance is per-
formed.
■ Settings
“Language”
Select to change the language on
the multi-information display.
Page 97 of 728
972-1. Instrument cluster
2
Vehicle status information and indicators
“Units”
Select to change t he units of mea-
sure displayed.
“Meter Type” (7-inch display)
Select to change the speedometer
display.
(Eco Driving Indicator
Light) ( P.92)
Select to activate/deactivate the
Eco Driving Indicator Light.
(Driving information dis-
play settings)
Select to change the display on
Fuel Economy ( P. 9 1 ) .
(Audio settings)
Select to enable/disable
screen.
(Vehicle information dis-
play settings)
• “Display Contents”
Select to enable/disable the AWD
system display ( P.94). (AWD
models)
• “Drive Info Type”
Select to change the drive informa-
tion type display between trip and
total. ( P. 9 3 ) .
• “Drive Info Items”
Select to set the items on the upper
and lower side of the drive informa-
tion screen. from three items, aver-
age speed, distance and total time.
“Pop-Up Display”
Select to enable/d isable the follow-
ing pop-up displays, which may
appear in some situations. • Intersection guidance display of
the navigation s ystem-linked sys-
tem (if equipped)
• Incoming call display of the hands-free phone system
• Audio operation
• Volume operation
• Voice control
• Stop & Start system duration (if equipped)
• Stop & Start system status (if equipped)
“MID OFF”
A blank screen is displayed
“Default Settings”
Select to reset the meter display
settings.
■Suspension of the settings dis-
play
●In the following situations, opera-
tion of the settings display will be
temporarily suspended.
• When a warning message
appears on the multi-information
display
• When the vehicle begins to move
●Settings for functions not
equipped to the vehicle are not
displayed.
●When a function is turned off, the
related settings for that function
are not selectable.
Page 121 of 728
1213-2. Opening, closing and locking the doors
3
Before driving
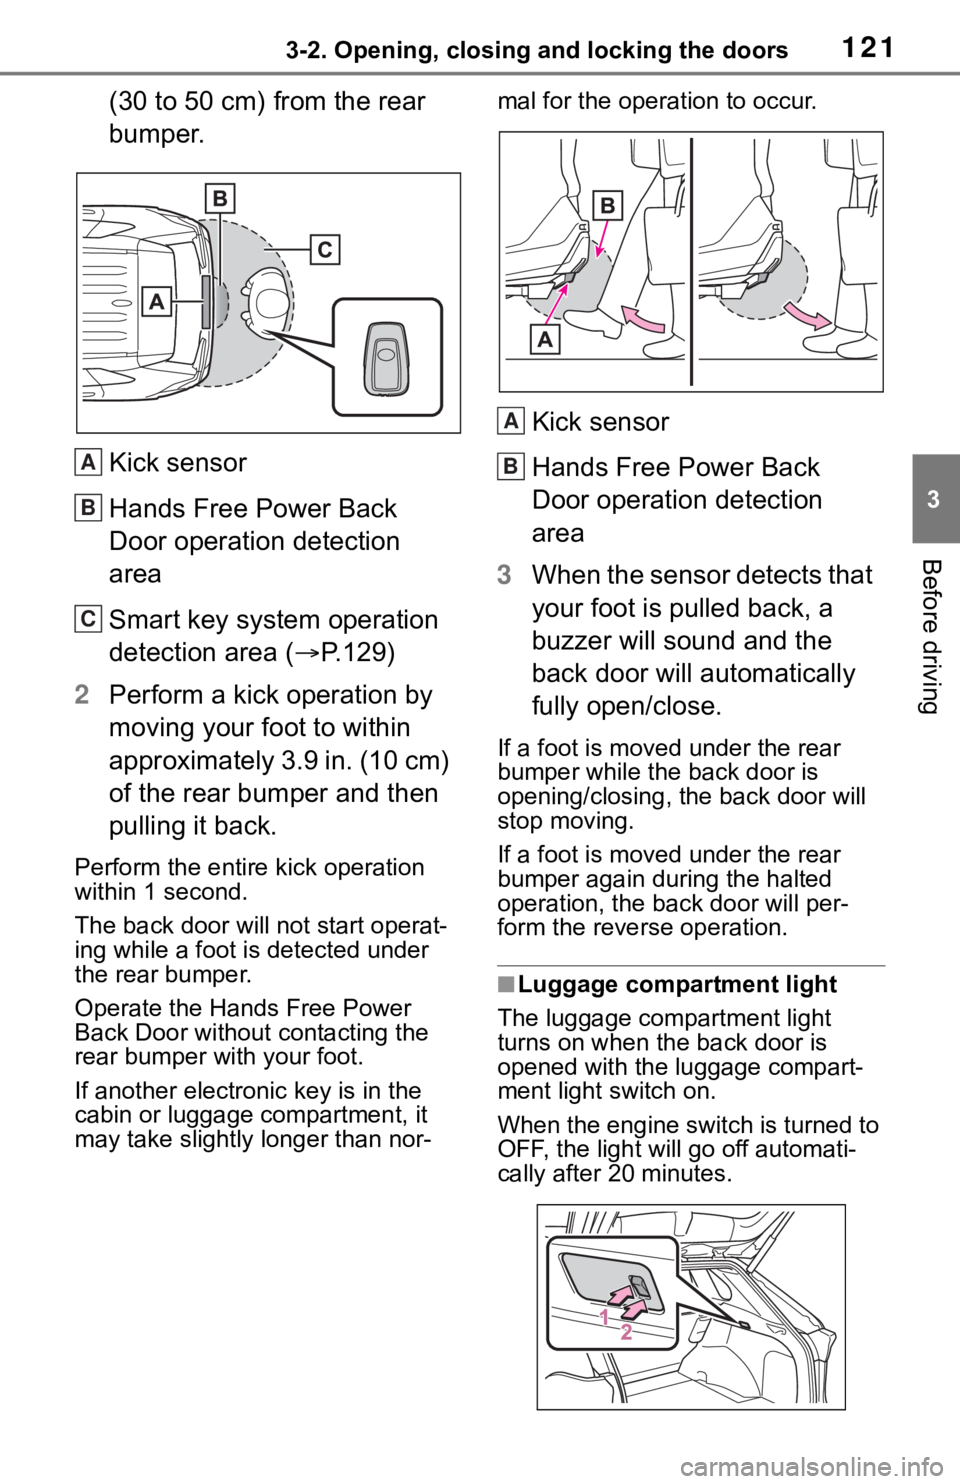
(30 to 50 cm) from the rear
bumper.
Kick sensor
Hands Free Power Back
Door operation detection
area
Smart key system operation
detection area (P.129)
2 Perform a kick operation by
moving your foot to within
approximately 3.9 in. (10 cm)
of the rear bumper and then
pulling it back.
Perform the entire kick operation
within 1 second.
The back door will not start operat-
ing while a foot is detected under
the rear bumper.
Operate the Hands Free Power
Back Door without contacting the
rear bumper with your foot.
If another electronic key is in the
cabin or luggage compartment, it
may take slightly longer than nor- mal for the operation to occur.
Kick sensor
Hands Free Power Back
Door operation detection
area
3 When the sensor detects that
your foot is pulled back, a
buzzer will sound and the
back door will automatically
fully open/close.
If a foot is moved under the rear
bumper while the back door is
opening/closing, the back door will
stop moving.
If a foot is moved under the rear
bumper again during the halted
operation, the ba ck door will per-
form the rever se operation.
■Luggage compartment light
The luggage compartment light
turns on when the back door is
opened with the luggage compart-
ment light switch on.
When the engine switch is turned to
OFF, the light will go off automati-
cally after 20 minutes.
A
B
C
A
B
Page 122 of 728
1223-2. Opening, closing and locking the doors
1On
2 Off
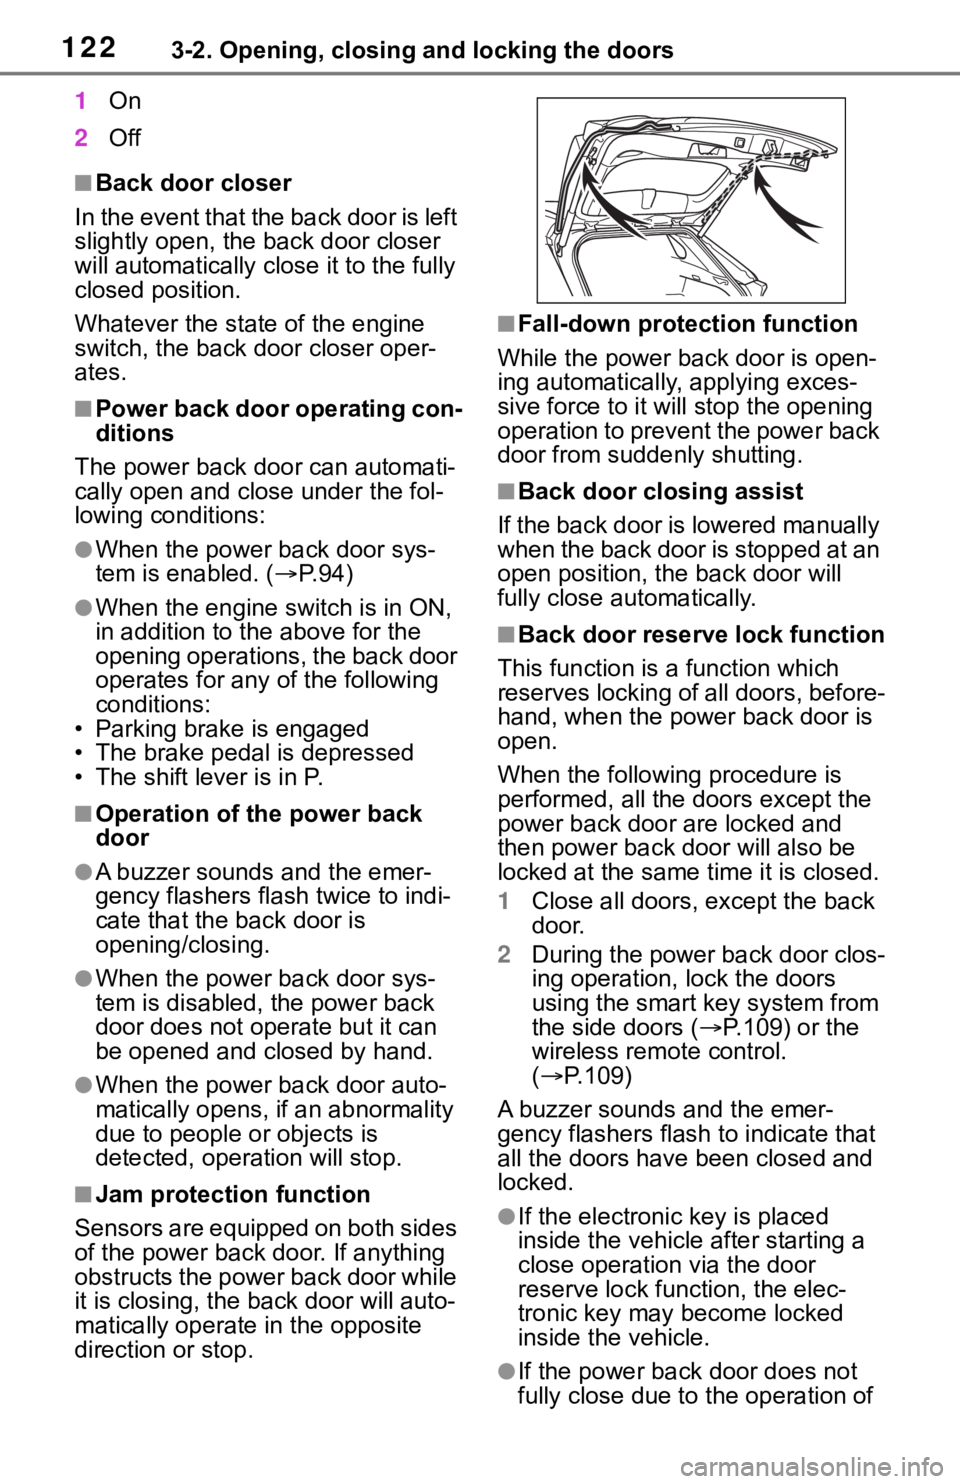
■Back door closer
In the event that the back door is left
slightly open, the back door closer
will automatically close it to the fully
closed position.
Whatever the state of the engine
switch, the back door closer oper-
ates.
■Power back door operating con-
ditions
The power back door can automati-
cally open and close under the fol-
lowing conditions:
●When the power back door sys-
tem is enabled. ( P. 9 4 )
●When the engine switch is in ON,
in addition to the above for the
opening operations, the back door
operates for any of the following
conditions:
• Parking brake is engaged
• The brake pedal is depressed
• The shift lever is in P.
■Operation of the power back
door
●A buzzer sounds and the emer-
gency flashers flash twice to indi-
cate that the back door is
opening/closing.
●When the power back door sys-
tem is disabled, the power back
door does not ope rate but it can
be opened and closed by hand.
●When the power back door auto-
matically opens, if an abnormality
due to people or objects is
detected, oper ation will stop.
■Jam protection function
Sensors are equipped on both sides
of the power back door. If anything
obstructs the power back door while
it is closing, the b ack door will auto-
matically operate in the opposite
direction or stop.
■Fall-down protection function
While the power back door is open-
ing automatically, applying exces-
sive force to it will stop the opening
operation to prevent the power back
door from suddenly shutting.
■Back door closing assist
If the back door is lowered manually
when the back door is stopped at an
open position, the back door will
fully close automatically.
■Back door reserve lock function
This function is a function which
reserves locking of all doors, before-
hand, when the power back door is
open.
When the following procedure is
performed, all the doors except the
power back door are locked and
then power back door will also be
locked at the same time it is closed.
1 Close all doors, except the back
door.
2 During the power back door clos-
ing operation, lock the doors
using the smart key system from
the side doors ( P.109) or the
wireless remote control.
( P.109)
A buzzer sounds and the emer-
gency flashers flash to indicate that
all the doors have been closed and
locked.
●If the electronic key is placed
inside the vehicle after starting a
close operation via the door
reserve lock function, the elec-
tronic key may become locked
inside the vehicle.
●If the power back door does not
fully close due to the operation of
Page 125 of 728
1253-2. Opening, closing and locking the doors
3
Before driving
WA R N I N G
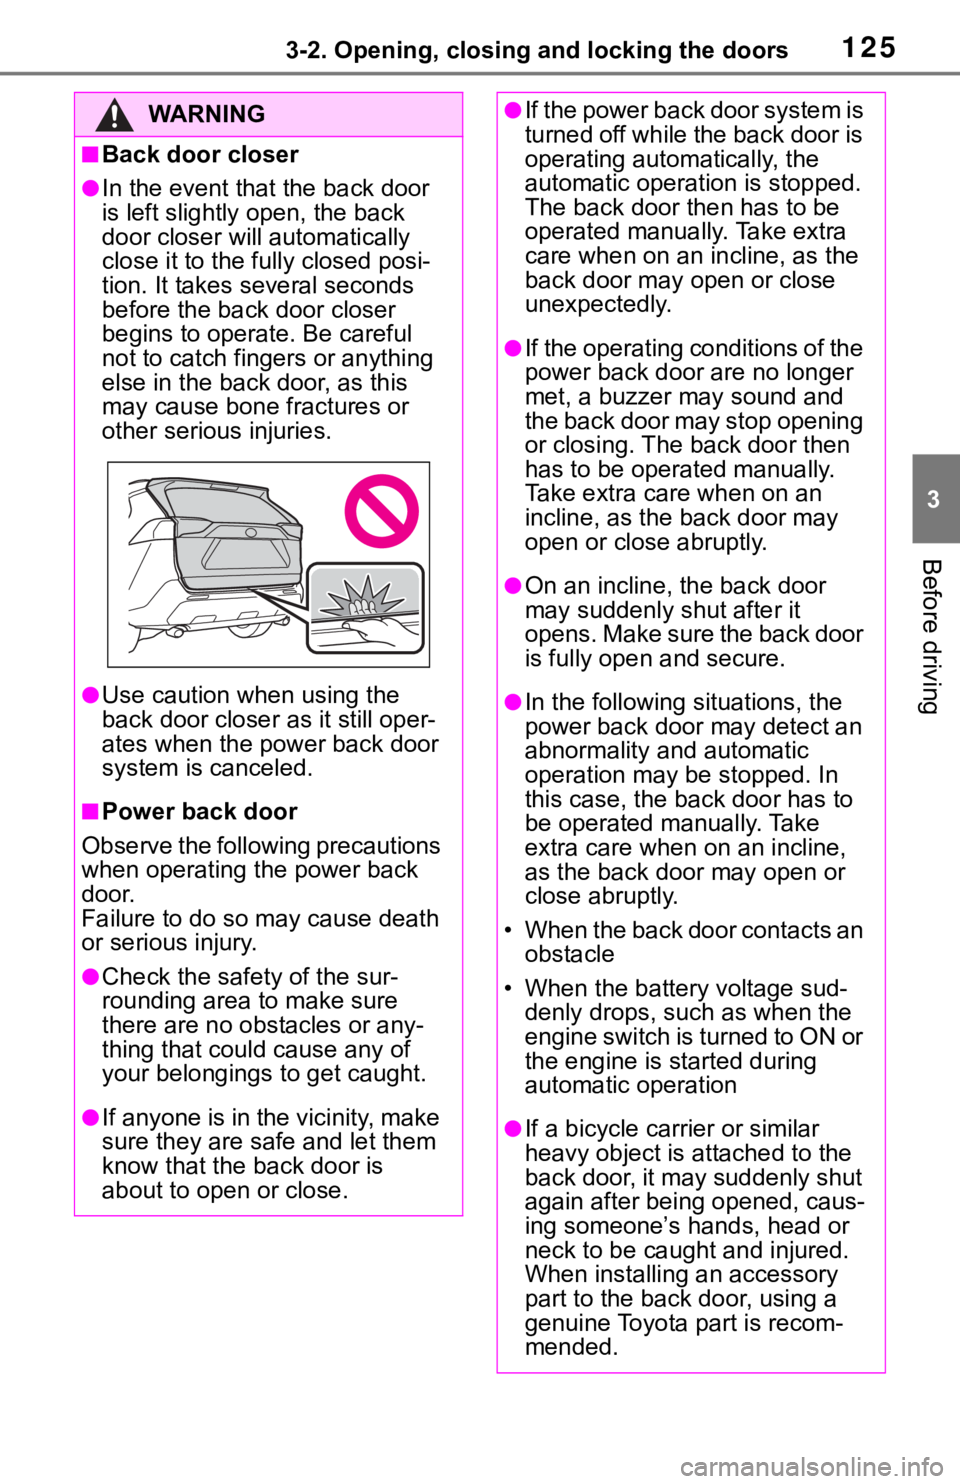
■Back door closer
●In the event that the back door
is left slightly open, the back
door closer will automatically
close it to the fully closed posi-
tion. It takes several seconds
before the back door closer
begins to operate. Be careful
not to catch fingers or anything
else in the back door, as this
may cause bone fractures or
other serious injuries.
●Use caution when using the
back door closer as it still oper-
ates when the power back door
system is canceled.
■Power back door
Observe the following precautions
when operating the power back
door.
Failure to do so may cause death
or serious injury.
●Check the safety of the sur-
rounding area to make sure
there are no obstacles or any-
thing that could cause any of
your belongings to get caught.
●If anyone is in the vicinity, make
sure they are safe and let them
know that the back door is
about to open or close.
●If the power back door system is
turned off while the back door is
operating automatically, the
automatic operation is stopped.
The back door then has to be
operated manually. Take extra
care when on an incline, as the
back door may open or close
unexpectedly.
●If the operating conditions of the
power back door are no longer
met, a buzzer may sound and
the back door may stop opening
or closing. The back door then
has to be operated manually.
Take extra care when on an
incline, as the back door may
open or close abruptly.
●On an incline, the back door
may suddenly shut after it
opens. Make sure the back door
is fully open and secure.
●In the following si tuations, the
power back door may detect an
abnormality and automatic
operation may be stopped. In
this case, the back door has to
be operated manually. Take
extra care when on an incline,
as the back door may open or
close abruptly.
• When the back door contacts an obstacle
• When the battery voltage sud- denly drops, such as when the
engine switch is turned to ON or
the engine is started during
automatic operation
●If a bicycle carr ier or similar
heavy object is attached to the
back door, it may suddenly shut
again after being opened, caus-
ing someone’s hands, head or
neck to be caught and injured.
When installing an accessory
part to the back door, using a
genuine Toyota part is recom-
mended.
Page 132 of 728

1323-2. Opening, closing and locking the doors
the effective range, the door may
lock and unlock repeatedly. In that
case, follow the fo llowing correc-
tion procedures to wash the vehi-
cle:
• Place the electronic key in a loca- tion 6 ft. (2 m) or more away from
the vehicle. (Take care to ensure
that the key is not stolen.)
• Set the electronic key to battery-
saving mode to disable the smart
key system. ( P.130)
●If the electronic key is inside the
vehicle and a door handle
becomes wet during a car wash, a
message may be shown on the
multi-informatio n display and a
buzzer will sound outside the vehi-
cle. To turn off the alarm, lock all
the doors.
●The lock sensor may not work
properly if it com es into contact
with ice, snow, mud, etc. Clean
the lock sensor and attempt to
operate it again, or use the lock
sensor on the lower part of the
door handle.
●A sudden approach to the effec-
tive range or door handle may pre-
vent the doors from being
unlocked. In this case, return the
door handle to the original position
and check that the doors unlock
before pulling the door handle
again.
●If there is another electronic key in
the detection area, it may take
slightly longer to unlock the doors
after the door handle is gripped.
■When the vehicle is not driven
for extended periods
●To prevent theft of the vehicle, do
not leave the electronic key within
6 ft. (2 m) of the vehicle.
●The smart key system can be
deactivated in advance. ( P.684)
●Battery-saving mode can reduce
the power consumption of elec-
tronic keys. ( P.130)
■To operate the system properly
Make sure to carry the electronic
key when operating the system. Do
not get the electronic key too close
to the vehicle when operating the
system from the out side of the vehi-
cle.
Depending on the position and hold-
ing condition of the electronic key,
the key may not be detected cor-
rectly and the system may not oper-
ate properly. (The alarm may go off
accidentally, or the door lock pre-
vention may not operate.)
■If the smart key system does
not operate properly
●Locking and unlocking the doors:
Use the mechanical key. ( P.647)
●Starting the engine: P. 6 4 8
■Customization
Settings (e.g. smart key system)
can be changed.
(Customizable features: P.684)
If the smart key system has been
deactivated in a customized setting,
refer to the explanations for the fol-
lowing operations.
●Locking and unlocking the doors:
Use the wireless remote control or
mechanical key. ( P.109, 647)
●Starting the engi ne and changing
engine switch modes: P. 6 4 8
●Stopping the engine: P. 1 9 8
Page 169 of 728
169
4
4
Driving
Driving
4-1. Before drivingDriving the vehicle....... 171
Cargo and luggage ..... 177
Vehicle load limits ....... 180
Trailer towing............... 181
Dinghy towing ............. 193
4-2. Driving procedures Engine (ignition) switch (vehicles without smart key
system)...................... 194
Engine (ignition) switch (vehicles with smart key
system)...................... 195
Automatic transmission 199
Turn signal lever.......... 203
Parking brake .............. 204
Brake Hold .................. 207
4-3. Operating the lights and wipers
Headlight switch .......... 209
Automatic High Beam . 212
Fog light switch ........... 215
Windshield wipers and washer....................... 215
Rear window wiper and washer....................... 218
4-4. Refueling Opening the fuel tank cap.................................. 2204-5. Using the dr
iving support
systems
Toyota Safety Sense 2.0 .................................. 223
PCS (Pre-Collision System) .................................. 229
LTA (Lane Tracing Assist) .................................. 238
RSA (Road Sign Assist) .................................. 249
Dynamic radar cruise con- trol with full-speed range.................................. 251
BSM (Blind Spot Monitor) .................................. 262
Intuitive parking assist . 271
PKSB (Parking Support Brake) ........................ 278
Parking Support Brake func- tion (static objects) .... 283
Parking Support Brake func- tion (rear-crossing vehi-
cles) ........................... 289
Rear view monitor system .................................. 293
Toyota parking assist moni- tor .............................. 301
Panoramic view monitor .................................. 314
Stop & Start system .... 346
Driving mode select switch .................................. 352
Page 171 of 728
1714-1. Before driving
4
Driving
4-1.Before driving
■Starting the engine
P.194, 195
■Driving
1 With the brake pedal
depressed, shift the shift
lever to D. ( P.199)
2 Release the parking brake.
( P.204)
If the parking brake is in automatic
mode, the parking brake is
released automatically when shift-
ing the shift lever to any position
other than P. ( P.205)
3 Gradually release the brake
pedal and gently depress the
accelerator pedal to acceler-
ate the vehicle.
■Stopping
1 With the shift lever in D,
depress the brake pedal.
2 If necessary, set the parking
brake. ( P.204)
If the vehicle is to be stopped for an
extended period of time, shift the
shift lever to P. ( P.199)
■Parking the vehicle
1 With the shift lever in D,
depress the brake pedal. 2
Set the parking brake
( P.204), and shift the shift
lever to P ( P.199).
3 Turn the engine switch to
OFF to stop the engine.
4 Lock the door, making sure
that you have the key on your
person.
If parking on a hill, block the wheels
as needed.
■Starting off on a steep
uphill
1 With the brake pedal
depressed, shift the shift
lever to D. ( P.199)
2 Pull the parking brake switch
and parking brake is set man-
ually. ( P.204)
3 Release the brake pedal and
gently depress the accelera-
tor pedal to accelerate the
vehicle.
4 Press the parking brake
switch and parking brake is
released manually. ( P.204)
■When starting off on a uphill
The hill-start assist control will acti-
vate. ( P.362)
■Driving in the rain
●Drive carefully whe n it is raining,
because visibility will be reduced,
the windows may become fogged-
up, and the road could be slippery.
●Drive carefully whe n it starts to
rain, as the road surface could be
especially slippery.
●Refrain from hig h speeds when
driving on an expressway in the
rain, because there may be a
Driving the vehicle
The following procedures
should be observed to
ensure safe driving:
Driving procedure