rear view mirror TOYOTA RAV4 2019 (in English) Service Manual
[x] Cancel search | Manufacturer: TOYOTA, Model Year: 2019, Model line: RAV4, Model: TOYOTA RAV4 2019Pages: 728, PDF Size: 21.09 MB
Page 512 of 728
5126-1. Using the air conditioning system and defogger
mode when opening and closing a
rear door, switch to automatic S-
FLOW mode. ( P.513)
■Defogging the windshield
Defoggers are used to defog the
windshield and front side win-
dows.
Press the windshield defogger
switch.
Set the outside/recirculated air
mode switch to outside air mode if
t h e r e c i r c u l a t e d a i r m o d e i s u s e d . ( I t
may switch automatically.)
To defog the windshield and the
side windows quickly, turn the air
flow and temperature up.
To return to the previous mode,
press the windshield defogger
switch again when the windshield is
defogged.
When the windshield defogger
switch is on, the indicator illumi-
nates on the windshield defogger
switch.
■Defogging the rear window
and outside rear view mir-
rors (if equipped)
Defoggers are used to defog the
rear window and to remove rain-
drops, dew and frost from the
outside rear view mirrors (if
equipped).
Press the rear window defogger
and outside rear view mirror
defoggers switch.
The defoggers will automatically
turn off after 15 minutes.
When the rear window defogger
and outside rear view mirror defog- gers switch is on, the indicator illu-
minates on the rear window
defogger and outside rear view mir-
ror defoggers switch.
■Fogging up of the windows
●The windows will
easily fog up
when the humidity in the vehicle is
high. Turning “A/C” on will dehu-
midify the air from the outlets and
defog the windshield effectively.
●If you turn “A/C” off, the windows
may fog up more easily.
●The windows may fog up if the
recirculated air mode is used.
■Outside/recirculated air mode
●When driving on du sty roads such
as tunnels or in heavy traffic, set
the outside/recirculated air mode
switch to the recirculated air
mode. This is effective in prevent-
ing outside air from entering the
vehicle interior. During cooling
operation, setting the recirculated
air mode will also cool the vehicle
interior effectively.
●Outside/recirculated air mode may
automatically switch depending on
the temperature setting or the
inside temperature.
■Passenger presence determina-
tion in S-FLOW mode
The system determines that there is
a passenger in any of the following
situations.
If a passenger is judged to be in the
vehicle, the system will retain the
judgment for a c ertain amount of
time after the en gine switch is
turned off.
●Front passenger seat
• When the front passenger’s door is opened and closed
• When a passenger is sitting on the front passenger seat
• When the front passenger side
seat belt is fastened
• When the front passenger seat set temperature is changed
Page 514 of 728
5146-1. Using the air conditioning system and defogger
temperature etc. or air blowing
stops. To stop the air conditioning
system from turnin g off, press the
Stop & Start cancel switch and
refrain from using the Stop & Start
system.
■When the windshield is fogged
up and the engine is stopped
due to the Stop & Start system
(vehicles with Stop & Start sys-
tem)
Press the windshield defogger
switch to restart the engine and
defog the windshield.
If the windshield continuously fogs
up, press the Stop & Start cancel
switch and refrain from using the
Stop & Start system.
■When an odor c omes from the
air conditioning system while
the engine is stopped due to the
Stop & Start system (vehicles
with Stop & Start system)
Press the Stop & Start cancel switch
to restart the engine.
■Air conditioning filter
P. 5 8 9
■Customization
Some functions can be customized.
(Customizable features: P.691)
1 Press the “AUTO” switch.
The dehumidification function
begins to operate. Air outlets and
fan speed are automatically
adjusted according to the tempera-
ture setting and humidity.
2Adjust the temperature set-
ting.
3 To stop the operation, press-
the “OFF” switch.
If the fan speed setting or air
flow modes are operated, the
automatic mode indicator goes
off. However, automatic mode
for functions other than that
operated is maintained.
■Using automatic mode
Fan speed is adjusted automati-
cally according to the temperature
setting and the am bient conditions.
Therefore, the fan may stop for a
while until warm or cool air is ready
to flow immediately after the auto-
matic mode switch is pressed.
WA R N I N G
■To prevent the windshield
from fogging up
Do not use the windshield defog-
ger switch during cool air opera-
tion in extremely humid weather.
The difference between the tem-
perature of the outside air and
that of the windshield can cause
the outer surface of the wind-
shield to fog up, blocking your
vision.
■When the outside rear view
mirror defoggers are operat-
ing (if equipped)
Do not touch the rear view mirror
surfaces when the outside rear
view mirror def oggers are on.
NOTICE
■To prevent battery discharge
Do not leave the air conditioning
system on longer than necessary
when the engine is off.
Using automatic mode
Page 541 of 728
5416-4. Using the other interior features
6
Interior features
The coat hooks are provided
with the rear assist grips.
*: If equipped
The HomeLink® wireless control
system in your vehicle has 3
buttons which can be pro-
grammed to operate 3 different
devices. Refer to the program-
ming methods on the following
pages to determine the method
which is appropriate for the
device.
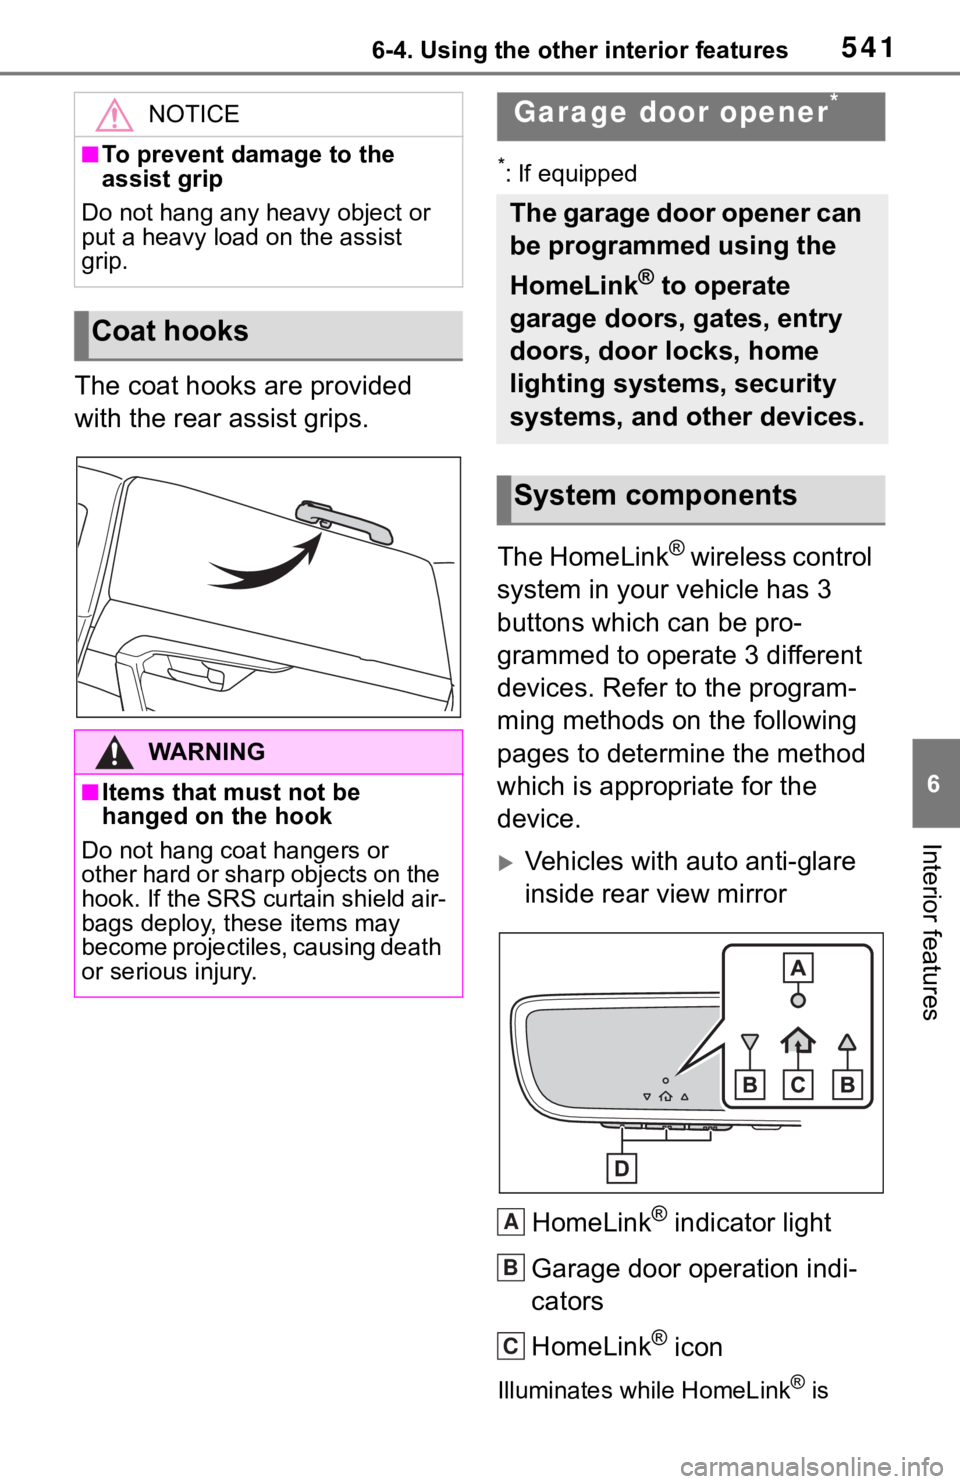
Vehicles with auto anti-glare
inside rear view mirror
HomeLink
® indicator light
Garage door operation indi-
cators
HomeLink
® icon
Illuminates while HomeLink® is
NOTICE
■To prevent damage to the
assist grip
Do not hang any heavy object or
put a heavy load on the assist
grip.
Coat hooks
WA R N I N G
■Items that must not be
hanged on the hook
Do not hang coat hangers or
other hard or sharp objects on the
hook. If the SRS curtain shield air-
bags deploy, these items may
become projectiles, causing death
or serious injury.
Garage door opener*
The garage door opener can
be programmed using the
HomeLink
® to operate
garage doors, gates, entry
doors, door locks, home
lighting systems, security
systems, and other devices.
System components
A
B
C
Page 542 of 728
5426-4. Using the other interior features
operating.
Buttons
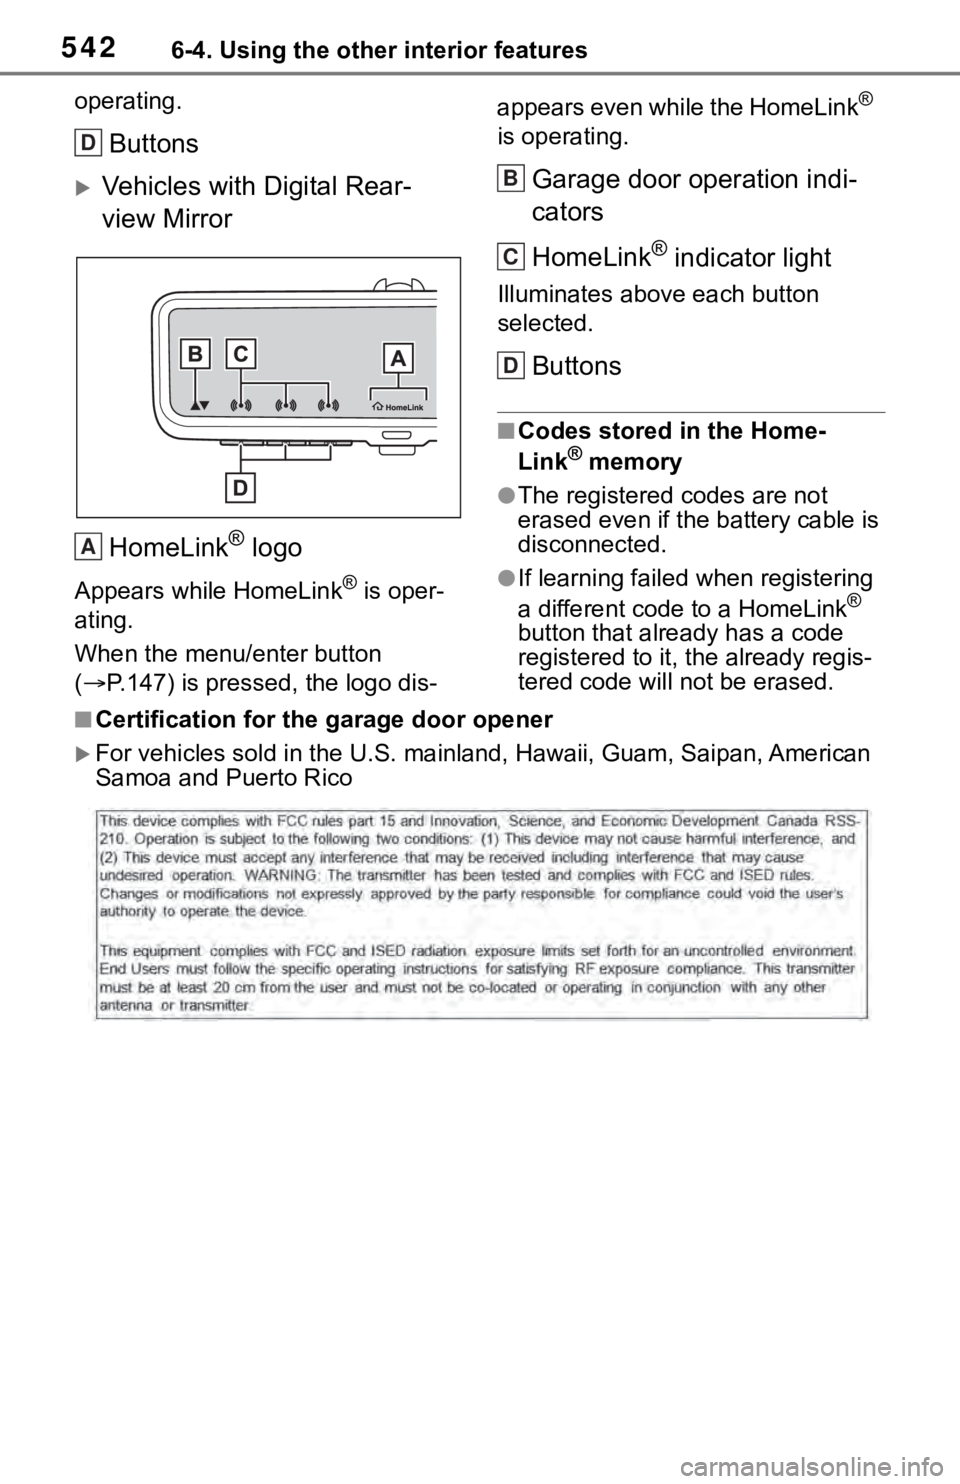
Vehicles with Digital Rear-
view MirrorHomeLink
® logo
Appears while HomeLink® is oper-
ating.
When the menu/enter button
( P.147) is pressed, the logo dis- appears even while the HomeLink
®
is operating.
Garage door operation indi-
cators
HomeLink
® indicator light
Illuminates above each button
selected.
Buttons
■Codes stored in the Home-
Link® memory
●The registered codes are not
erased even if the battery cable is
disconnected.
●If learning failed when registering
a different code to a HomeLink®
button that already has a code
registered to it, the already regis-
tered code will not be erased.
■Certification for the garage door opener
For vehicles sold in the U.S. mai nland, Hawaii, Guam, Saipan, American
Samoa and Puerto Rico
D
A
B
C
D
Page 544 of 728
5446-4. Using the other interior features
Garage door opener motors
manufactured after 1995 may
be equipped with rolling code
protection. If this is the case,
you may need a stepladder or
other sturdy, safe device to
reach the “Learn” or “Smart”
button on the garage door
opener motor.
■Programming HomeLink®
Steps 1 through 3 must be per-
formed within 60 seconds, oth-
erwise the HomeLink
® indicator
light will stop flashing and pro-
gramming will not be success-
fully completed.
1 Press and release the Home-
Link
® button you want to pro-
gram and check that the
HomeLink
® indicator light
flashes (orange).
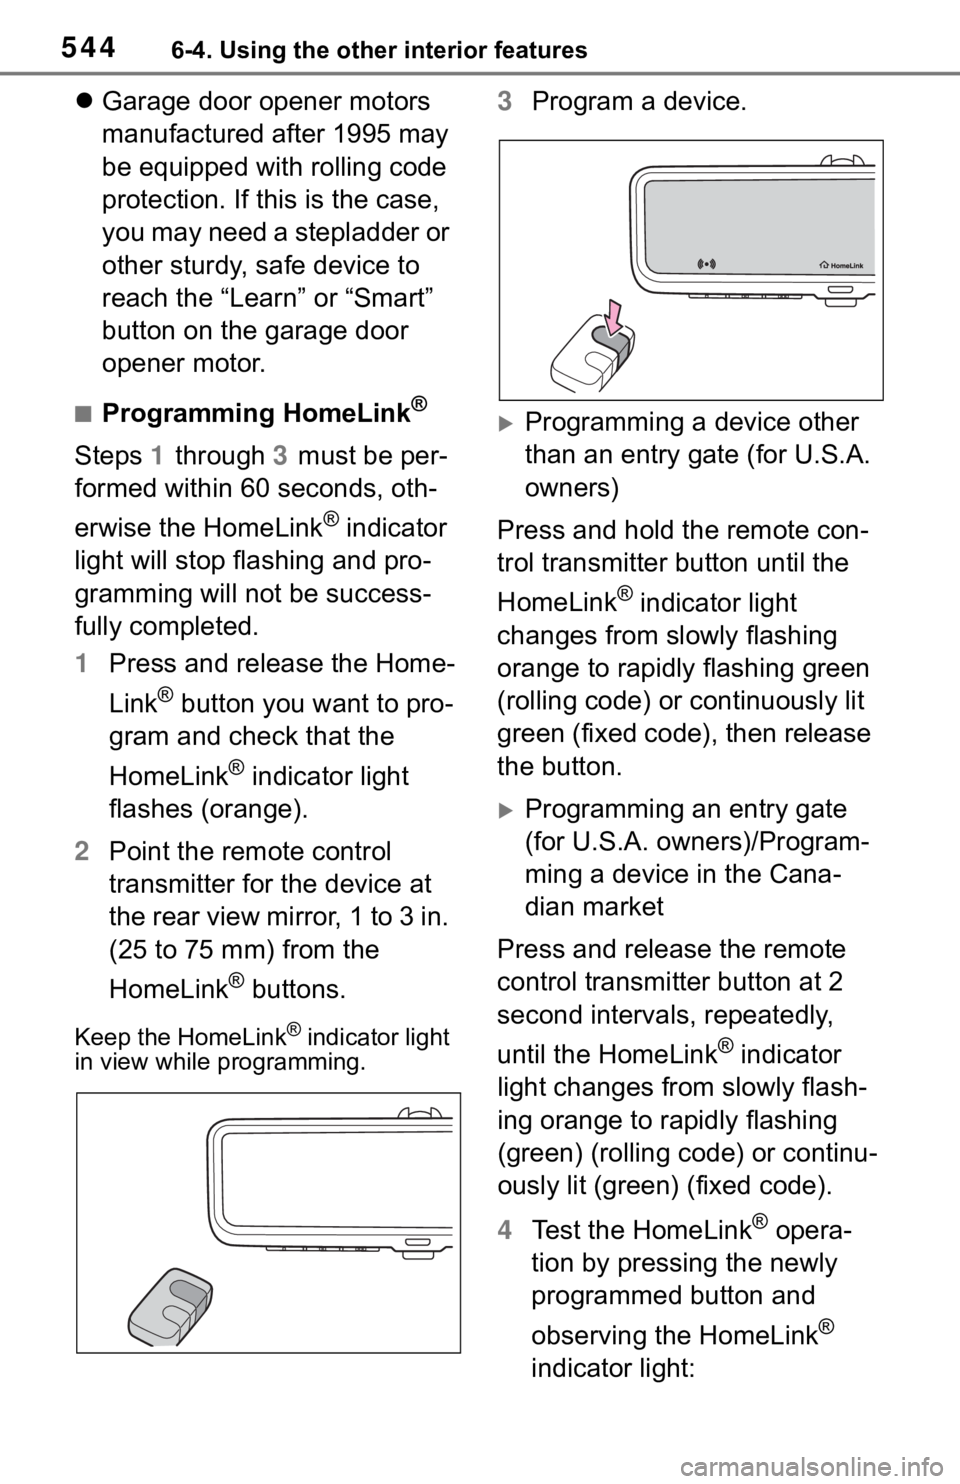
2 Point the remote control
transmitter for the device at
the rear view mirror, 1 to 3 in.
(25 to 75 mm) from the
HomeLink
® buttons.
Keep the HomeLink® indicator light
in view while programming.
3 Program a device.
Programming a device other
than an entry gate (for U.S.A.
owners)
Press and hold the remote con-
trol transmitter button until the
HomeLink
® indicator light
changes from slowly flashing
orange to rapidly flashing green
(rolling code) or continuously lit
green (fixed code), then release
the button.
Programming an entry gate
(for U.S.A. owners)/Program-
ming a device in the Cana-
dian market
Press and release the remote
control transmitter button at 2
second intervals, repeatedly,
until the HomeLink
® indicator
light changes from slowly flash-
ing orange to rapidly flashing
(green) (rolling code) or continu-
ously lit (green) (fixed code).
4 Test the HomeLink
® opera-
tion by pressing the newly
programmed button and
observing the HomeLink
®
indicator light:
Page 547 of 728
5476-4. Using the other interior features
6
Interior features
■Before programming
●Install a new battery in the trans-
mitter.
●The battery side of the transmitter
must be pointed away from the
HomeLink
® buttons.
Press the appropriate Home-
Link
® button. The HomeLink®
indicator light should turn on.
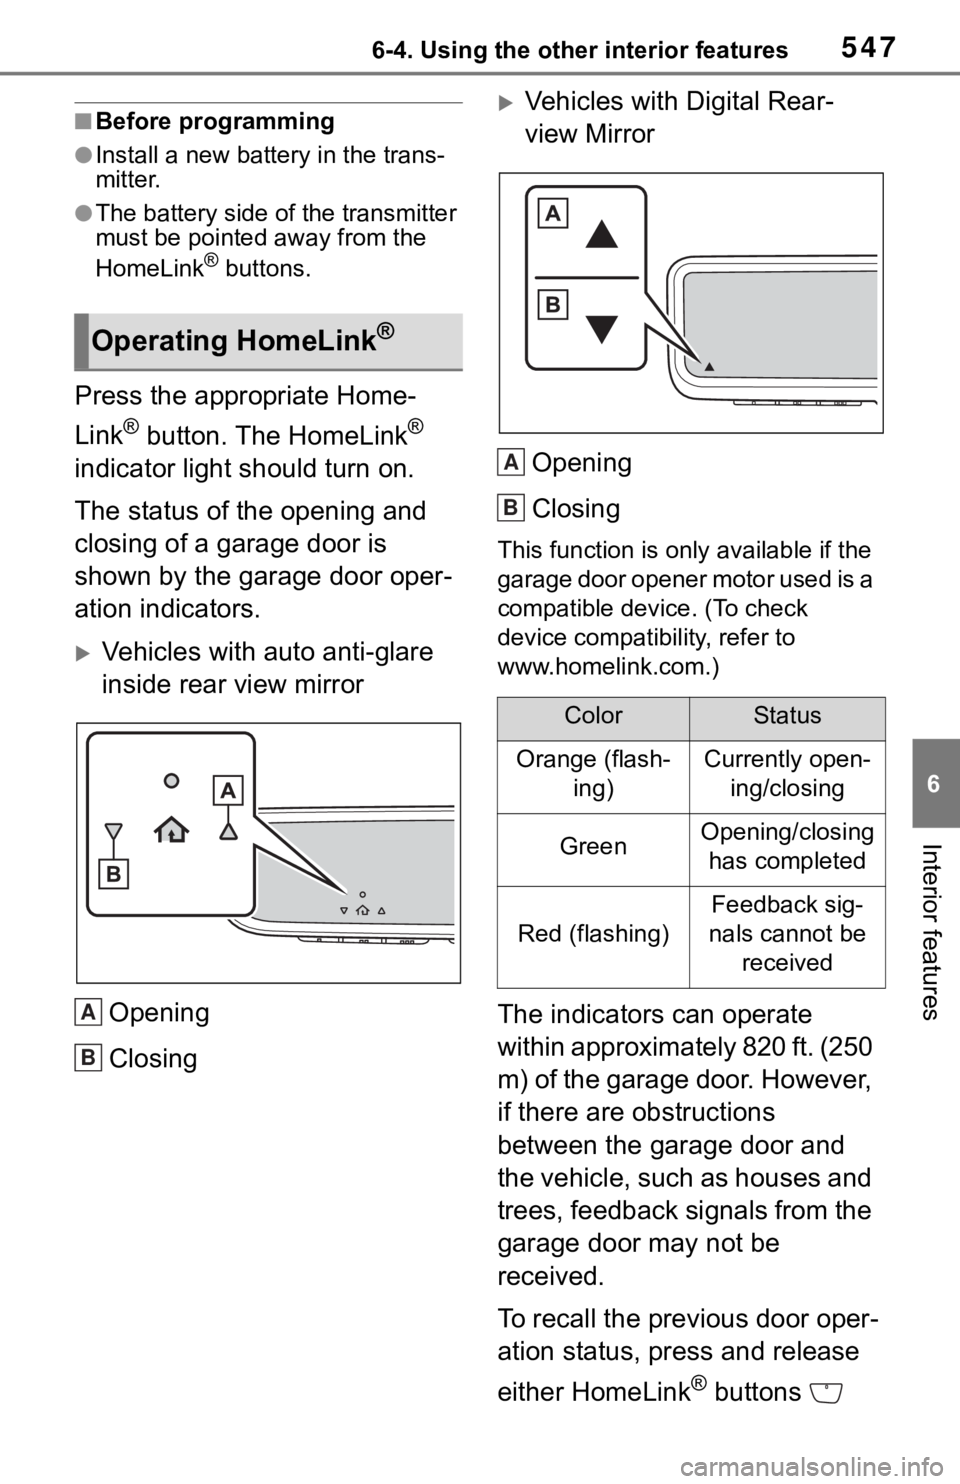
The status of the opening and
closing of a garage door is
shown by the garage door oper-
ation indicators.
Vehicles with auto anti-glare
inside rear view mirror
Opening
Closing
Vehicles with Digital Rear-
view Mirror
Opening
Closing
This function is only available if the
garage door opener motor used is a
compatible device. (To check
device compatibility, refer to
www.homelink.com.)
The indicators can operate
within approximately 820 ft. (250
m) of the garage door. However,
if there are obstructions
between the garage door and
the vehicle, such as houses and
trees, feedback signals from the
garage door may not be
received.
To recall the previous door oper-
ation status, press and release
either HomeLink
® buttons
Operating HomeLink®
A
B
ColorStatus
Orange (flash- ing)Currently open-ing/closing
GreenOpening/closing has completed
Red (flashing)
Feedback sig-
nals cannot be received
A
B
Page 548 of 728
5486-4. Using the other interior features
and or and (vehicles
with auto anti-glare inside rear
view mirror), and
or and (vehicles
with Digital Rear-view Mirror)
simultaneously. The last
recorded status will be dis-
played for 3 seconds.
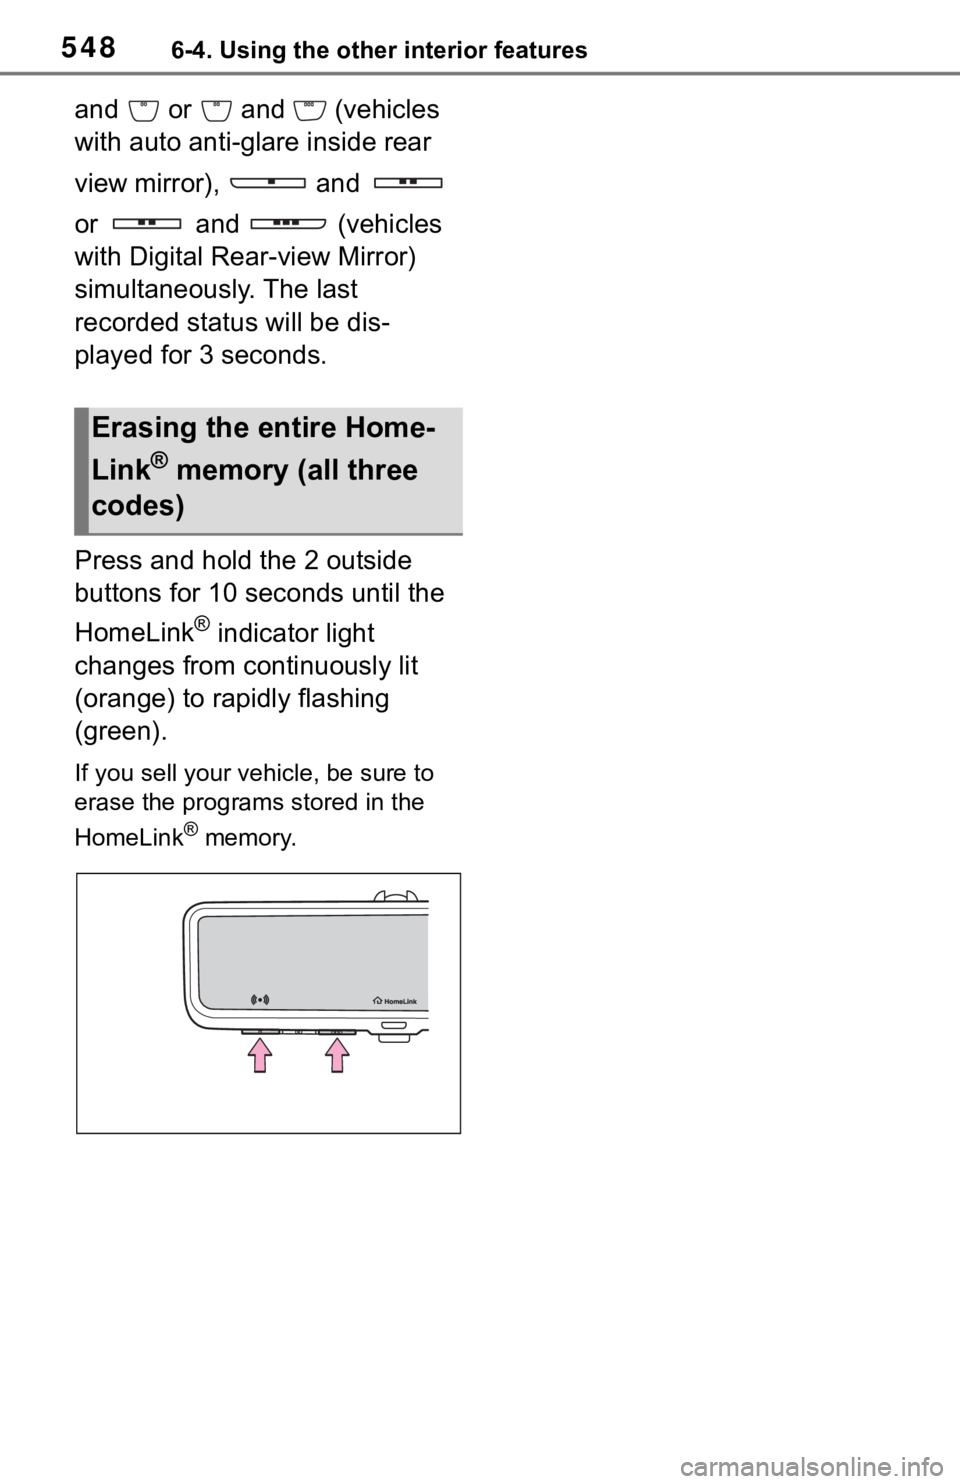
Press and hold the 2 outside
buttons for 10 seconds until the
HomeLink
® indicator light
changes from continuously lit
(orange) to rapidly flashing
(green).
If you sell your vehicle, be sure to
erase the programs stored in the
HomeLink
® memory.
Erasing the entire Home-
Link
® memory (all three
codes)
Page 606 of 728
6067-3. Do-it-yourself maintenance
again after installin g the bulb base.
6Reinstall the cover.
■Outer foot lights (if
equipped)
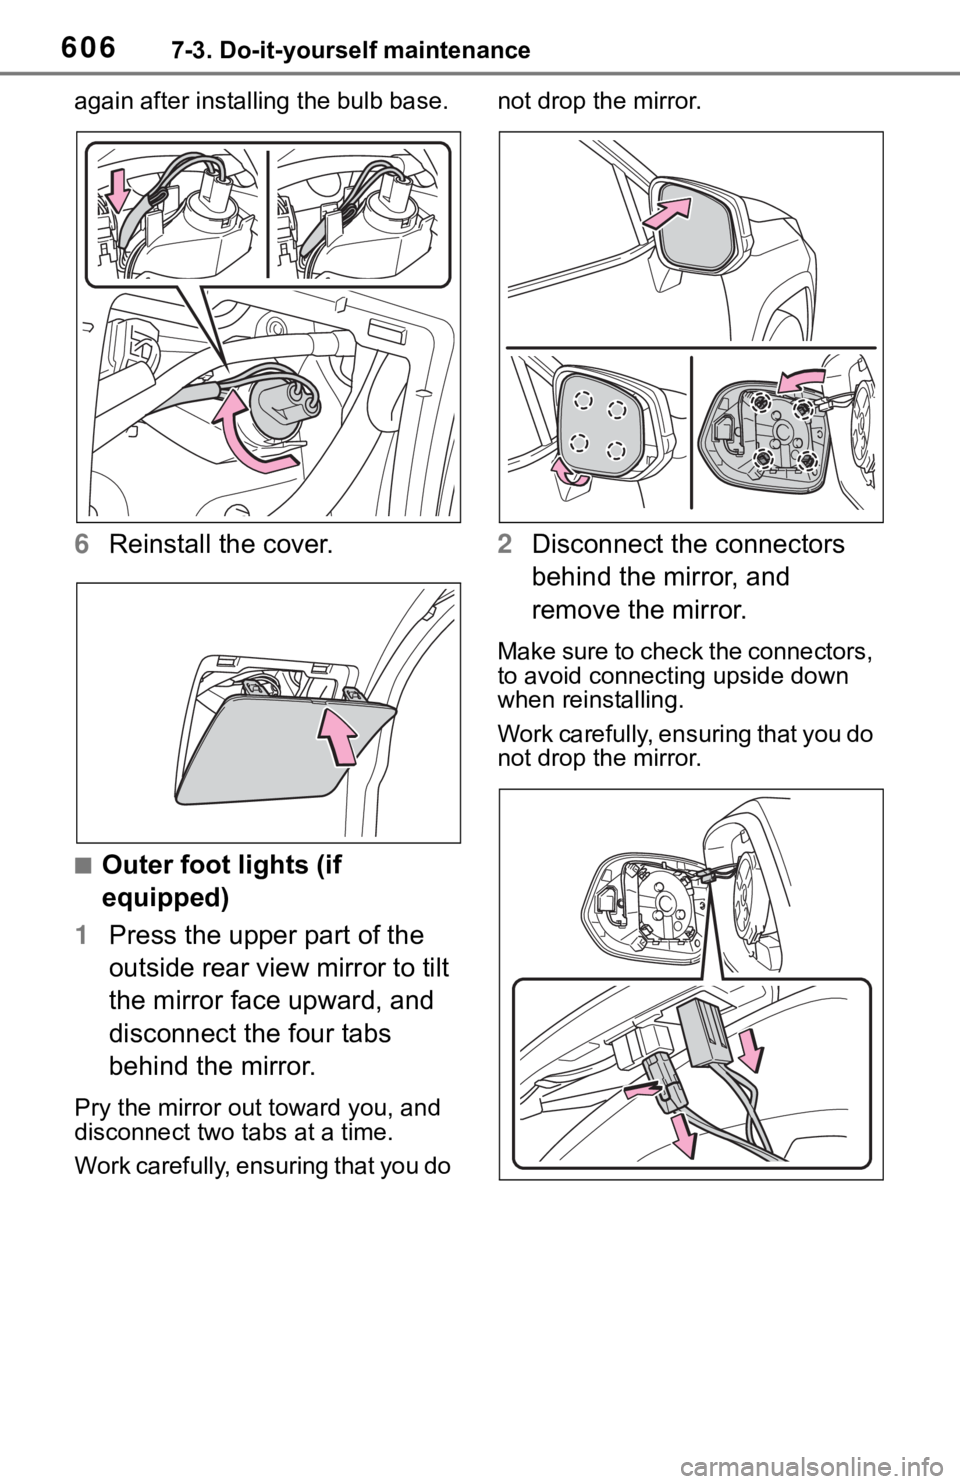
1 Press the upper part of the
outside rear view mirror to tilt
the mirror face upward, and
disconnect the four tabs
behind the mirror.
Pry the mirror out toward you, and
disconnect two tabs at a time.
Work carefully, ensuring that you do not drop the mirror.
2
Disconnect the connectors
behind the mirror, and
remove the mirror.
Make sure to check the connectors,
to avoid connecting upside down
when reinstalling.
Work carefully, ensuring that you do
not drop the mirror.
Page 690 of 728
6909-2. Customization
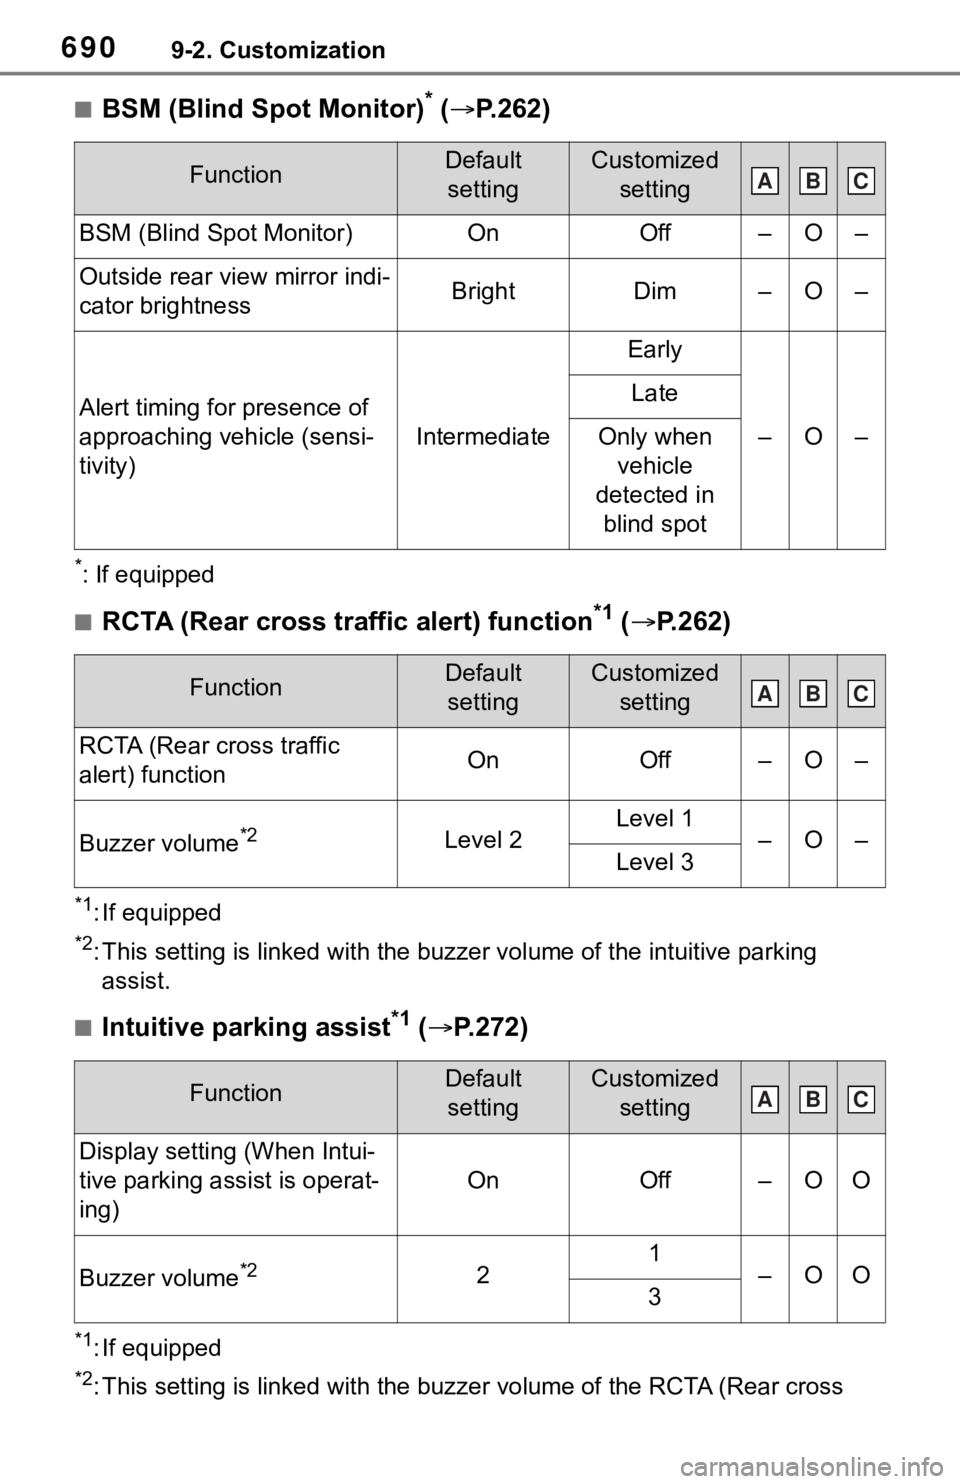
■BSM (Blind Spot Monitor)* ( P.262)
*: If equipped
■RCTA (Rear cross traffic alert) function*1 ( P.262)
*1: If equipped
*2: This setting is linked with the buzzer volume of the intuitive parking
assist.
■Intuitive parking assist*1 ( P.272)
*1: If equipped
*2: This setting is linked with the buzzer volume of the RCTA (Rear cross
FunctionDefault
settingCustomized setting
BSM (Blind Spot Monitor)OnOff–O–
Outside rear view mirror indi-
cator brightnessBrightDim–O–
Alert timing for presence of
approaching vehicle (sensi-
tivity)
Intermediate
Early
–O–
Late
Only when vehicle
detected in blind spot
FunctionDefault settingCustomized setting
RCTA (Rear cross traffic
alert) functionOnOff–O–
Buzzer volume*2Level 2Level 1–O–Level 3
FunctionDefault settingCustomized setting
Display setting (When Intui-
tive parking assist is operat-
ing)
OnOff–OO
Buzzer volume*221–OO3
ABC
ABC
ABC
Page 714 of 728

714Alphabetical Index
Deck board .............................. 526
DefoggerOutside rear view mirrors ... 505, 512
Rear window ................ 505, 512
Windshield.................... 505, 512
Differential .............................. 663
Digital Rear-view Mirror ......... 147
Dimensions ............................. 658
Dinghy towing ........................ 193
Display BSM (Blind Spot Monitor)..... 263
Drive information .................... 93
Driving information ................. 91
Dynamic radar cruise control with full-speed range .......... 252
Fuel consumption information 99
Intuitive parking assist .......... 272
LTA (Lane-Tracing Assist) .... 244
Multi-information display ........ 89
RCTA .................................... 263
Warning messages............... 633
Do-it-yourself maintenance . 557,
561
Door lock Back door ............................. 115
Side doors ............................ 109
Smart key system................. 129
Wireless remote control ....... 104
Doors Automatic door locking and unlocking system................ 114
Back door ............................. 115
Door glasses ........................ 158
Door lock .............................. 109
Open door warning buzzer ... 113
Outside rear view mirrors ..... 156
Rear door child-protectors.... 113
Side doors ............................ 109
Downhill assist control system ............................................... 360
Drive information ..................... 93 Driver’s seat belt reminder light
...............................................628
Driver’s seat position memory ...............................................139Driving position memory .......139
Memory recall function .........140
Drive-start control ..................172
Driving Break-in tips .........................172
Correct posture .......................27
Driving mode select switch ...353
Procedures ...........................171
Winter drive tips....................369
Driving information display .....91
Driving mode select switch ...353
Driving position memory .......139 Memory recall function .........140
Driving support system informa- tion display..............................93
Dynamic radar cruise control with full-speed rangeFunction................................252
Warning message.................633
Dynamic Torque Control AWD system ...................................363
Dynamic Torque Vectoring AWD system ...................................363
E
Eco drive mode .......................353
Eco Driving Indicator ...............92
Eco Driving Indicator Light......92
EDR (Event data recorder) .......10
Elapsed time .............................93
Electric Power Steering (EPS) Function................................363
Warning light.........................624
Electronic key Battery-saving function .........130
If the electronic key does not operate properly .................647
Replacing the battery ...........594