coolant TOYOTA RAV4 2019 Owners Manual (in English)
[x] Cancel search | Manufacturer: TOYOTA, Model Year: 2019, Model line: RAV4, Model: TOYOTA RAV4 2019Pages: 728, PDF Size: 21.09 MB
Page 78 of 728
782-1. Instrument cluster
*1: These lights turn on when the
engine switch is turned to ON to
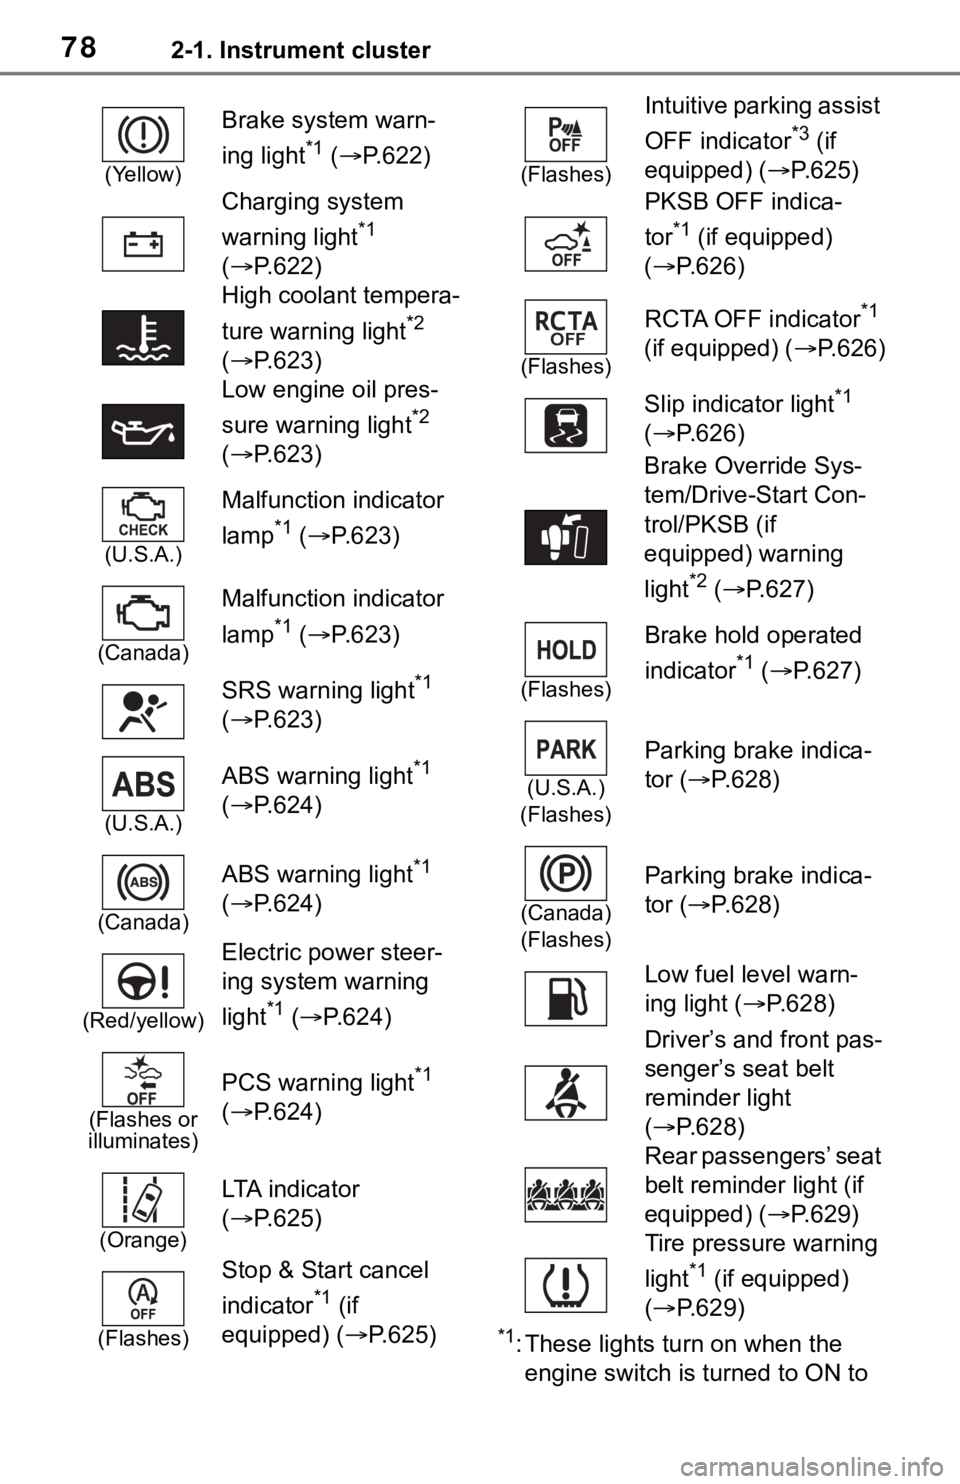
(Yellow)
Brake system warn-
ing light
*1 ( P.622)
Charging system
warning light
*1
( P.622)
High coolant tempera-
ture warning light
*2
( P.623)
Low engine oil pres-
sure warning light
*2
( P.623)
(U.S.A.)
Malfunction indicator
lamp
*1 ( P.623)
(Canada)
Malfunction indicator
lamp
*1 ( P.623)
SRS warning light
*1
( P.623)
(U.S.A.)
ABS warning light*1
( P.624)
(Canada)
ABS warning light*1
( P.624)
(Red/yellow)
Electric power steer-
ing system warning
light
*1 ( P.624)
(Flashes or
illuminates)
PCS warning light*1
( P.624)
(Orange)
LTA i n d i c a t o r
( P.625)
(Flashes)
Stop & Start cancel
indicator
*1 (if
equipped) (P.625)
(Flashes)
Intuitive parking assist
OFF indicator
*3 (if
equipped) ( P.625)
PKSB OFF indica-
tor
*1 (if equipped)
( P.626)
(Flashes)
RCTA OFF indicator*1
(if equipped) ( P.626)
Slip indicator light
*1
( P.626)
Brake Override Sys-
tem/Drive-Start Con-
trol/PKSB (if
equipped) warning
light
*2 ( P.627)
(Flashes)
Brake hold operated
indicator
*1 ( P.627)
(U.S.A.)
(Flashes)
Parking brake indica-
tor ( P.628)
(Canada)
(Flashes)
Parking brake indica-
tor ( P.628)
Low fuel level warn-
ing light ( P.628)
Driver’s and front pas-
senger’s seat belt
reminder light
( P.628)
Rear passengers’ seat
belt reminder light (if
equipped) ( P.629)
Tire pressure warning
light
*1 (if equipped)
( P.629)
Page 83 of 728
832-1. Instrument cluster
2
Vehicle status information and indicators
reset. Trip meters “A” and “B” c an be used to record and displa y different
distances independently.
Shift position and shift range indicator
Displays the selected shift posit ion or selected shift range (P.200)
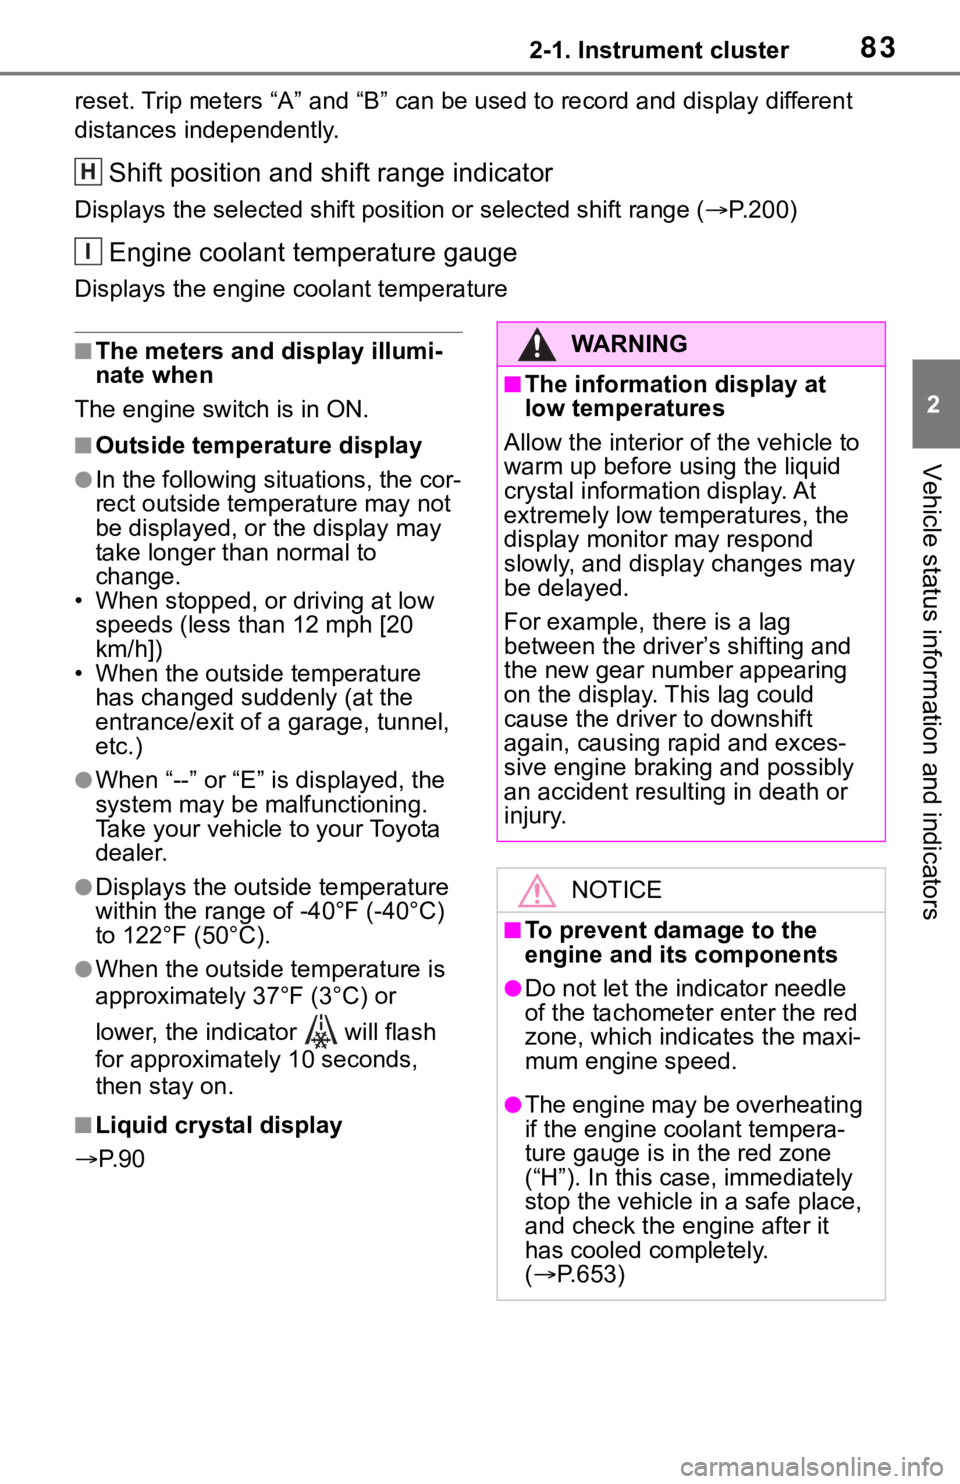
Engine coolant temperature gauge
Displays the engine c oolant temperature
■The meters and display illumi-
nate when
The engine switch is in ON.
■Outside temperature display
●In the following si tuations, the cor-
rect outside tempe rature may not
be displayed, or the display may
take longer than normal to
change.
• When stopped, or driving at low speeds (less than 12 mph [20
km/h])
• When the outside temperature has changed su ddenly (at the
entrance/exit of a garage, tunnel,
etc.)
●When “--” or “E” is displayed, the
system may be malfunctioning.
Take your vehicle to your Toyota
dealer.
●Displays the outside temperature
within the range of -40°F (-40°C)
to 122°F (50°C).
●When the outside temperature is
approximately 37°F (3°C) or
lower, the indicator will flash
for approximately 10 seconds,
then stay on.
■Liquid crystal display
P. 9 0
H
I
WA R N I N G
■The information display at
low temperatures
Allow the interior of the vehicle to
warm up before using the liquid
crystal information display. At
extremely low temperatures, the
display monitor may respond
slowly, and display changes may
be delayed.
For example, there is a lag
between the driver’s shifting and
the new gear number appearing
on the display. This lag could
cause the driver to downshift
again, causing rapid and exces-
sive engine braking and possibly
an accident resulting in death or
injury.
NOTICE
■To prevent damage to the
engine and its components
●Do not let the indicator needle
of the tachometer enter the red
zone, which indicates the maxi-
mum engine speed.
●The engine may be overheating
if the engine coolant tempera-
ture gauge is in the red zone
(“H”). In this case, immediately
stop the vehicle in a safe place,
and check the engine after it
has cooled completely.
( P.653)
Page 85 of 728
852-1. Instrument cluster
2
Vehicle status information and indicators
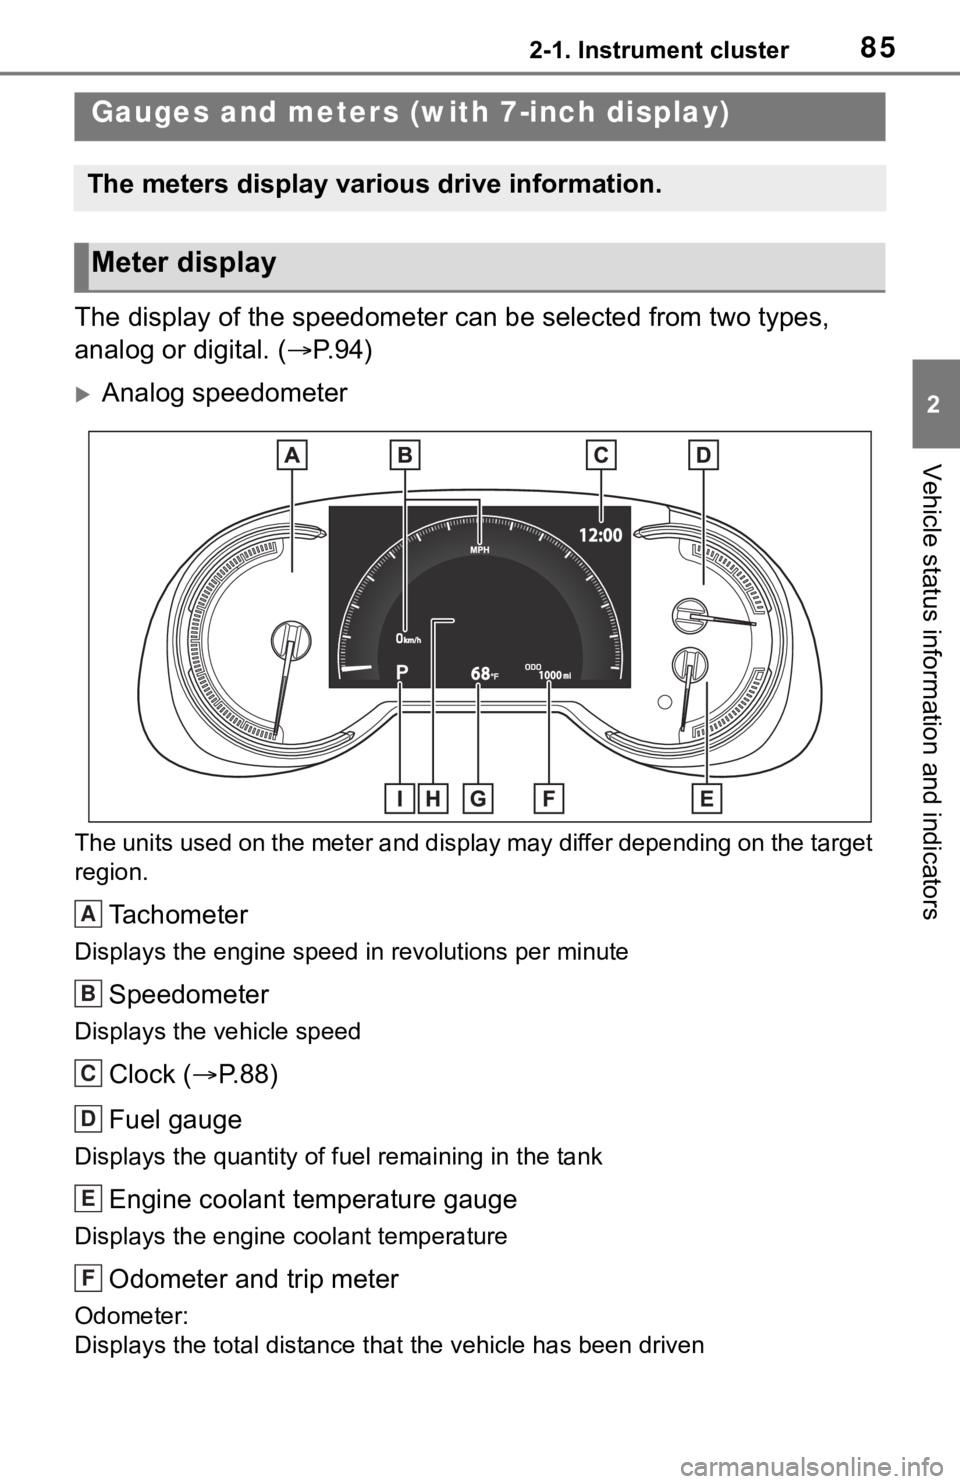
The display of the speedometer can be selected from two types,
analog or digital. ( P.94)
Analog speedometer
The units used on the meter and display may differ depending on the target
region.
Tachometer
Displays the engine speed in revolutions per minute
Speedometer
Displays the vehicle speed
Clock ( P. 8 8 )
Fuel gauge
Displays the quantity of fu el remaining in the tank
Engine coolant temperature gauge
Displays the engine coolant temperature
Odometer and trip meter
Odometer:
Displays the total distance th at the vehicle has been driven
Gauges and meters (with 7-inch display)
The meters display various drive information.
Meter display
A
B
C
D
E
F
Page 86 of 728
862-1. Instrument cluster
Trip meter:
Displays the distance the vehicle has been driven since the meter was last
reset. Trip meters “A” and “B” c an be used to record and displa y different
distances independently.
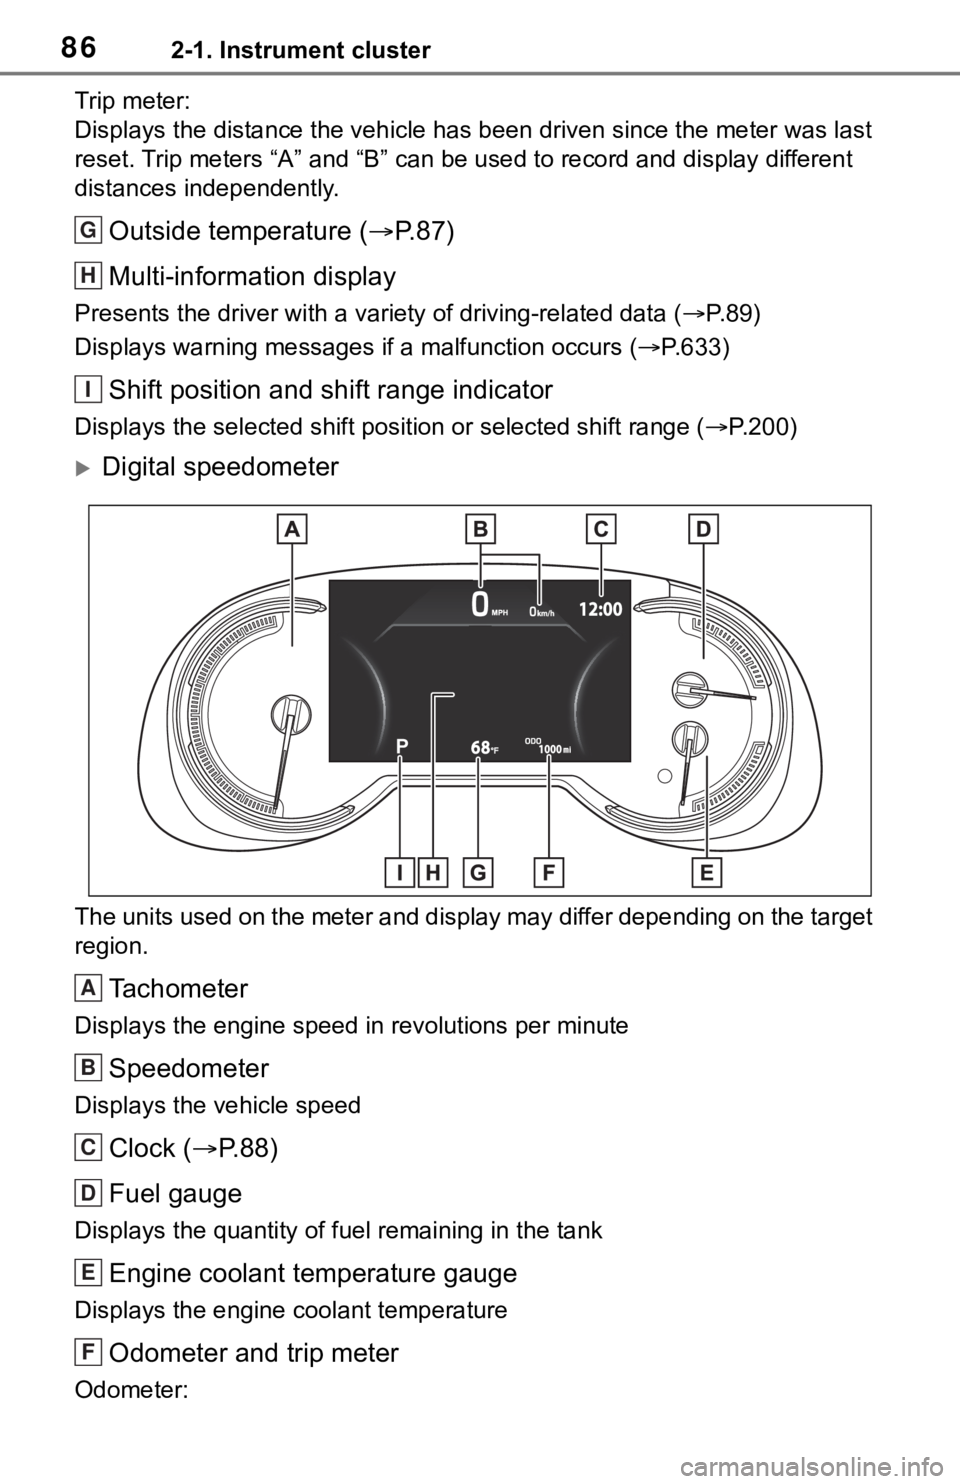
Outside temperature ( P. 8 7 )
Multi-information display
Presents the driver with a variety of driving-related data ( P. 8 9 )
Displays warning messages if a malfunction occurs (P.633)
Shift position and shift range indicator
Displays the selected shift posit ion or selected shift range (P.200)
Digital speedometer
The units used on the meter and display may differ depending on the target
region.
Tachometer
Displays the engine speed in revolutions per minute
Speedometer
Displays the vehicle speed
Clock ( P. 8 8 )
Fuel gauge
Displays the quantity of fu el remaining in the tank
Engine coolant temperature gauge
Displays the engine coolant temperature
Odometer and trip meter
Odometer:
G
H
I
A
B
C
D
E
F
Page 88 of 728
882-1. Instrument cluster
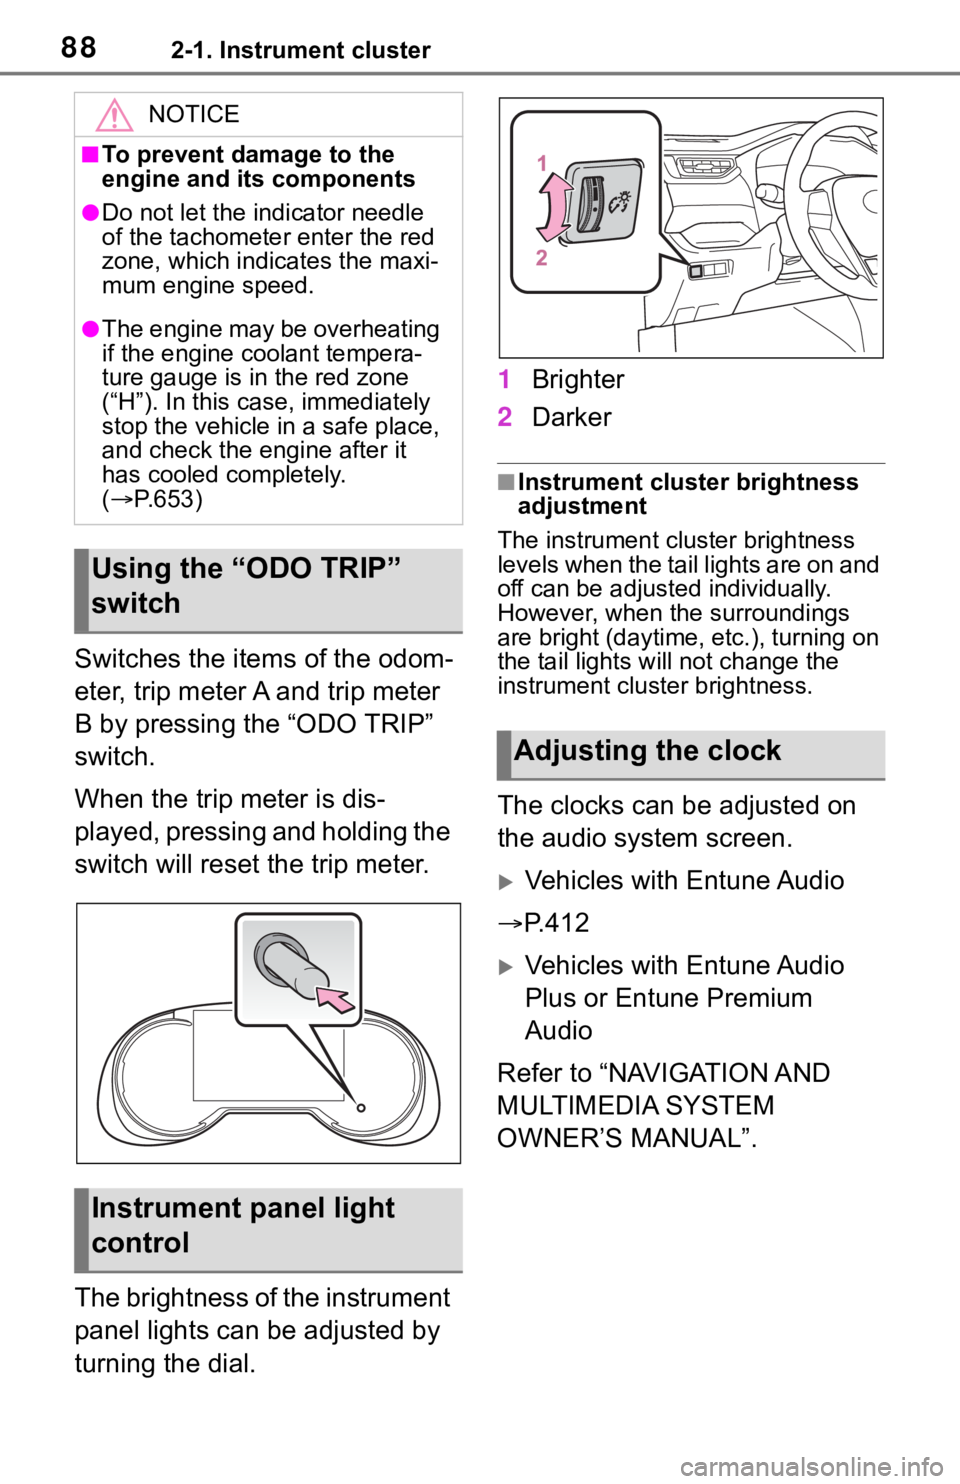
Switches the items of the odom-
eter, trip meter A and trip meter
B by pressing the “ODO TRIP”
switch.
When the trip meter is dis-
played, pressing and holding the
switch will reset the trip meter.
The brightness of the instrument
panel lights can be adjusted by
turning the dial.1
Brighter
2 Darker
■Instrument cluster brightness
adjustment
The instrument cluster brightness
levels when the tail lights are on and
off can be adjusted individually.
However, when the surroundings
are bright (daytime, etc.), turning on
the tail lights will not change the
instrument cluster brightness.
The clocks can be adjusted on
the audio system screen.
Vehicles with Entune Audio
P.412
Vehicles with Entune Audio
Plus or Entune Premium
Audio
Refer to “NAVIGATION AND
MULTIMEDIA SYSTEM
OWNER’S MANUAL”.
NOTICE
■To prevent damage to the
engine and its components
●Do not let the i ndicator needle
of the tachomete r enter the red
zone, which indicates the maxi-
mum engine speed.
●The engine may be overheating
if the engine coolant tempera-
ture gauge is in the red zone
(“H”). In this case, immediately
stop the vehicle in a safe place,
and check the engine after it
has cooled completely.
( P.653)
Using the “ODO TRIP”
switch
Instrument panel light
control
Adjusting the clock
Page 191 of 728

1914-1. Before driving
4
Driving
left. Move your hand to the
right to move the trailer to
right. (This is generally oppo-
site to reversing without a
trailer attached.) Avoid sharp
or prolonged turning. Have
someone guide you when
reversing to reduce the risk of
an accident.
As stopping distance is
increased when towing a
trailer, vehicle-to vehicle dis-
tance should be increased.
For each 10 mph (16 km/h) of
speed, allow at least one
vehicle and trailer length.
Avoid sudden braking as you
may skid, resulting in the
trailer jackknifing and a loss of
vehicle control. This is espe-
cially true on wet or slippery
surfaces.
Avoid jerky starts or sudden
acceleration.
Avoid jerky steering and
sharp turns, and slow down
before making turn.
Note that when making a turn,
the trailer wheels will be
closer than the vehicle wheels
to the inside of the turn. Com-
pensate by making a wider
than normal turning radius.
Slow down before making a
turn, in cross winds, on wet or
slippery surfaces, etc.
Increasing vehicle speed can
destabilize the trailer.
Take care when passing other
vehicles. Passing requires
considerable distance. After
passing a vehicle, do not for-
get the length of your trailer,
and be sure you have plenty
of room before changing
lanes.
To maintain engine braking
efficiency and charging sys-
tem performance when using
engine braking, do not put the
transmission in D. If in the S
mode, the transmission shift
range position must be in 6 or
lower.
Instability happens more fre-
quently when descending
steep or long downhill grades.
Before descending, slow
down and downshift. Do not
make sudden downshifts
while descending steep or
long downhill grades.
Avoid holding the brake pedal
down too long or applying the
brakes too frequently. This
could cause the brakes to
overheat and result in
reduced braking efficiency.
Due to the added load of the
trailer, your vehicle’s engine
may overheat on hot days (at
temperatures over 85°F
[30°C]) when driving up a long
or steep grade. If the engine
coolant temperature gauge
indicates overheating, imme-
diately turn off the air condi-
Page 348 of 728

3484-5. Using the driving support systems
ing wheel may temporarily feel
heavy.
■Operating conditions
●The Stop & Start system is opera-
tional when all of the following
conditions are met:
• The vehicle has been driven a cer-
tain amount of time.
• The brake pedal is being depressed firmly. (except when
the vehicle is stopped by the
dynamic radar cruise control with
full-speed range when in vehicle-
to-vehicle distanc e control mode)
• The D shift position is selected.
• The driver’s seat belt is fastened.
• The driver’s door is closed.
• The selected driv ing mode is nor-
mal or Eco drive mode.
• The selected driv ing mode is not
snow mode (if equipped).
• Mud & Sand or Rock & Dirt mode is not selected for Multi-terrain
Select (AWD models).
• The windshield defogger is off. (vehicles without a manual air
conditioning system)
• The accelerator pedal is not being depressed.
• The engine is adequately warmed up.
• The outside temperature is -5°C
(23°F) or higher.
• The hood is closed. ( P.349)
●In the following situations the
engine may not be stopped by the
Stop & Start system. This is not a
malfunction of the Stop & Start
system.
• When the air conditioning system
is being used.
• When the battery is undergoing a periodic recharge.
• When the battery is not sufficiently charged, such as if the vehicle
has been parked for a long time
and the battery charge has
decreased, the e lectric load is
large, the battery fluid tempera-
ture is excessively low or the bat-
tery has deteriorated.
• When the brake booster vacuum
is low. • When the elapsed time since the
engine was restarted is short.
• When the vehicle is stopped fre- quently, such as when in a traffic
jam.
• When the engine coolant tem- perature or transm ission fluid tem-
perature is extremely low or high.
• When the vehicle is stopped on a
steep incline.
• When the steering wheel is being operated.
• When the vehicle is being driven
in a high altitude area.
• When the battery fluid tempera- ture is extremely low or high.
• For a while after the battery termi- nals have been disconnected and
reconnected.
●When the engine is stopped by
the Stop & Star t system, the
engine will be restarted automati-
cally if any of the following condi-
tions are met:
(To enable the engine to be
stopped by the Stop & Start sys-
tem again, drive the vehicle.)
• The air conditioning system is
turned on. (vehicles without a
manual air conditioning system)
• The windshield defogger is turned
on. (vehicles without a manual air
conditioning system)
• The shift lever is shifted from D.
• The driver’s seat belt is unfas-
tened.
• The driver’s door is opened.
• The driving mode is changed from
normal or Eco drive mode to
another mode.
• The driving mode is changed to snow mode (if equipped).
• Mud & Sand or Rock & Dirt mode
is selected for Mult i-terrain Select
(AWD models).
• The Stop & Start cancel switch is
pressed.
• The steering wheel is operated.
• The accelerator pedal is depressed.
• The vehicle starts to roll on an incline.
●When the engine is stopped by
Page 368 of 728
3684-6. Driving tips
4-6.Driving tips
Use fluids that are appropriate
to the prevailing outside tem-
peratures.
• Engine oil
• Engine coolant
• Washer fluid
Have a service technician
inspect the condition of the
battery.
Have the vehicle fitted with
four snow tires or purchase a
set of tire chains for the front
tires.
*
Ensure that all tires are the same
size and brand, and that chains
match the size of the tires.
*: Tire chains cannot be mounted on vehicles with 235/55R19 101V
tires.
Winter driving tips
Carry out the necessary
preparations and inspec-
tions before driving the
vehicle in winter. Always
drive the vehicle in a man-
ner appropriate to the pre-
vailing weather conditions.
Pre-winter preparations
WA R N I N G
■Driving with snow tires
Observe the following precautions
to reduce the risk of accidents.
Failure to do so may result in a
loss of vehicle control and cause
death or serious injury.
●Use tires of the specified size.
●Maintain the recommended
level of air pressure.
●Do not drive in excess of 75
mph (120 km/h), regardless of
the type of snow tires being
used.
●Use snow tires on all, not just
some wheels.
■Driving with tire chains
(except 235/55R19 101V tires)
Observe the following precautions
to reduce the risk of accidents.
Failure to do so may result in the
vehicle being unable to be driven
safely, and may cause death or
serious injury.
●Do not drive in excess of the
speed limit specifi ed for the tire
chains being used, or 30 mph
(50 km/h), whichever is lower.
●Avoid driving on bumpy road
surfaces or over potholes.
●Avoid sudden acceleration,
abrupt steering, sudden brak-
ing and shifting operations that
cause sudden engine braking.
●Slow down sufficiently before
entering a curve to ensure that
vehicle control is maintained.
●Do not use LTA (Lane Tracing
Assist) system.
Page 557 of 728
5577-2. Maintenance
7
Maintenance and care
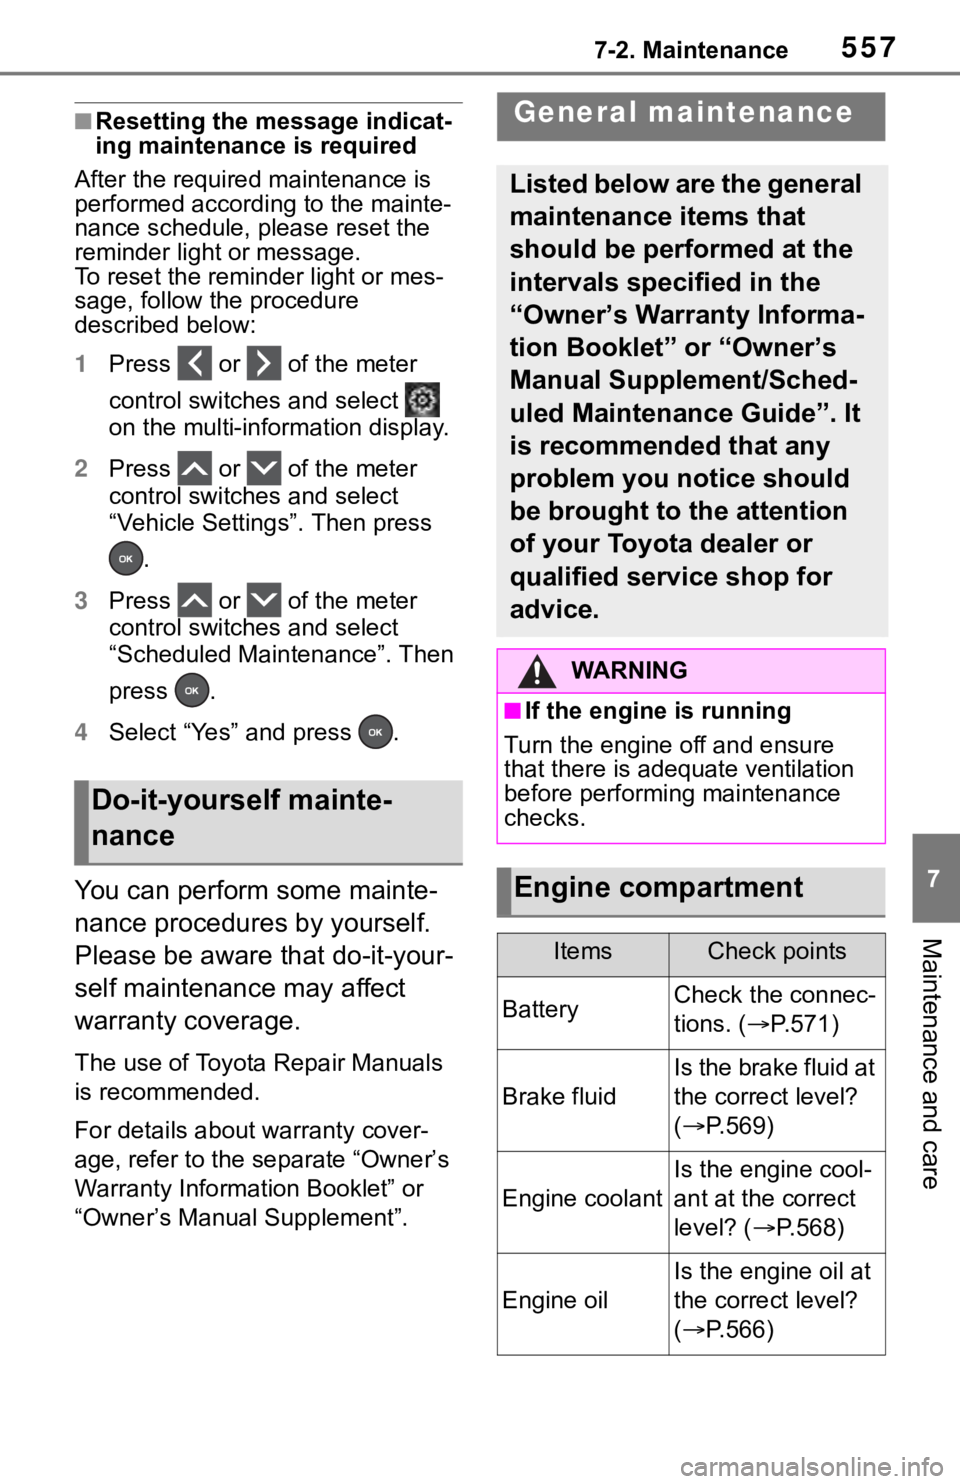
■Resetting the message indicat-
ing maintenance is required
After the required maintenance is
performed according to the mainte-
nance schedule, please reset the
reminder light or message.
To reset the remin der light or mes-
sage, follow the procedure
described below:
1 Press or of the meter
control switches and select
on the multi-information display.
2 Press or of the meter
control switches and select
“Vehicle Settings”. Then press
.
3 Press or of the meter
control switches and select
“Scheduled Maintenance”. Then
press .
4 Select “Yes” and press .
You can perform some mainte-
nance procedures by yourself.
Please be aware that do-it-your-
self maintenance may affect
warranty coverage.
The use of Toyota Repair Manuals
is recommended.
For details about warranty cover-
age, refer to the separate “Owner’s
Warranty Information Booklet” or
“Owner’s Manual Supplement”.
Do-it-yourself mainte-
nance
General maintenance
Listed below are the general
maintenance items that
should be performed at the
intervals specified in the
“Owner’s Warranty Informa-
tion Booklet” or “Owner’s
Manual Supplement/Sched-
uled Maintenance Guide”. It
is recommended that any
problem you notice should
be brought to the attention
of your Toyota dealer or
qualified service shop for
advice.
WA R N I N G
■If the engine is running
Turn the engine off and ensure
that there is adequate ventilation
before performing maintenance
checks.
Engine compartment
ItemsCheck points
BatteryCheck the connec-
tions. ( P.571)
Brake fluid
Is the brake fluid at
the correct level?
( P.569)
Engine coolant
Is the engine cool-
ant at the correct
level? ( P.568)
Engine oil
Is the engine oil at
the correct level?
( P.566)
Page 561 of 728
5617-3. Do-it-yourself maintenance
7
Maintenance and care
7-3.Do-it-yourself maintenance
Do-it-yourself ser vice
precautions
If you perform maintenance
by yourself, be sure to fol-
low the correct procedure as
given in these sections.
Maintenance
ItemsParts and tools
Battery con-
dition
( P.571)•Grease
• Conventional
wrench (for termi-
nal clamp bolts)
Brake fluid
level
( P.569)
• FMVSS No.116
DOT 3 or SAE
J1703 brake fluid
• FMVSS No.116 DOT 4 or SAE
J1704
• Rag or paper towel
• Funnel (used only for adding brake
fluid)
Engine cool-
ant level
( P.568)
• “Toyota Super
Long Life Cool-
ant” or a similar
high quality eth-
ylene glycol-based
non-silicate, non-
amine, non-nitrite
and non-borate
coolant with long-
life hybrid organic
acid technology
For the U.S.A.:
“Toyota Super
Long Life Cool-
ant” is pre-mixed
with 50% coolant
and 50% deion-
ized water.
For Canada:
“Toyota Super
Long Life Cool-
ant” is pre-mixed
with 55% coolant
and 45% deion-
ized water.
• Funnel (used only for adding coolant)
Engine oil
level
( P.566)
• “Toyota Genuine
Motor Oil” or
equivalent
• Rag or paper towel
• Funnel (used only for adding engine
oil)
Fuses
( P.597)• Fuse with same
amperage rating
as original
ItemsParts and tools