tow TOYOTA RAV4 2019 Owners Manual (in English)
[x] Cancel search | Manufacturer: TOYOTA, Model Year: 2019, Model line: RAV4, Model: TOYOTA RAV4 2019Pages: 728, PDF Size: 21.09 MB
Page 2 of 728
2TABLE OF CONTENTS
For your information...................8
Reading this manual ................ 12
How to search .......................... 13
Pictorial index .......................... 14
1-1. For safe use Before driving ................... 26
For safe driving ................ 27
Seat belts ......................... 29
SRS airbags ..................... 33
Front passenger occupant classification system ...... 43
Exhaust gas precautions.. 48
1-2. Child safety Riding with children .......... 49
Child restraint systems..... 50
1-3. Emergency assistance Safety Connect ................ 65
1-4. Theft deterrent system Engine immobilizer system....................................... 70
Alarm................................ 73
2-1. Instrument cluster Warning lights and indicators....................................... 76
Gauges and meters (with 4.2- inch display) ................... 82
Gauges and meters (with 7- inch display) ................... 85
Multi-information display .. 89
Fuel consumption information ....................................... 993-1. Key information
Keys .............................. 102
3-2. Opening, closing and lock- ing the doors
Side doors ..................... 109
Back door ...................... 115
Smart key system .......... 129
3-3. Adjusting the seats Front seats .................... 135
Rear seats ..................... 136
Driving position memory 139
Head restraints .............. 141
3-4. Adjusting the steering wheel and mirrors
Steering wheel............... 144
Inside rear view mirror ... 145
Digital Rear-view Mirror . 147
Outside rear view mirrors .................................... 156
3-5. Opening, closing the win- dows and moon roof
Power windows ............. 158
Moon roof ...................... 161
Panoramic moon roof .... 164
4-1. Before driving Driving the vehicle ......... 171
Cargo and luggage ........ 178
Vehicle load limits .......... 181
Trailer towing ................. 182
Dinghy towing ................ 193
1For safety and security
2Vehicle status information
and indicators
3Before driving
4Driving
Page 6 of 728
6TABLE OF CONTENTS
If your vehicle has to be stopped in an emergency
.................................... 612
If the vehicle is trapped in ris- ing water...................... 613
8-2. Steps to take in an emer- gency
If your vehicle needs to be towed........................... 615
If you think something is wrong .......................... 620
Fuel pump shut off system .................................... 621
If a warning light turns on or a warning buzzer sounds 622
If a warning message is dis- played.......................... 633
If you have a flat tire...... 636
If the engine will not start 645
If you lose your keys ..... 646
If the electronic key does not operate properly (vehicles
with smart key system) 647
If the vehicle battery is dis- charged ....................... 649
If your vehicle overheats 653
If the vehicle becomes stuck .................................... 655
9-1. Specifications Maintenance data (fuel, oil level, etc.) .................... 658
Fuel information ............ 669
Tire information ............. 671
9-2. Customization Customizable features .. 6819-3. Initialization
Items to initialize ............ 693
10-1.For owners Reporting safet y defects for
U.S. owners ................. 696
Seat belt instructions for Canadian owners (in
French) ........................ 697
SRS airbag instructions for Canadian owners (in
French) ........................ 698
What to do if... (Troubleshoot- ing) ............................. 708
Alphabetical Index ........ 711
9Vehicle specifications
10For owners
Index
Page 17 of 728
17Pictorial index
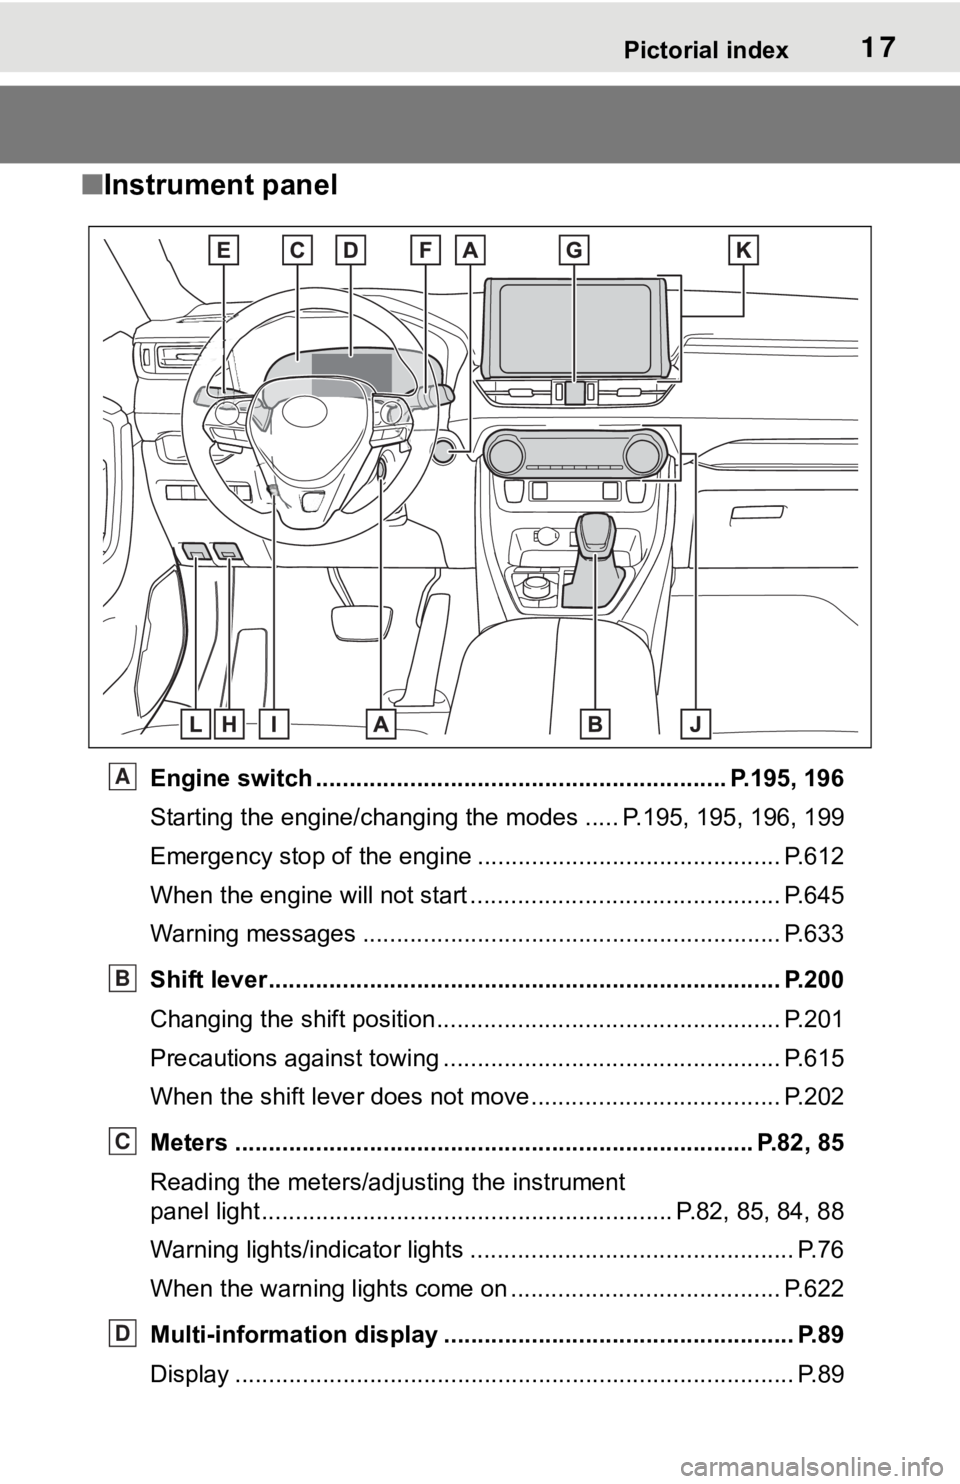
■Instrument panel
Engine switch ............................................................. P.195, 196
Starting the engine/changing the modes ..... P.195, 195, 196, 199
Emergency stop of the engin e ............................................. P.612
When the engine will not start ................................. ............. P.645
Warning messages ............................................... ............... P.633
Shift lever.................................................... ........................ P.200
Changing the shift position.................................... ............... P.201
Precautions against towing ..................................... ............. P.615
When the shift lever does not move............................. ........ P.202
Meters ............................................................................. P.82, 85
Reading the meters/adjusting the instrument
panel light............................................................. P.82, 85, 84, 88
Warning lights/indicator lights ................................ ................ P.76
When the warning lights come on ................................ ........ P.622
Multi-information display . ................................................... P.89
Display ........................................................ ........................... P.89A
B
C
D
Page 40 of 728
401-1. For safe use
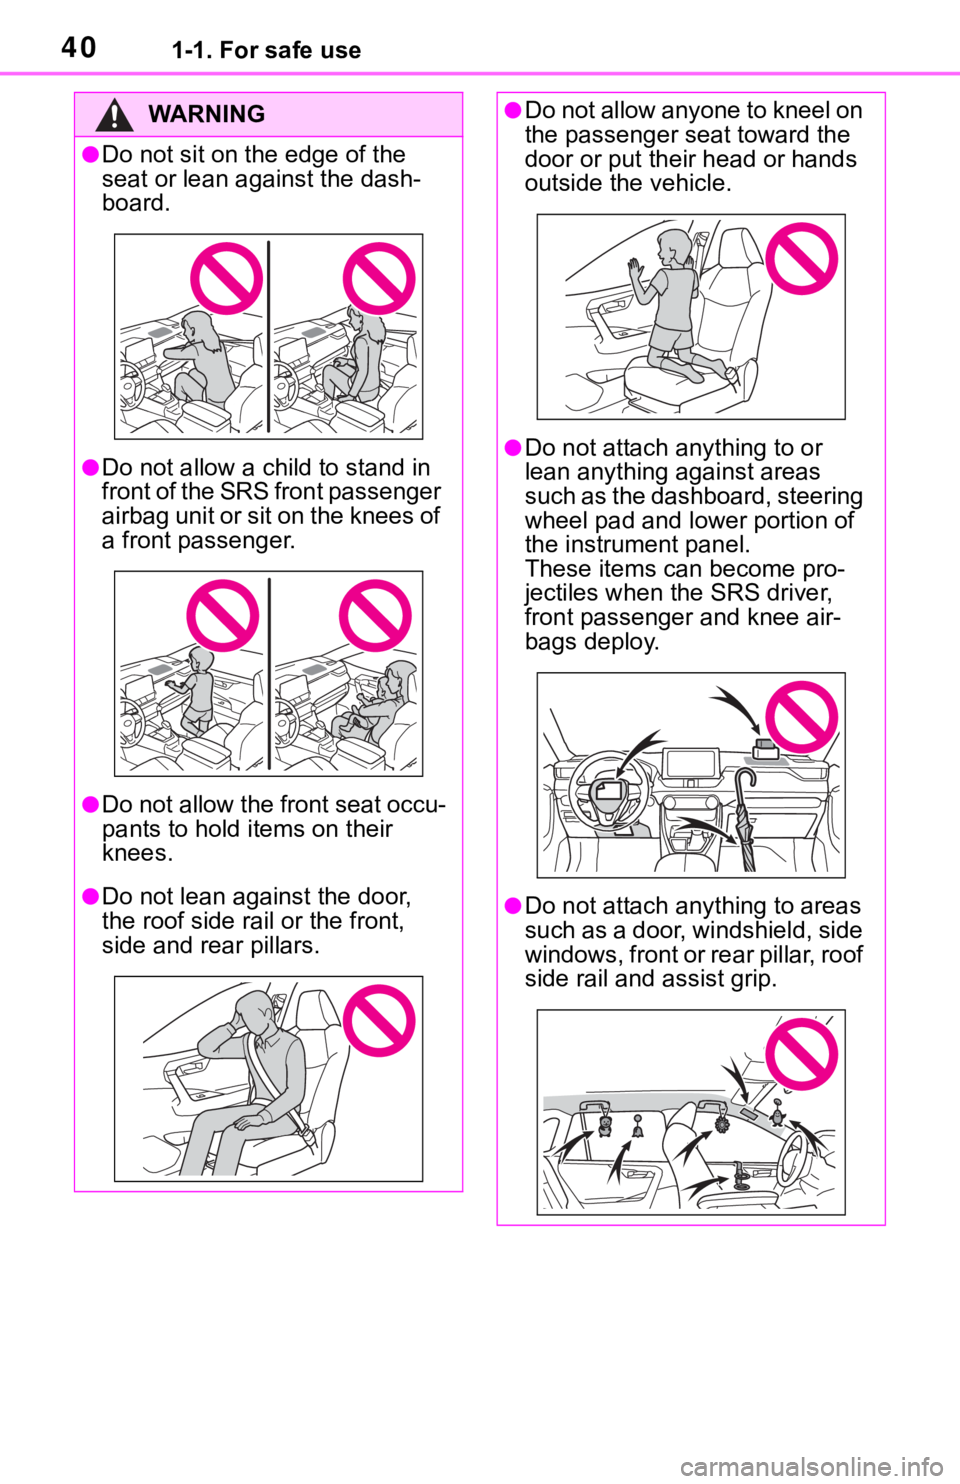
WA R N I N G
●Do not sit on the edge of the
seat or lean against the dash-
board.
●Do not allow a child to stand in
f r o n t o f t h e S R S f r o n t p a s s e n g e r
airbag unit or sit on the knees of
a front passenger.
●Do not allow the front seat occu-
pants to hold items on their
knees.
●Do not lean against the door,
the roof side rail or the front,
side and rear pillars.
●Do not allow anyone to kneel on
the passenger seat toward the
door or put their head or hands
outside the vehicle.
●Do not attach a nything to or
lean anything against areas
such as the dashboard, steering
wheel pad and lower portion of
the instrument panel.
These items can become pro-
jectiles when th e SRS driver,
front passenger and knee air-
bags deploy.
●Do not attach anything to areas
such as a door, windshield, side
windows, front or rear pillar, roof
side rail and assist grip.
Page 58 of 728
581-2. Child safety
buckle. Make sure that the
belt is not twisted.
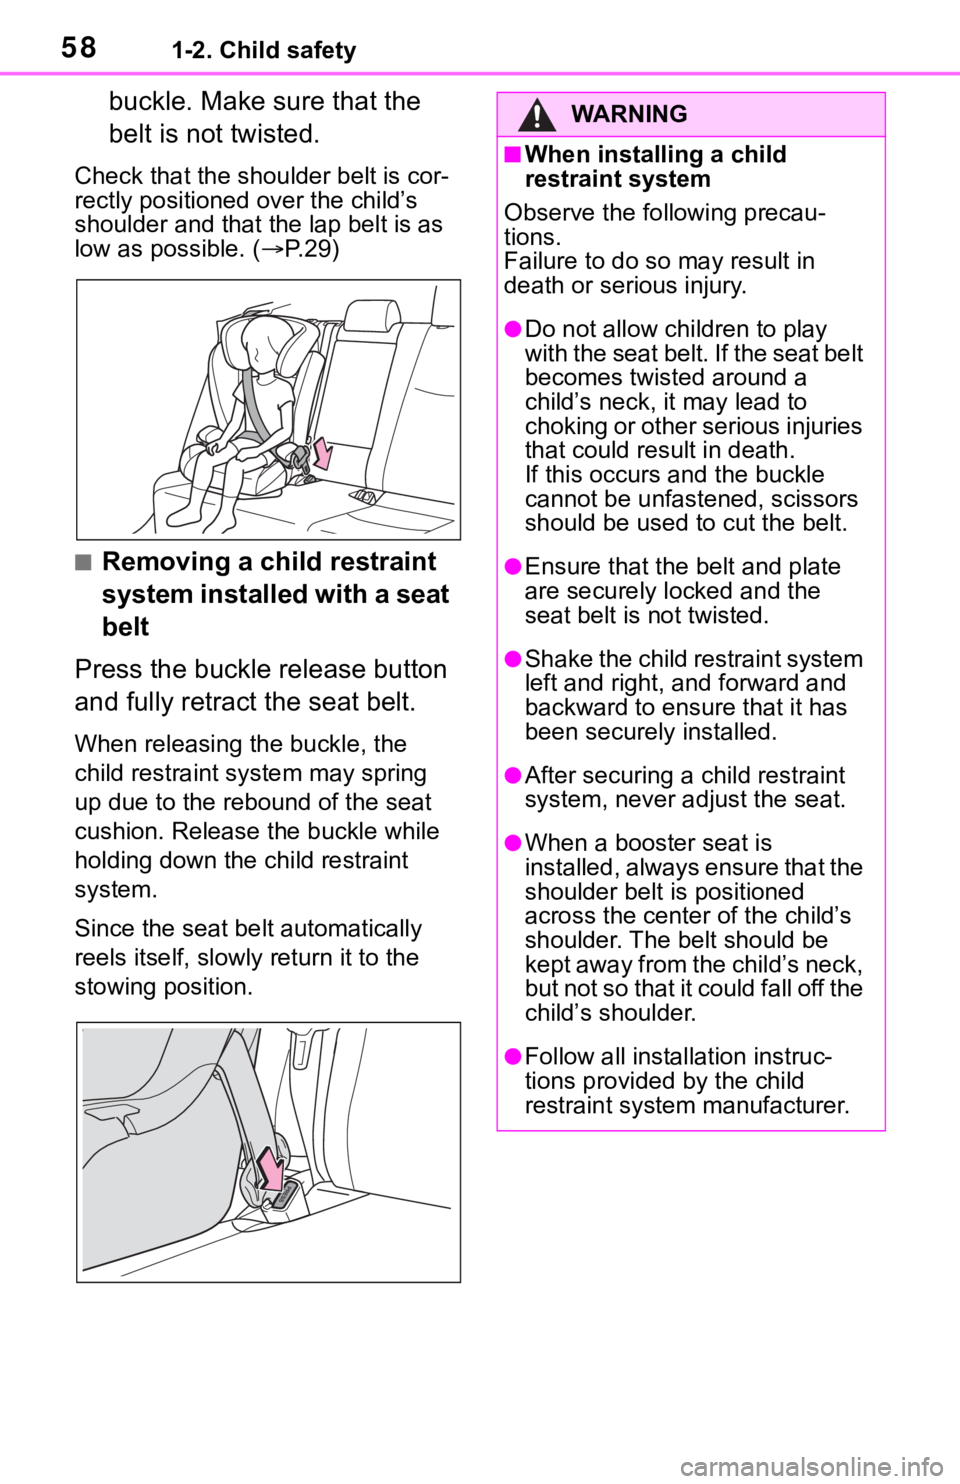
Check that the shoulder belt is cor-
rectly positioned over the child’s
shoulder and that the lap belt is as
low as possible. (P.29)
■Removing a child restraint
system installed with a seat
belt
Press the buckle release button
and fully retract the seat belt.
When releasing the buckle, the
child restraint system may spring
up due to the rebound of the seat
cushion. Release the buckle while
holding down the child restraint
system.
Since the seat belt automatically
reels itself, slowly return it to the
stowing position.
WA R N I N G
■When installing a child
restraint system
Observe the following precau-
tions.
Failure to do so may result in
death or serious injury.
●Do not allow children to play
with the seat belt. If the seat belt
becomes twisted around a
child’s neck, it may lead to
choking or other serious injuries
that could result in death.
If this occurs and the buckle
cannot be unfastened, scissors
should be used to cut the belt.
●Ensure that the belt and plate
are securely locked and the
seat belt is not twisted.
●Shake the child restraint system
left and right, and forward and
backward to ensure that it has
been securely installed.
●After securing a child restraint
system, never adjust the seat.
●When a booster seat is
installed, always ensure that the
shoulder belt is positioned
across the center of the child’s
shoulder. The belt should be
kept away from the child’s neck,
but not so that it could fall off the
child’s shoulder.
●Follow all installation instruc-
tions provided by the child
restraint system manufacturer.
Page 69 of 728
691-3. Emergency assistance
1
For safety and security
ing agent will determine your
vehicle’s location, assess the
emergency, and dispatch the
necessary assistance required.
If you accidentally press the “SOS”
button, tell the response-center
agent that you are not experiencing
an emergency.
■Enhanced Roadside Assis-
tance
Enhanced Roadside Assistance
adds GPS data to the already
included warranty-based Toyota
roadside service.
Subscribers can press the
“SOS” button to reach a Safety
Connect response-center agent,
who can help with a wide range
of needs, such as: towing, flat
tire, fuel delivery, etc. For a
description of the Enhanced
Roadside Assistance services
and their limitations, please see
the Safety Connect Terms and
Conditions, which are available
at Toyota.com in the United
States, Toyotapr.com in Puerto
Rico and Toyota.ca in Canada.
Important! Read this informa-
tion before using Safety Con-
nect.
■Exposure to radio fre-
quency signals
The Safety Connect system
installed in your vehicle is a low- power radio transmitter and
receiver. It receives and also
sends out radio frequency (RF)
signals.
In August 1996, the Federal
Communications Commission
(FCC) adopted RF exposure
guidelines with safety levels for
mobile wireless phones. Those
guidelines are consistent with
the safety standards previously
set by the following U.S. and
international standards bodies.
ANSI (American National
Standards Institute) C95.1
[1992]
NCRP (National Council on
Radiation Protection and
Measurement) Report 86
[1986]
ICNIRP (International Com-
mission on Non-Ionizing Radi-
ation Protection) [1996]
Those standards were based on
comprehensive and periodic
evaluations of the relevant sci-
entific literature. Over 120 scien-
tists, engineers, and physicians
from universities, and govern-
ment health agencies and
industries reviewed the avail-
able body of research to
develop the ANSI Standard
(C95.1).
The design of Safety Connect
complies with the FCC guide-
lines in addition to those stan-
dards.
Safety information for
Safety Connect
Page 105 of 728
1053-1. Key information
3
Before driving
Opens and closes the power
back door
*2 ( P.119)
Sounds the alarm ( P.105)
*1: These settings must be custom-
ized at your Toyota dealer.
*2: If equipped
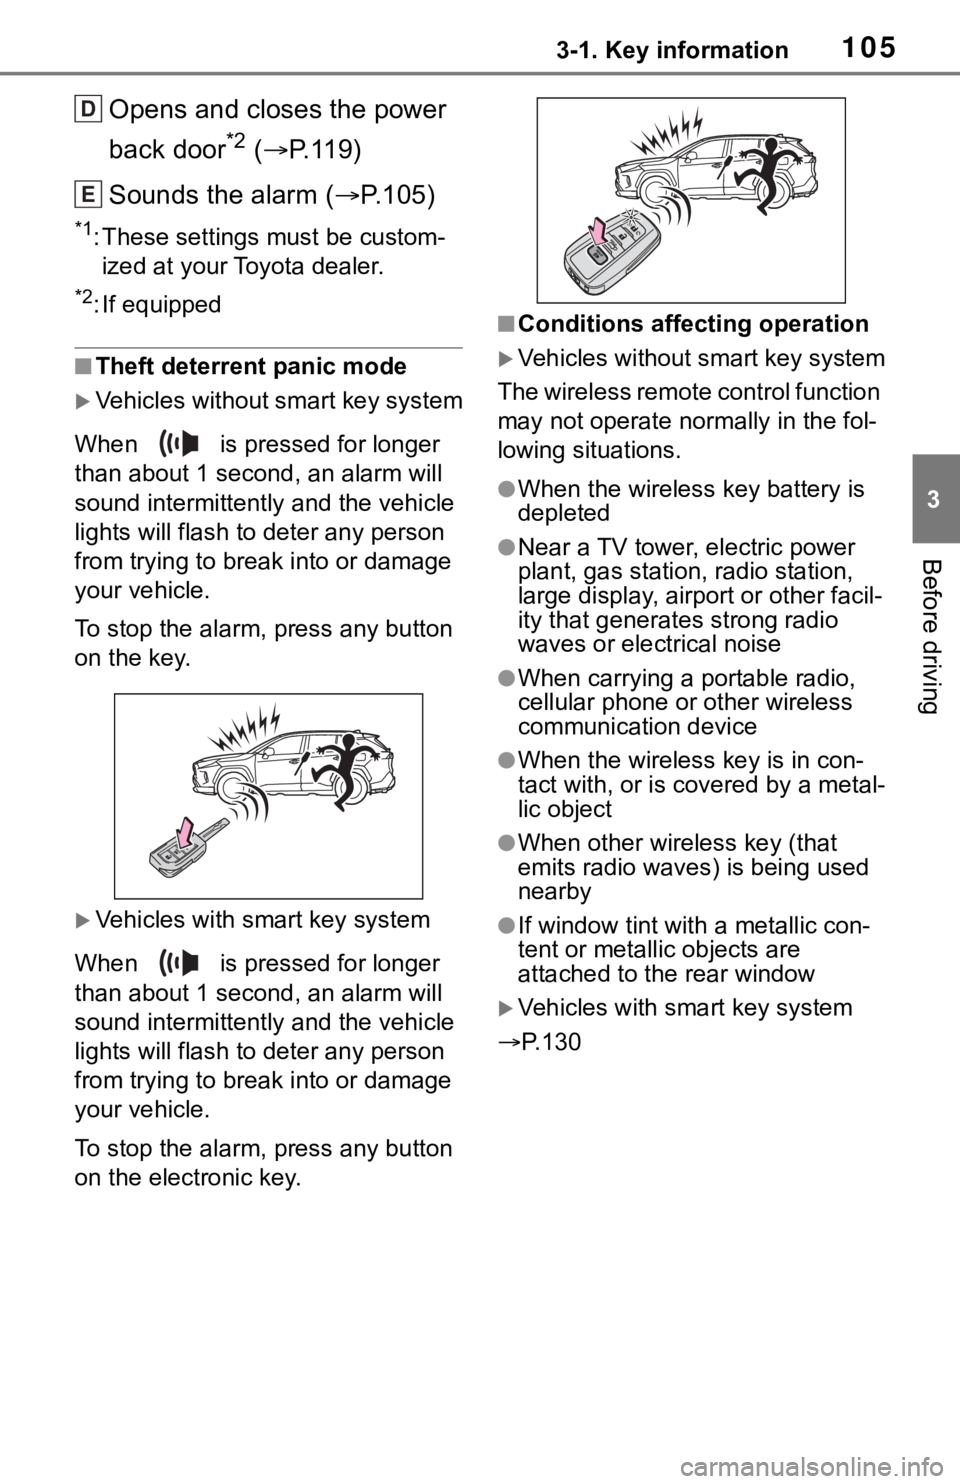
■Theft deterrent panic mode
Vehicles without smart key system
When is pressed for longer
than about 1 seco nd, an alarm will
sound intermittentl y and the vehicle
lights will flash to deter any person
from trying to break into or damage
your vehicle.
To stop the alarm, press any button
on the key.
Vehicles with smart key system
When is pressed for longer
than about 1 seco nd, an alarm will
sound intermittentl y and the vehicle
lights will flash to deter any person
from trying to break into or damage
your vehicle.
To stop the alarm, press any button
on the electronic key.
■Conditions affecting operation
Vehicles without smart key system
The wireless remote control function
may not operate normally in the fol-
lowing situations.
●When the wireles s key battery is
depleted
●Near a TV tower, electric power
plant, gas station, radio station,
large display, airpo rt or other facil-
ity that generates strong radio
waves or electrical noise
●When carrying a portable radio,
cellular phone or other wireless
communication device
●When the wireless key is in con-
tact with, or is c overed by a metal-
lic object
●When other wireless key (that
emits radio waves) is being used
nearby
●If window tint wit h a metallic con-
tent or metallic objects are
attached to the rear window
Vehicles with smart key system
P.130
D
E
Page 107 of 728

1073-1. Key information
3
Before driving
1Releasing
To release the key, press the but-
ton.
2Folding
To stow the key back in its case,
push the key back to the stowed position while pressing the button.
To take out the mechanical key,
slide the release lever and
take the key out.
The mechanical key can only be
inserted in one direction, as the key
only has grooves on one side. If the
key cannot be inserted in a lock cyl-
inder, turn it over a
nd re-attempt to
insert it.
After using the mechanical key,
store it in the electronic key. Carry
the mechanical k ey together with
the electronic key. If the electronic
Using the master key
(vehicles without smart
key system)
Using the mechanical key
(vehicles with smart key
system)
A
Page 123 of 728
1233-2. Opening, closing and locking the doors
3
Before driving
the jam protection function, etc.,
while the back doo r is automati-
cally closing after a door reserve
lock operation is performed, the
door reserve lock function is can-
celed and all the doors will unlock.
●Before leaving the vehicle, make
sure that all the doors are closed
and locked.
■Kick sensor operating condi-
tions (vehicles with Hands Free
Power Back Door)
The Hands Free Power Back Door
will open/close automatically when
the following cond itions are met:
●The kick sensor operation is
enabled ( P. 9 4 )
●The electronic key is within the
operational range. ( P.129)
●A foot is put near the lower center
part of the rear bumper and
moved away from the rear
bumper.
The power back door may also be
operated by putting a hand, an
elbow, a knee, etc . near the lower
center part of the rear bumper and
moving it away from the rear
bumper. Make sure to put it close
enough to the center part of the
rear bumper.
■Situations in which the Hands
Free Power Back Door may not
operate properly (vehicles with
Hands Free Powe r Back Door)
In the following situations, the
Hands Free Power Back Door may
not operate properly:
●When a foot remains under the
rear bumper
●If the rear bumper is strongly hit
with a foot or is touched for a while
If the rear bumper has been touched
for a while, wait for a short time
before attempting to operate the
Hands Free Power Back Door
again.
●When operated while a person is too close to the rear bumper
●When an external radio wave
source interferes with the commu-
nication between the electronic
key and the vehicle (
P.130)
●When the vehicle is parked near
an electrical noise source which
affects the sensitivity of the Hands
Free Power Back Door, such as a
pay parking spot, gas station,
electrically heated road, or fluo-
rescent light
●When the vehicle is near a TV
tower, electric pow er plant, radio
station, large display, airport or
other facility that generates strong
radio waves or electrical noise
●When a large amount of water is
applied to the rea r bumper, such
as when the vehicle is being
washed or in heavy rain
●When mud, snow, ice, etc. is
attached to the rear bumper
●When the vehicle has been
parked for a while near objects
that may move and contact the
rear bumper, such as plants
●When an accessory i s installed to
the rear bumper
If an accessory has been installed,
turn the Hands F ree Power Back
Door (kick sensor) operation setting
off.
■Preventing unintentional opera-
tion of the Hands Free Power
Back Door (vehicles with Hands
Free Power Back Door)
When an electronic key is in the
operation range, the Hands Free
Power Back Door may operate unin-
tentionally, so be careful in the fol-
lowing situations.
●When a large amount of water is
applied to the rea r bumper, such
as when the vehicle is being
washed or in heavy rain
●When dirt is wip ed off the rear
bumper
Page 124 of 728
1243-2. Opening, closing and locking the doors
●When a small animal or small
object, such as a ball, moves
under the rear bumper
●When an object is moved from
under the rear bumper
●If someone is swinging their legs
while sitting on the rear bumper
●If the legs or another part of some-
one’s body contacts the rear
bumper while passing by the vehi-
cle
●When the vehicle is parked near
an electrical noise source which
affects the sensitivity of the Hands
Free Power Back Door, such as a
pay parking spot , gas station,
electrically heated road, or fluo-
rescent light
●When the vehicle is near a TV
tower, electric po wer plant, radio
station, large display, airport or
other facility that generates strong
radio waves or electrical noise
●When the vehicle is parked in a
place where objects such as
plants are near the rear bumper
●If luggage, etc. is s et near the rear
bumper
●If accessories or a vehicle cover is
installed/removed near the rear
bumper
●When the vehicle is being towed
To prevent unintentional operation,
turn the Hands Free Power Back
Door (kick sensor) operation setting
off. ( P. 9 4 )
■When reconnecting the battery
To enable the power back door to
operate properly, close the back
door manually.
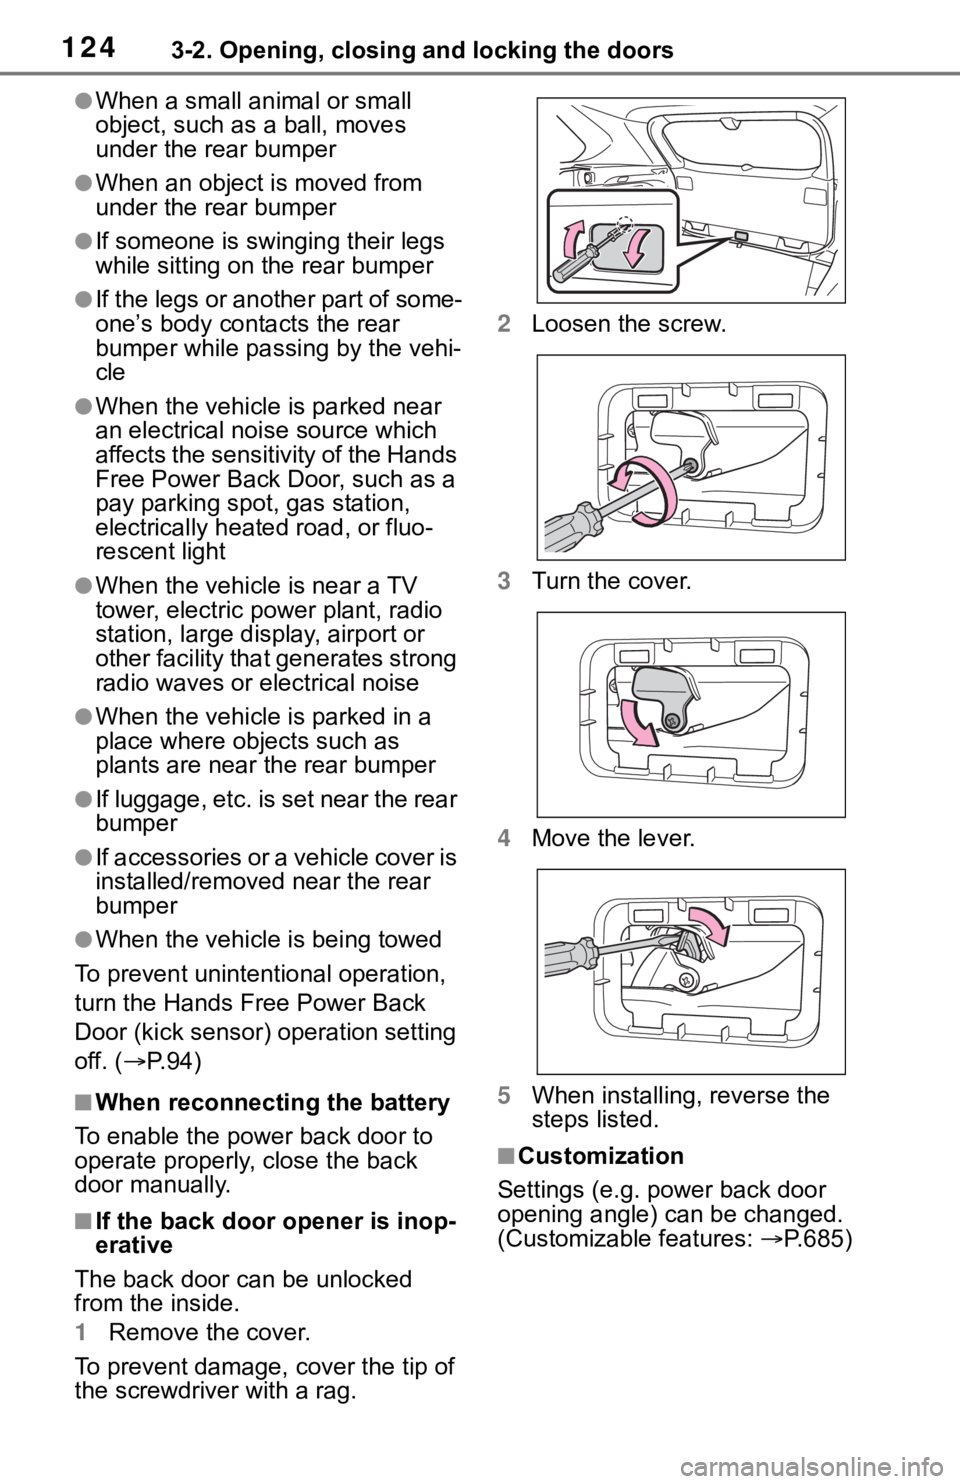
■If the back door opener is inop-
erative
The back door can be unlocked
from the inside.
1 Remove the cover.
To prevent damage, cover the tip of
the screwdriver with a rag. 2
Loosen the screw.
3 Turn the cover.
4 Move the lever.
5 When installing, reverse the
steps listed.
■Customization
Settings (e.g. power back door
opening angle) can be changed.
(Customizable features: P.685)