ECU TOYOTA RAV4 2022 Manual PDF
[x] Cancel search | Manufacturer: TOYOTA, Model Year: 2022, Model line: RAV4, Model: TOYOTA RAV4 2022Pages: 748, PDF Size: 22.93 MB
Page 569 of 748
5697-3. Do-it-yourself maintenance
7
Maintenance and care
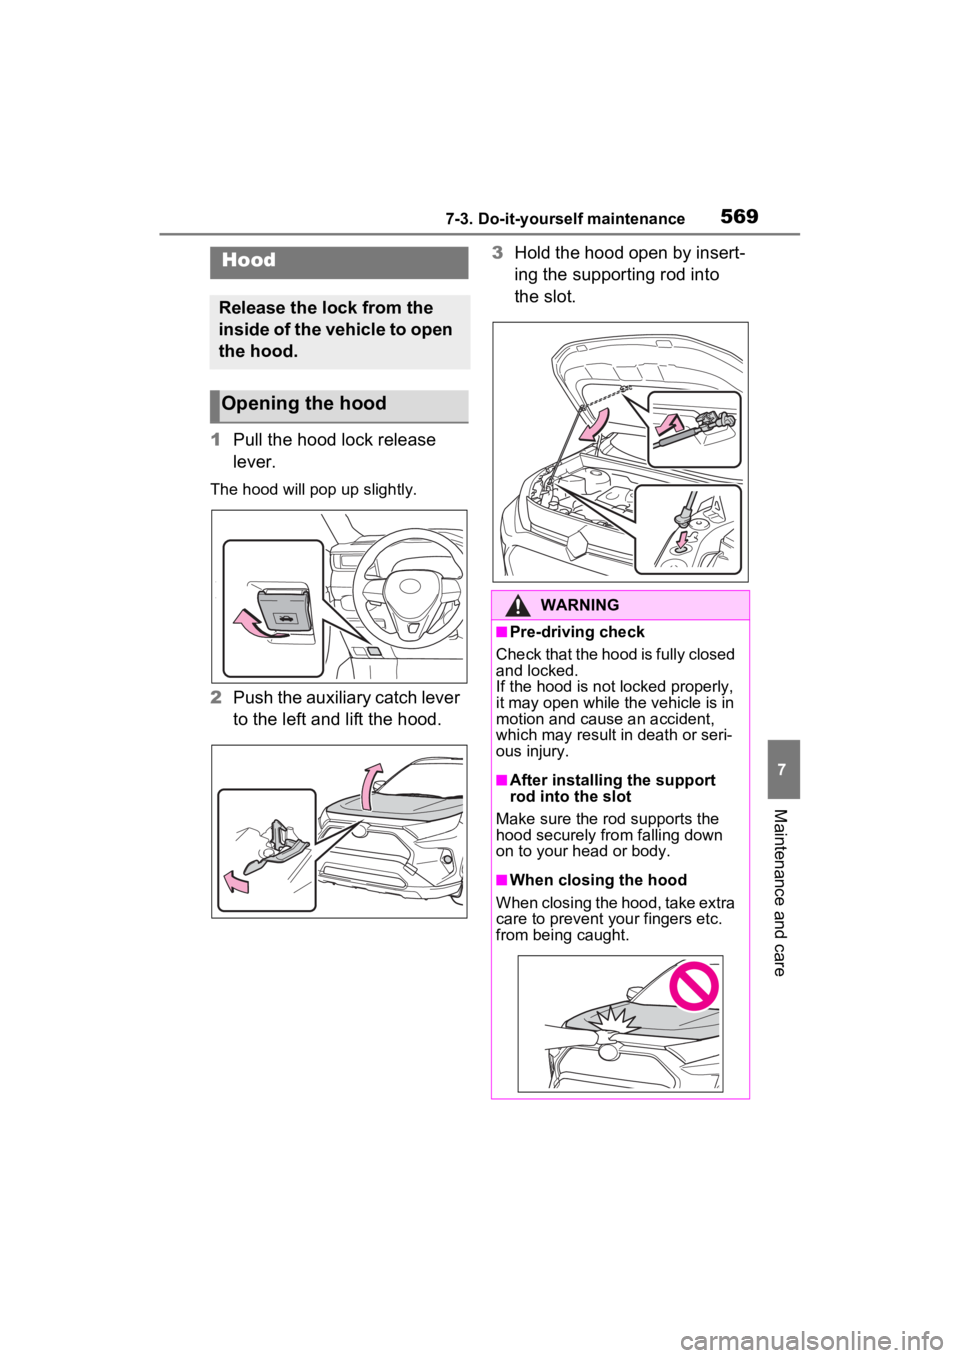
1Pull the hood lock release
lever.
The hood will pop up slightly.
2Push the auxiliary catch lever
to the left and lift the hood. 3
Hold the hood open by insert-
ing the supporting rod into
the slot.
Hood
Release the lock from the
inside of the vehicle to open
the hood.
Opening the hood
WARNING
■Pre-driving check
Check that the hood is fully closed
and locked.
If the hood is not locked properly,
it may open while the vehicle is in
motion and cause an accident,
which may result i n death or seri-
ous injury.
■After installing the support
rod into the slot
Make sure the rod supports the
hood securely fro m falling down
on to your head or body.
■When closing the hood
When closing the hood, take extra
care to prevent your fingers etc.
from being caught.
Page 595 of 748
5957-3. Do-it-yourself maintenance
7
Maintenance and care
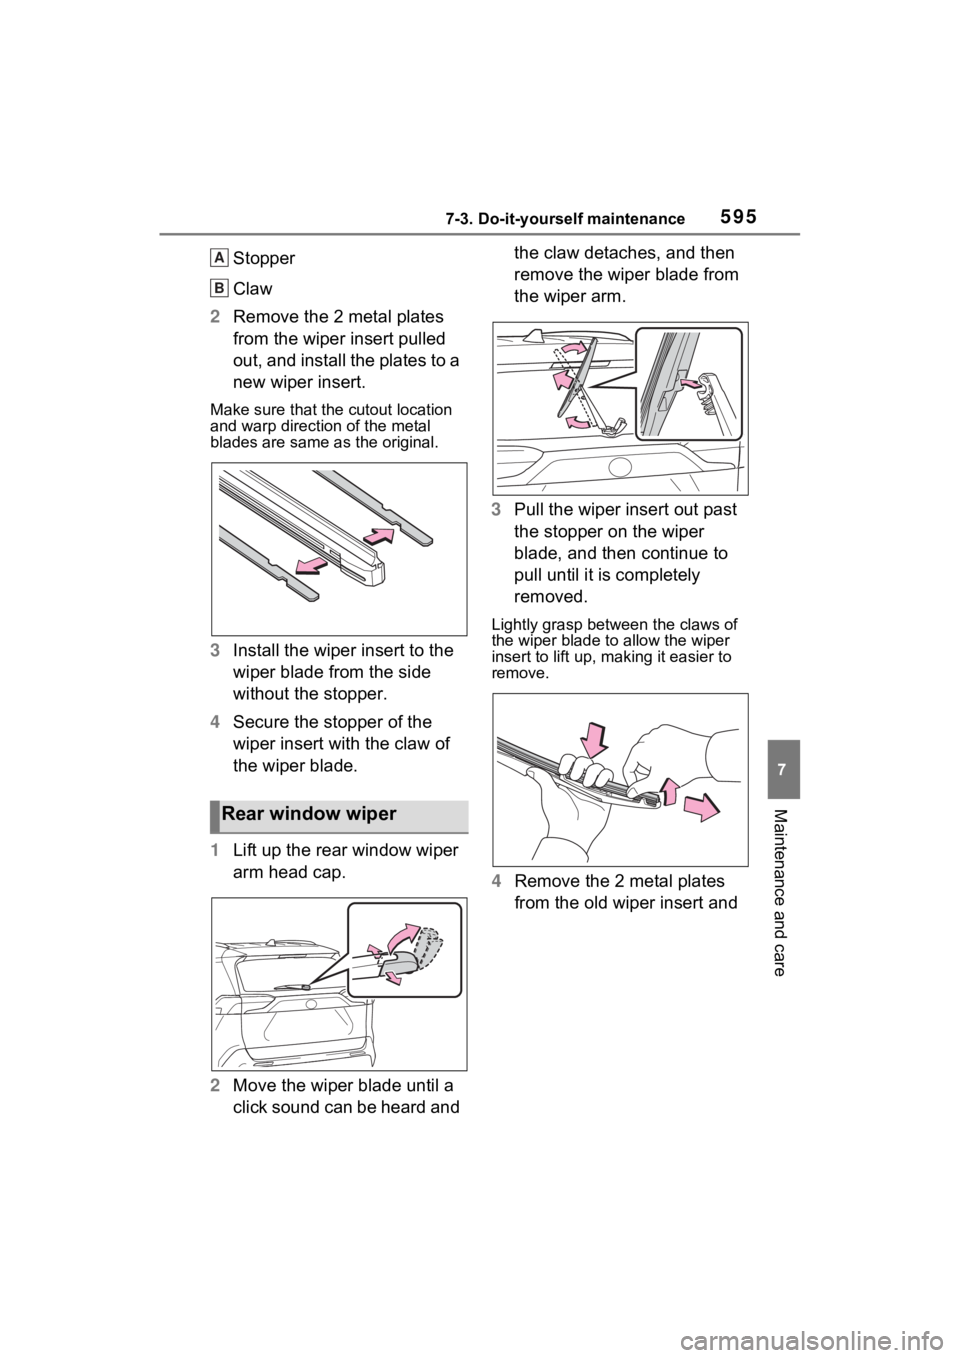
Stopper
Claw
2 Remove the 2 metal plates
from the wiper insert pulled
out, and install the plates to a
new wiper insert.
Make sure that the cutout location
and warp direction of the metal
blades are same as the original.
3Install the wiper insert to the
wiper blade from the side
without the stopper.
4 Secure the stopper of the
wiper insert with the claw of
the wiper blade.
1 Lift up the rear window wiper
arm head cap.
2 Move the wiper blade until a
click sound can be heard and the claw detaches, and then
remove the wiper blade from
the wiper arm.
3 Pull the wiper insert out past
the stopper on the wiper
blade, and then continue to
pull until it is completely
removed.
Lightly grasp between the claws of
the wiper blade to allow the wiper
insert to lift up, making it easier to
remove.
4 Remove the 2 metal plates
from the old wiper insert and
Rear window wiper
A
B
Page 598 of 748
5987-3. Do-it-yourself maintenance
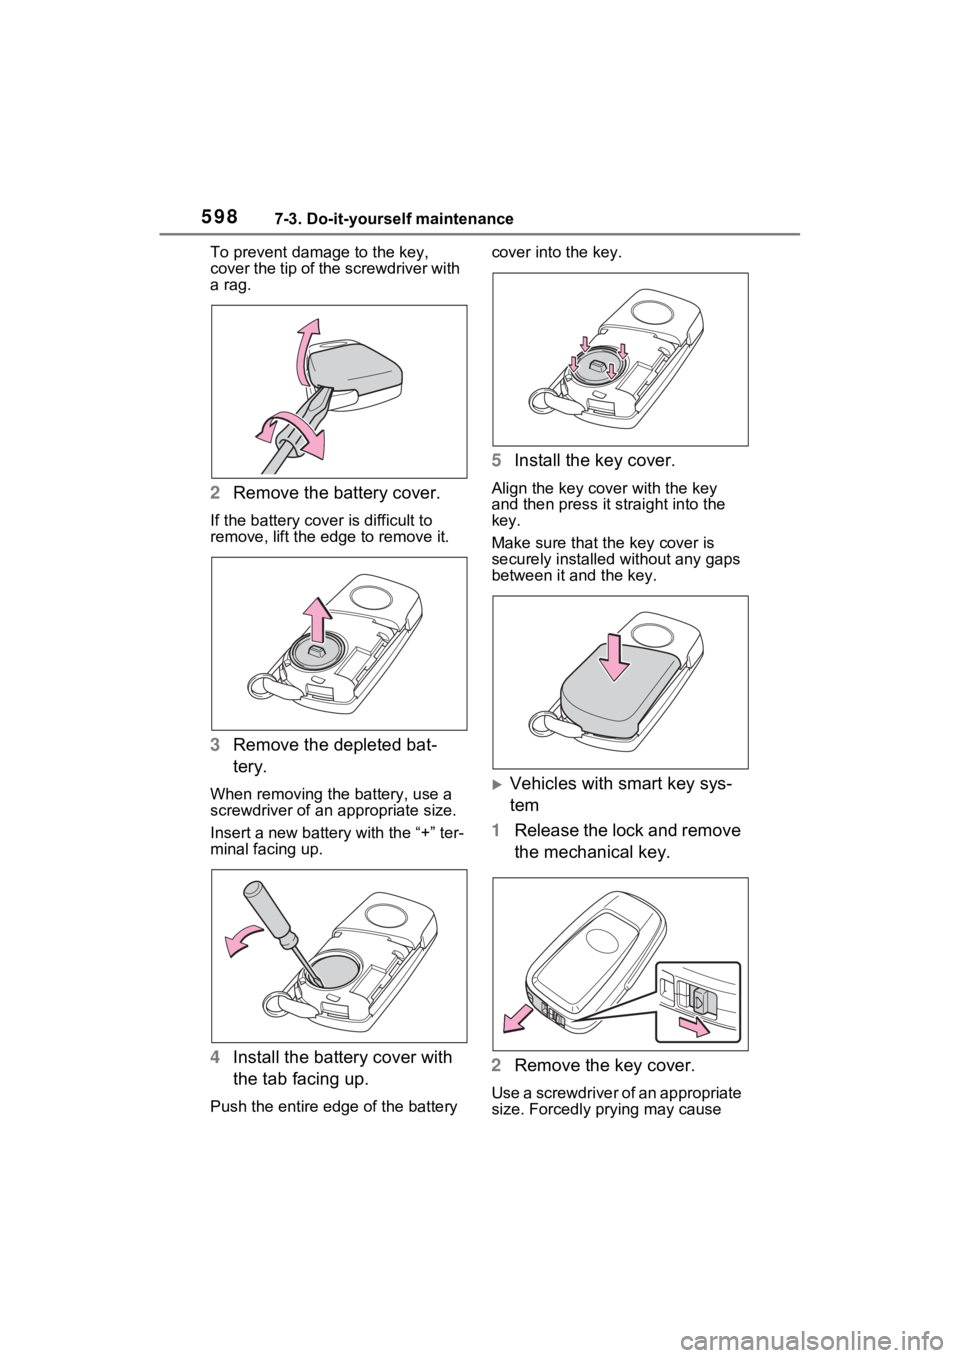
To prevent damag e to the key,
cover the tip of the screwdriver with
a rag.
2 Remove the battery cover.
If the battery cover is difficult to
remove, lift the ed ge to remove it.
3Remove the depleted bat-
tery.
When removing the battery, use a
screwdriver of an appropriate size.
Insert a new battery with the “+” ter-
minal facing up.
4Install the battery cover with
the tab facing up.
Push the entire edge of the battery cover into the key.
5
Install the key cover.
Align the key co ver with the key
and then press it straight into the
key.
Make sure that the key cover is
securely installed without any gaps
between it and the key.
Vehicles with smart key sys-
tem
1 Release the lock and remove
the mechanical key.
2 Remove the key cover.
Use a screwdriver of an appropriate
size. Forcedly prying may cause
Page 602 of 748
6027-3. Do-it-yourself maintenance
■After a fuse is replaced
●When installing the lid, make sure
that the tab is installed securely.
●If the lights do not turn on even
after the fuse has been replaced,
a bulb may need replacement.
( P.604)
●If the replaced fuse blows again,
have the vehicle inspected by
your Toyota dealer.
■If there is an overload in a cir-
cuit
The fuses are designed to blow,
protecting the wiring harness from
damage.
WARNING
■To prevent system break-
downs and vehicle fire
Observe the following precau-
tions.
Failure to do so may cause dam-
age to the vehicle, and possibly a
fire or injury.
●Never use a fuse of a higher
amperage rating than that indi-
cated, or use any other object in
place of a fuse.
●Always use a genuine Toyota
fuse or equivalent.
Never replace a fuse with a
wire, even as a temporary fix.
●Do not modify the fuses or fuse
boxes.
NOTICE
■Before replacing fuses
Have the cause of electrical over-
load determined and repaired by
your Toyota dealer as soon as
possible.
■To prevent damage to the
engine compartment fuse box
cover
When opening the fuse box, com-
pletely release the claw locks
before lifting up the cover. Other-
wise, the claws may be damaged.
Page 608 of 748
6087-3. Do-it-yourself maintenance
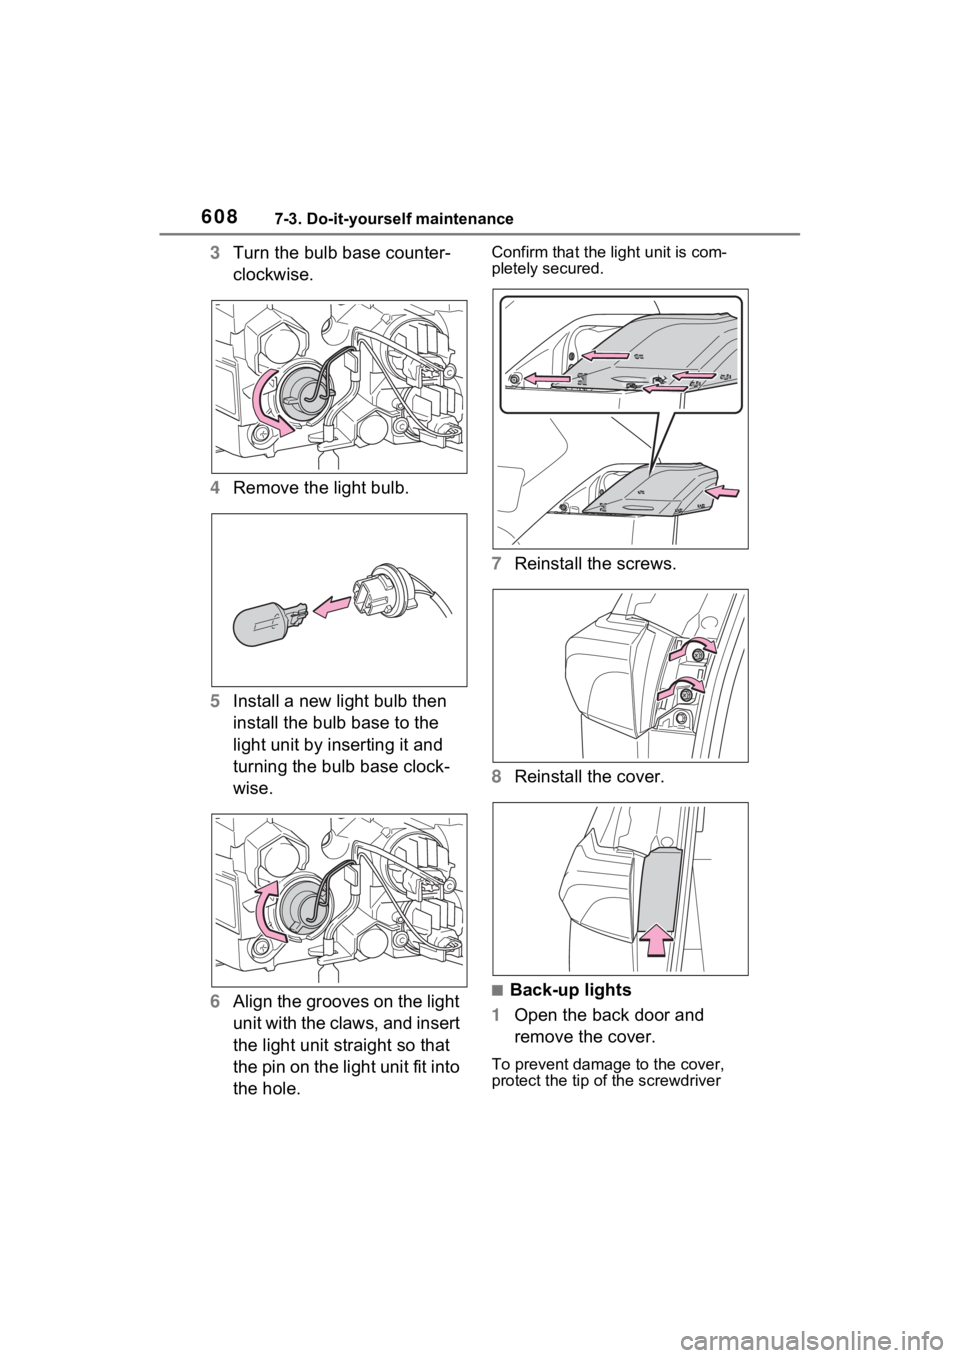
3Turn the bulb base counter-
clockwise.
4 Remove the light bulb.
5 Install a new light bulb then
install the bulb base to the
light unit by inserting it and
turning the bulb base clock-
wise.
6 Align the grooves on the light
unit with the claws, and insert
the light unit straight so that
the pin on the light unit fit into
the hole.Confirm that the light unit is com-
pletely secured.
7Reinstall the screws.
8 Reinstall the cover.
■Back-up lights
1 Open the back door and
remove the cover.
To prevent damage to the cover,
protect the tip of the screwdriver
Page 609 of 748
6097-3. Do-it-yourself maintenance
7
Maintenance and care
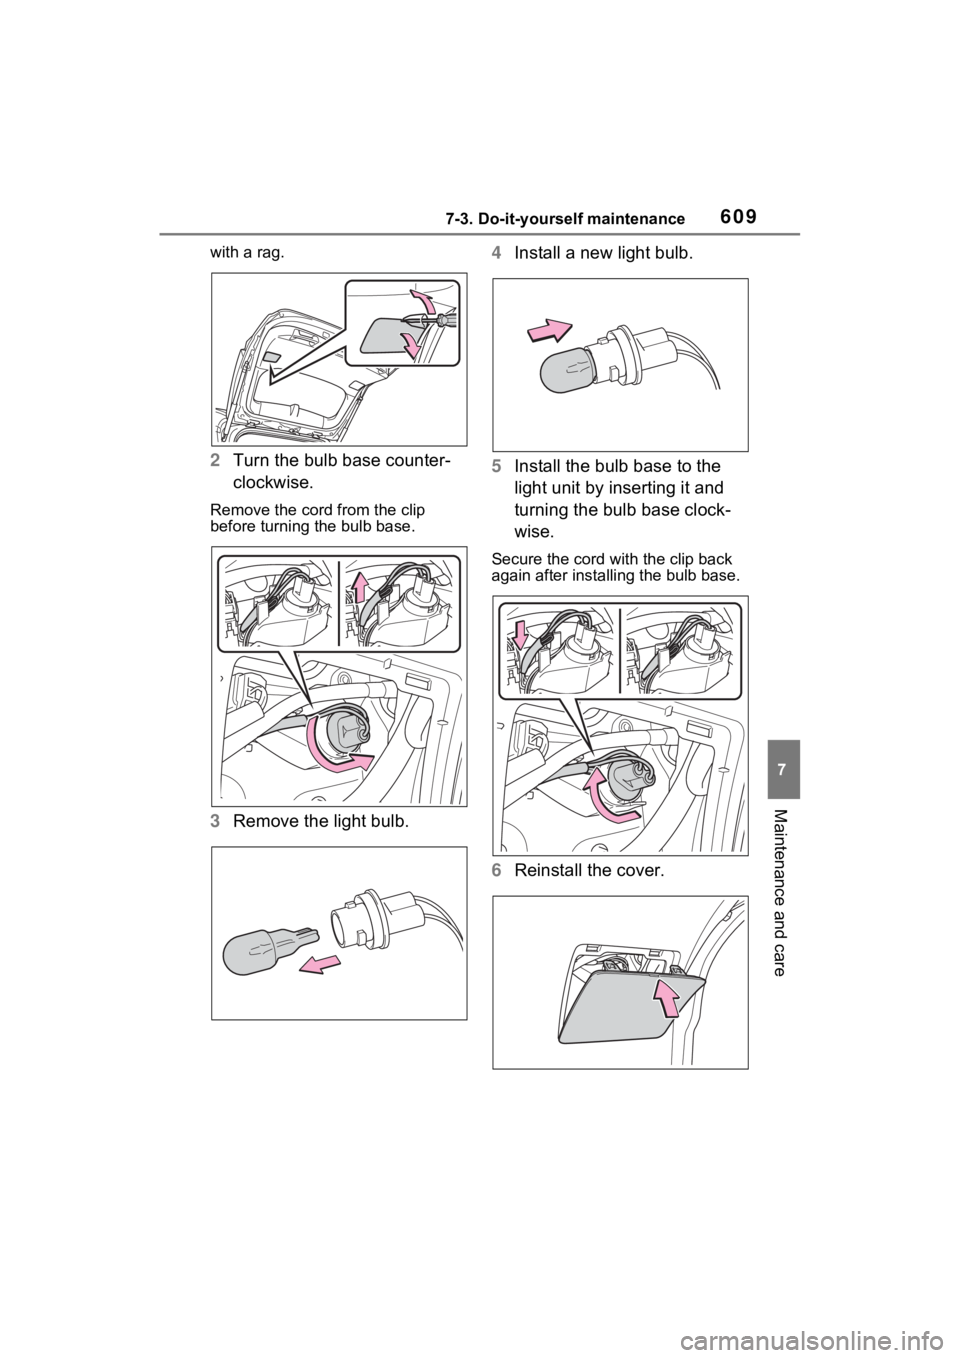
with a rag.
2Turn the bulb base counter-
clockwise.
Remove the cord from the clip
before turning the bulb base.
3Remove the light bulb. 4
Install a new light bulb.
5 Install the bulb base to the
light unit by inserting it and
turning the bulb base clock-
wise.
Secure the cord wit h the clip back
again after installing the bulb base.
6 Reinstall the cover.
Page 610 of 748
6107-3. Do-it-yourself maintenance
WARNING
■Replacing light bulb
●Turn off the light. Do not attempt
to replace the bulb immediately
after turning off the light.
The bulb become very hot and
may cause burns.
●Do not touch the glass portion
of the light bulb with bare
hands. When it is unavoidable
to hold the glass portion, use
and hold with a clean dry cloth
to avoid getting moisture and
oils on the bulb.
Also, if the bulb is scratched or
dropped, it may blow out or
crack.
●Fully install light bulb and any
parts used to secure it. Failure
to do so may result in heat dam-
age, fire, or water entering the
light unit. This may damage the
light or cause condensation to
build up on the lens.
●Do not attempt t o repair or dis-
assemble light bulbs, connec-
tors, electric circuits or
component parts.
Doing so may result in death or
serious injury due to electric
shock.
■To prevent damage or fire
●Make sure bulb is fully seated
and locked.
●Check the wattage of the bulb
before installing to prevent heat
damage.
Page 613 of 748
6138-1. Essential information
8
When trouble arises
Vehicles with smart key sys-
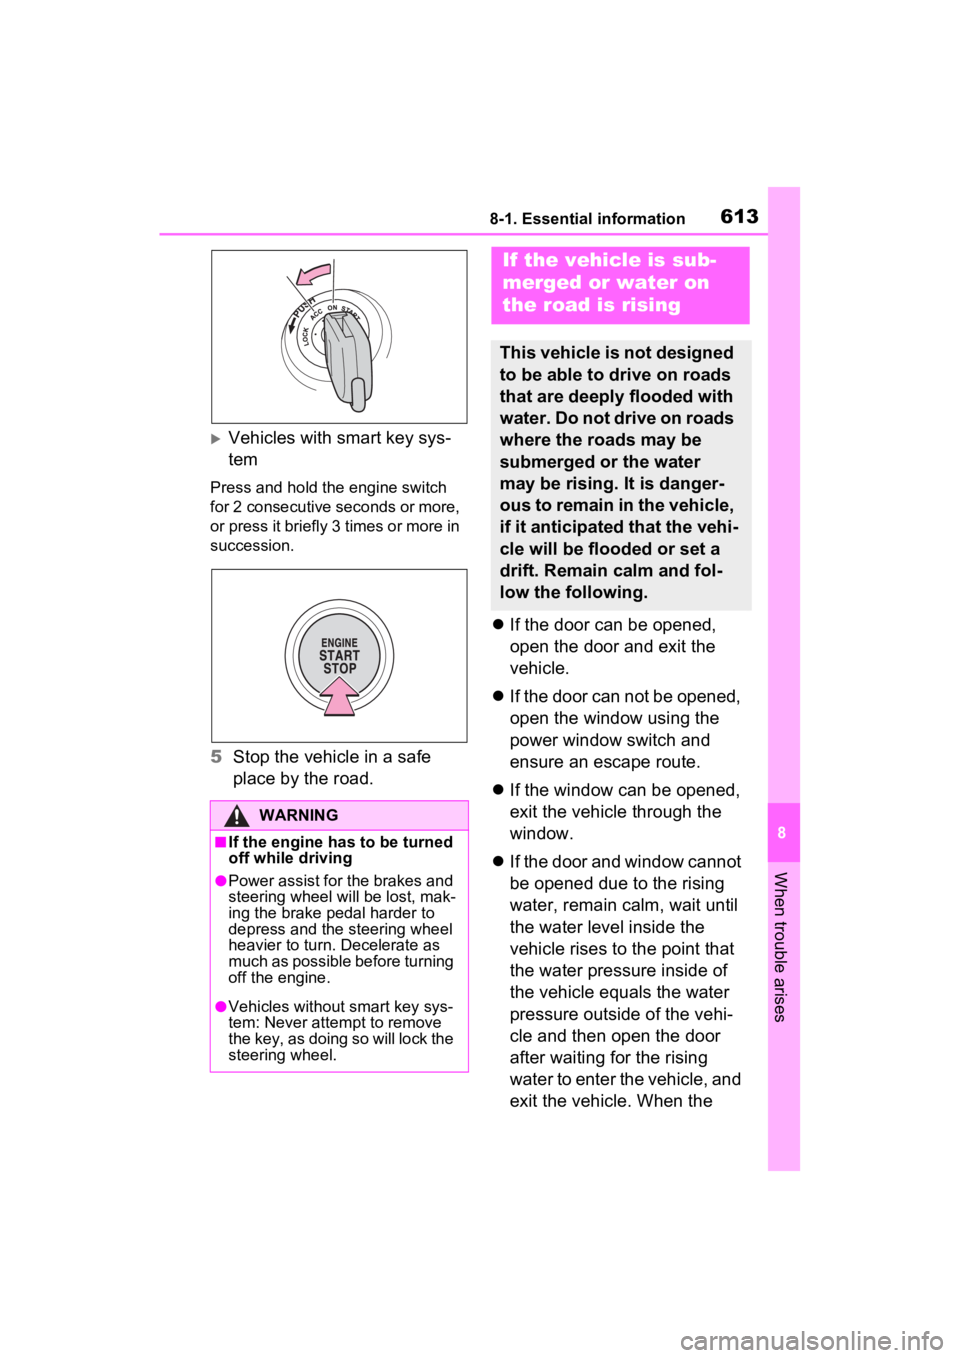
tem
Press and hold the engine switch
for 2 consecutive seconds or more,
or press it briefly 3 times or more in
succession.
5Stop the vehicle in a safe
place by the road.
If the door can be opened,
open the door and exit the
vehicle.
If the door can not be opened,
open the window using the
power window switch and
ensure an escape route.
If the window can be opened,
exit the vehicle through the
window.
If the door and window cannot
be opened due to the rising
water, remain calm, wait until
the water level inside the
vehicle rises to the point that
the water pressure inside of
the vehicle equals the water
pressure outside of the vehi-
cle and then open the door
after waiting for the rising
water to enter the vehicle, and
exit the vehicle. When the
WARNING
■If the engine has to be turned
off while driving
●Power assist for the brakes and
steering wheel will be lost, mak-
ing the brake pedal harder to
depress and the steering wheel
heavier to turn. Decelerate as
much as possible before turning
off the engine.
●Vehicles without smart key sys-
tem: Never attempt to remove
the key, as doing so will lock the
steering wheel.
If the vehicle is sub-
merged or water on
the road is rising
This vehicle is not designed
to be able to drive on roads
that are deeply flooded with
water. Do not drive on roads
where the roads may be
submerged or the water
may be rising. It is danger-
ous to remain in the vehicle,
if it anticipated that the vehi-
cle will be flooded or set a
drift. Remain calm and fol-
low the following.
Page 616 of 748
6168-2. Steps to take in an emergency
The following may indicate a
problem with your transmission.
Contact your Toyota dealer or
commercial towing service
WARNING
■While towing (vehicles with
towing eyelet)
●When towing using cables or
chains, avoid sudden starts, etc.
which place excessive stress on
the towing eyelets, cables or
chains. The towing eyelets,
cables or chains may become
damaged, broken debris may hit
people, and cause serious dam-
age.
●Do not turn the engine switch to
OFF (vehicles without smart key
system).
There is a possibility that the
steering wheel is locked and
cannot be operated.
■Installing towing eyelets to
the vehicle (vehicles with
towing eyelets)
Make sure that towing eyelets are
installed securely. If not securely
installed, towing eyelets may
come loose during towing.
NOTICE
■To prevent damage to the
vehicle when towing using a
wheel-lift type truck
●Do not tow the vehicle from the
rear when the engine switch is
off. The steering lock mecha-
nism (if equipped) is not strong
enough to hold the front wheels
straight.
●When raising the vehicle,
ensure adequate ground clear-
ance for towing at the opposite
end of the raised vehicle. With-
out adequate clearance, the
vehicle could be damaged while
being towed.
■To prevent damage to the
vehicle when towing with a
sling-type truck
Do not tow with a sling-type truck,
either from the front or rear.
■To prevent damage to the
vehicle during emergency
towing (vehicles with towing
eyelet)
Do not secure cables or chains to
the suspension components.
■When towing the vehicle
(vehicles with Stop & Start
system)
If it is necessary to tow the vehicle
with all four wheels on the ground,
perform the following procedure
before towing the vehicle, in order
to protect the system.
Turn the engine switch to OFF
and then start the engine or turn
the engine switch to ON.
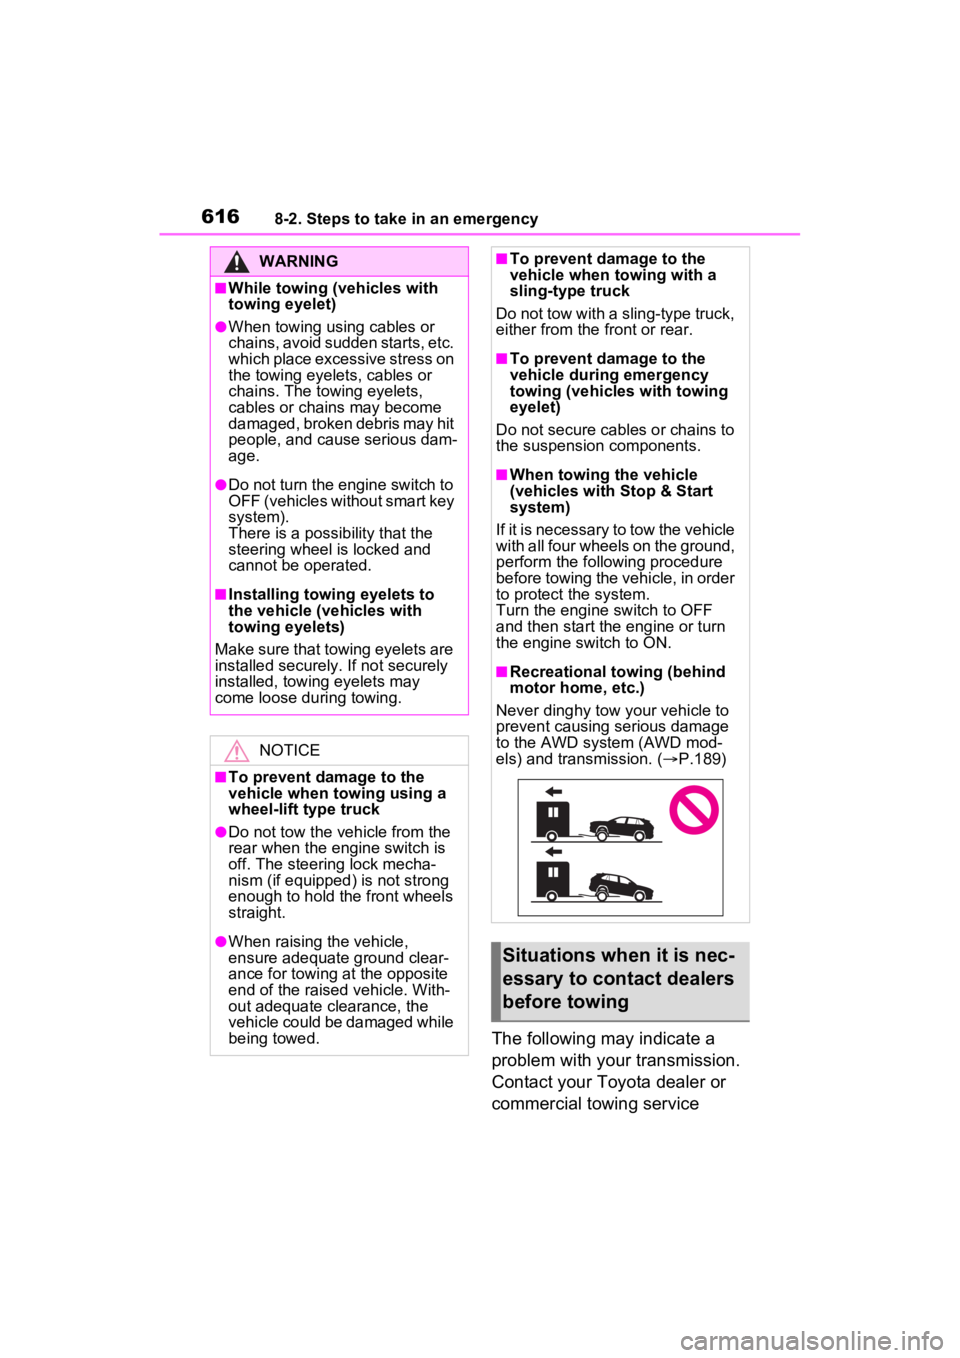
■Recreational towing (behind
motor home, etc.)
Never dinghy tow your vehicle to
prevent causing serious damage
to the AWD system (AWD mod-
els) and transmission. ( P.189)
Situations when it is nec-
essary to contact dealers
before towing
Page 618 of 748
6188-2. Steps to take in an emergency
tion, set the parking brake and
turn the engine switch to OFF.
If a tow truck is not available in
an emergency, your vehicle may
be temporarily towed using
cables or chains secured to the
emergency towing eyelets. This
should only be attempted on
hard surfaced roads for at most
50 miles (80 km) at under 18
mph (30 km/h).
A driver must be in the vehicle to
steer and operate the brakes.
The vehicle’s wheels, drive
train, axles, steering and brakes
must be in good condition.
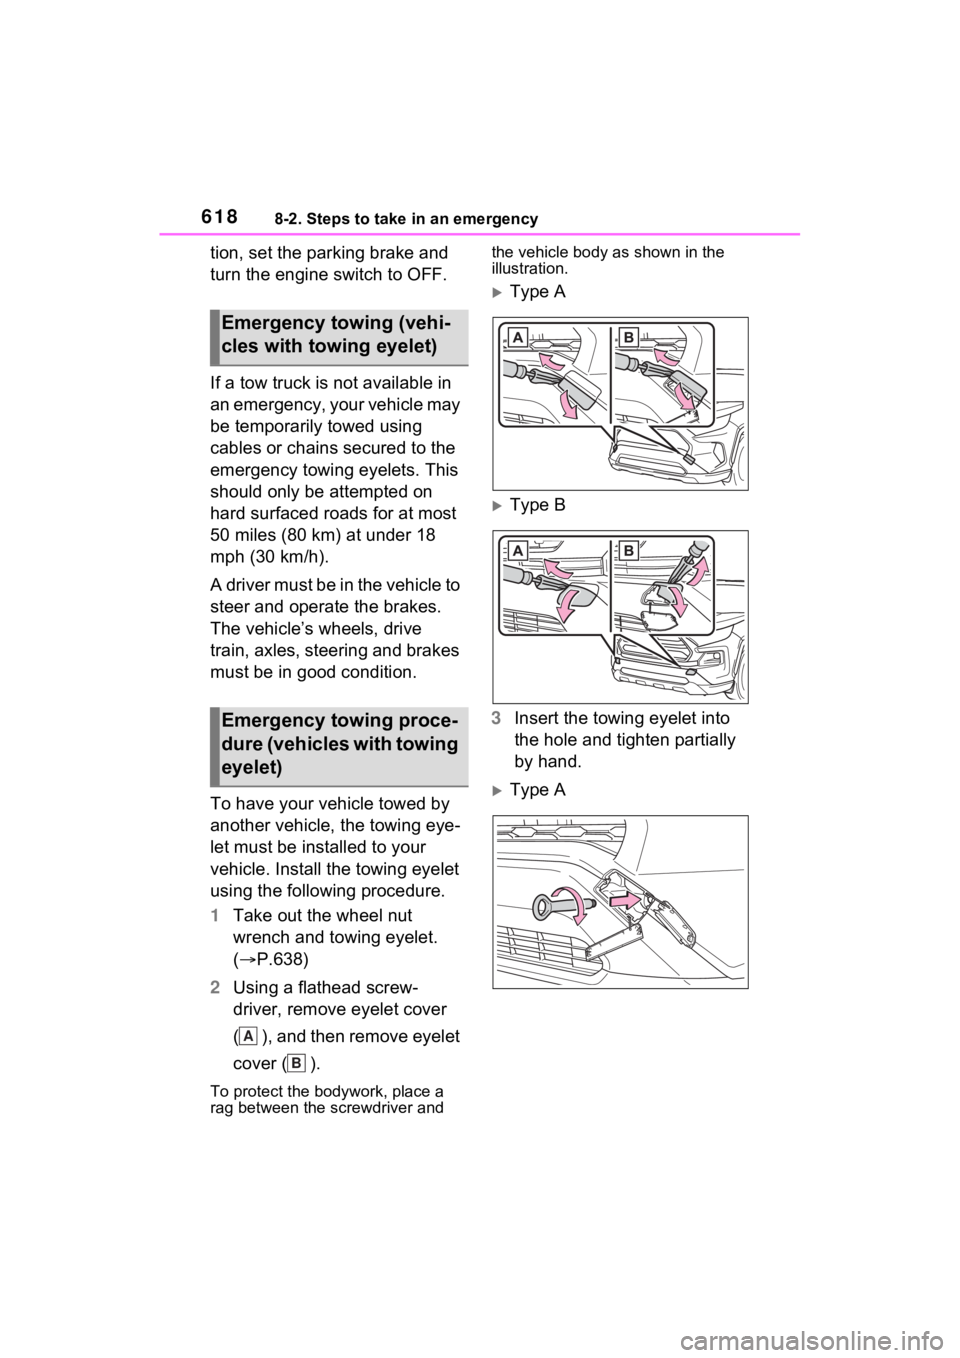
To have your vehicle towed by
another vehicle, the towing eye-
let must be installed to your
vehicle. Install the towing eyelet
using the following procedure.
1Take out the wheel nut
wrench and towing eyelet.
( P.638)
2 Using a flathead screw-
driver, remove eyelet cover
( ), and then remove eyelet
cover ( ).
To protect the bodywork, place a
rag between the screwdriver and the vehicle body
as shown in the
illustration.
Type A
Type B
3 Insert the towing eyelet into
the hole and tighten partially
by hand.
Type A
Emergency towing (vehi-
cles with towing eyelet)
Emergency towing proce-
dure (vehicles with towing
eyelet)
A
B