light TOYOTA RAV4 HYBRID 2020 Owners Manual (in English)
[x] Cancel search | Manufacturer: TOYOTA, Model Year: 2020, Model line: RAV4 HYBRID, Model: TOYOTA RAV4 HYBRID 2020Pages: 744, PDF Size: 31.43 MB
Page 596 of 744
5967-3. Do-it-yourself maintenance
2Adjust the tire inflation pres-
sure to the specified cold tire
inflation pressure level.
( P.681)
Make sure to adjust the tire pres-
sure to the specifie d cold tire infla-
tion pressure level. The tire
pressure warning system will oper-
ate based on this pressure level.
3 Start the hybrid system.
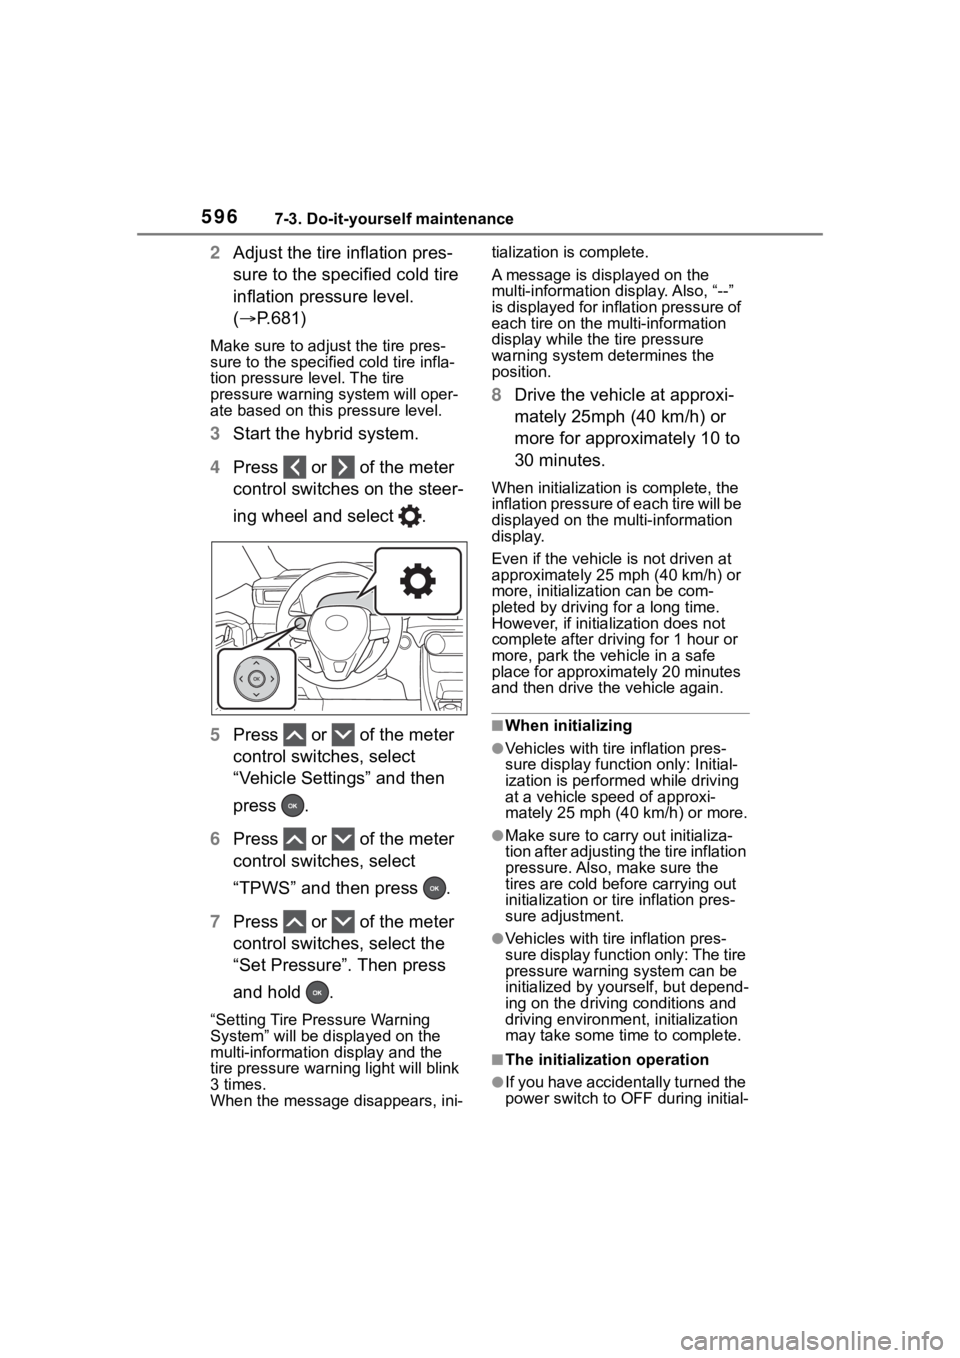
4 Press or of the meter
control switches on the steer-
ing wheel and select .
5 Press or of the meter
control switches, select
“Vehicle Settings” and then
press .
6 Press or of the meter
control switches, select
“TPWS” and then press .
7 Press or of the meter
control switches, select the
“Set Pressure”. Then press
and hold .
“Setting Tire Pressure Warning
System” will be dis played on the
multi-information display and the
tire pressure warni ng light will blink
3 times.
When the message disappears, ini- tialization is complete.
A message is displayed on the
multi-information di
splay. Also, “--”
is displayed for inflation pressure of
each tire on the m ulti-information
display while the tire pressure
warning system determines the
position.
8 Drive the vehicle at approxi-
mately 25mph (40 km/h) or
more for approximately 10 to
30 minutes.
When initialization is complete, the
inflation pressure of each tire will be
displayed on the multi-information
display.
Even if the vehicle is not driven at
approximately 25 mph (40 km/h) or
more, initialization can be com-
pleted by driving for a long time.
However, if initialization does not
complete after driving for 1 hour or
more, park the vehicle in a safe
place for approximately 20 minutes
and then drive the vehicle again.
■When initializing
●Vehicles with tire inflation pres-
sure display function only: Initial-
ization is perform ed while driving
at a vehicle speed of approxi-
mately 25 mph (40 km/h) or more.
●Make sure to carry out initializa-
tion after adjusting the tire inflation
pressure. Also, make sure the
tires are cold before carrying out
initialization or tire inflation pres-
sure adjustment.
●Vehicles with tire inflation pres-
sure display function only: The tire
pressure warning system can be
initialized by yourself, but depend-
ing on the driving conditions and
driving environment, initialization
may take some ti me to complete.
■The initialization operation
●If you have accidentally turned the
power switch to OFF during initial-
Page 597 of 744

5977-3. Do-it-yourself maintenance
7
Maintenance and care
ization, it is not necessary to
restart the initialization again as
initialization will restart automati-
cally when the power switch has
been turned to ON for the next
time.
●If you accidentally perform initial-
ization when initi alization is not
necessary, adjust the tire inflation
pressure to the specified level
when the tires are cold, and con-
duct initialization again.
●Vehicles with tire inflation pres-
sure display function only: While
the position of each tire is being
determined and the inflation pres-
sures are not being displayed on
the multi-informatio n display, if the
inflation pressure of a tire drops,
the tire pressure warning light will
come on.
■When initialization of the tire
pressure warning system has
failed (vehicles without tire
inflation pressure display func-
tion)
Initialization can be completed in a
few minutes. However, in the follow-
ing cases, the set tings have not
been recorded an d the system will
not operate properly. If repeated
attempts to record tire inflation pres-
sure settings are unsuccessful,
have the vehicle inspected by your
Toyota dealer.
●When operating the tire pressure
warning reset swit ch, the tire pres-
sure warning light does not blink 3
times.
●After driving for a certain period of
time since the initialization has
been completed, the warning light
comes on after blin king for 1 min-
ute.
■If the tire pressure warning sys-
tem is not initialized properly
(vehicles with tire inflation pres-
sure display function)
In the following sit uations, initializa-
tion may take longer than usual to
be completed or may not be possi- ble. Normally, initialization com-
pletes within ap
proximately 30
minutes.
●Vehicle is not driven at approxi-
mately 25 mph (40 km/h) or more
●Vehicle is driven on unpaved
roads
●Vehicle is driven near other vehi-
cles and system cannot recog-
nize tire pressure warning valve
and transmitters o f your vehicle
over those of other vehicles.
If initialization does not complete
after driving for 1 hour or more, park
the vehicle in a safe place for
approximately 20 minutes and then
drive the vehicle again.
●If the vehicle is reversed during
initialization, the data up to that
point is reset, so p erform the ini-
tialization procedure again from
the beginning.
●In the following situations, initial-
ization will not be started or was
not completed properly and the
system will not oper ate properly.
Perform the initialization proce-
dure again.
• If, when attempting to start initial-
ization, the tire pressure warning
light does not blink 3 times.
• If, when the veh icle has been
driven for about 20 minutes after
performing initialization, the tire
pressure warning light blinks for
approximately 1 minute and then
illuminates.
If the inflation pressure of each tire
is still not display ed, have the vehi-
cle inspected by your Toyota dealer.
Page 598 of 744
5987-3. Do-it-yourself maintenance
For models made in Japan*1
without tire inflation pressure
display function
Every tire pressure warning
valve and transmitter has a
unique ID code. In addition to
the set of tire pressure warning
system sensor ID codes initially
registered to the vehicle, a sec-
ond set of ID codes can be reg-
istered. A second set of tire
pressure warning system sensor
ID codes can be registered at
your Toyota dealer. When 2 sets
of ID codes have been regis-
tered, either ID code set can be
selected.
*1: The country of production is writ- ten on the Certification Regula-
tion label. ( P.676)
Except for models made in
Japan
*2 without tire inflation
pressure display function
*2: The country of production is writ- ten on the Certification Regula-
tion label. (
P.676)
Every tire pressure warning
valve and transmitter has a
unique ID code. When replacing
a tire pressure warning valve
and transmitter, it is necessary
to register the ID code.
When registering the ID codes,
perform the following procedure.
1 Park the vehicle in a safe
place, wait for approximately
20 minutes, and then start
the hybrid system.
2 Press or of the meter
control switches on the steer-
ing wheel and select .
3 Press or of the meter
control switches and select
“Vehicle Settings”, and then
press .
4 Press or of the meter
control switches and select
“TPWS”, and then press .
5 Press or of the meter
control switches and select
“Change Wheel”. Then press
and hold until the tire
pressure warning light starts
slowly blinking 3 times.
The change wheel set mode is acti-
vated and registra tion is started.
Vehicles with a tire inflation pres-
sure display function only:
Then a message will be displayed
on the multi-information display.
When registration is being per-
WA R N I N G
■When initializing the tire pres-
sure warning system
Do not initializing tire inflation
pressure without first adjusting
the tire inflation pressure to the
specified level. Otherwise, the tire
pressure warning light may not
come on even if the tire inflation
pressure is low, or it may come on
when the tire inflation pressure is
actually normal.
Registering ID codes
(vehicles with tire pres-
sure warning system)
Page 599 of 744
5997-3. Do-it-yourself maintenance
7
Maintenance and care
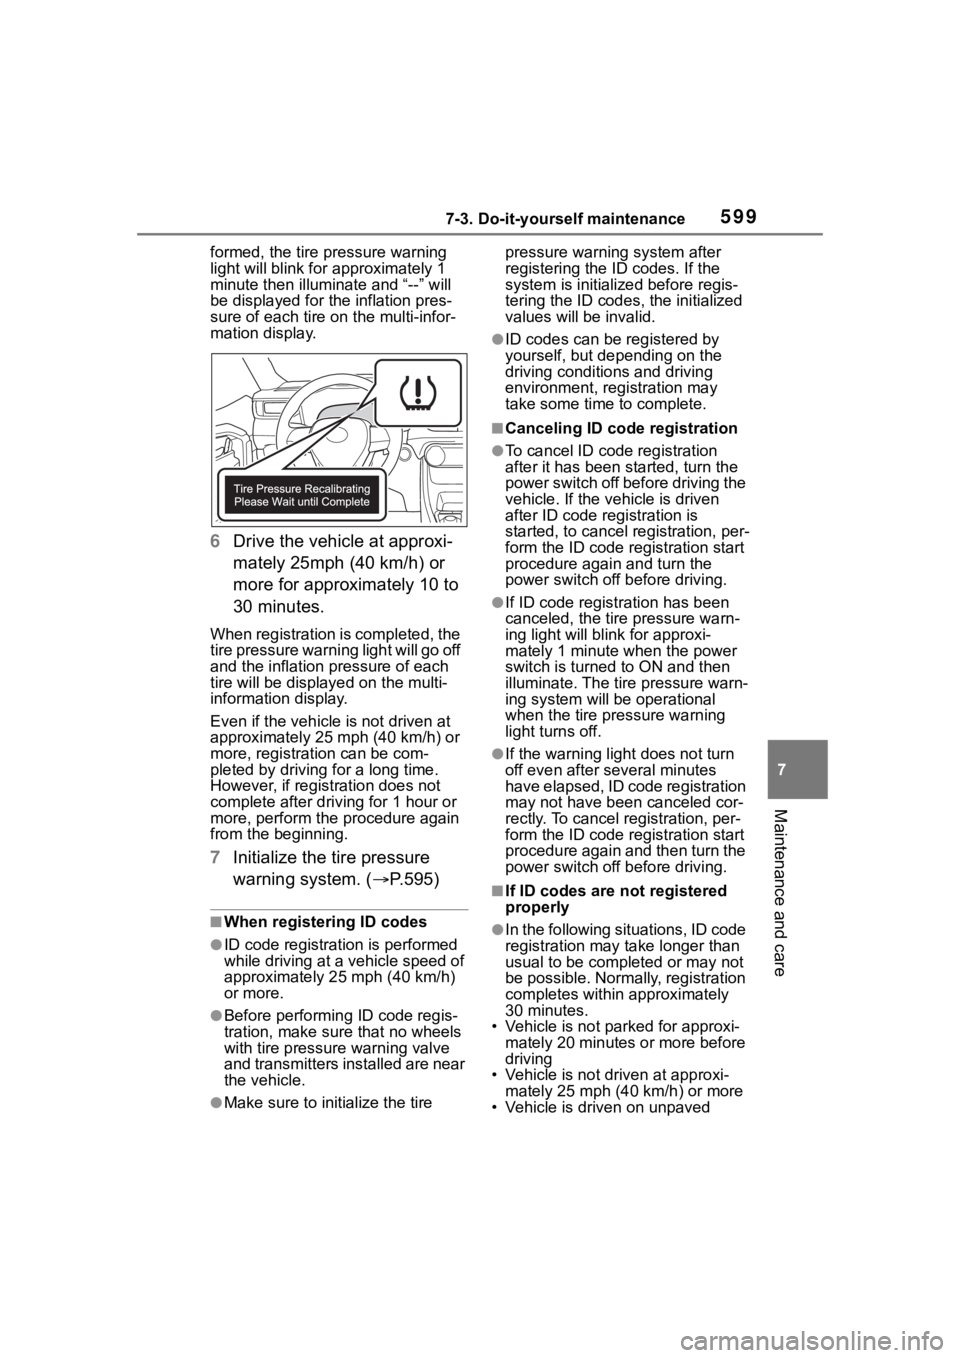
formed, the tire pressure warning
light will blink for approximately 1
minute then illumi nate and “--” will
be displayed for the inflation pres-
sure of each tire on the multi-infor-
mation display.
6 Drive the vehicle at approxi-
mately 25mph (40 km/h) or
more for approximately 10 to
30 minutes.
When registration is completed, the
tire pressure warning light will go off
and the inflation pressure of each
tire will be displayed on the multi-
information display.
Even if the vehicle is not driven at
approximately 25 mph (40 km/h) or
more, registration can be com-
pleted by driving for a long time.
However, if regist ration does not
complete after driving for 1 hour or
more, perform the procedure again
from the beginning.
7 Initialize the tire pressure
warning system. ( P.595)
■When registering ID codes
●ID code registration is performed
while driving at a vehicle speed of
approximately 25 mph (40 km/h)
or more.
●Before performin g ID code regis-
tration, make sure that no wheels
with tire pressur e warning valve
and transmitters installed are near
the vehicle.
●Make sure to initialize the tire pressure warning system after
registering the ID codes. If the
system is initialized before regis-
tering the ID codes
, the initialized
values will be invalid.
●ID codes can be registered by
yourself, but depending on the
driving conditions and driving
environment, registration may
take some time to complete.
■Canceling ID code registration
●To cancel ID code registration
after it has been started, turn the
power switch off before driving the
vehicle. If the vehicle is driven
after ID code registration is
started, to cancel registration, per-
form the ID code registration start
procedure again and turn the
power switch off before driving.
●If ID code registration has been
canceled, the tire pressure warn-
ing light will blin k for approxi-
mately 1 minute when the power
switch is turned to ON and then
illuminate. The tire pressure warn-
ing system will be operational
when the tire pressure warning
light turns off.
●If the warning lig ht does not turn
off even after several minutes
have elapsed, ID code registration
may not have been canceled cor-
rectly. To cancel registration, per-
form the ID code registration start
procedure again and then turn the
power switch off before driving.
■If ID codes are not registered
properly
●In the following situations, ID code
registration may take longer than
usual to be completed or may not
be possible. Normally, registration
completes within approximately
30 minutes.
• Vehicle is not parked for approxi-
mately 20 minutes or more before
driving
• Vehicle is not dr iven at approxi-
mately 25 mph (40 km/h) or more
• Vehicle is driven on unpaved
Page 600 of 744
6007-3. Do-it-yourself maintenance
roads
• Vehicle is driven near other vehi- cles and system cannot recog-
nize tire pressure warning valve
and transmitters of your vehicle
over those of other vehicles
• Wheel with tire p ressure warning
valve and transmitter installed is
inside or near the vehicle
If registration does not complete
after driving for 1 hour or more, per-
form the ID code registration proce-
dure again from the beginning.
●If the vehicle is reversed during
registration, the data up to that
point is reset, so perform the reg-
istration procedure again from the
beginning.
●In the following situations, ID code
registration will not be started or
was not completed properly and
the system will no t operate prop-
erly. Perform the ID code registra-
tion procedure again.
• If, when attempting to start ID
code registration, the tire pressure
warning light does not blink slowly
3 times.
• If, when the vehicle has been driven for about 20 minutes after
performing ID co de registration,
the tire pressur e warning light
blinks for approxi mately 1 minute
and then illu minates.
If the ID codes cannot be registered
even when performing the above
procedure, contact your Toyota
dealer.
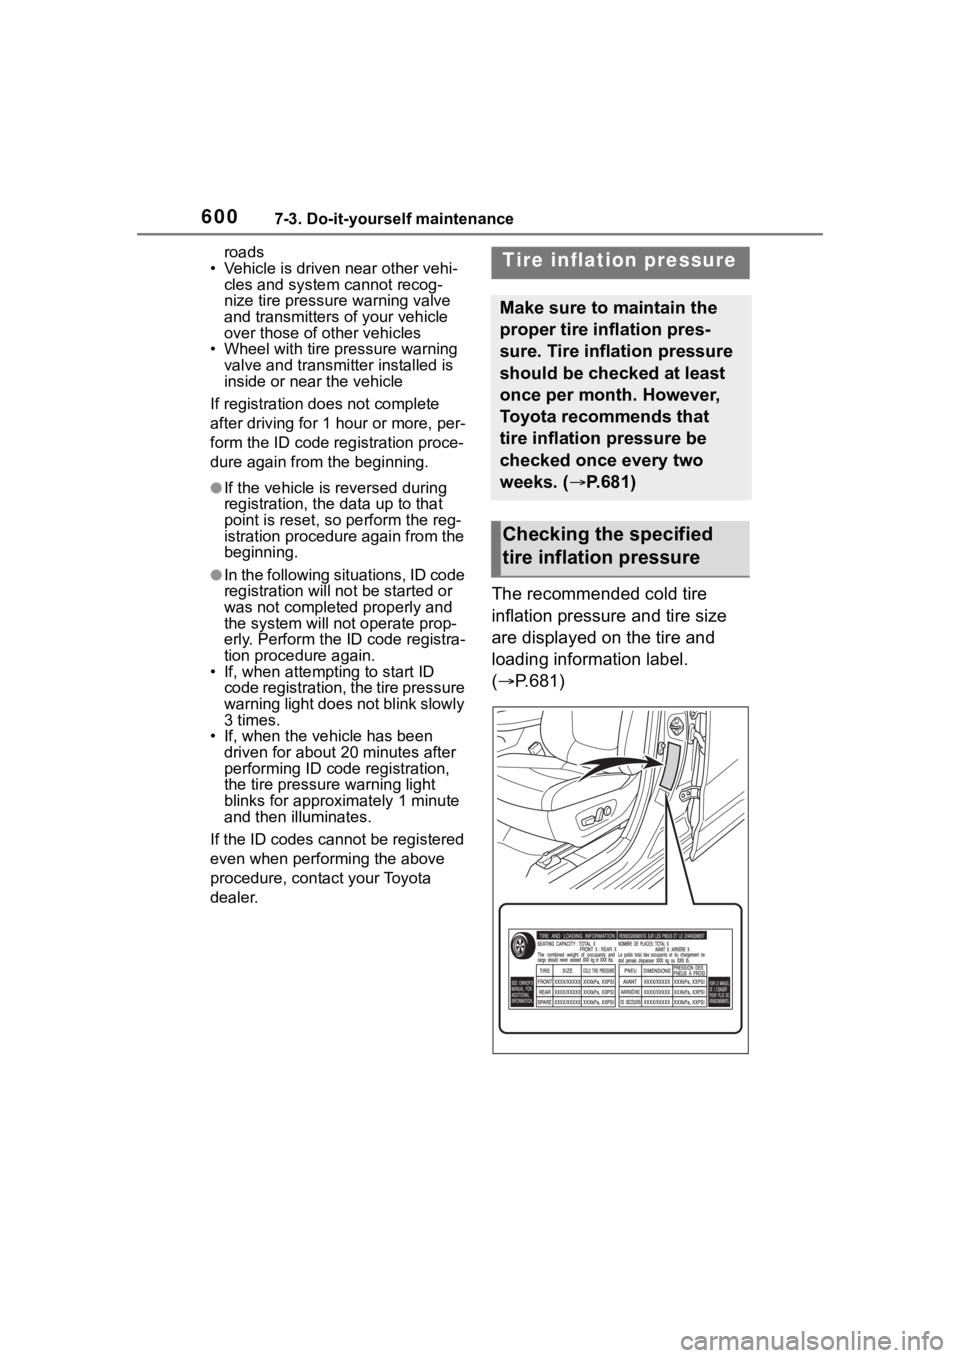
The recommended cold tire
inflation pressure and tire size
are displayed on the tire and
loading information label.
( P.681)
Tire inflation pressure
Make sure to maintain the
proper tire inflation pres-
sure. Tire inflation pressure
should be checked at least
once per month. However,
Toyota recommends that
tire inflation pressure be
checked once every two
weeks. ( P.681)
Checking the specified
tire inflation pressure
Page 604 of 744
6047-3. Do-it-yourself maintenance
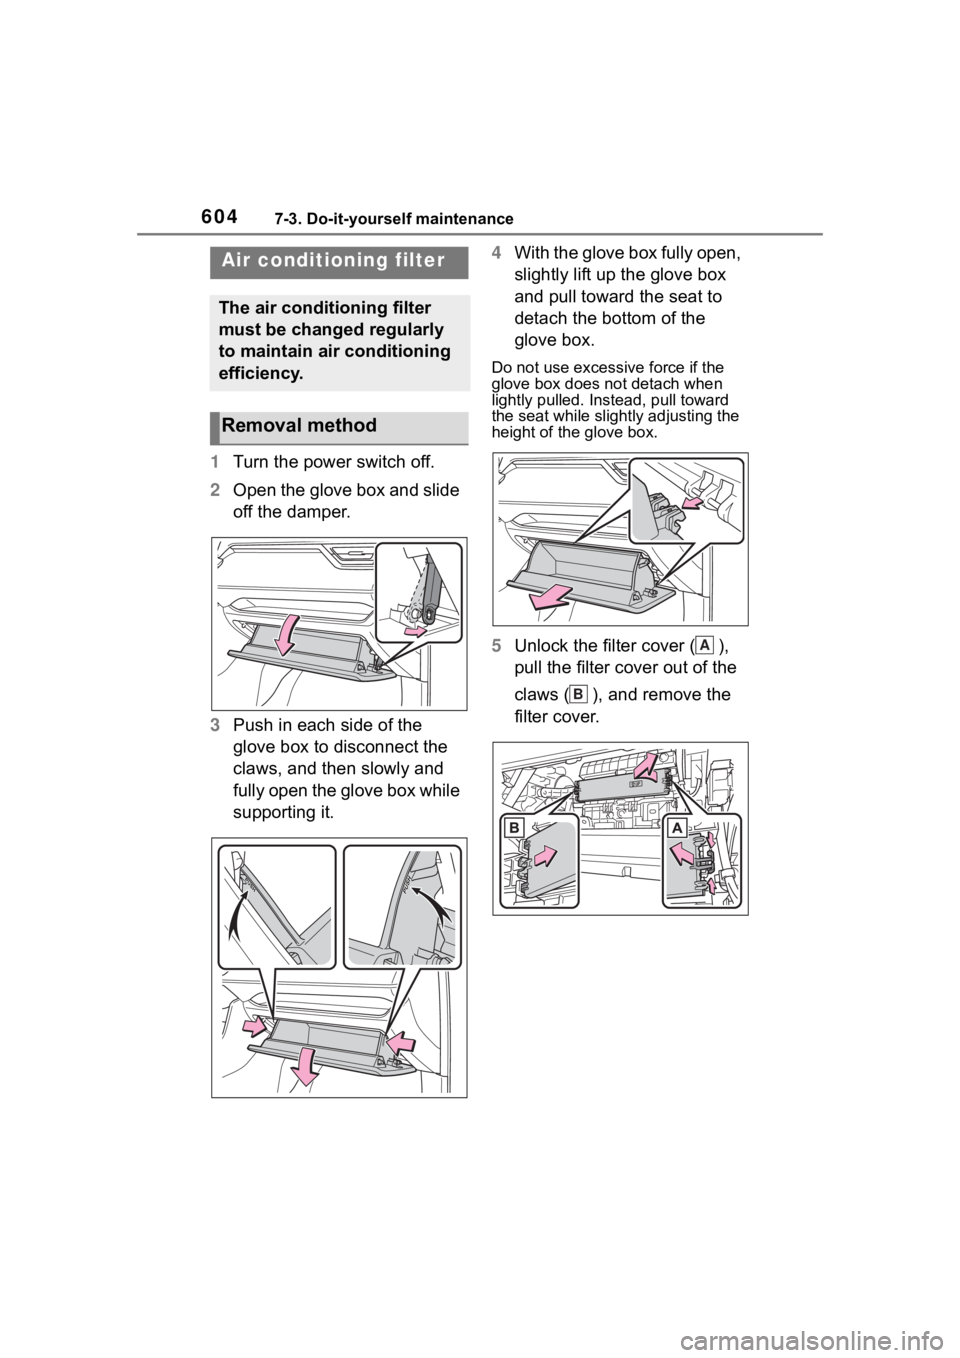
1Turn the power switch off.
2 Open the glove box and slide
off the damper.
3 Push in each side of the
glove box to disconnect the
claws, and then slowly and
fully open the glove box while
supporting it. 4
With the glove box fully open,
slightly lift up the glove box
and pull toward the seat to
detach the bottom of the
glove box.
Do not use excessi ve force if the
glove box does not detach when
lightly pulled. Ins tead, pull toward
the seat while slightly adjusting the
height of the glove box.
5 Unlock the filter cover ( ),
pull the filter cover out of the
claws ( ), and remove the
filter cover.
Air condition ing filter
The air conditioning filter
must be changed regularly
to maintain air conditioning
efficiency.
Removal method
A
B
Page 611 of 744
6117-3. Do-it-yourself maintenance
7
Maintenance and care
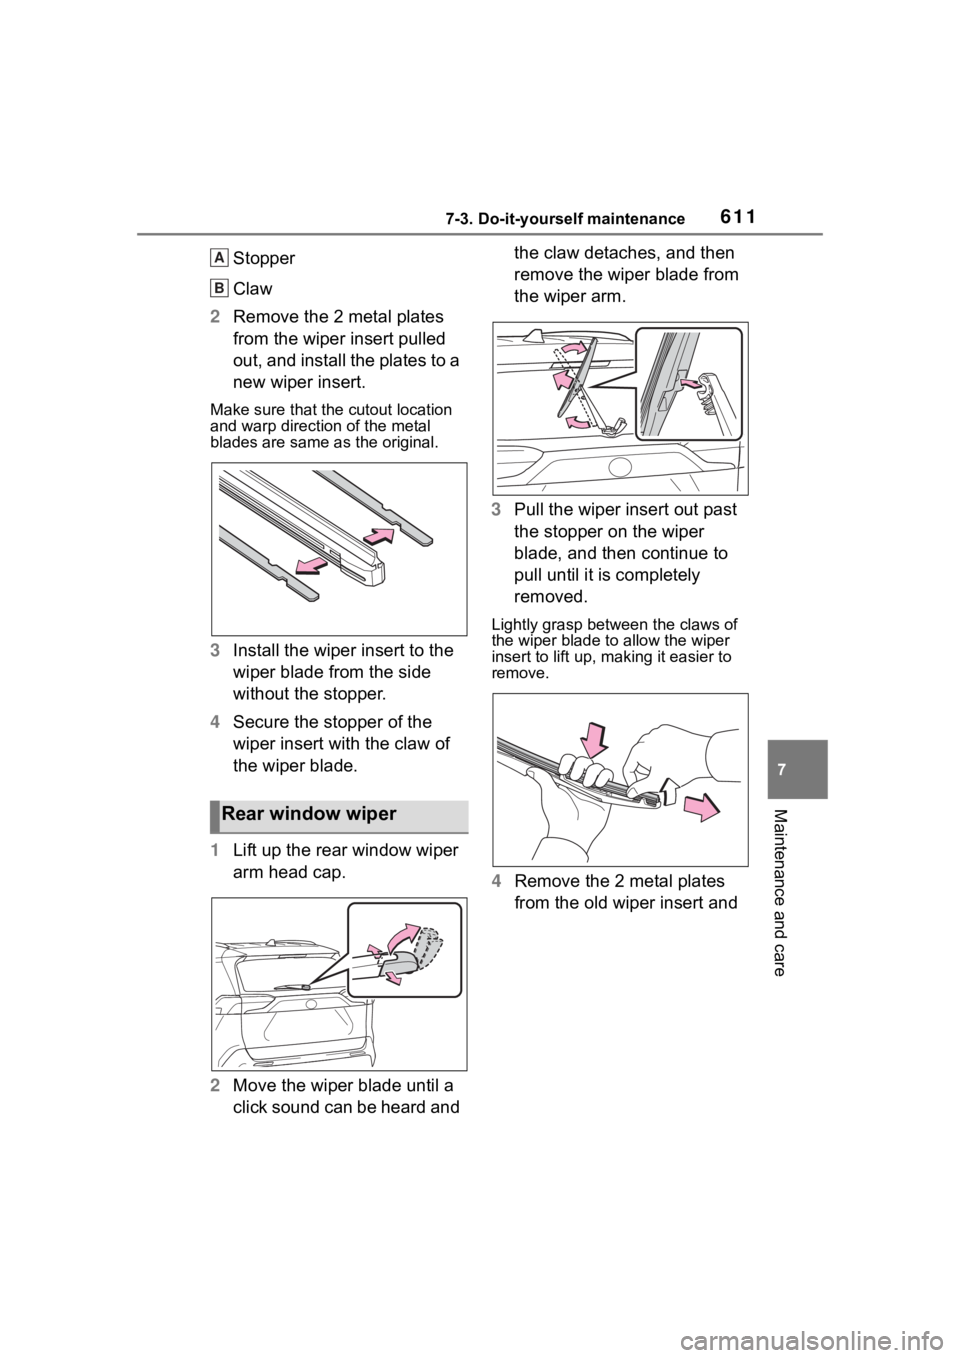
Stopper
Claw
2 Remove the 2 metal plates
from the wiper insert pulled
out, and install the plates to a
new wiper insert.
Make sure that the cutout location
and warp direction of the metal
blades are same as the original.
3Install the wiper insert to the
wiper blade from the side
without the stopper.
4 Secure the stopper of the
wiper insert with the claw of
the wiper blade.
1 Lift up the rear window wiper
arm head cap.
2 Move the wiper blade until a
click sound can be heard and the claw detaches, and then
remove the wiper blade from
the wiper arm.
3 Pull the wiper insert out past
the stopper on the wiper
blade, and then continue to
pull until it is completely
removed.
Lightly grasp between the claws of
the wiper blade to allow the wiper
insert to lift up, making it easier to
remove.
4 Remove the 2 metal plates
from the old wiper insert and
Rear window wiper
A
B
Page 612 of 744
6127-3. Do-it-yourself maintenance
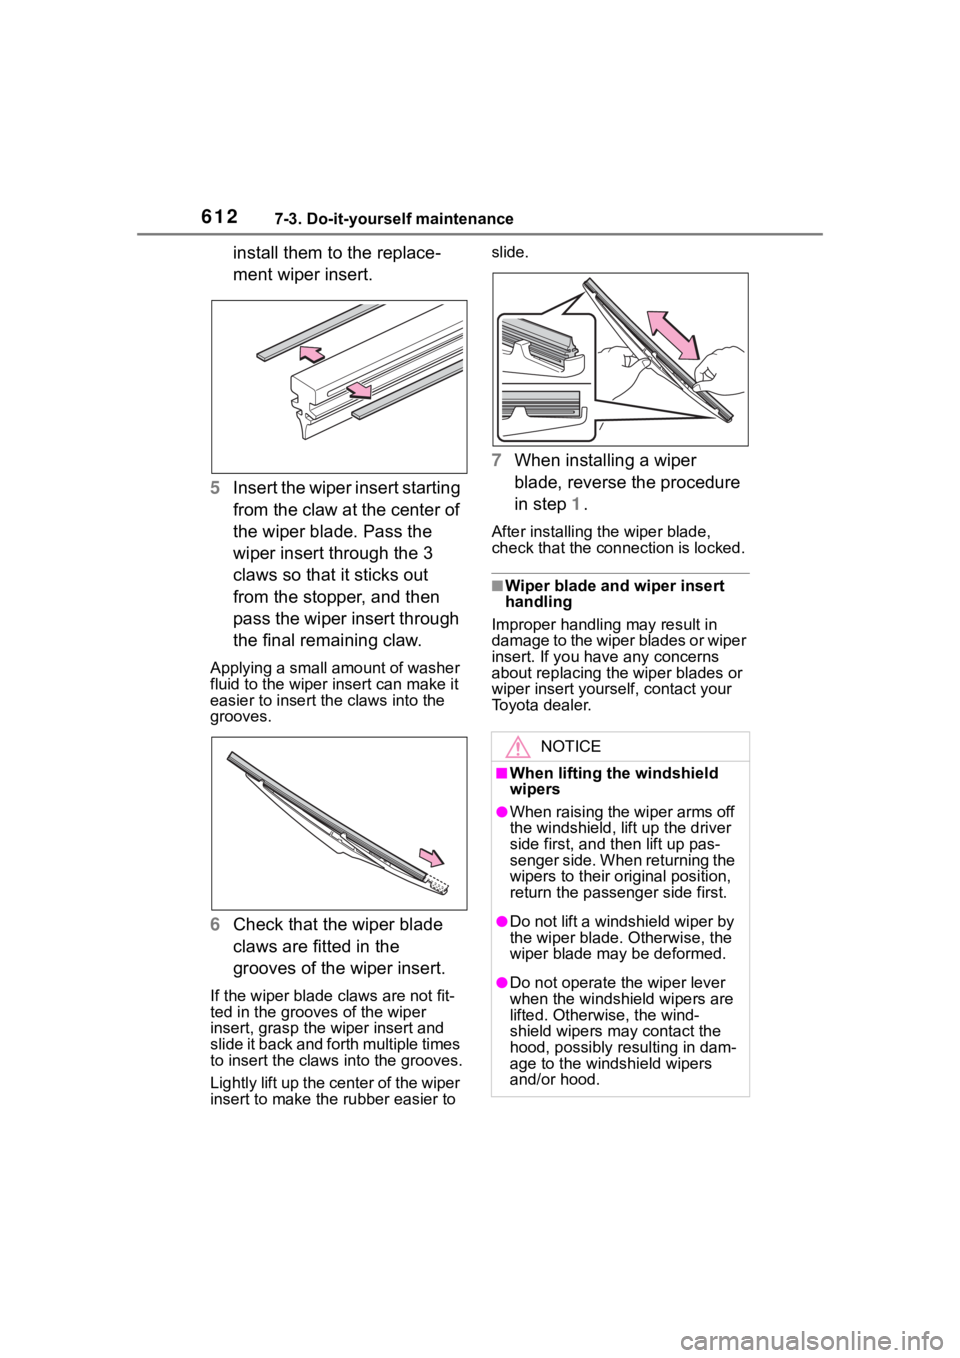
install them to the replace-
ment wiper insert.
5 Insert the wiper insert starting
from the claw at the center of
the wiper blade. Pass the
wiper insert through the 3
claws so that it sticks out
from the stopper, and then
pass the wiper insert through
the final remaining claw.
Applying a small amount of washer
fluid to the wiper insert can make it
easier to insert the claws into the
grooves.
6Check that the wiper blade
claws are fitted in the
grooves of the wiper insert.
If the wiper blade claws are not fit-
ted in the grooves of the wiper
insert, grasp the wiper insert and
slide it back and fo rth multiple times
to insert the claws into the grooves.
Lightly lift up the center of the wiper
insert to make the rubber easier to slide.
7
When installing a wiper
blade, reverse the procedure
in step 1.
After installing the wiper blade,
check that the connection is locked.
■Wiper blade and wiper insert
handling
Improper handling may result in
damage to the wiper blades or wiper
insert. If you have any concerns
about replacing the wiper blades or
wiper insert yourself, contact your
Toyota dealer.
NOTICE
■When lifting the windshield
wipers
●When raising the wiper arms off
the windshield, lift up the driver
side first, and then lift up pas-
senger side. When returning the
wipers to their original position,
return the passenger side first.
●Do not lift a windshield wiper by
the wiper blade. Otherwise, the
wiper blade may be deformed.
●Do not operate the wiper lever
when the windshield wipers are
lifted. Otherwise, the wind-
shield wipers may contact the
hood, possibly resulting in dam-
age to the windshield wipers
and/or hood.
Page 617 of 744
6177-3. Do-it-yourself maintenance
7
Maintenance and care
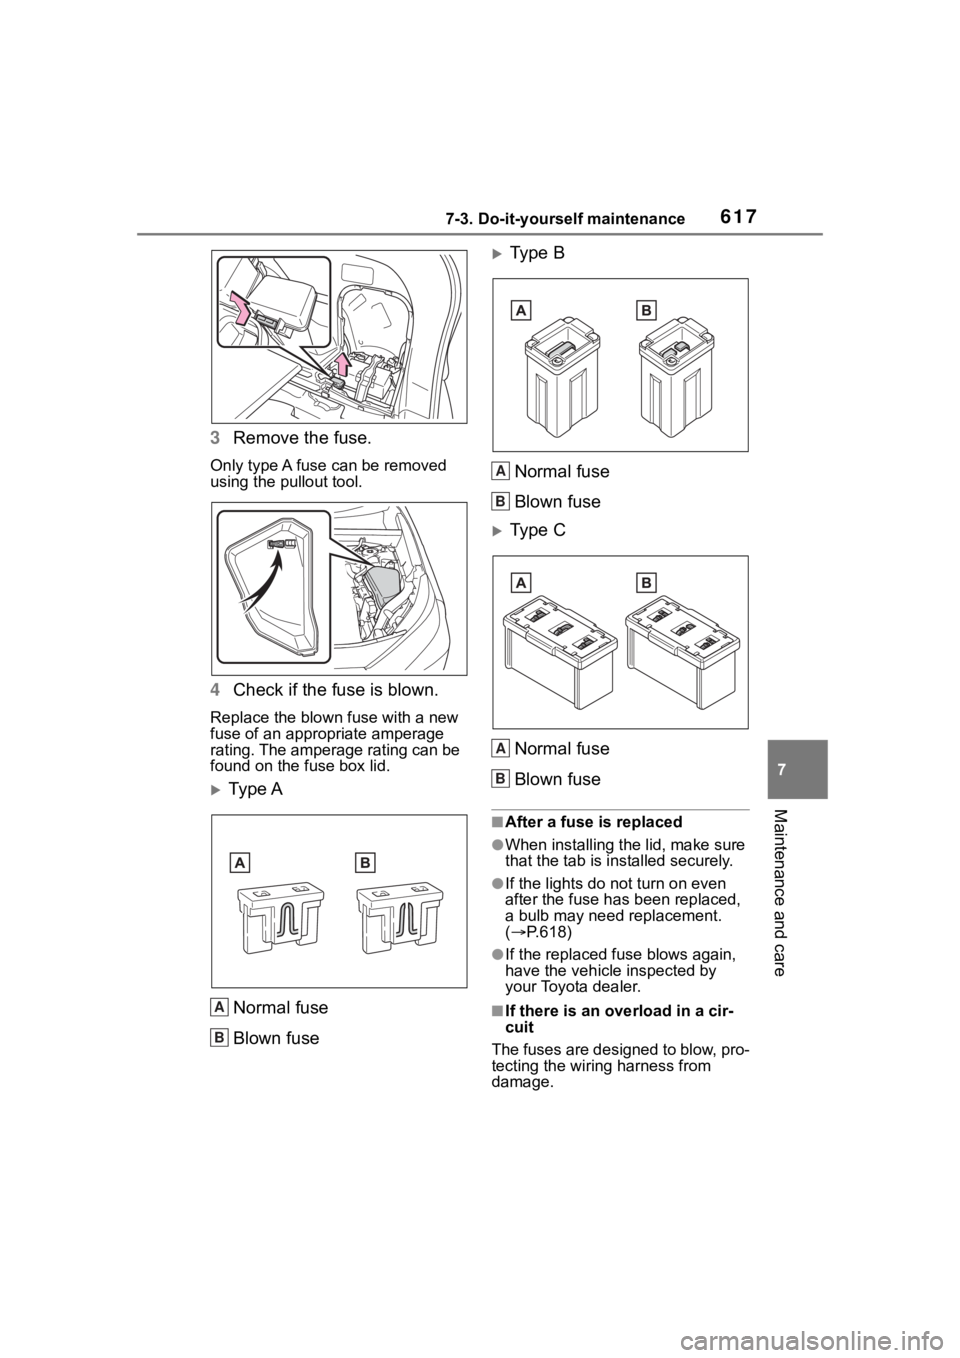
3Remove the fuse.
Only type A fuse can be removed
using the pullout tool.
4Check if the fuse is blown.
Replace the blown fuse with a new
fuse of an appropriate amperage
rating. The amperage rating can be
found on the fuse box lid.
Ty p e A
Normal fuse
Blown fuse
Type BNormal fuse
Blown fuse
Type CNormal fuse
Blown fuse
■After a fuse is replaced
●When installing the lid, make sure
that the tab is ins talled securely.
●If the lights do not turn on even
after the fuse has been replaced,
a bulb may need replacement.
( P.618)
●If the replaced fuse blows again,
have the vehicle inspected by
your Toyota dealer.
■If there is an ove rload in a cir-
cuit
The fuses are designed to blow, pro-
tecting the wiring harness from
damage.A
B
A
B
A
B
Page 618 of 744
6187-3. Do-it-yourself maintenance
Check the wattage of the light
bulb to be replaced. ( P.684)
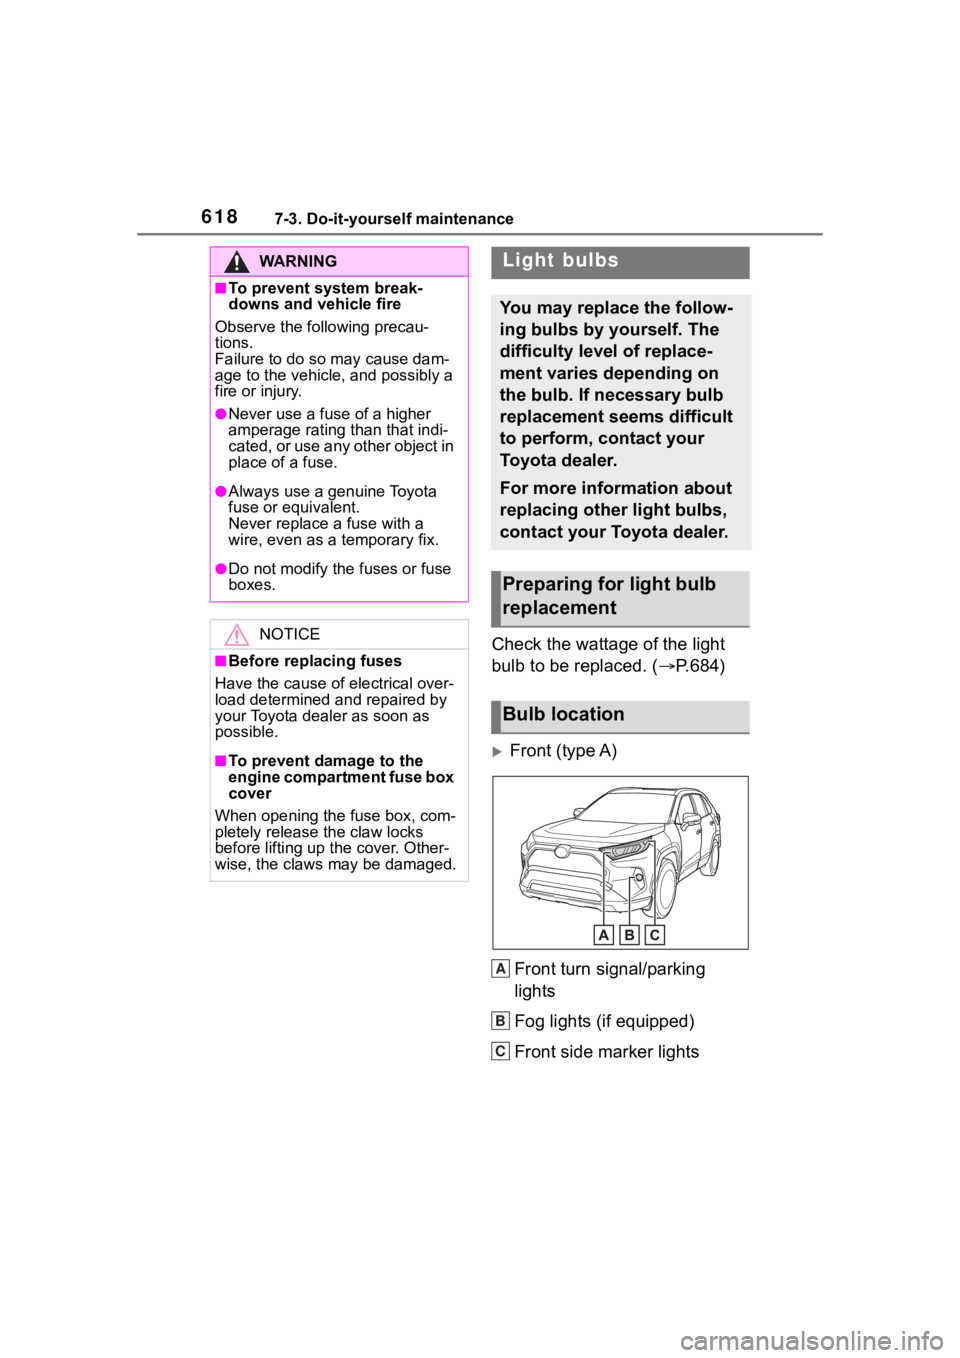
Front (type A)
Front turn signal/parking
lights
Fog lights (if equipped)
Front side marker lights
WA R N I N G
■To prevent system break-
downs and vehicle fire
Observe the following precau-
tions.
Failure to do so may cause dam-
age to the vehicle, and possibly a
fire or injury.
●Never use a fuse of a higher
amperage rating than that indi-
cated, or use any other object in
place of a fuse.
●Always use a genuine Toyota
fuse or equivalent.
Never replace a fuse with a
wire, even as a temporary fix.
●Do not modify the fuses or fuse
boxes.
NOTICE
■Before replacing fuses
Have the cause of electrical over-
load determined and repaired by
your Toyota dealer as soon as
possible.
■To prevent damage to the
engine compartment fuse box
cover
When opening the fuse box, com-
pletely release the claw locks
before lifting up the cover. Other-
wise, the claws may be damaged.
Light bulbs
You may replace the follow-
ing bulbs by yourself. The
difficulty level of replace-
ment varies depending on
the bulb. If necessary bulb
replacement seems difficult
to perform, contact your
Toyota dealer.
For more information about
replacing other light bulbs,
contact your Toyota dealer.
Preparing for light bulb
replacement
Bulb location
A
B
C