key TOYOTA RAV4 PHEV 2021 User Guide
[x] Cancel search | Manufacturer: TOYOTA, Model Year: 2021, Model line: RAV4 PHEV, Model: TOYOTA RAV4 PHEV 2021Pages: 666, PDF Size: 161.28 MB
Page 83 of 666
81
1
1-4. Theft dete rrent system
For safety and security
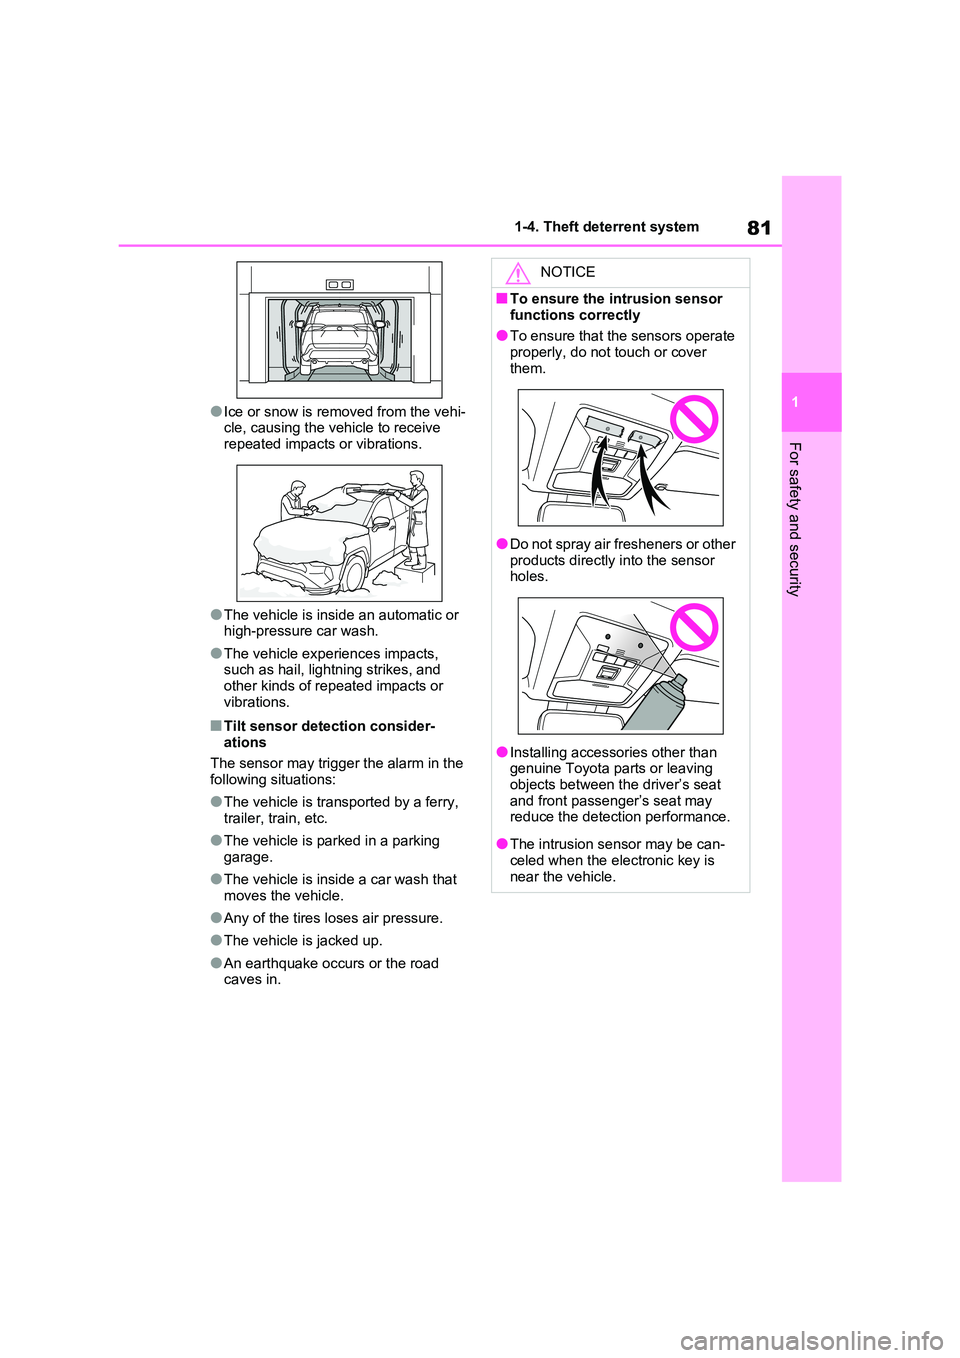
●Ice or snow is removed from the vehi-
cle, causing the vehicle to receive repeated impacts or vibrations.
●The vehicle is insid e an automatic or high-pressure car wash.
●The vehicle experiences impacts, such as hail, lightning strikes, and
other kinds of rep eated impacts or
vibrations.
■Tilt sensor detection consider - ations
The sensor may trigge r the alarm in the
following situations:
●The vehicle is transported by a ferry,
trailer, train, etc.
●The vehicle is par ked in a parking
garage.
●The vehicle is insid e a car wash that
moves the vehicle.
●Any of the tires loses air pressure.
●The vehicle is jacked up.
●An earthquake occurs or the road caves in.
NOTICE
■To ensure the intrusion sensor
functions correctly
●To ensure that the sensors operate properly, do not touch or cover
them.
●Do not spray air fresheners or other products directly into the sensor
holes.
●Installing accessories other than
genuine Toyota parts or leaving
objects between the driver’s seat and front passenger’s seat may
reduce the detection performance.
●The intrusion se nsor may be can-
celed when the ele ctronic key is
near the vehicle.
Page 117 of 666
115
2
2-2. Charging
Plug-in hybrid system
The plug-cord can be replaced
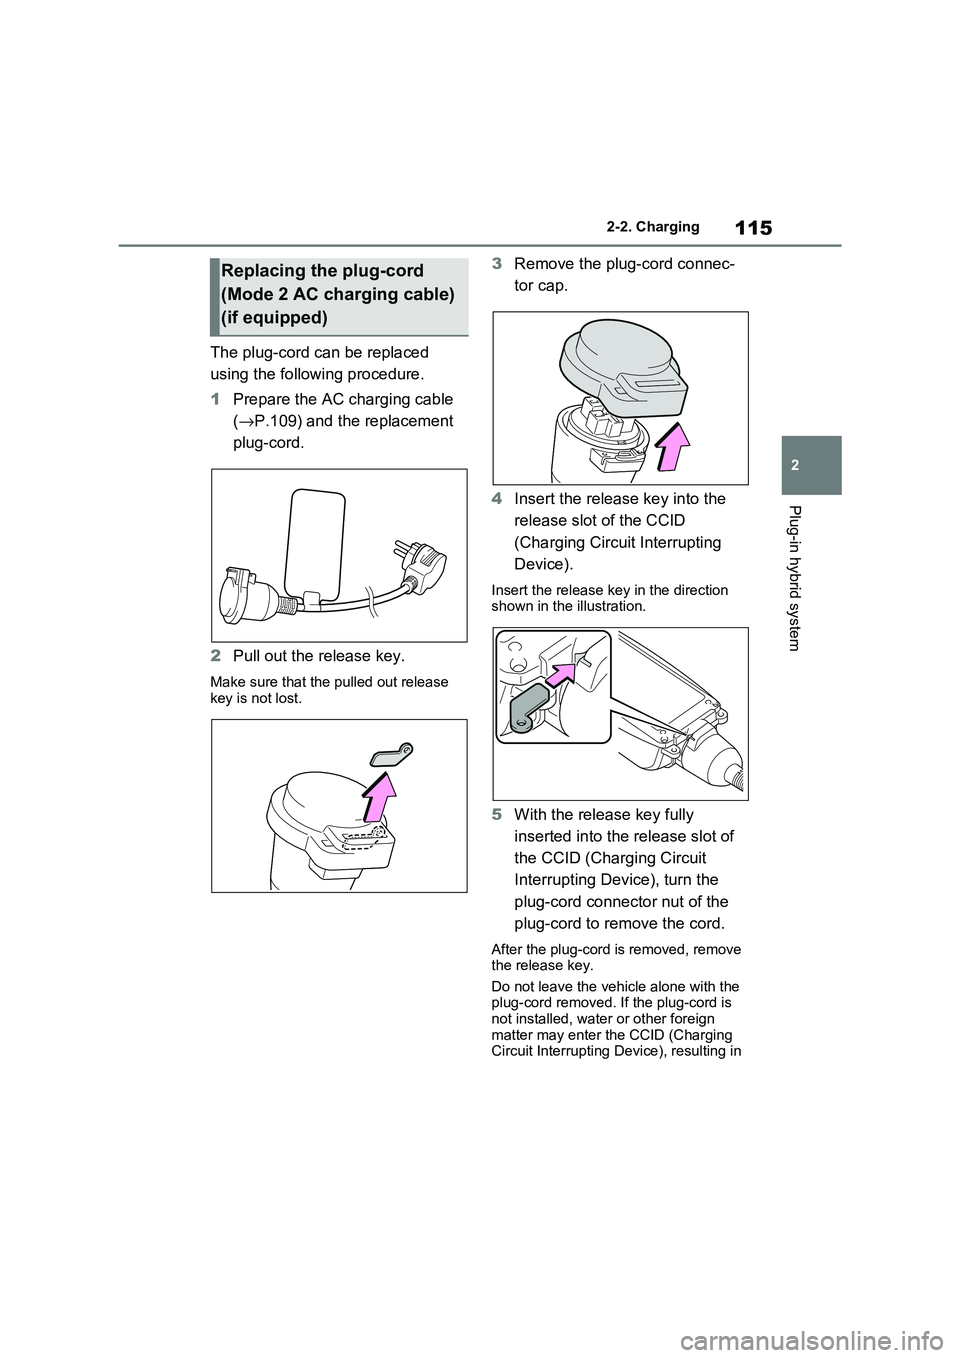
using the following procedure.
1 Prepare the AC charging cable
( →P.109) and the replacement
plug-cord.
2 Pull out the release key.
Make sure that the pulled out release key is not lost.
3 Remove the plug-cord connec-
tor cap.
4 Insert the release key into the
release slot of the CCID
(Charging Circuit Interrupting
Device).
Insert the release k ey in the direction shown in the illustration.
5 With the release key fully
inserted into the release slot of
the CCID (Charging Circuit
Interrupting Device), turn the
plug-cord connector nut of the
plug-cord to remove the cord.
After the plug-cord is removed, remove the release key.
Do not leave the vehicle alone with the
plug-cord removed. If the plug-cord is not installed, water or other foreign
matter may enter the CCID (Charging
Circuit Interrupting Device), resulting in
Replacing the plug-cord
(Mode 2 AC charging cable)
(if equipped)
Page 118 of 666
1162-2. Charging
a malfunction.
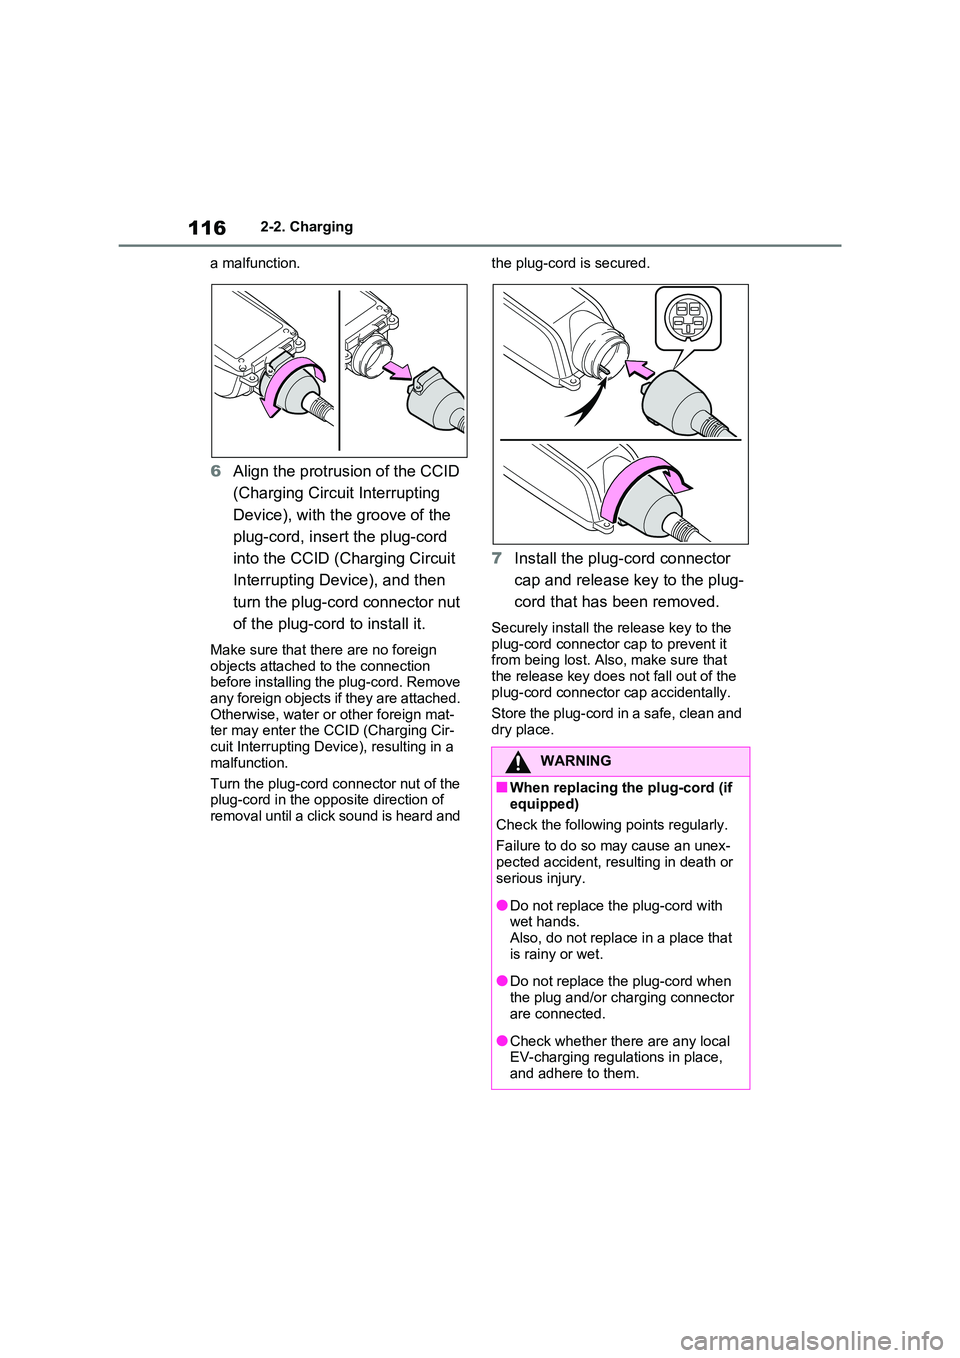
6 Align the protrusion of the CCID
(Charging Circuit Interrupting
Device), with the groove of the
plug-cord, insert the plug-cord
into the CCID (Charging Circuit
Interrupting Devi ce), and then
turn the plug-cord connector nut
of the plug-cord to install it.
Make sure that there are no foreign
objects attached to the connection
before installing the plug-cord. Remove any foreign objects if they are attached.
Otherwise, water or other foreign mat -
ter may enter the CCID (Charging Cir - cuit Interrupting Devi ce), resulting in a
malfunction.
Turn the plug-cord connector nut of the plug-cord in the opposite direction of
removal until a click sound is heard and
the plug-cord is secured.
7 Install the plug-cord connector
cap and release key to the plug-
cord that has been removed.
Securely install the release key to the
plug-cord connector cap to prevent it from being lost. Als o, make sure that
the release key does not fall out of the
plug-cord connector cap accidentally.
Store the plug-cord in a safe, clean and
dry place.
WARNING
■When replacing the plug-cord (if
equipped)
Check the following points regularly.
Failure to do so may cause an unex -
pected accident, resulting in death or serious injury.
●Do not replace th e plug-cord with wet hands.
Also, do not replace in a place that
is rainy or wet.
●Do not replace the plug-cord when
the plug and/or charging connector are connected.
●Check whether there are any local EV-charging regulations in place,
and adhere to them.
Page 123 of 666
121
2
2-2. Charging
Plug-in hybrid system
■Unlocking the charging port
lid
1 Unlock the doors using the
smart entry & start system or
wireless remote control.
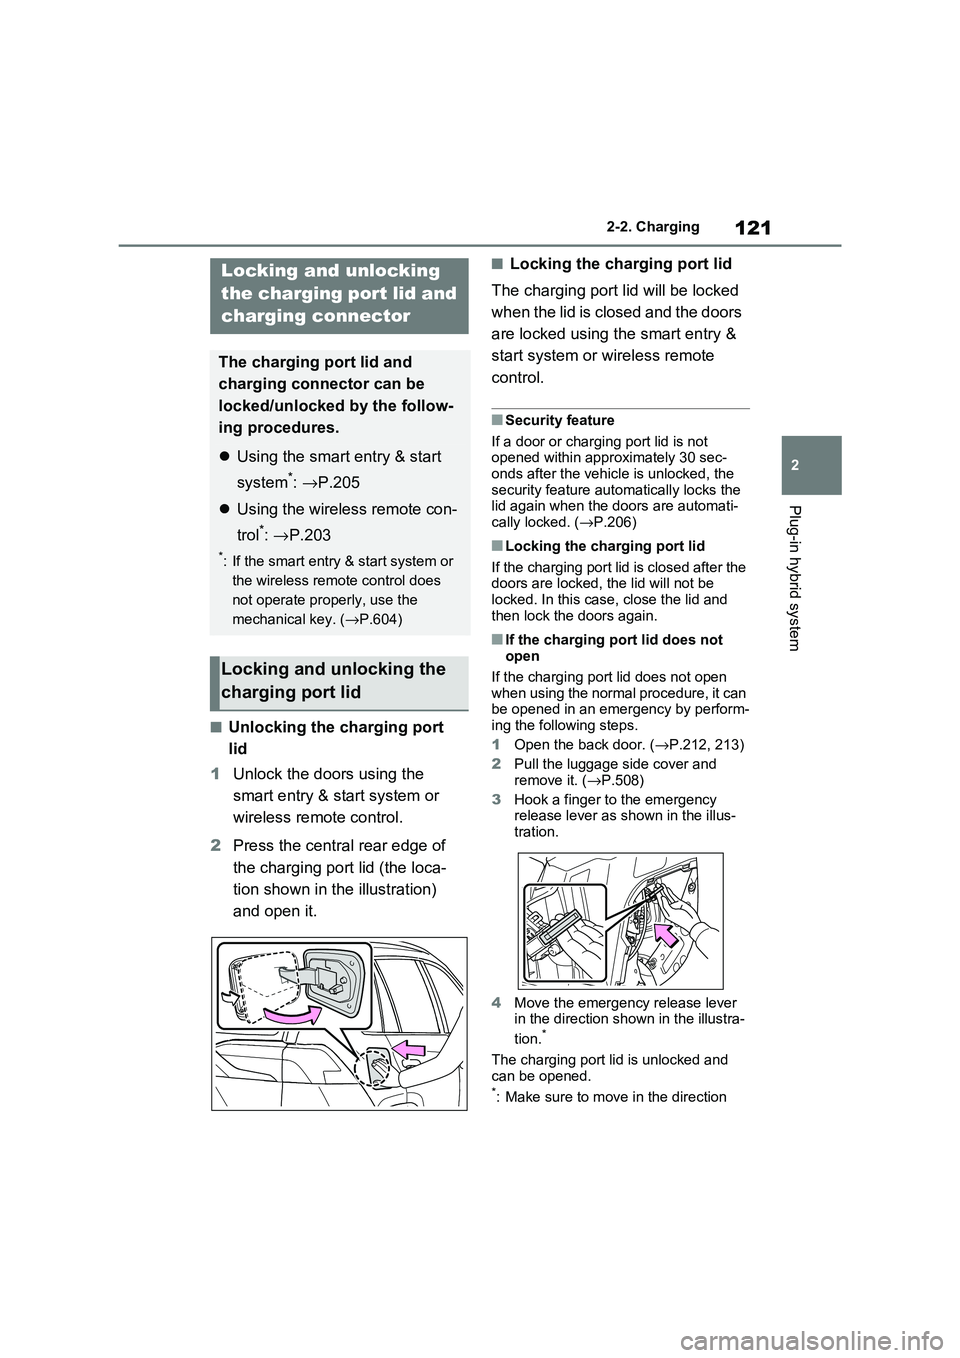
2 Press the central rear edge of
the charging port lid (the loca -
tion shown in the illustration)
and open it.
■Locking the charging port lid
The charging port lid will be locked
when the lid is closed and the doors
are locked using the smart entry &
start system or wir eless remote
control.
■Security feature
If a door or charging port lid is not opened within appr oximately 30 sec-
onds after the vehicle is unlocked, the
security feature aut omatically locks the lid again when the doors are automati -
cally locked. ( →P.206)
■Locking the charging port lid
If the charging port lid is closed after the doors are locked, the lid will not be
locked. In this case , close the lid and
then lock the doors again.
■If the charging port lid does not open
If the charging por t lid does not open
when using the normal procedure, it can be opened in an emergency by perform -
ing the following steps.
1 Open the back door. (→P.212, 213)
2 Pull the luggage side cover and
remove it. ( →P.508)
3 Hook a finger to the emergency
release lever as shown in the illus - tration.
4 Move the emergency release lever in the direction shown in the illustra -
tion.*
The charging port lid is unlocked and can be opened.*: Make sure to move in the direction
Locking and unlocking
the charging port lid and
charging connector
The charging port lid and
charging connector can be
locked/unlocked by the follow -
ing procedures.
Using the smart entry & start
system*: →P.205
Using the wireless remote con-
trol*: →P.203
*: If the smart entry & start system or
the wireless remote control does
not operate properly, use the
mechanical key. ( →P.604)
Locking and unlocking the
charging port lid
Page 203 of 666
4
201
4
Before driving
Before driving
4-1. Key information
Keys.................................. 202
4-2. Opening, closing and locking
the doors
Side doors ........................ 205
Back door ......................... 210
Smart entry & start system 223
4-3. Adjusting the seats
Front seats........................ 270
Rear seats ........................ 271
Driving position memory ... 273
Head restraints ................. 276
4-4. Adjusting the steering wheel
and mirrors
Steering wheel .................. 278
Inside rear view mirror ...... 279
Digital Rear-view Mirror .... 280
Outside rear view mirrors . 289
4-5. Opening, closing the win -
dows and moon roof
Power windows................. 291
Panoramic moon roof ....... 294
Page 204 of 666

2024-1. Key information
4-1.Key information
The following keys are provided
with the vehicle.
Electronic keys
• Operating the smart entry & start sys -
tem ( →P.223)
• Operating the wireless remote control
function ( →P.203)
Mechanical keys
Key number plate
■When riding in an aircraft
When bringing an electronic key onto an
aircraft, make sure you do not press any
buttons on the electronic key while inside the aircraft cabin. If you are carry -
ing an electronic key in your bag etc.,
ensure that the buttons are not likely to be pressed accidentally. Pressing a but -
ton may cause the electronic key to emit
radio waves that could interfere with the operation of t he aircraft.
■Electronic key battery depletion
●The standard battery life is 1 to 2
years.
●If the battery becom es low, an alarm
will sound in the cabin and a message will be displayed on the multi-informa -
tion display when the hybrid system
stops.
●To reduce key battery depletion when
the electronic key is to not be used for long periods of time, set the electronic
key to the batter y-saving mode.
( →P.225)
●As the electronic key always receives
radio waves, the ba ttery will become depleted even if the electronic key is
not used. The following symptoms
indicate that the electronic key battery may be depleted. Replace the battery
when necessary.
• The smart entry & start system or the wireless remote control does not oper -
ate.
• The detection area becomes smaller. • The LED indicator on the key surface
does not turn on.
You can replace the battery by yourself
( →P.543). However, as there is a dan-
ger that the electro nic key may be dam-
aged, it is recomm ended that replace-
ment is carried ou t by any authorized
Toyota retailer or Toyota authorized
repairer, or any reliable repairer.
●To avoid serious deterioration, do not
leave the electronic key within 1 m (3
ft.) of the followi ng electrical appli- ances that produce a magnetic field:
•TVs
• Personal computers • Cellular phones, cordless phones and
battery chargers
• Table lamps • Induction cookers
●If the electronic key is near the vehicle for longer than necessary, even if the
smart entry & star t system is not oper-
ated, the key battery may become depleted faster than normal.
■If a message regarding the state of the electronic key or power switch
mode, etc. is shown
To prevent trapping the electronic key inside the vehicle, leaving the vehicle
carrying the electronic key on your per -
son without turning t he power switch to OFF or other passengers from uninten -
tionally taking the key out of the vehicle,
Keys
Key types
A
B
C
Page 205 of 666
203
4
4-1. Key information
Before driving
etc., a message that prompts the user to
confirm the state of the electronic key or power switch mode may be shown on
the multi-information display. In those
cases, follow the inst ructions on the dis- play immediately.
■If “Key Battery Low Replace Key
Battery” is displayed on the multi-
information display
The electronic key has a low battery.
Replace the electronic key battery.
( →P.543)
■Replacing the battery
→ P.543
■Confirmation of the registered key
number
The number of keys already registered to the vehicle can be confirmed. Ask any
authorized Toyota retailer or Toyota
authorized repairer, or any reliable repairer for details.
■If “A New Key has been Registered
Contact Your Dealer for Details” is
displayed on the multi-information display
This message will be displayed each
time the driver’s door is opened when the doors are unlocked from the outside
for approximately 10 days after a new
electronic key has been registered. If this message is displayed but you
have not had a new electronic key regis -
tered, ask any authorized Toyota retailer or Toyota authorized repairer, or any
reliable repairer to check if an unknown
electronic key (other than those in your possession) has been registered.
The electronic keys are equipped
with the following wireless remote
control:
NOTICE
■To prevent key damage
●Do not drop the ke ys, subject them
to strong shocks or bend them.
●Do not expose the keys to high
temperatures for long periods of time.
●Do not get the k eys wet or wash them in an ultrasonic washer, etc.
●Do not attach metallic or magnetic materials to the k eys or place the
keys close to such materials.
●Do not disasse mble the keys.
●Do not attach a sticker or anything else to the surface of the electronic
key.
●Do not place the k eys near objects
that produce magnetic fields, such
as TVs, audio systems and induc - tion cookers.
●Do not place the keys near medical electrical equipment such as low-
frequency therapy equipment or
microwave therapy equipment, and do not receive medical attention
with the keys on your person.
■Carrying the electronic key on
your person
Carry the electronic key 10 cm (3.9 in.) or more away fr om electric appli-
ances that are turned on. Radio
waves emitted fr om electric appli- ances within 10 cm (3.9 in.) of the
electronic key may in terfere with the
key, causing the key to not function properly.
■In case of a smart entry & start system malfunction or other key-
related problems
→ P.604
■When an electronic key is lost
→ P.603
Wireless remote control
Page 206 of 666
2044-1. Key information
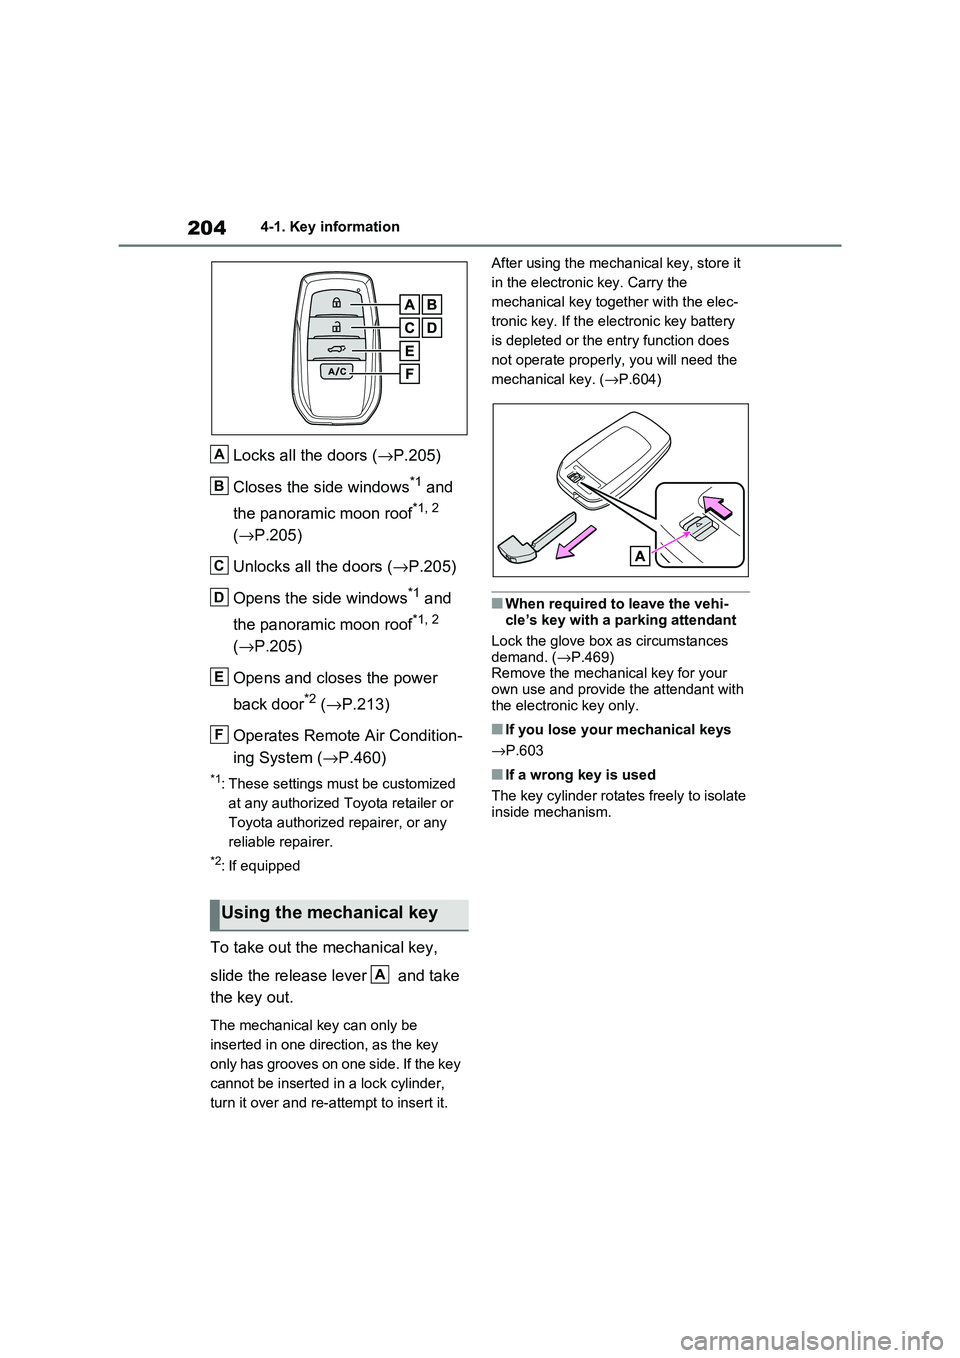
Locks all the doors (→P.205)
Closes the side windows*1 and
the panoramic moon roof*1, 2
( →P.205)
Unlocks all the doors ( →P.205)
Opens the side windows*1 and
the panoramic moon roof*1, 2
( →P.205)
Opens and closes the power
back door*2 ( →P.213)
Operates Remote Air Condition -
ing System ( →P.460)
*1: These settings must be customized
at any authorized Toyota retailer or
Toyota authorized repairer, or any
reliable repairer.
*2: If equipped
To take out the mechanical key,
slide the release lever and take
the key out.
The mechanical key can only be
inserted in one direction, as the key
only has grooves on one side. If the key
cannot be inserted i n a lock cylinder,
turn it over and re-at tempt to insert it.
After using the mec hanical key, store it
in the electronic key. Carry the
mechanical key together with the elec -
tronic key. If the elec tronic key battery
is depleted or the ent ry function does
not operate properly, you will need the
mechanical key. ( →P.604)
■When required to leave the vehi-
cle’s key with a parking attendant
Lock the glove box a s circumstances demand. ( →P.469)
Remove the mechani cal key for your
own use and provide the attendant with the electronic key only.
■If you lose your mechanical keys
→ P.603
■If a wrong key is used
The key cylinder rotate s freely to isolate inside mechanism.
Using the mechanical key
A
B
C
D
E
F
A
Page 207 of 666
205
4
4-2. Opening, closing and locking the doors
Before driving
4-2.Opening, closing and locking the doors
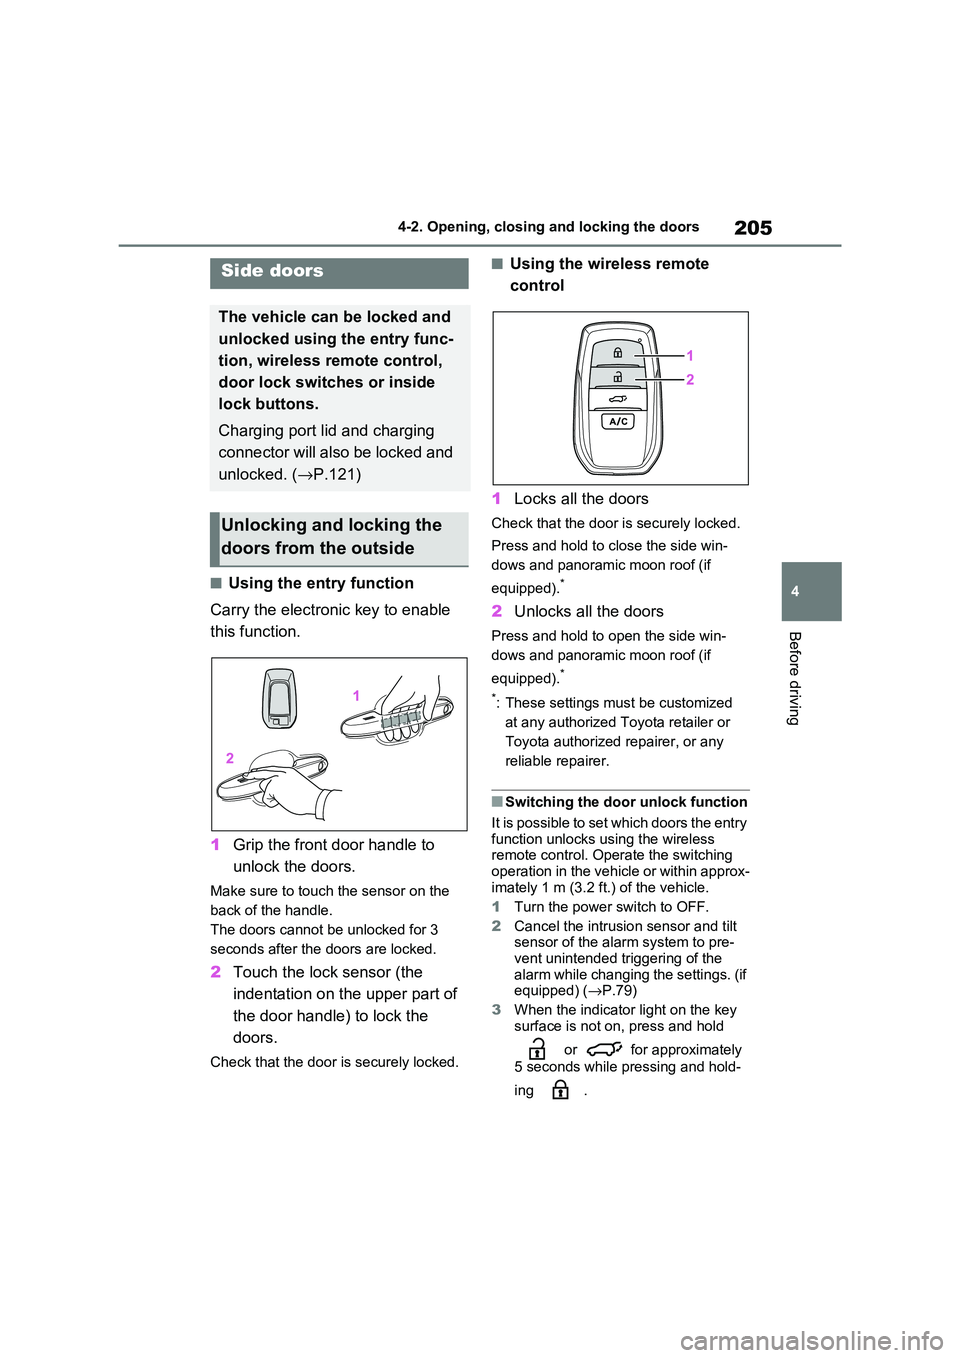
■Using the entry function
Carry the electronic key to enable
this function.
1 Grip the front door handle to
unlock the doors.
Make sure to touch the sensor on the
back of the handle.
The doors cannot be unlocked for 3
seconds after the doors are locked.
2 Touch the lock sensor (the
indentation on the upper part of
the door handl e) to lock the
doors.
Check that the door is securely locked.
■Using the wireless remote
control
1 Locks all the doors
Check that the door is securely locked.
Press and hold to close the side win-
dows and panoram ic moon roof (if
equipped).*
2 Unlocks all the doors
Press and hold to open the side win-
dows and panoram ic moon roof (if
equipped).*
*: These settings must be customized
at any authorized Toyota retailer or
Toyota authorized repairer, or any
reliable repairer.
■Switching the door unlock function
It is possible to set which doors the entry function unlocks us ing the wireless
remote control. Ope rate the switching
operation in the vehicle or within approx - imately 1 m (3.2 f t.) of the vehicle.
1 Turn the power switch to OFF.
2 Cancel the intrusion sensor and tilt
sensor of the alarm system to pre -
vent unintended triggering of the
alarm while changing the settings. (if equipped) ( →P.79)
3 When the indicator light on the key
surface is not on, press and hold
or for approximately
5 seconds while pressing and hold -
ing .
Side doors
The vehicle can be locked and
unlocked using the entry func -
tion, wireless remote control,
door lock switches or inside
lock buttons.
Charging port lid and charging
connector will also be locked and
unlocked. ( →P.121)
Unlocking and locking the
doors from the outside
Page 208 of 666
2064-2. Opening, closing and locking the doors
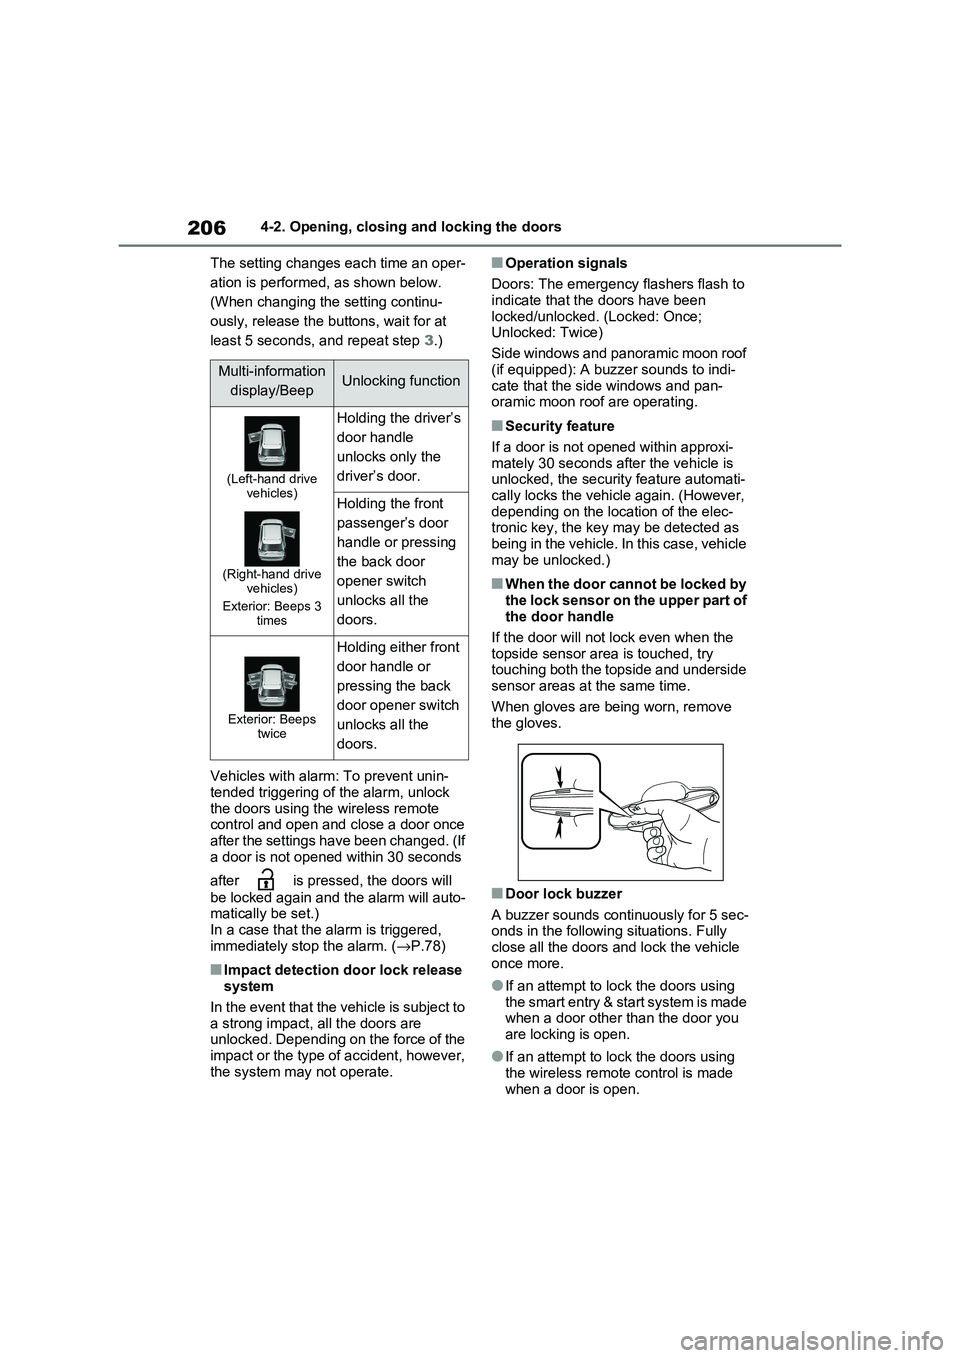
The setting changes each time an oper -
ation is performed, as shown below.
(When changing the setting continu-
ously, release the buttons, wait for at
least 5 seconds, and repeat step 3.)
Vehicles with alarm: To prevent unin - tended triggering of the alarm, unlock
the doors using the wireless remote
control and open and close a door once after the settings have been changed. (If
a door is not opened within 30 seconds
after is pressed, the doors will
be locked again and the alarm will auto - matically be set.)
In a case that the a larm is triggered,
immediately st op the alarm. (→P.78)
■Impact detection door lock release system
In the event that the vehicle is subject to
a strong impact, all the doors are unlocked. Depending on the force of the
impact or the type of accident, however,
the system may not operate.
■Operation signals
Doors: The emergency flashers flash to indicate that the doors have been
locked/unlocked. (Locked: Once;
Unlocked: Twice)
Side windows and panoramic moon roof
(if equipped): A buzzer sounds to indi -
cate that the side windows and pan- oramic moon roof are operating.
■Security feature
If a door is not opened within approxi -
mately 30 seconds af ter the vehicle is unlocked, the security feature automati -
cally locks the vehicl e again. (However,
depending on the location of the elec - tronic key, the key m ay be detected as
being in the vehicle. In this case, vehicle
may be unlocked.)
■When the door cannot be locked by the lock sensor on the upper part of
the door handle
If the door will not lock even when the topside sensor are a is touched, try
touching both the topside and underside
sensor areas at the same time.
When gloves are being worn, remove
the gloves.
■Door lock buzzer
A buzzer sounds continuously for 5 sec -
onds in the followi ng situations. Fully close all the doors and lock the vehicle
once more.
●If an attempt to lo ck the doors using the smart entry & start system is made
when a door other than the door you
are locking is open.
●If an attempt to lo ck the doors using
the wireless remote control is made when a door is open.
Multi-information
display/BeepUnlocking function
(Left-hand drive vehicles)
(Right-hand drive vehicles)
Exterior: Beeps 3 times
Holding the driver’s
door handle
unlocks only the
driver’s door.
Holding the front
passenger’s door
handle or pressing
the back door
opener switch
unlocks all the
doors.
Exterior: Beeps twice
Holding either front
door handle or
pressing the back
door opener switch
unlocks all the
doors.