lock TOYOTA RAV4 PLUG-IN HYBRID 2023 Owner's Manual
[x] Cancel search | Manufacturer: TOYOTA, Model Year: 2023, Model line: RAV4 PLUG-IN HYBRID, Model: TOYOTA RAV4 PLUG-IN HYBRID 2023Pages: 718, PDF Size: 167.55 MB
Page 80 of 718
781-4. Theft deterrent system
*: If equipped
■Setting
Turn the power switch to OFF, have
all the passengers exit the vehicle
and ensure that all the doors are
closed.
Using the entry function:
Touch the sensor area on the front
outside door handle twice within 5
seconds.
Using the wireless remote control:
Press twice within 5 sec-
onds.
■Canceling
Using the entry function:
Hold the front outside door handle.
Using the wireless remote control:
Press .
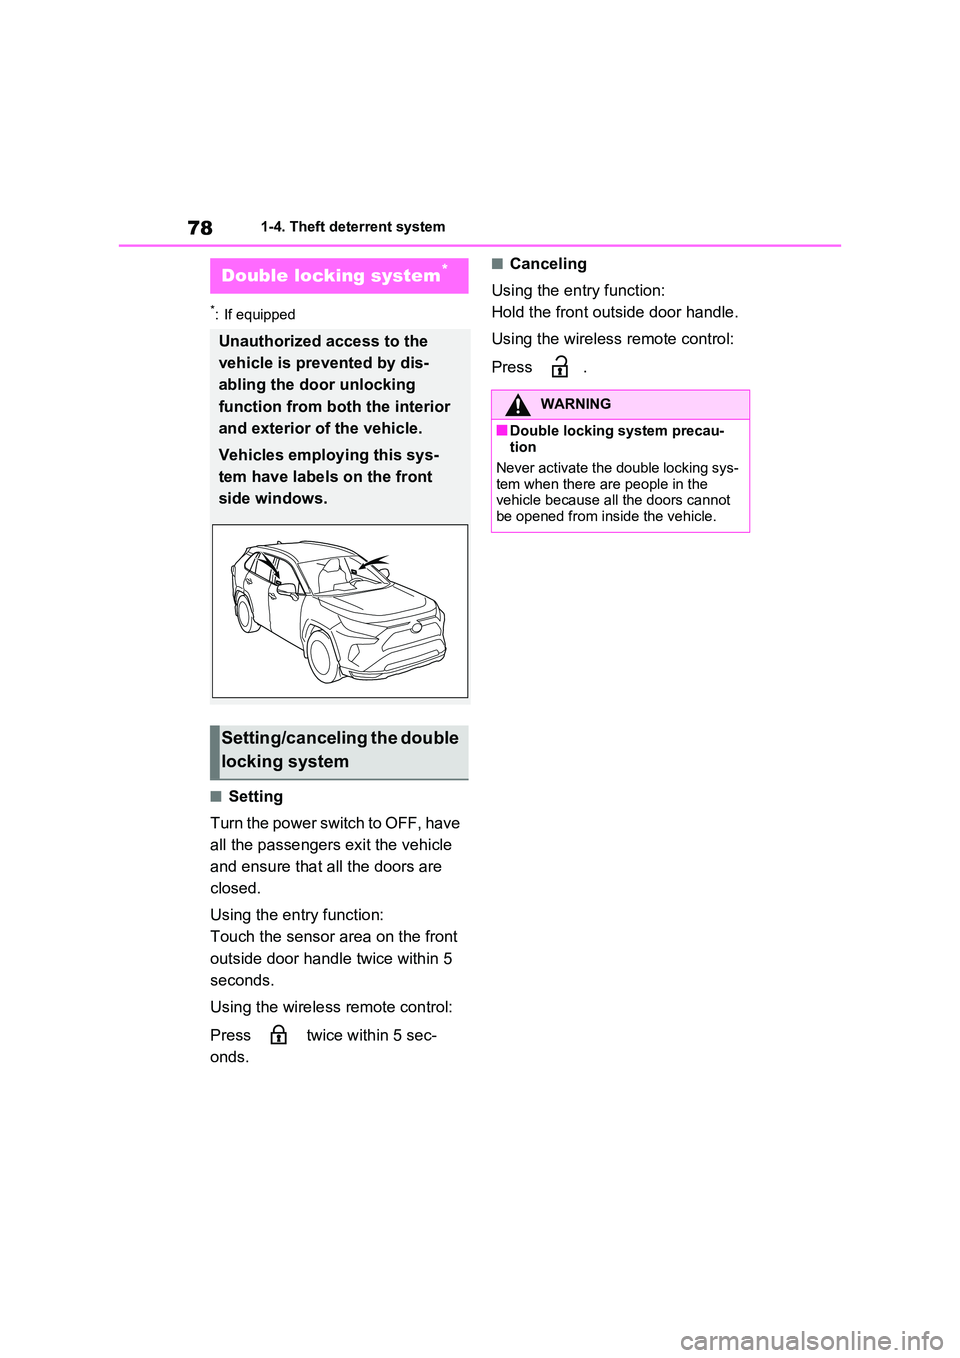
Double locking system*
Unauthorized access to the
vehicle is prevented by dis-
abling the door unlocking
function from both the interior
and exterior of the vehicle.
Vehicles employing this sys-
tem have labels on the front
side windows.
Setting/canceling the double
locking system
WARNING
■Double locking system precau- tion
Never activate the double locking sys-
tem when there are people in the vehicle because all the doors cannot be opened from inside the vehicle.
Page 81 of 718
79
1
1-4. Theft deterrent system
For safety and security
*: If equipped
■Items to check before locking
the vehicle
To prevent unexpected triggering of
the alarm and vehicle theft, make
sure of the following:
Nobody is in the vehicle.
The side windows and pan-
oramic moon roof (if equipped)
are closed before the alarm is
set.
No valuables or other personal
items are left in the vehicle.
■Setting
Close the doors and hood, and lock
all the doors using the entry func-
tion or wireless remote control. The
system will be set automatically
after 30 seconds.
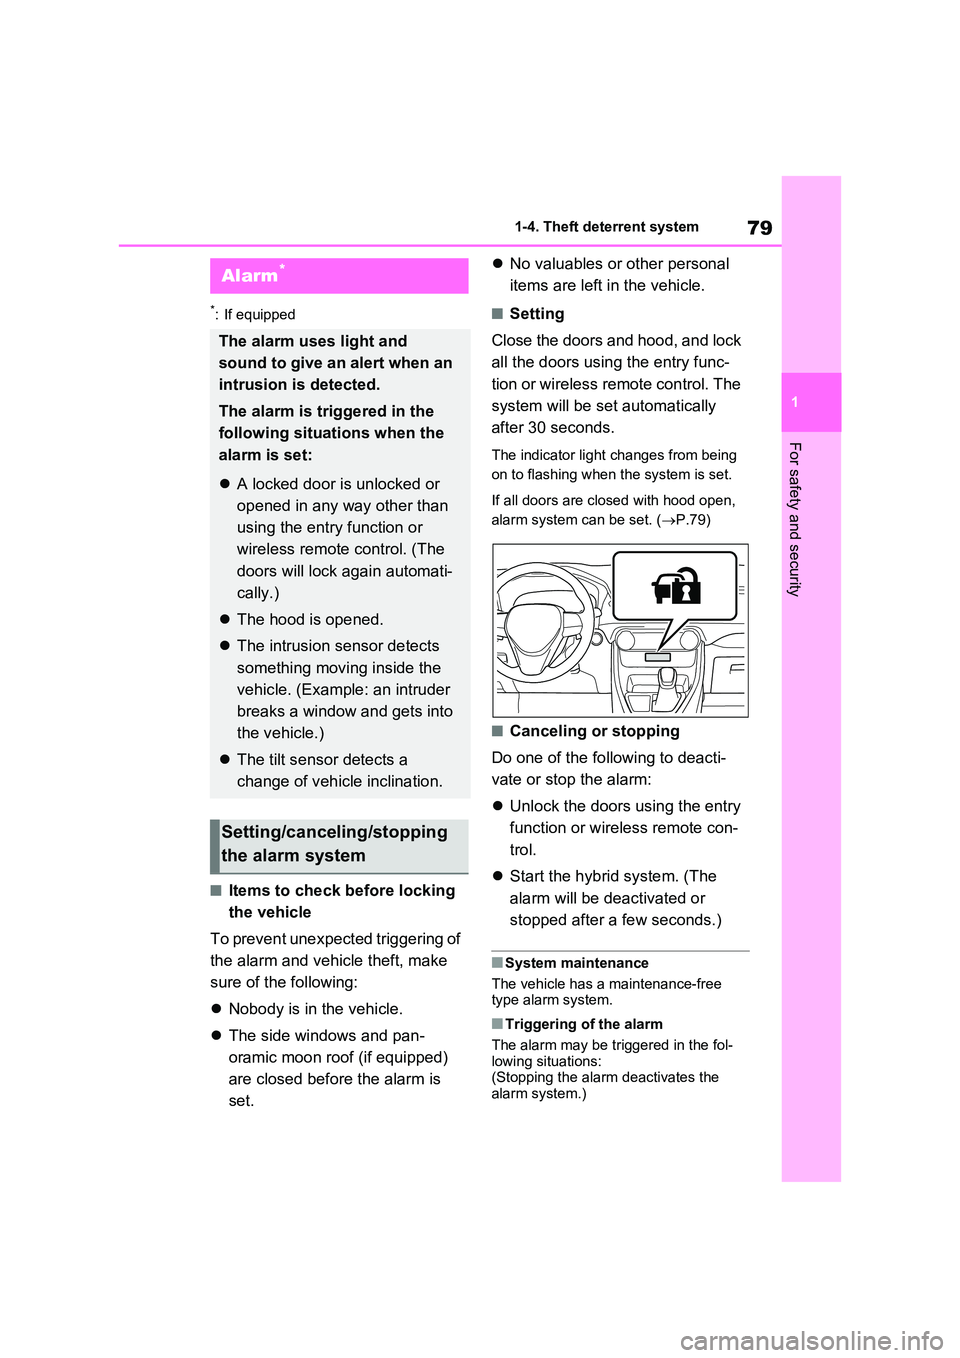
The indicator light changes from being
on to flashing when the system is set.
If all doors are closed with hood open,
alarm system can be set. ( P.79)
■Canceling or stopping
Do one of the following to deacti-
vate or stop the alarm:
Unlock the doors using the entry
function or wireless remote con-
trol.
Start the hybrid system. (The
alarm will be deactivated or
stopped after a few seconds.)
■System maintenance
The vehicle has a maintenance-free type alarm system.
■Triggering of the alarm
The alarm may be triggered in the fol- lowing situations:(Stopping the alarm deactivates the
alarm system.)
Alarm*
The alarm uses light and
sound to give an alert when an
intrusion is detected.
The alarm is triggered in the
following situations when the
alarm is set:
A locked door is unlocked or
opened in any way other than
using the entry function or
wireless remote control. (The
doors will lock again automati-
cally.)
The hood is opened.
The intrusion sensor detects
something moving inside the
vehicle. (Example: an intruder
breaks a window and gets into
the vehicle.)
The tilt sensor detects a
change of vehicle inclination.
Setting/canceling/stopping
the alarm system
Page 82 of 718

801-4. Theft deterrent system
●The doors are unlocked using the
mechanical key.
●A person inside the vehicle opens a
door or hood, or unlocks the vehicle using an inside lock button.
●The 12-volt battery is recharged or replaced when the vehicle is locked. ( P.573)
■Alarm-operated door lock
In the following cases, depending on the
situation, the door may automatically lock to prevent improper entry into the vehicle:
●When a person remaining in the vehi-cle unlocks the door and the alarm is
activated.
●While the alarm is activated, a person
remaining in the vehicle unlocks the door.
●When recharging or replacing the 12-volt battery.
■Customization (if equipped)
The alarm can be set to deactivate when the mechanical key is used to unlock.(Customizable features: P.596)
■The intrusion sensor and tilt
sensor detection
The intrusion sensor detects
intruders or movement in the
vehicle.
The tilt sensor detects changes
in vehicle inclination, such as
when the vehicle is towed away.
This system is designed to deter
and prevent vehicle theft but does
not guarantee absolute security
against all intrusions.
■Setting the intrusion sensor
and tilt sensor
The intrusion sensor and tilt sensor
will be set automatically when the
alarm is set. ( P.79)
■Canceling the intrusion sensor
and tilt sensor
If you are leaving pets or other
moving things inside the vehicle,
make sure to disable the intrusion
sensor and tilt sensor before setting
NOTICE
■To ensure the system operates correctly
Do not modify or remove the system.
If modified or removed, the proper operation of the system cannot be guaranteed.
Intrusion sensor and tilt
sensor
Page 83 of 718
81
1
1-4. Theft deterrent system
For safety and security
the alarm, as they will respond to
movement inside the vehicle.
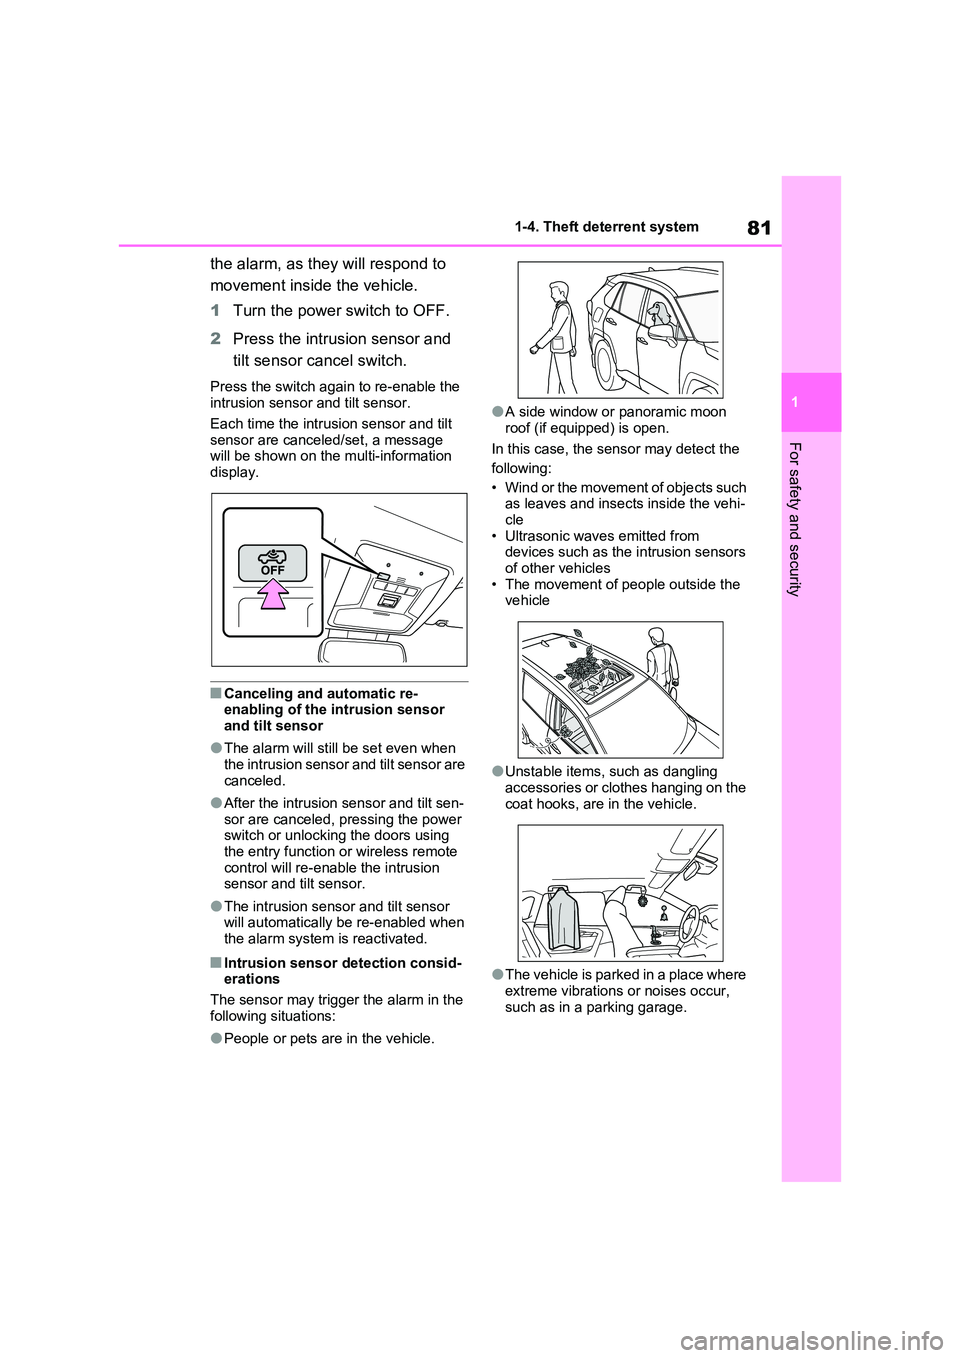
1 Turn the power switch to OFF.
2 Press the intrusion sensor and
tilt sensor cancel switch.
Press the switch again to re-enable the intrusion sensor and tilt sensor.
Each time the intrusion sensor and tilt
sensor are canceled/set, a message will be shown on the multi-information display.
■Canceling and automatic re-enabling of the intrusion sensor
and tilt sensor
●The alarm will still be set even when
the intrusion sensor and tilt sensor are canceled.
●After the intrusion sensor and tilt sen-sor are canceled, pressing the power switch or unlocking the doors using
the entry function or wireless remote control will re-enable the intrusion sensor and tilt sensor.
●The intrusion sensor and tilt sensor will automatically be re-enabled when
the alarm system is reactivated.
■Intrusion sensor detection consid- erations
The sensor may trigger the alarm in the
following situations:
●People or pets are in the vehicle.
●A side window or panoramic moon
roof (if equipped) is open.
In this case, the sensor may detect the
following:
• Wind or the movement of objects such as leaves and insects inside the vehi-
cle • Ultrasonic waves emitted from devices such as the intrusion sensors
of other vehicles • The movement of people outside the vehicle
●Unstable items, such as dangling accessories or clothes hanging on the
coat hooks, are in the vehicle.
●The vehicle is parked in a place where
extreme vibrations or noises occur, such as in a parking garage.
Page 85 of 718
2
83
2
Plug-in hybrid system
Plug-in hybrid system
2-1. Plug-in hybrid system
Plug-in hybrid system features
......................................... 84
Plug-in hybrid system precau-
tions .................................. 95
Plug-in Hybrid Electric Vehicle
driving tips ...................... 100
EV driving range ............... 103
2-2. Charging
Charging equipment ......... 106
AC charging cable ............ 109
Locking and unlocking the
charging port lid and charging
connector........................ 121
Power sources that can be
used ................................ 124
Charging methods ............ 127
Charging tips .................... 130
Things to know before
charging .......................... 132
How to charge .................. 135
Using the charging schedule
function ........................... 144
Using the “My Room Mode”
....................................... 164
When charging cannot be car-
ried out ........................... 167
Page 101 of 718
99
2
2-1. Plug-in hybrid system
Plug-in hybrid system
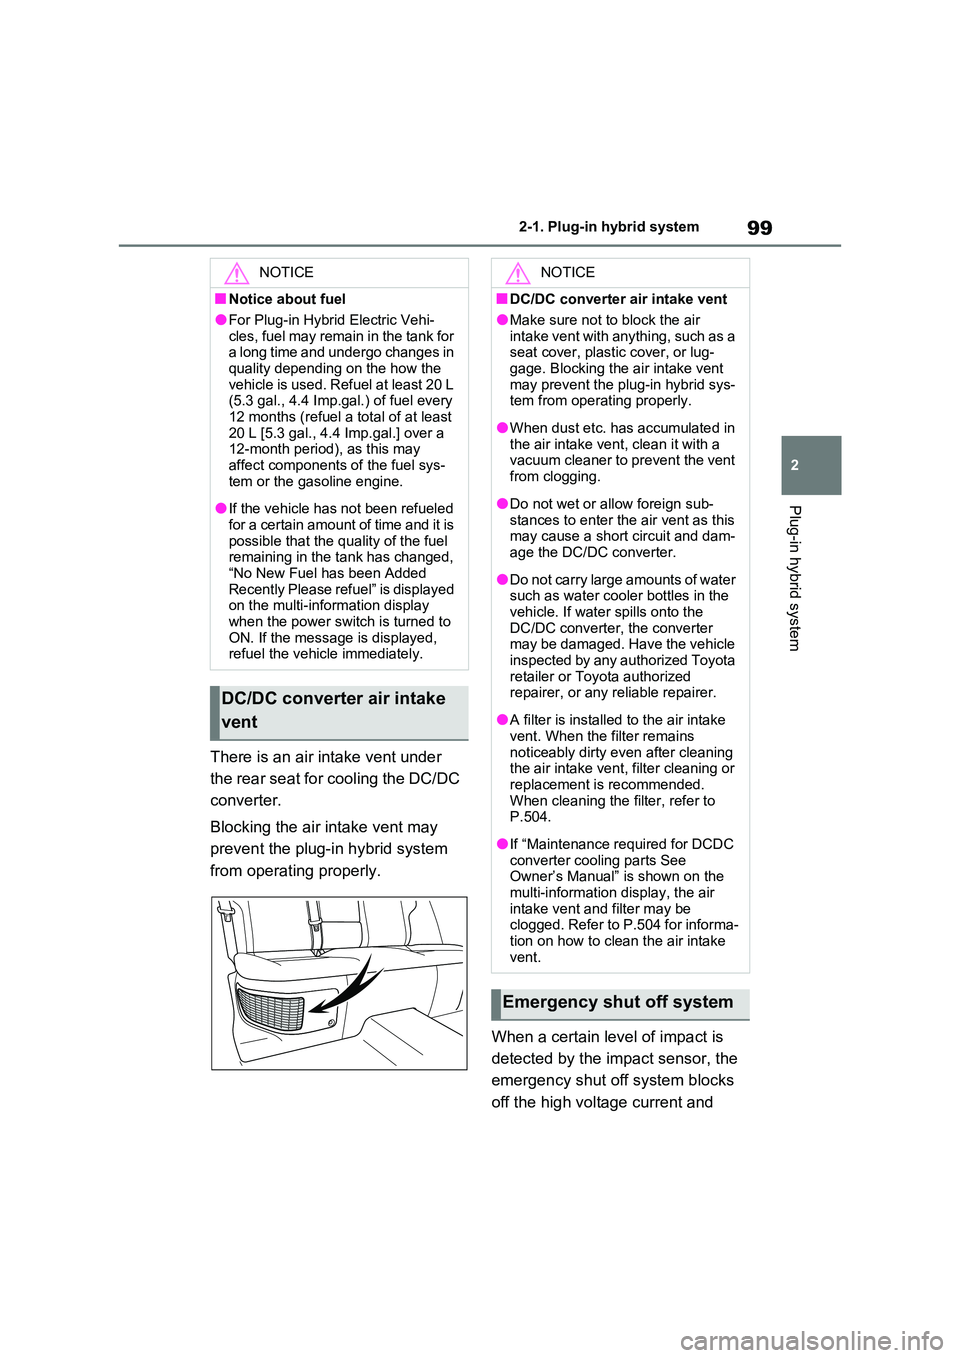
There is an air intake vent under
the rear seat for cooling the DC/DC
converter.
Blocking the air intake vent may
prevent the plug-in hybrid system
from operating properly.
When a certain level of impact is
detected by the impact sensor, the
emergency shut off system blocks
off the high voltage current and
NOTICE
■Notice about fuel
●For Plug-in Hybrid Electric Vehi-
cles, fuel may remain in the tank for a long time and undergo changes in quality depending on the how the
vehicle is used. Refuel at least 20 L (5.3 gal., 4.4 Imp.gal.) of fuel every 12 months (refuel a total of at least
20 L [5.3 gal., 4.4 Imp.gal.] over a 12-month period), as this may affect components of the fuel sys-
tem or the gasoline engine.
●If the vehicle has not been refueled
for a certain amount of time and it is possible that the quality of the fuel remaining in the tank has changed,
“No New Fuel has been Added Recently Please refuel” is displayed on the multi-information display
when the power switch is turned to ON. If the message is displayed, refuel the vehicle immediately.
DC/DC converter air intake
vent
NOTICE
■DC/DC converter air intake vent
●Make sure not to block the air
intake vent with anything, such as a seat cover, plastic cover, or lug-gage. Blocking the air intake vent
may prevent the plug-in hybrid sys- tem from operating properly.
●When dust etc. has accumulated in the air intake vent, clean it with a vacuum cleaner to prevent the vent
from clogging.
●Do not wet or allow foreign sub-
stances to enter the air vent as this may cause a short circuit and dam-age the DC/DC converter.
●Do not carry large amounts of water such as water cooler bottles in the
vehicle. If water spills onto the DC/DC converter, the converter may be damaged. Have the vehicle
inspected by any authorized Toyota retailer or Toyota authorized repairer, or any reliable repairer.
●A filter is installed to the air intake vent. When the filter remains
noticeably dirty even after cleaning the air intake vent, filter cleaning or replacement is recommended.
When cleaning the filter, refer to P.504.
●If “Maintenance required for DCDC converter cooling parts See Owner’s Manual” is shown on the
multi-information display, the air intake vent and filter may be clogged. Refer to P.504 for informa-
tion on how to clean the air intake vent.
Emergency shut off system
Page 109 of 718
107
2 2-2. Charging
Plug-in hybrid system
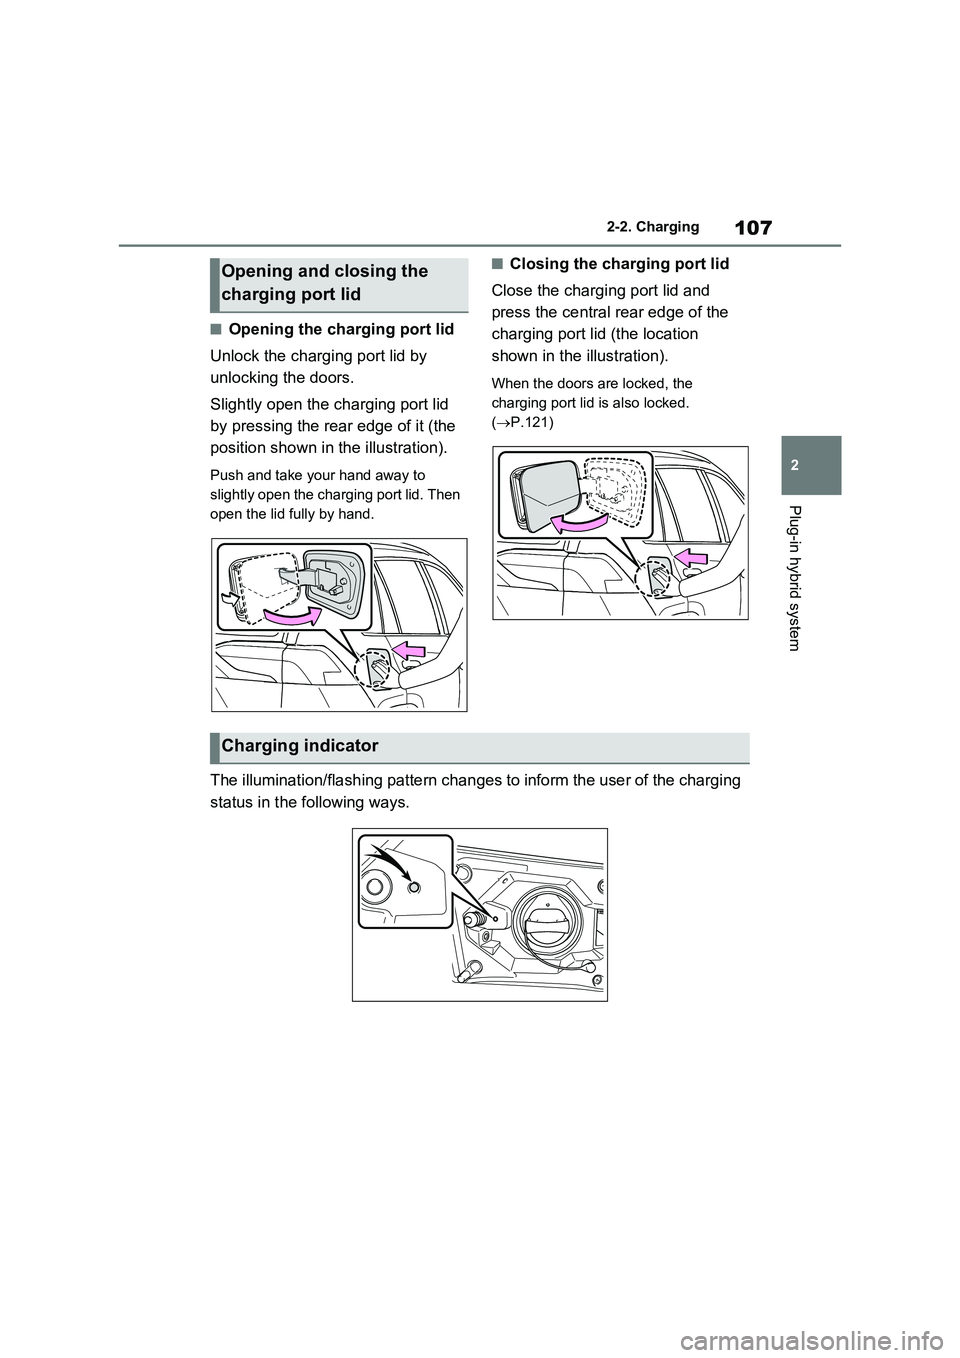
■Opening the charging port lid
Unlock the charging port lid by
unlocking the doors.
Slightly open the charging port lid
by pressing the rear edge of it (the
position shown in the illustration).
Push and take your hand away to
slightly open the charging port lid. Then
open the lid fully by hand.
■Closing the charging port lid
Close the charging port lid and
press the central rear edge of the
charging port lid (the location
shown in the illustration).
When the doors are locked, the
charging port lid is also locked.
(P.121)
The illumination/flashing pattern changes to inform the user of the charging
status in the following ways.
Opening and closing the
charging port lid
Charging indicator
Page 111 of 718
109
2
2-2. Charging
Plug-in hybrid system
*: If the AC charging cable is equipped.
AC charging cable*
The function, correct operating
procedure, etc. of the AC
charging cable are explained.
WARNING
■When using the AC charging cable and CCID (Charging Circuit Interrupting Device)
Observe the following precautions.
Failure to do so may cause an unex- pected accident, resulting in death or
serious injury.
●Do not attempt to disassemble or repair the AC charging cable,
charging connector, plug or CCID (Charging Circuit Interrupting Device).
If a problem arises with the AC charging cable or the CCID (Charging Circuit Interrupting
Device), stop charging immediately and contact any authorized Toyota
retailer or Toyota authorized repairer, or any reliable repairer.
●Do not subject the AC charging cable, charging connector, plug or CCID (Charging Circuit Interrupting
Device) to strong force or impact.
●Do not apply excessive force to the
AC charging cable by forcefully folding, twisting, pulling or dragging the AC charging cable.
●Do not damage the AC charging cable with sharp objects.
●Do not fold the charging connector or plug or insert foreign objects into
them.
●Do not put the charging connector
and plug into water.
●Do not bring the AC charging cable to a high-temperature item such as a heating device.
●Do not apply a load to the AC charging cable and plug-cord (such
as wrapping the AC charging cable around the CCID (Charging Circuit Interrupting Device) and the
charging connector).
●Do not use or leave the AC
charging cable in situations where a load is applied to the socket and the plug (such as when the CCID
(Charging Circuit Interrupting Device) is hanging in the air without contacting the ground).
●Mode 3 AC charging cable: Do not use outside the rated voltage (less
than 277 V) or rated current (less than 20 A).
NOTICE
■Precautions when handling AC
charging cable
Make sure to observe the following precautions. Failure to observe these
precautions may result in damage to the AC charging cable and AC charging inlet.
●Insert the charging connector straight into the AC charging inlet.
●After inserting the charging connec-tor, do not apply excessive force to
or twist the connector. Also, do not lean on the connector or hang any objects from it.
●Do not step on or trip over the AC charging cable.
●Before removing the charging con-nector, make sure that it is
unlocked. ( P.121)
●After removing the AC charging
cable, promptly return it to its proper location.
Page 123 of 718
121
2 2-2. Charging
Plug-in hybrid system
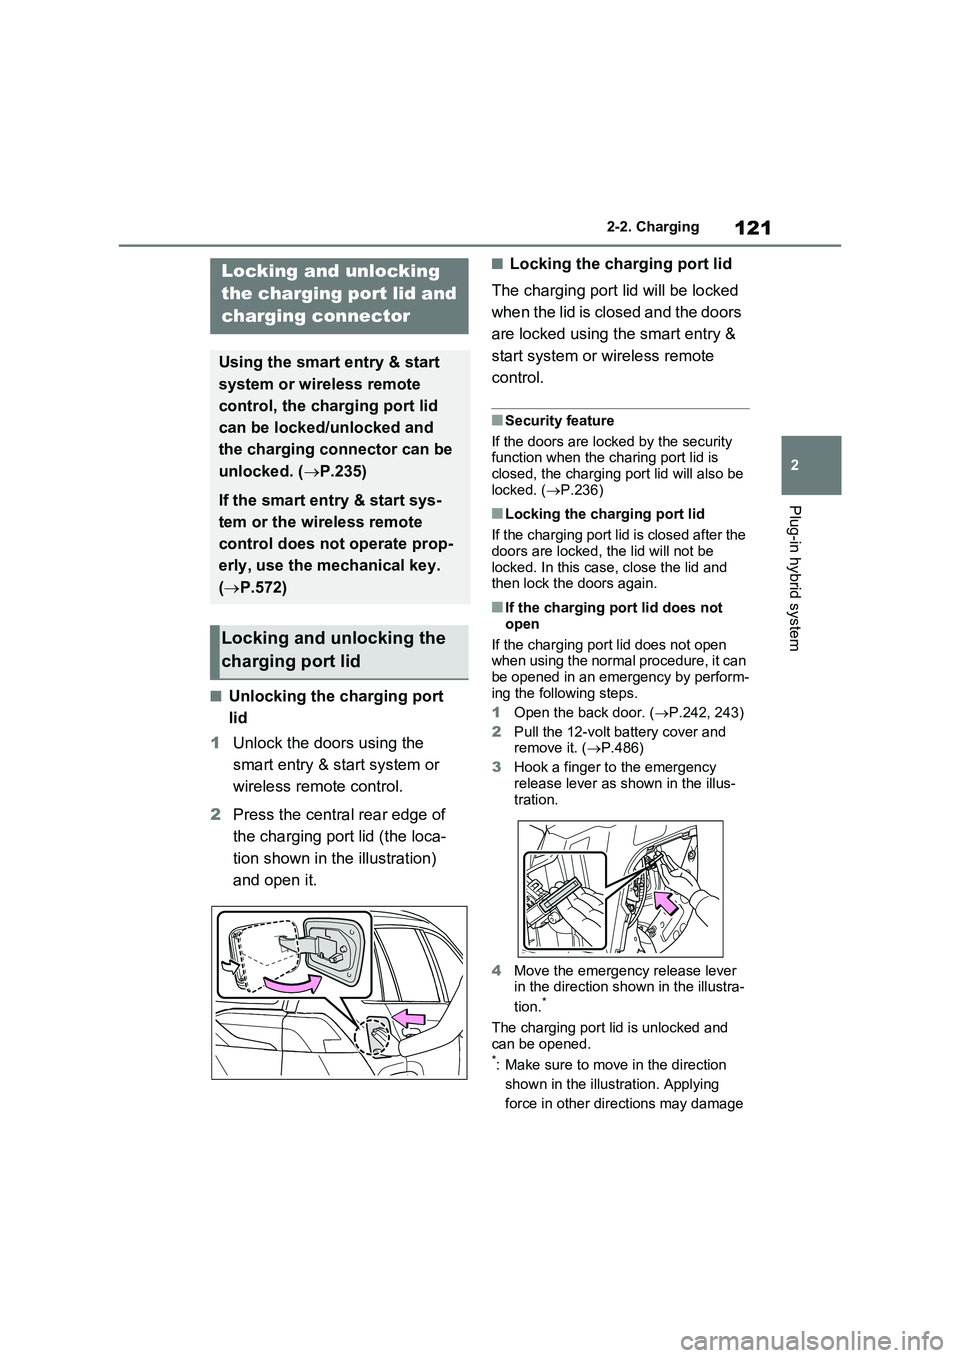
■Unlocking the charging port
lid
1Unlock the doors using the
smart entry & start system or
wireless remote control.
2Press the central rear edge of
the charging port lid (the loca-
tion shown in the illustration)
and open it.
■Locking the charging port lid
The charging port lid will be locked
when the lid is closed and the doors
are locked using the smart entry &
start system or wireless remote
control.
■Security feature
If the doors are locked by the security
function when the charing port lid is
closed, the charging port lid will also be
locked. (P.236)
■Locking the charging port lid
If the charging port lid is closed after the
doors are locked, the lid will not be
locked. In this case, close the lid and
then lock the doors again.
■If the charging port lid does not
open
If the charging port lid does not open
when using the normal procedure, it can
be opened in an emergency by perform-
ing the following steps.
1Open the back door. (P.242, 243)
2Pull the 12-volt battery cover and
remove it. (P.486)
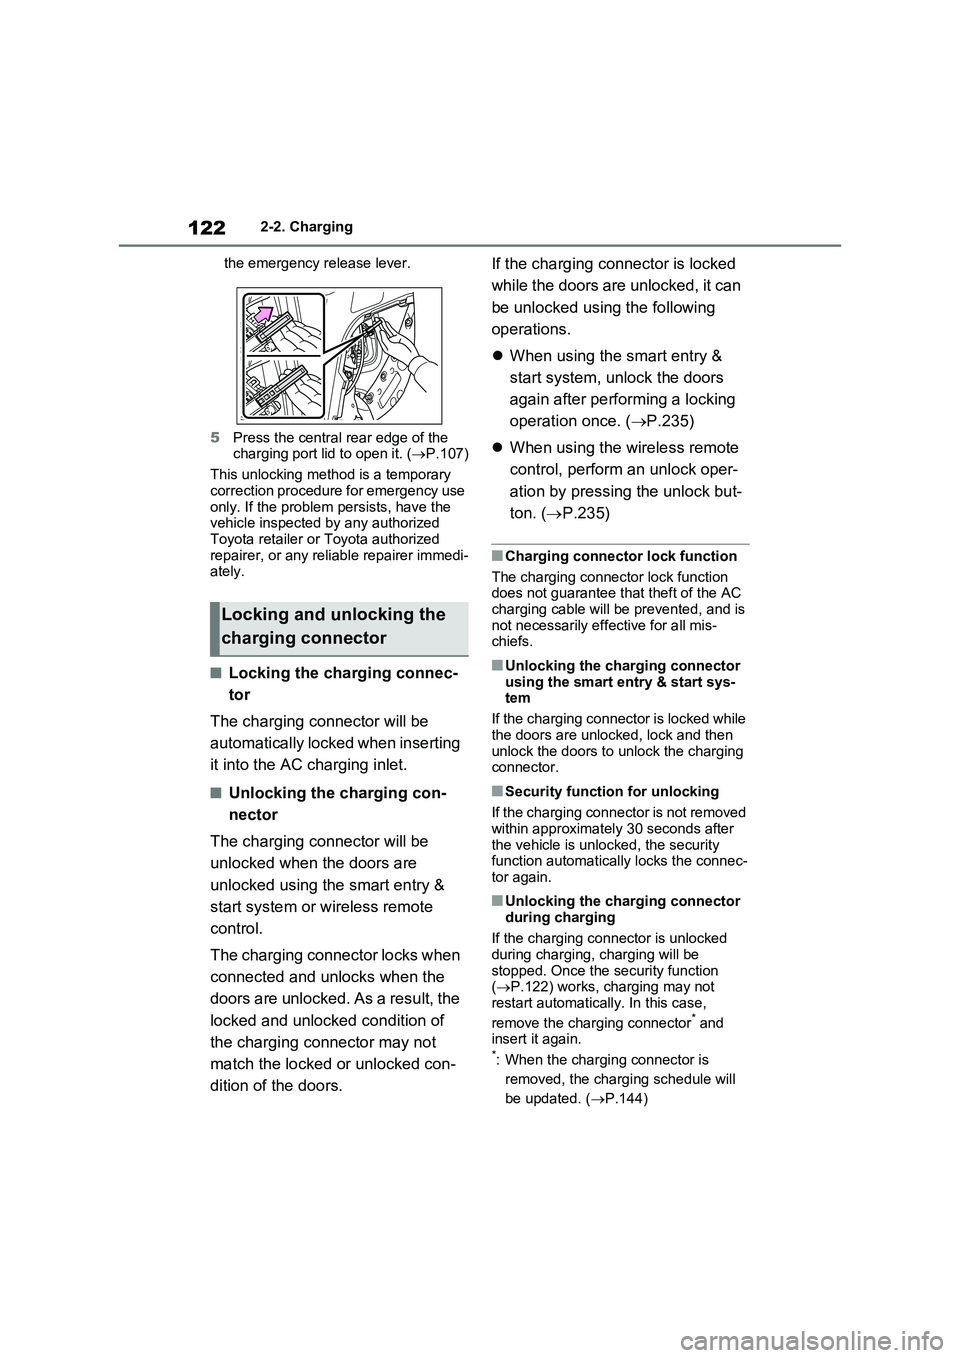
3Hook a finger to the emergency
release lever as shown in the illus-
tration.
4Move the emergency release lever
in the direction shown in the illustra-
tion.
*
The charging port lid is unlocked and
can be opened.
*: Make sure to move in the direction
shown in the illustration. Applying
force in other directions may damage
Locking and unlocking
the charging port lid and
charging connector
Using the smart entry & start
system or wireless remote
control, the charging port lid
can be locked/unlocked and
the charging connector can be
unlocked. (P.235)
If the smart entry & start sys-
tem or the wireless remote
control does not operate prop-
erly, use the mechanical key.
(P.572)
Locking and unlocking the
charging port lid
Page 124 of 718
1222-2. Charging
the emergency release lever.
5Press the central rear edge of the
charging port lid to open it. (P.107)
This unlocking method is a temporary
correction procedure for emergency use
only. If the problem persists, have the
vehicle inspected by any authorized
Toyota retailer or Toyota authorized
repairer, or any reliable repairer immedi-
ately.
■Locking the charging connec-
tor
The charging connector will be
automatically locked when inserting
it into the AC charging inlet.
■Unlocking the charging con-
nector
The charging connector will be
unlocked when the doors are
unlocked using the smart entry &
start system or wireless remote
control.
The charging connector locks when
connected and unlocks when the
doors are unlocked. As a result, the
locked and unlocked condition of
the charging connector may not
match the locked or unlocked con-
dition of the doors.If the charging connector is locked
while the doors are unlocked, it can
be unlocked using the following
operations.
When using the smart entry &
start system, unlock the doors
again after performing a locking
operation once. (P.235)
When using the wireless remote
control, perform an unlock oper-
ation by pressing the unlock but-
ton. (P.235)
■Charging connector lock function
The charging connector lock function
does not guarantee that theft of the AC
charging cable will be prevented, and is
not necessarily effective for all mis-
chiefs.
■Unlocking the charging connector
using the smart entry & start sys-
tem
If the charging connector is locked while
the doors are unlocked, lock and then
unlock the doors to unlock the charging
connector.
■Security function for unlocking
If the charging connector is not removed
within approximately 30 seconds after
the vehicle is unlocked, the security
function automatically locks the connec-
tor again.
■Unlocking the charging connector
during charging
If the charging connector is unlocked
during charging, charging will be
stopped. Once the security function
(P.122) works, charging may not
restart automatically. In this case,
remove the charging connector
* and
insert it again.
*: When the charging connector is
removed, the charging schedule will
be updated. (P.144)
Locking and unlocking the
charging connector