ECU TOYOTA RAV4 PLUG-IN HYBRID 2023 Manual Online
[x] Cancel search | Manufacturer: TOYOTA, Model Year: 2023, Model line: RAV4 PLUG-IN HYBRID, Model: TOYOTA RAV4 PLUG-IN HYBRID 2023Pages: 718, PDF Size: 167.55 MB
Page 534 of 718
5328-2. Steps to take in an emergency
Wheel nut wrench can be purchased
at any authorized Toyota retailer or Toyota authorized repairer, or any reli-able repairer.
Fluid leaks under the vehicle
(Water dripping from the air con-
ditioning after use is normal.)
Flat-looking tires or uneven tire
wear
High coolant temperature warn-
ing light flashes or come on
Changes in exhaust sound
Excessive tire squeal when cor-
nering
Strange noises related to the
suspension system
Pinging or other noises related to
the hybrid system
Engine missing, stumbling or
running roughly
Appreciable loss of power
WARNING
Observe the following precautions. Failure to do so may result in death or serious injury.
■While towing
●When towing using cables or
chains, avoid sudden starts, etc. which place excessive stress on the towing eyelets, cables or chains.
The towing eyelets, cables or chains may become damaged, bro-ken debris may hit people, and
cause serious damage.
●Vehicles with steering lock function:
Do not turn the power switch off. There is a possibility that the steer-ing wheel is locked and cannot be
operated.
■Installing towing eyelets to the
vehicle
Make sure that towing eyelets are installed securely. If not securely
installed, towing eyelets may come loose during towing.
NOTICE
■To prevent damage to the vehicle during emergency towing
Do not secure cables or chains to the suspension components.
If you think something is
wrong
If you notice any of the follow-
ing symptoms, your vehicle
probably needs adjustment or
repair. Contact any authorized
Toyota retailer or Toyota
authorized repairer, or any reli-
able repairer as soon as possi-
ble.
Visible symptoms
Audible symptoms
Operational symptoms
Page 554 of 718
5528-2. Steps to take in an emergency
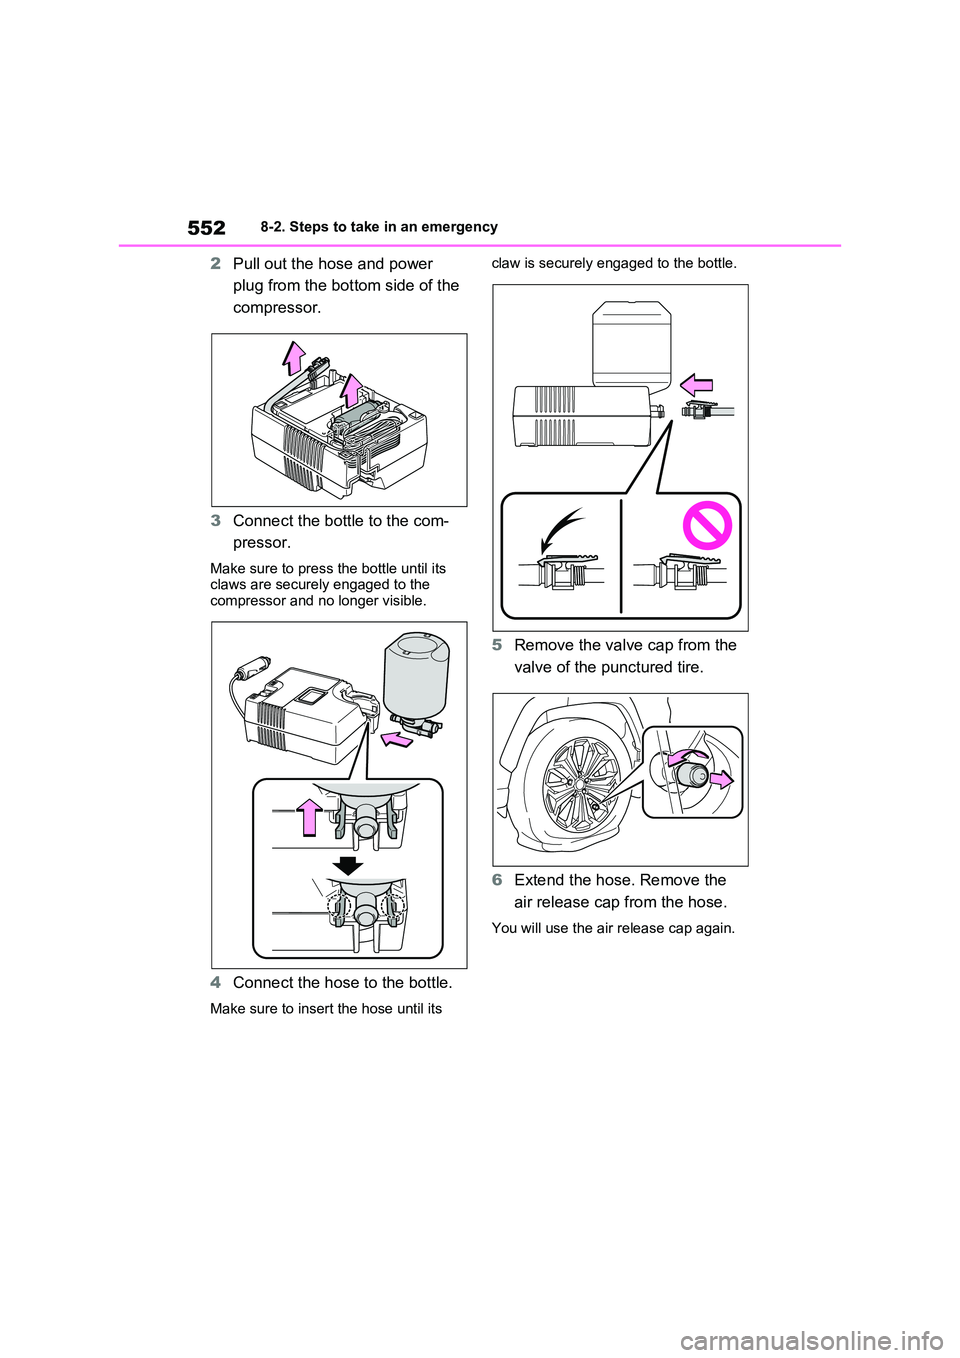
2Pull out the hose and power
plug from the bottom side of the
compressor.
3 Connect the bottle to the com-
pressor.
Make sure to press the bottle until its claws are securely engaged to the
compressor and no longer visible.
4 Connect the hose to the bottle.
Make sure to insert the hose until its
claw is securely engaged to the bottle.
5 Remove the valve cap from the
valve of the punctured tire.
6 Extend the hose. Remove the
air release cap from the hose.
You will use the air release cap again.
Page 558 of 718
5568-2. Steps to take in an emergency
may get dirty.
24 Store the bottle in the luggage
compartment while it is con-
nected to the compressor.
25 Taking precautions to avoid
sudden braking, sudden accel-
eration and sharp turns, drive
carefully at under 80 km/h (50
mph) to the nearest authorized
Toyota retailer or Toyota autho-
rized repairer, or reliable
repairer that is less than 100 km
(62 miles) away for tire repair or
replacement.
For repair and replacement of a tire or disposal of the tire puncture repair kit, contact any authorized Toyota retailer
or Toyota authorized repairer, or any reliable repairer.
When having the tire repaired or
replaced, make sure to tell the autho- rized Toyota retailer or Toyota autho-rized repairer, or reliable repairer that
the sealant is injected.
■If the tire is inflated to more than the specified air pressure
1 Disconnect the hose from the valve.
2 Install the air release cap to the end of the hose and push the protrusion
on the air release cap into the tire valve to let some air out.
3 Disconnect the hose from the valve, remove the air release cap from the hose and then reconnect the hose.
4 Turn the compressor switch on and
wait for several seconds, and then turn it off. Check that the air pres-sure indicator shows the specified
air pressure.
If the air pressure is under the desig- nated pressure, turn the compressor
switch on again and repeat the inflation procedure until the specified air pres-sure is reached.
■After a tire is repaired with the
emergency tire puncture repair kit
●The tire pressure warning valve and
transmitter should be replaced.
●Even if the tire inflation pressure is at
the recommended level, the tire pres- sure warning light may come on/flash.
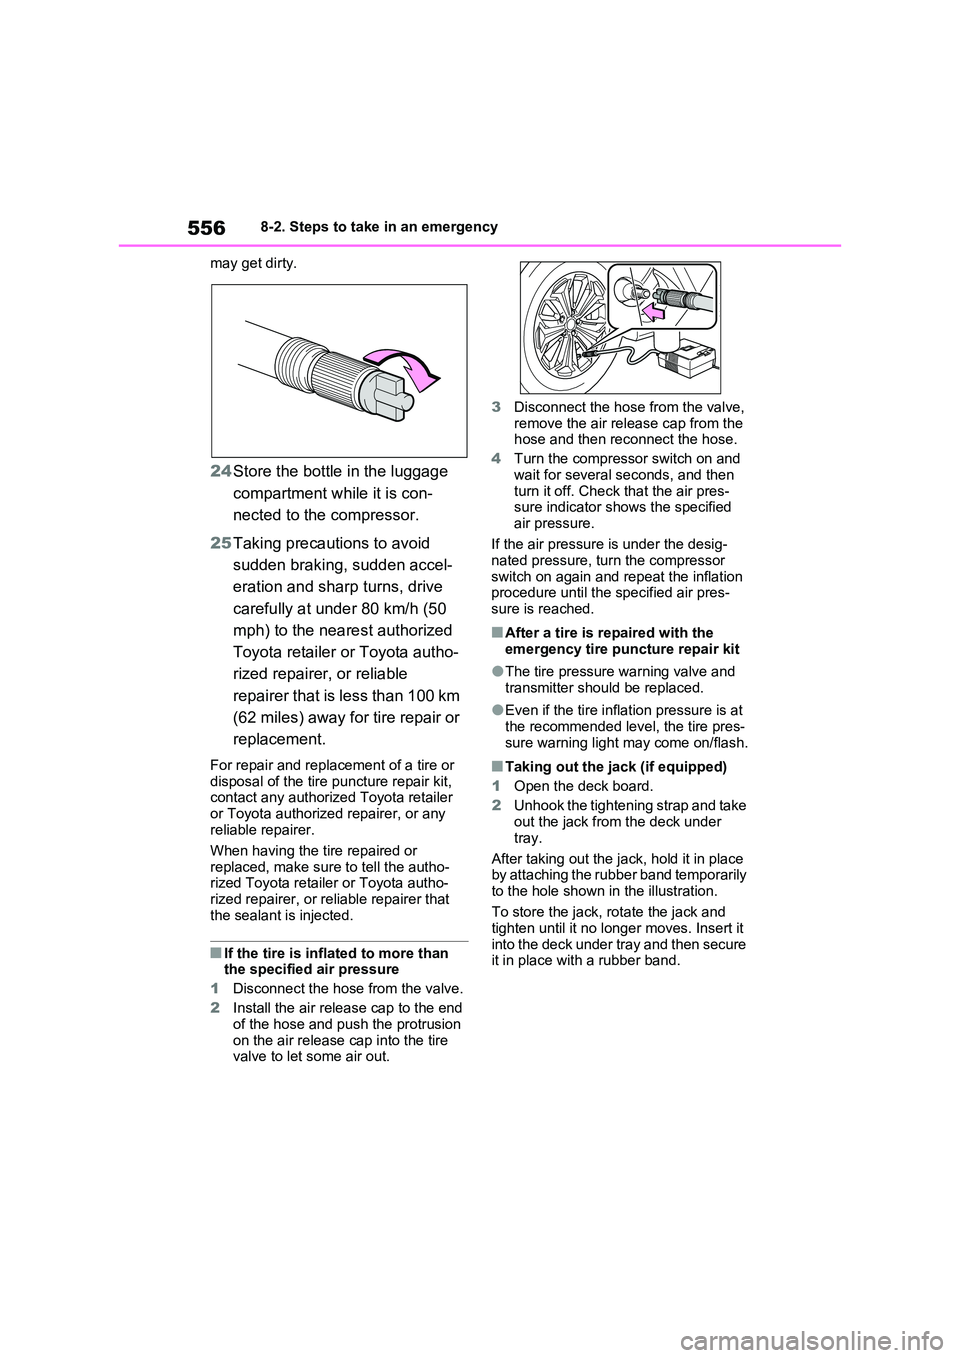
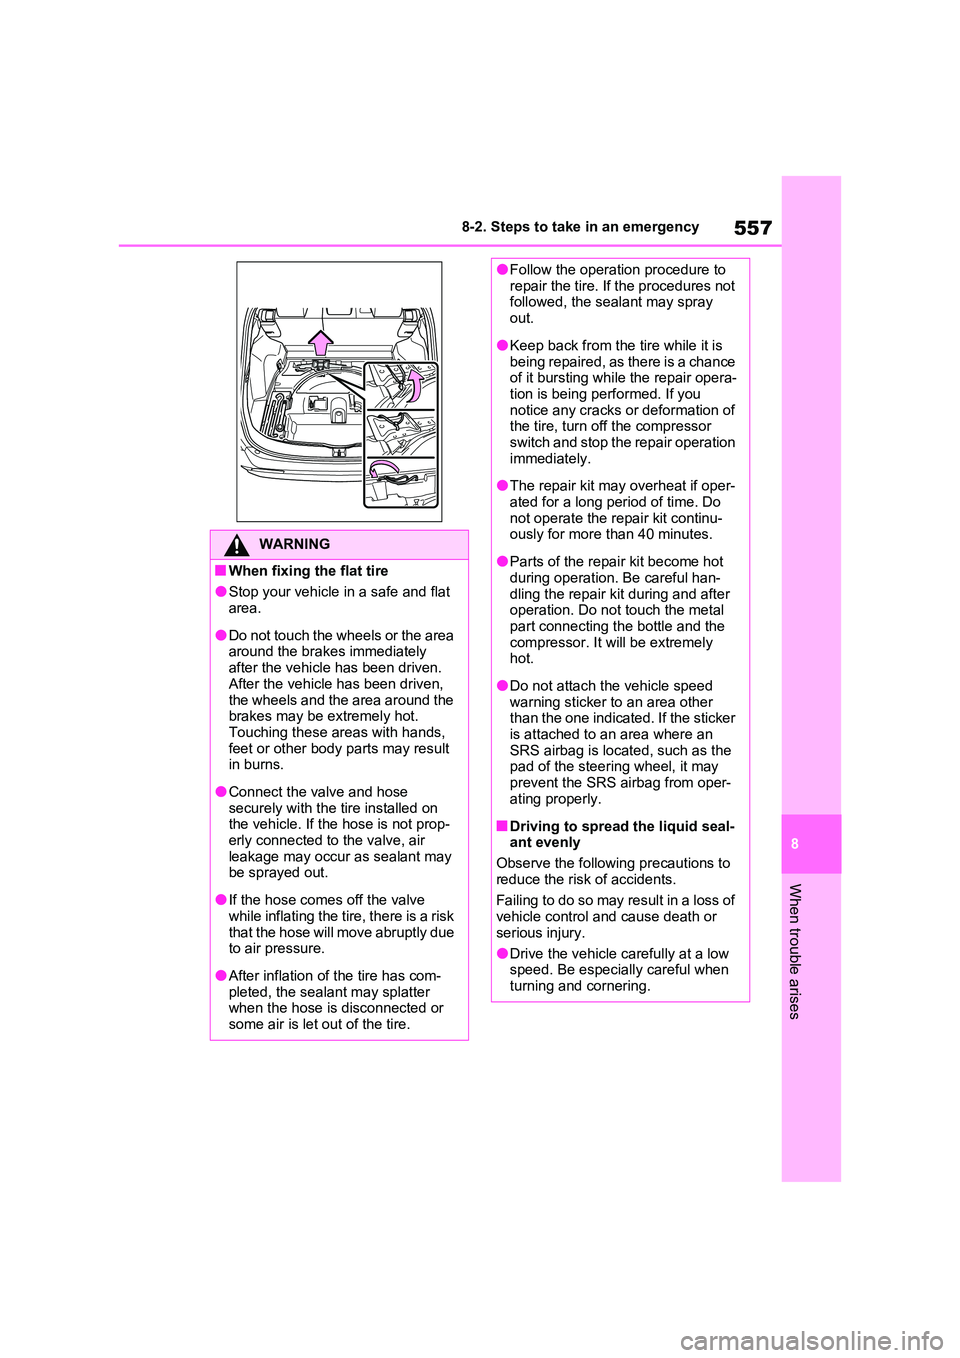
■Taking out the jack (if equipped)
1 Open the deck board.
2 Unhook the tightening strap and take out the jack from the deck under
tray.
After taking out the jack, hold it in place by attaching the rubber band temporarily
to the hole shown in the illustration.
To store the jack, rotate the jack and tighten until it no longer moves. Insert it
into the deck under tray and then secure it in place with a rubber band.
Page 559 of 718
557
8
8-2. Steps to take in an emergency
When trouble arises
WARNING
■When fixing the flat tire
●Stop your vehicle in a safe and flat area.
●Do not touch the wheels or the area around the brakes immediately
after the vehicle has been driven. After the vehicle has been driven,
the wheels and the area around the brakes may be extremely hot. Touching these areas with hands,
feet or other body parts may result in burns.
●Connect the valve and hose securely with the tire installed on the vehicle. If the hose is not prop-
erly connected to the valve, air leakage may occur as sealant may be sprayed out.
●If the hose comes off the valve while inflating the tire, there is a risk
that the hose will move abruptly due to air pressure.
●After inflation of the tire has com-pleted, the sealant may splatter when the hose is disconnected or
some air is let out of the tire.
●Follow the operation procedure to repair the tire. If the procedures not followed, the sealant may spray
out.
●Keep back from the tire while it is
being repaired, as there is a chance of it bursting while the repair opera-tion is being performed. If you
notice any cracks or deformation of the tire, turn off the compressor switch and stop the repair operation
immediately.
●The repair kit may overheat if oper-
ated for a long period of time. Do not operate the repair kit continu-ously for more than 40 minutes.
●Parts of the repair kit become hot during operation. Be careful han-
dling the repair kit during and after operation. Do not touch the metal part connecting the bottle and the
compressor. It will be extremely hot.
●Do not attach the vehicle speed warning sticker to an area other than the one indicated. If the sticker
is attached to an area where an SRS airbag is located, such as the pad of the steering wheel, it may
prevent the SRS airbag from oper- ating properly.
■Driving to spread the liquid seal-ant evenly
Observe the following precautions to
reduce the risk of accidents.
Failing to do so may result in a loss of vehicle control and cause death or
serious injury.
●Drive the vehicle carefully at a low speed. Be especially careful when
turning and cornering.
Page 563 of 718
561
8
8-2. Steps to take in an emergency
When trouble arises
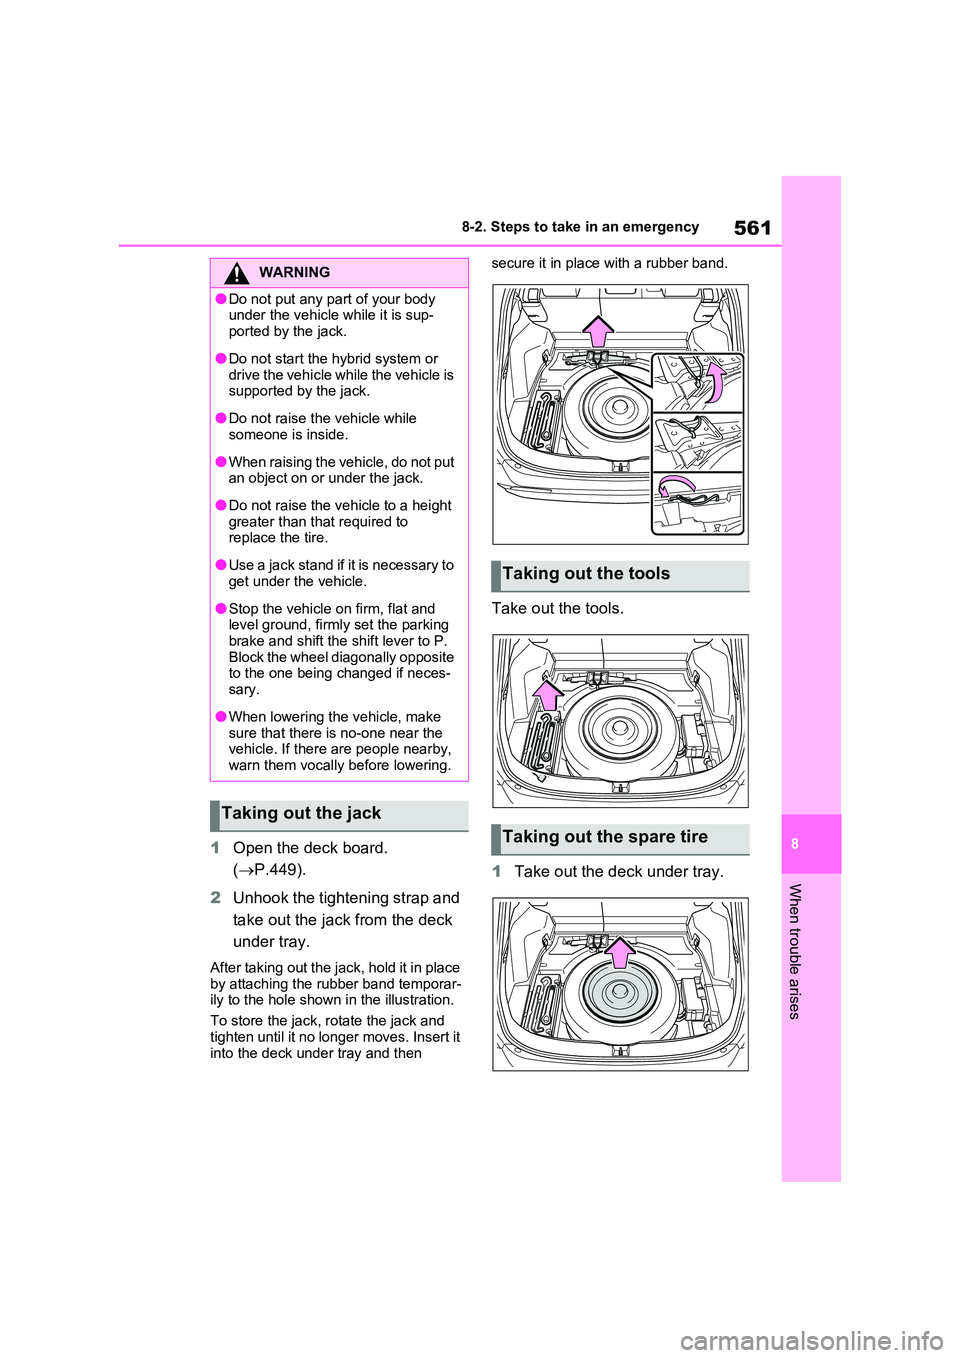
1 Open the deck board.
( P.449).
2 Unhook the tightening strap and
take out the jack from the deck
under tray.
After taking out the jack, hold it in place
by attaching the rubber band temporar- ily to the hole shown in the illustration.
To store the jack, rotate the jack and
tighten until it no longer moves. Insert it into the deck under tray and then
secure it in place with a rubber band.
Take out the tools.
1 Take out the deck under tray.
WARNING
●Do not put any part of your body under the vehicle while it is sup-
ported by the jack.
●Do not start the hybrid system or
drive the vehicle while the vehicle is supported by the jack.
●Do not raise the vehicle while someone is inside.
●When raising the vehicle, do not put an object on or under the jack.
●Do not raise the vehicle to a height greater than that required to replace the tire.
●Use a jack stand if it is necessary to get under the vehicle.
●Stop the vehicle on firm, flat and level ground, firmly set the parking
brake and shift the shift lever to P. Block the wheel diagonally opposite to the one being changed if neces-
sary.
●When lowering the vehicle, make
sure that there is no-one near the vehicle. If there are people nearby, warn them vocally before lowering.
Taking out the jack
Taking out the tools
Taking out the spare tire
Page 564 of 718
5628-2. Steps to take in an emergency
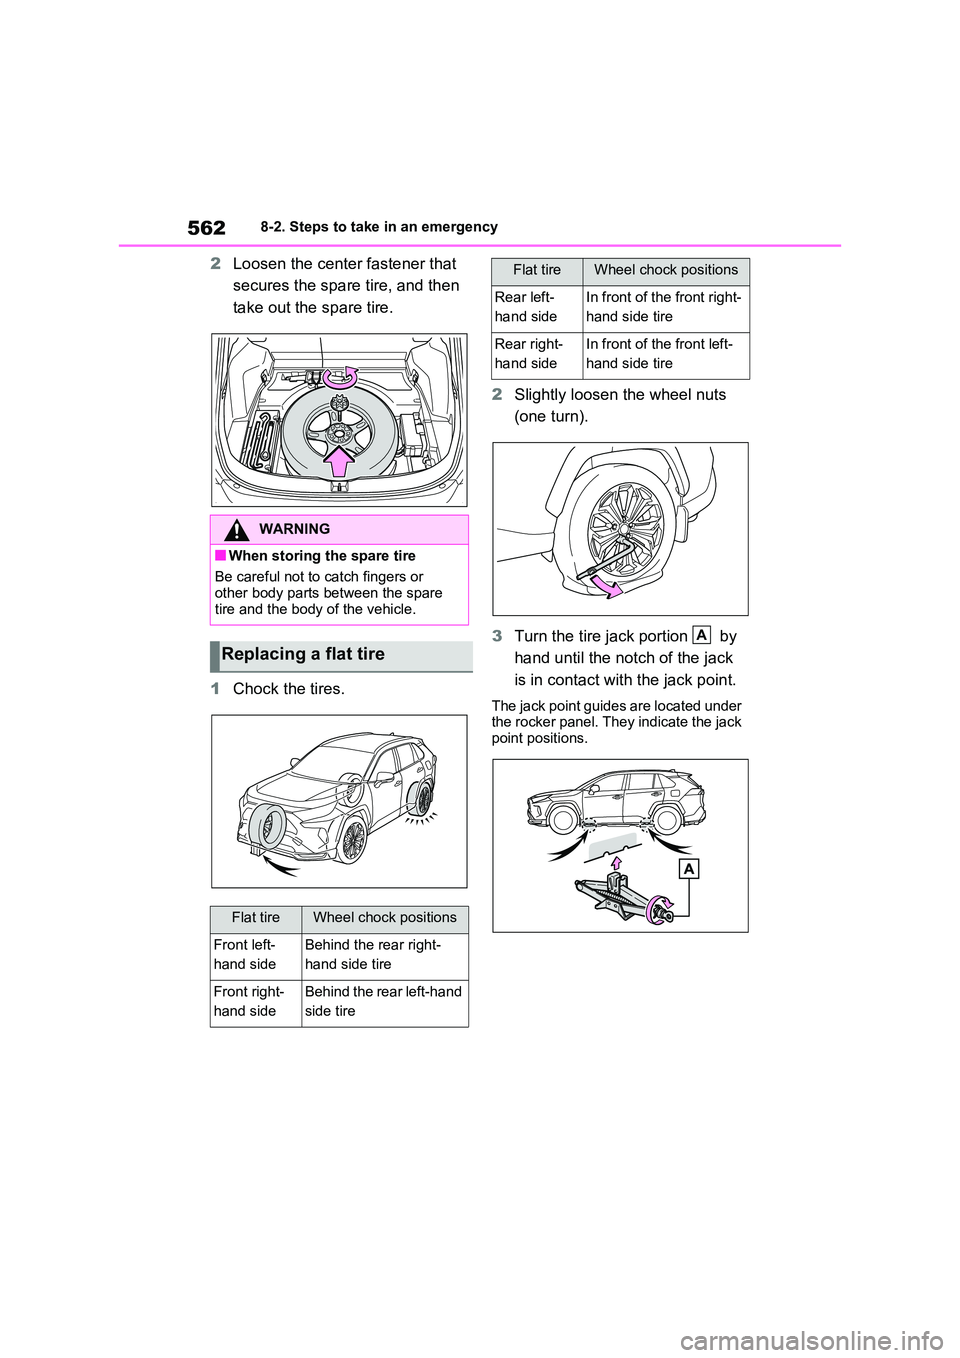
2Loosen the center fastener that
secures the spare tire, and then
take out the spare tire.
1 Chock the tires.
2 Slightly loosen the wheel nuts
(one turn).
3 Turn the tire jack portion by
hand until the notch of the jack
is in contact with the jack point.
The jack point guides are located under the rocker panel. They indicate the jack
point positions.
WARNING
■When storing the spare tire
Be careful not to catch fingers or
other body parts between the spare tire and the body of the vehicle.
Replacing a flat tire
Flat tireWheel chock positions
Front left-
hand side
Behind the rear right-
hand side tire
Front right-
hand side
Behind the rear left-hand
side tire
Rear left-
hand side
In front of the front right-
hand side tire
Rear right-
hand side
In front of the front left-
hand side tire
Flat tireWheel chock positions
A
Page 569 of 718
567
8
8-2. Steps to take in an emergency
When trouble arises
WARNING
■When using the compact spare tire
●Remember that the compact spare tire provided is specifically designed for use with your vehicle.
Do not use your compact spare tire on another vehicle.
●Do not use more than one compact spare tire simultaneously.
●Replace the compact spare tire with a standard tire as soon as possible.
●Avoid sudden acceleration, abrupt steering, sudden braking and shift-ing operations that cause sudden
engine braking.
■When the compact spare tire is
attached
The vehicle speed may not be cor- rectly detected, and the following sys-
tems may not operate correctly:
• ABS & Brake assist
• VSC/Trailer Sway Control
•TRC
• Cruise control (if equipped)
• Dynamic radar cruise control with full-speed range (if equipped)
• PCS (Pre-Collision System) (if equipped)
• EPS
• LTA (Lane Tracing Assist) (if
equipped)
• Tire pressure warning system
• AHB (Automatic High Beam) (if equipped)
• BSM (if equipped)
• RCTA (if equipped)
• PKSB (if equipped)
• Toyota parking assist-sensor
• Rear view monitor system (if
equipped)
• Panoramic view monitor (if
equipped)
• Toyota parking assist monitor (if
equipped)
• Navigation system (if equipped)
Also, not only can the following sys- tem not be utilized fully, but it may
actually negatively affect the drive- train components:
• E-Four (Electronic On-Demand
AWD system)
■Speed limit when using the com-
pact spare tire
Do not drive at speeds in excess of 80 km/h (50 mph) when a compact spare
tire is installed on the vehicle.
The compact spare tire is not designed for driving at high speeds.
Failure to observe this precaution may lead to an accident causing death or serious injury.
■After using the tools and jack
Before driving, make sure all the tools
and jack are securely in place in their storage location to reduce the possi-bility of personal injury during a colli-
sion or sudden braking.
NOTICE
■Be careful when driving over bumps with the compact spare
tire installed on the vehicle
The vehicle height may become lower when driving with the compact spare
tire compared to when driving with standard tires. Be careful when driv-ing over uneven road surfaces.
Page 577 of 718
575
8
8-2. Steps to take in an emergency
When trouble arises
minutes to recharge the 12-volt
battery of your vehicle.
6 Vehicles with steering lock func-
tion: Open and close any of the
doors of your vehicle with the
power switch off.
7 Maintain the engine speed of
the second vehicle and start the
hybrid system of your vehicle by
turning the power switch to ON.
8 Make sure the “READY” indica-
tor comes on. If the indicator
light does not come on, contact
any authorized Toyota retailer or
Toyota authorized repairer, or
any reliable repairer.
9 Once the hybrid system has
started, remove the jumper
cables in the exact reverse
order from which they were con-
nected.
10 Close the exclusive jump start-
ing terminal cover, and reinstall
the fuse box cover to its original
position.
Once the hybrid system starts,
have the vehicle inspected at any
authorized Toyota retailer or Toyota
authorized repairer, or any reliable
repairer as soon as possible.
■Starting the hybrid system when the 12-volt battery is discharged
The hybrid system cannot be started by push-starting.
■To prevent 12-volt battery dis-charge
●Turn off the headlights and the audio
system while the hybrid system is off.
●Turn off any unnecessary electrical components when the vehicle is run-
ning at a low speed for an extended period, such as in heavy traffic.
■When the 12-volt battery is removed or discharged
●Information stored in the ECU is cleared. When the 12-volt battery is
depleted, have the vehicle inspected at any authorized Toyota retailer or Toyota authorized repairer, or any reli-
able repairer.
●Some systems may require initializa-
tion. ( P.609)
■When removing the 12-volt battery terminals
When the 12-volt battery terminals are
removed, the information stored in the ECU is cleared. Before removing the 12-volt battery terminals, contact any
authorized Toyota retailer or Toyota authorized repairer, or any reliable repairer.
■Charging the 12-volt battery
The electricity stored in the 12-volt bat- tery will discharge gradually even when the vehicle is not in use, due to natural
discharge and the draining effects of certain electrical appliances. If the vehi-cle is left for a long time, the 12-volt bat-
tery may discharge, and the hybrid system may be unable to start. (The 12-volt battery recharges automatically
while the hybrid system is operating.)
■When recharging or replacing the 12-volt battery
●In some cases, it may not be possible to unlock the doors using the smart entry & start system when the 12-volt
battery is discharged. Use the wire- less remote control or the mechanical key to lock or unlock the doors.
●The hybrid system may not start on the first attempt after reinstalling the
12-volt battery. In that case, start the hybrid system in the same manner as when the electronic key does not
Page 578 of 718
5768-2. Steps to take in an emergency
operate properly ( P.572). This is not
a malfunction, as the hybrid system will start normally on the second attempt.
●The power switch mode is memorized by the vehicle. When the 12-volt bat-
tery is reconnected, the system will return to the mode it was in before the 12-volt battery was discharged.
Before disconnecting the 12-volt bat- tery, turn the power switch off.If you are unsure what mode the
power switch was in before the 12-volt battery discharged, be especially careful when reconnecting the 12-volt
battery.
■When replacing the 12-volt battery
●Use a 12-volt battery that conforms to
European regulations.
●Use a 12-volt battery that the case
size is same as the previous one (LN2), 20 hours rate capacity (20HR) is equivalent (55Ah) or greater, and
performance rating (CCA) is equiva- lent (345A) or greater.• If the sizes differ, the 12-volt battery
cannot be properly secured. • If the 20 hour rate capacity is low, even if the time period where the vehi-
cle is not used is a short time, the 12- volt battery may discharge and hybrid system may not be able to start.
●Use a ventilation type calcium battery
●Use a 12-volt battery with a handle. If a 12-volt battery without a handle is used, removal is more difficult.
●When removing the 12-volt battery: P.486
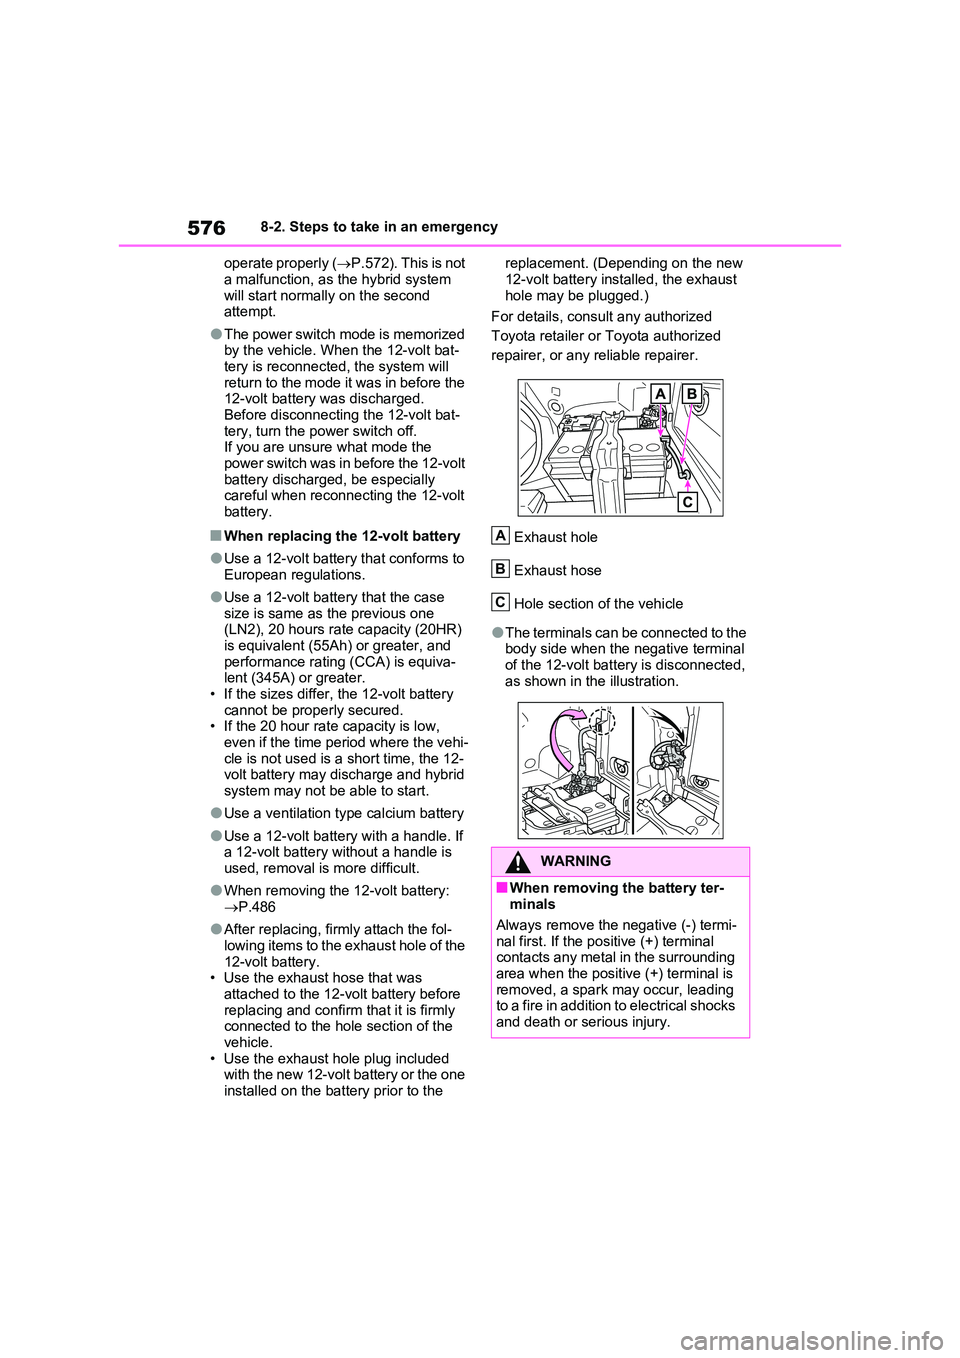
●After replacing, firmly attach the fol- lowing items to the exhaust hole of the
12-volt battery. • Use the exhaust hose that was attached to the 12-volt battery before
replacing and confirm that it is firmly connected to the hole section of the vehicle.
• Use the exhaust hole plug included with the new 12-volt battery or the one installed on the battery prior to the
replacement. (Depending on the new
12-volt battery installed, the exhaust hole may be plugged.)
For details, consult any authorized
Toyota retailer or Toyota authorized
repairer, or any reliable repairer.
Exhaust hole
Exhaust hose
Hole section of the vehicle
●The terminals can be connected to the body side when the negative terminal
of the 12-volt battery is disconnected, as shown in the illustration.
WARNING
■When removing the battery ter-minals
Always remove the negative (-) termi-
nal first. If the positive (+) terminal contacts any metal in the surrounding area when the positive (+) terminal is
removed, a spark may occur, leading to a fire in addition to electrical shocks and death or serious injury.
A
B
C
Page 579 of 718
577
8
8-2. Steps to take in an emergency
When trouble arises
WARNING
■Avoiding 12-volt battery fires or explosions
Observe the following precautions to prevent accidentally igniting the flam-mable gas that may be emitted from
the 12-volt battery:
●Make sure each jumper cable is connected to the correct terminal
and that it is not unintentionally in contact with any other than the intended terminal.
●Do not allow the other end of the jumper cable connected to the “+”
terminal to come into contact with any other parts or metal surfaces in the area, such as brackets or
unpainted metal.
●Do not allow the + and - clamps of
the jumper cables to come into con- tact with each other.
●Do not smoke, use matches, ciga-rette lighters or allow open flame near the 12-volt battery.
■12-volt battery precautions
The 12-volt battery contains poison-
ous and corrosive acidic electrolyte, while related parts contain lead and lead compounds. Observe the follow-
ing precautions when handling the 12-volt battery:
●When working with the 12-volt bat-
tery, always wear safety glasses and take care not to allow any bat-tery fluids (acid) to come into con-
tact with skin, clothing or the vehicle body.
●Do not lean over the 12-volt battery.
●In the event that battery fluid comes
into contact with the skin or eyes, immediately wash the affected area with water and seek medical atten-
tion. Place a wet sponge or cloth over the affected area until medical
attention can be received.
●Always wash your hands after han- dling the 12-volt battery support, terminals, and other battery-related
parts.
●Do not allow children near the 12-
volt battery.
■After recharging the 12-volt bat-
tery
Have the 12-volt battery inspected at any authorized Toyota retailer or
Toyota authorized repairer, or any reliable repairer as soon as possible.If the 12-volt battery is deteriorating,
continued use may cause the 12-volt battery to emit a malodorous gas, which may be detrimental to the
health of passengers.
■When replacing the 12-volt bat-
tery
●For information regarding 12-volt battery replacement, contact any
authorized Toyota retailer or Toyota authorized repairer, or any reliable repairer.
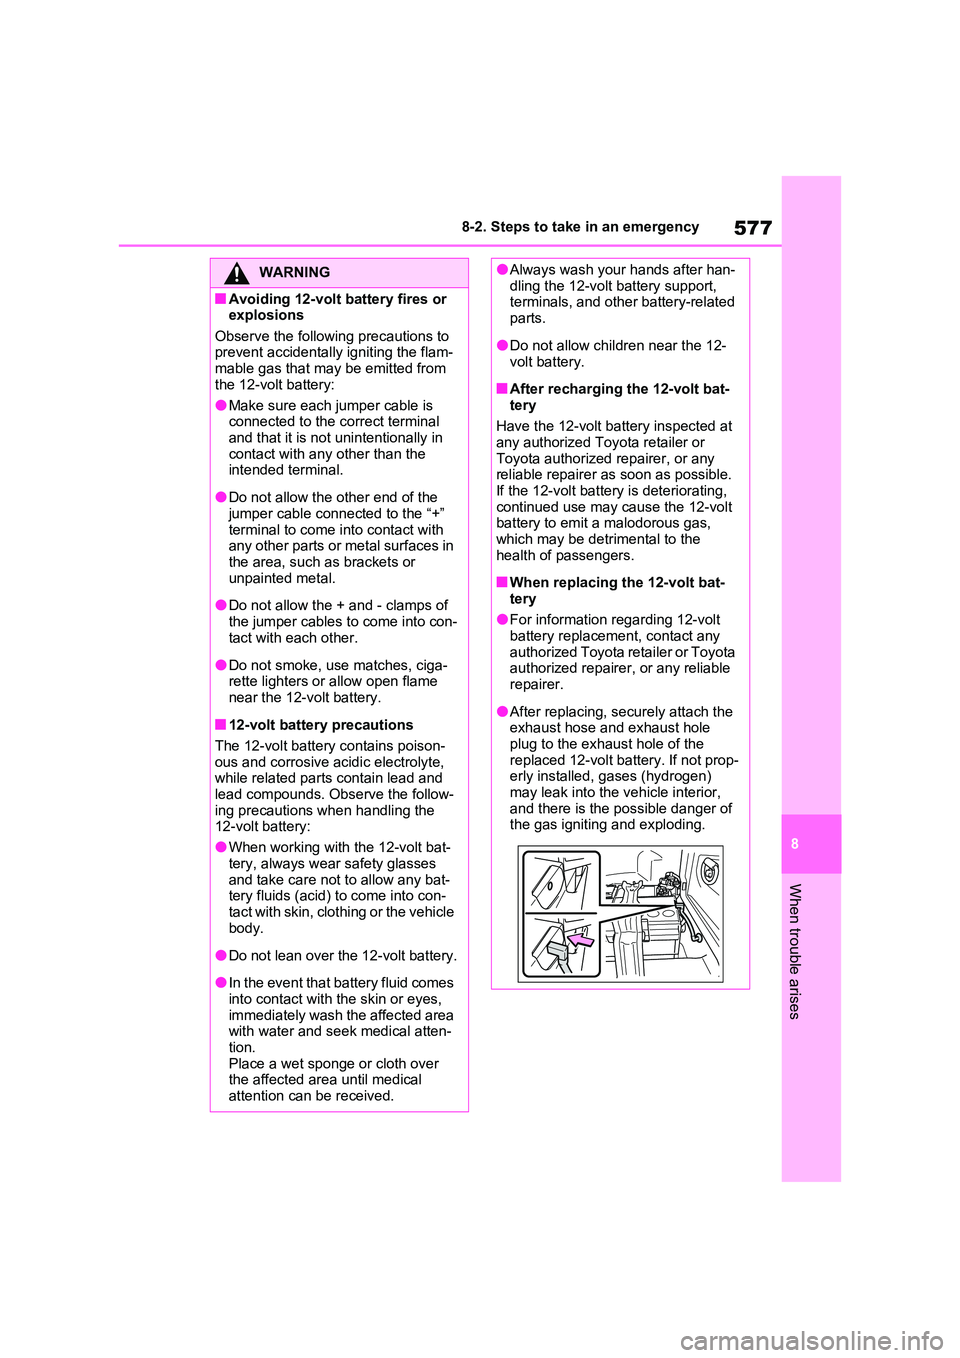
●After replacing, securely attach the exhaust hose and exhaust hole
plug to the exhaust hole of the replaced 12-volt battery. If not prop-erly installed, gases (hydrogen)
may leak into the vehicle interior, and there is the possible danger of the gas igniting and exploding.