ECU TOYOTA RAV4 PLUG-IN HYBRID 2023 Workshop Manual
[x] Cancel search | Manufacturer: TOYOTA, Model Year: 2023, Model line: RAV4 PLUG-IN HYBRID, Model: TOYOTA RAV4 PLUG-IN HYBRID 2023Pages: 718, PDF Size: 167.55 MB
Page 237 of 718

235
4
4-2. Opening, closing and locking the doors
Before driving
4-2.Opening, closing and lo cking th e d oors
■Using the entry function
Carry the electronic key to enable
this function.
1 Grip the front door handle to
unlock the doors.
Make sure to touch the sensor on the
back of the handle.
The doors cannot be unlocked for 3
seconds after the doors are locked.
2 Touch the lock sensor (the
indentation on the upper part of
the door handle) to lock the
doors.
Check that the door is securely locked.
■Using the wireless remote
control
1 Locks all the doors
Check that the door is securely locked.
Press and hold to close the side win-
dows and panoramic moon roof (if
equipped).*
2 Unlocks all the doors
Press and hold to open the side win-
dows and panoramic moon roof (if
equipped).*
*: These settings must be customized
at any authorized Toyota retailer or
Toyota authorized repairer, or any
reliable repairer.
■Switching the door unlock function
It is possible to set which doors the entry function unlocks using the wireless
remote control. Operate the switching operation in the vehicle or within approx-imately 1 m (3.2 ft.) of the vehicle.
1 Turn the power switch to OFF.
2 Cancel the intrusion sensor and tilt
sensor of the alarm system to pre- vent unintended triggering of the
alarm while changing the settings. (if equipped) ( P.80)
3 When the indicator light on the key
surface is not on, press and hold
or for approximately
5 seconds while pressing and hold-
ing .
Side doors
The vehicle can be locked and
unlocked using the entry func-
tion, wireless remote control,
door lock switches or inside
lock buttons.
Charging port lid and charging
connector will also be locked and
unlocked. ( P.121)
Unlocking and locking the
doors from the outside
Page 238 of 718
2364-2. Opening, closing and locking the doors
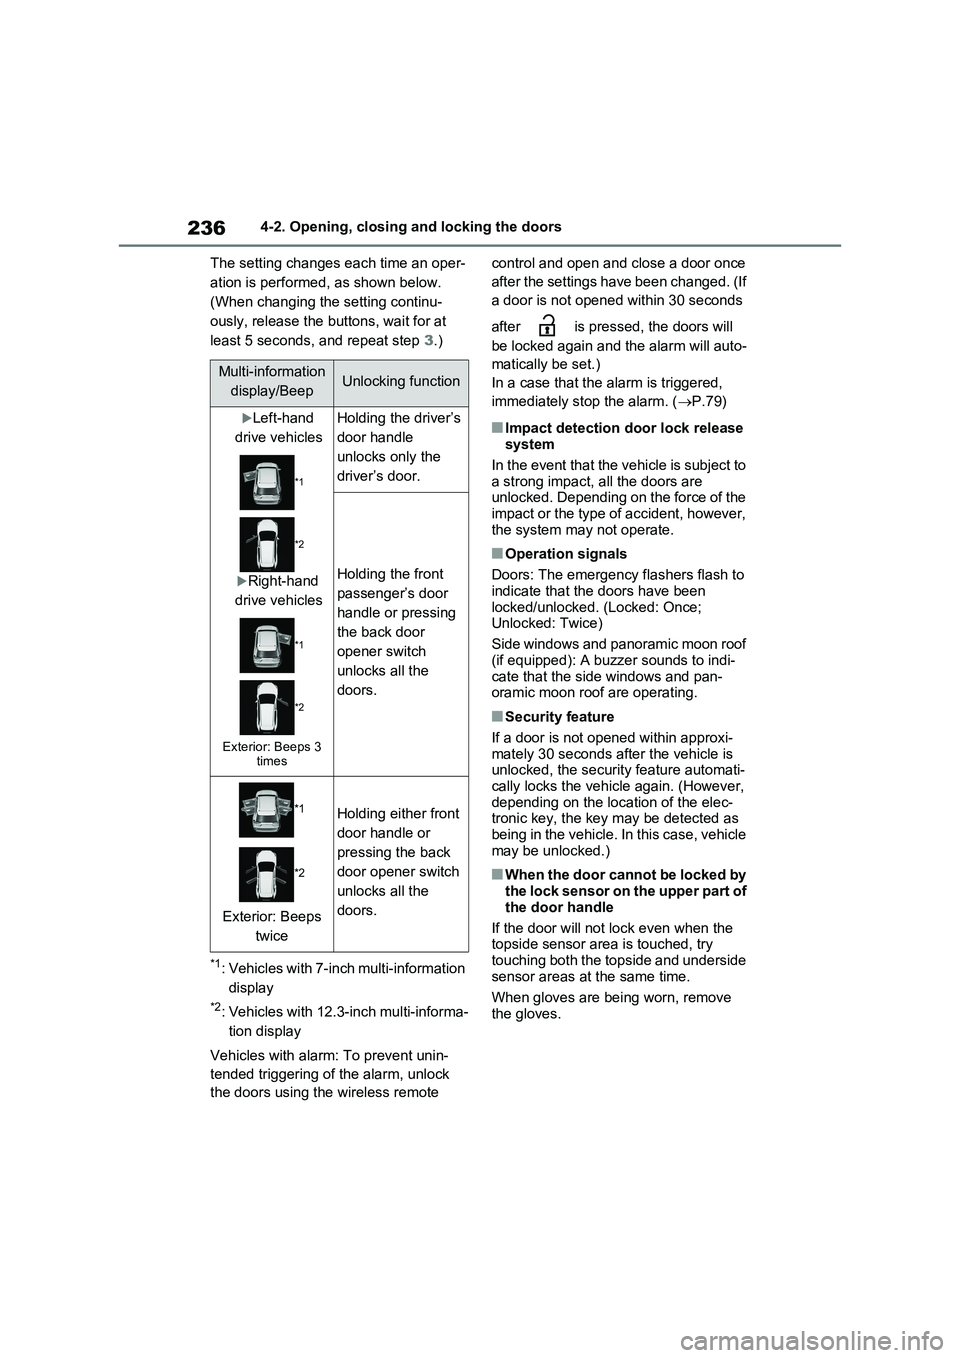
The setting changes each time an oper-
ation is performed, as shown below.
(When changing the setting continu-
ously, release the buttons, wait for at
least 5 seconds, and repeat step 3.)
*1: Vehicles with 7-inch multi-information
display
*2: Vehicles with 12.3-inch multi-informa-
tion display
Vehicles with alarm: To prevent unin-
tended triggering of the alarm, unlock
the doors using the wireless remote control and open and close a door once
after the settings have been changed. (If
a door is not opened within 30 seconds
after is pressed, the doors will
be locked again and the alarm will auto-
matically be set.)
In a case that the alarm is triggered,
immediately stop the alarm. (P.79)
■Impact detection door lock release
system
In the event that the vehicle is subject to
a strong impact, all the doors are
unlocked. Depending on the force of the
impact or the type of accident, however,
the system may not operate.
■Operation signals
Doors: The emergency flashers flash to
indicate that the doors have been
locked/unlocked. (Locked: Once;
Unlocked: Twice)
Side windows and panoramic moon roof
(if equipped): A buzzer sounds to indi-
cate that the side windows and pan-
oramic moon roof are operating.
■Security feature
If a door is not opened within approxi-
mately 30 seconds after the vehicle is
unlocked, the security feature automati-
cally locks the vehicle again. (However,
depending on the location of the elec-
tronic key, the key may be detected as
being in the vehicle. In this case, vehicle
may be unlocked.)
■When the door cannot be locked by
the lock sensor on the upper part of
the door handle
If the door will not lock even when the
topside sensor area is touched, try
touching both the topside and underside
sensor areas at the same time.
When gloves are being worn, remove
the gloves.
Multi-information
display/BeepUnlocking function
Left-hand
drive vehicles
*1
*2
Right-hand
drive vehicles
*1
*2
Exterior: Beeps 3
times
Holding the driver’s
door handle
unlocks only the
driver’s door.
Holding the front
passenger’s door
handle or pressing
the back door
opener switch
unlocks all the
doors.
*1
*2
Exterior: Beeps
twice
Holding either front
door handle or
pressing the back
door opener switch
unlocks all the
doors.
Page 243 of 718
241
4
4-2. Opening, closing and locking the doors
Before driving
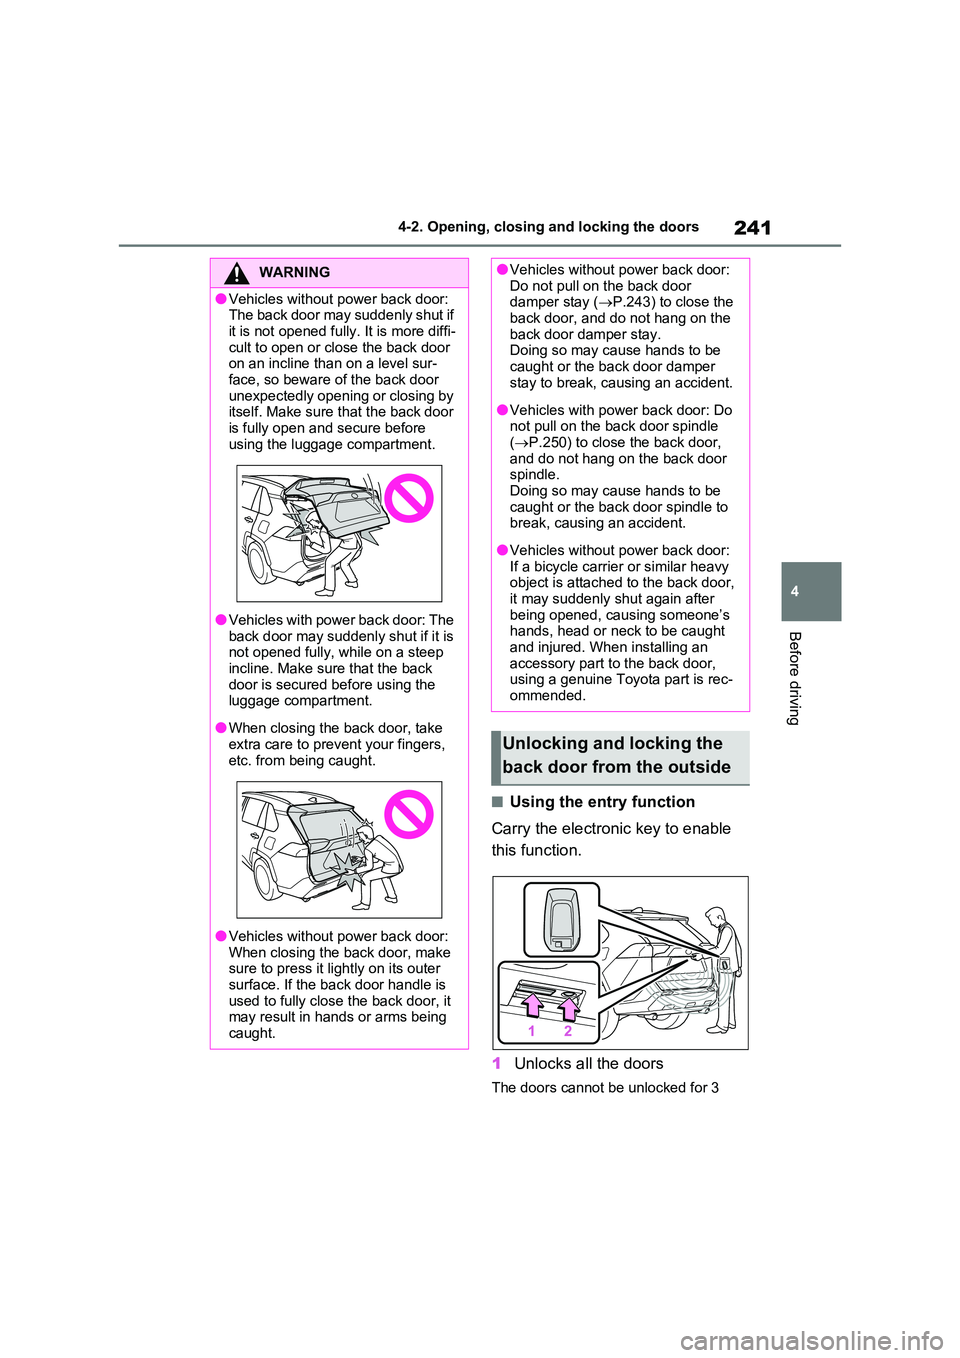
■Using the entry function
Carry the electronic key to enable
this function.
1 Unlocks all the doors
The doors cannot be unlocked for 3
WARNING
●Vehicles without power back door: The back door may suddenly shut if
it is not opened fully. It is more diffi- cult to open or close the back door on an incline than on a level sur-
face, so beware of the back door unexpectedly opening or closing by itself. Make sure that the back door
is fully open and secure before using the luggage compartment.
●Vehicles with power back door: The back door may suddenly shut if it is not opened fully, while on a steep
incline. Make sure that the back door is secured before using the luggage compartment.
●When closing the back door, take extra care to prevent your fingers,
etc. from being caught.
●Vehicles without power back door:
When closing the back door, make sure to press it lightly on its outer surface. If the back door handle is
used to fully close the back door, it may result in hands or arms being caught.
●Vehicles without power back door: Do not pull on the back door damper stay ( P.243) to close the
back door, and do not hang on the back door damper stay. Doing so may cause hands to be
caught or the back door damper stay to break, causing an accident.
●Vehicles with power back door: Do not pull on the back door spindle ( P.250) to close the back door,
and do not hang on the back door spindle. Doing so may cause hands to be
caught or the back door spindle to break, causing an accident.
●Vehicles without power back door: If a bicycle carrier or similar heavy object is attached to the back door,
it may suddenly shut again after being opened, causing someone’s hands, head or neck to be caught
and injured. When installing an accessory part to the back door, using a genuine Toyota part is rec-
ommended.
Unlocking and locking the
back door from the outside
Page 244 of 718
2424-2. Opening, closing and locking the doors
seconds after the doors are locked.
2 Locks all the doors
Check that the door is securely locked.
■Using the wireless remote
control
P.235
■Operation signals
P.236
■Security feature
P.236
■Using the door lock switches
P.238
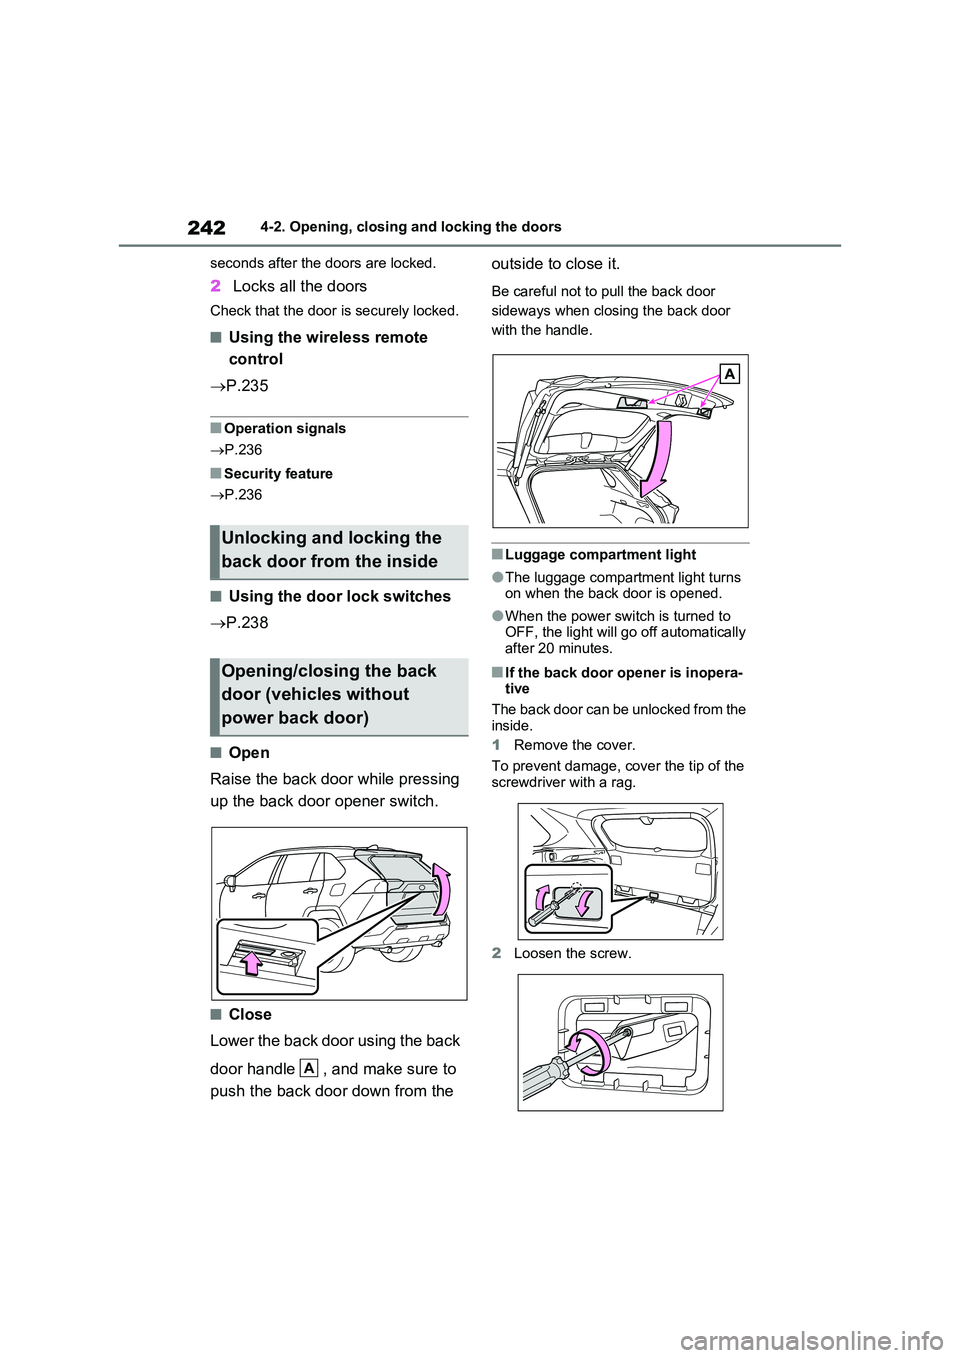
■Open
Raise the back door while pressing
up the back door opener switch.
■Close
Lower the back door using the back
door handle , and make sure to
push the back door down from the
outside to close it.
Be careful not to pull the back door
sideways when closing the back door
with the handle.
■Luggage compartment light
●The luggage compartment light turns on when the back door is opened.
●When the power switch is turned to OFF, the light will go off automatically
after 20 minutes.
■If the back door opener is inopera- tive
The back door can be unlocked from the
inside.
1 Remove the cover.
To prevent damage, cover the tip of the screwdriver with a rag.
2 Loosen the screw.
Unlocking and locking the
back door from the inside
Opening/closing the back
door (vehicles without
power back door)
A
Page 251 of 718
249
4
4-2. Opening, closing and locking the doors
Before driving
WARNING
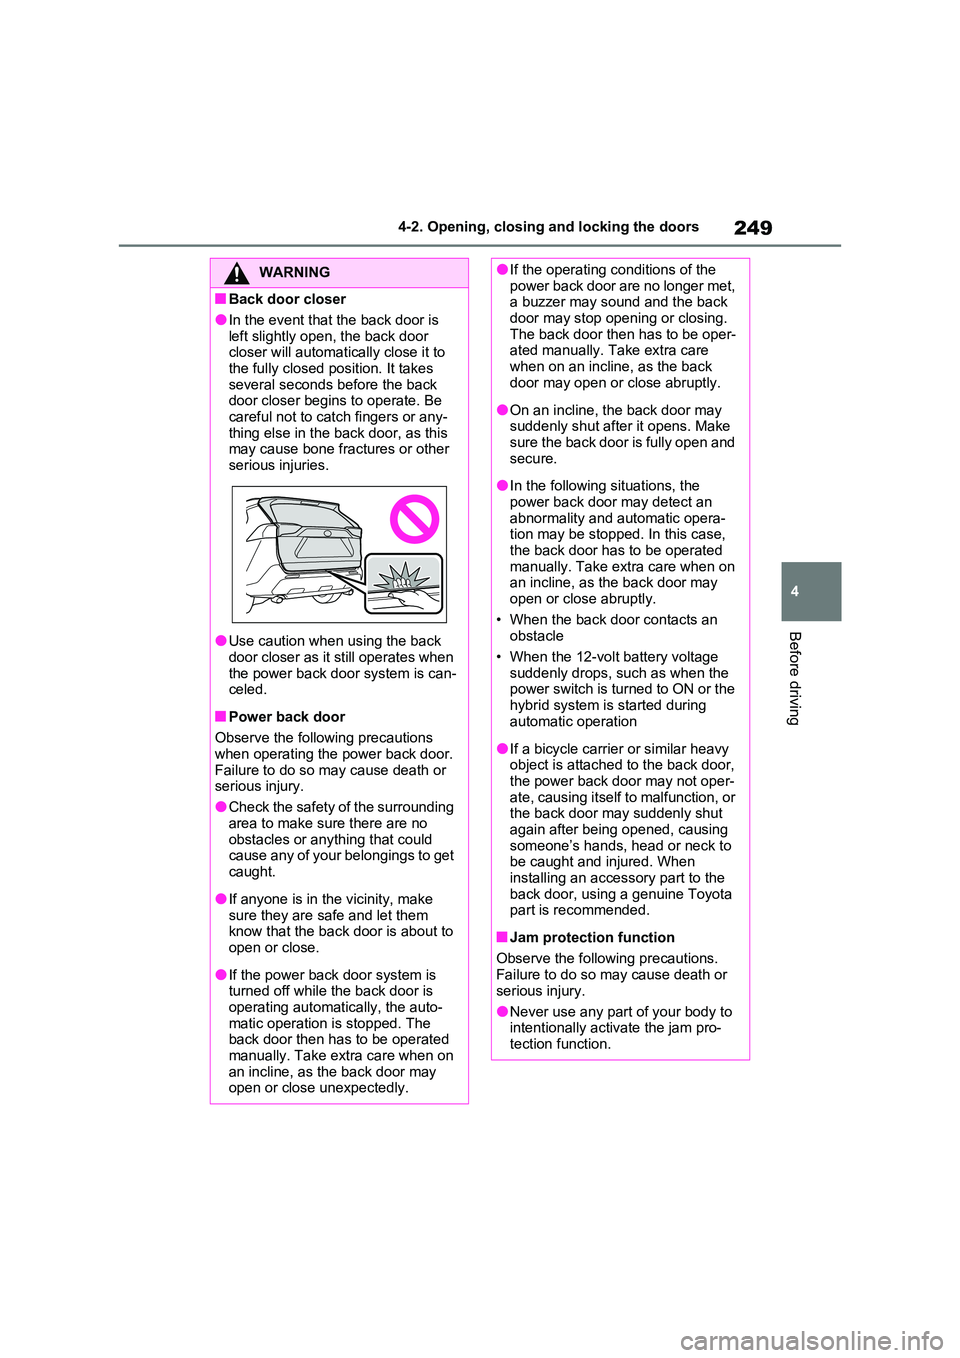
■Back door closer
●In the event that the back door is
left slightly open, the back door closer will automatically close it to the fully closed position. It takes
several seconds before the back door closer begins to operate. Be careful not to catch fingers or any-
thing else in the back door, as this may cause bone fractures or other serious injuries.
●Use caution when using the back door closer as it still operates when
the power back door system is can- celed.
■Power back door
Observe the following precautions when operating the power back door.
Failure to do so may cause death or serious injury.
●Check the safety of the surrounding
area to make sure there are no obstacles or anything that could cause any of your belongings to get
caught.
●If anyone is in the vicinity, make
sure they are safe and let them know that the back door is about to open or close.
●If the power back door system is turned off while the back door is
operating automatically, the auto- matic operation is stopped. The back door then has to be operated
manually. Take extra care when on an incline, as the back door may open or close unexpectedly.
●If the operating conditions of the power back door are no longer met, a buzzer may sound and the back
door may stop opening or closing. The back door then has to be oper-ated manually. Take extra care
when on an incline, as the back door may open or close abruptly.
●On an incline, the back door may suddenly shut after it opens. Make sure the back door is fully open and
secure.
●In the following situations, the
power back door may detect an abnormality and automatic opera-tion may be stopped. In this case,
the back door has to be operated manually. Take extra care when on an incline, as the back door may
open or close abruptly.
• When the back door contacts an obstacle
• When the 12-volt battery voltage suddenly drops, such as when the power switch is turned to ON or the
hybrid system is started during automatic operation
●If a bicycle carrier or similar heavy object is attached to the back door, the power back door may not oper-
ate, causing itself to malfunction, or the back door may suddenly shut again after being opened, causing
someone’s hands, head or neck to be caught and injured. When installing an accessory part to the
back door, using a genuine Toyota part is recommended.
■Jam protection function
Observe the following precautions. Failure to do so may cause death or
serious injury.
●Never use any part of your body to intentionally activate the jam pro-
tection function.
Page 258 of 718
2564-2. Opening, closing and locking the doors
key is near the vehicle, there is a pos-
sibility that the door may not be
unlocked by the entry function. (Use
the wireless remote control to unlock
the doors.)
●Touching the door lock sensor while
wearing gloves may delay or prevent
lock operation. Remove the gloves
and touch the lock sensor again.
●When the lock operation is performed
using the lock sensor, recognition sig-
nals will be shown up to two consecu-
tive times. After this, no recognition
signals will be given.
●If the door handle becomes wet while
the electronic key is within the effec-
tive range, the door may lock and
unlock repeatedly. In that case, follow
the following correction procedures to
wash the vehicle:
• Place the electronic key in a location 2
m (6 ft.) or more away from the vehi-
cle. (Take care to ensure that the key
is not stolen.)
• Set the electronic key to battery-sav-
ing mode to disable the smart entry &
start system. (P.254)
●If the electronic key is inside the vehi-
cle and a door handle becomes wet
during a car wash, a message may be
shown on the multi-information dis-
play and a buzzer will sound outside
the vehicle. To turn off the alarm, lock
all the doors.
●The lock sensor may not work prop-
erly if it comes into contact with ice,
snow, mud, etc. Clean the lock sensor
and attempt to operate it again, or use
the lock sensor on the lower part of
the door handle.
●A sudden approach to the effective
range or door handle may prevent the
doors from being unlocked. In this
case, return the door handle to the
original position and check that the
doors unlock before pulling the door
handle again.
●If there is another electronic key in the
detection area, it may take slightly lon-
ger to unlock the doors after the door handle is gripped.
■When the vehicle is not driven for
extended periods
●To prevent theft of the vehicle, do not
leave the electronic key within 2 m (6
ft.) of the vehicle.
●The smart entry & start system can be
deactivated in advance. (P.601)
●Battery-saving mode can reduce the
power consumption of electronic keys.
(P.254)
■To operate the system properly
Make sure to carry the electronic key
when operating the system. For vehicles
with entry function, do not get the elec-
tronic key too close to the vehicle when
operating the system from the outside of
the vehicle.
Depending on the position and holding
condition of the electronic key, the key
may not be detected correctly and the
system may not operate properly. (The
alarm may go off accidentally, or the
door lock prevention may not operate.)
■If the smart entry & start system
does not operate properly
●Locking and unlocking the doors: Use
the mechanical key. (P.572)
●Starting the hybrid system: P.310
■Customization
Settings (e.g. smart entry & start sys-
tem) can be changed.
(Customizable features: P.600)
If the smart entry & start system has
been deactivated in a customized set-
ting, refer to the explanations for the fol-
lowing operations.
●Locking and unlocking the doors:
Use the wireless remote control or
mechanical key. (P.235, 572)
●Starting the hybrid system and chang-
ing power switch modes: P.572
●Stopping the hybrid system: P.312
Page 262 of 718
2604-3. Adjusting the seats
■Before folding down the seat-
backs
1 Park the vehicle in a safe place.
Apply the parking brake (P.320) and shift the shift lever to P. ( P.316)
2Adjust the position of the front
seat and the angle of the seat-
back. ( P.258)
Depending on the position of the front
seat, if the seatback is folded back- ward, it may interfere with the operation of the rear seat.
3 Lower the head restraint of the
rear seat. ( P.264)
4 Stow the armrest of the rear
seat if it is pulled out. ( P.462)
This step is not necessary when oper-
ating the left side seat only.
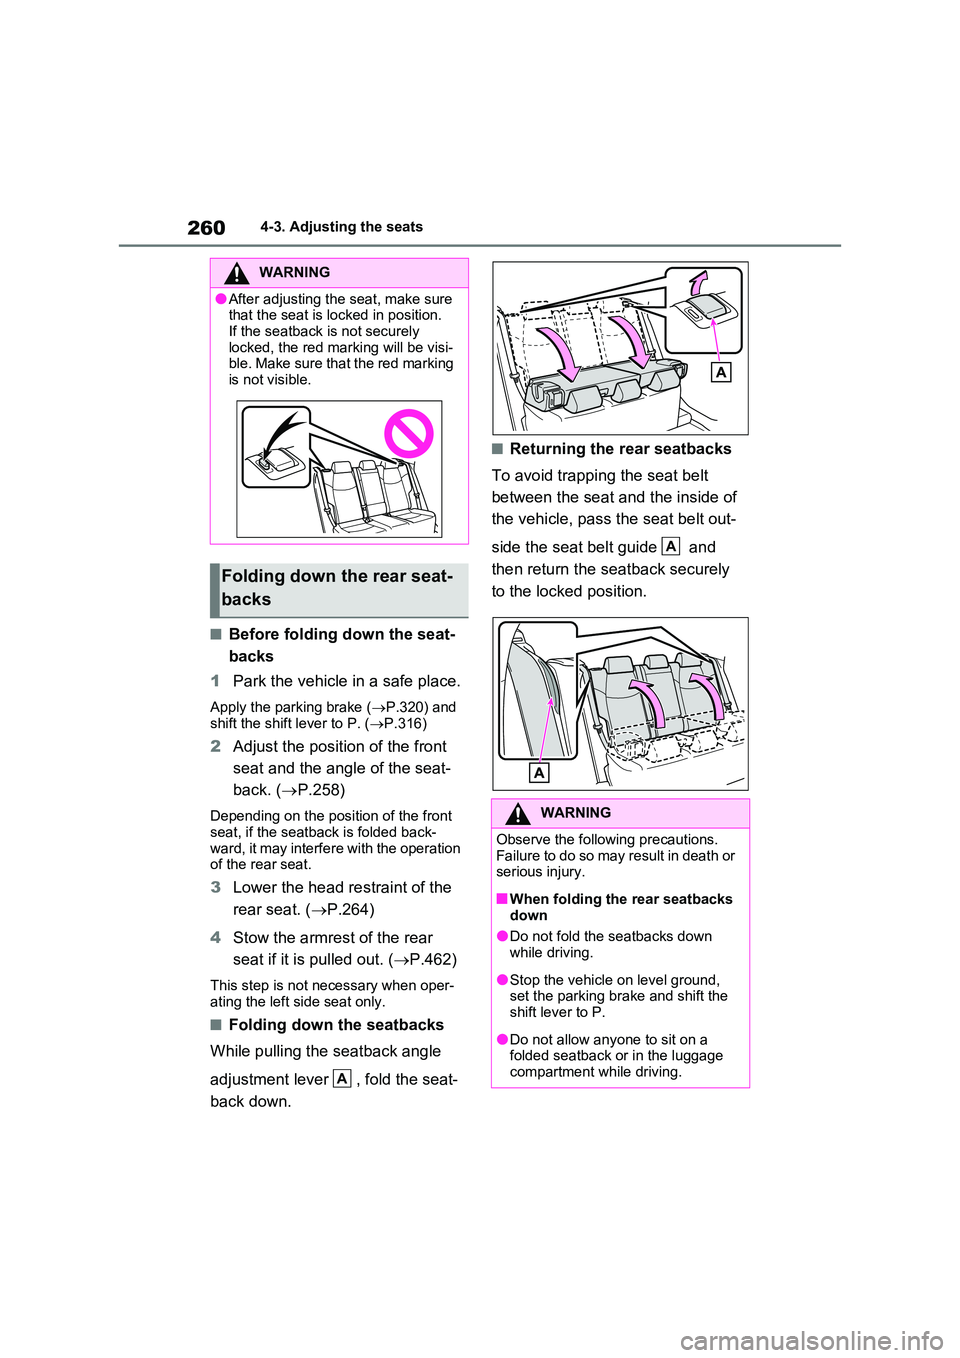
■Folding down the seatbacks
While pulling the seatback angle
adjustment lever , fold the seat-
back down.
■Returning the rear seatbacks
To avoid trapping the seat belt
between the seat and the inside of
the vehicle, pass the seat belt out-
side the seat belt guide and
then return the seatback securely
to the locked position.
WARNING
●After adjusting the seat, make sure that the seat is locked in position.
If the seatback is not securely locked, the red marking will be visi-ble. Make sure that the red marking
is not visible.
Folding down the rear seat-
backs
A
WARNING
Observe the following precautions. Failure to do so may result in death or serious injury.
■When folding the rear seatbacks down
●Do not fold the seatbacks down while driving.
●Stop the vehicle on level ground, set the parking brake and shift the shift lever to P.
●Do not allow anyone to sit on a folded seatback or in the luggage
compartment while driving.
A
Page 263 of 718
261
4
4-3. Adjusting the seats
Before driving
*: If equipped
■Recording procedure
1 Check that the shift lever is in P.
2 Turn the power switch to ON.
3 Adjust the driver’s seat to the
desired positions.
4 While pressing the “SET” but-
ton, or within 3 seconds after the
“SET” button is pressed, press
button “1” or “2” until the buzzer
sounds.
If the selected button has already been preset, the previously recorded position
WARNING
●Do not allow children to enter the luggage compartment.
●Do not operate the rear seat if it is occupied.
●Be careful not to get feet or hands caught in the moving parts or joints
of the seats during operation.
●Do not allow children to operate the
seat.
■After returning the rear seatback
to the upright position
●Make sure that the seatback is securely locked in position by lightly
pushing it back and forth. If the seatback is not securely locked, the red marking will be visi-
ble. Make sure that the red marking is not visible.
●Check that the seat belts are not twisted or caught in the seatback.
Driving position mem-
ory*
This feature automatically
adjusts the driver’s seat to suit
your preferences.
Your preferred driving position
(the position of the driver’s
seat) can be recorded and
recalled by pressing a button.
Two different driving positions
can be recorded into memory.
Each electronic key can be
registered to recall your pre-
ferred driving position.
Recording/recalling a driv-
ing position
Page 268 of 718
2664-4. Adjusting the steering wheel and mirrors
4-4.Adjusting the steering whe el an d mirrors
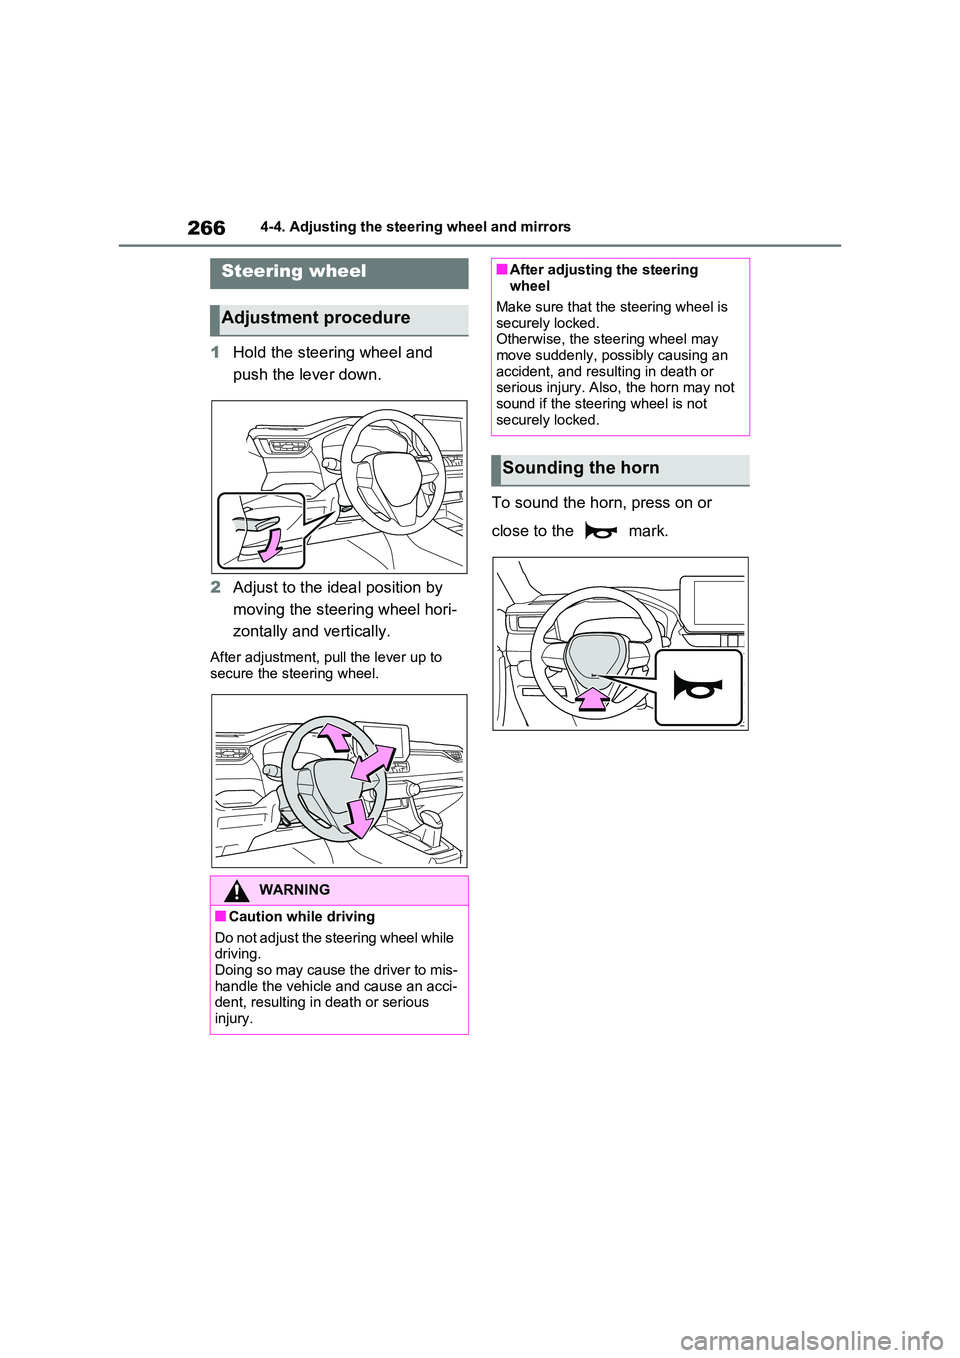
1Hold the steering wheel and
push the lever down.
2 Adjust to the ideal position by
moving the steering wheel hori-
zontally and vertically.
After adjustment, pull the lever up to
secure the steering wheel.
To sound the horn, press on or
close to the mark.
Steering wheel
Adjustment procedure
WARNING
■Caution while driving
Do not adjust the steering wheel while driving.Doing so may cause the driver to mis-
handle the vehicle and cause an acci- dent, resulting in death or serious injury.
■After adjusting the steering wheel
Make sure that the steering wheel is
securely locked. Otherwise, the steering wheel may move suddenly, possibly causing an
accident, and resulting in death or serious injury. Also, the horn may not sound if the steering wheel is not
securely locked.
Sounding the horn
Page 293 of 718
291
5
5-1. Before driving
Driving
WARNING
●After driving through a puddle, lightly depress the brake pedal to
make sure that the brakes are func- tioning properly. Wet brake pads may prevent the brakes from func-
tioning properly. If the brakes on only one side are wet and not func-tioning properly, steering control
may be affected.
■When shifting the shift lever
●Do not let the vehicle roll backward while a forward driving position is selected, or roll forward while the
shift lever is in R. Doing so may result in an accident or damage to the vehicle.
●Do not shift the shift lever to P while the vehicle is moving.
Doing so can damage the transmis- sion and may result in a loss of vehicle control.
●Do not shift the shift lever to R while the vehicle is moving forward.
Doing so can damage the transmis- sion and may result in a loss of vehicle control.
●Do not shift the shift lever to a driv-ing position while the vehicle is
moving backward. Doing so can damage the transmis-sion and may result in a loss of
vehicle control.
●Moving the shift lever to N while the
vehicle is moving will disengage the hybrid system. Engine braking is not available with the hybrid system
disengaged.
●Be careful not to shift the shift lever with the accelerator pedal depressed.
Shifting the shift lever to a gear other than P or N may lead to unex-pected rapid acceleration of the
vehicle that may cause an accident and result in death or serious injury. Doing so can damage the transmis-
sion and may result in a loss of vehicle control.
■If you hear a squealing or scrap-ing noise (brake pad wear indica-tors)
Have the brake pads checked and replaced by any authorized Toyota retailer or Toyota authorized repairer,
or any reliable repairer as soon as possible.Rotor damage may result if the pads
are not replaced when needed. It is dangerous to drive the vehicle when the wear limits of the brake
pads and/or those of the brake discs are exceeded.
■When the vehicle is stopped
●Do not depress the accelerator pedal unnecessarily.
If the vehicle is in any gear other than P or N, the vehicle may accel-erate suddenly and unexpectedly,
causing an accident.
●In order to prevent accidents due to
the vehicle rolling away, always keep depressing the brake pedal while stopped with the “READY”
indicator is illuminated, and apply the parking brake as necessary.
●If the vehicle is stopped on an incline, in order to prevent acci-dents caused by the vehicle rolling
forward or backward, always depress the brake pedal and securely apply the parking brake as
needed.