Smart entry TOYOTA RAV4 PLUG-IN HYBRID 2023 Owners Manual
[x] Cancel search | Manufacturer: TOYOTA, Model Year: 2023, Model line: RAV4 PLUG-IN HYBRID, Model: TOYOTA RAV4 PLUG-IN HYBRID 2023Pages: 718, PDF Size: 167.55 MB
Page 5 of 718
3TABLE OF CONTENTS
1
6
5
4
3
2
8
7
9
4-1. Key information
Keys .................................... 232
4-2. Opening, closing and locking
the doors
Side doors........................... 235
Back door............................ 240
Smart entry & start system . 253
4-3. Adjusting the seats
Front seats .......................... 258
Rear seats .......................... 259
Driving position memory ..... 261
Head restraints ................... 264
4-4. Adjusting the steering wheel
and mirrors
Steering wheel .................... 266
Inside rear view mirror ........ 267
Digital Rear-view Mirror ...... 268
Outside rear view mirrors.... 277
4-5. Opening, closing the win-
dows and moon roof
Power windows ................... 279
Panoramic moon roof ......... 282
5-1. Before driving
Driving the vehicle .............. 288
Cargo and luggage ............. 294
Trailer towing ...................... 296
5-2. Driving procedures
Power (ignition) switch ........ 310
Hybrid transmission ............ 315
Turn signal lever ................. 319
Parking brake...................... 320
Brake Hold .......................... 323
5-3. Operating the lights and wip-
ers
Headlight switch.................. 326
AHB (Automatic High Beam)
.......................................... 328
Fog light switch ................... 331
Windshield wipers and washer
.......................................... 332
Rear window wiper and washer
.......................................... 334
5-4. Refueling
Opening the fuel tank cap ... 336
5-5. Using the driving support sys-
tems
Toyota Safety Sense .......... 338
PCS (Pre-Collision System) 343
LTA (Lane Tracing Assist) .. 353
RSA (Road Sign Assist)...... 364
Dynamic radar cruise control
with full-speed range ........ 368
Cruise control...................... 381
Speed limiter ....................... 384
BSM (Blind Spot Monitor) ... 386
Toyota parking assist-sensor
.......................................... 395
PKSB (Parking Support Brake)
.......................................... 403
Parking Support Brake function
(static objects) .................. 407
Parking Support Brake function
(rear-crossing vehicles) .... 410
Driving mode select switch . 411
Trail Mode ........................... 413
4Before driving
5Driving
Page 123 of 718
121
2 2-2. Charging
Plug-in hybrid system
■Unlocking the charging port
lid
1Unlock the doors using the
smart entry & start system or
wireless remote control.
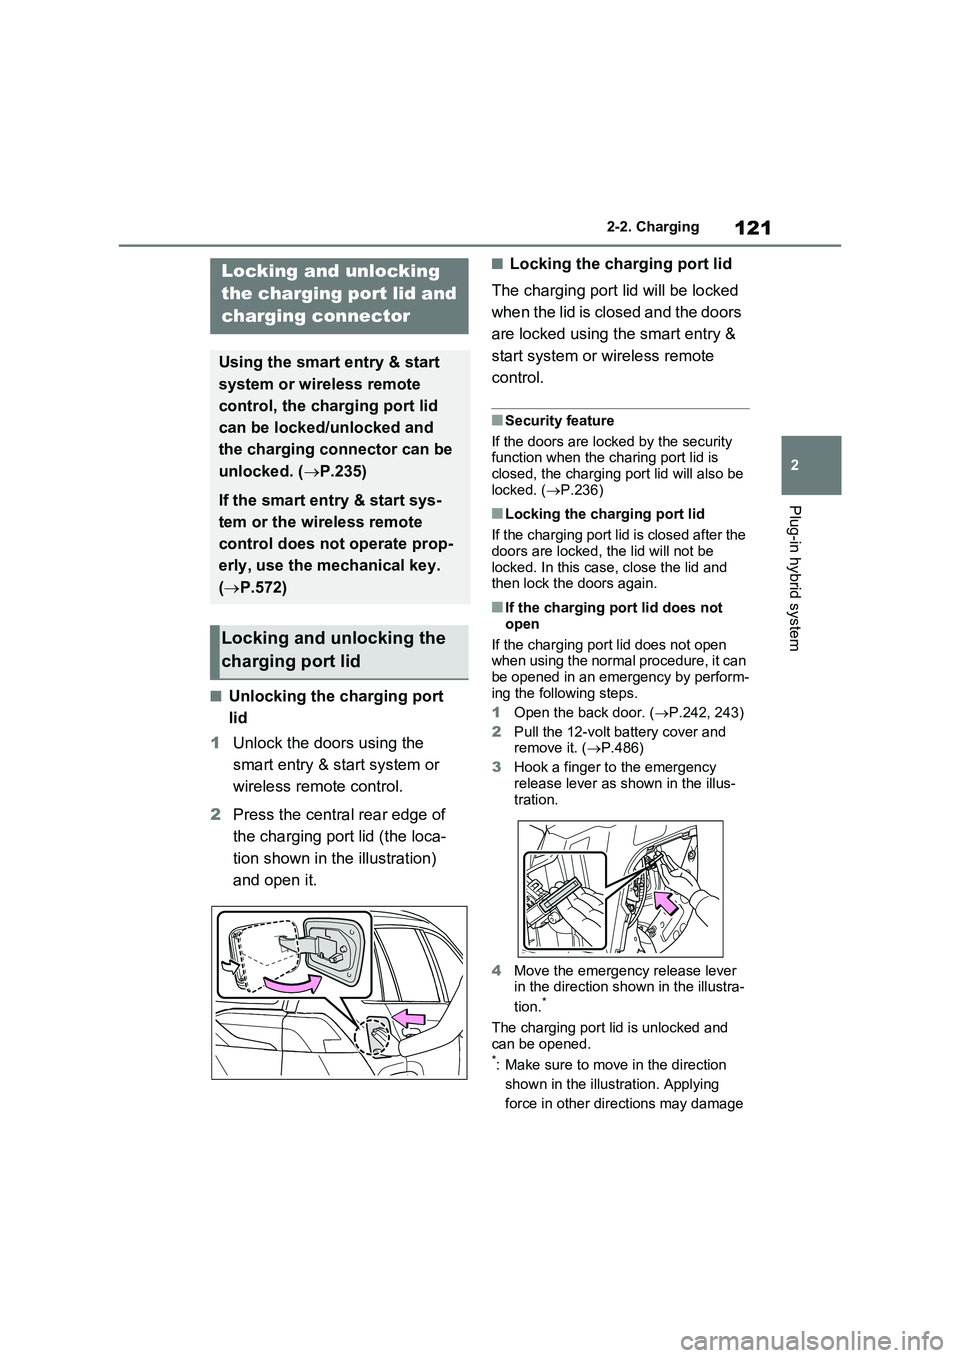
2Press the central rear edge of
the charging port lid (the loca-
tion shown in the illustration)
and open it.
■Locking the charging port lid
The charging port lid will be locked
when the lid is closed and the doors
are locked using the smart entry &
start system or wireless remote
control.
■Security feature
If the doors are locked by the security
function when the charing port lid is
closed, the charging port lid will also be
locked. (P.236)
■Locking the charging port lid
If the charging port lid is closed after the
doors are locked, the lid will not be
locked. In this case, close the lid and
then lock the doors again.
■If the charging port lid does not
open
If the charging port lid does not open
when using the normal procedure, it can
be opened in an emergency by perform-
ing the following steps.
1Open the back door. (P.242, 243)
2Pull the 12-volt battery cover and
remove it. (P.486)
3Hook a finger to the emergency
release lever as shown in the illus-
tration.
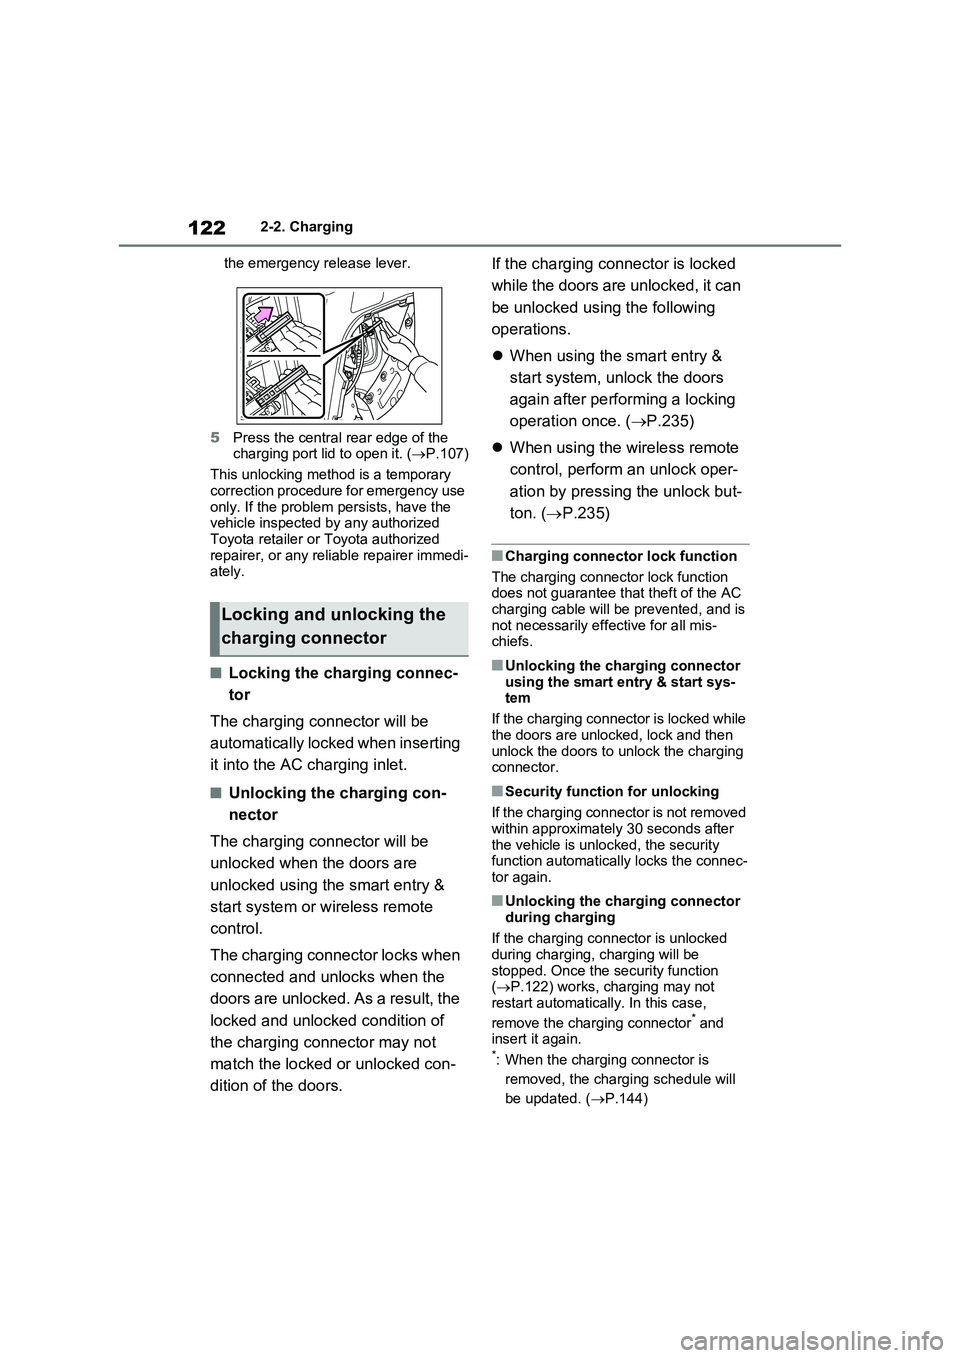
4Move the emergency release lever
in the direction shown in the illustra-
tion.
*
The charging port lid is unlocked and
can be opened.
*: Make sure to move in the direction
shown in the illustration. Applying
force in other directions may damage
Locking and unlocking
the charging port lid and
charging connector
Using the smart entry & start
system or wireless remote
control, the charging port lid
can be locked/unlocked and
the charging connector can be
unlocked. (P.235)
If the smart entry & start sys-
tem or the wireless remote
control does not operate prop-
erly, use the mechanical key.
(P.572)
Locking and unlocking the
charging port lid
Page 124 of 718
1222-2. Charging
the emergency release lever.
5Press the central rear edge of the
charging port lid to open it. (P.107)
This unlocking method is a temporary
correction procedure for emergency use
only. If the problem persists, have the
vehicle inspected by any authorized
Toyota retailer or Toyota authorized
repairer, or any reliable repairer immedi-
ately.
■Locking the charging connec-
tor
The charging connector will be
automatically locked when inserting
it into the AC charging inlet.
■Unlocking the charging con-
nector
The charging connector will be
unlocked when the doors are
unlocked using the smart entry &
start system or wireless remote
control.
The charging connector locks when
connected and unlocks when the
doors are unlocked. As a result, the
locked and unlocked condition of
the charging connector may not
match the locked or unlocked con-
dition of the doors.If the charging connector is locked
while the doors are unlocked, it can
be unlocked using the following
operations.
When using the smart entry &
start system, unlock the doors
again after performing a locking
operation once. (P.235)
When using the wireless remote
control, perform an unlock oper-
ation by pressing the unlock but-
ton. (P.235)
■Charging connector lock function
The charging connector lock function
does not guarantee that theft of the AC
charging cable will be prevented, and is
not necessarily effective for all mis-
chiefs.
■Unlocking the charging connector
using the smart entry & start sys-
tem
If the charging connector is locked while
the doors are unlocked, lock and then
unlock the doors to unlock the charging
connector.
■Security function for unlocking
If the charging connector is not removed
within approximately 30 seconds after
the vehicle is unlocked, the security
function automatically locks the connec-
tor again.
■Unlocking the charging connector
during charging
If the charging connector is unlocked
during charging, charging will be
stopped. Once the security function
(P.122) works, charging may not
restart automatically. In this case,
remove the charging connector
* and
insert it again.
*: When the charging connector is
removed, the charging schedule will
be updated. (P.144)
Locking and unlocking the
charging connector
Page 125 of 718
123
2
2-2. Charging
Plug-in hybrid system
■When the charging connector can-
not be inserted into the AC charging inlet
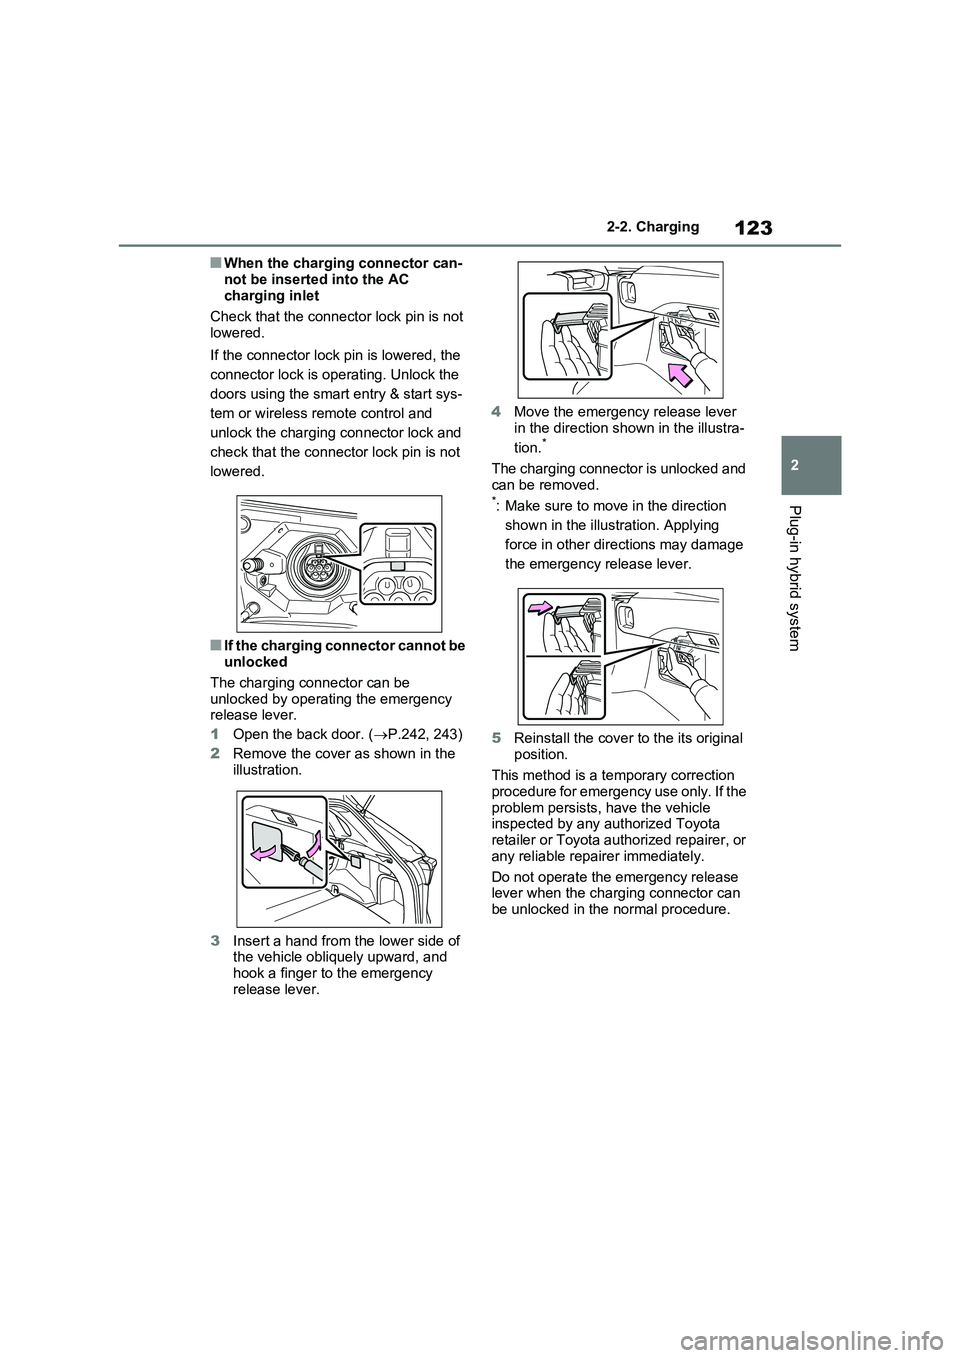
Check that the connector lock pin is not
lowered.
If the connector lock pin is lowered, the
connector lock is operating. Unlock the
doors using the smart entry & start sys-
tem or wireless remote control and
unlock the charging connector lock and
check that the connector lock pin is not
lowered.
■If the charging connector cannot be unlocked
The charging connector can be
unlocked by operating the emergency release lever.
1 Open the back door. (P.242, 243)
2 Remove the cover as shown in the illustration.
3 Insert a hand from the lower side of the vehicle obliquely upward, and
hook a finger to the emergency release lever.
4 Move the emergency release lever
in the direction shown in the illustra-
tion.*
The charging connector is unlocked and
can be removed.*: Make sure to move in the direction
shown in the illustration. Applying
force in other directions may damage
the emergency release lever.
5 Reinstall the cover to the its original
position.
This method is a temporary correction procedure for emergency use only. If the
problem persists, have the vehicle inspected by any authorized Toyota retailer or Toyota authorized repairer, or
any reliable repairer immediately.
Do not operate the emergency release lever when the charging connector can
be unlocked in the normal procedure.
Page 145 of 718
143
2
2-2. Charging
Plug-in hybrid system
■When the outside temperature is low or high
The level shown on the SOC (State of Charge) gauge ( P.187, 193) may drop slightly when the power switch is turned
to ON, even if charging has been com- pleted and the hybrid battery (traction battery) is fully charged. However, this
does not indicate a malfunction.
■When removing the charging con- nector
Unlock the doors using the smart entry
& start system or wireless remote con- trol to unlock the charging connector, check that the lock is released, and then
pull the charging connector towards you. ( P.121)
■If the charging connector cannot be unlocked
P.123
WARNING
■After charging
Remove the plug if it will not be used for a long time.
Dirt and dust may accumulate plug or
socket, which could cause a malfunc- tion or fire, possibly leading to death or serious injury.
NOTICE
■After charging
●Store the AC charging cable out of
reach from infants and children.
●After disconnecting the charging
connector from the AC charging inlet, make sure to put on the AC charging inlet cap and close the
charging port lid. If the AC charging inlet cap is not put on, water or for-eign objects may enter the AC
charging inlet, which could lead to vehicle damage.
●After removing the plug from the socket, keep it in a safe place free from moisture and dust. The AC
charging cable or plug may be dam- aged if the cable is stepped on or ridden over by the vehicle.
Page 186 of 718
1843-1. Instrument cluster
cle inspected by any authorized
Toyota retailer or Toyota authorized
repairer, or any reliable repairer.
*2: This light illuminates on the multi-
information display with a message.
*3: Toyota parking assist-sensor OFF
indicator turns on when the power
switch is turned to ON while the
Toyota parking assist-sensor func-
tion is on. It will turn off after a few
seconds.
*4: Vehicles with 12.3-inch display
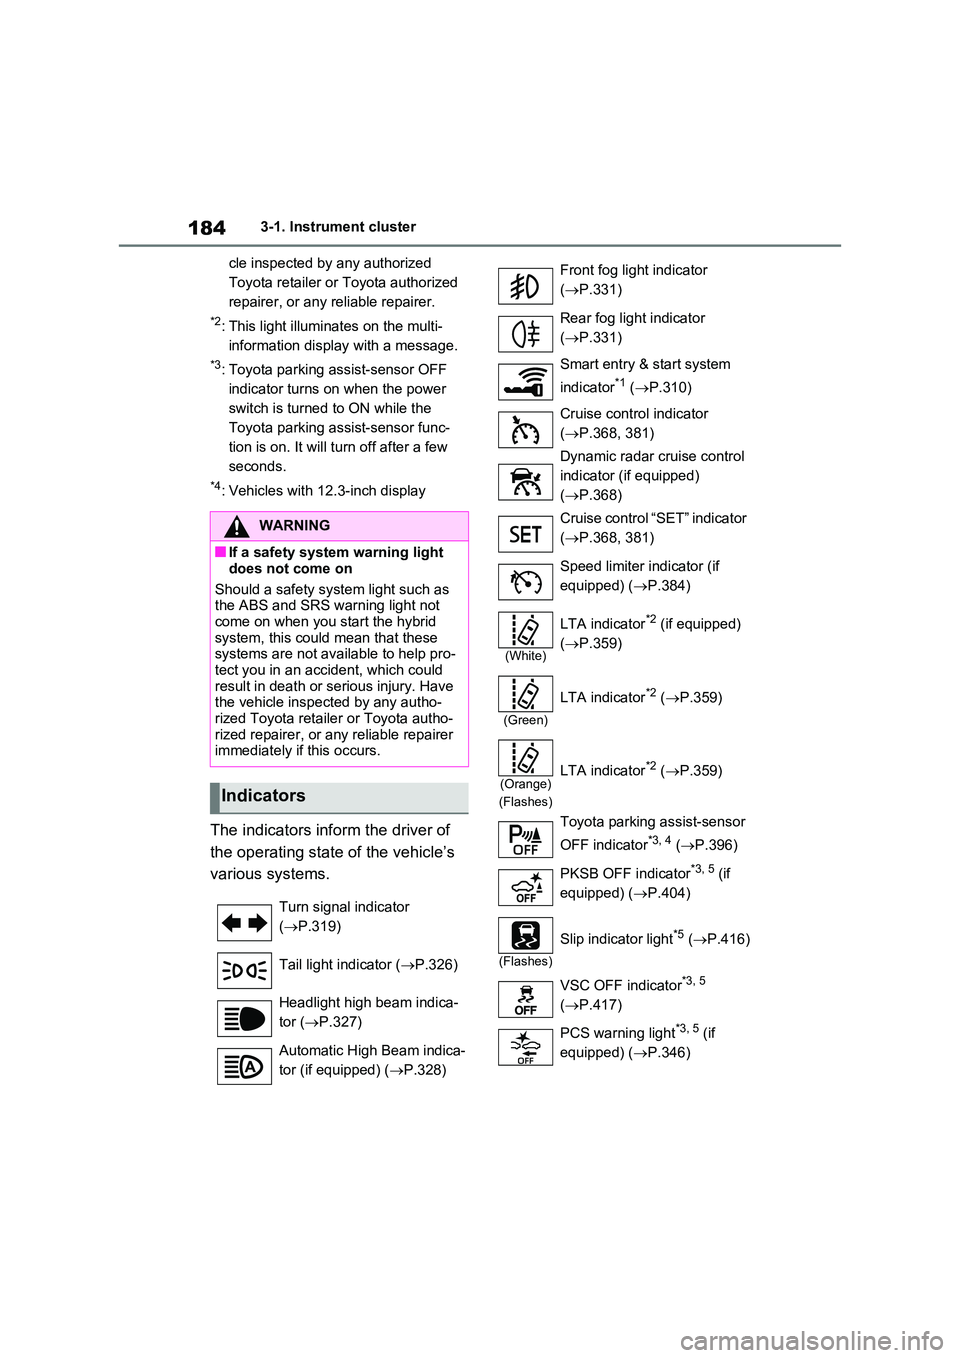
The indicators inform the driver of
the operating state of the vehicle’s
various systems.
WARNING
■If a safety system warning light
does not come on
Should a safety system light such as the ABS and SRS warning light not
come on when you start the hybrid system, this could mean that these systems are not available to help pro-
tect you in an accident, which could result in death or serious injury. Have the vehicle inspected by any autho-
rized Toyota retailer or Toyota autho- rized repairer, or any reliable repairer immediately if this occurs.
Indicators
Turn signal indicator
( P.319)
Tail light indicator ( P.326)
Headlight high beam indica-
tor ( P.327)
Automatic High Beam indica-
tor (if equipped) ( P.328)
Front fog light indicator
( P.331)
Rear fog light indicator
( P.331)
Smart entry & start system
indicator*1 ( P.310)
Cruise control indicator
( P.368, 381)
Dynamic radar cruise control
indicator (if equipped)
( P.368)
Cruise control “SET” indicator
( P.368, 381)
Speed limiter indicator (if
equipped) ( P.384)
(White)
LTA indicator*2 (if equipped)
( P.359)
(Green)
LTA indicator*2 (P.359)
(Orange)
(Flashes)
LTA indicator*2 ( P.359)
Toyota parking assist-sensor
OFF indicator*3, 4 ( P.396)
PKSB OFF indicator*3, 5 (if
equipped) ( P.404)
(Flashes)
Slip indicator light*5 (P.416)
VSC OFF indicator*3, 5
( P.417)
PCS warning light*3, 5 (if
equipped) ( P.346)
Page 233 of 718
4
231
4
Before driving
Before driving
4-1. Key information
Keys.................................. 232
4-2. Opening, closing and locking
the doors
Side doors ........................ 235
Back door ......................... 240
Smart entry & start system
....................................... 253
4-3. Adjusting the seats
Front seats........................ 258
Rear seats ........................ 259
Driving position memory ... 261
Head restraints ................. 264
4-4. Adjusting the steering wheel
and mirrors
Steering wheel .................. 266
Inside rear view mirror ...... 267
Digital Rear-view Mirror .... 268
Outside rear view mirrors . 277
4-5. Opening, closing the win-
dows and moon roof
Power windows................. 279
Panoramic moon roof ....... 282
Page 234 of 718
2324-1. Key information
4-1.Key info rmation
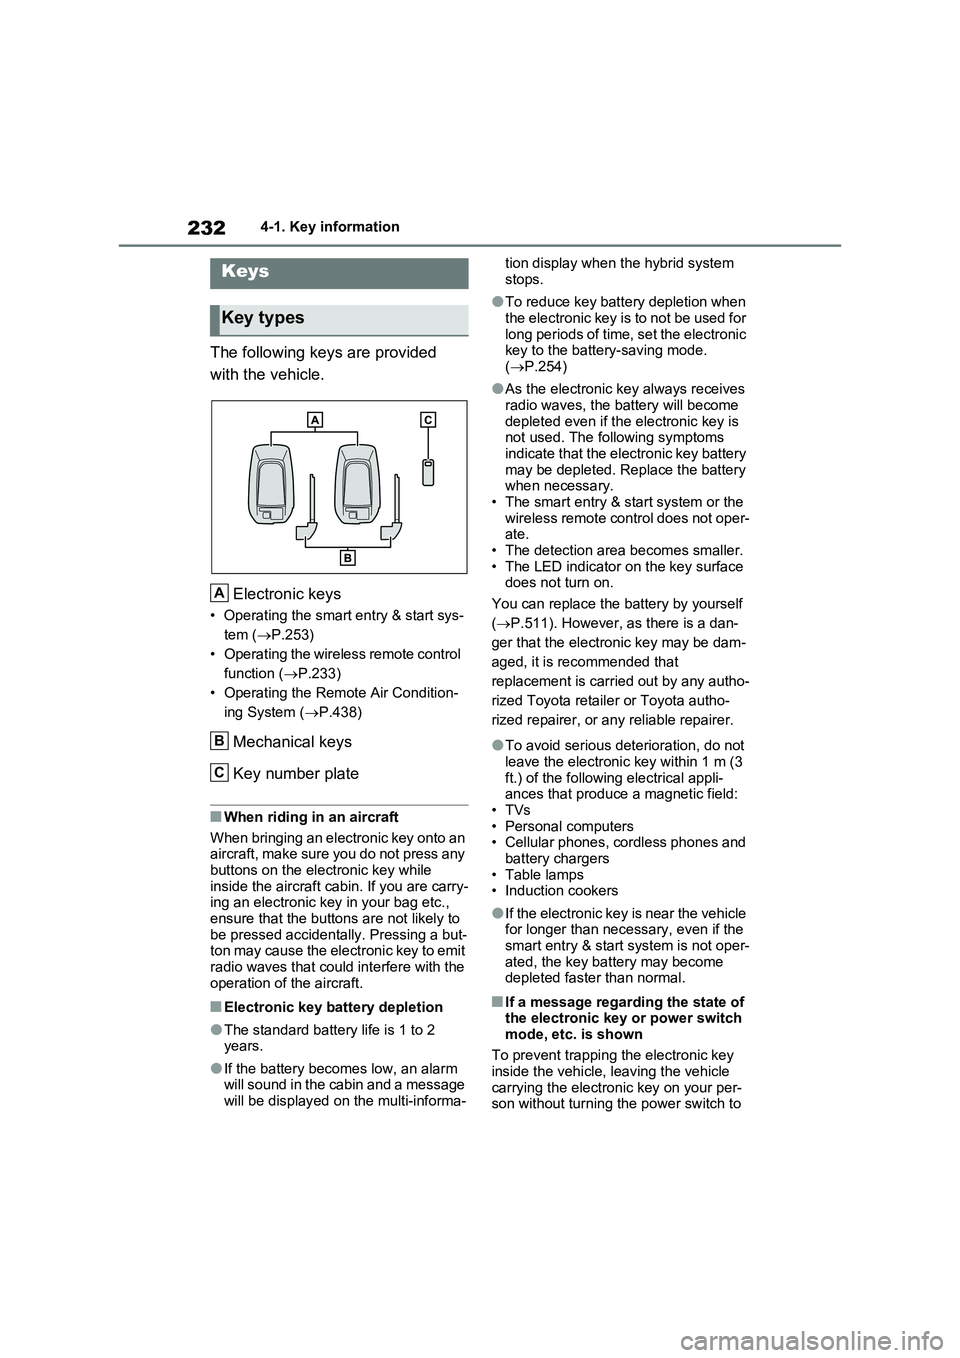
The following keys are provided
with the vehicle.
Electronic keys
• Operating the smart entry & start sys-
tem ( P.253)
• Operating the wireless remote control
function ( P.233)
• Operating the Remote Air Condition-
ing System ( P.438)
Mechanical keys
Key number plate
■When riding in an aircraft
When bringing an electronic key onto an aircraft, make sure you do not press any
buttons on the electronic key while inside the aircraft cabin. If you are carry-ing an electronic key in your bag etc.,
ensure that the buttons are not likely to be pressed accidentally. Pressing a but-ton may cause the electronic key to emit
radio waves that could interfere with the operation of the aircraft.
■Electronic key battery depletion
●The standard battery life is 1 to 2 years.
●If the battery becomes low, an alarm will sound in the cabin and a message will be displayed on the multi-informa-
tion display when the hybrid system
stops.
●To reduce key battery depletion when
the electronic key is to not be used for long periods of time, set the electronic key to the battery-saving mode.
( P.254)
●As the electronic key always receives
radio waves, the battery will become depleted even if the electronic key is not used. The following symptoms
indicate that the electronic key battery may be depleted. Replace the battery when necessary.
• The smart entry & start system or the wireless remote control does not oper-ate.
• The detection area becomes smaller. • The LED indicator on the key surface does not turn on.
You can replace the battery by yourself
( P.511). However, as there is a dan-
ger that the electronic key may be dam-
aged, it is recommended that
replacement is carried out by any autho-
rized Toyota retailer or Toyota autho-
rized repairer, or any reliable repairer.
●To avoid serious deterioration, do not leave the electronic key within 1 m (3
ft.) of the following electrical appli- ances that produce a magnetic field:•TVs
• Personal computers • Cellular phones, cordless phones and battery chargers
•Table lamps • Induction cookers
●If the electronic key is near the vehicle for longer than necessary, even if the smart entry & start system is not oper-
ated, the key battery may become depleted faster than normal.
■If a message regarding the state of the electronic key or power switch
mode, etc. is shown
To prevent trapping the electronic key inside the vehicle, leaving the vehicle
carrying the electronic key on your per- son without turning the power switch to
Keys
Key types
A
B
C
Page 235 of 718
233
4
4-1. Key information
Before driving
OFF or other passengers from uninten-
tionally taking the key out of the vehicle, etc., a message that prompts the user to confirm the state of the electronic key or
power switch mode may be shown on the multi-information display. In those cases, follow the instructions on the dis-
play immediately.
■If “Key Battery Low Replace Key Battery” is displayed on the multi-information display
The electronic key has a low battery. Replace the electronic key battery. ( P.511)
■Replacing the battery
P.511
■Confirmation of the registered key number
The number of keys already registered
to the vehicle can be confirmed. Ask any authorized Toyota retailer or Toyota authorized repairer, or any reliable
repairer for details.
■If “New Key Registered Contact Your Dealer if You Did Not Register a New Key” or “A New Key has
been Registered Contact Your Dealer for Details” is displayed on the multi-information display
This message will be displayed each time the driver’s door is opened when the doors are unlocked from the outside
for approximately 10 days after a new electronic key has been registered. If this message is displayed but you
have not had a new electronic key regis- tered, ask any authorized Toyota retailer or Toyota authorized repairer, or any
reliable repairer to check if an unknown electronic key (other than those in your possession) has been registered.
The electronic keys are equipped
with the following wireless remote
NOTICE
■To prevent key damage
●Do not drop the keys, subject them to strong shocks or bend them.
●Do not expose the keys to high temperatures for long periods of time.
●Do not get the keys wet or wash them in an ultrasonic washer, etc.
●Do not attach metallic or magnetic materials to the keys or place the
keys close to such materials.
●Do not disassemble the keys.
●Do not attach a sticker or anything else to the surface of the electronic
key.
●Do not place the keys near objects
that produce magnetic fields, such as TVs, audio systems and induc-tion cookers.
●Do not place the keys near medical electrical equipment such as low-
frequency therapy equipment or microwave therapy equipment, and do not receive medical attention
with the keys on your person.
■Carrying the electronic key on
your person
Carry the electronic key 10 cm (3.9 in.) or more away from electric appli-
ances that are turned on. Radio waves emitted from electric appli-ances within 10 cm (3.9 in.) of the
electronic key may interfere with the key, causing the key to not function properly.
■In case of a smart entry & start system malfunction or other key-
related problems
P.571
■When an electronic key is lost
P.570
Wireless remote control
Page 239 of 718
237
4
4-2. Opening, closing and locking the doors
Before driving
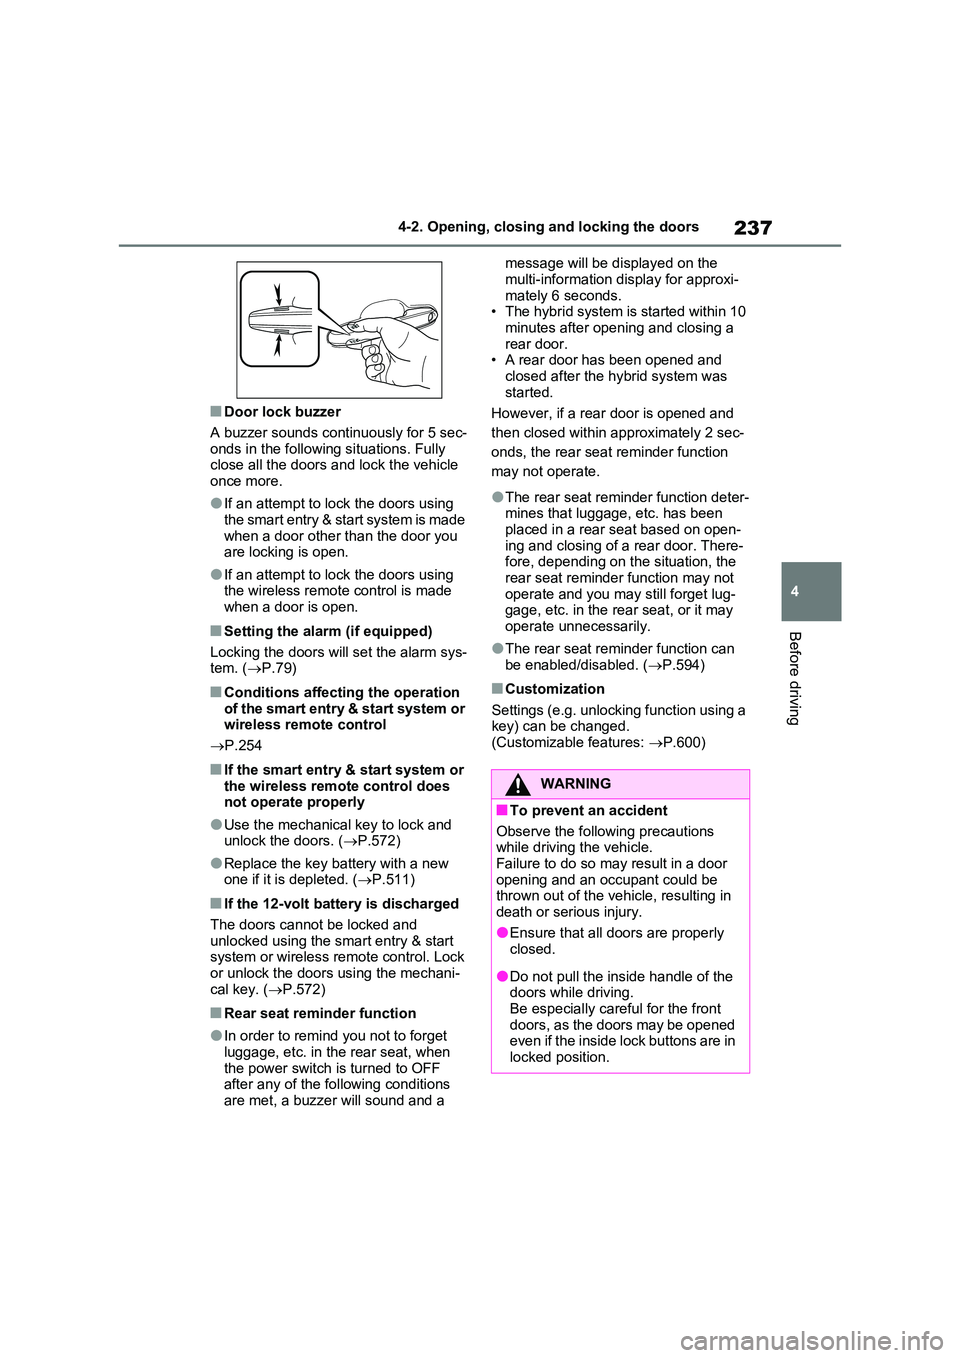
■Door lock buzzer
A buzzer sounds continuously for 5 sec- onds in the following situations. Fully close all the doors and lock the vehicle
once more.
●If an attempt to lock the doors using
the smart entry & start system is made when a door other than the door you are locking is open.
●If an attempt to lock the doors using the wireless remote control is made
when a door is open.
■Setting the alarm (if equipped)
Locking the doors will set the alarm sys- tem. ( P.79)
■Conditions affecting the operation
of the smart entry & start system or wireless remote control
P.254
■If the smart entry & start system or
the wireless remote control does not operate properly
●Use the mechanical key to lock and unlock the doors. ( P.572)
●Replace the key battery with a new one if it is depleted. ( P.511)
■If the 12-volt battery is discharged
The doors cannot be locked and
unlocked using the smart entry & start system or wireless remote control. Lock or unlock the doors using the mechani-
cal key. ( P.572)
■Rear seat reminder function
●In order to remind you not to forget
luggage, etc. in the rear seat, when the power switch is turned to OFF after any of the following conditions
are met, a buzzer will sound and a
message will be displayed on the
multi-information display for approxi- mately 6 seconds.• The hybrid system is started within 10
minutes after opening and closing a rear door.• A rear door has been opened and
closed after the hybrid system was started.
However, if a rear door is opened and
then closed within approximately 2 sec-
onds, the rear seat reminder function
may not operate.
●The rear seat reminder function deter- mines that luggage, etc. has been placed in a rear seat based on open-
ing and closing of a rear door. There- fore, depending on the situation, the rear seat reminder function may not
operate and you may still forget lug- gage, etc. in the rear seat, or it may operate unnecessarily.
●The rear seat reminder function can be enabled/disabled. ( P.594)
■Customization
Settings (e.g. unlocking function using a key) can be changed.(Customizable features: P.600)
WARNING
■To prevent an accident
Observe the following precautions while driving the vehicle.
Failure to do so may result in a door opening and an occupant could be thrown out of the vehicle, resulting in
death or serious injury.
●Ensure that all doors are properly closed.
●Do not pull the inside handle of the doors while driving.
Be especially careful for the front doors, as the doors may be opened even if the inside lock buttons are in
locked position.