display TOYOTA tC 2010 Accessories, Audio & Navigation (in English)
[x] Cancel search | Manufacturer: TOYOTA, Model Year: 2010, Model line: tC, Model: TOYOTA tC 2010Pages: 284, PDF Size: 32.36 MB
Page 98 of 284
ADVANCED FUNCTIONS
97
V573_E
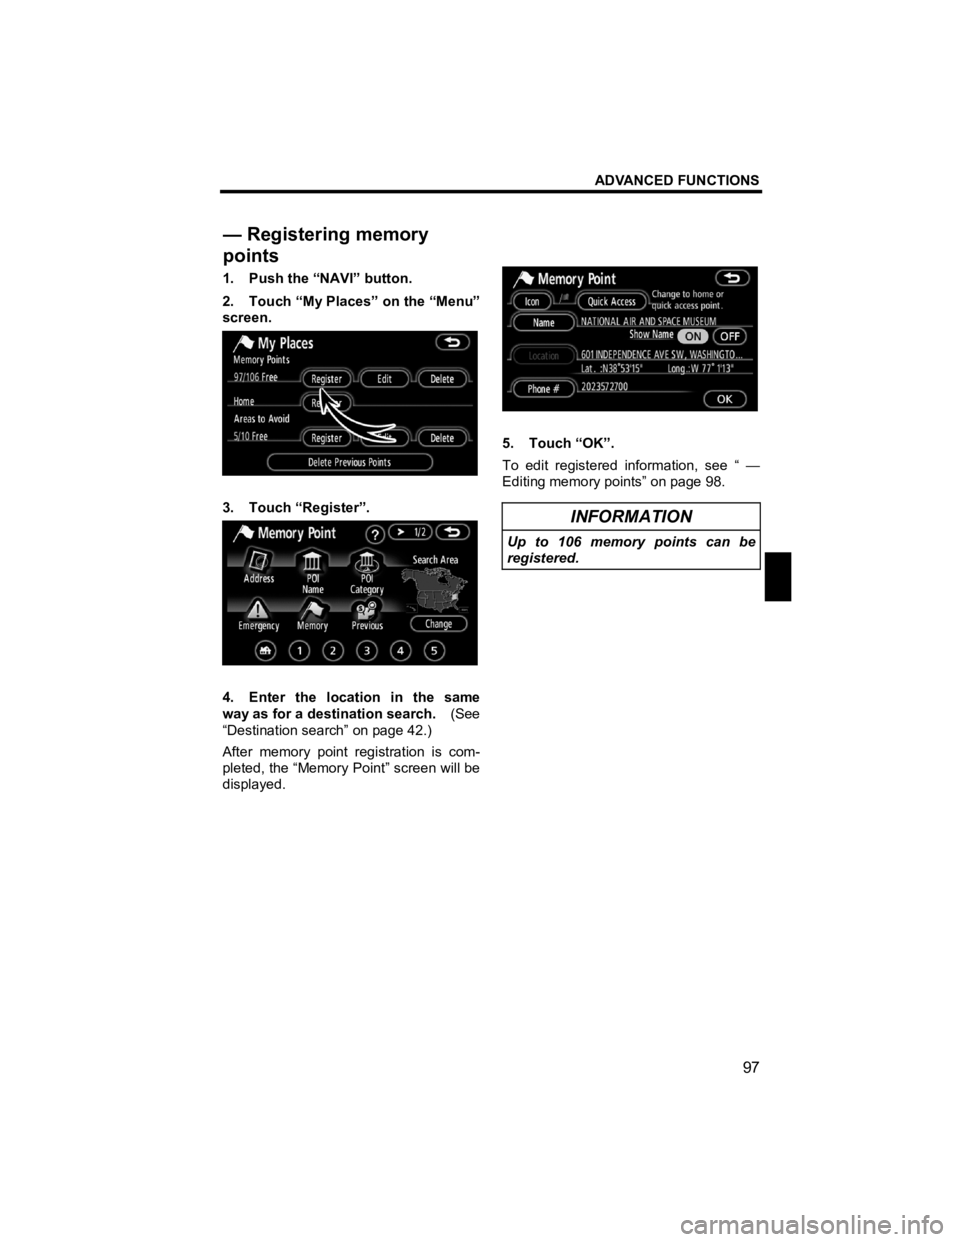
1. Push the “NAVI” button.
2. Touch “My Places” on the “Menu”
screen.
3. Touch “Register”.
4. Enter the location in the same
way as for a destination search. (See
“Destination search” on page 42.)
After memory point registration is com-
pleted, the “Memory Point” screen will be
displayed.
5. Touch “OK”.
To edit registered information, see “ —
Editing memory points” on page 98.
INFORMATION
Up to 106 memory points can be
registered.
— Registering memory
points
Page 99 of 284
ADVANCED FUNCTIONS
98
V573_E
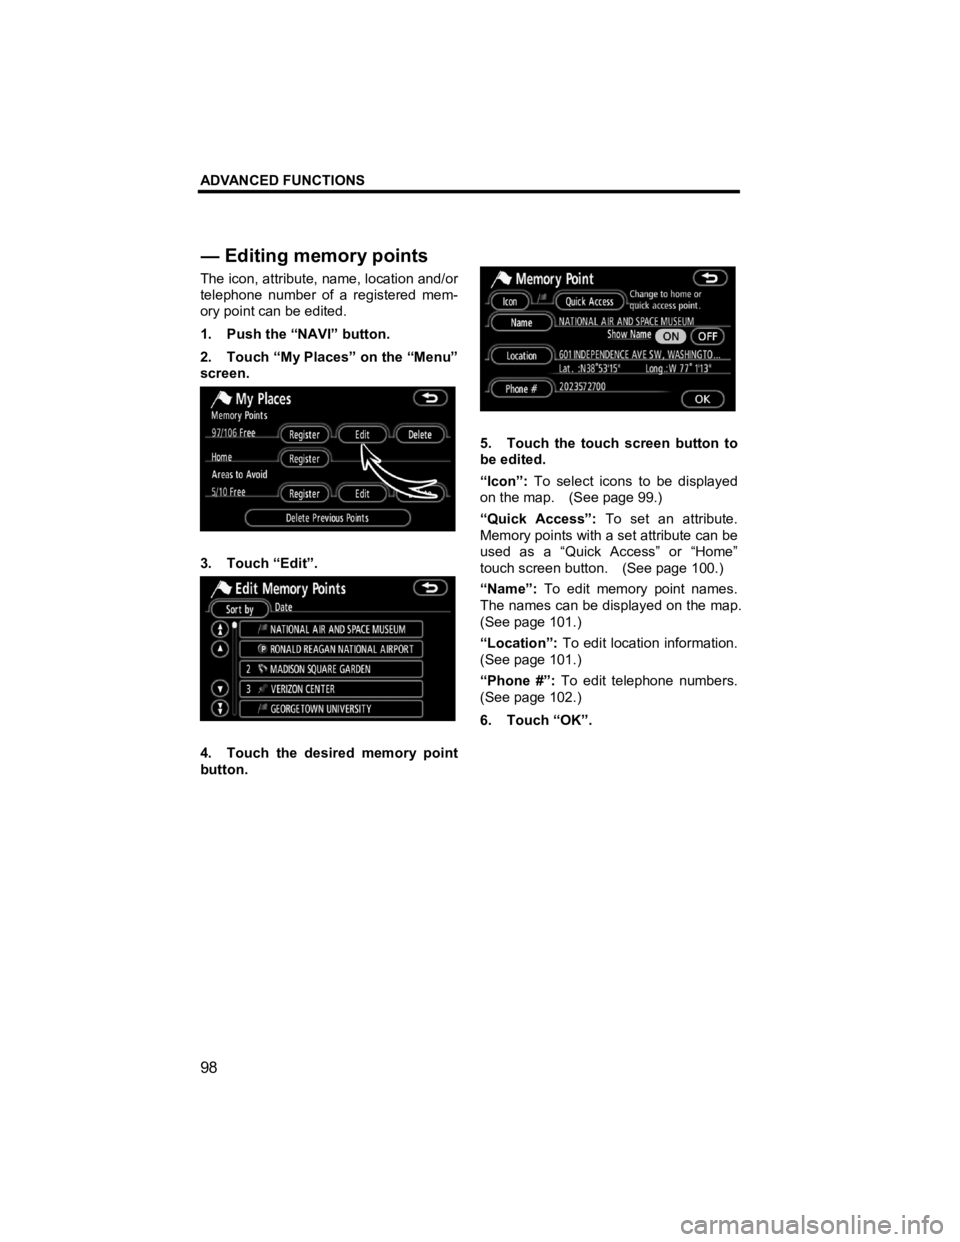
The icon, attribute, name, location and/or
telephone number of a registered mem-
ory point can be edited.
1. Push the “NAVI” button.
2. Touch “My Places” on the “Menu”
screen.
3. Touch “Edit”.
4. Touch the desired memory point
button.
5. Touch the touch screen button to
be edited.
“Icon”: To select icons to be displayed
on the map. (See page 99.)
“Quick Access”: To set an attribute.
Memory points with a set attribute can be
used as a “Quick Access” or “Home”
touch screen button. (See page 100.)
“Name”: To edit memory point names.
The names can be displayed on the map.
(See page 101.)
“Location”: To edit location information.
(See page 101.)
“Phone #”: To edit telephone numbers.
(See page 102.)
6. Touch “OK”.
— Editin
g memory points
Page 102 of 284
ADVANCED FUNCTIONS
101
V573_E
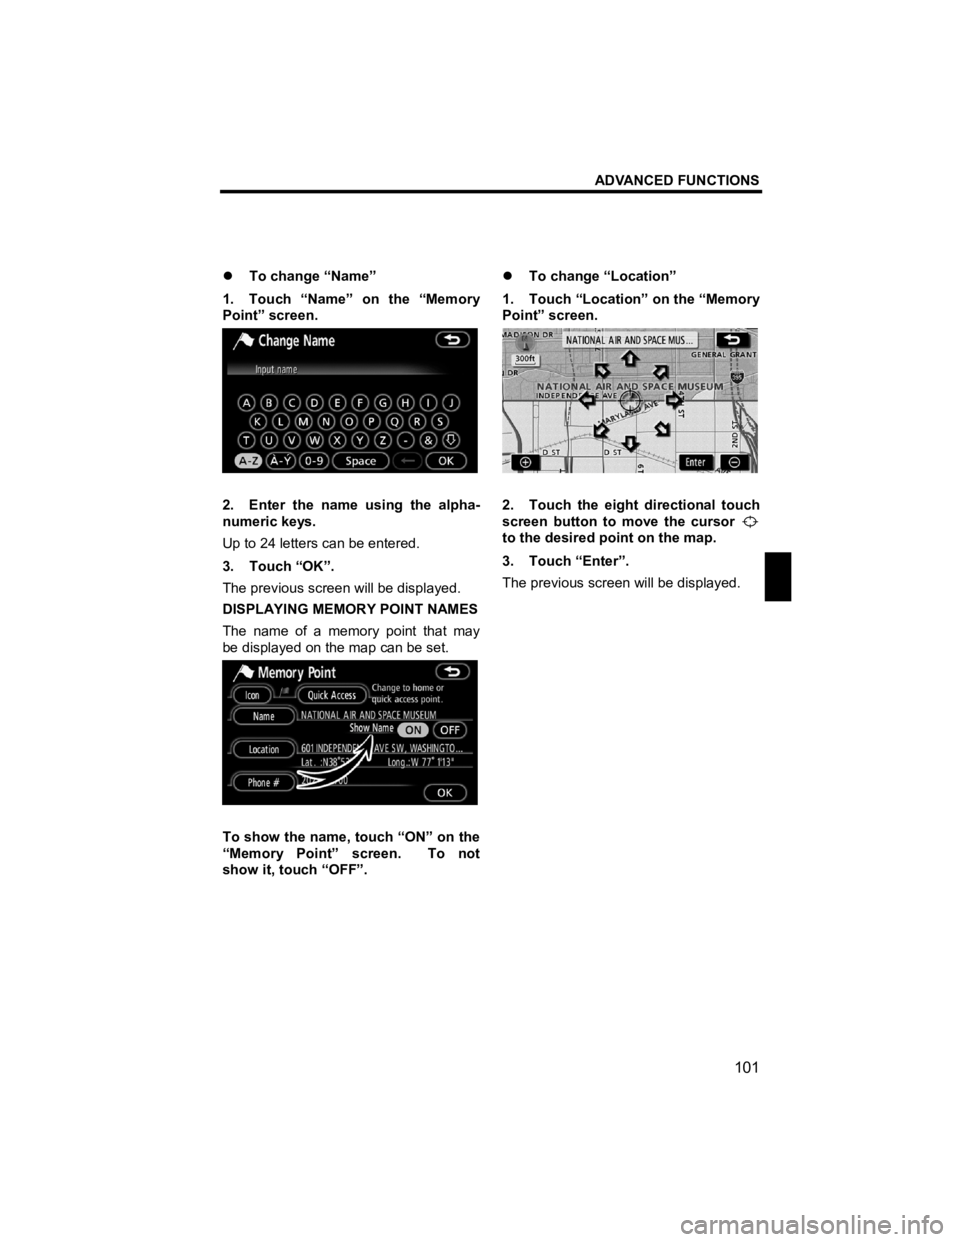
�z To change “Name”
1. Touch “Name” on the “Memory
Point” screen.
2. Enter the name using the alpha-
numeric keys.
Up to 24 letters can be entered.
3. Touch “OK”.
The previous screen will be displayed.
DISPLAYING MEMORY POINT NAMES
The name of a memory point that may
be displayed on the map can be set.
To show the name, touch “ON” on the
“Memory Point” screen. To not
show it, touch “OFF”. �z
To change “Location”
1. Touch “Location” on the “Memory
Point” screen.
2. Touch the eight directional touch
screen button to move the cursor
to the desired point on the map.
3. Touch “Enter”.
The previous screen will be displayed.
Page 103 of 284
ADVANCED FUNCTIONS
102
V573_E
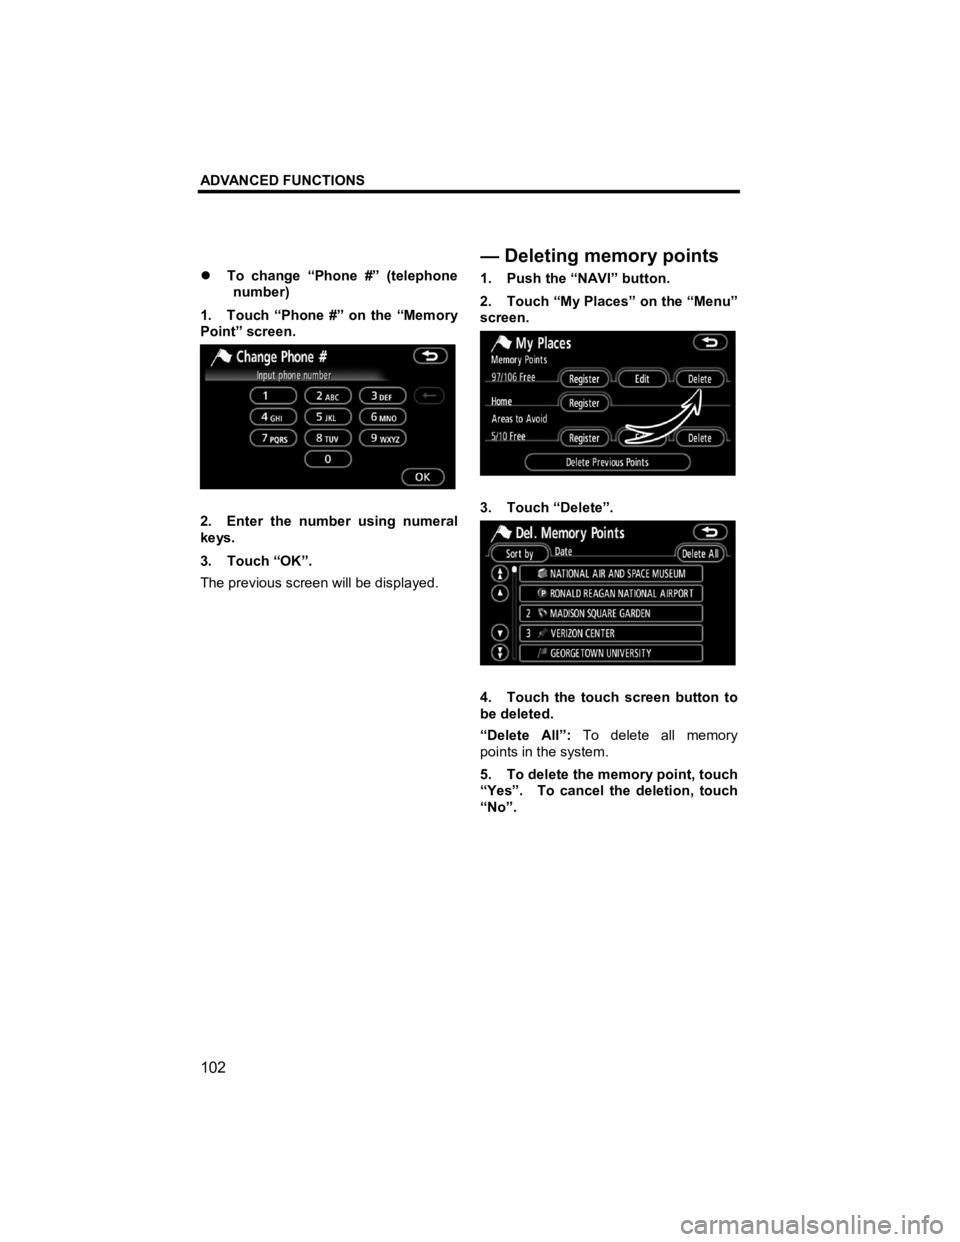
�z To change “Phone #” (telephone
number)
1. Touch “Phone #” on the “Memory
Point” screen.
2. Enter the number using numeral
keys.
3. Touch “OK”.
The previous screen will be displayed. 1. Push the “NAVI” button.
2. Touch “My Places” on the “Menu”
screen.
3. Touch “Delete”.
4. Touch the touch screen button to
be deleted.
“Delete All”:
To delete all memory
points in the system.
5. To delete the memory point, touch
“Yes”. To cancel the deletion, touch
“No”.
—Deletingmemory points
Page 105 of 284
ADVANCED FUNCTIONS
104
V573_E
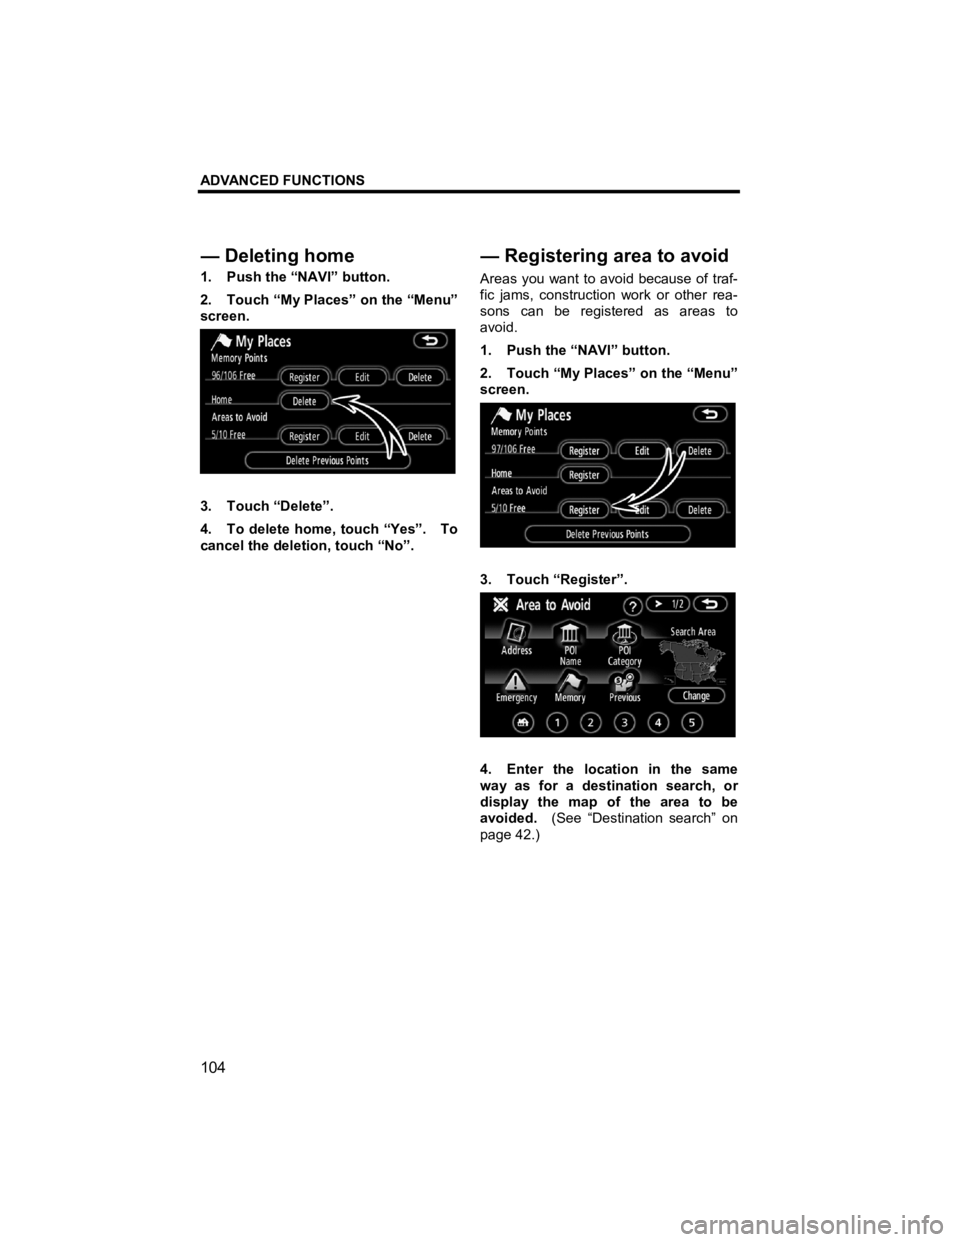
1. Push the “NAVI” button.
2. Touch “My Places” on the “Menu”
screen.
3. Touch “Delete”.
4. To delete home, touch “Yes”. To
cancel the deletion, touch “No”. Areas you want to avoid because of traf-
fic jams, construction work or other rea-
sons can be registered as areas to
avoid.
1. Push the “NAVI” button.
2. Touch “My Places” on the “Menu”
screen.
3. Touch “Register”.
4. Enter the location in the same
way as for a destination search, or
display the map of the area to be
avoided.
(See “Destination search” on
page 42.)
— Deletin
g home
—Registering area to avoid
Page 106 of 284
ADVANCED FUNCTIONS
105
V573_E
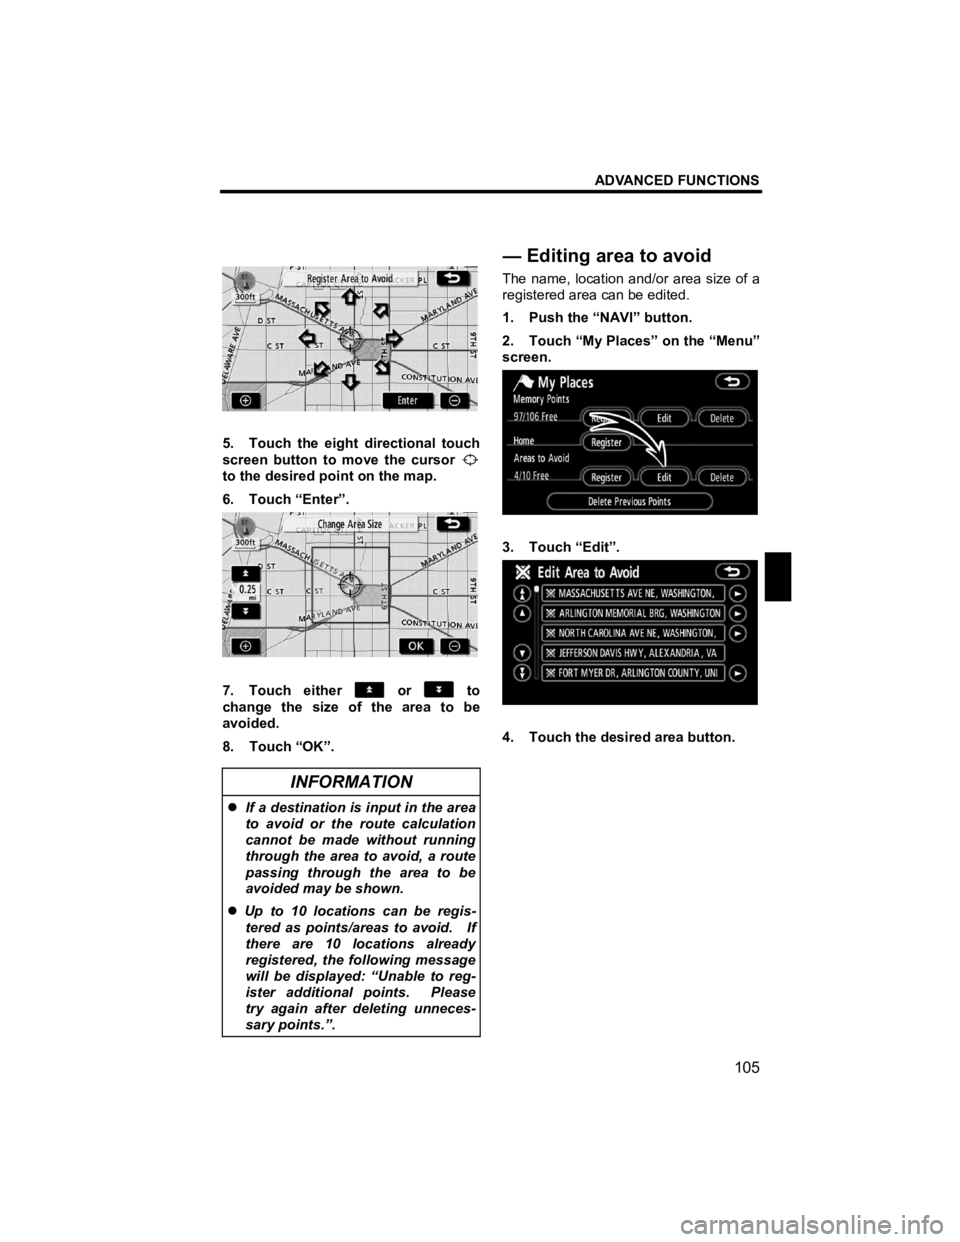
5. Touch the eight directional touch
screen button to move the cursor
to the desired point on the map.
6. Touch “Enter”.
7. Touch either or to
change the size of the area to be
avoided.
8. Touch “OK”.
INFORMATION
�z If a destination is input in the area
to avoid or the route calculation
cannot be made without running
through the area to avoid, a route
passing through the area to be
avoided may be shown.
�z Up to 10 locations can be regis-
tered as points/areas to avoid. If
there are 10 locations already
registered, the following message
will be displayed: “Unable to reg-
ister additional points. Please
try again after deleting unneces-
sary points.”.
The name, location and/or area size of a
registered area can be edited.
1. Push the “NAVI” button.
2. Touch “My Places” on the “Menu”
screen.
3. Touch “Edit”.
4. Touch the desired area button.
—Editing area to avoid
Page 107 of 284
ADVANCED FUNCTIONS
106
V573_E
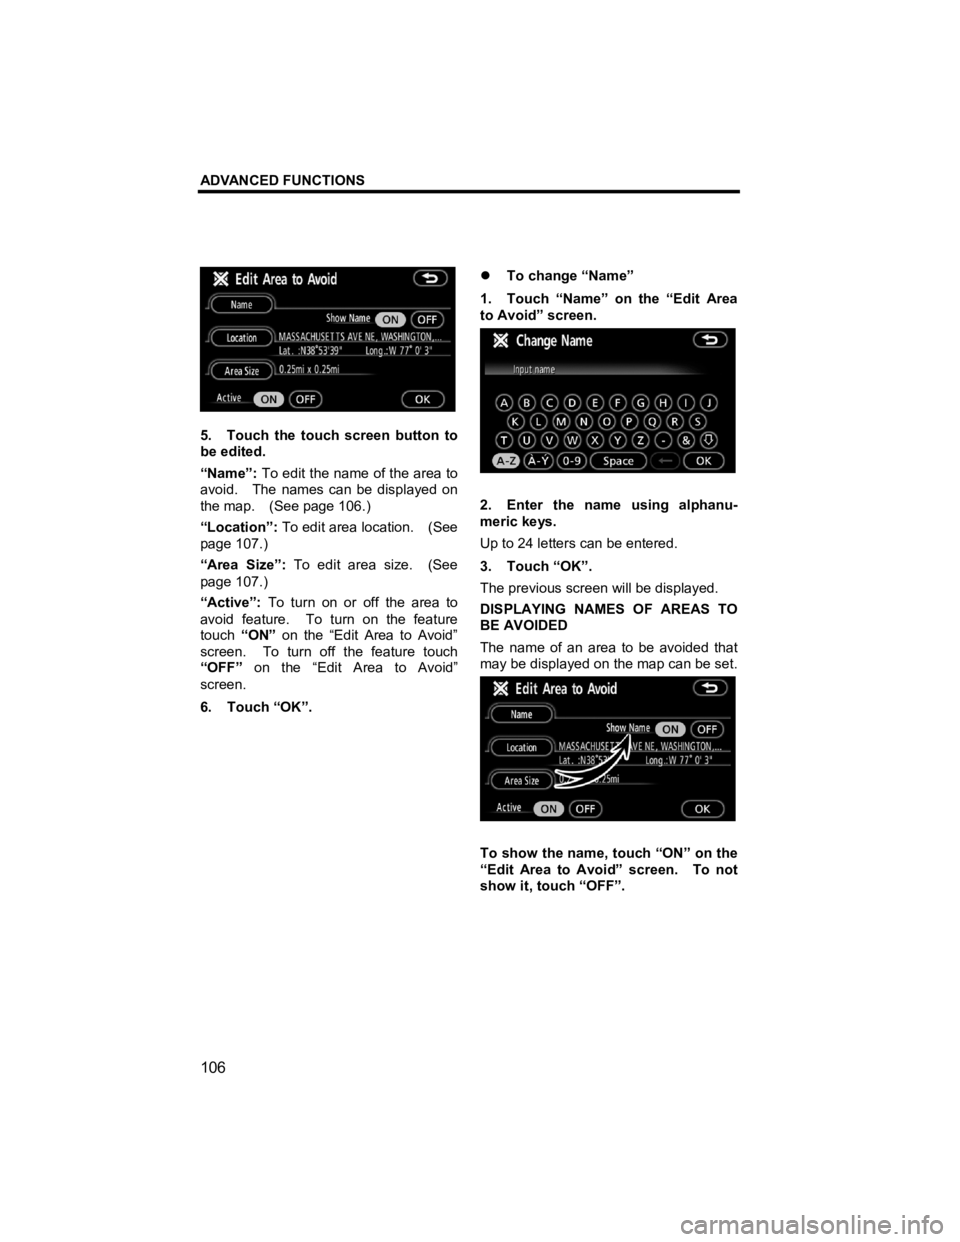
5. Touch the touch screen button to
be edited.
“Name”: To edit the name of the area to
avoid. The names can be displayed on
the map. (See page 106.)
“Location”: To edit area location. (See
page 107.)
“Area Size”: To edit area size. (See
page 107.)
“Active”: To turn on or off the area to
avoid feature. To turn on the feature
touch “ON” on the “Edit Area to Avoid”
screen. To turn off the feature touch
“OFF” on the “Edit Area to Avoid”
screen.
6. Touch “OK”. �z
To change “Name”
1. Touch “Name” on the “Edit Area
to Avoid” screen.
2. Enter the name using alphanu-
meric keys.
Up to 24 letters can be entered.
3. Touch “OK”.
The previous screen will be displayed.
DISPLAYING NAMES OF AREAS TO
BE AVOIDED
The name of an area to be avoided that
may be displayed on the map can be set.
To show the name, touch “ON” on the
“Edit Area to Avoid” screen. To not
show it, touch “OFF”.
Page 108 of 284

ADVANCED FUNCTIONS
107
V573_E
�z To change “Location”
1. Touch “Location” on the “Edit
Area to Avoid” screen.
2. Touch the eight directional touch
screen button to move the cursor
to the desired point on the map.
3. Touch “Enter”.
The previous screen will be displayed. �z
To change “Area Size”
1. Touch “Area Size” on the “Edit
Area to Avoid” screen.
2. Touch either or to
change the size of the area to be
avoided.
3. Touch “OK”.
The previous screen will be displayed.
Page 110 of 284
ADVANCED FUNCTIONS
109
V573_E
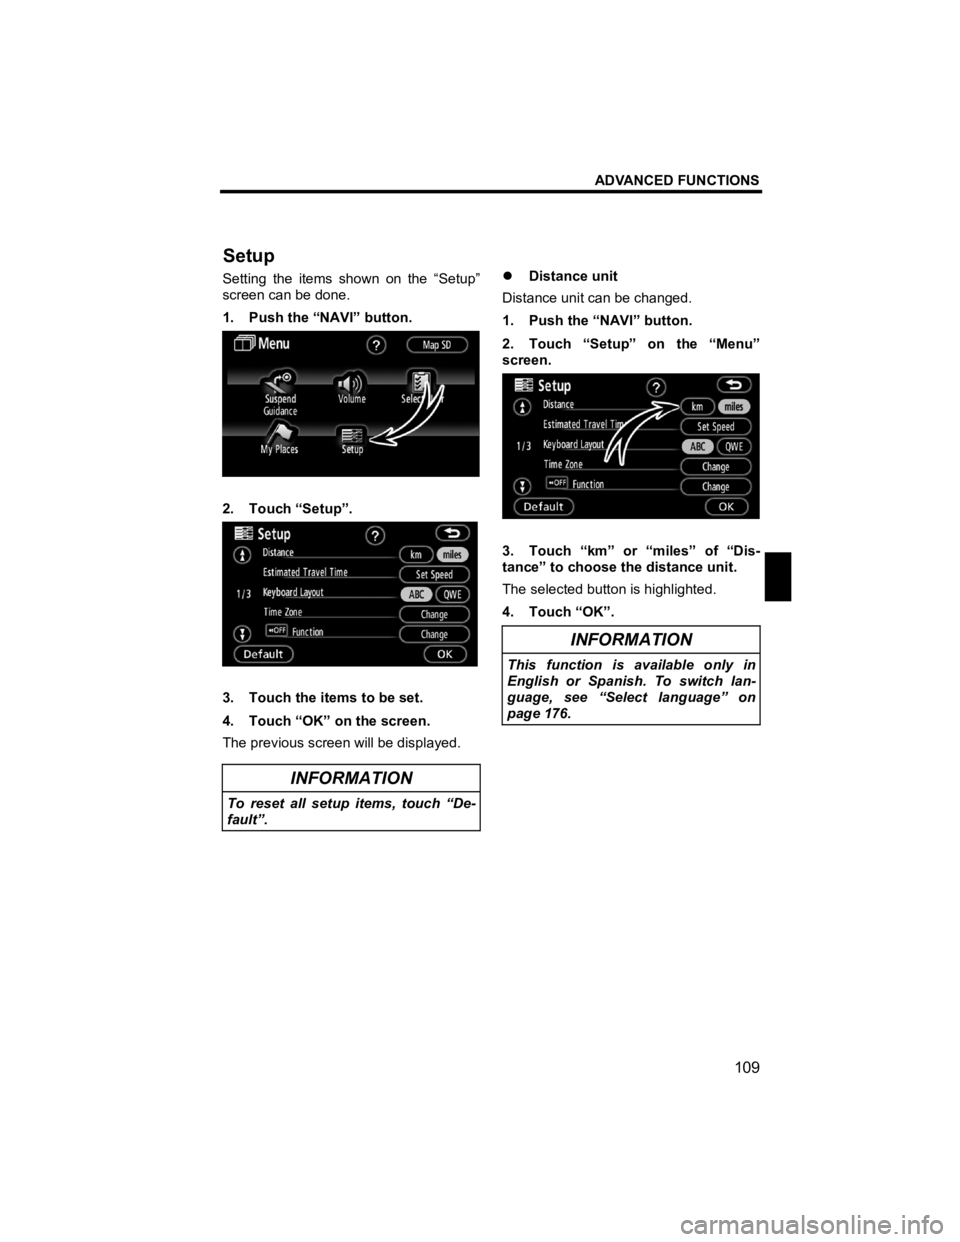
Setting the items shown on the “Setup”
screen can be done.
1. Push the “NAVI” button.
2. Touch “Setup”.
3. Touch the items to be set.
4. Touch “OK” on the screen.
The previous screen will be displayed.
INFORMATION
To reset all setup items, touch “De-
fault”.
�z Distance unit
Distance unit can be changed.
1. Push the “NAVI” button.
2. Touch “Setup” on the “Menu”
screen.
3. Touch “km” or “miles” of “Dis-
tance” to choose the distance unit.
The selected button is highlighted.
4. Touch “OK”.
INFORMATION
This function is available only in
English or Spanish. To switch lan-
guage, see “Select language” on
page 176.
Setu
p
Page 111 of 284
ADVANCED FUNCTIONS
110
V573_E
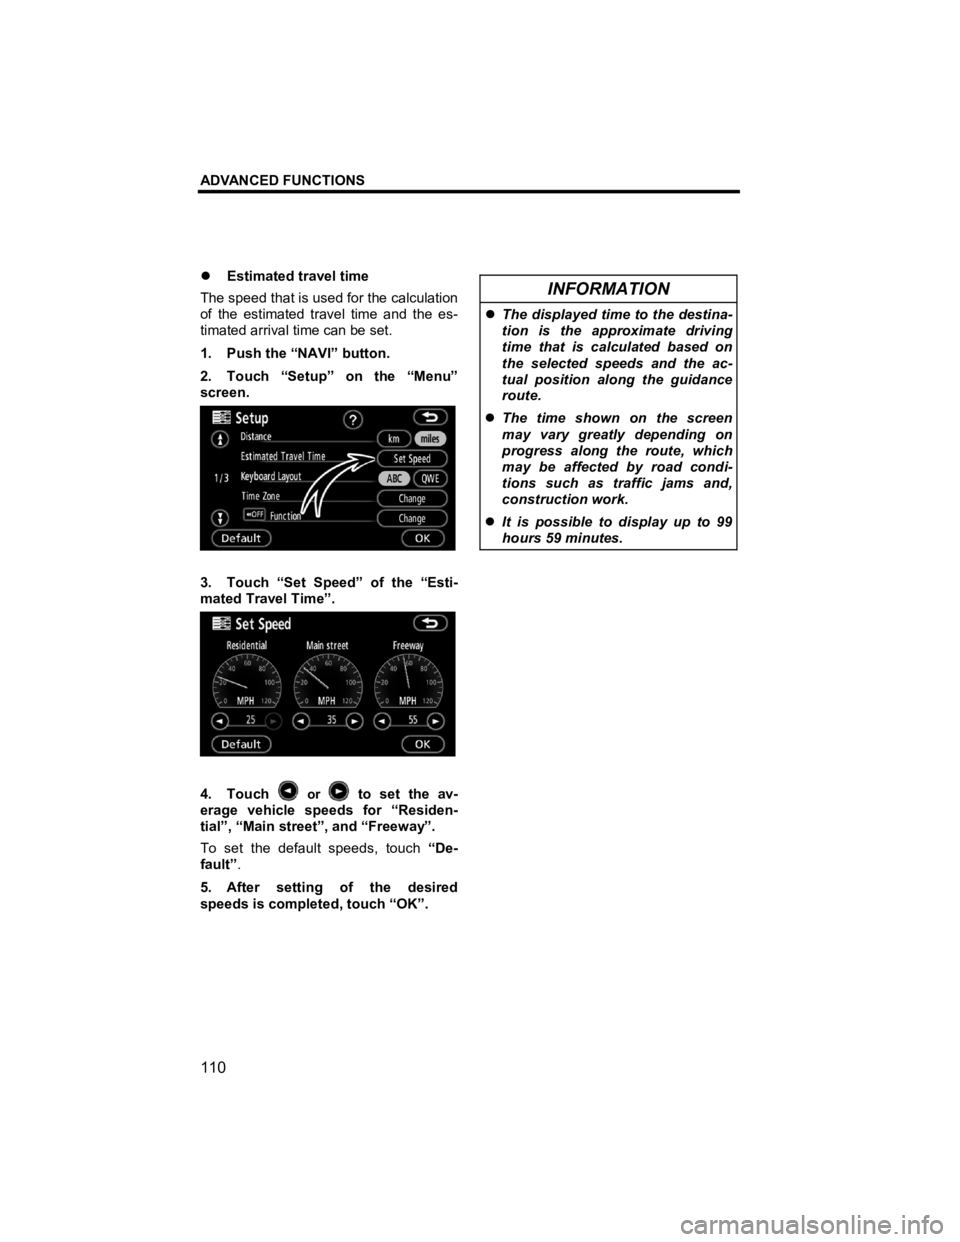
�z Estimated travel time
The speed that is used for the calculation
of the estimated travel time and the es-
timated arrival time can be set.
1. Push the “NAVI” button.
2. Touch “Setup” on the “Menu”
screen.
3. Touch “Set Speed” of the “Esti-
mated Travel Time”.
4. Touch or to set the av-
erage vehicle speeds for “Residen-
tial”, “Main street”, and “Freeway”.
To set the default speeds, touch “De-
fault” .
5. After setting of the desired
speeds is completed, touch “OK”.
INFORMATION
�z The displayed time to the destina-
tion is the approximate driving
time that is calculated based on
the selected speeds and the ac-
tual position along the guidance
route.
�z The time shown on the screen
may vary greatly depending on
progress along the route, which
may be affected by road condi-
tions such as traffic jams and,
construction work.
�z It is possible to display up to 99
hours 59 minutes.