TOYOTA TUNDRA 2018 Owners Manual (in English)
Manufacturer: TOYOTA, Model Year: 2018, Model line: TUNDRA, Model: TOYOTA TUNDRA 2018Pages: 672, PDF Size: 14.09 MB
Page 381 of 672
3815-9. Bluetooth® phone
5
Multimedia
■Check the messages
●Depending on the type of Bluetooth® phone being connected, it may be nec-
essary to perform additional steps on the phone.
● Messages are displayed in the appropriate connected Bluetooth
® phone’s
registered mail address folder.
Select the tab of the desired folder to be displayed.
● Only received messages on the connected Bluetooth
® phone can be dis-
played.
● The text of the message is not displayed while driving.
● When “Automatic Message Readout” is set to on, messages will be auto-
matically read out. ( P. 393)
● Turn the “PWR VOL” knob to adjust the message read out volume.
● The message read out function is available even while driving.
Display the “Message Inbox” screen. ( P. 379)
Select the desired message from the list.
Select “Quick Message”.
Select the desired message.
Select “Send”.
■Editing quick reply message
This operation cannot be performed while driving. Select “Quick Message”.
Select corresponding to th e desired message to edit.
Select “OK” when editing is completed.
Replying to a message
1
2
3
4
5
1
2
3
Page 382 of 672
3825-9. Bluetooth® phone
Calls can be made to an e-mail/SMS/MMS message sender’s phone
number.
Display the “Message Inbox” screen. ( P. 379)
Select the desired message.
Select .
Check that the “Call” screen is displayed.
■Calling from a number within a message
Calls can be made to a number ide ntified in a message’s text area.
Display the “Message Inbox” screen. ( P. 379)
Select the desired message.
Select the text area.
Select corresponding t o the desired number.
Check that the “Call” screen is displayed.
■Calling from the incoming message screen
P. 378
Calling the message sender
1
2
3
4
1
2
3
4
5
Page 383 of 672
3835-9. Bluetooth® phone
5
Multimedia
Using the steering wheel switches
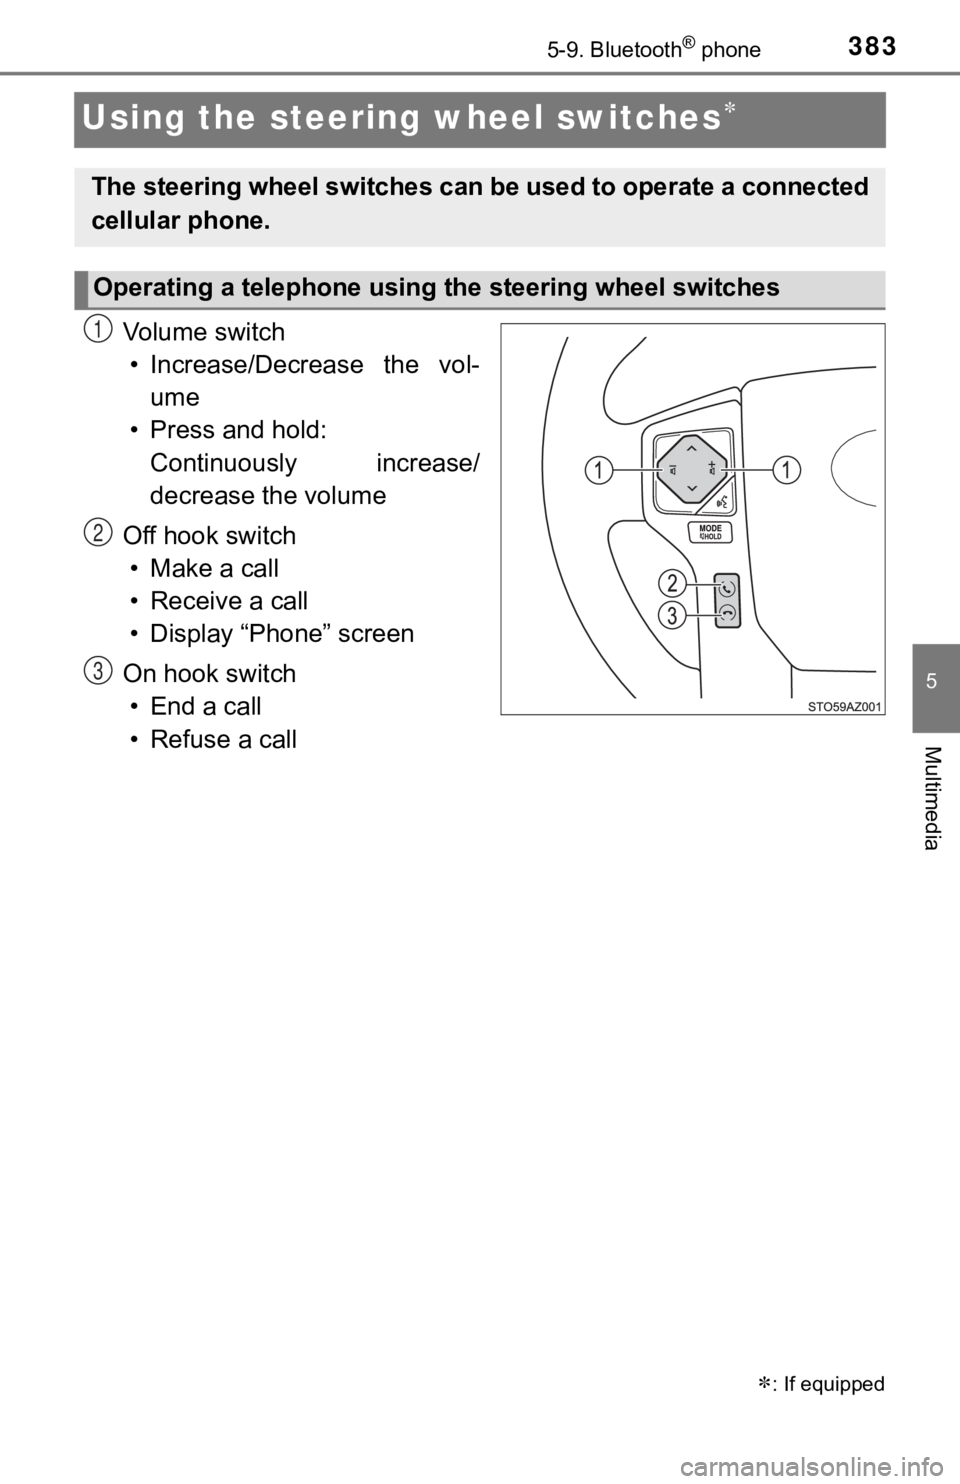
Vo l u m e s w i t c h• Increase/Decrease the vol- ume
• Press and hold: Continuously increase/
decrease the volume
Off hook switch • Make a call
• Receive a call
• Display “Phone” screen
On hook switch • End a call
• Refuse a call
: If equipped
The steering wheel switches can be used to operate a connected
cellular phone.
Operating a telephone using the steering wheel switches
1
2
3
Page 384 of 672
3845-9. Bluetooth® phone
Bluetooth® phone settings
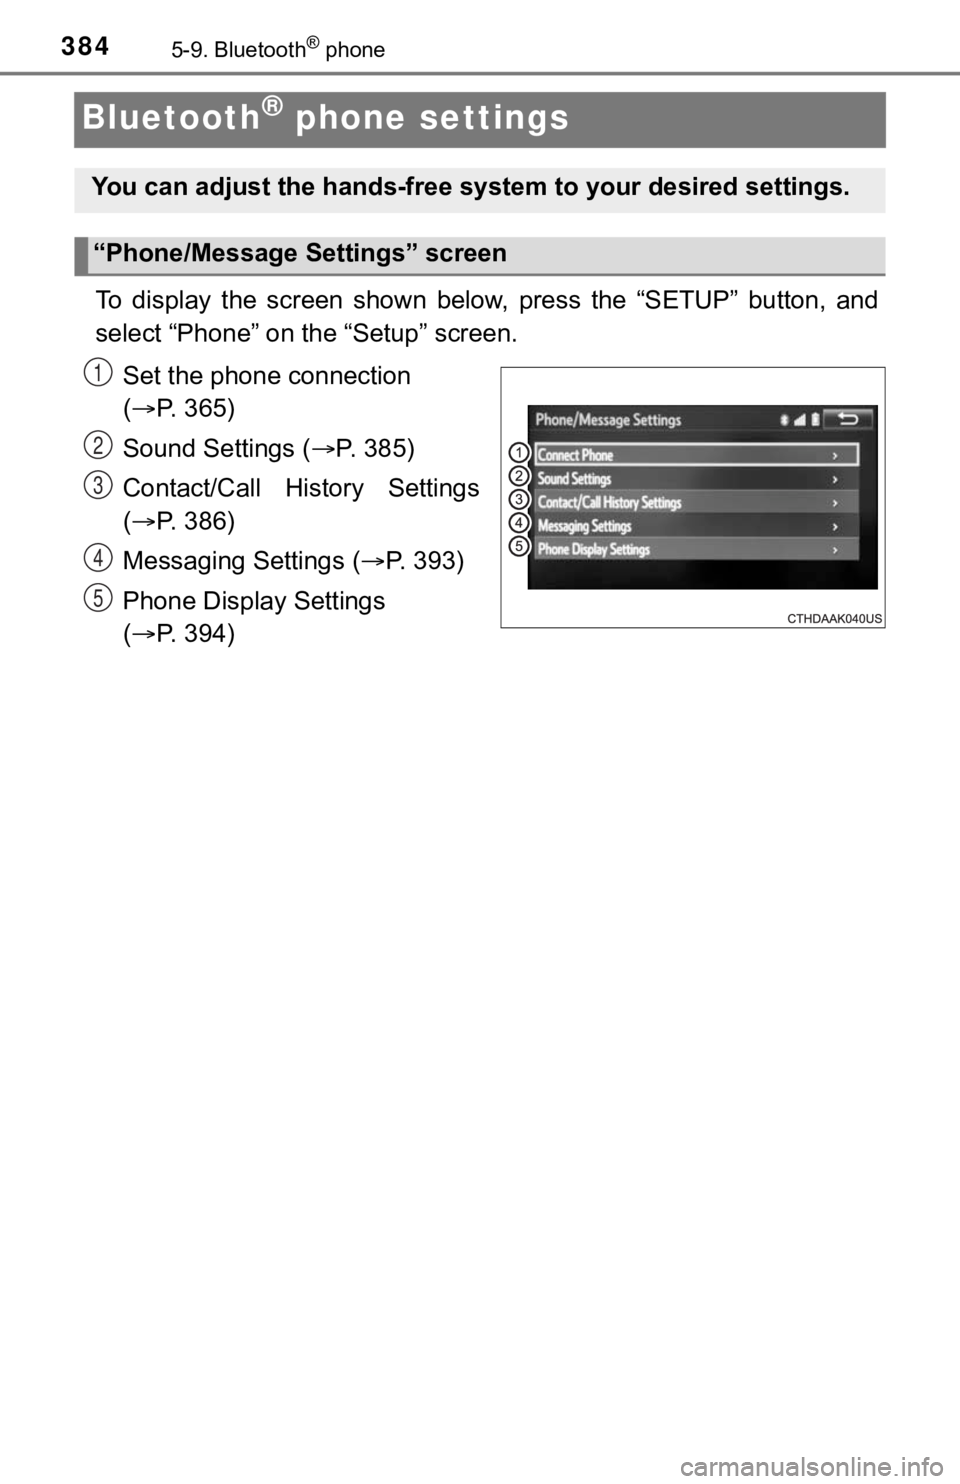
To display the screen shown below, press the “SETUP” button, and
select “Phone” on the “Setup” screen.
Set the phone connection
( P. 365)
Sound Settings ( P. 385)
Contact/Call History Settings
( P. 386)
Messaging Settings ( P. 3 9 3 )
Phone Display Settings
( P. 394)
You can adjust the hands-free sys tem to your desired settings.
“Phone/Message Settings” screen
1
2
13
14
5
Page 385 of 672
3855-9. Bluetooth® phone
5
Multimedia
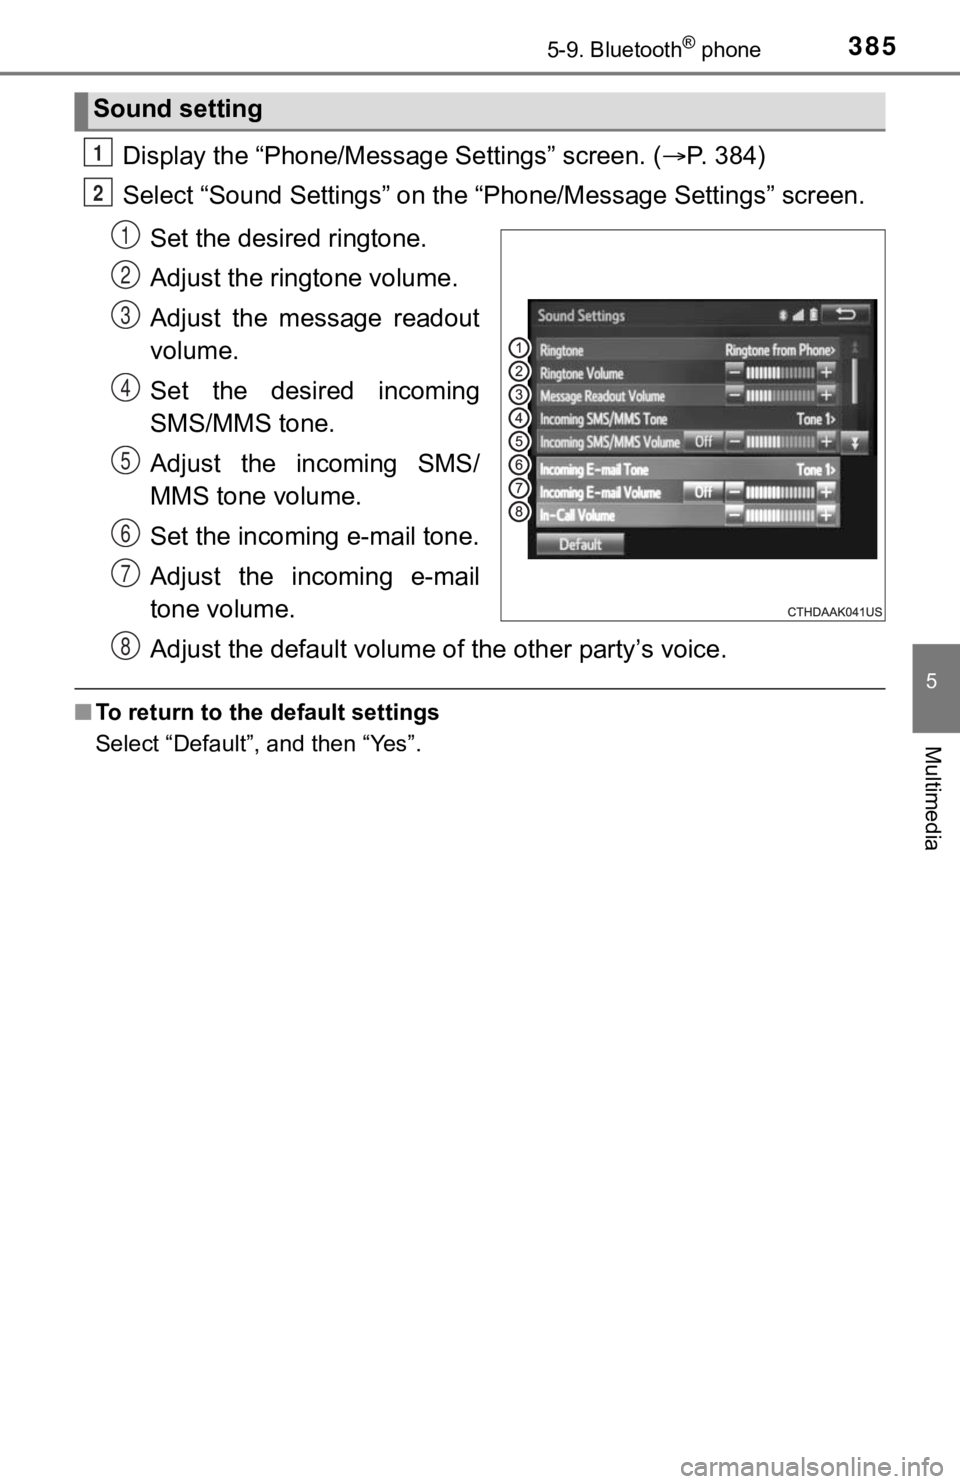
Display the “Phone/Message Settings” screen. (P. 384)
Select “Sound Settings” on the “Phone/Message Settings” screen.
Set the desired ringtone.
Adjust the ringtone volume.
Adjust the message readout
volume.
Set the desired incoming
SMS/MMS tone.
Adjust the incoming SMS/
MMS tone volume.
Set the incoming e-mail tone.
Adjust the incoming e-mail
tone volume.
Adjust the default volume of the other party’s voice.
■To return to the default settings
Select “Default”, and then “Yes”.
Sound setting
1
2
1
2
13
4
5
6
7
8
Page 386 of 672

3865-9. Bluetooth® phone
Contact/Call Histor y Settings
The contact can be transferred from a Bluetooth® phone to the sys-
tem. The contact al so can be added, edited and deleted.
The call history can be deleted and contact and favorites can b e
changed.
Display the “Phone/Messag e Settings” screen. (P. 384)
Select “Contact/Call History Settings”.
Select the desired item to be set.
For PBAP compatible
Bluetooth
® phones, select to
set “Automatic Transfer” on/
off. When set to on, the
phone’s contact data and his-
tory are automatically trans-
ferred.
Select to update contacts
from the connected phone.
( P. 387)
Select to sort contacts by the
first name or last name field.
Select to add contacts t o the favorites list. (P. 3 9 0 )
Select to delete contacts f rom the favorites list. (P. 3 9 2 )
Select to clear contacts from the call history.
Select to add new contacts to the contact list.
* ( P. 388)
Select to edit contacts in the contact list.
* ( P. 389)
Select to delete contacts from the contact list.
* ( P. 3 9 0 )
Select to reset all setup items.
*: For PBAP compatible Bluetooth® phones only, this function is available
when “Automatic Transfer” is set to off.
( P. 386)
1
2
3
1
2
3
4
5
6
7
8
9
10
Page 387 of 672
3875-9. Bluetooth® phone
5
Multimedia
Operation methods differ between PBAP compatible and PBAP
incompatible but OPP compatible Bluetooth® phones.
If your cellular phone is neither PBAP nor OPP compatible, the con-
tacts cannot be transferred.
■For PBAP Compatible Bluetooth® Phones
Select “Update Contacts from Phone”.
Check that a confirmation scr een is displayed when the opera-
tion is complete.
This operation may be unnecessary depending on the type of cell ular
phone.
Depending on the type of cellular phone, OBEX authentication ma y be
required when transferring contact data. Enter “1234” into the Blue-
tooth
® phone.
If another Bluetooth
® device is connected when transferring contact
data, depending on the phone, the connected Bluetooth® device may
need to be disconnected.
Depending on the type of Bluetooth
® phone being connected, it may be
necessary to perform additional steps on the phone.
■
For PBAP Incompatible but OPP compatible Bluetooth®
Phones
Select “Update Contacts from Phone”.
Transfer the contact data to the system using a Bluetooth
®
phone.
This operation may be unnecessary depending on the type of cell ular
phone.
Depending on the type of cellular phone, OBEX authentication ma y be
required when transferring contact data. Enter “1234” into the Blue-
tooth
® phone.
To cancel this function, select “Cancel”.
Check that a confirmation scr een is displayed when the opera-
tion is complete.
Update contacts from phone
1
2
1
2
3
Page 388 of 672
3885-9. Bluetooth® phone
■Updating the contacts in a different way (From the “Call His-
tory” screen)
For PBAP compatible Bluetooth
® phones, this function is available
when “Automatic Transfer” is set to off. ( P. 386)
Display the phone screen. ( P. 3 7 0 )
Select the “Call History” tab and select a contact not yet regi s-
tered in the contact list.
Select “Update Contact”.
Select the desired contact.
Select a phone type for the phone number.
New contact data can be register ed. Up to 4 numbers per person can
be registered. For PBAP compatible Bluetooth
® phones, this function
is available when “Automatic Transfer” is set to off. (P. 386)
Select “New Contact”.
Enter the name and select “OK”.
Enter the phone number and select “OK”.
Select the phone type for the phone number.
To add another number to thi s contact, select “Yes”.
■Registering a new contact in a different way (From the “Call
History” screen)
Display the phone screen. ( P. 3 7 0 )
Select the “Call History” tab and select a contact not yet regi s-
tered in the contact list.
Select “Add to Contacts”.
Follow the steps in “Registering a new contact to the contacts
list” from step . ( P. 388)
Registering a new cont act to the contact list
1
2
3
4
5
1
2
3
4
5
1
2
3
4
2
Page 389 of 672
3895-9. Bluetooth® phone
5
Multimedia
For PBAP compatible Bluetooth® phones, this function is available
when “Automatic Transfer” is set to off. ( P. 386)
Select “Edit Contact”.
Select the desired contact.
Select icon corresponding to the desired name or number.
For editing the name
Follow the steps in “Registering a new contact to the contact l ist”
from step . ( P. 3 8 8 )
For editing the number
Follow the steps in “Registering a new contact to the contact l ist”
from step . ( P. 3 8 8 )
■Editing the contacts in a different way (From the “Contact
Details” screen)
Display the phone screen. ( P. 3 7 0 )
Select the “Contacts”, “Call history” tab or the “Favorites” ta b and
select the desired contact.
Select “Edit Contact”.
“E-mail Addresses”: Select to display all registered e-mail add resses for
the contact.
Follow the steps in “Editing the contac t data” from step .
( P. 389)
Editing the contact data
1
2
3
4
2
4
3
1
2
3
43
Page 390 of 672
3905-9. Bluetooth® phone
For PBAP compatible Bluetooth® phones, this function is available
when “Automatic Transfer” is set to off. ( P. 386)
Select “Delete Contacts”.
Select the desired contac t and select “Delete”.
Select “Yes” when the confirmation screen appears.
■Deleting the contact in a different way (From the “Contact
Details” screen) Display the phone screen. ( P. 3 7 0 )
Select the “Contacts”, “Call history” tab or the “Favorites” ta b and
select the desired contact.
Select “Delete Contact”.
Select “Yes” when the confirmation screen appears.
Up to 15 contacts (maximum of 4 numbers per contact) can be reg is-
tered in the favorites list.
■Registering the contacts in the favorites list
Select “Add Favorite”.
Select the desired contact to add to the favorites list.
Dimmed contacts are already stored as a favorite.
Check that a confirmation scr een is displayed when the opera-
tion is complete.
Deleting the contact data
Favorites list setting
1
2
13
1
2
3
4
1
2
3