display TOYOTA YARIS HATCHBACK 2020 (in English) Owner's Manual
[x] Cancel search | Manufacturer: TOYOTA, Model Year: 2020, Model line: YARIS HATCHBACK, Model: TOYOTA YARIS HATCHBACK 2020Pages: 572, PDF Size: 7.94 MB
Page 222 of 572
222
YARIS_YARIS HATCHBACK_OM_OM99V59z_(U)
3-7. Fuel Economy Monitor
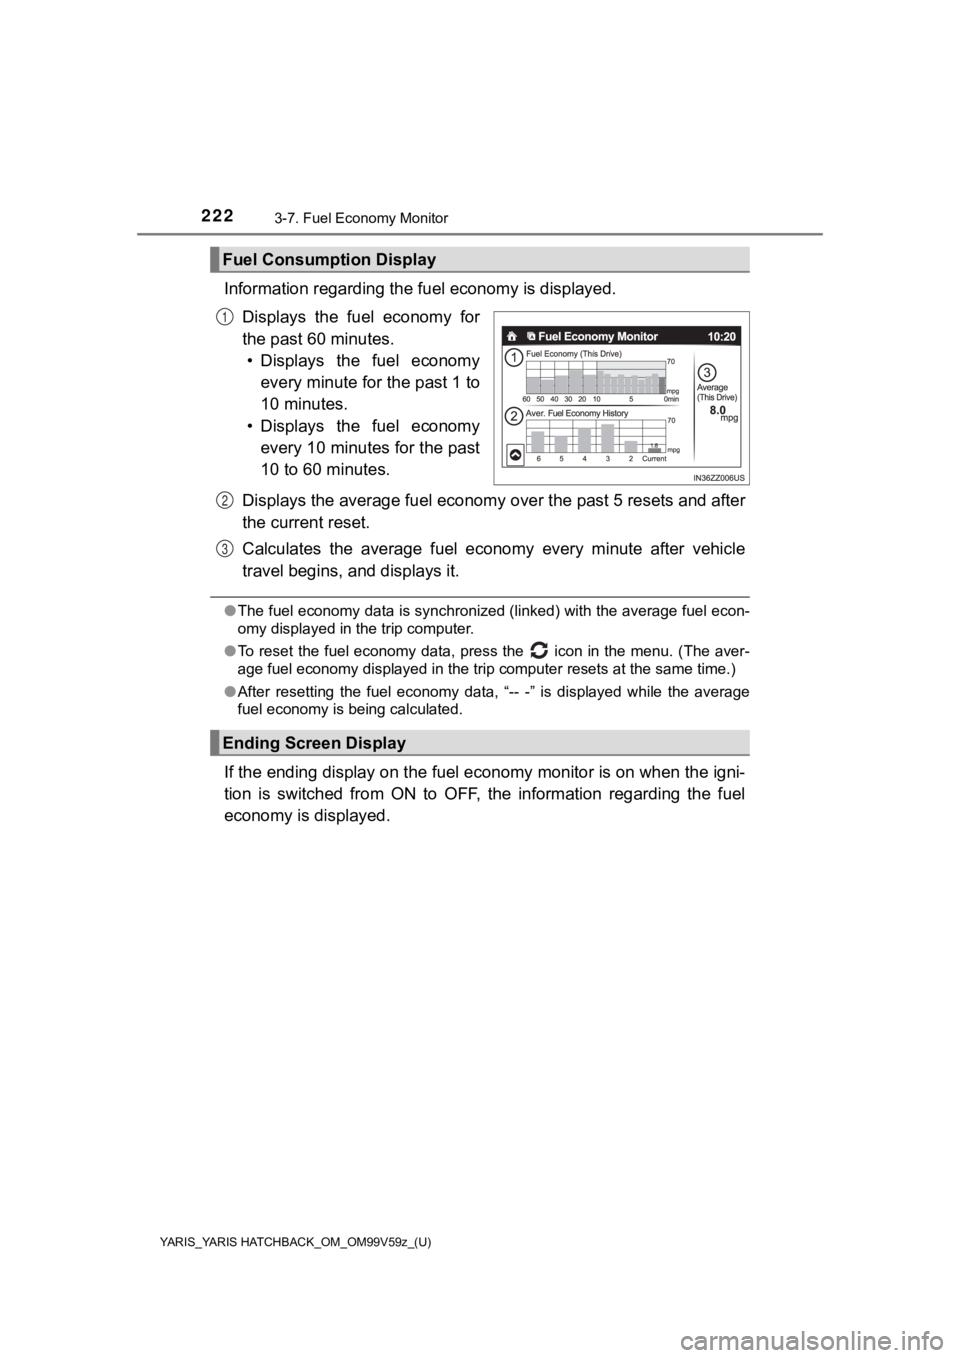
Information regarding the fuel economy is displayed.
Displays the fuel economy for
the past 60 minutes. • Displays the fuel economy
every minute for the past 1 to
10 minutes.
• Displays the fuel economy
every 10 minutes for the past
10 to 60 minutes.
Displays the average fuel econom y over the past 5 resets and after
the current reset.
Calculates the average fuel econo my every minute after vehicle
travel begins, and displays it.
● The fuel economy data is synchronized (linked) with the average fuel econ-
omy displayed in the trip computer.
● To reset the fuel economy data, press the icon in the menu. (The aver-
age fuel economy displayed in the trip computer resets at the same time.)
● After resetting the fuel economy data, “-- -” is displayed whil e the average
fuel economy is being calculated.
If the ending display on the fuel economy monitor is on when th e igni-
tion is switched from ON to OFF, the information regarding the fuel
economy is displayed.
Fuel Consumption Display
1
Ending Screen Display
2
3
Page 223 of 572
YARIS_YARIS HATCHBACK_OM_OM99V59z_(U)
2233-7. Fuel Economy Monitor
3
When Driving
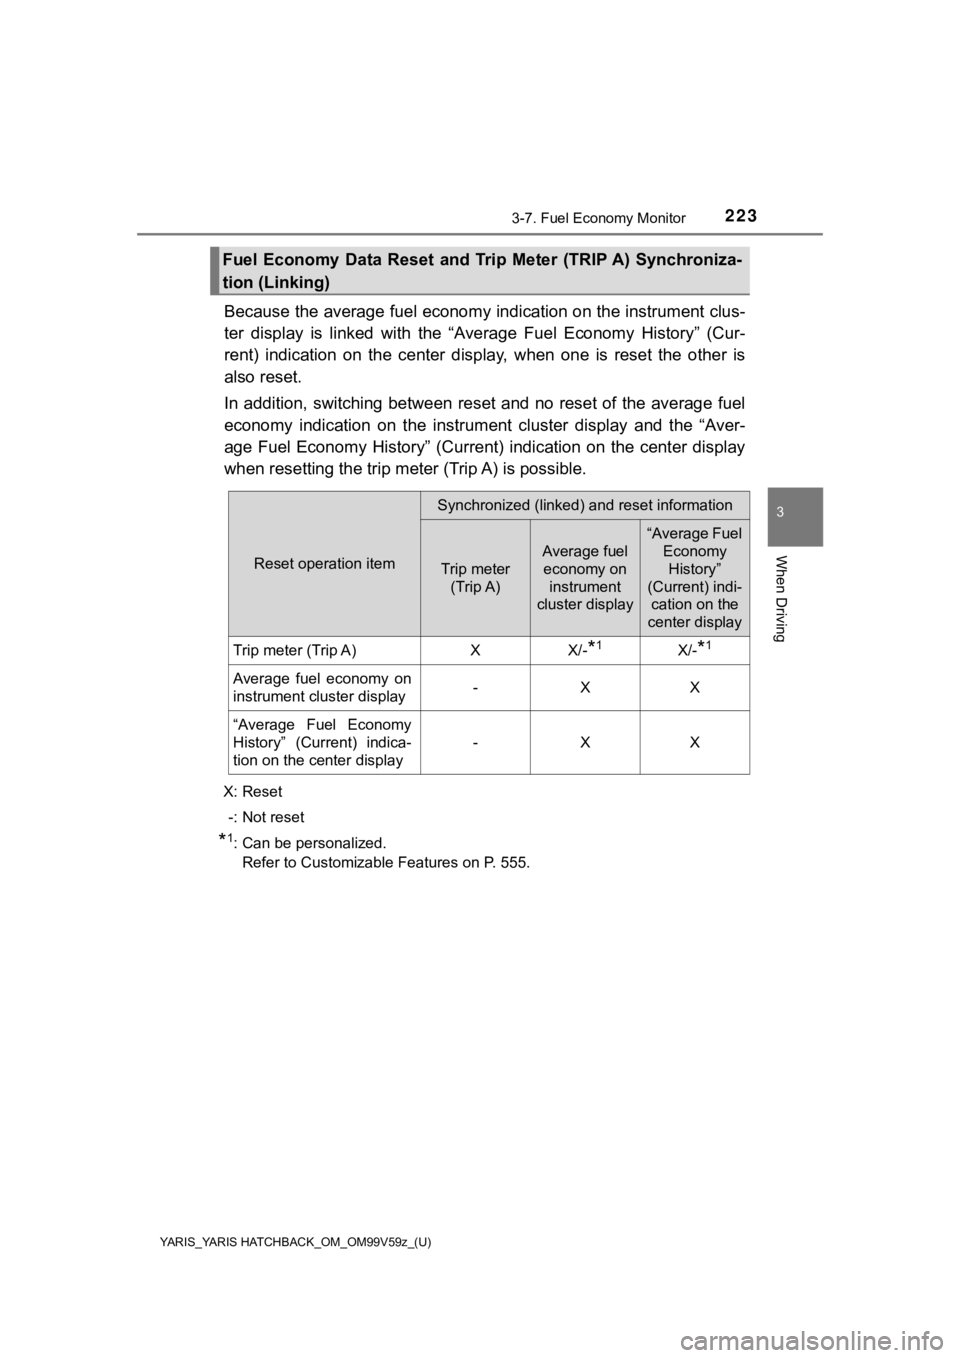
Because the average fuel economy indication on the instrument clus-
ter display is linked with the “ Average Fuel Economy History” ( Cur-
rent) indication on the center d isplay, when one is reset the other is
also reset.
In addition, switching between reset and no reset of the averag e fuel
economy indication on the instrument cluster display and the “A ver-
age Fuel Economy History” (Curre nt) indication on the center display
when resetting the trip meter (Trip A) is possible.
X: Reset
-: Not reset
*1: Can be personalized. Refer to Customizable Features on P. 555.
Fuel Economy Data Reset and Trip Meter (TRIP A) Synchroniza-
tion (Linking)
Reset operation item
Synchronized (linked) and reset information
Trip meter (Trip A)
Average fuel economy on
instrument
cluster display
“Average Fuel Economy History”
(Current) indi- cation on the
center display
Trip meter (Trip A)XX/-*1X/-*1
Average fuel economy on
instrument cluster display-XX
“Average Fuel Economy
History” (Current) indica-
tion on the center display
-XX
Page 237 of 572

YARIS_YARIS HATCHBACK_OM_OM99V59z_(U)
2373-11. Cruise Control
3
When Driving
■Cruise main indication (white)
The cruise main indication
(white) is displayed in the
instrument cluster when the
cruise control system is acti-
vated.
■Cruise set indication (white)/indicator light (green)
The cruise set indication (white)
is displayed in the instrument
cluster and the cruise set indi-
cator light (green) turns on
when a cruising speed has
been set.
To activate the system, press t he ON switch. The cruise main in dica-
tion (white) is displayed.
To deactivate the s ystem, press the OFF/CAN switch.
The cruise main indication (white) turns off.
When the ignition is switched OFF, the system status before it was turned off
is maintained. For example, if the ignition is switched OFF with the cruise
control system operable, the system will be operable when the i gnition is
switched ON the next time.
Cruise Main Indicati on (White), Cruise Se t Indication (White)/
Indicator Light (Green)
Activation/Deactivation
WARNING
■ Always turn off the cruise cont rol system when it is not in use
Leaving the cruise control system in an activation-ready state while the
cruise control is not in use is dangerous as the cruise control could unex-
pectedly activate if the activation button is accidentally pres sed, and result
in loss of vehicle control and an accident.
Page 238 of 572
238
YARIS_YARIS HATCHBACK_OM_OM99V59z_(U)
3-11. Cruise Control
Activate the cruise control system by pressing the ON switch. The
cruise main indication (white) is displayed.
Accelerate to the desired speed, which must be more than 16 mph
(25 km/h).
Set the cruise control by pressing the SET/ switch at the desir ed
speed. The cruise control is set at the moment the SET/ switch is
pressed. Release the accelerator pedal simultaneously. The crui se
set indication (white) is displayed and the cruise set indicato r light
(green) turns on.
● The cruise control speed setting cannot be performed under the following
conditions:
• Manual transaxle: The shift lever is in the neutral position.
• Automatic transaxle: The select or lever is in the P or N position.
• The parking brake is applied.
● Release the SET/ or RES/ switch at the desired speed, otherwise the
speed will continue increasing while the RES/ switch is pressed and held,
and continue decreasing while the SET/ switch is pressed and he ld
(except when the accelerator pedal is depressed).
● On a steep grade, the vehicle may momentarily slow down while a scending,
or speed up while descending.
● The cruise control will cancel if the vehicle speed decreases b elow 13 mph
(21 km/h) when climbing a steep grade.
● The cruise control may cancel at about 9 mph (15 km/h) below th e preset
speed such as when climbing a long, steep grade.
To Set Speed
1
2
3
Page 239 of 572
YARIS_YARIS HATCHBACK_OM_OM99V59z_(U)
2393-11. Cruise Control
3
When Driving
Follow either of these procedures.
■To increase speed using cruise control switch
Press the RES/ switch and hold it. Your vehicle will accelerate .
Release the switch a t the desired speed.
Press the RES/ switch and release it immediately to adjust the
preset speed. Multiple operations will increase the preset spee d
according to the number of times it is operated.
● Increasing speed with a sing le RES/ switch operation
Instrument cluster display for ve hicle speed indicated in mph:
1 mph (1.6 km/h)
Instrument cluster dis play for vehicle speed indicated in km/h:
1 km/h (0.6 mph)
■To increase speed using accelerator pedal
Depress the accelerator pedal to accelerate to the desired spee d.
Press the SET/ switch a nd release it immediately.
Accelerate if you want to speed up temporarily when the cruise control
is on. Greater speed will not interfere with or change the set speed.
Take your foot off the accelerator to return to the set speed.
Press the SET/ switch and hold it. The vehicle will gradually s low.
Release the switch a t the desired speed.
Press the SET/ switch and release it immediately to adjust the pre-
set speed. Multiple operations will decrease the preset speed accord-
ing to the number of times it is operated.
● Decreasing speed with a single SET/ switch operation
Instrument cluster display for vehicle speed indicated in mph:
1 mph (1.6 km/h)
Instrument cluster display for v ehicle speed indicated in km/h:
1 km/h (0.6 mph)
To Increase Cruising Speed
To Decrease Cruising Speed
Page 240 of 572
240
YARIS_YARIS HATCHBACK_OM_OM99V59z_(U)
3-11. Cruise Control
If the cruise control system temporarily canceled (such as applying
the brake pedal) and the system i s still activated, the most recent set
speed will automatically resume when the RES/ switch is pressed .
If vehicle speed is below 16 mph (25 km/h), increase the vehicl e
speed up to 16 mph (25 km/h) or m ore and press the RES/ switch.
To temporarily cancel the syst em, use one of these methods:
• Slightly depress the brake pedal.
• Manual transaxle: Depress the clutch pedal.
• Press the OFF/CAN switch.
If the RES/ switch is pressed w hen the vehicle speed is 16 mph (25
km/h) or higher, the system rev erts to the previously set speed .
●If any of the following conditions occur, the cruise control sy stem is tempo-
rarily canceled.
• The parking brake is applied.
• Manual transaxle: The shift lever is in the neutral position.
• Automatic transaxle: The select or lever is in the P or N position.
● When the cruise control system is temporarily canceled by even one of the
applicable cancel conditions, the speed cannot be re-set.
● Automatic transaxle:
The cruise control cannot be cancelled while driving in manual mode (selec-
tor lever shifted from D to M position). Therefore, engine brak ing will not be
applied even if the transaxle is shifted down to a lower gear. If deceleration
is required, lower the set speed or depress the brake pedal.
■
When a cruising speed has been set (cruise set indication
(white) is displayed/cruise set indicator light (green) turns on)
Long-press the OFF/CAN switch o r press the OFF/CAN switch 2
times.
■When a cruising speed has not been set (cruise main indica-
tion (white) is displayed)
Press the OFF/CAN switch.
To Resume Cruising Speed at More Than 16 mph (25 km/h)
To Temporarily Cancel
To Deactivate
Page 245 of 572

245
YARIS_YARIS HATCHBACK_OM_OM99V59z_(U)
3-13. Rear View Monitor
3
When Driving
Rear View Monitor
●If water, snow, or mud is stuck on the camera lens, wipe it off using a soft
cloth. If it cannot be wiped off, use a mild detergent.
● If the camera temperature changes rapidly (Hot to cold, cold to hot), the rear
view monitor may not operate correctly.
● When replacing the tires, consult your Toyota dealer. Replacing the tires
could result in deviation of the guide lines which appear on th e display.
● If the vehicle’s front, side, or rear has been involved in a collision, the align-
ment of the rear view parking camera (location, installation an gle) may have
deviated. Always consult your Toyota dealer to have the vehicle inspected.
● If “No Video Signal Available” is indicated in the display, the re could be a
problem with the camera. Have your vehicle inspected at your To yota
dealer.
The rear view monitor provides vi sual images of the rear of the
vehicle when reversing.
WARNING
■ Always drive carefully confirming the safety of the rear and the sur-
rounding conditions by looking directly with your eyes
Reversing the vehicle by only looking at the screen is dangerous as it may
cause an accident or a collision with an object. The rear view monitor is only
a visual assist device when reversing the vehicle. The images o n the screen
may be different from the actual conditions.
■ Do not use the rear view monitor under the following conditions
Using the rear view monitor under the following conditions is d angerous and
could result in injury or vehicle damage or both.
● Icy or snow-covered roads.
● Tire chains or a temporary spare tire is installed.
● The liftgate/trunk lid is not fully closed.
● The vehicle is on a road incline.
■ Rear view monitor display pr ecautions in cold temperatures
When the display is cold, images may course across the monitor or the
screen and may be dimmer than usual, which could cause difficulty in con-
firming the surrounding conditions of the vehicle. Always drive carefully con-
firming the safety of the rear and the surrounding conditions b y looking
directly with your eyes.
Page 246 of 572
246
YARIS_YARIS HATCHBACK_OM_OM99V59z_(U)
3-13. Rear View Monitor
Shift the shift lever to R with the ignition switched ON to switch the dis-
play to the rear view monitor display.
When the shift lever is shifted from R to another shift lever p osition, the
screen returns to the previous display.
NOTICE
● Do not apply excessive force to the camera. The camera position and
angle may deviate.
● Do not disassemble, modify, or remove it as it may no longer be water-
proof.
● The camera cover is made of plastic. Do not apply degreasing ag ents,
organic solvents, wax, or glass coating agents to the camera cover. If any
are spilled on the cover, wipe off with a soft cloth immediatel y.
● Do not rub the camera cover forcefully with an abrasive or hard brush. The
camera cover or lens may be scratched which might affect the images.
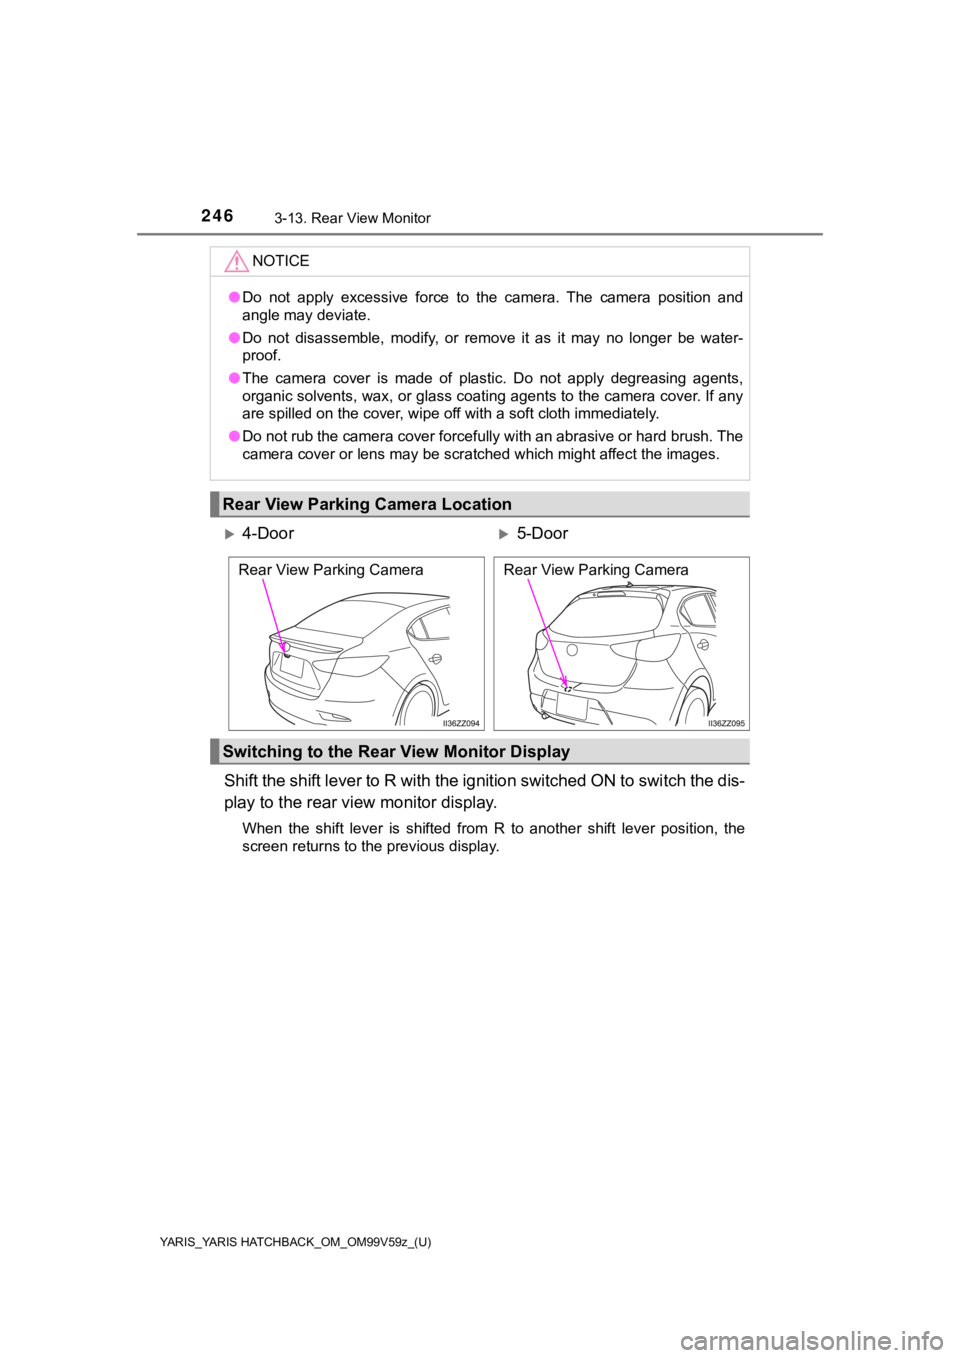
Rear View Parking Camera Location
4-Door5-Door
Switching to the Rear View Monitor Display
Rear View Parking CameraRear View Parking Camera
Page 247 of 572
YARIS_YARIS HATCHBACK_OM_OM99V59z_(U)
2473-13. Rear View Monitor
3
When Driving
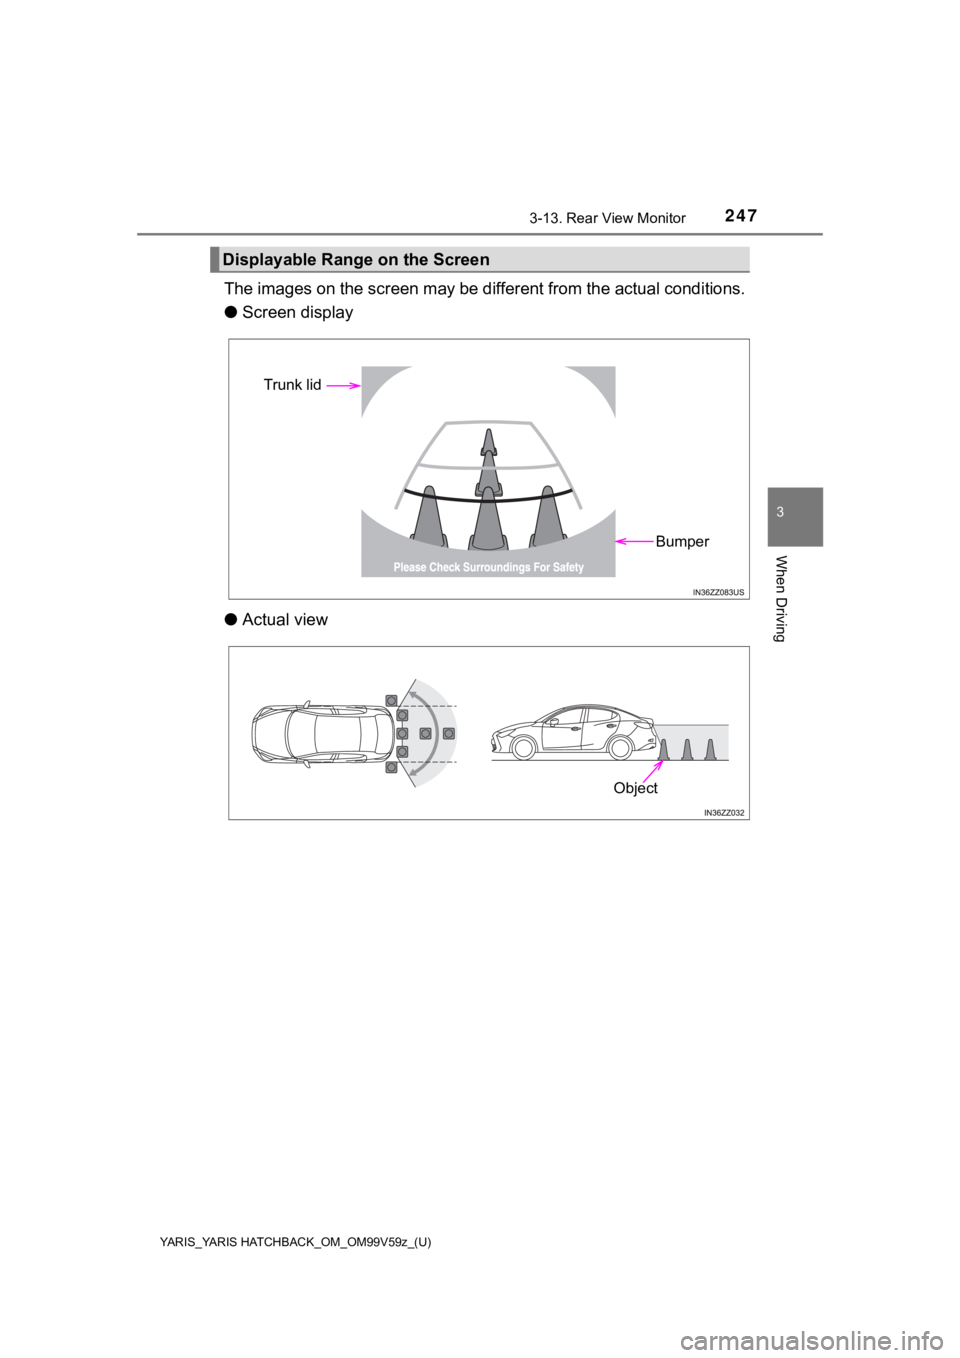
The images on the screen may be different from the actual conditions.
● Screen display
● Actual view
Displayable Range on the Screen
Trunk lid
Bumper
Object
Page 248 of 572

248
YARIS_YARIS HATCHBACK_OM_OM99V59z_(U)
3-13. Rear View Monitor
●The displayable range varies depending on the vehicle and road conditions.
● The displayable range is limited. Objects under the bumper or a round the
bumper ends cannot be displayed.
● The distance appearing in the displayed image is different from the actual
distance because the rear view parking camera is equipped with a specific
lens.
● Some optionally installed vehicle accessories may be picked up by the cam-
era. Do not install any optional parts that can interfere with the camera view,
such as illuminating parts or parts made of reflective material .
● It may be difficult to see the display under the following cond itions, however,
it does not indicate a malfunction.
• In darkened areas.
• When the temperature around the lens is high/low.
• When the camera is wet such as on a rainy day or during periods of high humidity.
• When foreign material such as mud is stuck around the camera.
• When the camera lens reflects sunlight or headlight beams.
● Image display may be delayed if the temperature around the came ra is low.