VOLKSWAGEN CORRADO 1993 Repair Manual
Manufacturer: VOLKSWAGEN, Model Year: 1993, Model line: CORRADO, Model: VOLKSWAGEN CORRADO 1993Pages: 920, PDF Size: 6.92 MB
Page 621 of 920

INSTRUMENT PANEL
Article Text (p. 2)
1993 Volkswagen Corrado
For Volkswagen Technical Site: http://vw.belcom.ru
Copyright © 1998 Mitchell Repair Information Company, LLC
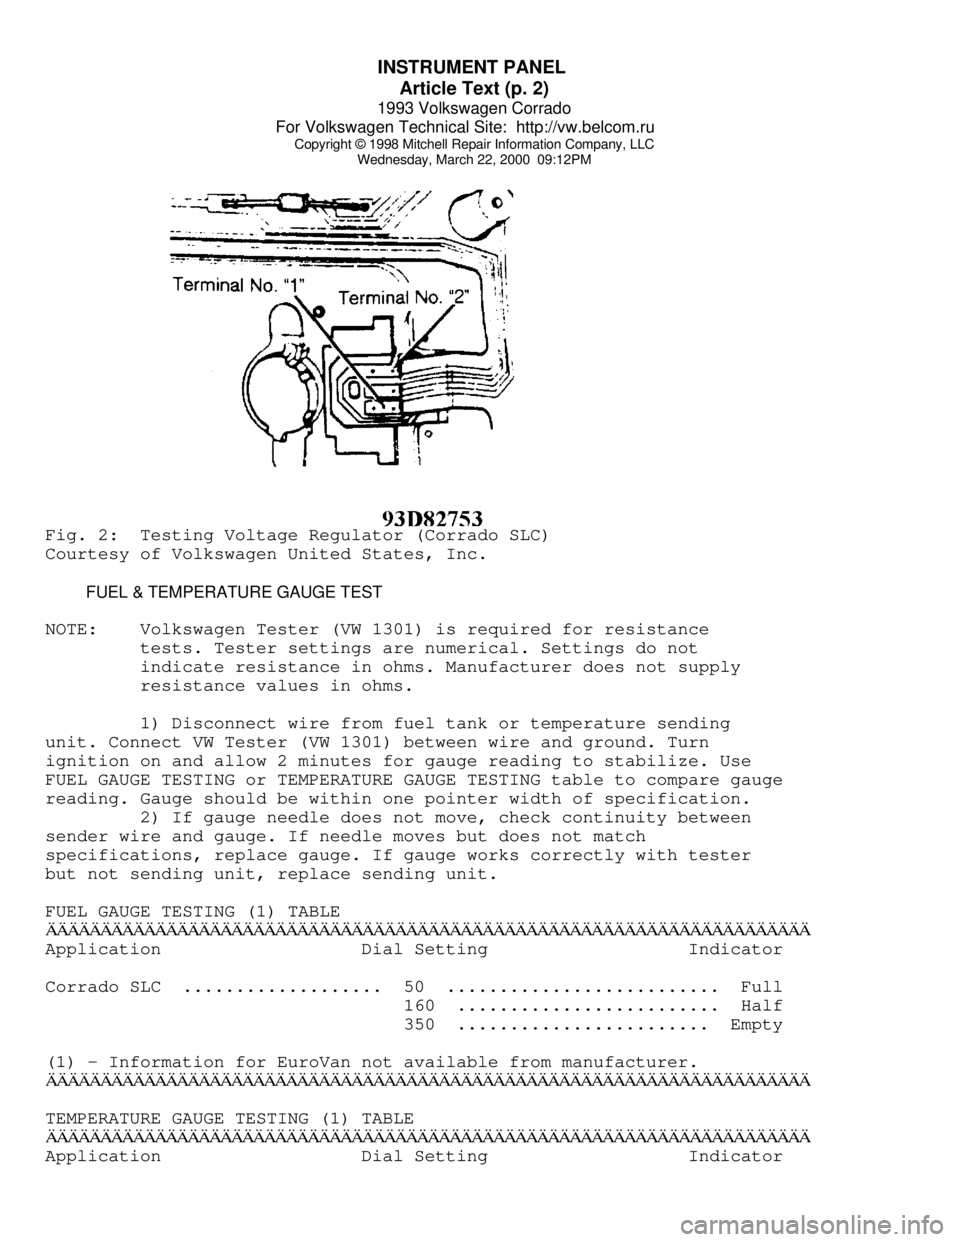
Wednesday, March 22, 2000 09:12PMFig. 2: Testing Voltage Regulator (Corrado SLC)
Courtesy of Volkswagen United States, Inc.
FUEL & TEMPERATURE GAUGE TEST
NOTE: Volkswagen Tester (VW 1301) is required for resistance
tests. Tester settings are numerical. Settings do not
indicate resistance in ohms. Manufacturer does not supply
resistance values in ohms.
1) Disconnect wire from fuel tank or temperature sending
unit. Connect VW Tester (VW 1301) between wire and ground. Turn
ignition on and allow 2 minutes for gauge reading to stabilize. Use
FUEL GAUGE TESTING or TEMPERATURE GAUGE TESTING table to compare gauge
reading. Gauge should be within one pointer width of specification.
2) If gauge needle does not move, check continuity between
sender wire and gauge. If needle moves but does not match
specifications, replace gauge. If gauge works correctly with tester
but not sending unit, replace sending unit.
FUEL GAUGE TESTING (1) TABLEÄÄÄÄÄÄÄÄÄÄÄÄÄÄÄÄÄÄÄÄÄÄÄÄÄÄÄÄÄÄÄÄÄÄÄÄÄÄÄÄÄÄÄÄÄÄÄÄÄÄÄÄÄÄÄÄÄÄÄÄÄÄÄÄÄÄÄÄÄÄApplication Dial Setting Indicator
Corrado SLC ................... 50 .......................... Full
160 ......................... Half
350 ........................ Empty
(1) - Information for EuroVan not available from manufacturer.
ÄÄÄÄÄÄÄÄÄÄÄÄÄÄÄÄÄÄÄÄÄÄÄÄÄÄÄÄÄÄÄÄÄÄÄÄÄÄÄÄÄÄÄÄÄÄÄÄÄÄÄÄÄÄÄÄÄÄÄÄÄÄÄÄÄÄÄÄÄÄTEMPERATURE GAUGE TESTING (1) TABLE
ÄÄÄÄÄÄÄÄÄÄÄÄÄÄÄÄÄÄÄÄÄÄÄÄÄÄÄÄÄÄÄÄÄÄÄÄÄÄÄÄÄÄÄÄÄÄÄÄÄÄÄÄÄÄÄÄÄÄÄÄÄÄÄÄÄÄÄÄÄÄApplication Dial Setting Indicator
Page 622 of 920

INSTRUMENT PANEL
Article Text (p. 3)
1993 Volkswagen Corrado
For Volkswagen Technical Site: http://vw.belcom.ru
Copyright © 1998 Mitchell Repair Information Company, LLC
Wednesday, March 22, 2000 09:12PM
Corrado SLC ................... 80 ........................ Normal
50 ....................... (2) Hot
(1) - Information for EuroVan not available from manufacturer.
(2) - With Red LED flashing.ÄÄÄÄÄÄÄÄÄÄÄÄÄÄÄÄÄÄÄÄÄÄÄÄÄÄÄÄÄÄÄÄÄÄÄÄÄÄÄÄÄÄÄÄÄÄÄÄÄÄÄÄÄÄÄÄÄÄÄÄÄÄÄÄÄÄÄÄÄÄ REMOVAL & INSTALLATION
CAUTION: DO NOT damage printed circuit when installing instruments.
INSTRUMENT CLUSTER
Removal & Installation
1) Obtain radio code. Disconnect negative battery cable.
Remove steering wheel only when removing complete instrument cluster
housing. Remove trim screw caps and screws located on lower part of
instrument cluster trim. Remove instrument cluster trim.
2) Remove trip odometer reset button. Remove trim cover
retaining screws. Remove trim cover from instrument cluster. Remove
instrument cluster housing retaining screws. Pull instrument cluster
from dash panel. Disconnect multi-point connector, MFI vacuum hose (if
equipped) and speedometer drive cable. Remove instrument cluster
housing.
NOTE: All components in instrument cluster, except for printed
circuit, can be removed from front, without removing
complete instrument cluster housing.
3) Disconnect speedometer cable, remove mounting screws and
pull speedometer from housing. Squeeze locating pins on other
instruments and pull from housing. To install, reverse removal
procedure.
Page 623 of 920

INSTRUMENT PANEL
Article Text (p. 4)
1993 Volkswagen Corrado
For Volkswagen Technical Site: http://vw.belcom.ru
Copyright © 1998 Mitchell Repair Information Company, LLC
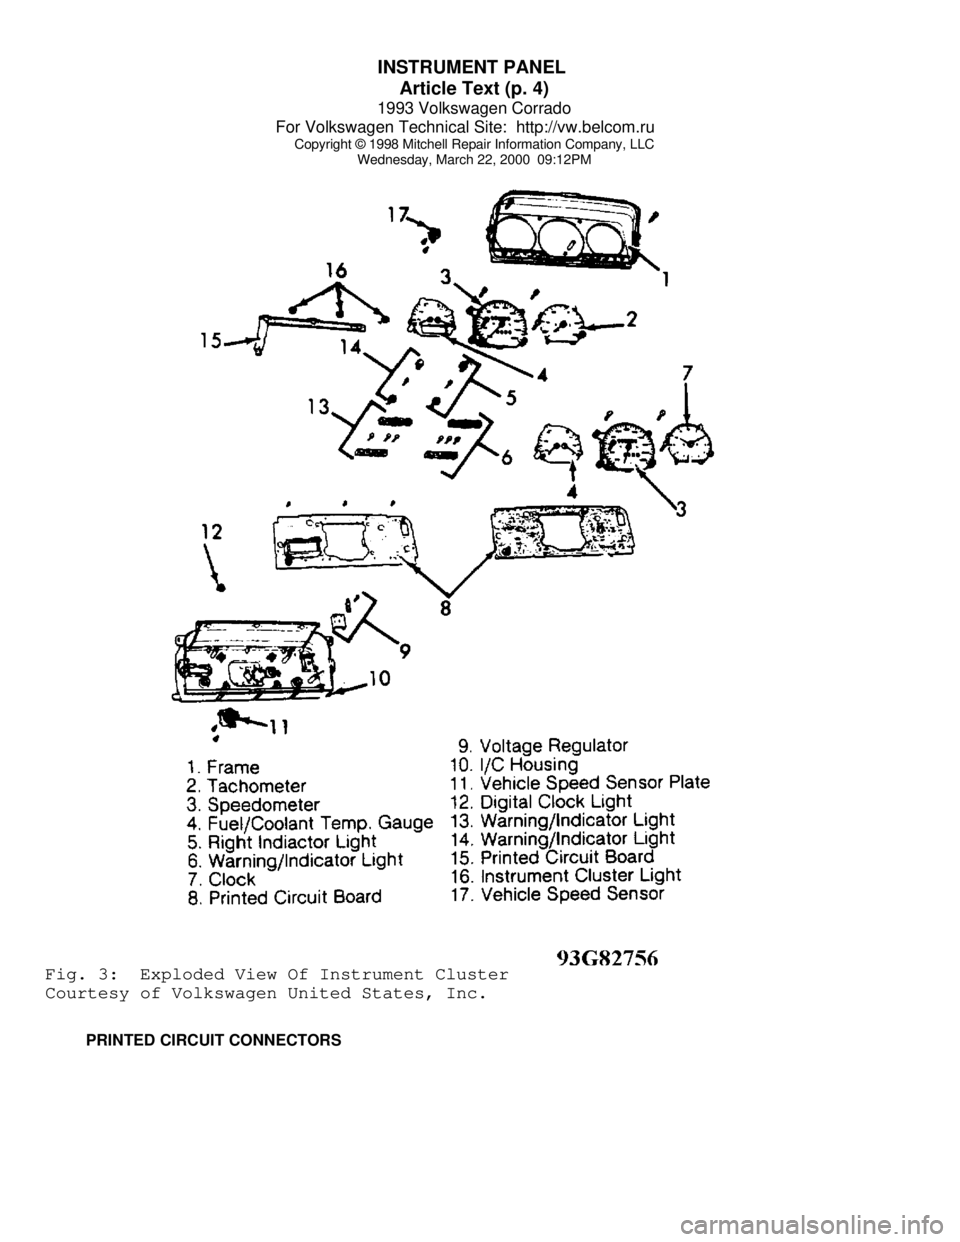
Wednesday, March 22, 2000 09:12PMFig. 3: Exploded View Of Instrument Cluster
Courtesy of Volkswagen United States, Inc.
PRINTED CIRCUIT CONNECTORS
Page 624 of 920

INSTRUMENT PANEL
Article Text (p. 5)
1993 Volkswagen Corrado
For Volkswagen Technical Site: http://vw.belcom.ru
Copyright © 1998 Mitchell Repair Information Company, LLC
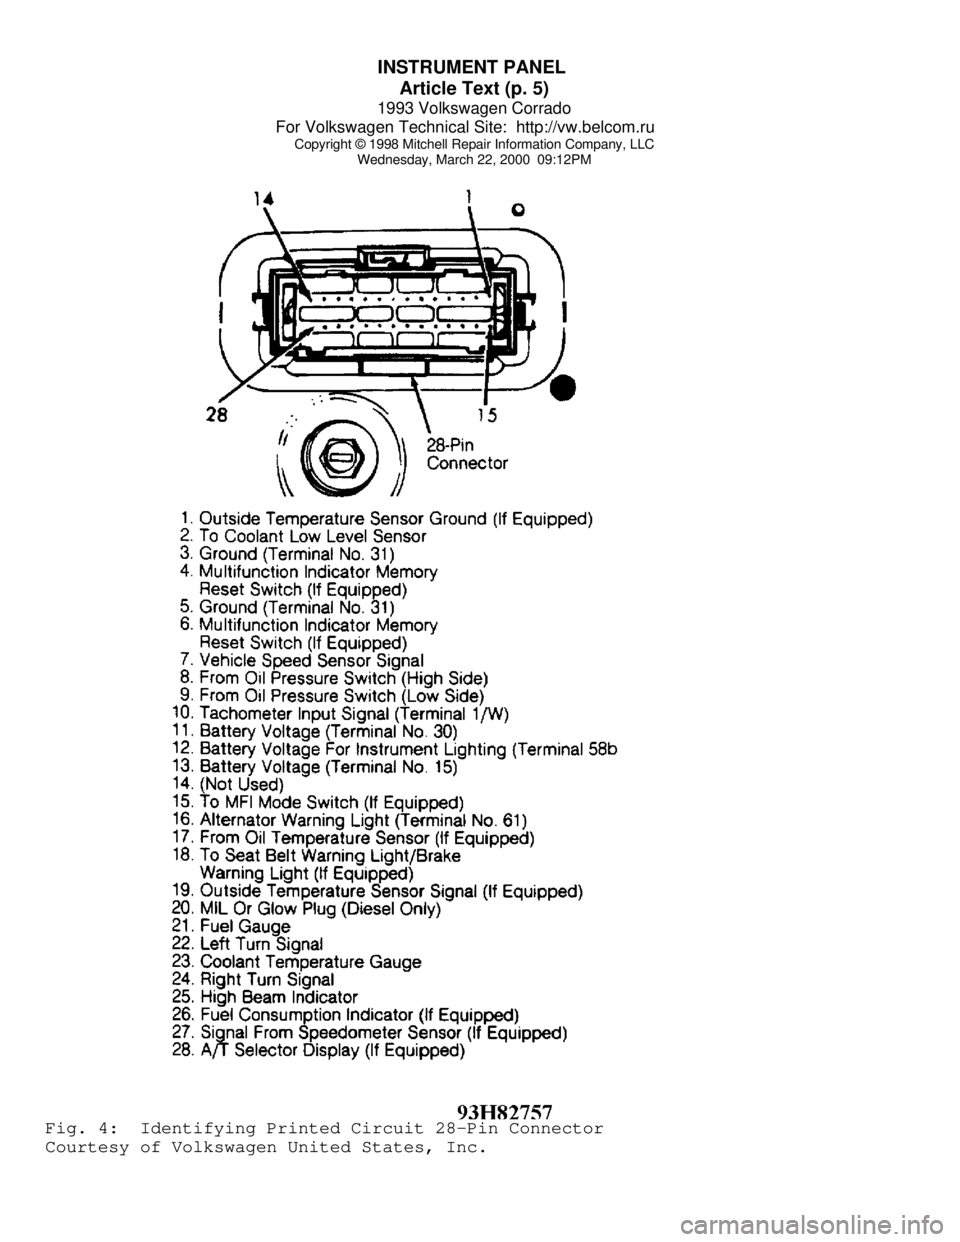
Wednesday, March 22, 2000 09:12PMFig. 4: Identifying Printed Circuit 28-Pin Connector
Courtesy of Volkswagen United States, Inc.
Page 625 of 920

INSTRUMENT PANEL
Article Text (p. 6)
1993 Volkswagen Corrado
For Volkswagen Technical Site: http://vw.belcom.ru
Copyright © 1998 Mitchell Repair Information Company, LLC
Wednesday, March 22, 2000 09:12PM
WIRING DIAGRAMS
See appropriate chassis wiring diagram in WIRING DIAGRAMS.
END OF ARTICLE
Page 626 of 920

INTERFERENCE VERIFICATION CHECK FOR OHC ENGINE
Article Text
1993 Volkswagen Corrado
For Volkswagen Technical Site: http://vw.belcom.ru
Copyright © 1998 Mitchell Repair Information Company, LLC
Wednesday, March 22, 2000 09:12PM
ARTICLE BEGINNING
Maintenance & Service Information
1974-96 Volkswagen - Timing Belt Information
Cabrio, Cabriolet, Corrado, Dasher, Eurovan (Canadian), Fox,
Golf, Golf (Canadian), GTI, GTI (Canadian), Jetta, Jetta GLI,
Passat, Passat (Canadian), Pickup, Quantum, Rabbit, Scirocco,
Scirocco (Canadian), Transporter (Canadian), Vanagon
TIMING BELT INTERFERENCE VERIFICATION INFORMATION
TIMING BELT INTERFERENCE CAUTION
NOTE: CAMSHAFT DRIVE BELTS OR TIMING BELTS - The condition of
camshaft drive belts should always be checked on vehicles
which have more than 50,000 miles. Although some
manufacturers do not recommend replacement at a specified
mileage, others require it at 60,000-100,000 miles. A
camshaft drive belt failure may cause extensive damage to
internal engine components on most engines, although some
designs do not allow piston-to-valve contact. These designs
are often called "Free Wheeling". Many manufacturers changed
their maintenance and warranty schedules in the mid-1980's to
reflect timing belt inspection and/or replacement at
50,000-60,000 miles. Most service interval schedules shown in
this section reflect these changes. Belts or components
should be inspected and replaced if any of the following
conditions exist:
* Crack Or Tears In Belt Surface
* Missing, Damaged, Cracked Or Rounded Teeth
* Oil Contamination
* Damaged Or Faulty Tensioners
* Incorrect Tension Adjustment
TIMING BELT INTERFERENCE CHECK MENU
TIMING BELT INTERFERENCE VERIF. TABLE - PASSENGER CARS (1)ÄÄÄÄÄÄÄÄÄÄÄÄÄÄÄÄÄÄÄÄÄÄÄÄÄÄÄÄÄÄÄÄÄÄÄÄÄÄÄÄÄÄÄÄÄÄÄÄÄÄÄÄÄÄÄÄÄÄÄÄ Replacement Interval
Application Engine (Miles)
Cabrio
1995-96 .......... 2.0L 4-Cyl. ............ (3) 60,000
Cabriolet
1985-89 ....... 1.8L 4-Cyl. (DOHC) ........ (3) 60,000
1.8L 4-Cyl. (SOHC) ........ (3) 60,000
1990-93 .......... 1.8L 4-Cyl. ............ (3) 60,000
Corrado
1990-92 .......... 1.8L 4-Cyl. ............ (3) 60,000
Dasher
Page 627 of 920

INTERFERENCE VERIFICATION CHECK FOR OHC ENGINE
Article Text (p. 2)
1993 Volkswagen Corrado
For Volkswagen Technical Site: http://vw.belcom.ru
Copyright © 1998 Mitchell Repair Information Company, LLC
Wednesday, March 22, 2000 09:12PM
1976-80 ..... (2) 1.5L 4-Cyl. Diesel ...... (3) 60,000
1974-80 .......... 1.6L 4-Cyl. ............ (3) 60,000
1981-80 ......... (2) 1.6L 4-Cyl.
Diesel & Turbo Diesel ...... (3) 60,000
Fox
1987-93 .......... 1.8L 4-Cyl. ............ (3) 60,000
Golf
1985-88 ..... (2) 1.6L 4-Cyl. Diesel ...... (3) 60,000
1985-89 ....... 1.8L 4-Cyl. (DOHC) ........ (3) 60,000
1985-93 ....... 1.8L 4-Cyl. (SOHC) ........ (3) 60,000
1990-92 .......... 1.8L 4-Cyl. ............ (3) 60,000
1993-96 .......... 2.0L 4-Cyl. ............ (3) 60,000
Golf (Canadian)
1985-92 ..... (2) 1.6L 4-Cyl. Diesel ...... (3) 60,000
1993 ............. 1.8L 4-Cyl. ............ (3) 60,000
GTI
1983-84 ..... (2) 1.6L 4-Cyl. Diesel ...... (3) 60,000
(2) 1.6L 4-Cyl. Turbo Diesel ... (3) 60,000
1.7L 4-Cyl. ............ (3) 60,000
1.8L 4-Cyl. ............ (3) 60,000
1985-89 .......... 1.8L 4-Cyl. (DOHC) ..... (3) 60,000
1983-92 .......... 1.8L 4-Cyl. (SOHC) ..... (3) 60,000
1990-92 .......... 1.8L 4-Cyl. ............ (3) 60,000
1990-96 .......... 2.0L 4-Cyl. ............ (3) 60,000
GTI (Canadian)
1993 ............. 2.0L 4-Cyl. ............ (3) 60,000
Jetta
1980 ............. 1.6L 4-Cyl. ............ (3) 60,000
1981-92 ........ (2) 1.6L 4-Cyl.
Diesel & Turbo Diesel ....... (3) 60,000
1983-84 .......... 1.7L 4-Cyl. ............ (3) 60,000
1.8L 4-Cyl. ............ (3) 60,000
1985-89 ....... 1.8L 4-Cyl. (DOHC) ........ (3) 60,000
1983-92 ....... 1.8L 4-Cyl. (SOHC) ........ (3) 60,000
1990-92 .......... 1.8L 4-Cyl. ............ (3) 60,000
1993-96 .......... 2.0L 4-Cyl. ............ (3) 60,000
Jetta GLI
1990-92 .......... 2.0L 4-Cyl. ............ (3) 60,000
Passat
1990-96 .......... 2.0L 4-Cyl. ............ (3) 60,000
Passat (Canadian)
1993 ............. 1.8L 4-Cyl. ............ (3) 60,000
Quantum
1981-86 ........ (2) 1.6L 4-Cyl.
Diesel & Turbo Diesel ....... (3) 60,000
1981-84 .......... 1.7L 4-Cyl. ............ (3) 60,000
1984-85 .......... 2.1L 5-Cyl. ............ (3) 60,000
1983-88 .......... 2.2L 5-Cyl. ............ (3) 60,000
1985-86 .......... 1.8L 4-Cyl. ............ (3) 60,000
Rabbit
1974-79 .......... 1.5L 4-Cyl. ............ (3) 60,000
1.6L 4-Cyl. ............ (3) 60,000
Page 628 of 920

INTERFERENCE VERIFICATION CHECK FOR OHC ENGINE
Article Text (p. 3)
1993 Volkswagen Corrado
For Volkswagen Technical Site: http://vw.belcom.ru
Copyright © 1998 Mitchell Repair Information Company, LLC
Wednesday, March 22, 2000 09:12PM
1976-80 ..... (2) 1.5L 4-Cyl. Diesel ...... (3) 60,000
1981-84 ........ (2) 1.6L 4-Cyl.
Diesel & Turbo Diesel ....... (3) 60,000
1983-84 .......... 1.7L 4-Cyl. ............ (3) 60,000
1.8L 4-Cyl. ............ (3) 60,000
Scirocco
1976-79 .......... 1.5L 4-Cyl. ............ (3) 60,000
1976-80 .......... 1.6L 4-Cyl. ............ (3) 60,000
1983-84 .......... 1.7L 4-Cyl. ............ (3) 60,000
1.8L 4-Cyl. ............ (3) 60,000
1985-89 ....... 1.8L 4-Cyl. (DOHC) ........ (3) 60,000
1.8L 4-Cyl. (SOHC) ........ (3) 60,000
Scirocco (Canadian)
1989 .......... 1.8L 4-Cyl. (DOHC) ........ (3) 60,000
1.8L 4-Cyl. (SOHC) ........ (3) 60,000
(1) - Other interference engine applications may exist which
are not indicated here.
(2) - Interference engine. Check for possible damage to
piston(s) or valve(s) if there has been a timing belt
failure.
(3) - Although the vehicle manufacturer does not recommend a
specific scheduled maintenance interval, aftermarket
belt manufacturers suggest the belt be replaced at
60,000 mile intervals.
(4) - Vehicle manufacturer recommends replacing all belts at
the same time.ÄÄÄÄÄÄÄÄÄÄÄÄÄÄÄÄÄÄÄÄÄÄÄÄÄÄÄÄÄÄÄÄÄÄÄÄÄÄÄÄÄÄÄÄÄÄÄÄÄÄÄÄÄÄÄÄÄÄÄÄTIMING BELT INTERFERENCE VERIF. TABLE - LIGHT TRUCKS (1)
ÄÄÄÄÄÄÄÄÄÄÄÄÄÄÄÄÄÄÄÄÄÄÄÄÄÄÄÄÄÄÄÄÄÄÄÄÄÄÄÄÄÄÄÄÄÄÄÄÄÄÄÄÄÄÄÄÄÄÄÄ Replacement Interval
Application Engine (Miles)
Eurovan (Canadian)
1992-96 .......... 2.5L 5-Cyl. ............ (3) 60,000
Pickup
1980 ....... (2) 1.5L 4-Cyl. Diesel ....... (3) 60,000
1980-83 .......... 1.6L 4-Cyl. ............ (3) 60,000
1981-83 .... (2) 1.6L 4-Cyl. Diesel ....... (3) 60,000
1.7L 4-Cyl. ............ (3) 60,000
Transporter (Canadian)
1992-96 .......... 2.5L 5-Cyl. ............ (3) 60,000
Vanagon
1981-82 .... (2) 1.6L 4-Cyl. Diesel ....... (3) 60,000
(1) - Other interference engine applications may exist which
are not indicated here.
(2) - Interference engine. Check for possible damage to
piston(s) or valve(s) if there has been a timing belt
failure.
(3) - Although the vehicle manufacturer does not recommend a
Page 629 of 920

INTERFERENCE VERIFICATION CHECK FOR OHC ENGINE
Article Text (p. 4)
1993 Volkswagen Corrado
For Volkswagen Technical Site: http://vw.belcom.ru
Copyright © 1998 Mitchell Repair Information Company, LLC
Wednesday, March 22, 2000 09:12PM
specific scheduled maintenance interval, aftermarket
belt manufacturers suggest the belt be replaced at
60,000 mile intervals.
(4) - Vehicle manufacturer recommends replacing all belts at
the same time.ÄÄÄÄÄÄÄÄÄÄÄÄÄÄÄÄÄÄÄÄÄÄÄÄÄÄÄÄÄÄÄÄÄÄÄÄÄÄÄÄÄÄÄÄÄÄÄÄÄÄÄÄÄÄÄÄÄÄÄÄEND OF ARTICLE
Page 630 of 920

J - PIN VOLTAGE CHARTS
Article Text
1993 Volkswagen Corrado
For Volkswagen Technical Site: http://vw.belcom.ru
Copyright © 1998 Mitchell Repair Information Company, LLC
Wednesday, March 22, 2000 09:14PM
ARTICLE BEGINNING
1993 ENGINE PERFORMANCE
Volkswagen Pin Voltage Charts
Corrado SLC
INTRODUCTION
Pin voltage charts are supplied to reduce diagnostic time.
Checking pin voltages at ECU/ECM determines whether ECU/ECM is
receiving and transmitting proper voltage signals. Charts may also
help determine if ECU/ECM harness has an electrical short or open.
NOTE: Unless stated otherwise in testing procedures, perform all
voltage tests using a Digital Volt-Ohmmeter (DVOM) with a
minimum 10-megohm input impedance. Voltage readings may vary
slightly due to battery condition or charging rate.
ECU PIN VOLTAGES (CORRADO SLC)
ECU PIN VOLTAGES (CORRADO SLC - MOTRONIC)ÄÄÄÄÄÄÄÄÄÄÄÄÄÄÄÄÄÄÄÄÄÄÄÄÄÄÄÄÄÄÄÄÄÄÄÄÄÄÄÄÄÄÄÄÄÄÄÄÄÄÄÄÄÄÄÄÄÄÄÄÄÄÄÄÄÄÄÄÄÄComponent/Circuit (1) Test Conditions & Specified Value
(VAG 1598 Terminal No.) Additional Steps Or Test Result
ECU NOT CONNECTED TO VAG 1598/18
Voltage Supply -
Control Module (1 & 54) ... Ignition Off ..... Battery Voltage
Voltage Supply -
Control Module
Relay (1 & 23) ........ (2) Ignition Off ... Battery Voltage
Wiring To Fuel Pump
(6 & 55 - Jumper) ......... Ignition On ....... Fuel Pump Must
Operate
Heated Oxygen (O2)
Sensor Relay (7 & 28 -
Briefly Jumper) ....... (2) Ignition On ......... Relay Must
Operate (Click)
Malfunction Indicator
Light (5 & 10 - Jumper) ... Ignition On .. MIL Must Illuminate
Wiring For A/C (39 & 55) .... Ignition On,
A/C Switch On .... Battery Voltage
Wiring To A/C Compressor
(37 & 38 - Jumper) ........ Ignition On ......... A/C Magnetic
Clutch Operates
Fuel Injector No. 1
(23 & 24) ................. Ignition Off ........ 15-21.5 Ohms
Fuel Injector No. 2
(3 & 23) .................. Ignition Off ........ 15-21.5 Ohms
Fuel Injector No. 3