front VOLKSWAGEN T-ROC 2021 Owner´s Manual
[x] Cancel search | Manufacturer: VOLKSWAGEN, Model Year: 2021, Model line: T-ROC, Model: VOLKSWAGEN T-ROC 2021Pages: 502, PDF Size: 9.42 MB
Page 298 of 502
Never exceed the vehicle's maximum payload. Both the payload and the distribution of the load in
the vehicle will have an effect on the handling and braking distance of the vehicle.
Transporting heavy objects changes the vehicle's handling and the centre of gravity.
The load should be distributed as evenly as possible in the vehicle.
Always secure heavy objects in the luggage compartment as far in front of the rear axle as possible.
Loose objects in the luggage compartment can suddenly slide and change the way the vehicle
handles.
Always adapt your speed and driving style to suit visibility, weather, road and traffic conditions.
Accelerate very carefully and gently.
Avoid sudden braking and driving manoeuvres.
Brake earlier than in normal driving.
NOTICE
Objects rubbing against the rear windows may damage or destroy the heating wires or, depending
on the vehicle equipment, also the aerial.
Luggage compartment cover
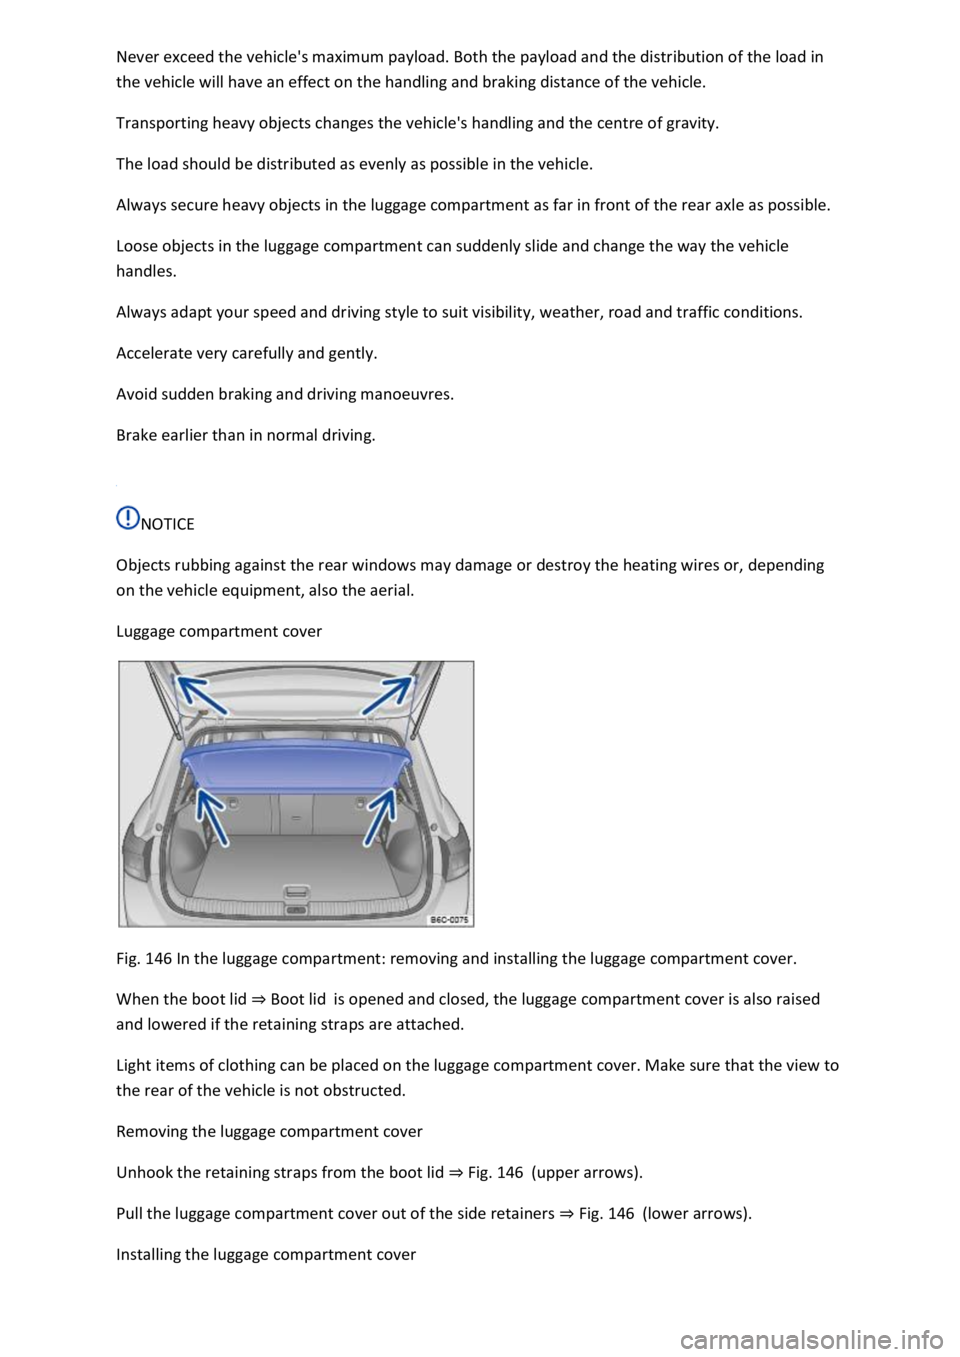
Fig. 146 In the luggage compartment: removing and installing the luggage compartment cover.
When the boot lid ⇒ Boot lid is opened and closed, the luggage compartment cover is also raised
and lowered if the retaining straps are attached.
Light items of clothing can be placed on the luggage compartment cover. Make sure that the view to
the rear of the vehicle is not obstructed.
Removing the luggage compartment cover
Unhook the retaining straps from the boot lid ⇒ Fig. 146 (upper arrows).
Pull the luggage compartment cover out of the side retainers ⇒ Fig. 146 (lower arrows).
Installing the luggage compartment cover
Page 301 of 502
NOTICE
Never drop the luggage compartment floor; guide it slowly back down. The trims or the luggage
compartment floor could otherwise be damaged.
NOTICE
In the upper position, the variable luggage compartment floor has a maximum load capacity of
120 kg.
Depending on the vehicle equipment, there may be compartments for stowing small items under
the luggage compartment floor.
Luggage compartment equipment
Fastening rings
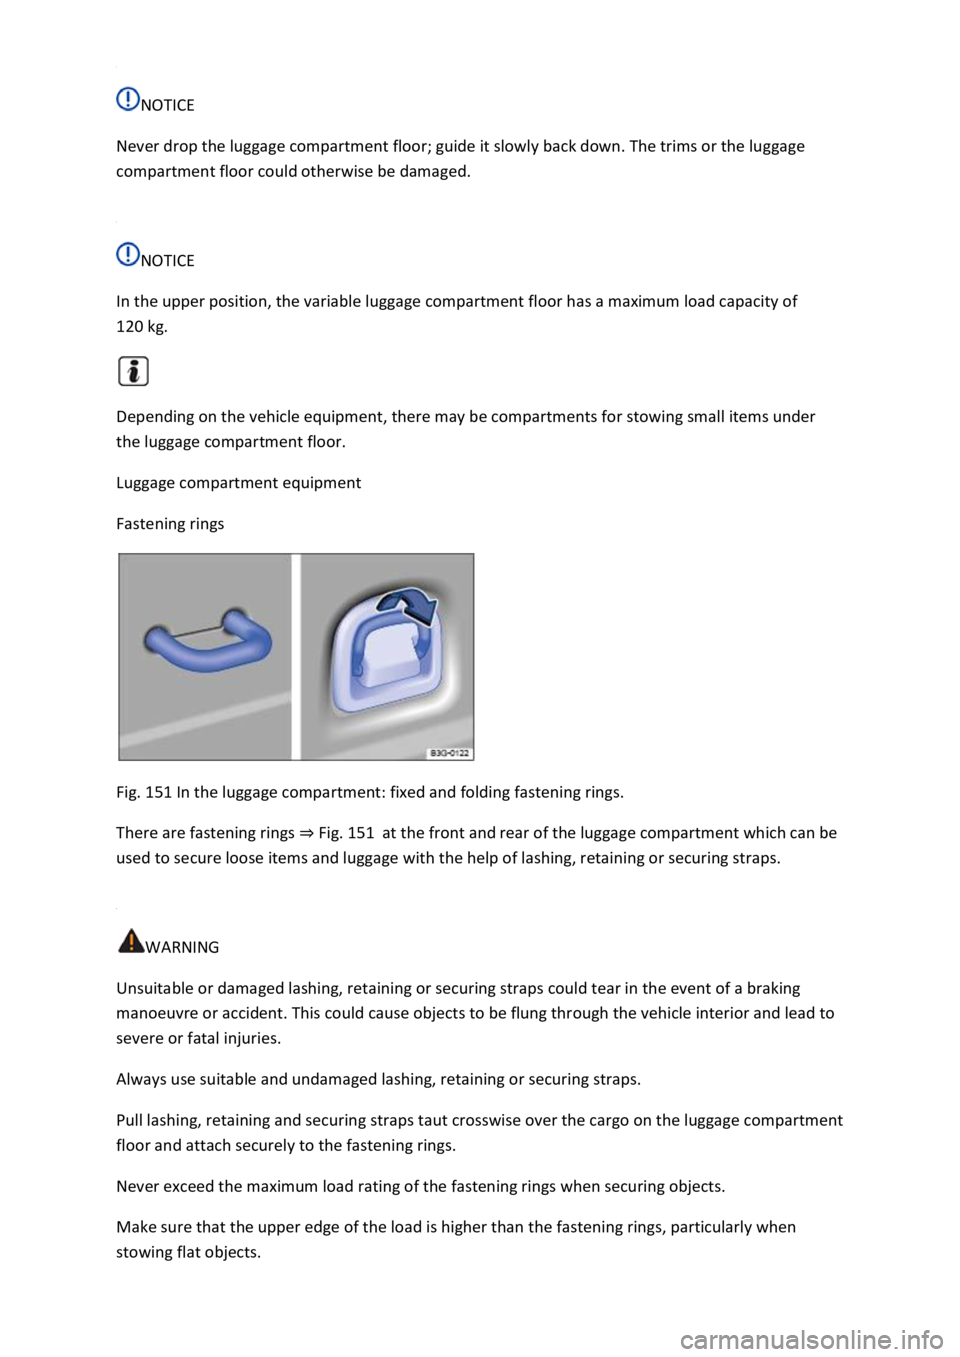
Fig. 151 In the luggage compartment: fixed and folding fastening rings.
There are fastening rings ⇒ Fig. 151 at the front and rear of the luggage compartment which can be
used to secure loose items and luggage with the help of lashing, retaining or securing straps.
WARNING
Unsuitable or damaged lashing, retaining or securing straps could tear in the event of a braking
manoeuvre or accident. This could cause objects to be flung through the vehicle interior and lead to
severe or fatal injuries.
Always use suitable and undamaged lashing, retaining or securing straps.
Pull lashing, retaining and securing straps taut crosswise over the cargo on the luggage compartment
floor and attach securely to the fastening rings.
Never exceed the maximum load rating of the fastening rings when securing objects.
Make sure that the upper edge of the load is higher than the fastening rings, particularly when
stowing flat objects.
Page 317 of 502
If you park the trailer using the support wheel or other trailer supports, the trailer must be
unhitched from the vehicle. The vehicle could move up and down if the load changes or if there is
damage to the tyres, for example. If this happens, a great deal of force will be exerted on the towing
bracket and trailer, which could lead to damage to the vehicle and trailer.
If there is a fault in the vehicle or trailer electrical systems or in the anti-theft alarm, have the vehicle
checked by a qualified workshop.
If the 12-volt vehicle battery charge level is low, the electrical connection to the trailer will be
interrupted automatically.
Loading the trailer
First read and observe the introductoryinformation and safety warnings⇒Introduction
Trailer weight and drawbar load
The trailer weight is the weight that the vehicle can pull ⇒ .
The drawbar load is the load that is exerted vertically from above onto the ball head of the towing
bracket.
The figures for trailer weights and drawbar weights that are given on the data plate of the towing
bracket are for certification purposes only. The correct values for your specific model, which may be
lower than these figures, are given in the vehicle registration documents. All data in the official
vehicle documents take precedence over these data.
The maximum permitted drawbar load exerted by the trailer drawbar on the ball head of the towing
bracket must not exceed 80 kg.
In the interest of driving safety, Volkswagen recommends that you always use the maximum
drawbar load. The handling of the vehicle combination will be impaired if the drawbar load is too
low.
The drawbar load increases the weight on the rear axle and reduces the maximum payload of the
vehicle as a result.
Gross combination weight
The gross combination weight is made up of the actual weight of the loaded vehicle and of the
loaded trailer.
In some countries, trailers are divided into different classes. Volkswagen recommends that you
contact a qualified workshop to find out about suitable trailers.
Loading the trailer
The weight of the load should be distributed evenly. The maximum permitted drawbar load should
be utilised. Do not place the load only at the front or the rear of the trailer:
Page 318 of 502
possible.
Tyre pressure
Follow the trailer manufacturer's recommendations concerning the tyre pressure for the trailer
tyres.
When towing a trailer, inflate the wheels on the towing vehicle with the maximum permitted tyre
pressure ⇒ Tyre pressure .
WARNING
Accidents and serious injuries can occur if you exceed the vehicle's maximum permitted gross axle
weight rating, drawbar load, gross vehicle weight rating or gross combination weight rating.
exceed the permissible gross vehicle weight for the vehicle with weight at the front and rear of the
vehicle.
WARNING
Loads that may slide can severely impair stability and driving safety, which can cause accidents and
severe injuries.
secure loads using suitable and undamaged lashing, retaining or securing straps.
Driving with a trailer
First read and observe the introductoryinformation and safety warnings⇒Introduction
Headlight adjustment
Towing a trailer can raise the front end of the vehicle enough for the dipped beam to dazzle other
road users. Use the headlight range control to lower the light cone as required. Vehicles with
dynamic headlight range control are adjusted automatically.
Things to note when driving with a trailer
If the trailer has an overrun brake, apply the brakes gently at first and then firmly. This will
prevent the jerking that can be caused by the trailer wheels locking.
Page 335 of 502
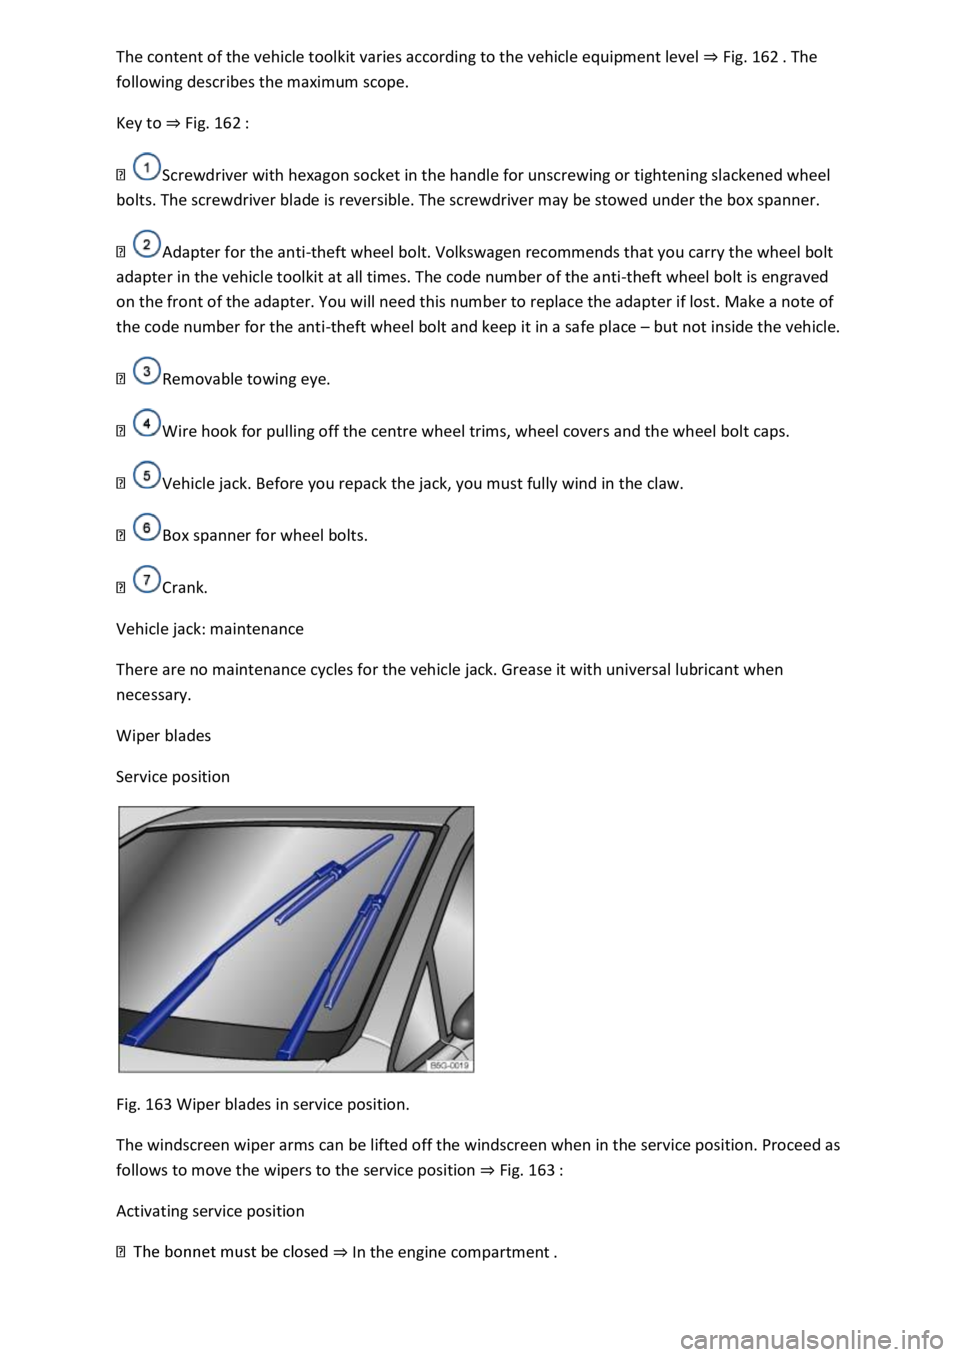
The content of the vehicle toolkit varies according to the vehicle equipment level ⇒ Fig. 162 . The
following describes the maximum scope.
Key to ⇒ Fig. 162 :
Screwdriver with hexagon socket in the handle for unscrewing or tightening slackened wheel
bolts. The screwdriver blade is reversible. The screwdriver may be stowed under the box spanner.
Adapter for the anti-theft wheel bolt. Volkswagen recommends that you carry the wheel bolt
adapter in the vehicle toolkit at all times. The code number of the anti-theft wheel bolt is engraved
on the front of the adapter. You will need this number to replace the adapter if lost. Make a note of
the code number for the anti-theft wheel bolt and keep it in a safe place – but not inside the vehicle.
Removable towing eye.
Wire hook for pulling off the centre wheel trims, wheel covers and the wheel bolt caps.
Vehicle jack. Before you repack the jack, you must fully wind in the claw.
Box spanner for wheel bolts.
Crank.
Vehicle jack: maintenance
There are no maintenance cycles for the vehicle jack. Grease it with universal lubricant when
necessary.
Wiper blades
Service position
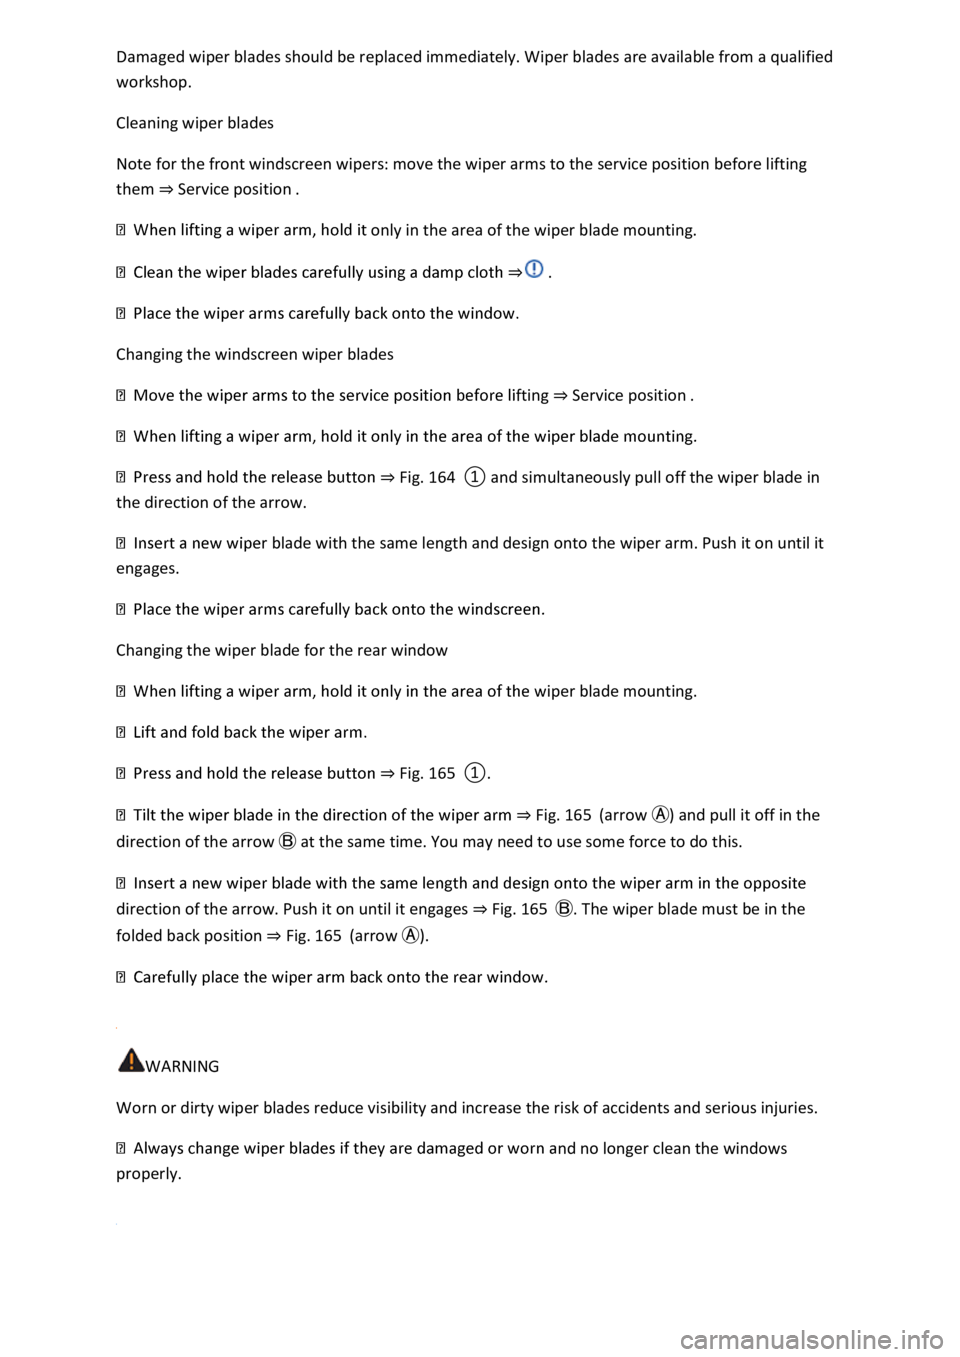
Fig. 163 Wiper blades in service position.
The windscreen wiper arms can be lifted off the windscreen when in the service position. Proceed as
follows to move the wipers to the service position ⇒ Fig. 163 :
Activating service position
⇒ In the engine compartment .
Page 337 of 502
Damaged wiper blades should be replaced immediately. Wiper blades are available from a qualified
workshop.
Cleaning wiper blades
Note for the front windscreen wipers: move the wiper arms to the service position before lifting
them ⇒ Service position .
only in the area of the wiper blade mounting.
⇒ .
Changing the windscreen wiper blades
fting ⇒ Service position .
⇒ Fig. 164 ① and simultaneously pull off the wiper blade in
the direction of the arrow.
r blade with the same length and design onto the wiper arm. Push it on until it
engages.
Changing the wiper blade for the rear window
iper blade mounting.
⇒ Fig. 165 ①.
⇒ Fig. 165 (arrow Ⓐ) and pull it off in the
direction of the arrow Ⓑ at the same time. You may need to use some force to do this.
direction of the arrow. Push it on until it engages ⇒ Fig. 165 Ⓑ. The wiper blade must be in the
folded back position ⇒ Fig. 165 (arrow Ⓐ).
WARNING
Worn or dirty wiper blades reduce visibility and increase the risk of accidents and serious injuries.
nd no longer clean the windows
properly.
Page 338 of 502
NOTICE
Damaged or dirty wiper blades can scratch the window glass.
can damage the graphite coating of the wiper blades during cleaning.
Wax deposits from car washes on the windscreen and rear window can cause the wiper blades to
rub. Remove wax residue using a special cleaning product or cleaning cloths.
Changing bulbs
Introduction
This chapter contains information on the followingsubjects:
⇒ Checklist
⇒ Changing bulbs in the front headlights (halogen bulbs)
⇒ Changing the bulbs in the headlights (lights with LED technology)
⇒ Changing the front turn signal bulbs
⇒ Changing bulbs in the front bumper
⇒ Changing bulbs in the tail light clusters (LED lights)
⇒ Changing bulbs in the number plate light (LED lights)
⇒ Troubleshooting
Changing the vehicle bulbs requires a certain amount of technical skill. Volkswagen therefore
recommends having bulbs replaced by a qualified workshop if you are uncertain. The work must be
performed by an expert if other vehicle parts around the affected bulbs need to be removed.
Volkswagen recommends having bulbs replaced by a Volkswagen dealership.
You should keep a box with spare light bulbs for the lights that ensure the vehicle is roadworthy in
the vehicle at all times. Spare bulbs are available from Volkswagen dealerships. In some countries it
is a legal requirement to have these spare bulbs in the vehicle.
It may be illegal to drive with defective lights of the exterior lighting.
Information on indicator and warning lamps can be found in the troubleshooting section at the end
of the chapter ⇒ Troubleshooting .
LED lights on the vehicle
The exterior lighting may feature LEDs: Owners cannot replace the LEDs themselves. If some LEDs
fail, this may be an indication that more elements are on the point of failure. In this case, have the
lights checked and replaced if necessary at a qualified workshop.
Page 341 of 502
Do not touch the glass part of the bulb with unprotected fingers. When switched on, the heat of the
bulb would cause the remaining fingerprint to evaporate and be deposited on the reflector. This will
impair the light output of the headlight.
After changing a bulb, check to ensure that the bulb is working properly. If the bulb is not working
properly, the bulb may not have been inserted properly, may have failed again, or the connector
may have been fitted incorrectly.
Any time you change a bulb at the front of the vehicle, the headlight settings should be checked by a
qualified workshop.
WARNING
Ignoring any of the items on this important safety checklist can lead to accidents and severe injuries.
NOTICE
Always take care when removing or fitting lights to prevent damage to the paintwork or to other
vehicle parts.
Changing bulbs in the front headlights (halogen bulbs)
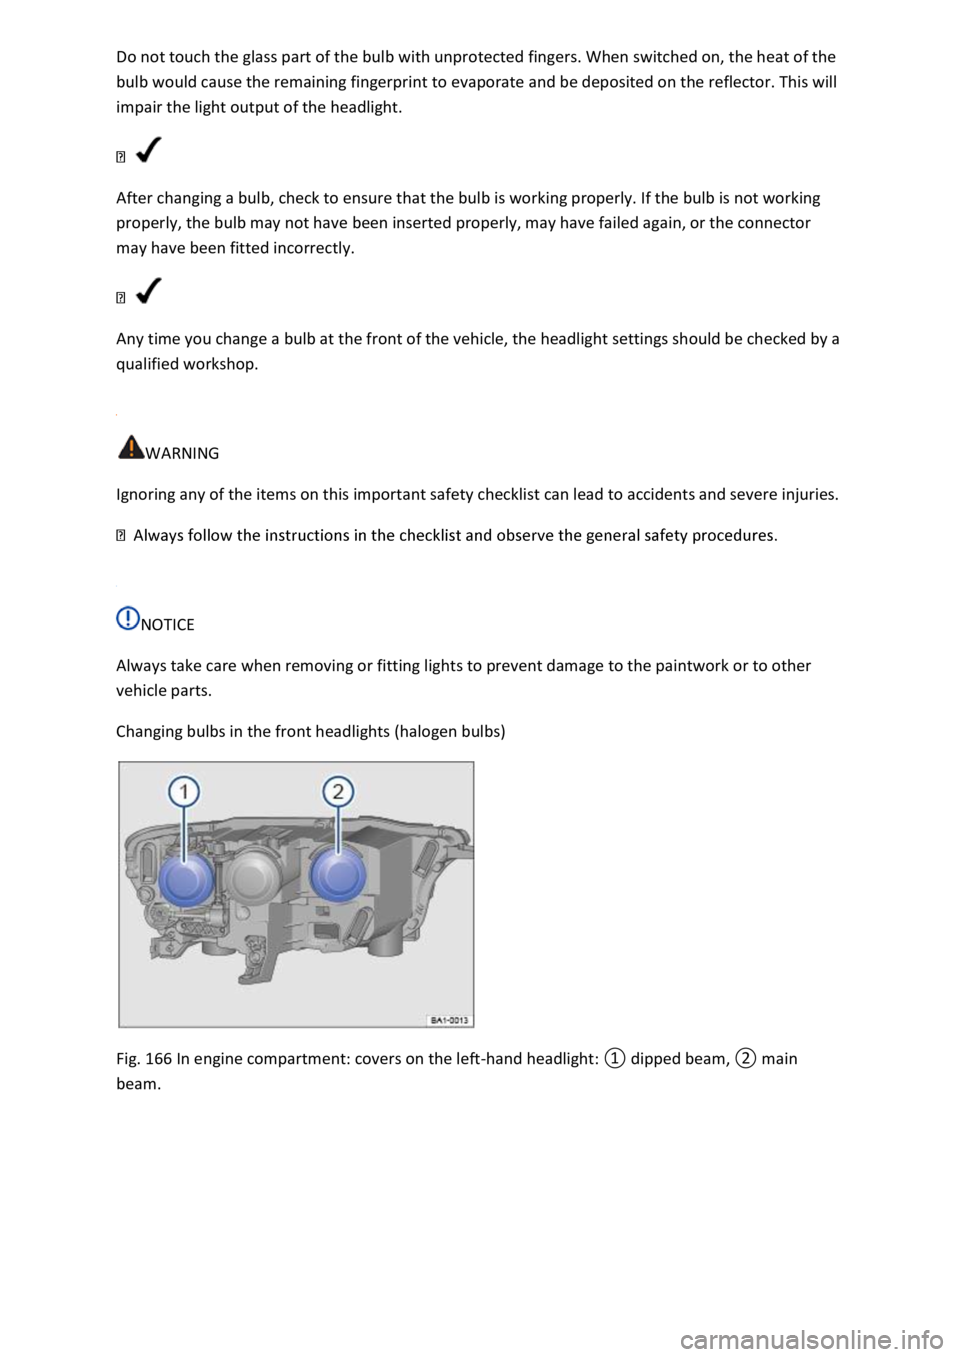
Fig. 166 In engine compartment: covers on the left-hand headlight: ① dipped beam, ② main
beam.
Page 342 of 502
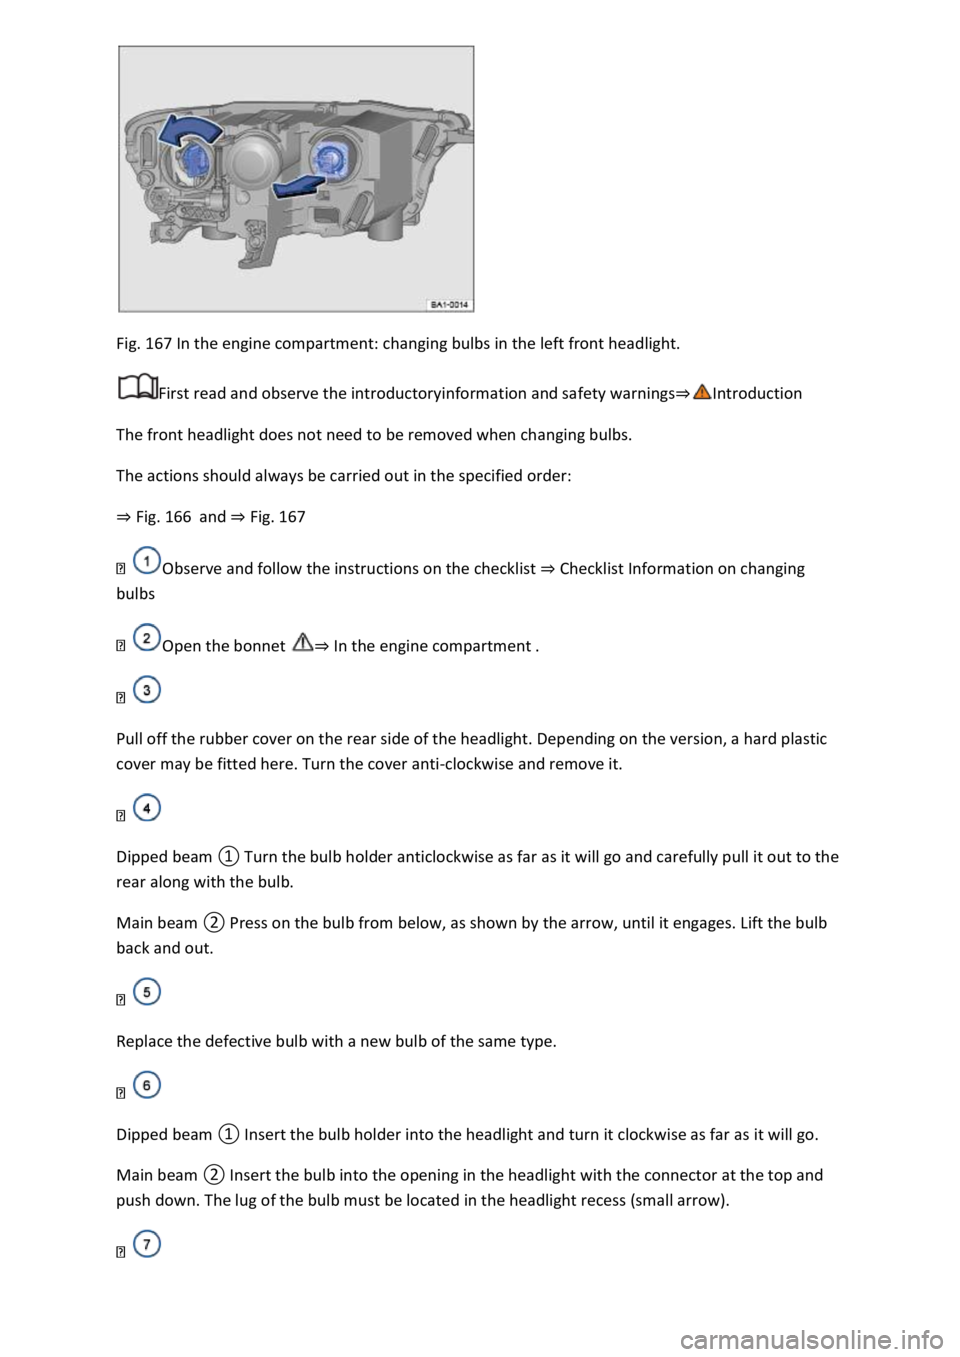
Fig. 167 In the engine compartment: changing bulbs in the left front headlight.
First read and observe the introductoryinformation and safety warnings⇒Introduction
The front headlight does not need to be removed when changing bulbs.
The actions should always be carried out in the specified order:
⇒ Fig. 166 and ⇒ Fig. 167
Observe and follow the instructions on the checklist ⇒ Checklist Information on changing
bulbs
Open the bonnet ⇒ In the engine compartment .
Pull off the rubber cover on the rear side of the headlight. Depending on the version, a hard plastic
cover may be fitted here. Turn the cover anti-clockwise and remove it.
Dipped beam ① Turn the bulb holder anticlockwise as far as it will go and carefully pull it out to the
rear along with the bulb.
Main beam ② Press on the bulb from below, as shown by the arrow, until it engages. Lift the bulb
back and out.
Replace the defective bulb with a new bulb of the same type.
Dipped beam ① Insert the bulb holder into the headlight and turn it clockwise as far as it will go.
Main beam ② Insert the bulb into the opening in the headlight with the connector at the top and
push down. The lug of the bulb must be located in the headlight recess (small arrow).
Page 343 of 502
Attach the rubber cover or hard plastic cover and turn it clockwise as far as it will go.
Close the bonnet ⇒ In the engine compartment .
Changing the bulbs in the headlights (lights with LED technology)
First read and observe the introductoryinformation and safety warnings⇒Introduction
These lamps use LED technology. The LEDs cannot be replaced by customers. If some LEDs fail, this
may be an indication that more elements are on the point of failure. In this case, have the lights
checked and renewed if necessary at a qualified workshop.
Changing the front turn signal bulbs
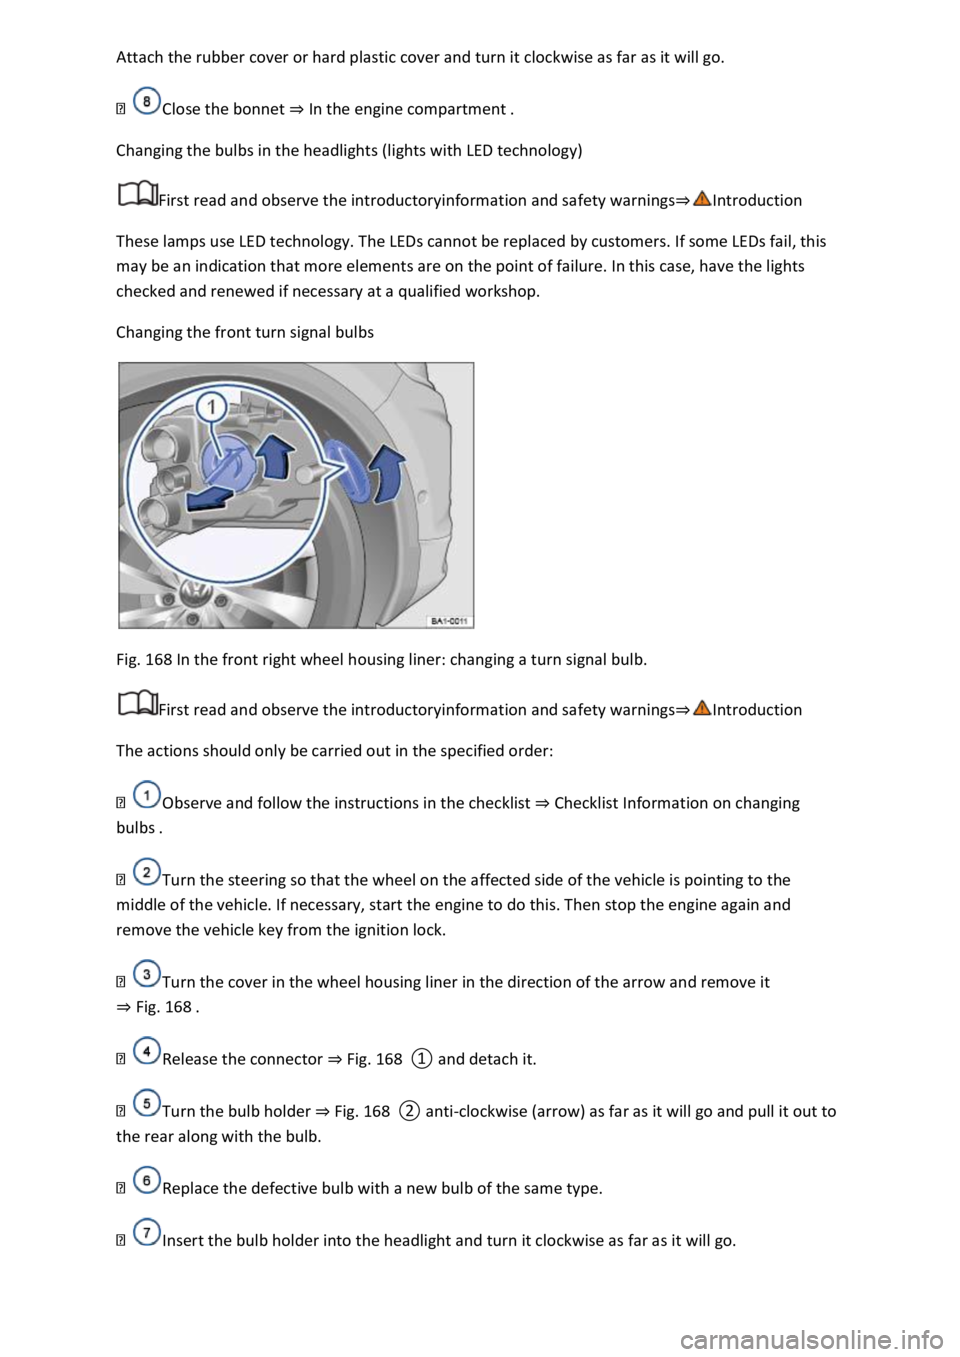
Fig. 168 In the front right wheel housing liner: changing a turn signal bulb.
First read and observe the introductoryinformation and safety warnings⇒Introduction
The actions should only be carried out in the specified order:
Observe and follow the instructions in the checklist ⇒ Checklist Information on changing
bulbs .
Turn the steering so that the wheel on the affected side of the vehicle is pointing to the
middle of the vehicle. If necessary, start the engine to do this. Then stop the engine again and
remove the vehicle key from the ignition lock.
Turn the cover in the wheel housing liner in the direction of the arrow and remove it
⇒ Fig. 168 .
Release the connector ⇒ Fig. 168 ① and detach it.
Turn the bulb holder ⇒ Fig. 168 ② anti-clockwise (arrow) as far as it will go and pull it out to
the rear along with the bulb.
Replace the defective bulb with a new bulb of the same type.
Insert the bulb holder into the headlight and turn it clockwise as far as it will go.