VOLVO V60 2014 Owners Manual
Manufacturer: VOLVO, Model Year: 2014, Model line: V60, Model: VOLVO V60 2014Pages: 442, PDF Size: 13.85 MB
Page 341 of 442
M A I N T E N A N C E A N D S E R V I C E
ProCarManuals.co’
Page 342 of 442
10 Maintenance and service
10
340
Volvo service programme
To keep the car as safe and reliable as possi- ble, follow the Volvo service programme asspecified in the Service and Warranty Booklet. Volvo recommends engaging an authorised Volvo workshop to perform the service andmaintenance work. Volvo workshops have thepersonnel, special tools and service literatureto guarantee the highest quality of service.
IMPORTANT
For the Volvo warranty to apply, check and follow the instructions in the Service andWarranty Booklet.
Related information
•Climate control system - fault tracing and repair (p. 352)
ProCarManuals.co’
Page 343 of 442
10 Maintenance and service
10
}}
341
Raising the car
When raising the car it is important that the jack or lifting arms are fitted in the intendedpoints on the car's underbody.
NOTE
Volvo recommends only using the jack that belongs to the car model in question. If ajack is selected other than the one recom-mended by Volvo, follow the instructionssupplied with the equipment.
ProCarManuals.co’
Page 344 of 442
||
10 Maintenance and service
10
342
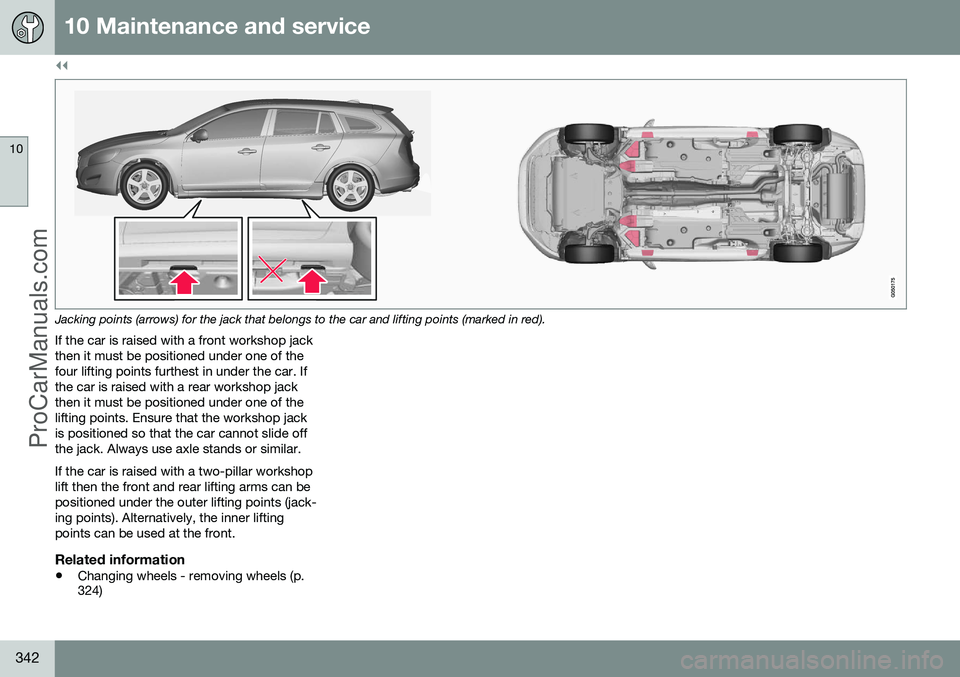
Jacking points (arrows) for the jack that belongs to the car and lifting points (marked in red).
If the car is raised with a front workshop jack then it must be positioned under one of thefour lifting points furthest in under the car. Ifthe car is raised with a rear workshop jackthen it must be positioned under one of thelifting points. Ensure that the workshop jackis positioned so that the car cannot slide offthe jack. Always use axle stands or similar. If the car is raised with a two-pillar workshop lift then the front and rear lifting arms can bepositioned under the outer lifting points (jack-ing points). Alternatively, the inner liftingpoints can be used at the front.
Related information
• Changing wheels - removing wheels (p. 324)
ProCarManuals.co’
Page 345 of 442
10 Maintenance and service
10
343
Bonnet - opening and closing
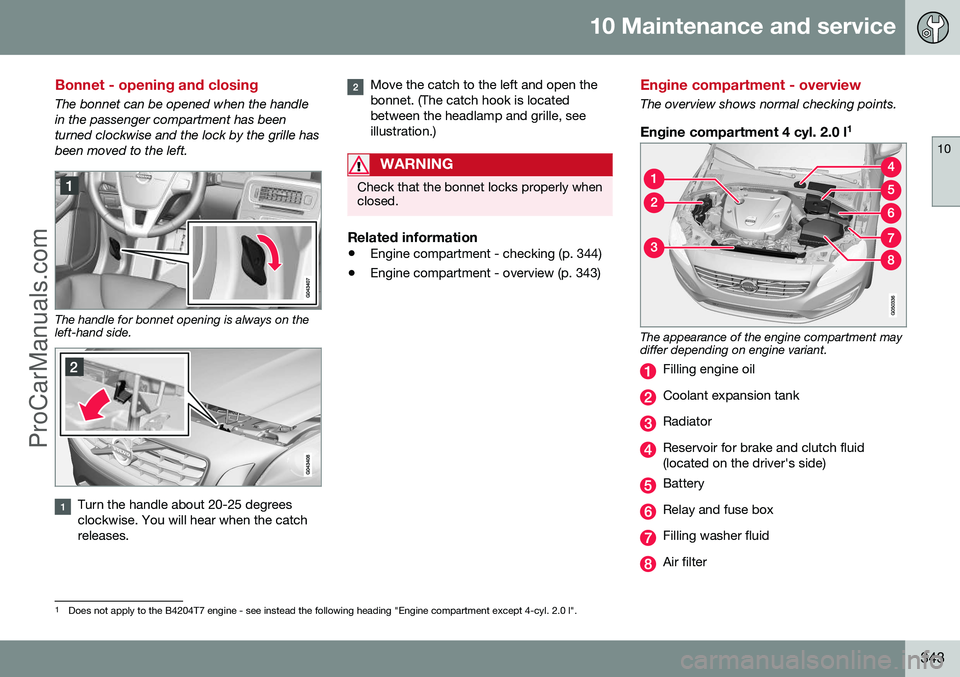
The bonnet can be opened when the handle in the passenger compartment has beenturned clockwise and the lock by the grille hasbeen moved to the left.
The handle for bonnet opening is always on the left-hand side.
Turn the handle about 20-25 degrees clockwise. You will hear when the catchreleases.
Move the catch to the left and open the bonnet. (The catch hook is locatedbetween the headlamp and grille, seeillustration.)
WARNING
Check that the bonnet locks properly when closed.
Related information
•Engine compartment - checking (p. 344)
• Engine compartment - overview (p. 343)
Engine compartment - overview
The overview shows normal checking points.
Engine compartment 4 cyl. 2.0 l 1
The appearance of the engine compartment may differ depending on engine variant.
Filling engine oil
Coolant expansion tank
Radiator
Reservoir for brake and clutch fluid (located on the driver's side)
Battery
Relay and fuse box
Filling washer fluid
Air filter
1
Does not apply to the B4204T7 engine - see instead the following heading "Engine compartment except 4-cyl. 2.0 l".
ProCarManuals.co’
Page 346 of 442
||
10 Maintenance and service
10
344
WARNING
The ignition system has very high voltage and output. The voltage in the ignition sys-tem is highly dangerous. The car's electri-cal system must always be in key position0 when work is being performed in the
engine compartment; see Key positions -functions at different levels (p. 70). Do not touch the spark plugs or ignition coil when the car's electrical system is inkey position II or when the engine is hot.
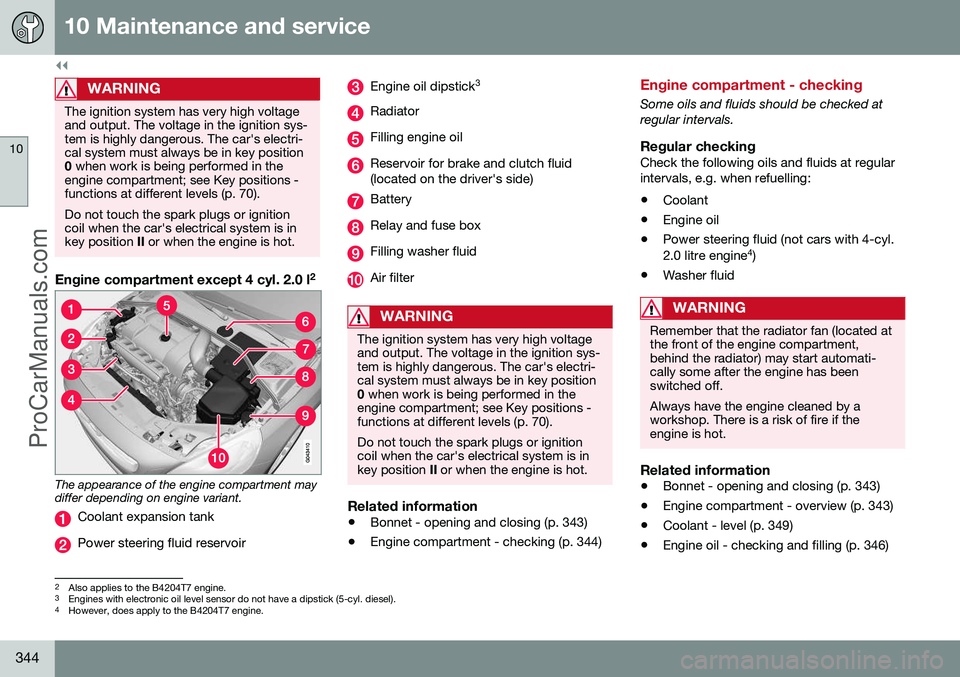
Engine compartment except 4 cyl. 2.0 l 2
The appearance of the engine compartment may differ depending on engine variant.
Coolant expansion tank
Power steering fluid reservoir
Engine oil dipstick
3
Radiator
Filling engine oil
Reservoir for brake and clutch fluid (located on the driver's side)
Battery
Relay and fuse box
Filling washer fluid
Air filter
WARNING
The ignition system has very high voltage and output. The voltage in the ignition sys-tem is highly dangerous. The car's electri-cal system must always be in key position0
when work is being performed in the
engine compartment; see Key positions -functions at different levels (p. 70). Do not touch the spark plugs or ignition coil when the car's electrical system is inkey position II or when the engine is hot.
Related information
• Bonnet - opening and closing (p. 343)
• Engine compartment - checking (p. 344)
Engine compartment - checking
Some oils and fluids should be checked at regular intervals.
Regular checkingCheck the following oils and fluids at regularintervals, e.g. when refuelling:
• Coolant
• Engine oil
• Power steering fluid (not cars with 4-cyl. 2.0 litre engine 4
)
• Washer fluid
WARNING
Remember that the radiator fan (located at the front of the engine compartment,behind the radiator) may start automati-cally some after the engine has beenswitched off. Always have the engine cleaned by a workshop. There is a risk of fire if theengine is hot.
Related information
• Bonnet - opening and closing (p. 343)
• Engine compartment - overview (p. 343)
• Coolant - level (p. 349)
• Engine oil - checking and filling (p. 346)
2
Also applies to the B4204T7 engine.3 Engines with electronic oil level sensor do not have a dipstick (5-cyl. diesel).
4 However, does apply to the B4204T7 engine.
ProCarManuals.co’
Page 347 of 442
10 Maintenance and service
10
345
•
Power steering fluid - level (p. 351)
• Washer fluid - filling (p. 361)
Engine oil - general
An approved engine oil must be used in order that the recommended service intervals canbe applied.
Volvo recommends:
When driving under adverse conditions, see Engine oil - adverse driving conditions (p.395).
IMPORTANT
In order to fulfil the requirements for the engine's service intervals all engines arefilled with a specially adapted syntheticengine oil at the factory. The choice of oilhas been made very carefully with regardto service life, starting characteristics, fuelconsumption and environmental impact. An approved engine oil must be used in order that the recommended service inter-vals can be applied. Only use a prescribedgrade of oil for both filling and oil change,otherwise you will risk affecting service life,starting characteristics, fuel consumptionand environmental impact. Volvo Car Corporation disclaims all war- ranty liability if engine oil of the prescribedgrade and viscosity is not used. Volvo recommends that oil changes are carried out at an authorised Volvo work-shop.
Volvo uses different systems for warning of low/high oil level or low/high oil pressure.Certain engine variants have an oil pressuresensor, and then the combined instrumentpanel's warning symbol for low oil pressure isused. Other variants have an oil level sensor,when the driver is informed via the instru- ment's warning symbol
and display
ProCarManuals.co’
Page 348 of 442

||
10 Maintenance and service
10
346
texts. Certain variants have both systems. Contact a Volvo dealer for more information. Change the engine oil and oil filter in accord- ance with the intervals specified in the Serv-ice and Warranty Booklet. Using oil of a higher than specified grade is permitted. If the car is driven in adverse con-ditions, Volvo recommends using an oil of ahigher grade; see Engine oil - adverse drivingconditions (p. 395). For filling capacities, see Engine oil - grade and volume (p. 396).
Related information
•Engine oil - checking and filling (p. 346)
Engine oil - checking and filling
The oil level is checked on certain engine vari- ants with the electronic oil level sensor, onother engine variants with the oil dipstick.
Engine with oil dipstick 5
G021734
Dipstick and filler pipe. Checking the oil level in a new car is espe- cially important before the first scheduled oilchange. Volvo recommends checking the oil level every 2 500 km. The most accurate measure-ments are made on a cold engine before star-ting. The measurement will be inaccurate iftaken immediately after the engine isswitched off. The dipstick will indicate thatthe level is too low because the oil has nothad time to flow down into the oil sump.
G021737
The oil level must be between the
MIN and MAX
marks.
Measurement and filling if required1. Ensure that the car is level. After switch-
ing off the engine it is important to wait 5 minutes to allow the oil time to run backto the sump.
2. Pull up and wipe the dipstick.
3. Re-insert the dipstick.
4. Pull it out and check the level.
5. If the level is close to MIN then 0.5 litres
should be added. If the level is signifi- cantly below, then an additional amountis required.
6. If required, check the level again, do it after driving a short distance. Then repeatsteps 1-4.
5Does not apply to the 4-cyl. 2.0 litre or 5-cyl. diesel, which have electronic oil level sensor. However, does apply to the B4204T7 engine.
ProCarManuals.co’
Page 349 of 442
10 Maintenance and service
10
}}
347
WARNING
Never fill above the MAX mark. The level
should never be above MAX or below MIN
as this could lead to engine damage.
WARNING
Do not spill oil onto the hot exhaust mani- fold due to the risk of fire.
Engine with electronic oil level sensor, 4-cyl. 2.0 l 6
Filler pipe.
7
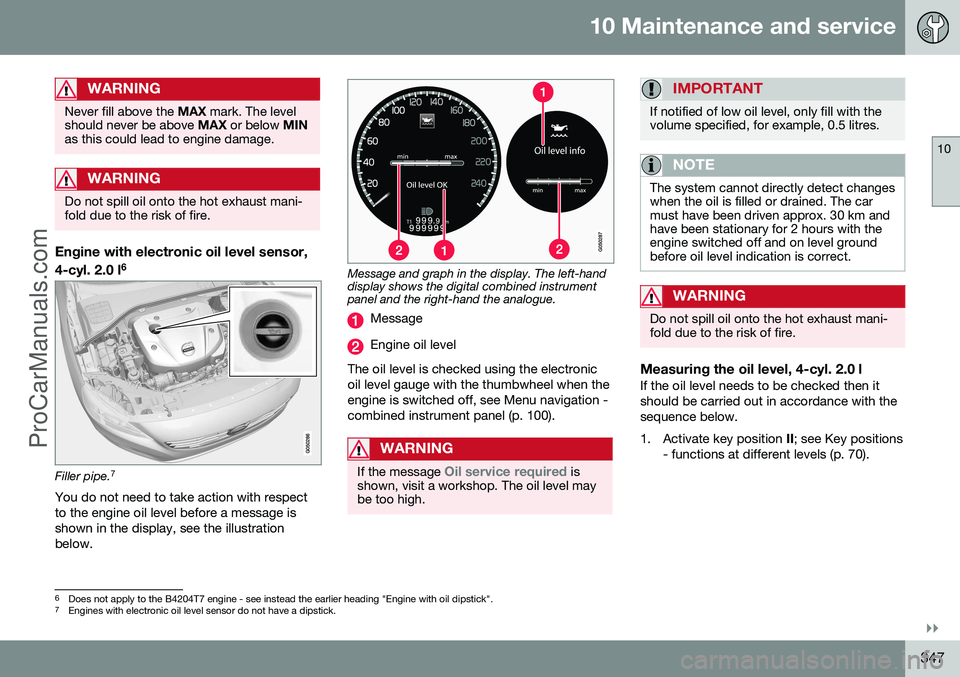
You do not need to take action with respect to the engine oil level before a message isshown in the display, see the illustrationbelow.
Message and graph in the display. The left-hand display shows the digital combined instrumentpanel and the right-hand the analogue.
Message
Engine oil level
The oil level is checked using the electronic oil level gauge with the thumbwheel when theengine is switched off, see Menu navigation -combined instrument panel (p. 100).
WARNING
If the message Oil service required is
shown, visit a workshop. The oil level may be too high.
IMPORTANT
If notified of low oil level, only fill with the volume specified, for example, 0.5 litres.
NOTE
The system cannot directly detect changes when the oil is filled or drained. The carmust have been driven approx. 30 km andhave been stationary for 2 hours with theengine switched off and on level groundbefore oil level indication is correct.
WARNING
Do not spill oil onto the hot exhaust mani- fold due to the risk of fire.
Measuring the oil level, 4-cyl. 2.0 lIf the oil level needs to be checked then it should be carried out in accordance with thesequence below.
1. Activate key position II; see Key positions
- functions at different levels (p. 70).
6 Does not apply to the B4204T7 engine - see instead the earlier heading "Engine with oil dipstick".7
Engines with electronic oil level sensor do not have a dipstick.
ProCarManuals.co’
Page 350 of 442
||
10 Maintenance and service
10
348
2. Rotate the thumbwheel on the left-handstalk switch to position Oil level.
> You will then see information displayed about the engine oil level. For more information on menu naviga- tion, see Menu navigation - combinedinstrument panel (p. 100).
NOTE
If the right conditions for measuring the oil level are not met (time after engine shut-down, the car's inclination, outside tem- perature, etc.) then the message
Not
available will be shown. This does not
mean that there is something wrong in the car's systems.
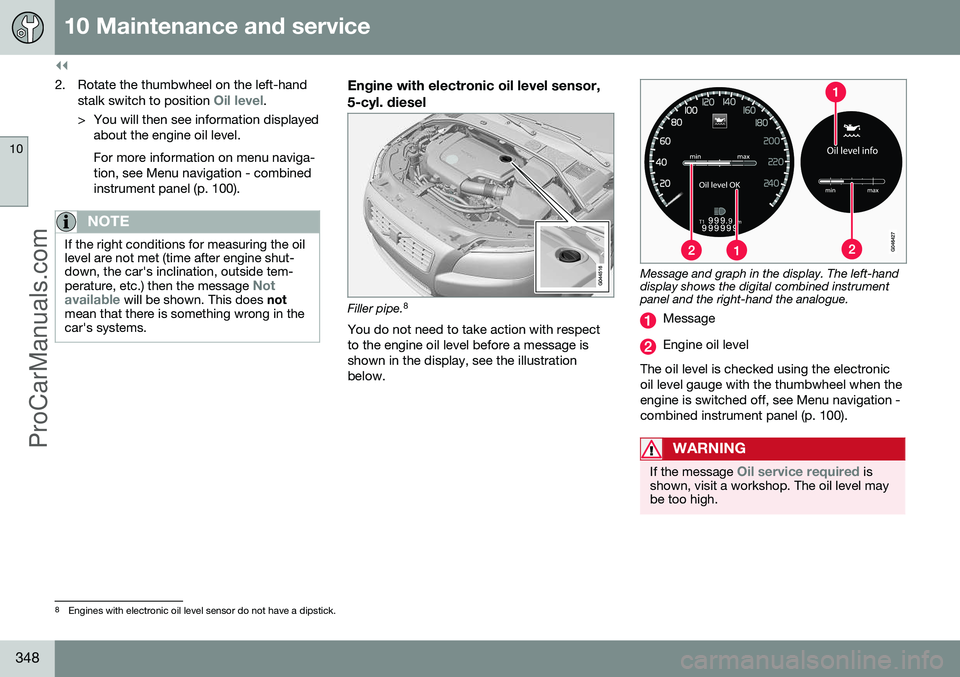
Engine with electronic oil level sensor, 5-cyl. diesel
Filler pipe. 8
You do not need to take action with respect to the engine oil level before a message isshown in the display, see the illustrationbelow.
Message and graph in the display. The left-hand display shows the digital combined instrumentpanel and the right-hand the analogue.
Message
Engine oil level
The oil level is checked using the electronic oil level gauge with the thumbwheel when theengine is switched off, see Menu navigation -combined instrument panel (p. 100).
WARNING
If the message Oil service required is
shown, visit a workshop. The oil level may be too high.
8 Engines with electronic oil level sensor do not have a dipstick.
ProCarManuals.co’