VOLVO V90 CROSS COUNTRY 2021 Owners Manual
Manufacturer: VOLVO, Model Year: 2021, Model line: V90 CROSS COUNTRY, Model: VOLVO V90 CROSS COUNTRY 2021Pages: 683, PDF Size: 14.19 MB
Page 591 of 683

MAINTENANCE AND SERVICE
}}
* Option/accessory.589
Hoisting the vehicle
When hoisting the vehicle, it is important that the jack is positioned on the designatedpoints under the vehicle.
The triangles in the plastic covering indicate where the jack attachment points/lifting points (red areas) are located.
NOTE
For vehicles with Leveling Control* : If the
vehicle is equipped with pneumatic sus- pension, this feature must be turned offbefore the vehicle is lifted onto a tow truck.
NOTE
Volvo recommends only using the jack intended for your specific vehicle model. Ifa jack other than that recommended byVolvo is used, follow the instructionsincluded with the equipment.
The vehicle's ordinary jack is only intended to be used in temporary situations for shortperiods of time, such as when changingwheels in the event of a flat tire. If the vehi-cle needs to be lifted more frequently, orfor a longer period of time than for a wheelchange, a garage jack or hoist is recom-mended. Always follow the instructions foruse provided with the equipment.
Page 592 of 683

||
MAINTENANCE AND SERVICE
* Option/accessory.
590
WARNING
Apply the parking brake and put the gear selector in the Park (
P) position.
Block the wheels standing on theground, use rigid wooden blocks orlarge stones.
Check that the jack is not damaged,the threads are properly lubricated andit is free from dirt.
Be sure the jack is on a firm, level, non-slippery surface and that it is uprightand not leaning.
The jack must correctly engage in thejack attachment.
No objects should be placed betweenthe base of the jack and the ground, orbetween the jack and the attachmentbar on the vehicle.
Never let anyone remain in the vehiclewhen it is raised on a jack.
If a tire must be changed near passingtraffic, make sure all passengers moveto a safe location.
Use a jack intended for the vehiclewhen changing a tire. For any otherjob, use stands to support the vehicle.
Never crawl under or allow any part of your body to be extended under a vehi-cle supported by a jack.
WARNING
If the vehicle is lifted on a garage jack, the jack must be placed under one of the fourlifting points. Make sure that the vehicle iscorrectly positioned on the jack and that itcannot slide off. Make sure the jack platehas a rubber pad to help keep the vehiclestable and prevent damage. Always useaxle stands or similar.
When not in use, the jack * should be kept in
its storage compartment under the cargo compartment floor. Read through all instructions before starting. Before raising the vehicle using a jack or lift,take out all the tools you will need.
1. Turn on the vehicle's hazard warning flashers if e.g. a wheel change must be performed in an area with traffic.
2. Apply the parking brake and put the gear selector in P, or first gear if the vehicle has
a manual transmission. If the vehicle is equipped with
Leveling
Control* , this feature must be turned off
before the vehicle is lifted onto a tow truck. 3. Place chocks in front of and behind the
wheels that are still on the ground. Forexample, use heavy wooden blocks orlarge stones.
4. Position the jack or garage lift arms at the designated points under the vehicle. Thetriangle markings on the plastic cover indi-cate where the jack attachment points/lift-ing points are located. There are two jackattachment points on each side of thevehicle. There is a groove for the jack ateach attachment point.
5. Position the jack under the attachmentpoint being used, ensuring that the sur- face is firm, flat and not slippery.
Page 593 of 683

MAINTENANCE AND SERVICE
* Option/accessory.591
6. Crank it up until it is properly aligned and
it is in contact with the vehicle's jack attachment point. Make sure the top ofthe jack (or the garage lift arms) is cor-rectly positioned in the attachment point,with the bump on the top of the jack in therecess in the attachment point and itsbase positioned vertically under theattachment point.
7. Turn the jack so that the crank is as far as possible from the side of the vehicle,which will position the jack's arms per-pendicular to the vehicle's direction ofmovement.
8. Raise the vehicle to a suitable height for the operation to be performed.
Related information
Jack
* (p. 551)
Wheel bolts (p. 551)
Tool kit (p. 550)
Leveling control settings
* (p. 432)
Page 594 of 683

MAINTENANCE AND SERVICE
* Option/accessory.
592
Climate control system service
Service and repairs on the air conditioning system should only be done by an authorizedworkshop.
Troubleshooting and repairsThe air conditioning system contains a fluores- cent tracer substance. Ultraviolet light is usedto search for leaks in the system. Volvo recommends contacting an authorized Volvo workshop. The climate system in the vehicle uses a freon- free R1234yf refrigerant. For informationregarding the refrigerant, refer to the decallocated on the inside of the hood.
WARNING
The air conditioning system contains the refrigerant R1234yf under pressure. Inaccordance with SAE J2845 (TechnicianTraining for Safe Service and Containmentof Refrigerants Used in Mobile A/C Sys-tem), service and repairs to the refrigerantsystem may only be performed by trainedand certified technicians in order to ensurethe safety of the system.
Related information
Volvo's service program (p. 582)
Replacing a windshield with head- up display
*
Vehicles with a head-up display have a spe- cial type of windshield that meets therequirements for displaying projected infor-mation.
Volvo recommends contacting an authorized Volvo workshop for assistance replacing thewindshield. The correct type of replacementwindshield must be used in order for the head-up display to function properly.
Related information
Head-up display
* (p. 146)
Cleaning the head-up display
* and instru-
ment panel (p. 630)
Opening and closing the hood
To open the hood, pull the lever in the pas- senger compartment and then turn the han-dle under the hood.
Opening the hood
Pull the handle to the left of the brake pedal to release the hood from its fullyclosed position.
Page 595 of 683

MAINTENANCE AND SERVICE
593
Turn the handle under the front edge of the hood counterclockwise to release thecatch and lift the hood.
Warning - hood not closedWhen the hood is released, a warn-ing symbol and graphic will be dis-played in the instrument panel andan audible signal will sound. If the
vehicle begins to roll, the audible signal will berepeated several times.
NOTE
If the warning symbol is illuminated or an audible warning signal sounds even thoughthe hood is securely closed, consult aworkshop - an authorized Volvo workshopis recommended.
Closing the hood1. Press down the hood until it begins to close under its own weight.
2. When the hood reaches the catch at the handle in the front edge of the vehicle, press down on the hood to close it com-pletely.
WARNING
Risk of injury! When closing, make sure that the hood is completely unobstructedand that no one can be injured.
WARNING
Make sure the hood locks securely after closing. It must audibly lock on both sides.
Hood not completely closed.
Hood completely closed.
WARNING
Never drive with the hood open! If this symbol appears, or anything else indicatesthat the hood is not com-pletely closed while driv-ing, stop immediately and
close it properly.
Related information
Engine compartment overview (p. 594)
Door and seat belt reminders (p. 54)
Page 596 of 683

MAINTENANCE AND SERVICE
594
Engine compartment overview
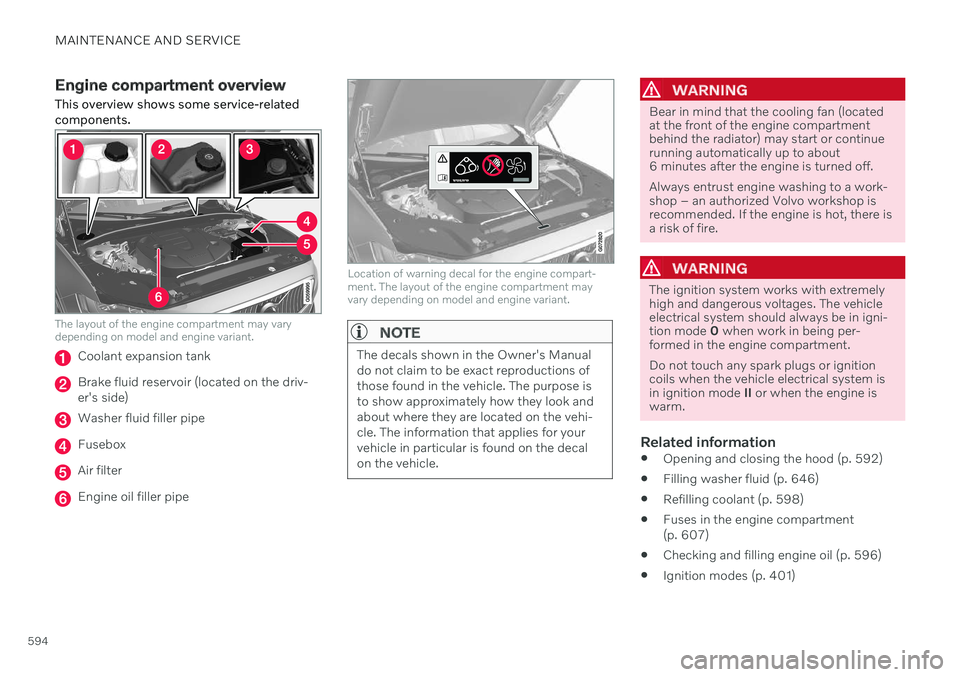
This overview shows some service-related components.
The layout of the engine compartment may vary depending on model and engine variant.
Coolant expansion tank
Brake fluid reservoir (located on the driv- er's side)
Washer fluid filler pipe
Fusebox
Air filter
Engine oil filler pipe
Location of warning decal for the engine compart- ment. The layout of the engine compartment mayvary depending on model and engine variant.
NOTE
The decals shown in the Owner's Manual do not claim to be exact reproductions ofthose found in the vehicle. The purpose isto show approximately how they look andabout where they are located on the vehi-cle. The information that applies for yourvehicle in particular is found on the decalon the vehicle.
WARNING
Bear in mind that the cooling fan (located at the front of the engine compartmentbehind the radiator) may start or continuerunning automatically up to about6 minutes after the engine is turned off. Always entrust engine washing to a work- shop – an authorized Volvo workshop isrecommended. If the engine is hot, there isa risk of fire.
WARNING
The ignition system works with extremely high and dangerous voltages. The vehicleelectrical system should always be in igni-tion mode 0 when work in being per-
formed in the engine compartment. Do not touch any spark plugs or ignition coils when the vehicle electrical system isin ignition mode II or when the engine is
warm.
Related information
Opening and closing the hood (p. 592)
Filling washer fluid (p. 646)
Refilling coolant (p. 598)
Fuses in the engine compartment (p. 607)
Checking and filling engine oil (p. 596)
Ignition modes (p. 401)
Page 597 of 683

MAINTENANCE AND SERVICE
}}
595
Engine oil For the recommended service intervals and warranties to be applied, an approved engineoil must be used.
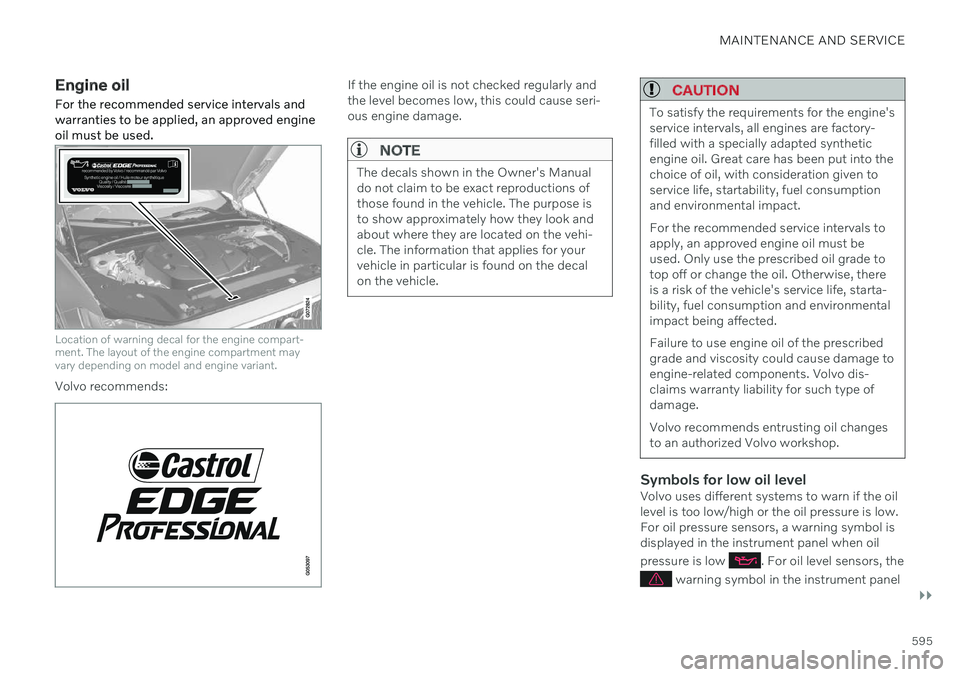
Location of warning decal for the engine compart- ment. The layout of the engine compartment mayvary depending on model and engine variant.
Volvo recommends:
If the engine oil is not checked regularly and the level becomes low, this could cause seri-ous engine damage.
NOTE
The decals shown in the Owner's Manual do not claim to be exact reproductions ofthose found in the vehicle. The purpose isto show approximately how they look andabout where they are located on the vehi-cle. The information that applies for yourvehicle in particular is found on the decalon the vehicle.
CAUTION
To satisfy the requirements for the engine's service intervals, all engines are factory-filled with a specially adapted syntheticengine oil. Great care has been put into thechoice of oil, with consideration given toservice life, startability, fuel consumptionand environmental impact. For the recommended service intervals to apply, an approved engine oil must beused. Only use the prescribed oil grade totop off or change the oil. Otherwise, thereis a risk of the vehicle's service life, starta-bility, fuel consumption and environmentalimpact being affected. Failure to use engine oil of the prescribed grade and viscosity could cause damage toengine-related components. Volvo dis-claims warranty liability for such type ofdamage. Volvo recommends entrusting oil changes to an authorized Volvo workshop.
Symbols for low oil levelVolvo uses different systems to warn if the oil level is too low/high or the oil pressure is low.For oil pressure sensors, a warning symbol isdisplayed in the instrument panel when oil pressure is low
. For oil level sensors, the
warning symbol in the instrument panel
Page 598 of 683

||
MAINTENANCE AND SERVICE
596and display messages are used to alert the driver. Some engine variants have both sys-tems. Contact a Volvo retailer for more infor-mation. Change the engine oil and oil filter according to the schedule specified in the Warranty andMaintenance Records Information booklet.Oils of a higher grade than that specified maybe used. If the vehicle is driven in adverse con-ditions, Volvo recommends using an oil with ahigher grade than that specified.
Related information
Checking and filling engine oil (p. 596)
Engine oil specifications (p. 658)
Volvo Cars support site (p. 21)
Checking and filling engine oil
The engine oil level is monitored by an elec- tronic oil level sensor.
Viewing oil level in the center display
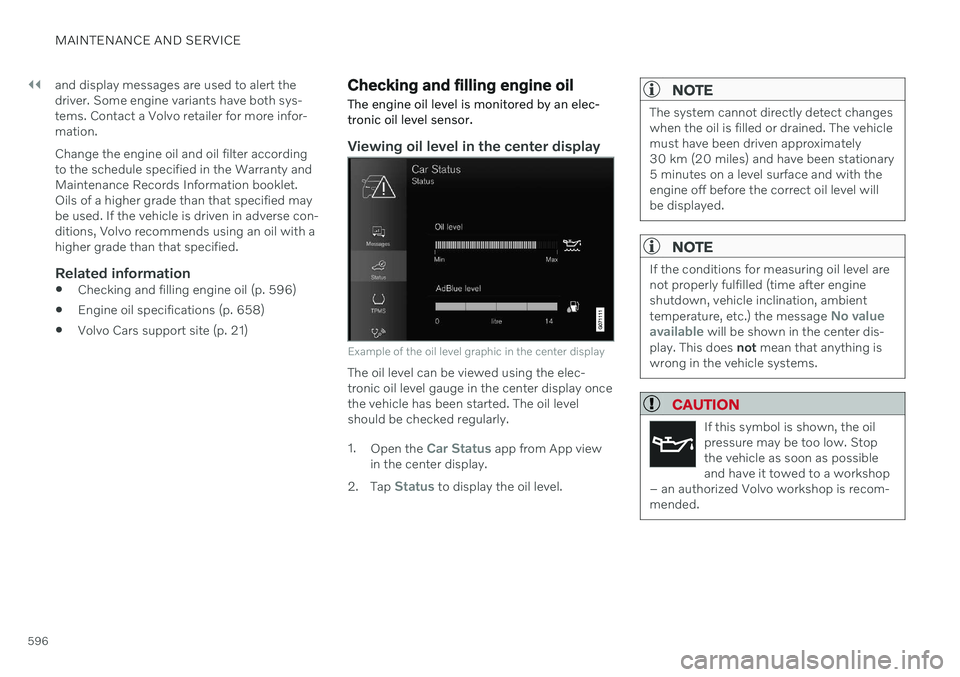
Example of the oil level graphic in the center display
The oil level can be viewed using the elec- tronic oil level gauge in the center display oncethe vehicle has been started. The oil levelshould be checked regularly. 1. Open the
Car Status app from App view
in the center display.
2. Tap
Status to display the oil level.
NOTE
The system cannot directly detect changes when the oil is filled or drained. The vehiclemust have been driven approximately30 km (20 miles) and have been stationary5 minutes on a level surface and with theengine off before the correct oil level willbe displayed.
NOTE
If the conditions for measuring oil level are not properly fulfilled (time after engineshutdown, vehicle inclination, ambient temperature, etc.) the message
No value
available will be shown in the center dis-
play. This does not mean that anything is
wrong in the vehicle systems.
CAUTION
If this symbol is shown, the oil pressure may be too low. Stopthe vehicle as soon as possibleand have it towed to a workshop
– an authorized Volvo workshop is recom-mended.
Page 599 of 683

MAINTENANCE AND SERVICE
597
Filling engine oil
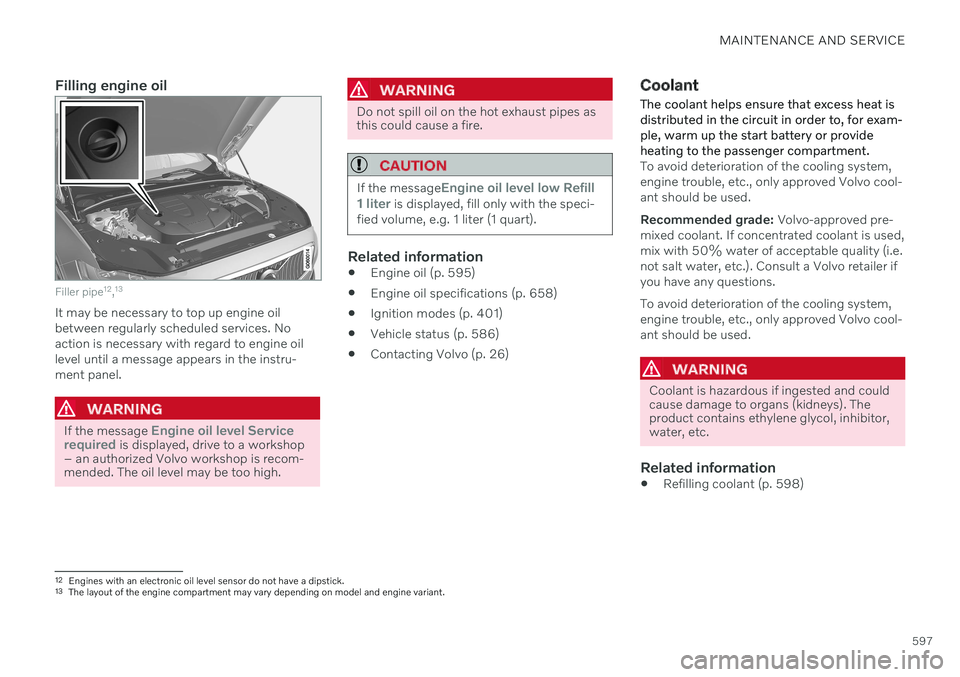
Filler pipe12
,13
It may be necessary to top up engine oil between regularly scheduled services. Noaction is necessary with regard to engine oillevel until a message appears in the instru-ment panel.
WARNING
If the message Engine oil level Service
required is displayed, drive to a workshop
– an authorized Volvo workshop is recom- mended. The oil level may be too high.
WARNING
Do not spill oil on the hot exhaust pipes as this could cause a fire.
CAUTION
If the messageEngine oil level low Refill
1 liter is displayed, fill only with the speci-
fied volume, e.g. 1 liter (1 quart).
Related information
Engine oil (p. 595)
Engine oil specifications (p. 658)
Ignition modes (p. 401)
Vehicle status (p. 586)
Contacting Volvo (p. 26)
Coolant
The coolant helps ensure that excess heat is distributed in the circuit in order to, for exam-ple, warm up the start battery or provideheating to the passenger compartment.
To avoid deterioration of the cooling system, engine trouble, etc., only approved Volvo cool-ant should be used. Recommended grade: Volvo-approved pre-
mixed coolant. If concentrated coolant is used, mix with 50% water of acceptable quality (i.e.not salt water, etc.). Consult a Volvo retailer ifyou have any questions. To avoid deterioration of the cooling system, engine trouble, etc., only approved Volvo cool-ant should be used.
WARNING
Coolant is hazardous if ingested and could cause damage to organs (kidneys). Theproduct contains ethylene glycol, inhibitor,water, etc.
Related information
Refilling coolant (p. 598)
12
Engines with an electronic oil level sensor do not have a dipstick.
13 The layout of the engine compartment may vary depending on model and engine variant.
Page 600 of 683

MAINTENANCE AND SERVICE
598
Refilling coolant
When refilling coolant, follow the instructions on the package. Never fill the cooling systemwith only water. The risk of freezing isincreased with too low or too high amountsof coolant.
If there is coolant under the vehicle, smoke from the cooling system, or if more than2 liters (about 2 quarts) of coolant has beenadded to the system, there could be some-thing wrong with the cooling system and star-ting the vehicle could damage the engine. Calla tow truck and do not attempt to start theengine.
WARNING
The coolant may be very hot. Never unscrew the cap when the coolant is hot. Ifcoolant must be filled, unscrew the expan-sion tank cap slowly to relieve overpres-sure.
Coolant expansion tank, left-hand drive vehicle
Unscrew the cover in the plastic covering.
Unscrew the expansion tank cap and fill coolant as needed. The level should notexceed the yellow MAX mark inside the
expansion tank.
Put the components back in place in thereverse order.
CAUTION
Do not ingest the contents. May cause damage to organs (kidneys).
Use premixed coolant according toVolvo's recommendations. If concen-trated coolant is used, make sure thatthe coolant mixture is 50% coolantand 50% water of acceptable quality.
Do not mix different types of coolant.
To help ensure sufficient corrosion pro-tection in the system, only use newcoolant when replacing larger compo-nents in the cooling system.
Never run the engine unless the cool-ing system is properly filled. Animproperly filled cooling system couldlead to high temperatures and cracksin the cylinder heads.
High levels of chlorine, chlorides andother salts may cause corrosion in thecooling system.