VOLVO V90 CROSS COUNTRY 2021 Owners Manual
Manufacturer: VOLVO, Model Year: 2021, Model line: V90 CROSS COUNTRY, Model: VOLVO V90 CROSS COUNTRY 2021Pages: 683, PDF Size: 14.19 MB
Page 631 of 683
MAINTENANCE AND SERVICE
}}
* Option/accessory.629
Related information
Cleaning the center display (p. 629)
Cleaning fabric upholstery and ceiling liner (p. 630)
Cleaning the seat belt (p. 631)
Cleaning textile floor and inlay mats(p. 632)
Cleaning leather upholstery
* (p. 632)
Cleaning the leather steering wheel(p. 633)
Cleaning interior plastic, metal and woodsurfaces (p. 634)
Cleaning the center display
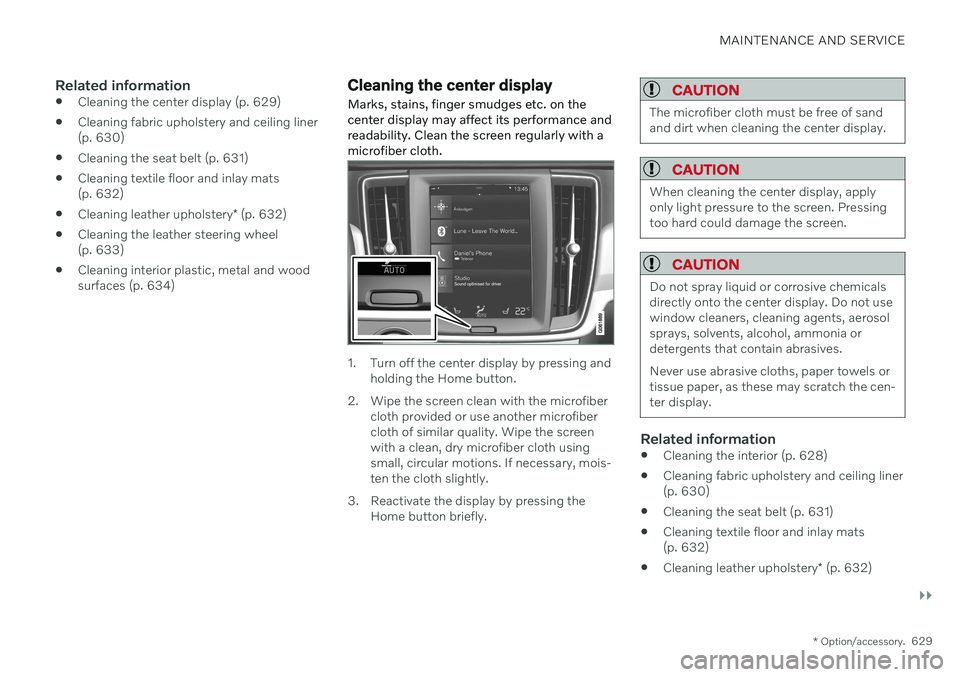
Marks, stains, finger smudges etc. on the center display may affect its performance andreadability. Clean the screen regularly with amicrofiber cloth.
1. Turn off the center display by pressing and holding the Home button.
2. Wipe the screen clean with the microfiber cloth provided or use another microfiber cloth of similar quality. Wipe the screenwith a clean, dry microfiber cloth usingsmall, circular motions. If necessary, mois-ten the cloth slightly.
3. Reactivate the display by pressing the Home button briefly.
CAUTION
The microfiber cloth must be free of sand and dirt when cleaning the center display.
CAUTION
When cleaning the center display, apply only light pressure to the screen. Pressingtoo hard could damage the screen.
CAUTION
Do not spray liquid or corrosive chemicals directly onto the center display. Do not usewindow cleaners, cleaning agents, aerosolsprays, solvents, alcohol, ammonia ordetergents that contain abrasives. Never use abrasive cloths, paper towels or tissue paper, as these may scratch the cen-ter display.
Related information
Cleaning the interior (p. 628)
Cleaning fabric upholstery and ceiling liner (p. 630)
Cleaning the seat belt (p. 631)
Cleaning textile floor and inlay mats(p. 632)
Cleaning leather upholstery
* (p. 632)
Page 632 of 683
MAINTENANCE AND SERVICE
* Option/accessory.
630
Cleaning the leather steering wheel (p. 633)
Cleaning interior plastic, metal and woodsurfaces (p. 634)
Cleaning the head-up display
* and
instrument panel
Carefully wipe the glass covering the head-up display unit with a clean and dry microfibercloth. If necessary, the cloth may be slightlymoistened.
Never use strong stain removers. For difficult cleaning conditions, a special cleaning agentcan be purchased at a Volvo retailer.
Related information
Activating and deactivating the head-up display
* (p. 147)
Head-up display
* (p. 146)
Cleaning fabric upholstery and ceiling liner
Use of textile cleaner is recommended when cleaning textile materials. Clean as neededand treat stains immediately.
CAUTION
Never scrape or rub a stain because this may damage the upholstery.
CAUTION
Never use stain removers or strong sol- vents because these may damage theupholstery.
Cleaning textile upholstery1. Start by vacuuming the upholstery.
2. Follow the instructions of the textile cleaner.
3. When cleaning upholstery, a spray extrac- tion cleaner is recommended for sucking up cleaning fluids and rinse water.
CAUTION
Certain dyed clothing (such as denim and suede garments) may stain the upholstery.Difficult stains, like oil, can be difficult toremove.
Page 633 of 683
MAINTENANCE AND SERVICE
* Option/accessory.631
CAUTION
Always clean all of the upholstery, even if it only has isolated stains. This helps to pre-vent permanent water rings.
NOTE
Do not remove the upholstery when clean- ing.
Cleaning the ceiling liner1. Carefully brush the ceiling liner using a
soft brush.
2. Follow the instructions of the textile cleaner.
3. Then use a soft, lint-free cloth to wipe the ceiling liner.
CAUTION
Failure to take care during cleaning could lead to damage to the ceiling liner.
Related information
Cleaning the interior (p. 628)
Cleaning the center display (p. 629)
Cleaning the seat belt (p. 631)
Cleaning textile floor and inlay mats (p. 632)
Cleaning leather upholstery
* (p. 632)
Cleaning the leather steering wheel(p. 633)
Cleaning interior plastic, metal and woodsurfaces (p. 634)
Cleaning the seat belt
Use cleaning agents and car care products recommended by Volvo. Clean regularly andtreat stains immediately. It is important tovacuum before using a cleaning agent.
Use water and a synthetic soap solution. Spe- cially designed textile cleaning agents areavailable for purchase at Volvo retailers. Makesure the belt is dry before it is retracted.
Related information
Cleaning the interior (p. 628)
Cleaning the center display (p. 629)
Cleaning fabric upholstery and ceiling liner(p. 630)
Cleaning textile floor and inlay mats(p. 632)
Cleaning leather upholstery
* (p. 632)
Cleaning the leather steering wheel(p. 633)
Cleaning interior plastic, metal and woodsurfaces (p. 634)
Page 634 of 683
MAINTENANCE AND SERVICE
* Option/accessory.
632
Cleaning textile floor and inlay mats
Use of textile cleaner is recommended when cleaning textile mats. Clean regularly andtreat stains immediately. It is important tovacuum before using a cleaning agent.
Remove the inlay mats to clean the floor mats and inlay mats separately. Each inlay mat issecured into place with pins.
1. Remove the inlay mat by grasping the inlay mat at each pin and lifting the mat straight up.
2. Use a vacuum to remove dust and dirt.
NOTE
Do not swing or strike the inlay mats vio- lently against another object to remove dirtas this could damage the mats.
3. After vacuuming, a specially designed tex- tile cleaning agent should be used to remove stains on floor mats.
4. After cleaning, put the inlay mat back into place by pressing it in at each pin.
WARNING
Never use more than one inlay mat at a time on the driver's floor. If any othertype of floor mat is used, remove theoriginal mat from the driver's seat floorbefore driving. All types of mats mustbe securely anchored in the attach-ment points in the floor. Make sure thefloor mat does not impede the move-ment of the brake pedal or acceleratorpedal in any way, as this could be aserious safety hazard.
Volvo's floor mats are specially manu-factured for your vehicle. They must beproperly secured in the attachmentpoints in the floor to help ensure theycannot slide and become trappedunder the pedals.
Related information
Cleaning the interior (p. 628)
Cleaning the center display (p. 629)
Cleaning fabric upholstery and ceiling liner(p. 630)
Cleaning the seat belt (p. 631)
Cleaning leather upholstery
* (p. 632)
Cleaning the leather steering wheel(p. 633)
Cleaning interior plastic, metal and woodsurfaces (p. 634)
Cleaning leather upholstery
*
Use cleaning agents and car care products recommended by Volvo. Clean regularly andtreat stains immediately. It is important tovacuum before using a cleaning agent.
Volvo's leather upholstery * is treated to pro-
tect its original appearance. Over time, sun- light, grease, dirt, etc. could break down theprotective layer. This could result in scratchesand cracking. Leather upholstery * is a natural product that
changes and acquires a beautiful patina over time. Regular cleaning and treatments arerequired to preserve the qualities and color ofthe leather. Volvo offers a comprehensiveproduct, Volvo Leather Care KitWipes, forcleaning and treating leather upholstery.When used as directed, it helps preserve theleather's protective coating. For optimal results, Volvo recommends clean- ing and applying protective cream one to fourtimes a year (or more often as needed). VolvoLeather Care Kit 951 0251 and Volvo LeatherSoftener 943 7429 are available for purchaseat Volvo retailers.
Cleaning the leather upholstery1. Apply the leather cleaner to a damp sponge and squeeze it until the cleanerfoams.
Page 635 of 683
MAINTENANCE AND SERVICE
* Option/accessory.633
2. Move the sponge in circular motions to
apply the foam to the stain.
3. Dampen the stain thoroughly with the sponge. Let the sponge absorb the stain and do not rub.
4. Dry the stain using a soft towel and let the leather dry completely.
Protecting the leather upholstery1. Apply a small amount of leather protector to a cloth and then apply the protector tothe leather using light circular movements.
2. Let it dry for approximately 20 minutes. > Protecting the leather upholsterymakes it better able to withstand sun-light's harmful UV rays.
Related information
Cleaning the interior (p. 628)
Cleaning the center display (p. 629)
Cleaning fabric upholstery and ceiling liner(p. 630)
Cleaning the seat belt (p. 631)
Cleaning textile floor and inlay mats(p. 632)
Cleaning the leather steering wheel(p. 633)
Cleaning interior plastic, metal and wood surfaces (p. 634)
Cleaning the leather steering wheel
Use cleaning agents and car care products recommended by Volvo. Clean regularly andtreat stains immediately. It is important tovacuum before using a cleaning agent.
Leather needs to breathe. Never cover the leather steering wheel with a plastic protector.Volvo Leather Care Kit 951 0251 and LeatherSoftener 943 7429 are recommended forcleaning the leather steering wheel. First,remove dirt, dust, etc. with a damp sponge orcloth.
CAUTION
Sharp objects such as rings could damage the leather on the steering wheel.
Treating stains on the steering wheel:Type 1 (ink, wine, coffee, milk, sweat or blood)
–Use a soft cloth or sponge. Wipe the steering wheel using a solution of 5%ammonia. For blood stains, mix approxi-mately 2 dl (1 cup) of water with 25 g(one ounce) of salt and wipe the stain.
Type 2 (grease, oil, sauces or chocolate)
1. Same procedure as for Type 1 stains.
2. Finish by wiping the wheel with an absorbent paper or towel. Type 3
(dry dirt or dust)
1. Remove the dirt/dust using a soft brush.
2. Same procedure as for Type 1 stains.
Related information
Cleaning the interior (p. 628)
Cleaning the center display (p. 629)
Cleaning fabric upholstery and ceiling liner (p. 630)
Cleaning the seat belt (p. 631)
Cleaning textile floor and inlay mats(p. 632)
Cleaning leather upholstery
* (p. 632)
Cleaning interior plastic, metal and woodsurfaces (p. 634)
Page 636 of 683
MAINTENANCE AND SERVICE
* Option/accessory.
634
Cleaning interior plastic, metal and wood surfaces
Use cleaning agents and car care products recommended by Volvo. Clean regularly andtreat stains immediately.
A lightly dampened microfiber cloth is recom- mended for cleaning interior details and surfa-ces. These cloths are available for purchase atVolvo retailers. Never scrape or rub a stain. Never use strong stain removers.
CAUTION
Do not use solvent containing alcohol to clean the instrument panel glass.
CAUTION
Keep in mind that glossy surfaces can be easily scratched. Wipe these surfaces witha clean and dry microfiber cloth usingsmall, circular motions. If necessary, mois-ten the cloth lightly with clean water.
Related information
Cleaning the interior (p. 628)
Cleaning the center display (p. 629)
Cleaning fabric upholstery and ceiling liner (p. 630)
Cleaning the seat belt (p. 631)
Cleaning textile floor and inlay mats(p. 632)
Cleaning leather upholstery
* (p. 632)
Cleaning the leather steering wheel(p. 633)
Cleaning the exterior
The vehicle should be washed as soon as it becomes dirty. This makes the vehicle easierto clean because dirt does not attach asstrongly. It also reduces the risk of scratchesand keeps the vehicle looking new. Wash therims at a car wash or garage with an oil sepa-rator. Use a car washing detergent recom-mended by Volvo.
Related information
Cleaning the exterior (p. 634)
Polishing and waxing (p. 635)
Hand washing (p. 636)
Automatic car washes (p. 637)
High-pressure washing (p. 638)
Cleaning the wiper blades (p. 639)
Cleaning exterior plastic, rubber and trim components (p. 639)
Cleaning rims (p. 640)
Corrosion protection (p. 641)
Page 637 of 683
MAINTENANCE AND SERVICE
635
Polishing and waxing
Polish and wax the vehicle when the paint is dull or to provide extra protection. The vehicledoes not need to be polished until it is atleast a year old. However, it can be waxedduring the first year. Do not polish or wax thevehicle in direct sunlight. The surface of thevehicle should not be warmer than 45 °C(113 °F).
Wash and dry the vehicle very carefully before polishing or waxing. Removeasphalt and tar stains with asphaltremover or paint thinner. More stubbornstains can be removed with a grindingpaste designed for vehicle paint. Usecleaning agents recommended by Volvo.
Use polish first and then liquid or pastewax. Follow the instructions on the pack-age carefully. Many products contain bothpolish and wax.
A wide range of polymer-based waxes canbe purchased today. These waxes are easyto use and produce a long-lasting, high-gloss finish that protects the bodyworkagainst oxidation, road dirt and fading.
CAUTION
Never polish or wax initially matte exterior details on the vehicle. This could destroythe matte effect and make the surface per-manently shiny.
CAUTION
Avoid waxing and polishing plastic and rubber. If using degreaser on plastic and rubber, only rub (if necessary) with slight pressure.Use a soft sponge. Polishing glossy trim moldings can wear away or damage the glossy surface layer. Polish containing abrasives must not be used.
CAUTION
Use cleaning agents recommended by Volvo. Other treatments, such as preserva-tion, sealing, protection, luster sealing orsimilar, could damage the paintwork.Paintwork damage caused by such treat-ments are not covered by Volvo's warranty.
Related information
Cleaning the exterior (p. 634)
Hand washing (p. 636)
Automatic car washes (p. 637)
High-pressure washing (p. 638)
Cleaning the wiper blades (p. 639)
Cleaning exterior plastic, rubber and trim components (p. 639)
Cleaning rims (p. 640)
Corrosion protection (p. 641)
Page 638 of 683
MAINTENANCE AND SERVICE
* Option/accessory.
636
Hand washing
The vehicle should be washed as soon as it becomes dirty. This makes the vehicle easierto clean because dirt does not attach asstrongly. It also reduces the risk of scratchesand keeps the vehicle looking new. Wash thevehicle in a car wash or garage with an oilseparator and use car washing detergent.Use cleaning agents and car care productsrecommended by Volvo.
Important to keep in mind when handwashing your vehicle
Avoid washing the vehicle in direct sun- light. This could cause the detergent orwax to dry out and become abrasive.
Remove bird droppings from paintwork assoon as possible. It contains chemicalsthat affect and discolor paintwork veryquickly. Use e.g. soft paper or a spongesoaked in lots of water. Consult an author-ized Volvo workshop for assistanceremoving discoloration.
Hose down the underbody, including thewheel housings and bumper.
Hose down the entire vehicle and removeany loose dirt, droppings etc. to reducethe risk of scratches from washing. Do notspray directly onto locks.
If necessary, use cold degreaser on heavilysoiled surfaces. Note that in such casesthe surfaces must not be hot from the sun.
Wash using a sponge, car washing deter-gent and plenty of lukewarm water. Makesure that the sponge is clean. A dirtysponge can scratch the paint.
Clean the wiper blades with lukewarmsoap solution or car washing detergent.
Dry the vehicle using a clean, soft chamoisor a squeegee. Try not to let drops ofwater dry in strong sunlight. This couldcause water drying stains that may needto be polished out.
In areas with heavy industrial emissions,more frequent washing of the vehicle'sexterior is recommended.
Tar spots from asphalt may remain evenafter washing. Use a Volvo-recommendedtar remover to remove these spots afterwashing the vehicle.
WARNING
Always entrust engine washing to a work- shop. If the engine is hot, there is a risk offire.
CAUTION
Dirty headlights do not work as well. Clean them regularly, e.g. when refueling. Do not use corrosive cleaners. Use water and a non-abrasive sponge.
NOTE
Exterior lighting such as headlights and taillights may develop temporary conden-sation on the inside of the lens. This is nor-mal. All exterior lighting is designed toresist this. Condensation is normally ven-ted out of the lamp housing once the lighthas been lit for some period of time.
CAUTION
Make sure that the panoramic roof
*
and sun shade are closed before wash- ing the vehicle.
Never use abrasive polishing agents onthe panoramic roof.
Never use wax on the rubber sealsaround the panoramic roof.
Page 639 of 683
MAINTENANCE AND SERVICE
}}
637
CAUTION
Remember to remove dirt from the drain holes in the doors and sills after washingthe vehicle.
Related information
Cleaning the exterior (p. 634)
Polishing and waxing (p. 635)
Automatic car washes (p. 637)
High-pressure washing (p. 638)
Cleaning the wiper blades (p. 639)
Cleaning exterior plastic, rubber and trim components (p. 639)
Cleaning rims (p. 640)
Corrosion protection (p. 641)
Settings for automatically activating theparking brake (p. 408)
Automatic car washes
The vehicle should be washed as soon as it becomes dirty. The longer the dirt remains,the more difficult it will be to keep the vehicleclean. It could also lead to paint damage.
Washing your vehicle in an automatic car wash is a fast and easy way to keep your vehi-cle clean, but it does not reach all areas of thevehicle. Volvo recommends washing yourvehicle by hand or supplementing automaticcar washes with a hand wash.
NOTE
Volvo recommends not washing the vehi- cle in an automatic car wash during thefirst few months; the paintwork on newvehicles takes some time to fully harden.
CAUTION
Before driving the vehicle into a car wash, deactivate the Automatic Braking whenStationary and Automatic Parking BrakeApplication functions. If the functions arenot deactivated, the brake system willseize when the vehicle is stationary and thevehicle will not be able to roll.
CAUTION
For automatic car washes in which the vehicle is pulled forward on rolling wheels:
1. Before washing the vehicle, make sure that the automatic rain sensor is deac- tivated. If it is not deactivated andinadvertently starts, the wiper armscould be damaged.
2. To help prevent damage from the auto- matic car wash machinery, make surethat the door mirrors are folded in,antennas retracted or removed, andany auxiliary lights secured.
3. Drive into the automatic car wash.
4. Turn off the "Automatic Braking when Stationary" function using the
but-
ton in the tunnel console.
5. Turn off the "Automatic Parking Brake Application" function in the center dis- play's Top view.
6. Turn off the engine by turning the start knob in the tunnel console clockwise.Hold the knob in position for at least2 seconds.
The vehicle is now ready for the automaticcar wash.
Page 640 of 683
||
MAINTENANCE AND SERVICE
* Option/accessory.
638
CAUTION
The system will automatically change to P
mode if the above steps are not followed. In P mode, the wheels are locked, which
they should not be when the vehicle isbeing washed in a car wash.
NOTE
Keep in mind that if the vehicle is equipped with the keyless locking and unlocking function *, the doors and tailgate/trunk lid
may open when washing the vehicle if the remote key is within range.
Testing the brakes
WARNING
Always test the brakes after washing the vehicle, including the parking brake, toensure moisture and corrosion do notattach the brake pads and impair brakefunctionality.
Lightly depress the brake pedal from time to time when driving long distances in rain orslush. The heat from the friction will helpwarm up and dry the brake pads. Do the sameafter starting the vehicle in very damp or coldweather.
Related information
Cleaning the exterior (p. 634)
Polishing and waxing (p. 635)
Hand washing (p. 636)
High-pressure washing (p. 638)
Cleaning the wiper blades (p. 639)
Cleaning exterior plastic, rubber and trimcomponents (p. 639)
Cleaning rims (p. 640)
Corrosion protection (p. 641)
Auto-hold brakes (p. 409)
Settings for automatically activating theparking brake (p. 408)
Keyless and touch-sensitive surfaces
*
(p. 262)
High-pressure washing The vehicle should be washed as soon as it becomes dirty. The longer the dirt remains,the more difficult it will be to keep the vehicleclean. It could also lead to paint damage.Wash the vehicle in a car wash or garagewith an oil separator. Use a car washingdetergent recommended by Volvo.
If washing the vehicle with a high-pressure wash, use sweeping movements and keep thenozzle at least 30 cm (13 in.) from the vehicle.Do not spray directly onto locks.
Related information
Cleaning the exterior (p. 634)
Polishing and waxing (p. 635)
Hand washing (p. 636)
Automatic car washes (p. 637)
Cleaning the wiper blades (p. 639)
Cleaning exterior plastic, rubber and trimcomponents (p. 639)
Cleaning rims (p. 640)
Corrosion protection (p. 641)