VOLVO V90 CROSS COUNTRY 2021 Owners Manual
Manufacturer: VOLVO, Model Year: 2021, Model line: V90 CROSS COUNTRY, Model: VOLVO V90 CROSS COUNTRY 2021Pages: 683, PDF Size: 14.19 MB
Page 621 of 683
MAINTENANCE AND SERVICE
}}
619
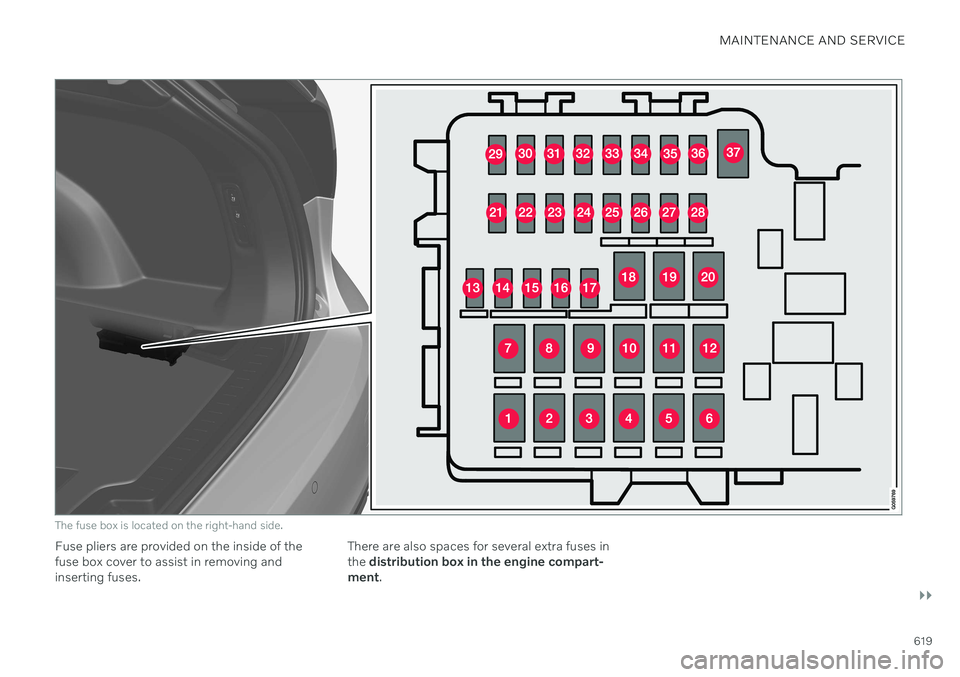
The fuse box is located on the right-hand side.
Fuse pliers are provided on the inside of the fuse box cover to assist in removing andinserting fuses.There are also spaces for several extra fuses inthe
distribution box in the engine compart-
ment .
Page 622 of 683
||
MAINTENANCE AND SERVICE
* Option/accessory.
620
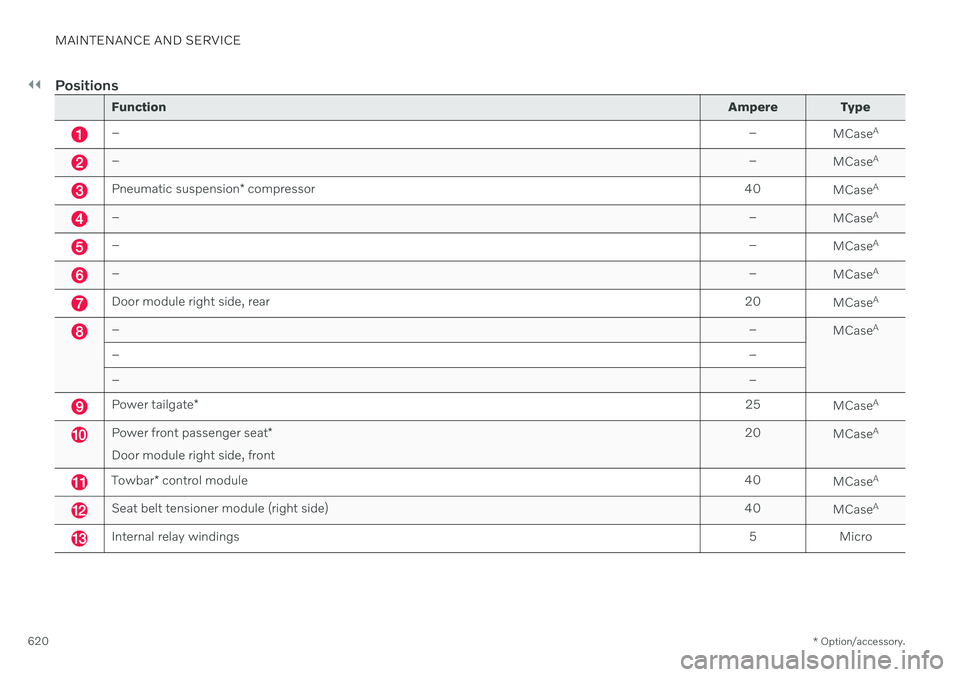
Positions
Function Ampere Type
– –
MCaseA
–
–
MCaseA
Pneumatic suspension
* compressor 40
MCaseA
–
–
MCaseA
–
–
MCaseA
–
–
MCaseA
Door module right side, rear
20
MCaseA
–
–
MCaseA
– –
– –
Power tailgate* 25
MCaseA
Power front passenger seat
*
Door module right side, front 20
MCaseA
Towbar
* control module 40
MCaseA
Seat belt tensioner module (right side)
40
MCaseA
Internal relay windings
5 Micro
Page 623 of 683
MAINTENANCE AND SERVICE
}}
* Option/accessory.621
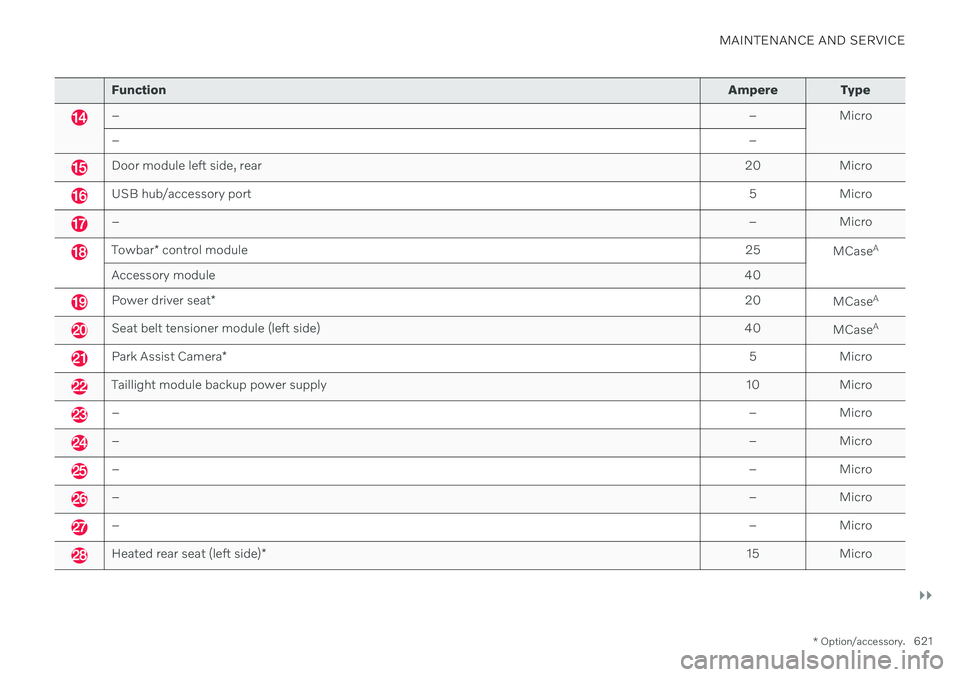
Function Ampere Type
– – Micro
– –
Door module left side, rear20 Micro
USB hub/accessory port 5 Micro
–– Micro
Towbar* control module 25
MCaseA
Accessory module 40
Power driver seat* 20
MCaseA
Seat belt tensioner module (left side)
40
MCaseA
Park Assist Camera
* 5 Micro
Taillight module backup power supply
10 Micro
– – Micro
–– Micro
–– Micro
–– Micro
–– Micro
Heated rear seat (left side)* 15 Micro
Page 624 of 683
||
MAINTENANCE AND SERVICE
* Option/accessory.
622
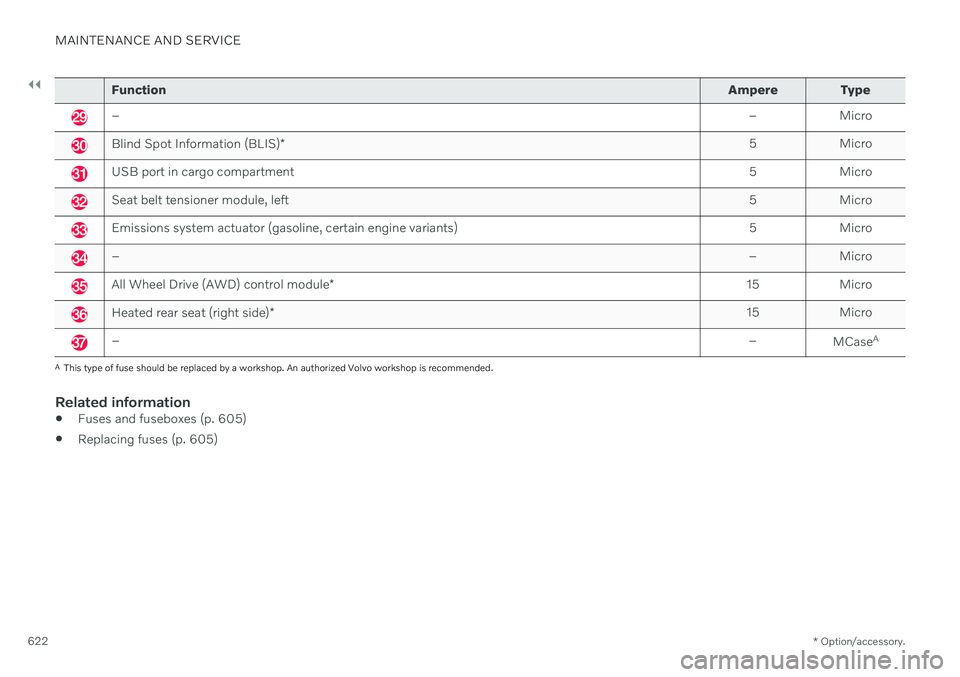
Function Ampere Type
– – Micro
Blind Spot Information (BLIS)* 5 Micro
USB port in cargo compartment
5 Micro
Seat belt tensioner module, left5 Micro
Emissions system actuator (gasoline, certain engine variants)5 Micro
–– Micro
All Wheel Drive (AWD) control module* 15 Micro
Heated rear seat (right side)
* 15 Micro
–
–
MCaseA
A
This type of fuse should be replaced by a workshop. An authorized Volvo workshop is recommended.
Related information
Fuses and fuseboxes (p. 605)
Replacing fuses (p. 605)
Page 625 of 683
MAINTENANCE AND SERVICE
* Option/accessory.623
Replacing bulbs
Bulb types vary depending on model and equipment level. If a light bulb 14
breaks, it can
be replaced by following the procedure shown in the Owner's Manual. If you are experiencing problems with any lights other than light bulbs, contact a work- shop 15
.
If there is a problem with an LED 16
light, the
entire lamp unit will normally need to be replaced.
NOTE
For information on lights not mentioned in the Owner's Manual, contact a Volvoretailer or an authorized Volvo workshop.
WARNING
The vehicle electrical system must be in ignition mode 0 when bulbs are replaced.
CAUTION
Never touch the bulb glass with your bare fingers. Grease and oils from your fingersvaporize in the heat and will leave adeposit on the reflector, which may dam-age it.
NOTE
If the error message persists after the defective bulb has been replaced, we rec-ommend a visit to an authorized Volvoworkshop.
NOTE
Exterior lighting such as headlights and taillights may develop temporary conden-sation on the inside of the lens. This is nor-mal. All exterior lighting is designed toresist this. Condensation is normally ven-ted out of the lamp housing once the lighthas been lit for some period of time.
NOTE
Bulbs for Active Bending Lights * contain
traces of mercury and should therefore always be deposited at an authorized Volvoworkshop.
Related information
Location of exterior lights (p. 624)
Removing the plastic cover to replace bulbs (p. 624)
Replacing the low beam headlight bulbs(p. 625)
Replacing the high beam headlight bulbs(p. 626)
Replacing daytime running lights/frontparking light bulbs (p. 626)
Replacing front turn signal bulbs (p. 627)
Bulb specifications (p. 628)
14
Some vehicles do not have any light bulbs.
15 An authorized Volvo workshop is recommended.
16 LED (Light Emitting Diode)
Page 626 of 683
MAINTENANCE AND SERVICE
* Option/accessory.
624
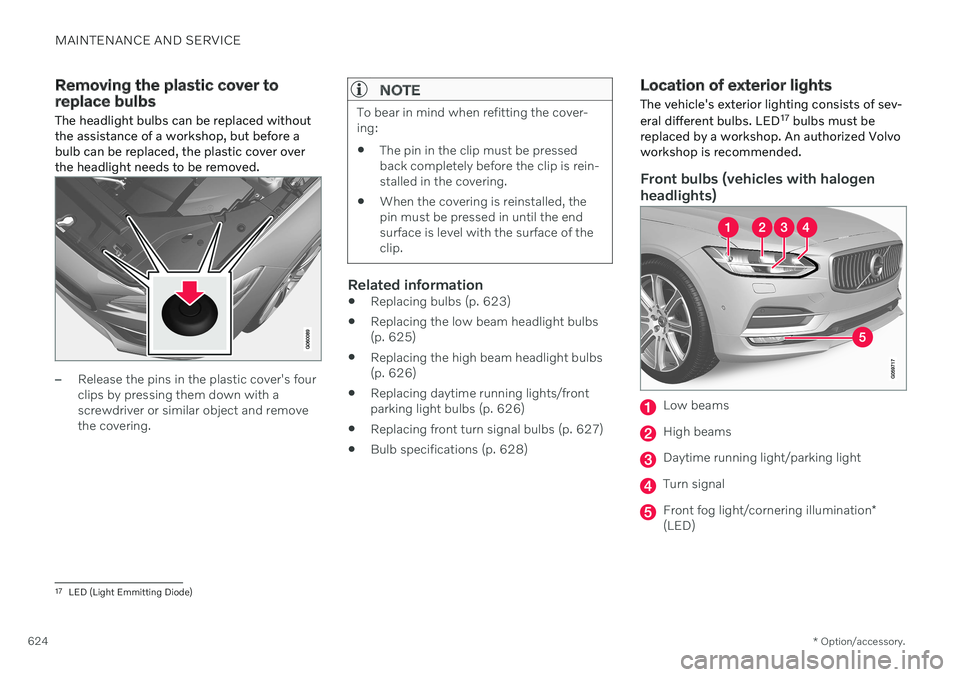
Removing the plastic cover to replace bulbs The headlight bulbs can be replaced without the assistance of a workshop, but before abulb can be replaced, the plastic cover overthe headlight needs to be removed.
–Release the pins in the plastic cover's four clips by pressing them down with ascrewdriver or similar object and removethe covering.
NOTE
To bear in mind when refitting the cover- ing:
The pin in the clip must be pressedback completely before the clip is rein-stalled in the covering.
When the covering is reinstalled, thepin must be pressed in until the endsurface is level with the surface of theclip.
Related information
Replacing bulbs (p. 623)
Replacing the low beam headlight bulbs (p. 625)
Replacing the high beam headlight bulbs(p. 626)
Replacing daytime running lights/frontparking light bulbs (p. 626)
Replacing front turn signal bulbs (p. 627)
Bulb specifications (p. 628)
Location of exterior lights The vehicle's exterior lighting consists of sev- eral different bulbs. LED 17
bulbs must be
replaced by a workshop. An authorized Volvo workshop is recommended.
Front bulbs (vehicles with halogen headlights)
Low beams
High beams
Daytime running light/parking light
Turn signal
Front fog light/cornering illumination *
(LED)
17 LED (Light Emmitting Diode)
Page 627 of 683
MAINTENANCE AND SERVICE
625
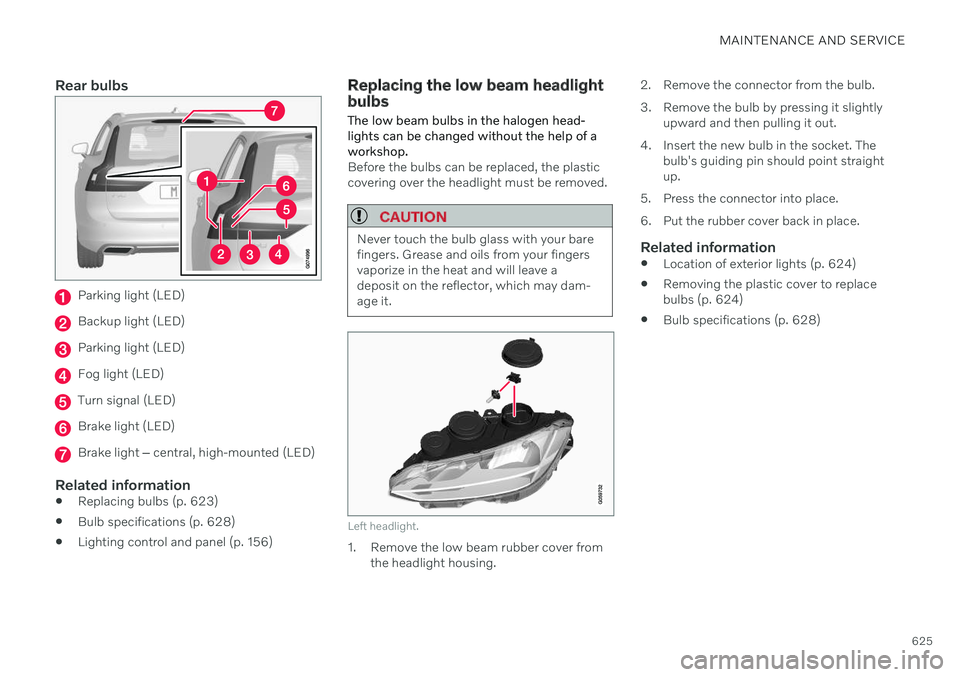
Rear bulbs
Parking light (LED)
Backup light (LED)
Parking light (LED)
Fog light (LED)
Turn signal (LED)
Brake light (LED)
Brake light ‒ central, high-mounted (LED)
Related information
Replacing bulbs (p. 623)
Bulb specifications (p. 628)
Lighting control and panel (p. 156)
Replacing the low beam headlight bulbs The low beam bulbs in the halogen head- lights can be changed without the help of aworkshop.
Before the bulbs can be replaced, the plastic covering over the headlight must be removed.
CAUTION
Never touch the bulb glass with your bare fingers. Grease and oils from your fingersvaporize in the heat and will leave adeposit on the reflector, which may dam-age it.
Left headlight.
1. Remove the low beam rubber cover from
the headlight housing. 2. Remove the connector from the bulb.
3. Remove the bulb by pressing it slightly
upward and then pulling it out.
4. Insert the new bulb in the socket. The bulb's guiding pin should point straight up.
5. Press the connector into place.
6. Put the rubber cover back in place.
Related information
Location of exterior lights (p. 624)
Removing the plastic cover to replace bulbs (p. 624)
Bulb specifications (p. 628)
Page 628 of 683
MAINTENANCE AND SERVICE
626
Replacing the high beam headlight bulbs The high beam bulbs in the halogen head- lights can be changed without the help of aworkshop.
Before the bulbs can be replaced, the plastic covering over the headlight must be removed.
CAUTION
Never touch the bulb glass with your bare fingers. Grease and oils from your fingersvaporize in the heat and will leave adeposit on the reflector, which may dam-age it.
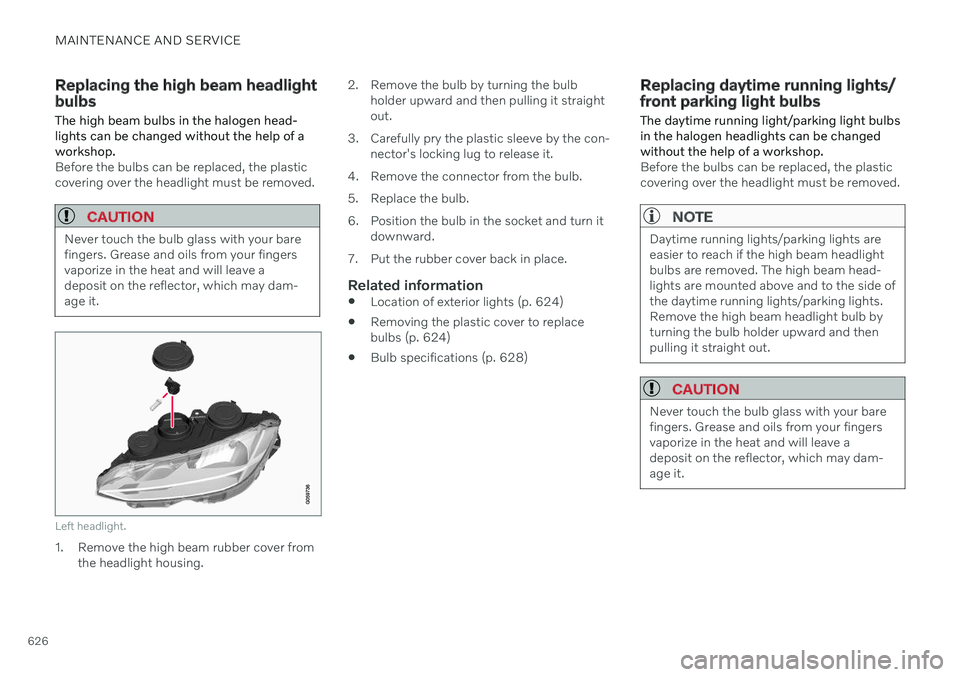
Left headlight.
1. Remove the high beam rubber cover fromthe headlight housing. 2. Remove the bulb by turning the bulb
holder upward and then pulling it straight out.
3. Carefully pry the plastic sleeve by the con- nector's locking lug to release it.
4. Remove the connector from the bulb.
5. Replace the bulb.
6. Position the bulb in the socket and turn it downward.
7. Put the rubber cover back in place.
Related information
Location of exterior lights (p. 624)
Removing the plastic cover to replace bulbs (p. 624)
Bulb specifications (p. 628)
Replacing daytime running lights/ front parking light bulbs
The daytime running light/parking light bulbs in the halogen headlights can be changedwithout the help of a workshop.
Before the bulbs can be replaced, the plastic covering over the headlight must be removed.
NOTE
Daytime running lights/parking lights are easier to reach if the high beam headlightbulbs are removed. The high beam head-lights are mounted above and to the side ofthe daytime running lights/parking lights.Remove the high beam headlight bulb byturning the bulb holder upward and thenpulling it straight out.
CAUTION
Never touch the bulb glass with your bare fingers. Grease and oils from your fingersvaporize in the heat and will leave adeposit on the reflector, which may dam-age it.
Page 629 of 683
MAINTENANCE AND SERVICE
}}
627
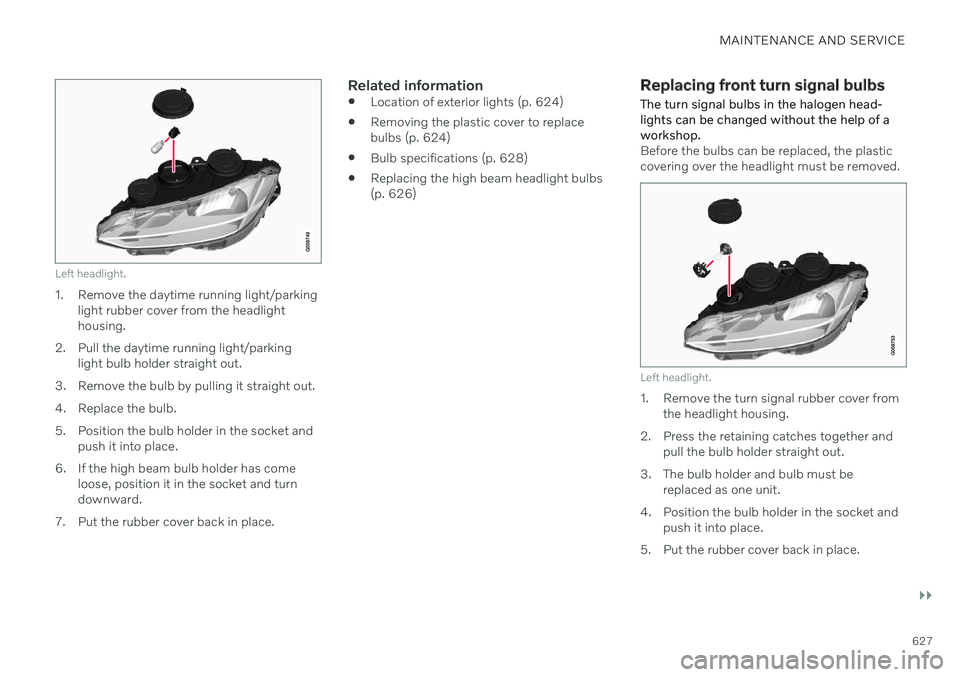
Left headlight.
1. Remove the daytime running light/parkinglight rubber cover from the headlight housing.
2. Pull the daytime running light/parking light bulb holder straight out.
3. Remove the bulb by pulling it straight out.
4. Replace the bulb.
5. Position the bulb holder in the socket and push it into place.
6. If the high beam bulb holder has come loose, position it in the socket and turn downward.
7. Put the rubber cover back in place.
Related information
Location of exterior lights (p. 624)
Removing the plastic cover to replacebulbs (p. 624)
Bulb specifications (p. 628)
Replacing the high beam headlight bulbs(p. 626)
Replacing front turn signal bulbs
The turn signal bulbs in the halogen head- lights can be changed without the help of aworkshop.
Before the bulbs can be replaced, the plastic covering over the headlight must be removed.
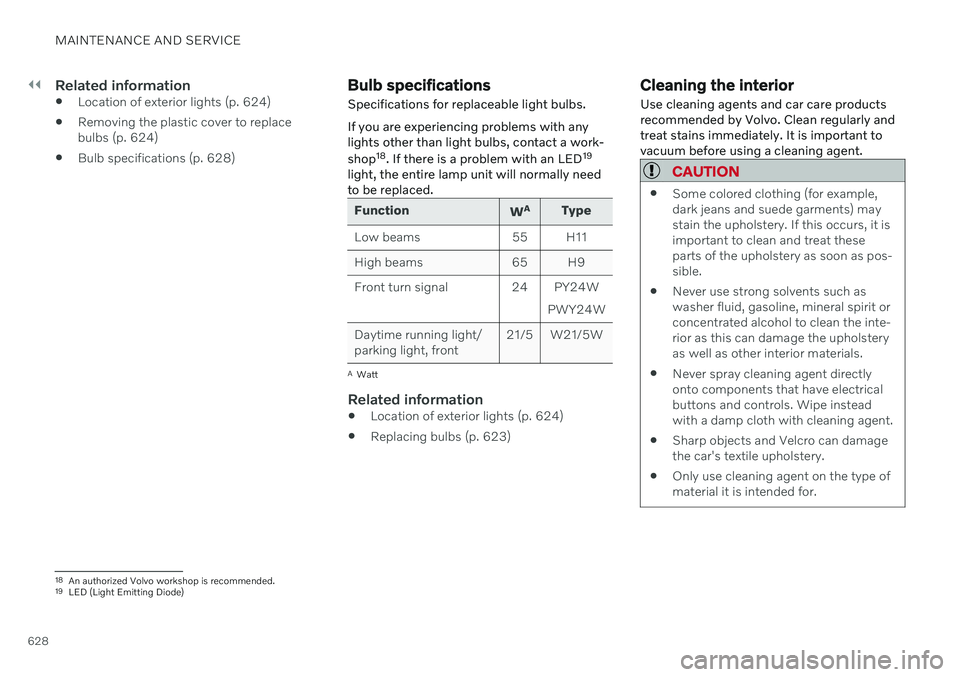
Left headlight.
1. Remove the turn signal rubber cover from the headlight housing.
2. Press the retaining catches together and pull the bulb holder straight out.
3. The bulb holder and bulb must be replaced as one unit.
4. Position the bulb holder in the socket and push it into place.
5. Put the rubber cover back in place.
Page 630 of 683
||
MAINTENANCE AND SERVICE
628
Related information
Location of exterior lights (p. 624)
Removing the plastic cover to replace bulbs (p. 624)
Bulb specifications (p. 628)
Bulb specifications
Specifications for replaceable light bulbs. If you are experiencing problems with any lights other than light bulbs, contact a work- shop 18
. If there is a problem with an LED 19
light, the entire lamp unit will normally need to be replaced.
Function WA
Type
Low beams 55 H11
High beams 65 H9
Front turn signal 24 PY24W PWY24W
Daytime running light/ parking light, front 21/5 W21/5W
A
Watt
Related information
Location of exterior lights (p. 624)
Replacing bulbs (p. 623)
Cleaning the interior
Use cleaning agents and car care products recommended by Volvo. Clean regularly andtreat stains immediately. It is important tovacuum before using a cleaning agent.
CAUTION
Some colored clothing (for example, dark jeans and suede garments) maystain the upholstery. If this occurs, it isimportant to clean and treat theseparts of the upholstery as soon as pos-sible.
Never use strong solvents such aswasher fluid, gasoline, mineral spirit orconcentrated alcohol to clean the inte-rior as this can damage the upholsteryas well as other interior materials.
Never spray cleaning agent directlyonto components that have electricalbuttons and controls. Wipe insteadwith a damp cloth with cleaning agent.
Sharp objects and Velcro can damagethe car's textile upholstery.
Only use cleaning agent on the type ofmaterial it is intended for.
18
An authorized Volvo workshop is recommended.
19 LED (Light Emitting Diode)