Socket VOLVO XC90 T8 2016 Owner´s Manual
[x] Cancel search | Manufacturer: VOLVO, Model Year: 2016, Model line: XC90 T8, Model: VOLVO XC90 T8 2016Pages: 546, PDF Size: 10.26 MB
Page 4 of 546
2
INTRODUCTION
Contacting Volvo14
Volvo On Call Roadside Assistance 14
Additional information about your vehicle 14
General information about the XC90 T8 Twin Engine Plug-in Hybrid 16
Volvo and the environment 20
Owner's manual and the environment 21
IntelliSafe —driver support
21
Sensus 22
Owner's manual in mobile devices 25
Options, accessories and the On-board Diagnostic (OBDII) socket 26
Owner's information 27
Driver distraction 28
Volvo Structural Parts Statement 29
Crash event data 30
Volvo ID 31
Center display overview 32
Changing center display settings 34
Using the center display keyboard 35
Function view buttons 40
Navigating in the center display's views 42
Symbols in the center display status bar 47
Changing settings in different typesof apps 48
Using the center display
49
Using the owner's manual 53
On-board digital owner's manual 55
Navigating in the digital owner's manual 56
Glass 57
Technician certification 57
SAFETY
General safety information60
Occupant safety 60
Reporting safety defects 61
Recall information 62
Safety during pregnancy 62
Whiplash protection system 63
Seat belts 64
Seat belt pretensioners 65
Buckling and unbuckling seat belts 65
Door and seat belt reminders 67
Child safety 68
Child restraints 70
Infant seats 72
Convertible seats 74
Booster cushions 77
ISOFIX/LATCH lower anchors 78
Lower child seat attachment points 79
Top tether anchors 80
Integrated booster cushion *
81
Raising the integrated booster cushion *
82
Stowing the integrated booster cushion *
83
Occupant weight sensor 84
Safety mode 87
CONTENTS
Page 7 of 546
5
Defrosting windows and mirrors195
Turning steering wheel heating * on
and off 197
Air conditioning 198
Turning seat heating * on and off
199
Turning front seat ventilation * on and off
200
Air distribution 201
Opening/closing/directing air vents 202
Adjusting air distribution 202
Air distribution table 204
LOADING AND STORAGE
Cargo space208
Passenger compartment storage spaces 208
Using the glove compartment 209
Tunnel console 210
Sun visors 211
Electrical sockets 212
Loading 215
Grocery bag holder 217
Cargo net 217
Steel cargo grid *
219
Load anchoring eyelets 220
Cargo compartment cover *
221
LOCKS AND ALARM
Locks and remote keys
226
Alarm 226
Automatically arming/disarming the alarm 228
Deactivating the alarm without afunctioning remote key 228
Child safety locks 228
Antenna locations for the start andlock system 230
Start and lock system type designations 230
Immobilizer 231
Changing the remote key's battery 232
Remote key's range 235
Remote key 235
Detachable key blade 237
Foot movement tailgate operation *
238
Locking and unlocking confirmation 240
Locking/unlocking from inside thevehicle 242
Locking/unlocking from outside thevehicle 243
Locking/unlocking the tailgate 244
Power tailgate *
246
Locking/unlocking with the detacha-ble key blade 248
Page 10 of 546
8
Driving with a trailer367
Detachable trailer hitch 368
Trailer Stability Assist (TSA) 369
Ignition modes 370
Battery drain 372
Starting the engine 372
Turning the engine off 374
Driving systems 374
Hybrid battery charging cable 375
Hybrid charging cable circuit breaker 377
Hybrid-related symbols and messages 378
Preparations for charging the hybrid battery 380
Stopping hybrid battery charging 381
Initiating hybrid battery charging 382
Charging the hybrid battery 383
Hybrid battery charge status 385
Charger status indicators 387
Hybrid battery charging current 387
Long-term storage of a vehicle witha hybrid battery 388
Using the electric motor in city driving 389
Drive modes 390
ECO drive mode 394
Automatic transmission 395
Shiftlock396
Gear shift indicator 396
Gear selector positions 396
Steering wheel paddles *
398
Low Speed Control (LSC) 399
All Wheel Drive (AWD) 400
Suspension and leveling control *
400
INFOTAINMENT
The infotainment system
404
Sound settings 404
Radio 405
Radio settings 405
RBDS radio 406
Changing and searching for radio stations 406
HD Radio ™reception
407
Switching HD Radio on and off 409
HD Radio sub-channels 409
HD Radio limitations 410
SiriusXM ®
Satellite radio * 411
Using SiriusXM ®
Satellite radio radio *412
SiriusXM ®
Satellite radio * settings 413
Phone 414
Pairing a cell phone 415
Connecting/disconnecting a cell phone 416
Handling phone calls 417
Handling text messages 418
Phone settings 419
Text message settings 420
Connecting a Bluetooth ®
device 420
Connecting a device via theAUX/USB socket 420
Media player 421
Page 11 of 546
9
Apple CarPlay422
Apple CarPlay settings 423
CD (media) player *
424
Playing media 424
Media searches 426
Playing media through the AUX/USB sockets 427
Streaming media through a Blue-tooth connection 427
Media sound settings 428
Gracenote 428
Video 429
Media player technical data 429
Internet connected vehicle 431
Connecting to the Internet 431
Apps (applications) 433
Bluetooth settings 433
Downloading, updating and uninstal-ling apps 434
Internet connection troubleshooting 435
Tethering (Wi-Fi sharing) 435
Deleting Wi-Fi networks 436
Wi-Fi technology and security 436
Vehicle modem settings 437
Infotainment system license information 437
Terms, conditions and confidentiality441
WHEELS AND TIRES
Tires444
Tire sidewall designations 445
Wheel (rim) designations 447
Tire terminology 447
Tire direction of rotation 448
Tread wear indicator 449
Loading specifications 449
Uniform Tire Quality Grading 450
Snow tires and chains 451
Checking tire inflation pressure 451
Changing tires 453
Tools in the cargo compartment 453
Jack 453
Wheel bolts 454
Removing a wheel 454
Installing a wheel 456
Tire Pressure Monitoring System (TPMS) 457
Checking inflation pressure 458
Reinflating tires equipped with the Tire Pressure Monitoring System (TPMS) 459
Calibrating the Tire PressureMonitoring System (TPMS) 460
Tire Pressure Monitoring Systemtype approval 461
Tire sealing system 461
Page 20 of 546
||
INTRODUCTION
18
Electrical current for charging the hybrid bat- tery
Electric motor for powering the rear wheels
Hybrid battery
Drive modes (change in the center display or by using the drive mode control in the tunnelconsole)
Instrument panel showing unique hybrid-rela- ted information
WARNING
Please be aware that there is no sound from the engine when the vehicle is being poweredby the electric motor and it may be difficult todetect by children, pedestrians, cyclists andanimals. This is especially true at low speeds.
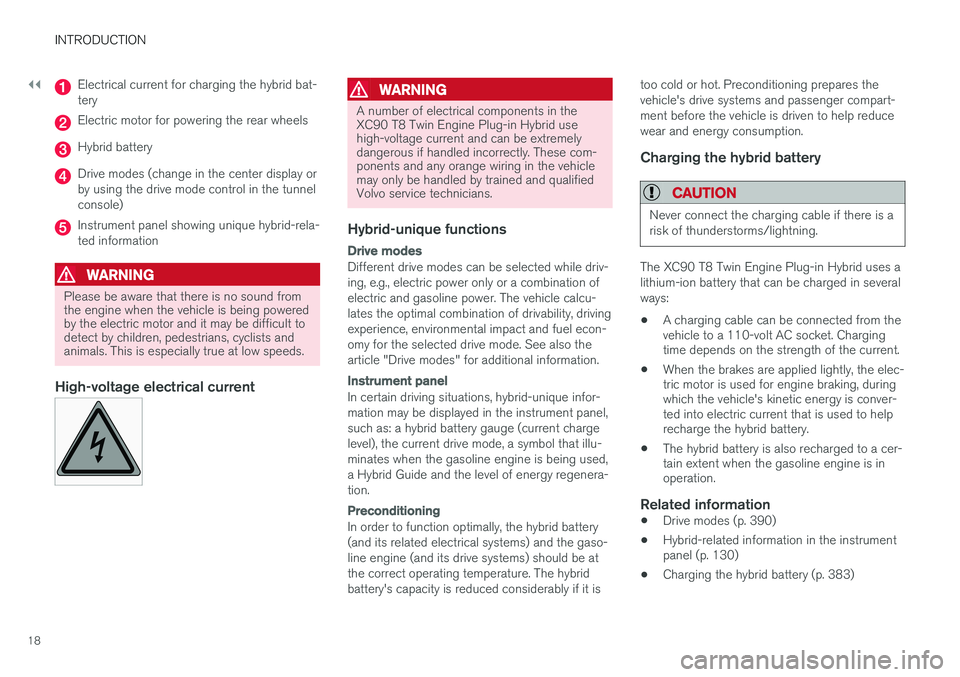
High-voltage electrical current
WARNING
A number of electrical components in the XC90 T8 Twin Engine Plug-in Hybrid usehigh-voltage current and can be extremelydangerous if handled incorrectly. These com-ponents and any orange wiring in the vehiclemay only be handled by trained and qualifiedVolvo service technicians.
Hybrid-unique functions
Drive modes
Different drive modes can be selected while driv- ing, e.g., electric power only or a combination ofelectric and gasoline power. The vehicle calcu-lates the optimal combination of drivability, drivingexperience, environmental impact and fuel econ-omy for the selected drive mode. See also thearticle "Drive modes" for additional information.
Instrument panel
In certain driving situations, hybrid-unique infor- mation may be displayed in the instrument panel,such as: a hybrid battery gauge (current chargelevel), the current drive mode, a symbol that illu-minates when the gasoline engine is being used,a Hybrid Guide and the level of energy regenera-tion.
Preconditioning
In order to function optimally, the hybrid battery (and its related electrical systems) and the gaso-line engine (and its drive systems) should be atthe correct operating temperature. The hybridbattery's capacity is reduced considerably if it istoo cold or hot. Preconditioning prepares thevehicle's drive systems and passenger compart-ment before the vehicle is driven to help reducewear and energy consumption.
Charging the hybrid battery
CAUTION
Never connect the charging cable if there is a risk of thunderstorms/lightning.
The XC90 T8 Twin Engine Plug-in Hybrid uses a lithium-ion battery that can be charged in severalways:
• A charging cable can be connected from the vehicle to a 110-volt AC socket. Chargingtime depends on the strength of the current.
• When the brakes are applied lightly, the elec-tric motor is used for engine braking, duringwhich the vehicle's kinetic energy is conver-ted into electric current that is used to helprecharge the hybrid battery.
• The hybrid battery is also recharged to a cer-tain extent when the gasoline engine is inoperation.
Related information
•Drive modes (p. 390)
• Hybrid-related information in the instrumentpanel (p. 130)
• Charging the hybrid battery (p. 383)
Page 28 of 546
INTRODUCTION
26
Options, accessories and the On- board Diagnostic (OBDII) socket We strongly recommend that Volvo owners install only genuine, Volvo-approved accesso-ries, and that accessory installations be per-formed only by a trained and qualified Volvoservice technician.
Optional or accessory equipment described in this manual is indicated by an asterisk. Optional or accessory equipment may not be available in all countries or markets. Please notethat some vehicles may be equipped differently,depending on special legal requirements. Contact your Volvo retailer for additional informa- tion.
NOTE
• Do not export your Volvo to another country before investigating that coun-try's applicable safety and exhaust emis-sion requirements. In some cases it maybe difficult or impossible to comply withthese requirements. Modifications to theemission control system(s) may renderyour Volvo not certifiable for legal opera-tion in the U.S., Canada and other coun-tries.
• All information, illustrations and specifica-tions contained in this manual are basedon the latest product information availa-ble at the time of publication. Please notethat some vehicles may be equipped dif-ferently, depending on market-specificadaptations or special legal requirements.Optional equipment described in thismanual may not be available in all mar-kets.
• Some of the illustrations shown aregeneric and are intended as examplesonly, and may not depict the exact modelfor which this owner's information isintended.
• Volvo reserves the right to make modeland product changes at any time, or tochange specifications or design withoutnotice and without incurring obligation.
WARNING
If your vehicle is involved in an accident, unseen damage may affect its drivability andsafety.
WARNING
CALIFORNIA proposition 65 Engine exhaust, some of its constituents, and certain vehicle components contain or emitchemicals known to the state of California tocause cancer, and birth defects or otherreproductive harm. In addition, certain fluidscontained in vehicles and certain products ofcomponent wear contain or emit chemicalsknown to the State of California to cause can-cer, and birth defects or other reproductiveharm.
WARNING
Certain components of this vehicle such as air bag modules, seat belt pretensioners, adap-tive steering columns, and button cell batter-ies may contain Perchlorate material. Specialhandling may apply for service or vehicle endof life disposal. See www.dtsc.ca.gov/hazardouswaste/ perchlorate.
• Genuine Volvo accessories are tested to ensure compatibility with the performance,safety, and emission systems in your vehicle.Additionally, a trained and qualified Volvo
Page 29 of 546
INTRODUCTION
}}
27
service technician knows where accessories may and may not be safely installed in yourVolvo. In all cases, please consult a trainedand qualified Volvo service technician beforeinstalling any accessory in or on your vehicle.
• Accessories that have not been approved byVolvo may or may not be specifically testedfor compatibility with your vehicle. Addition-ally, an inexperienced installer may not befamiliar with some of your car's systems.
• Any of your car's performance and safetysystems could be adversely affected if youinstall accessories that Volvo has not tested,or if you allow accessories to be installed bysomeone unfamiliar with your vehicle.
• Damage caused by unapproved or improperlyinstalled accessories may not be covered byyour new vehicle warranty. See your Warrantyand Service Records Information booklet formore warranty information. Volvo assumes noresponsibility for death, injury, or expensesthat may result from the installation of non-genuine accessories.
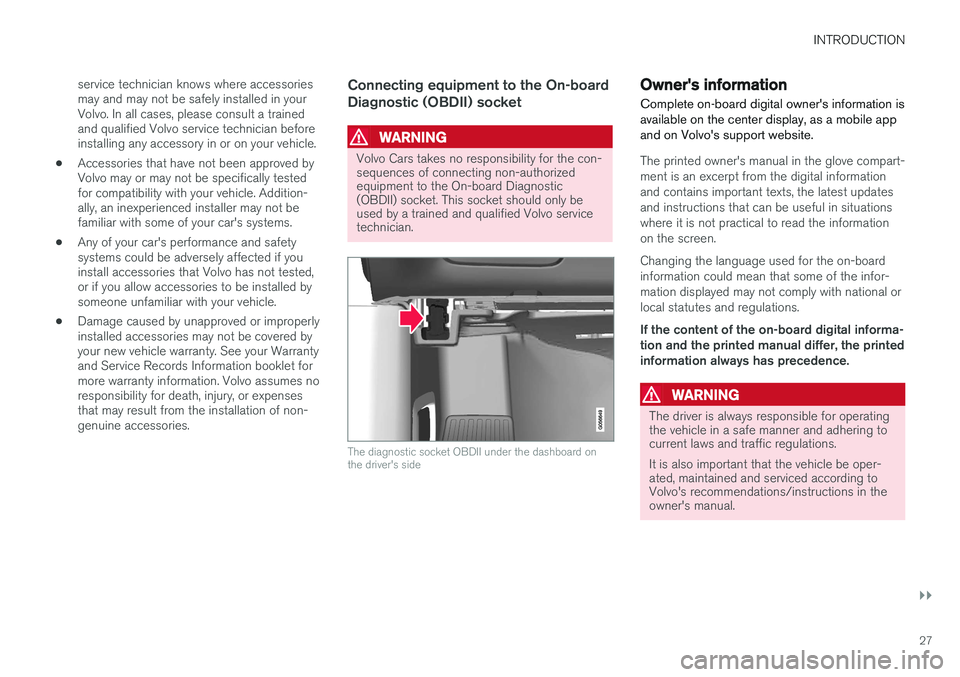
Connecting equipment to the On-board Diagnostic (OBDII) socket
WARNING
Volvo Cars takes no responsibility for the con- sequences of connecting non-authorizedequipment to the On-board Diagnostic(OBDII) socket. This socket should only beused by a trained and qualified Volvo servicetechnician.
The diagnostic socket OBDII under the dashboard on the driver's side
Owner's information
Complete on-board digital owner's information is available on the center display, as a mobile appand on Volvo's support website.
The printed owner's manual in the glove compart- ment is an excerpt from the digital informationand contains important texts, the latest updatesand instructions that can be useful in situationswhere it is not practical to read the informationon the screen. Changing the language used for the on-board information could mean that some of the infor-mation displayed may not comply with national orlocal statutes and regulations. If the content of the on-board digital informa- tion and the printed manual differ, the printedinformation always has precedence.
WARNING
The driver is always responsible for operating the vehicle in a safe manner and adhering tocurrent laws and traffic regulations. It is also important that the vehicle be oper- ated, maintained and serviced according toVolvo's recommendations/instructions in theowner's manual.
Page 210 of 546
LOADING AND STORAGE
* Option/accessory, for more information, see Introduction.
208
Cargo space
The vehicle has flexible cargo capacity that makes it possible to load and secure largeobjects.
By folding down the backrests in the second and third rows * of seats, the cargo capacity of the
vehicle increases considerably. To make loading easier, the rear section of the vehicle can beraised and lowered using the pneumatic suspen- sion *. Use the load anchoring eyelets or the gro-
cery bag holder to secure objects and the cargo compartment cover helps conceal the load. The jack * and tools can be found under the cargo
compartment's floor.
Related information
• Loading (p. 215)
• Cargo compartment cover
* (p. 221)
• Cargo net (p. 217)
• Grocery bag holder (p. 217)
• Load anchoring eyelets (p. 220)
• Steel cargo grid
* (p. 219)
Passenger compartment storage spaces
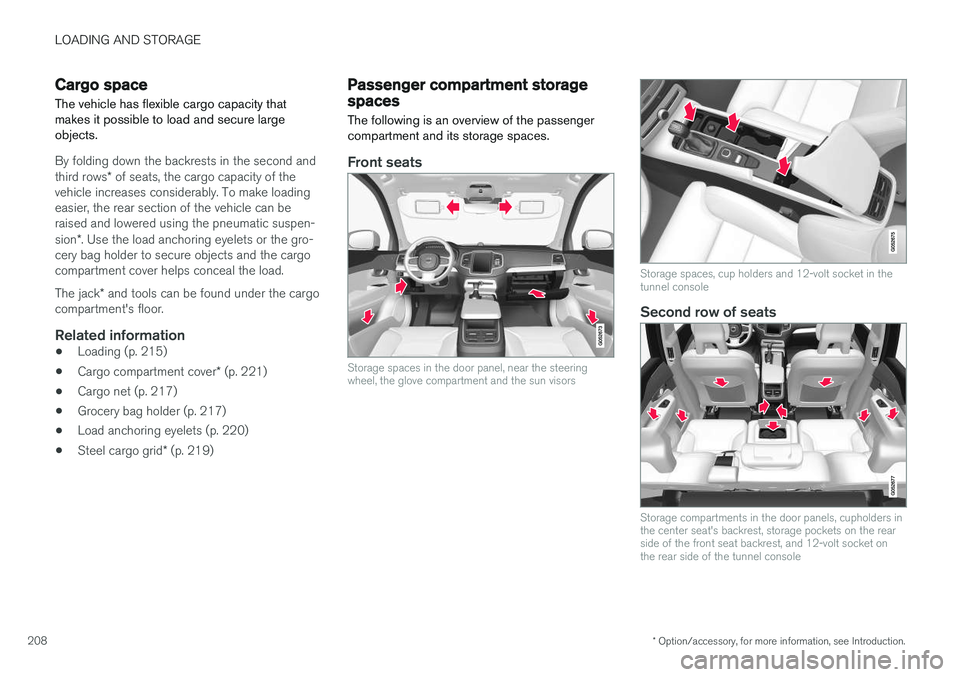
The following is an overview of the passenger compartment and its storage spaces.
Front seats
Storage spaces in the door panel, near the steering wheel, the glove compartment and the sun visors
Storage spaces, cup holders and 12-volt socket in the tunnel console
Second row of seats
Storage compartments in the door panels, cupholders in the center seat's backrest, storage pockets on the rearside of the front seat backrest, and 12-volt socket onthe rear side of the tunnel console
Page 211 of 546
LOADING AND STORAGE
}}
209
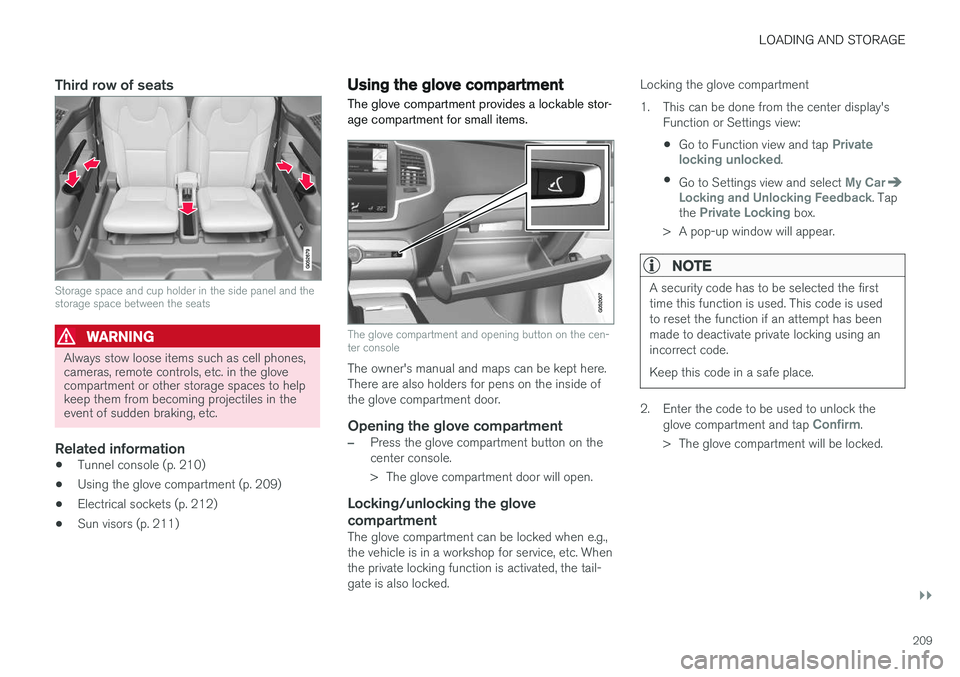
Third row of seats
Storage space and cup holder in the side panel and the storage space between the seats
WARNING
Always stow loose items such as cell phones, cameras, remote controls, etc. in the glovecompartment or other storage spaces to helpkeep them from becoming projectiles in theevent of sudden braking, etc.
Related information
•Tunnel console (p. 210)
• Using the glove compartment (p. 209)
• Electrical sockets (p. 212)
• Sun visors (p. 211)
Using the glove compartment
The glove compartment provides a lockable stor- age compartment for small items.
The glove compartment and opening button on the cen- ter console
The owner's manual and maps can be kept here. There are also holders for pens on the inside ofthe glove compartment door.
Opening the glove compartment
–Press the glove compartment button on the center console.
> The glove compartment door will open.
Locking/unlocking the glove compartment
The glove compartment can be locked when e.g., the vehicle is in a workshop for service, etc. Whenthe private locking function is activated, the tail-gate is also locked. Locking the glove compartment
1. This can be done from the center display's
Function or Settings view:
• Go to Function view and tap
Private
locking unlocked.
• Go to Settings view and select
My CarLocking and Unlocking Feedback. Tap
the Private Locking box.
> A pop-up window will appear.
NOTE
A security code has to be selected the first time this function is used. This code is usedto reset the function if an attempt has beenmade to deactivate private locking using anincorrect code. Keep this code in a safe place.
2. Enter the code to be used to unlock the glove compartment and tap Confirm.
> The glove compartment will be locked.
Page 212 of 546
||
LOADING AND STORAGE
* Option/accessory, for more information, see Introduction.
210 Unlocking the glove compartment
1. This function can be deactivated from the
center display's Function or Settings view:
• Go to Function view and tap
Private
locking locked.
• Go to settings and select
My CarLocking and Unlocking Feedback.
Deselect the Private Locking box.
> A pop-up window will appear.
2. Specify the code to be used to lock the glove compartment and tap
Confirm.
> The glove compartment will be unlocked.
Using the glove compartment as a cooler *
The glove compartment can be used to cool drinks or food and the cooling feature functionswhen the climate system is active (i.e., when the ignition is in mode II or when the engine is run-
ning).
Cooling activated
Cooling deactivated
–Activate/deactivate cooling by moving the control as far as possible toward the passen-ger compartment/glove compartment.
Related information
• Passenger compartment storage spaces (p. 208)
• Locking/unlocking the tailgate (p. 244)
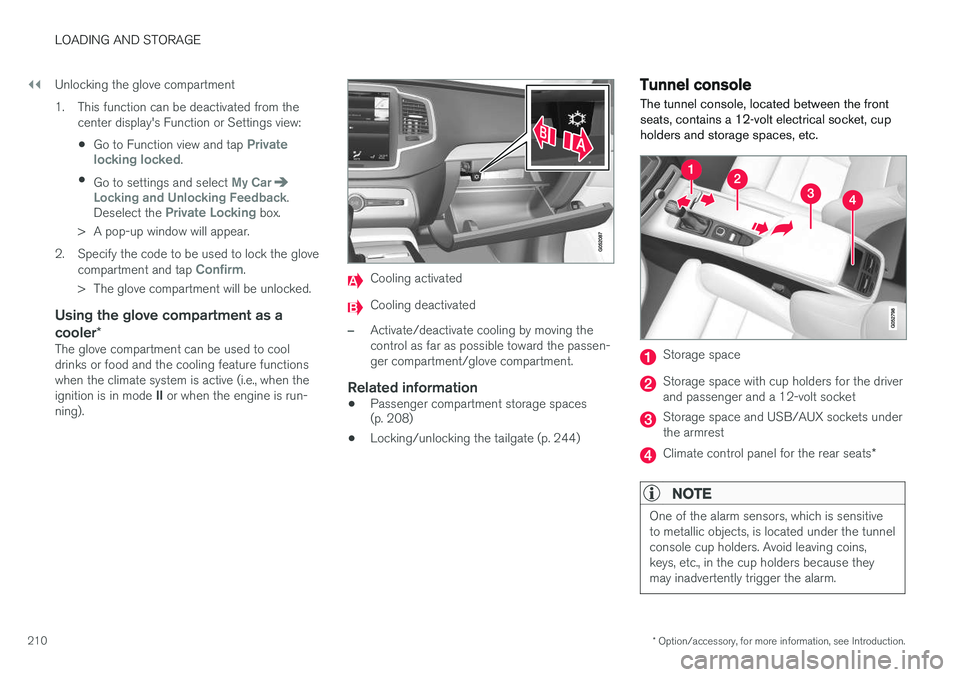
Tunnel console The tunnel console, located between the front seats, contains a 12-volt electrical socket, cupholders and storage spaces, etc.
Storage space
Storage space with cup holders for the driver and passenger and a 12-volt socket
Storage space and USB/AUX sockets under the armrest
Climate control panel for the rear seats
*
NOTE
One of the alarm sensors, which is sensitive to metallic objects, is located under the tunnelconsole cup holders. Avoid leaving coins,keys, etc., in the cup holders because theymay inadvertently trigger the alarm.