VOLVO XC90 TWIN ENGINE HYBRID 2017 Owners Manual
Manufacturer: VOLVO, Model Year: 2017, Model line: XC90 TWIN ENGINE HYBRID, Model: VOLVO XC90 TWIN ENGINE HYBRID 2017Pages: 584, PDF Size: 14.2 MB
Page 101 of 584
I N S T R U M E N T S A N D C O N T R O L S
Page 102 of 584
INSTRUMENTS AND CONTROLS
* Option/accessory, for more information, see Introduction.100
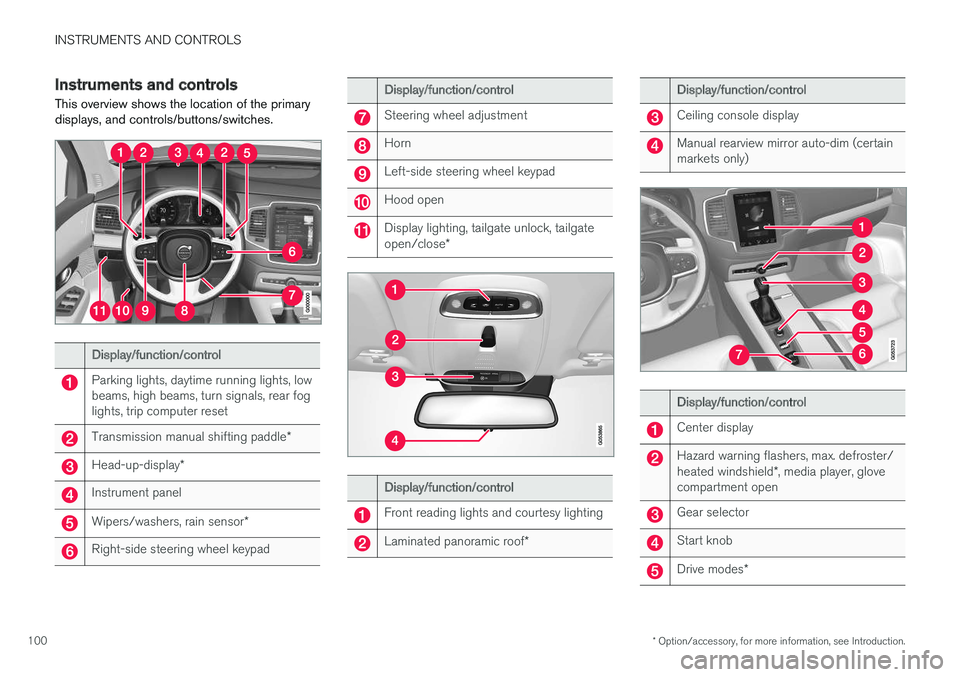
Instruments and controls
This overview shows the location of the primarydisplays, and controls/buttons/switches.
Display/function/control
Parking lights, daytime running lights, lowbeams, high beams, turn signals, rear foglights, trip computer reset
Transmission manual shifting paddle*
Head-up-display*
Instrument panel
Wipers/washers, rain sensor*
Right-side steering wheel keypad
Display/function/control
Steering wheel adjustment
Horn
Left-side steering wheel keypad
Hood open
Display lighting, tailgate unlock, tailgateopen/close*
Display/function/control
Front reading lights and courtesy lighting
Laminated panoramic roof*
Display/function/control
Ceiling console display
Manual rearview mirror auto-dim (certainmarkets only)
Display/function/control
Center display
Hazard warning flashers, max. defroster/heated windshield*, media player, glovecompartment open
Gear selector
Start knob
Drive modes*
Page 103 of 584
INSTRUMENTS AND CONTROLS
}}
* Option/accessory, for more information, see Introduction.101
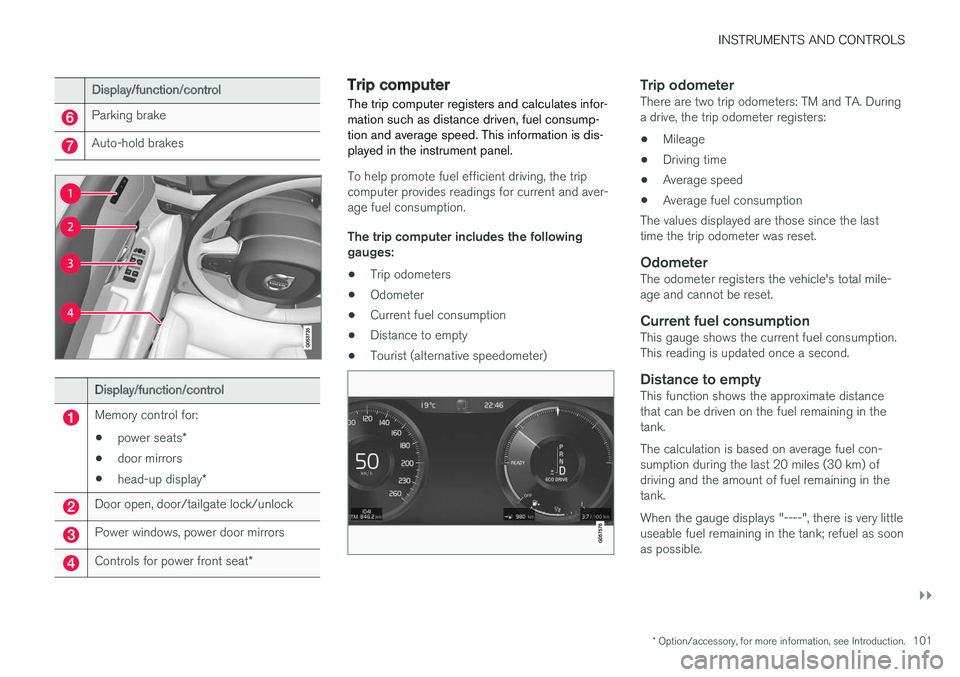
Display/function/control
Parking brake
Auto-hold brakes
Display/function/control
Memory control for:
•power seats*
•door mirrors
•head-up display*
Door open, door/tailgate lock/unlock
Power windows, power door mirrors
Controls for power front seat*
Trip computer
The trip computer registers and calculates infor-mation such as distance driven, fuel consump-tion and average speed. This information is dis-played in the instrument panel.
To help promote fuel efficient driving, the tripcomputer provides readings for current and aver-age fuel consumption.
The trip computer includes the followinggauges:
•Trip odometers
•Odometer
•Current fuel consumption
•Distance to empty
•Tourist (alternative speedometer)
Trip odometer
There are two trip odometers: TM and TA. Duringa drive, the trip odometer registers:
•Mileage
•Driving time
•Average speed
•Average fuel consumption
The values displayed are those since the lasttime the trip odometer was reset.
Odometer
The odometer registers the vehicle's total mile-age and cannot be reset.
Current fuel consumption
This gauge shows the current fuel consumption.This reading is updated once a second.
Distance to empty
This function shows the approximate distancethat can be driven on the fuel remaining in thetank.
The calculation is based on average fuel con-sumption during the last 20 miles (30 km) ofdriving and the amount of fuel remaining in thetank.
When the gauge displays "----", there is very littleuseable fuel remaining in the tank; refuel as soonas possible.
Page 104 of 584
||
INSTRUMENTS AND CONTROLS
102
The accuracy of this figure may vary if your driv-ing style changes. An economical driving style willgenerally increase this distance.
Distance to discharged battery
This gauge shows the approximate distance thatcan be driven on the charge remaining in thehybrid battery. When the gauge displays "----"there is no guaranteed driving charge remainingin the battery.
This calculation is based on the average electricalcurrent consumption in a normally loaded vehicleduring normal driving, and whether the A/C is onor off.
An economical driving style will generallyincrease this distance.
Distance using the electric motor
To get the optimal driving distance using theelectric motor, it is essential to conserve current.Functions that use a great deal of current (e.g.,audio system, electrical heating in the steeringwheel/door mirrors/rear window/seats, very coldair from the climate system, etc.) reduce the pos-sible driving distance.
NOTE
In addition to high electrical consumption inthe passenger compartment, fast accelera-tion, sudden braking, heavy loads, low ambienttemperatures and driving up hills can reducethe possible driving distance.
Tourist (alternative speedometer)
This is an alternative digital speedometer can beused when driving in areas in which the speedlimit is listed in a different unit of measure. If thespeedometer is in mph, this gauge will show thevehicle's speed in km/h and vice versa.
Related information
•Displaying trip computer information (p. 102)
•Displaying trip statistics (p. 104)
Displaying trip computerinformation
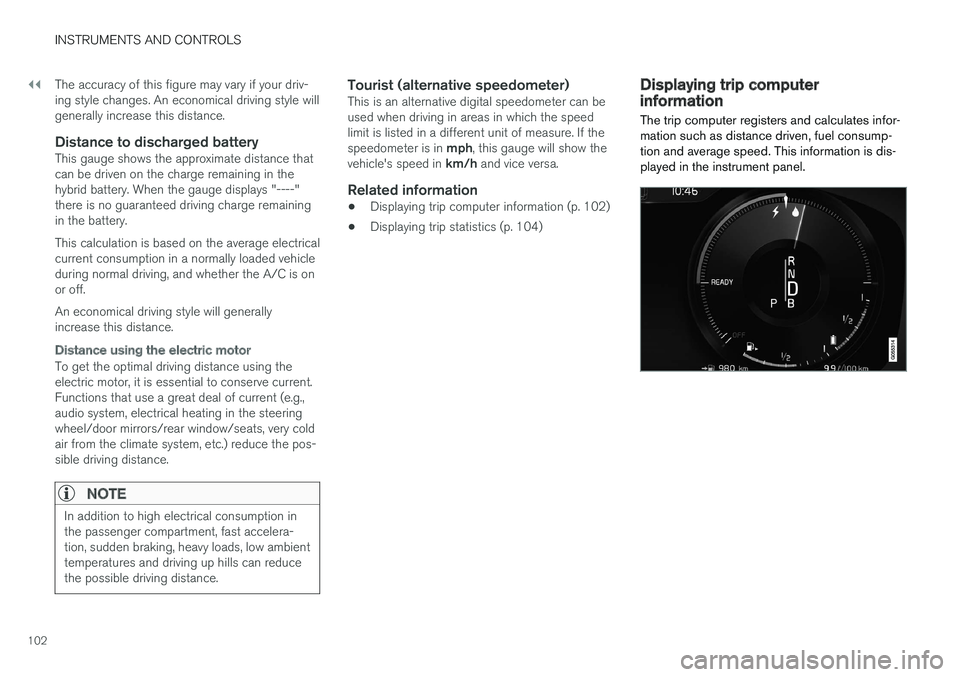
The trip computer registers and calculates infor-mation such as distance driven, fuel consump-tion and average speed. This information is dis-played in the instrument panel.
Page 105 of 584
INSTRUMENTS AND CONTROLS
* Option/accessory, for more information, see Introduction.103
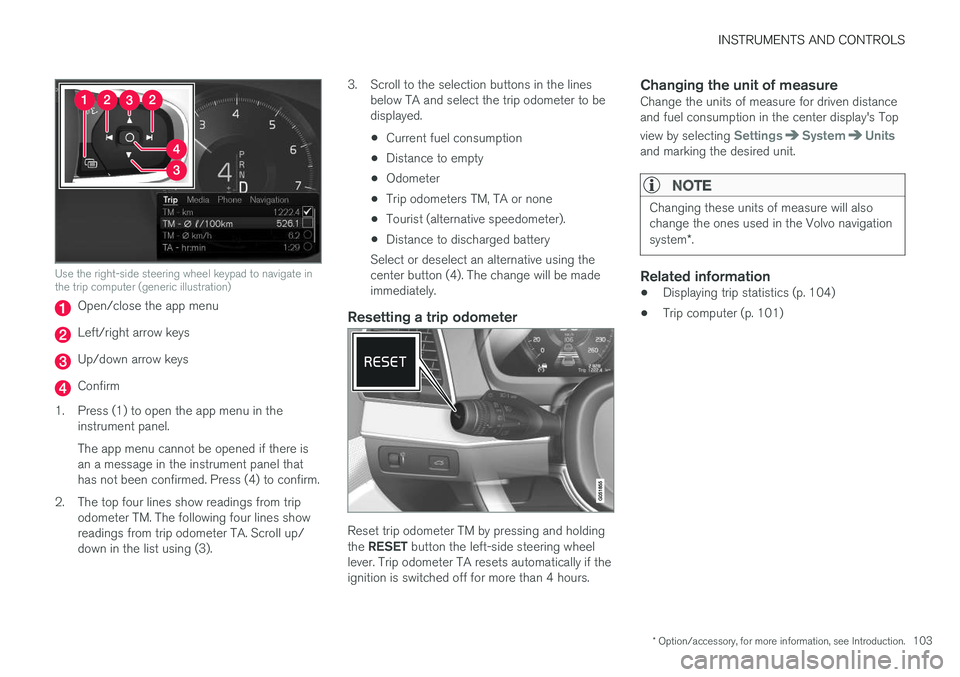
Use the right-side steering wheel keypad to navigate inthe trip computer (generic illustration)
Open/close the app menu
Left/right arrow keys
Up/down arrow keys
Confirm
1.Press (1) to open the app menu in theinstrument panel.
The app menu cannot be opened if there isan a message in the instrument panel thathas not been confirmed. Press (4) to confirm.
2. The top four lines show readings from tripodometer TM. The following four lines showreadings from trip odometer TA. Scroll up/down in the list using (3).
3. Scroll to the selection buttons in the linesbelow TA and select the trip odometer to bedisplayed.
•Current fuel consumption
•Distance to empty
•Odometer
•Trip odometers TM, TA or none
•Tourist (alternative speedometer).
•Distance to discharged battery
Select or deselect an alternative using thecenter button (4). The change will be madeimmediately.
Resetting a trip odometer
Reset trip odometer TM by pressing and holdingthe RESET button the left-side steering wheellever. Trip odometer TA resets automatically if theignition is switched off for more than 4 hours.
Changing the unit of measure
Change the units of measure for driven distanceand fuel consumption in the center display's Top
view by selecting SettingsSystemUnitsand marking the desired unit.
NOTE
Changing these units of measure will alsochange the ones used in the Volvo navigationsystem*.
Related information
•Displaying trip statistics (p. 104)
•Trip computer (p. 101)
Page 106 of 584
INSTRUMENTS AND CONTROLS
* Option/accessory, for more information, see Introduction.104
Displaying trip statistics
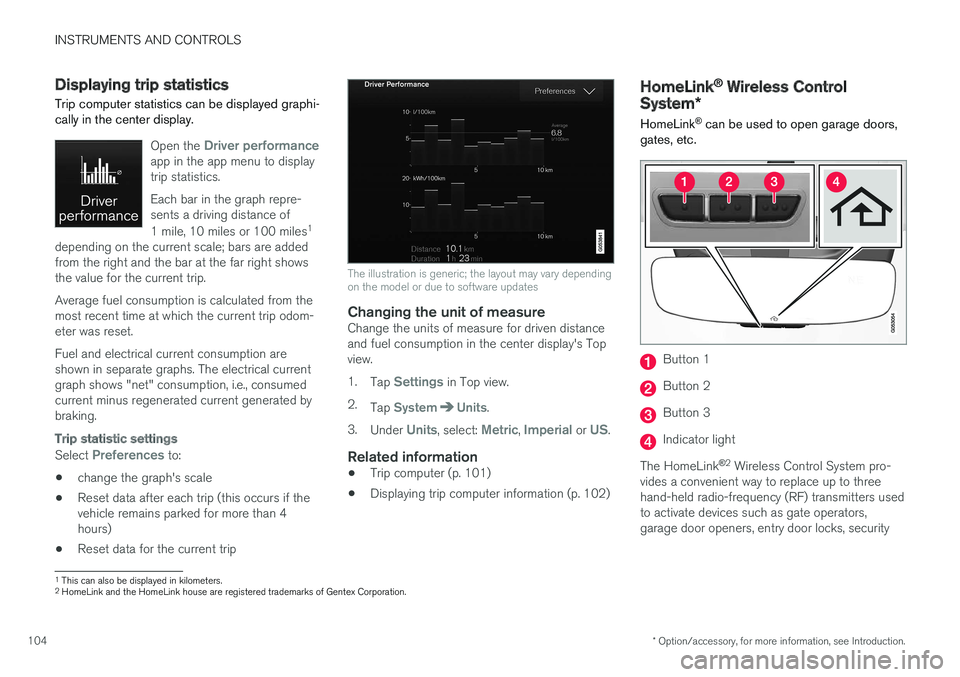
Trip computer statistics can be displayed graphi-cally in the center display.
Open the Driver performanceapp in the app menu to displaytrip statistics.
Each bar in the graph repre-sents a driving distance of
1 mile, 10 miles or 100 miles1
depending on the current scale; bars are addedfrom the right and the bar at the far right showsthe value for the current trip.
Average fuel consumption is calculated from themost recent time at which the current trip odom-eter was reset.
Fuel and electrical current consumption areshown in separate graphs. The electrical currentgraph shows "net" consumption, i.e., consumedcurrent minus regenerated current generated bybraking.
Trip statistic settings
Select Preferences to:
•change the graph's scale
•Reset data after each trip (this occurs if thevehicle remains parked for more than 4hours)
•Reset data for the current trip
The illustration is generic; the layout may vary dependingon the model or due to software updates
Changing the unit of measure
Change the units of measure for driven distanceand fuel consumption in the center display's Topview.
1.Tap Settings in Top view.
2.Tap SystemUnits.
3.Under Units, select: Metric, Imperial or US.
Related information
•Trip computer (p. 101)
•Displaying trip computer information (p. 102)
HomeLink® Wireless Control
System*
HomeLink® can be used to open garage doors,gates, etc.
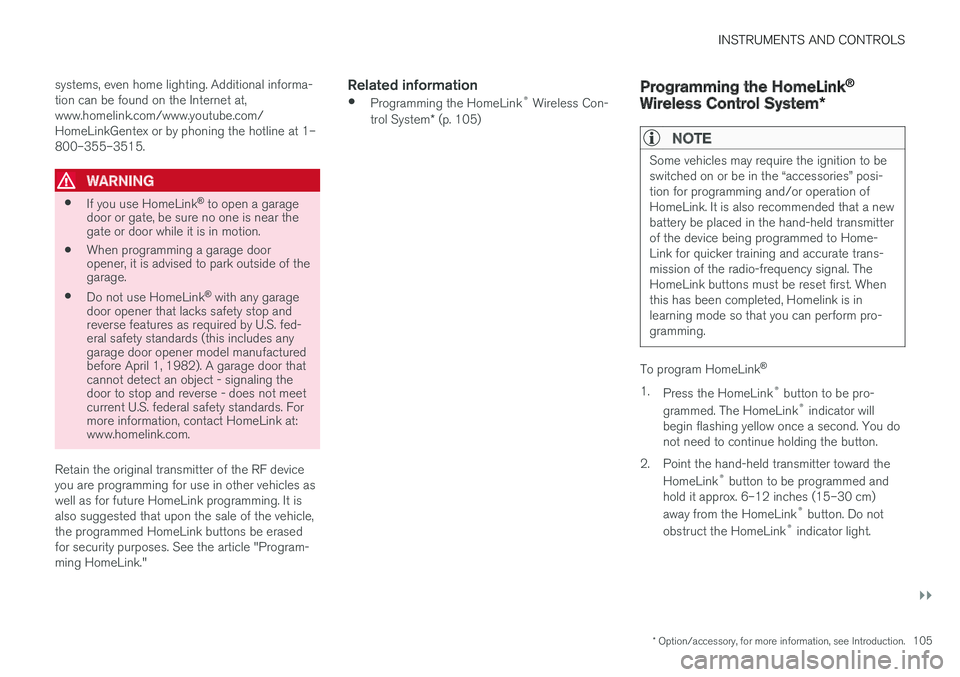
Button 1
Button 2
Button 3
Indicator light
The HomeLink®2 Wireless Control System pro-vides a convenient way to replace up to threehand-held radio-frequency (RF) transmitters usedto activate devices such as gate operators,garage door openers, entry door locks, security
1This can also be displayed in kilometers.2HomeLink and the HomeLink house are registered trademarks of Gentex Corporation.
Page 107 of 584
INSTRUMENTS AND CONTROLS
}}
* Option/accessory, for more information, see Introduction.105
systems, even home lighting. Additional informa-tion can be found on the Internet at,www.homelink.com/www.youtube.com/HomeLinkGentex or by phoning the hotline at 1–800–355–3515.
WARNING
•If you use HomeLink® to open a garagedoor or gate, be sure no one is near thegate or door while it is in motion.
•When programming a garage dooropener, it is advised to park outside of thegarage.
•Do not use HomeLink® with any garagedoor opener that lacks safety stop andreverse features as required by U.S. fed-eral safety standards (this includes anygarage door opener model manufacturedbefore April 1, 1982). A garage door thatcannot detect an object - signaling thedoor to stop and reverse - does not meetcurrent U.S. federal safety standards. Formore information, contact HomeLink at:www.homelink.com.
Retain the original transmitter of the RF deviceyou are programming for use in other vehicles aswell as for future HomeLink programming. It isalso suggested that upon the sale of the vehicle,the programmed HomeLink buttons be erasedfor security purposes. See the article "Program-ming HomeLink."
Related information
•Programming the HomeLink® Wireless Con-trol System* (p. 105)
Programming the HomeLink®
Wireless Control System*
NOTE
Some vehicles may require the ignition to beswitched on or be in the “accessories” posi-tion for programming and/or operation ofHomeLink. It is also recommended that a newbattery be placed in the hand-held transmitterof the device being programmed to Home-Link for quicker training and accurate trans-mission of the radio-frequency signal. TheHomeLink buttons must be reset first. Whenthis has been completed, Homelink is inlearning mode so that you can perform pro-gramming.
To program HomeLink®
1.Press the HomeLink® button to be pro-
grammed. The HomeLink® indicator willbegin flashing yellow once a second. You donot need to continue holding the button.
2.Point the hand-held transmitter toward the
HomeLink® button to be programmed andhold it approx. 6–12 inches (15–30 cm)
away from the HomeLink® button. Do not
obstruct the HomeLink® indicator light.
Page 108 of 584
||
INSTRUMENTS AND CONTROLS
106
3. Press and hold the button on the originalremote control that is to be programmed on
HomeLink® and observe the HomeLink®
indicator light. Hold the button until the indi-cator light has changed from flashing yellowonce a second to either flashing green 10times a second or by glowing steadily green.
When the HomeLink® indicator light flashesor glows steadily green, the button on theoriginal remote control can be released.Note: for certain remote controls, theinstructions listed under "Gate operators/Canadian programming" at the end of thisarticle should be used instead of step 3.
4.Press the programmed HomeLink® buttonand check the indicator light.
Indicator light glows steadily green: pro-gramming has been completed. The garagedoor, gate, etc., should now be activatedwhen the programmed button is pressed.
Indicator light flashes 10 times a second:
press the HomeLink® button that is beingprogrammed. Hold it for 2 seconds andrelease it. Repeat the “press/hold/release”sequence a second time, and, depending onthe brand of the garage door opener, repeatthis sequence a third time to complete theprogramming process. Programming shouldnow be completed and the garage door,gate, etc., should now be activated when theprogrammed button is pressed.
If the garage door, etc. still does notreact: continue with steps 6-8 to completeprogramming.
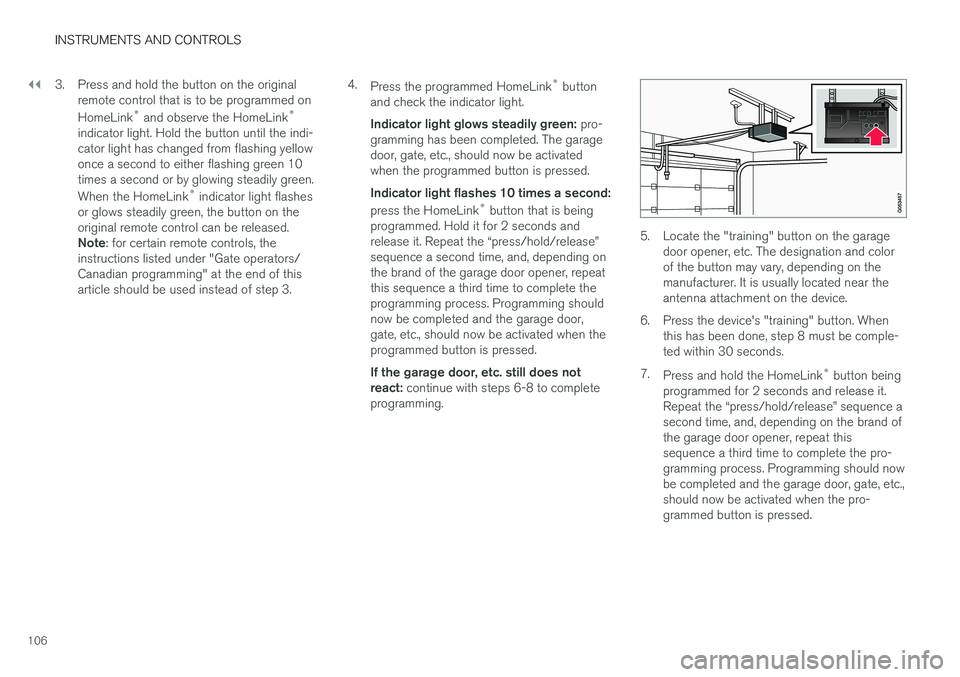
5. Locate the "training" button on the garagedoor opener, etc. The designation and colorof the button may vary, depending on themanufacturer. It is usually located near theantenna attachment on the device.
6.Press the device's "training" button. Whenthis has been done, step 8 must be comple-ted within 30 seconds.
7.Press and hold the HomeLink® button beingprogrammed for 2 seconds and release it.Repeat the “press/hold/release” sequence asecond time, and, depending on the brand ofthe garage door opener, repeat thissequence a third time to complete the pro-gramming process. Programming should nowbe completed and the garage door, gate, etc.,should now be activated when the pro-grammed button is pressed.
Page 109 of 584
INSTRUMENTS AND CONTROLS
}}
107
Gate Operator/Canadian Programming
Canadian radio-frequency laws require transmit-ter signals to “time-out” (or quit) after severalseconds of transmission – which may not be longenough for HomeLink to pick up the signal dur-ing programming. Similar to this Canadian law,some U.S. gate operators are designed to “time-out” in the same manner.
If you live in Canada or you are having difficultiesprogramming a gate operator or garage dooropener by using the “Programming” procedures,replace “Programming HomeLink” step 3with the following:
•Continue to press and hold the HomeLinkbutton while you press and release - everytwo seconds (“cycle”) your hand-held trans-mitter until the HomeLink indicator lightchanges from a slow to a rapidly blinkinglight. Now you may release both the Home-Link and hand-held transmitter buttons.
Proceed with “Programming” step 4 to complete.
Using HomeLink ®
When programming has been completed,
HomeLink® can be used instead of the originalremote controls.
To operate, press and hold the programmed
HomeLink® button until the trained device begins
to operate3 (this may take several seconds). The
indicator light will glow steadily or flash when thebutton has been pressed. Activation will nowoccur for the trained device (i.e., garage dooropener, gate operator, security system, entry doorlock, home/office lighting, etc.).
NOTE
If the ignition is switched off, HomeLink willfunction for 30 minutes after the driver's doorhas been opened.
For convenience, the hand-held transmitter of thedevice may also be used at any time.
In the event that there are still programming diffi-culties or questions, contact HomeLink at:www.HomeLink.com, www.youtube.com/HomeLinkGentex or by phoning the hotline at 1–800–355–3515.
Resetting HomeLink ®
buttons
Use the following procedure to reset (erase pro-
gramming) from the three HomeLink® buttons(individual buttons cannot be reset but can be“reprogrammed” as outlined in the following sec-tion):
1.Press and hold HomeLink® buttons 1 and 3for approx. 10 seconds until the indicatorlight begins to flash green.
2. Release both buttons.
>HomeLink® is now in the training (orlearning) mode and can be programmedat any time beginning with “To program
HomeLink®" above.
Reprogramming a single HomeLink ®
button
To reprogram an individual HomeLink® button:
1.Press and hold the desired HomeLink® but-ton. DO NOT release the button.
2. The yellow indicator light will begin to flashafter 20 seconds. Without releasing theHomeLink button, proceed with “To program
HomeLink®" step 1 above.
For questions or comments, contact HomeLinkat: www.HomeLink.com, www.youtube.com/HomeLinkGentex or by phoning the hotline at 1–800–355–3515.
FCC (USA) and IC (Canada)
This device complies with FCC rules part 15 andIndustry Canada RSS-210. Operation is subjectto the following two conditions: (1) This devicemay not cause harmful interference, and (2) Thisdevice must accept any interference that may bereceived including interference that may causeundesired operation. WARNING: The transmitterhas been tested and complies with FCC and IC
3Do not hold the button for more than 20 seconds as this will clear the programming of the button.
Page 110 of 584
||
INSTRUMENTS AND CONTROLS
* Option/accessory, for more information, see Introduction.108
rules. Changes or modifications not expresslyapproved by the party are prohibited.
NOTE
The transmitter has been tested and complieswith FCC and IC rules. Changes or modifica-tions not expressly approved by the partyresponsible for compliance could void the
user