YAMAHA TZR50 2012 Manual PDF
Manufacturer: YAMAHA, Model Year: 2012, Model line: TZR50, Model: YAMAHA TZR50 2012Pages: 92, PDF Size: 5.1 MB
Page 71 of 92
3. Turn the key to “ ” and turn onthe electrical circuits to check if
the devices operate.
4. If the fuse immediately blows again, have a Yamaha dealer
check the electrical system.
EAU23804
Replacing the headlight bulb
This model is equipped with a halo-
gen bulb headlight. If the headlight
bulb burns out, replace it as follows.
ECA10650
Take care not to damage the follo-
wing parts:
�Headlight bulb
Do not touch the glass part of
the headlight bulb to keep it
free from oil, otherwise the
transparency of the glass, the
luminosity of the bulb, and the
bulb life will be adversely affec-
ted. Thoroughly clean off any
dirt and fingerprints on the
headlight bulb using a cloth
moistened with alcohol or thin-
ner.
�Headlight lens
Do not affix any type of tinted
film or stickers to the headlight
lens.
Do not use a headlight bulb of
a wattage higher than speci-
fied.
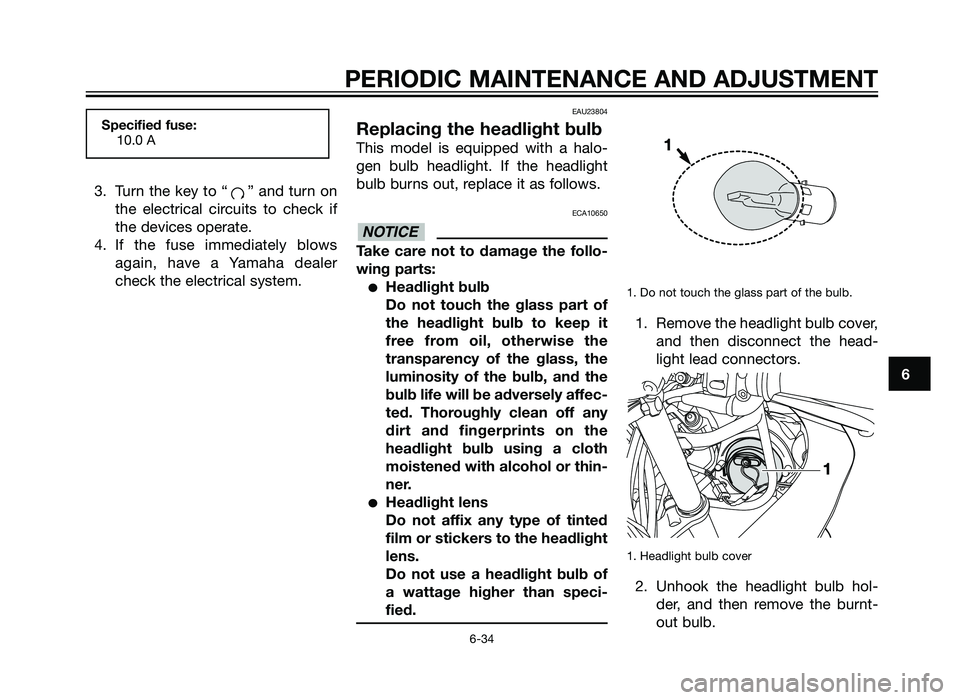
1. Do not touch the glass part of the bulb.
1. Remove the headlight bulb cover,and then disconnect the head-
light lead connectors.
1. Headlight bulb cover
2. Unhook the headlight bulb hol-der, and then remove the burnt-
out bulb.
NOTICE
Specified fuse:10.0 A
PERIODIC MAINTENANCE AND ADJUSTMENT
6-34
6
1HD-F819D-E0 7/3/11 20:27 Página 71
2AS-F819D-E0.indd 7131/07/12 10:09
Page 72 of 92
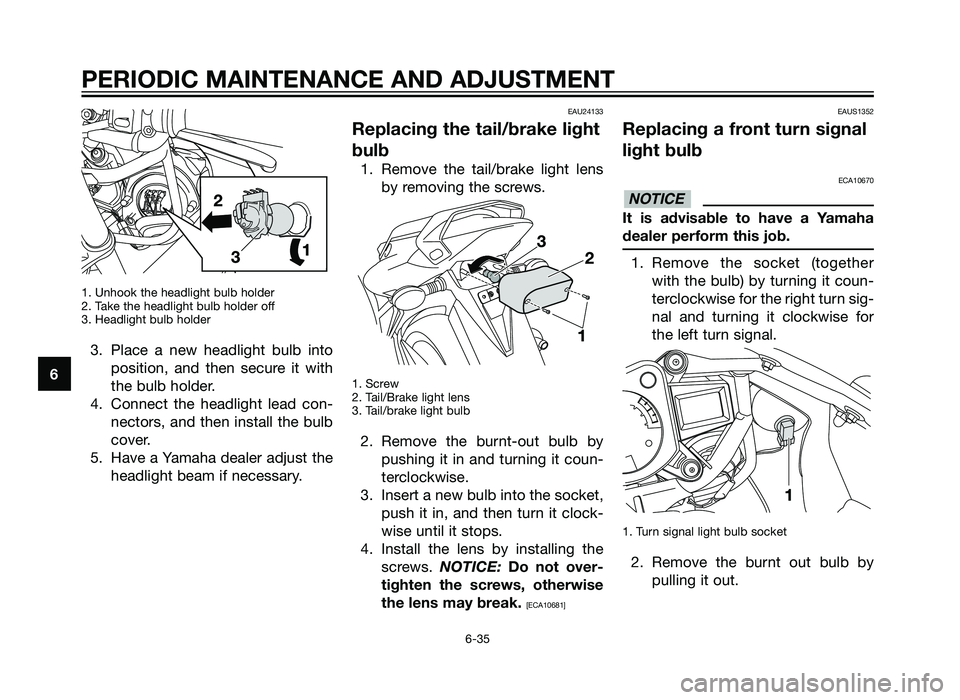
1. Unhook the headlight bulb holder
2. Take the headlight bulb holder off
3. Headlight bulb holder
3. Place a new headlight bulb intoposition, and then secure it with
the bulb holder.
4. Connect the headlight lead con- nectors, and then install the bulb
cover.
5. Have a Yamaha dealer adjust the headlight beam if necessary.
EAU24133
Replacing the tail/brake light
bulb
1. Remove the tail/brake light lensby removing the screws.
1. Screw
2. Tail/Brake light lens
3. Tail/brake light bulb
2. Remove the burnt-out bulb bypushing it in and turning it coun-
terclockwise.
3. Insert a new bulb into the socket, push it in, and then turn it clock-
wise until it stops.
4. Install the lens by installing the screws. NOTICE: Do not over-
tighten the screws, otherwise
the lens may break.
[ECA10681] EAUS1352
Replacing a front turn signal
light bulb
ECA10670
It is advisable to have a Yamaha
dealer perform this job.
1. Remove the socket (together
with the bulb) by turning it coun-
terclockwise for the right turn sig-
nal and turning it clockwise for
the left turn signal.
1. Turn signal light bulb socket
2. Remove the burnt out bulb bypulling it out.
NOTICE
PERIODIC MAINTENANCE AND ADJUSTMENT
6-35
6
1HD-F819D-E0 7/3/11 20:27 Página 72
2AS-F819D-E0.indd 7231/07/12 10:09
Page 73 of 92
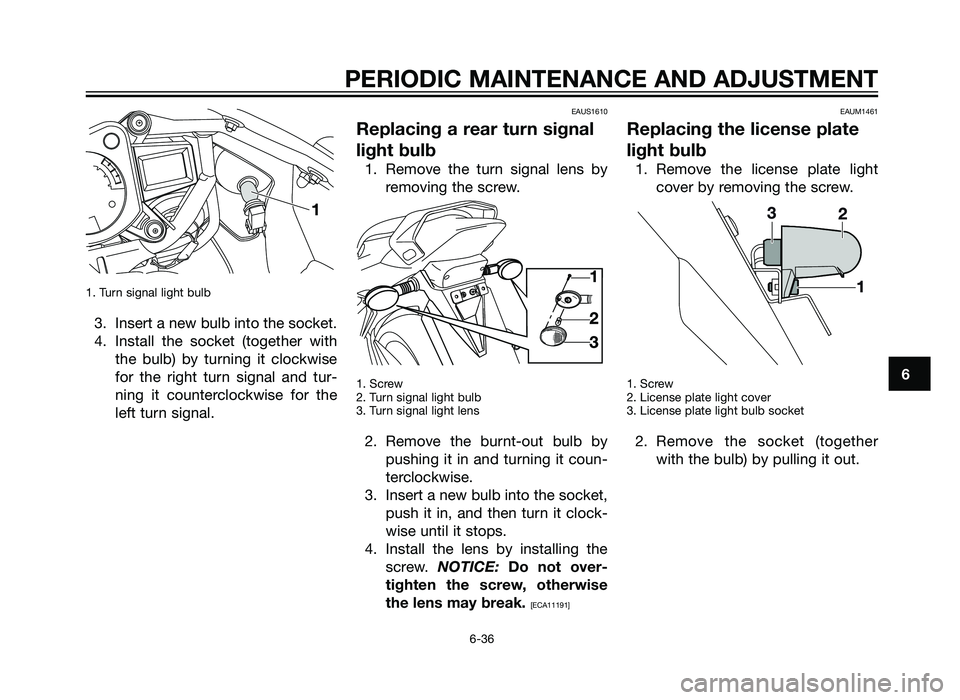
1. Turn signal light bulb
3. Insert a new bulb into the socket.
4. Install the socket (together withthe bulb) by turning it clockwise
for the right turn signal and tur-
ning it counterclockwise for the
left turn signal.
EAUS1610
Replacing a rear turn signal
light bulb
1. Remove the turn signal lens byremoving the screw.
1. Screw
2. Turn signal light bulb
3. Turn signal light lens
2. Remove the burnt-out bulb bypushing it in and turning it coun-
terclockwise.
3. Insert a new bulb into the socket, push it in, and then turn it clock-
wise until it stops.
4. Install the lens by installing the screw. NOTICE: Do not over-
tighten the screw, otherwise
the lens may break.
[ECA11191] EAUM1461
Replacing the license plate
light bulb
1. Remove the license plate light
cover by removing the screw.
1. Screw
2. License plate light cover
3. License plate light bulb socket
2. Remove the socket (togetherwith the bulb) by pulling it out.
PERIODIC MAINTENANCE AND ADJUSTMENT
6-36
6
1HD-F819D-E0 7/3/11 20:27 Página 73
2AS-F819D-E0.indd 7331/07/12 10:09
Page 74 of 92

1. Bulb
3. Remove the burnt out bulb bypulling it out.
4. Insert a new bulb into the socket.
5. Install the socket (together with the bulb) by pushing it in.
6. Install the license plate light cover by installing the screw.
EAU25871
Troubleshooting
Although Yamaha motorcycles recei-
ve a thorough inspection before ship-
ment from the factory, trouble may
occur during operation. Any problem
in the fuel, compression, or ignition
systems, for example, can cause poor
starting and loss of power.
The following troubleshooting charts
represent quick and easy procedures
for checking these vital systems your-
self. However, should your motorcy-
cle require any repair, take it to a
Yamaha dealer, whose skilled techni-
cians have the necessary tools, expe-
rience, and know-how to service the
motorcycle properly.
Use only genuine Yamaha replace-
ment parts. Imitation parts may look
like Yamaha parts, but they are often
inferior, have a shorter service life and
can lead to expensive repair bills.
EWA15141
When checking the fuel system, do
not smoke, and make sure there
are no open flames or sparks in the
area, including pilot lights from
water heaters or furnaces. Gasoli-
ne or gasoline vapors can ignite or
explode, causing severe injury or
property damage.
WARNING
PERIODIC MAINTENANCE AND ADJUSTMENT
6-37
6
1HD-F819D-E0 7/3/11 20:27 Página 74
2AS-F819D-E0.indd 7431/07/12 10:09
Page 75 of 92
EAU25924
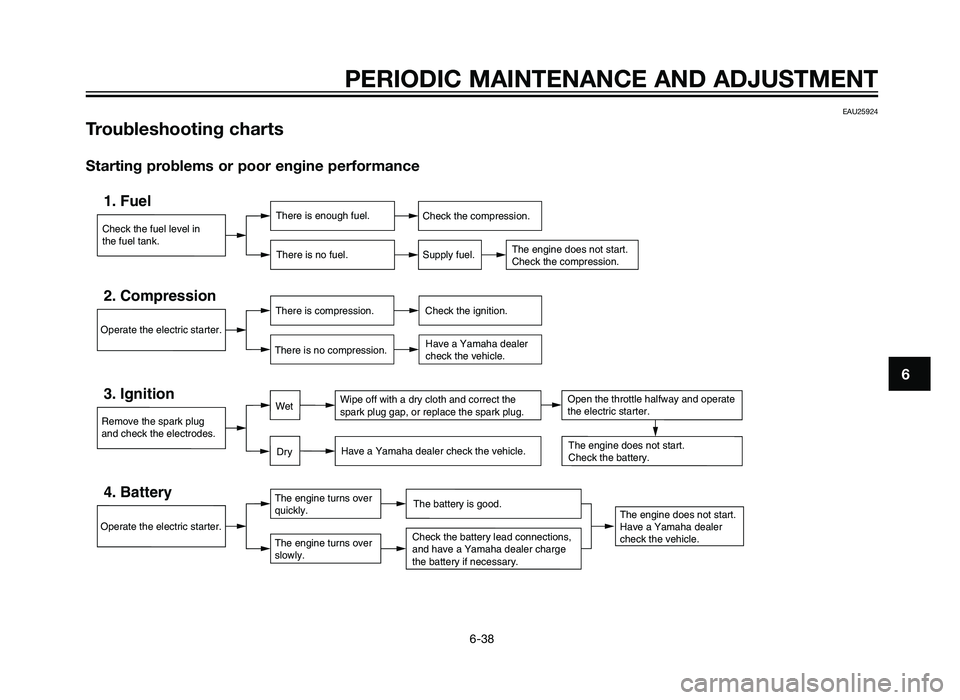
Troubleshooting charts
Starting problems or poor engine performance
Check the fuel level in
the fuel tank.
1. FuelThere is enough fuel.There is no fuel.Check the compression.
Supply fuel.
The engine does not start.
Check the compression.
Operate the electric starter.
2. CompressionThere is compression.
There is no compression.Check the ignition. Have a Yamaha dealer
check the vehicle.
Remove the spark plug
and check the electrodes.
3. IgnitionWipe off with a dry cloth and correct the
spark plug gap, or replace the spark plug.
Have a Yamaha dealer check the vehicle.
The engine does not start.
Have a Yamaha dealer
check the vehicle.
The engine does not start.
Check the battery.
Operate the electric starter.
4. BatteryThe engine turns over
quickly.
The engine turns over
slowly.The battery is good.
Check the battery lead connections,
and have a Yamaha dealer charge
the battery if necessary.
Dry
WetOpen the throttle halfway and operate
the electric starter.
PERIODIC MAINTENANCE AND ADJUSTMENT
6-38
6
1HD-F819D-E0 7/3/11 20:27 Página 75
2AS-F819D-E0.indd 7531/07/12 10:09
Page 76 of 92
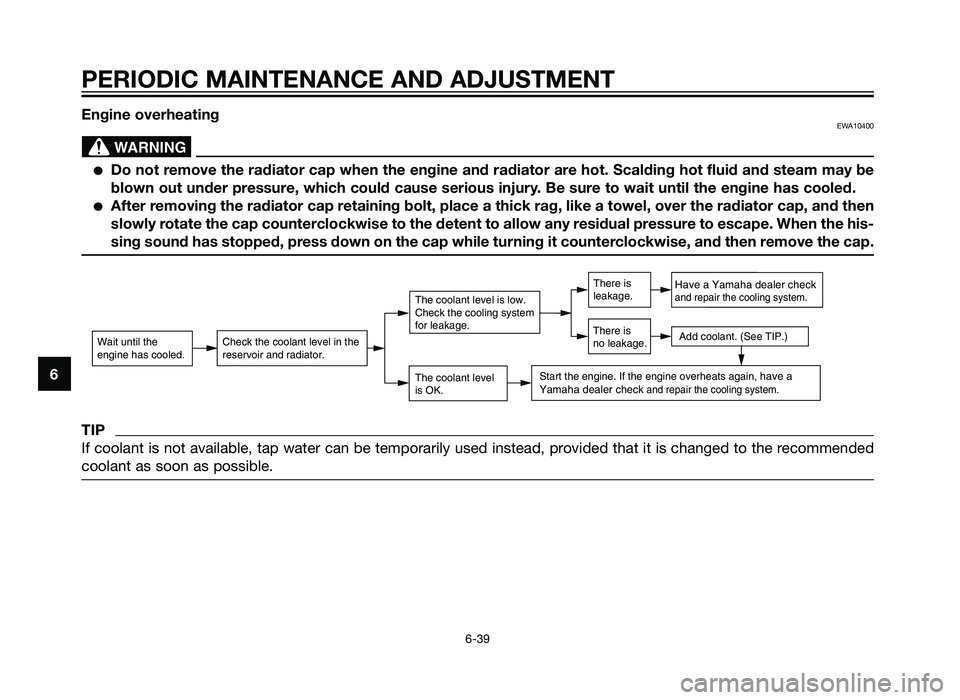
Engine overheatingEWA10400
�Do not remove the radiator cap when the engine and radiator are hot. Scalding hot fluid and steam may be
blown out under pressure, which could cause serious injury. Be sure to wait until the engine has cooled.
�After removing the radiator cap retaining bolt, place a thick rag, like a towel, over the radiator cap, a\
nd then
slowly rotate the cap counterclockwise to the detent to allow any residual pressure to escape. When the his-
sing sound has stopped, press down on the cap while turning it counterclockwise, and then remove the cap.
TIP
If coolant is not available, tap water can be temporarily used instead, \
provided that it is changed to the recommended
coolant as soon as possible.
Wait until the
engine has cooled.Check the coolant level in the
reservoir and radiator.
The coolant level
is OK.
The coolant level is low.
Check the cooling system
for leakage.
Have a Yamaha dealer checkand repair the cooling system.
Add coolant. (See TIP.)
Start the engine. If the engine overheats again, have a
Yamaha dealer check and repair the cooling system.
There is
leakage.
There is
no leakage.
WARNING
PERIODIC MAINTENANCE AND ADJUSTMENT
6-39
6
1HD-F819D-E0 7/3/11 20:27 Página 76
2AS-F819D-E0.indd 7631/07/12 10:09
Page 77 of 92
MOTORCYCLE CARE AND STORAGE
7-1
7
EAU37833
Matte color caution
ECA15192
Some models are equipped with
matte colored finished parts. Be
sure to consult a Yamaha dealer for
advice on what products to use
before cleaning the vehicle.
Using a brush, harsh chemical pro-
ducts or cleaning compounds
when cleaning these parts will
scratch or damage their surface.
Wax also should not be applied to
any matte colored finished parts.
EAU26004
Care
While the open design of a motorcy-
cle reveals the attractiveness of the
technology, it also makes it more vul-
nerable. Rust and corrosion can
develop even if high-quality compo-
nents are used. A rusty exhaust pipe
may go unnoticed on a car, however,
it detracts from the overall appearan-
ce of a motorcycle. Frequent and pro-
per care does not only comply with
the terms of the warranty, but it will
also keep your motorcycle looking
good, extend its life and optimize its
performance.
Before cleaning1. Cover the muffler outlet with a plastic bag after the engine has
cooled down.
2. Make sure that all caps and covers as well as all electrical
couplers and connectors, inclu-
ding the spark plug cap, are
tightly installed.
3. Remove extremely stubborn dirt, like oil burnt onto the crankcase,
with a degreasing agent and a brush, but never apply such pro-
ducts onto seals, gaskets, sproc-
kets, the drive chain and wheel
axles. Always rinse the dirt and
degreaser off with water.
Cleaning
ECA10772
�Avoid using strong acidic whe-
el cleaners, especially on spo-
ked wheels. If such products
are used on hard-to-remove
dirt, do not leave the cleaner on
the affected area any longer
than instructed. Also, tho-
roughly rinse the area off with
water, immediately dry it, and
then apply a corrosion protec-
tion spray.
�Improper cleaning can damage
plastic parts (such as cowlings,
panels, windshields, headlight
lenses, meter lenses, etc.) and
the mufflers. Use only a soft,
clean cloth or sponge with
water to clean plastic. Howe-
ver, if the plastic parts cannot
be thoroughly cleaned with
NOTICE
NOTICE
1HD-F819D-E0 7/3/11 20:27 Página 77
2AS-F819D-E0.indd 7731/07/12 10:09
Page 78 of 92
water, diluted mild detergent
with water may be used. Be
sure to rinse off any detergent
residue using plenty of water,
as it is harmful to plastic parts.
�Do not use any harsh chemical
products on plastic parts. Be
sure to avoid using cloths or
sponges which have been in
contact with strong or abrasive
cleaning products, solvent or
thinner, fuel (gasoline), rust
removers or inhibitors, brake
fluid, antifreeze or electrolyte.
�Do not use high-pressure was-
hers or steam-jet cleaners sin-
ce they cause water seepage
and deterioration in the follo-
wing areas: seals (of wheel and
swingarm bearings, fork and
brakes), electric components
(couplers, connectors, instru-
ments, switches and lights),
breather hoses and vents.
�For motorcycles equipped with
a windshield: Do not use strong
cleaners or hard sponges as
they will cause dulling or scrat-
ching. Some cleaning com-pounds for plastic may leave
scratches on the windshield.
Test the product on a small hid-
den part of the windshield to
make sure that it does not lea-
ve any marks. If the windshield
is scratched, use a quality
plastic polishing compound
after washing.
After normal use
Remove dirt with warm water, a mild
detergent, and a soft, clean sponge,
and then rinse thoroughly with clean
water. Use a toothbrush or bottlebrush
for hard-to-reach areas. Stubborn dirt
and insects will come off more easily if
the area is covered with a wet cloth for
a few minutes before cleaning.
After riding in the rain, near the sea or
on salt-sprayed roads
Since sea salt or salt sprayed on
roads during winter are extremely
corrosive in combination with water,
carry out the following steps after
each ride in the rain, near the sea or
on salt-sprayed roads.
TIP
Salt sprayed on roads in the winter
may remain well into spring.
1. Clean the motorcycle with cold
water and a mild detergent, after
the engine has cooled down.
NOTICE: Do not use warm
water since it increases the
corrosive action of the salt.
[ECA10791]
2. Apply a corrosion protection spray on all metal, including
chrome- and nickel-plated, surfa-
ces to prevent corrosion.
After cleaning 1. Dry the motorcycle with a cha- mois or an absorbing cloth.
2. Immediately dry the drive chain and lubricate it to prevent it from
rusting.
3. Use a chrome polish to shine chrome, aluminum and stainless-
steel parts, including the exhaust
system. (Even the thermally indu-
ced discoloring of stainless-steel
exhaust systems can be removed
through polishing.)
MOTORCYCLE CARE AND STORAGE
7-2
7
1HD-F819D-E0 7/3/11 20:27 Página 78
2AS-F819D-E0.indd 7831/07/12 10:09
Page 79 of 92
4. To prevent corrosion, it is recom-mended to apply a corrosion pro-
tection spray on all metal, inclu-
ding chrome- and nickel-plated,
surfaces.
5. Use spray oil as a universal clea- ner to remove any remaining dirt.
6. Touch up minor paint damage caused by stones, etc.
7. Wax all painted surfaces.
8. Let the motorcycle dry comple- tely before storing or covering it.
EWA11131
Contaminants on the brakes or
tires can cause loss of control.
�Make sure that there is no oil or
wax on the brakes or tires.
�If necessary, clean the brake
discs and brake linings with a
regular brake disc cleaner or
acetone, and wash the tires
with warm water and a mild
detergent. Before riding at hig-
her speeds, test the motorcy-
cle’s braking performance and
cornering behavior.
ECA10800
�Apply spray oil and wax spa-
ringly and make sure to wipe
off any excess.
�Never apply oil or wax to any
rubber and plastic parts, but
treat them with a suitable care
product.
�Avoid using abrasive polishing
compounds as they will wear
away the paint.
TIP
�Consult a Yamaha dealer for
advice on what products to use.
�Washing, rainy weather or humid
climates can cause the headlight
lens to fog. Turning the headlight
on for a short period of time will
help remove the moisture from
the lens.
EAU37222
Storage
Short-term
Always store your motorcycle in a
cool, dry place and, if necessary, pro-
tect it against dust with a porous
cover. Be sure the engine and the
exhaust system are cool before cove-
ring the motorcycle.
ECA10810
�Storing the motorcycle in a
poorly ventilated room or cove-
ring it with a tarp, while it is still
wet, will allow water and humi-
dity to seep in and cause rust.
�To prevent corrosion, avoid
damp cellars, stables (because
of the presence of ammonia)
and areas where strong chemi-
cals are stored.
Long-term
Before storing your motorcycle for
several months:1. Follow all the instructions in the “Care” section of this chapter.
NOTICE
NOTICE
WARNING
MOTORCYCLE CARE AND STORAGE
7-3
7
1HD-F819D-E0 7/3/11 20:27 Página 79
2AS-F819D-E0.indd 7931/07/12 10:09
Page 80 of 92
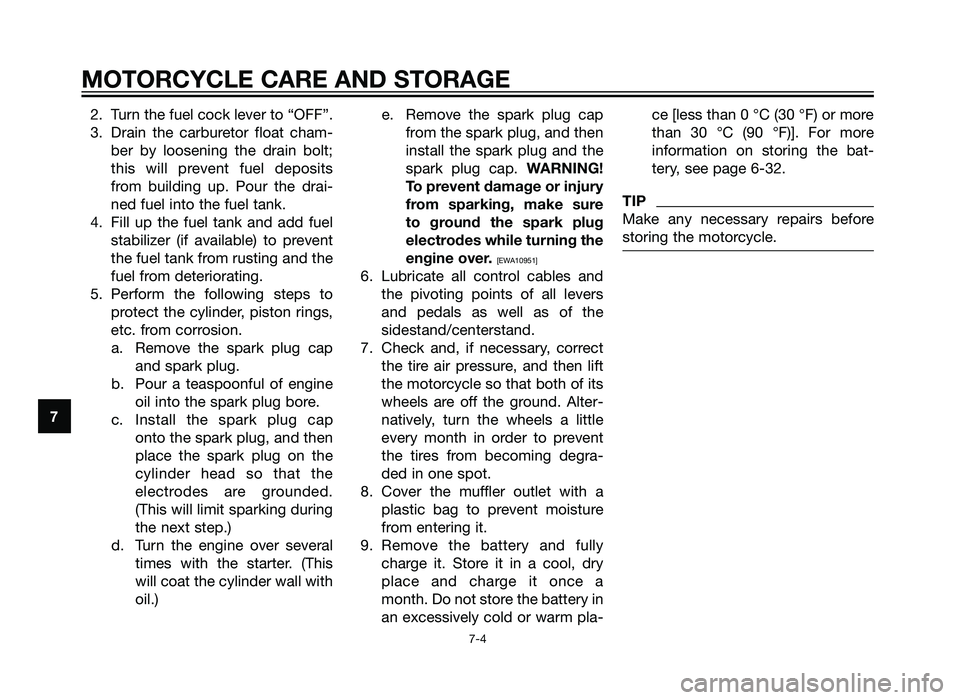
2. Turn the fuel cock lever to “OFF”.
3. Drain the carburetor float cham-ber by loosening the drain bolt;
this will prevent fuel deposits
from building up. Pour the drai-
ned fuel into the fuel tank.
4. Fill up the fuel tank and add fuel stabilizer (if available) to prevent
the fuel tank from rusting and the
fuel from deteriorating.
5. Perform the following steps to protect the cylinder, piston rings,
etc. from corrosion.a. Remove the spark plug cap and spark plug.
b. Pour a teaspoonful of engine oil into the spark plug bore.
c. Install the spark plug cap onto the spark plug, and then
place the spark plug on the
cylinder head so that the
electrodes are grounded.
(This will limit sparking during
the next step.)
d. Turn the engine over several times with the starter. (This
will coat the cylinder wall with
oil.) e. Remove the spark plug cap
from the spark plug, and then
install the spark plug and the
spark plug cap. WARNING!
To prevent damage or injury
from sparking, make sure
to ground the spark plug
electrodes while turning the
engine over.
[EWA10951]
6. Lubricate all control cables andthe pivoting points of all levers
and pedals as well as of the
sidestand/centerstand.
7. Check and, if necessary, correct the tire air pressure, and then lift
the motorcycle so that both of its
wheels are off the ground. Alter-
natively, turn the wheels a little
every month in order to prevent
the tires from becoming degra-
ded in one spot.
8. Cover the muffler outlet with a plastic bag to prevent moisture
from entering it.
9. Remove the battery and fully charge it. Store it in a cool, dry
place and charge it once a
month. Do not store the battery in
an excessively cold or warm pla- ce [less than 0 °C (30 °F) or more
than 30 °C (90 °F)]. For more
information on storing the bat-
tery, see page 6-32.
TIP
Make any necessary repairs before
storing the motorcycle.
MOTORCYCLE CARE AND STORAGE
7-4
7
1HD-F819D-E0 7/3/11 20:27 Página 80
2AS-F819D-E0.indd 8031/07/12 10:09