lock YAMAHA WR 250F 2015 Service Manual
[x] Cancel search | Manufacturer: YAMAHA, Model Year: 2015, Model line: WR 250F, Model: YAMAHA WR 250F 2015Pages: 430, PDF Size: 14.14 MB
Page 207 of 430
FRONT FORK
5-49
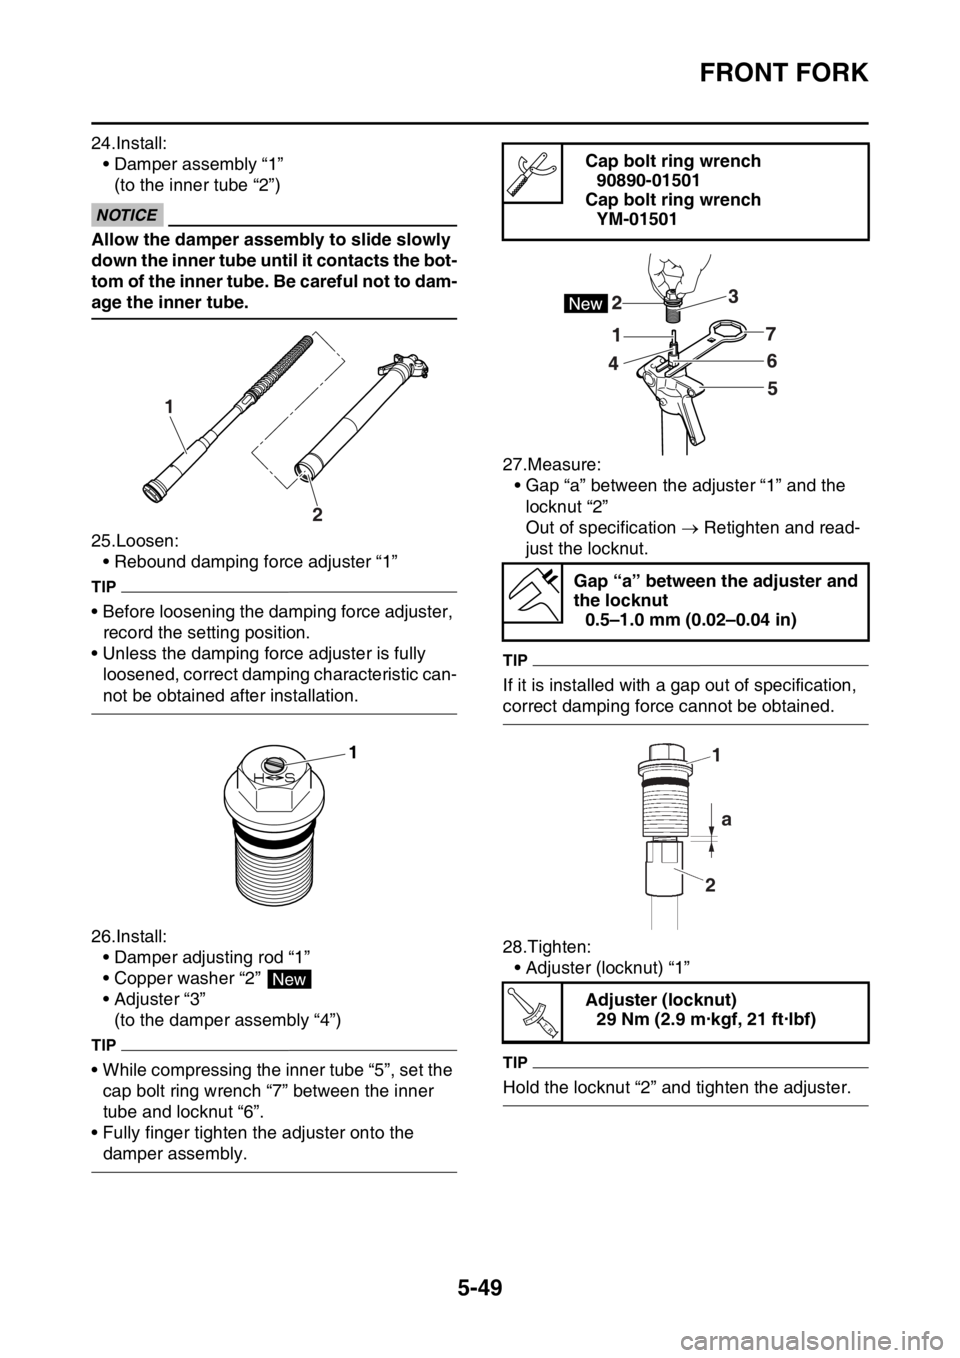
24.Install:
• Damper assembly “1”
(to the inner tube “2”)
ECA
NOTICE
Allow the damper assembly to slide slowly
down the inner tube until it contacts the bot-
tom of the inner tube. Be careful not to dam-
age the inner tube.
25.Loosen:
• Rebound damping force adjuster “1”
TIP
• Before loosening the damping force adjuster,
record the setting position.
• Unless the damping force adjuster is fully
loosened, correct damping characteristic can-
not be obtained after installation.
26.Install:
• Damper adjusting rod “1”
• Copper washer “2”
• Adjuster “3”
(to the damper assembly “4”)
TIP
• While compressing the inner tube “5”, set the
cap bolt ring wrench “7” between the inner
tube and locknut “6”.
• Fully finger tighten the adjuster onto the
damper assembly.27.Measure:
• Gap “a” between the adjuster “1” and the
locknut “2”
Out of specification Retighten and read-
just the locknut.
TIP
If it is installed with a gap out of specification,
correct damping force cannot be obtained.
28.Tighten:
• Adjuster (locknut) “1”
TIP
Hold the locknut “2” and tighten the adjuster.
1
2
1
New
Cap bolt ring wrench
90890-01501
Cap bolt ring wrench
YM-01501
Gap “a” between the adjuster and
the locknut
0.5–1.0 mm (0.02–0.04 in)
Adjuster (locknut)
29 Nm (2.9 m·kgf, 21 ft·lbf)
1
2a
T R..
Page 213 of 430
STEERING HEAD
5-55
TIP
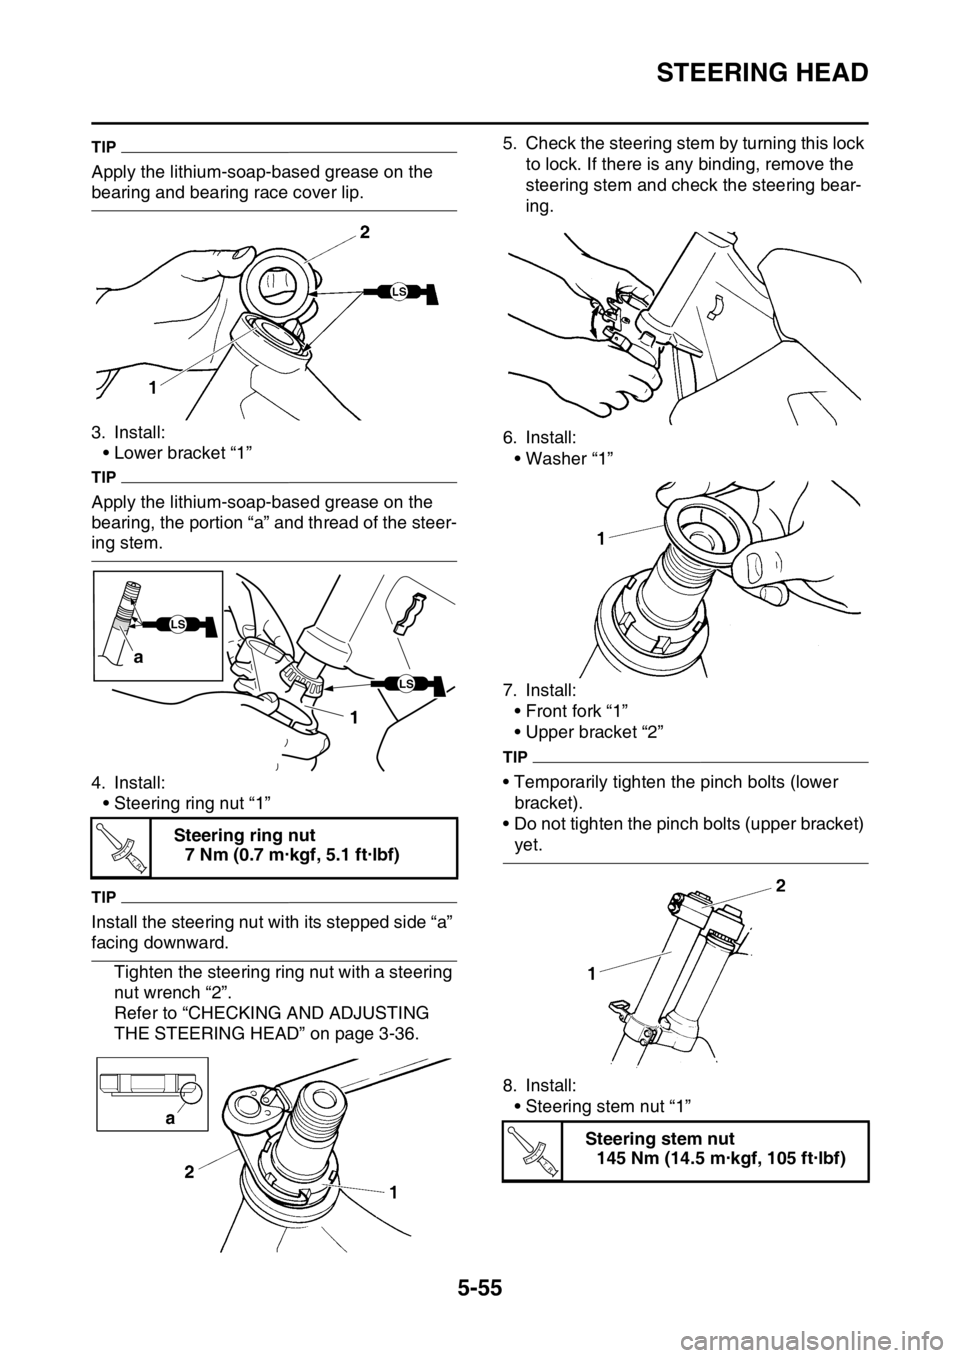
Apply the lithium-soap-based grease on the
bearing and bearing race cover lip.
3. Install:
• Lower bracket “1”
TIP
Apply the lithium-soap-based grease on the
bearing, the portion “a” and thread of the steer-
ing stem.
4. Install:
• Steering ring nut “1”
TIP
Install the steering nut with its stepped side “a”
facing downward.
Tighten the steering ring nut with a steering
nut wrench “2”.
Refer to “CHECKING AND ADJUSTING
THE STEERING HEAD” on page 3-36.5. Check the steering stem by turning this lock
to lock. If there is any binding, remove the
steering stem and check the steering bear-
ing.
6. Install:
• Washer “1”
7. Install:
• Front fork “1”
• Upper bracket “2”
TIP
• Temporarily tighten the pinch bolts (lower
bracket).
• Do not tighten the pinch bolts (upper bracket)
yet.
8. Install:
• Steering stem nut “1” Steering ring nut
7 Nm (0.7 m·kgf, 5.1 ft·lbf)
LS
1 a
LSLS
T R..
Steering stem nut
145 Nm (14.5 m·kgf, 105 ft·lbf)
T R..
Page 215 of 430
REAR SHOCK ABSORBER ASSEMBLY
5-57
EAS2GB2209
REAR SHOCK ABSORBER ASSEMBLY
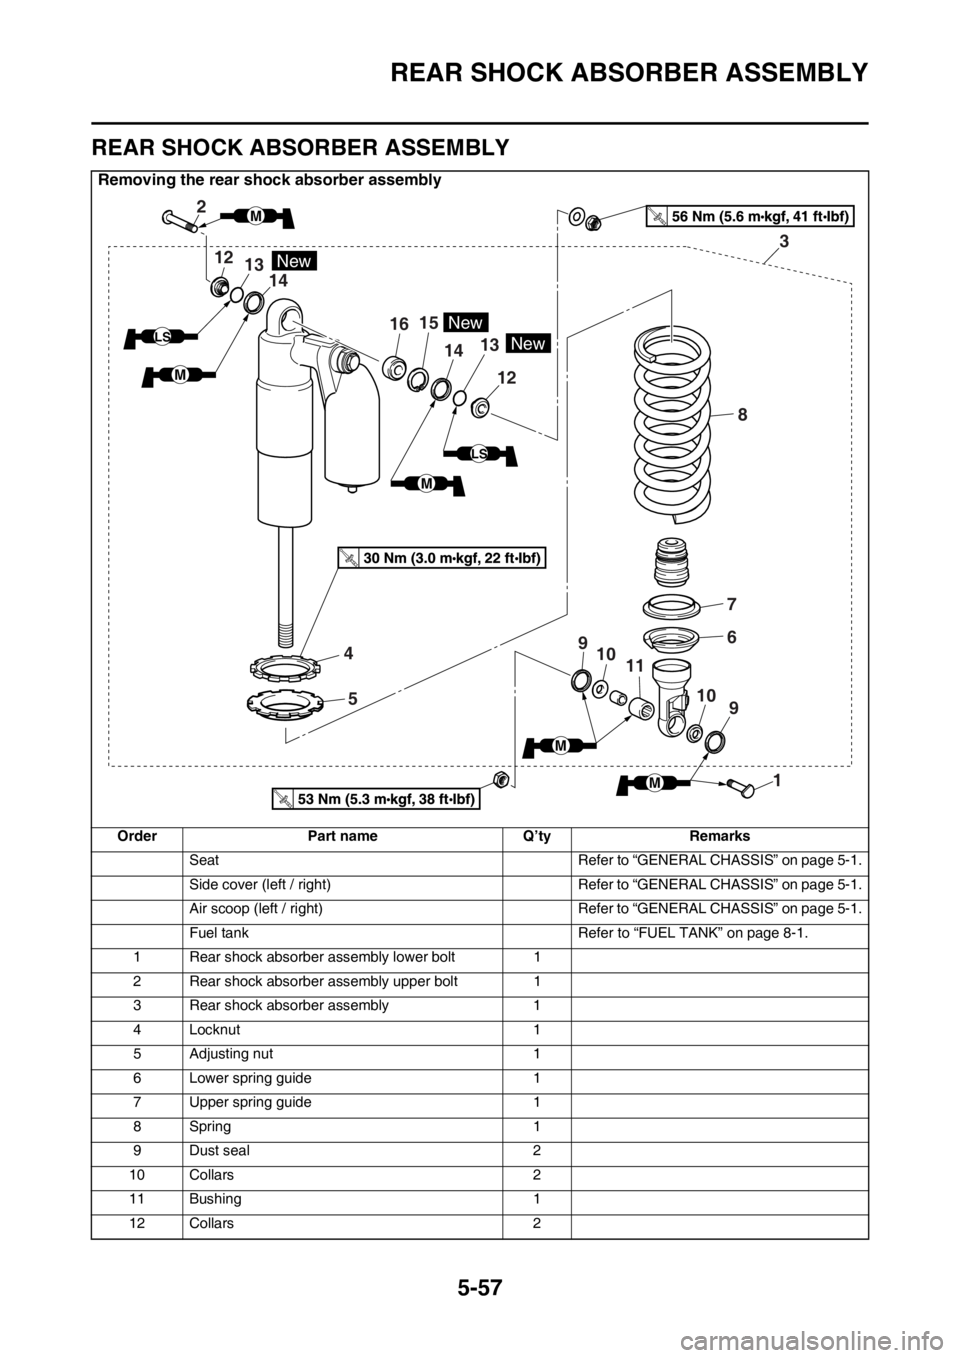
Removing the rear shock absorber assembly
Order Part name Q’ty Remarks
Seat Refer to “GENERAL CHASSIS” on page 5-1.
Side cover (left / right) Refer to “GENERAL CHASSIS” on page 5-1.
Air scoop (left / right) Refer to “GENERAL CHASSIS” on page 5-1.
Fuel tank Refer to “FUEL TANK” on page 8-1.
1 Rear shock absorber assembly lower bolt 1
2 Rear shock absorber assembly upper bolt 1
3 Rear shock absorber assembly 1
4 Locknut 1
5 Adjusting nut 1
6 Lower spring guide 1
7 Upper spring guide 1
8Spring 1
9 Dust seal 2
10 Collars 2
11 Bushing 1
12 Collars 2
2
12
1615
1413
12
14
4
5
7
6
83
9
9 10
10 11
1
New
New
13New
LS
LS
M
M
M
M
M
Page 228 of 430
CHAIN DRIVE
5-70
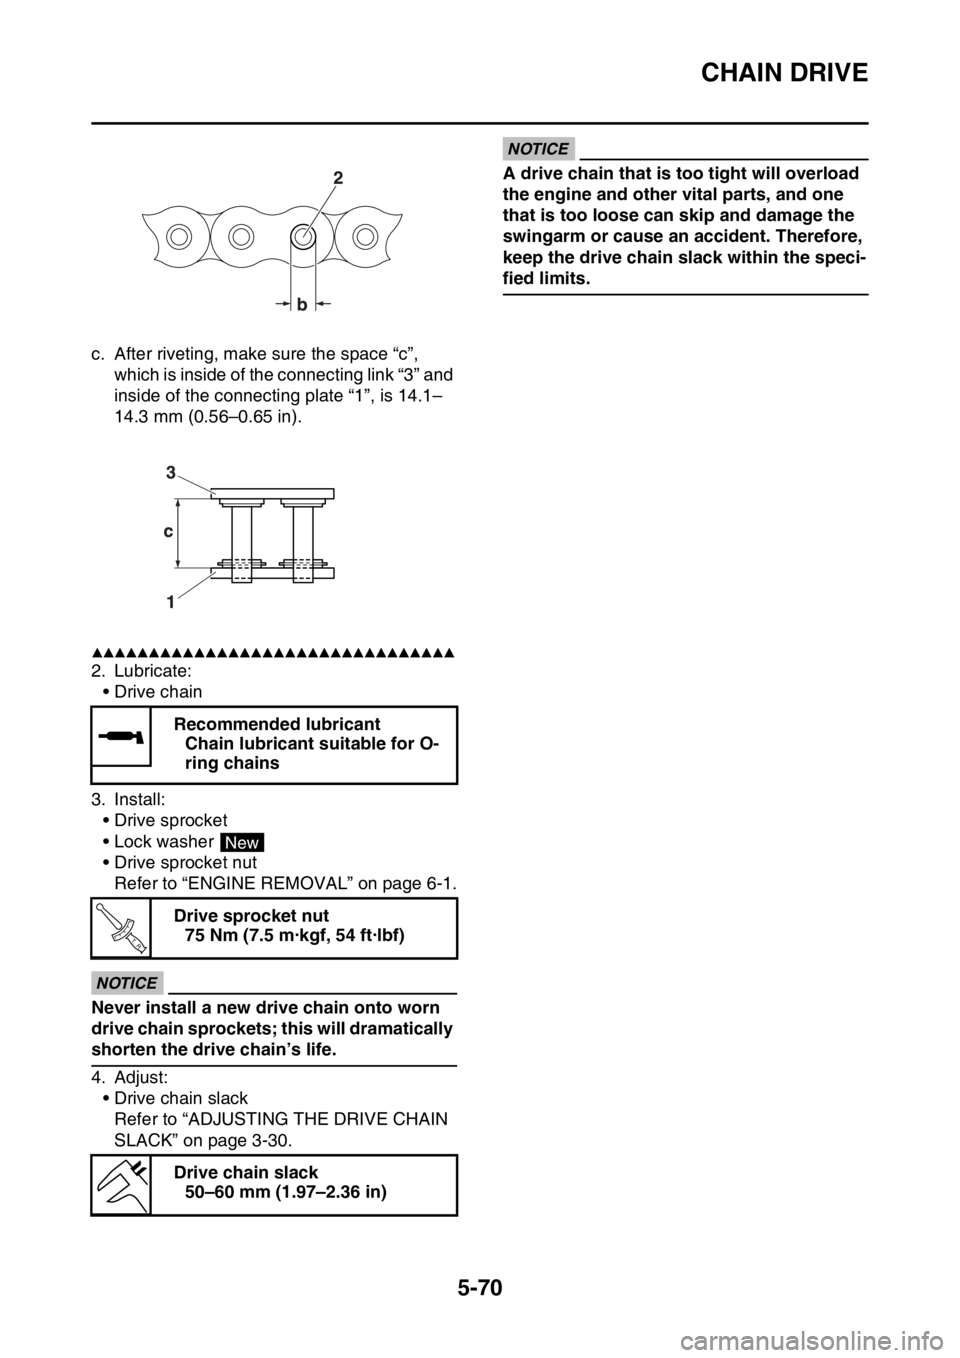
c. After riveting, make sure the space “c”,
which is inside of the connecting link “3” and
inside of the connecting plate “1”, is 14.1–
14.3 mm (0.56–0.65 in).
▲▲▲▲▲▲▲▲▲▲▲▲▲▲▲▲▲▲▲▲▲▲▲▲▲▲▲▲▲▲▲▲
2. Lubricate:
•Drive chain
3. Install:
• Drive sprocket
• Lock washer
• Drive sprocket nut
Refer to “ENGINE REMOVAL” on page 6-1.
ECA
NOTICE
Never install a new drive chain onto worn
drive chain sprockets; this will dramatically
shorten the drive chain’s life.
4. Adjust:
• Drive chain slack
Refer to “ADJUSTING THE DRIVE CHAIN
SLACK” on page 3-30.
ECA
NOTICE
A drive chain that is too tight will overload
the engine and other vital parts, and one
that is too loose can skip and damage the
swingarm or cause an accident. Therefore,
keep the drive chain slack within the speci-
fied limits.
Recommended lubricant
Chain lubricant suitable for O-
ring chains
Drive sprocket nut
75 Nm (7.5 m·kgf, 54 ft·lbf)
Drive chain slack
50–60 mm (1.97–2.36 in)
New
T R..
Page 237 of 430
ENGINE REMOVAL
6-6
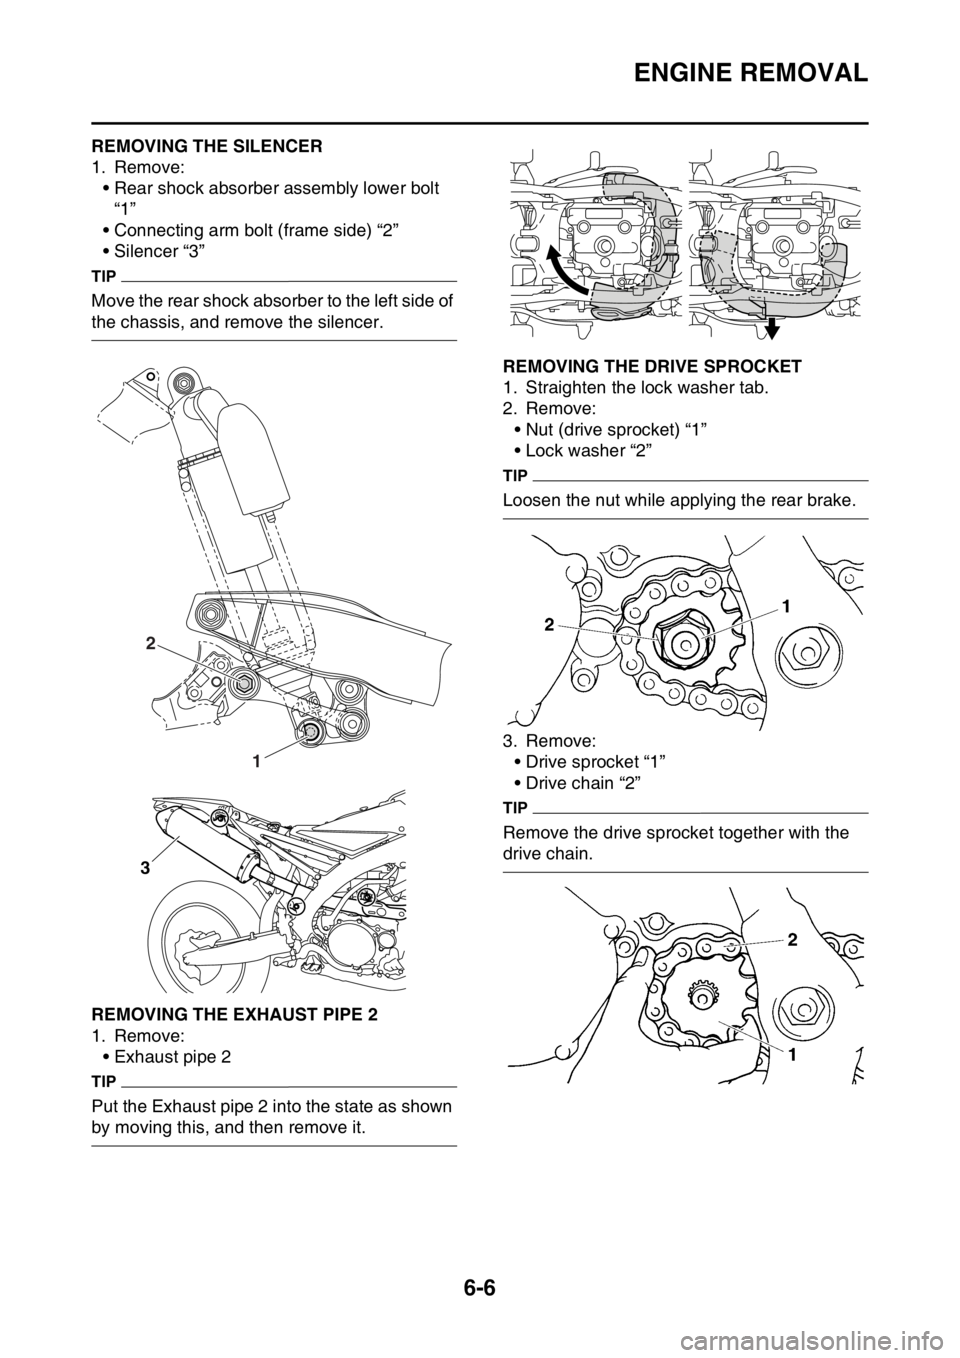
EAS2GB2229REMOVING THE SILENCER
1. Remove:
• Rear shock absorber assembly lower bolt
“1”
• Connecting arm bolt (frame side) “2”
• Silencer “3”
TIP
Move the rear shock absorber to the left side of
the chassis, and remove the silencer.
EAS2GB2230REMOVING THE EXHAUST PIPE 2
1. Remove:
• Exhaust pipe 2
TIP
Put the Exhaust pipe 2 into the state as shown
by moving this, and then remove it.
EAS2GB2231REMOVING THE DRIVE SPROCKET
1. Straighten the lock washer tab.
2. Remove:
• Nut (drive sprocket) “1”
• Lock washer “2”
TIP
Loosen the nut while applying the rear brake.
3. Remove:
• Drive sprocket “1”
• Drive chain “2”
TIP
Remove the drive sprocket together with the
drive chain.
1 2
3
Page 240 of 430
ENGINE REMOVAL
6-9
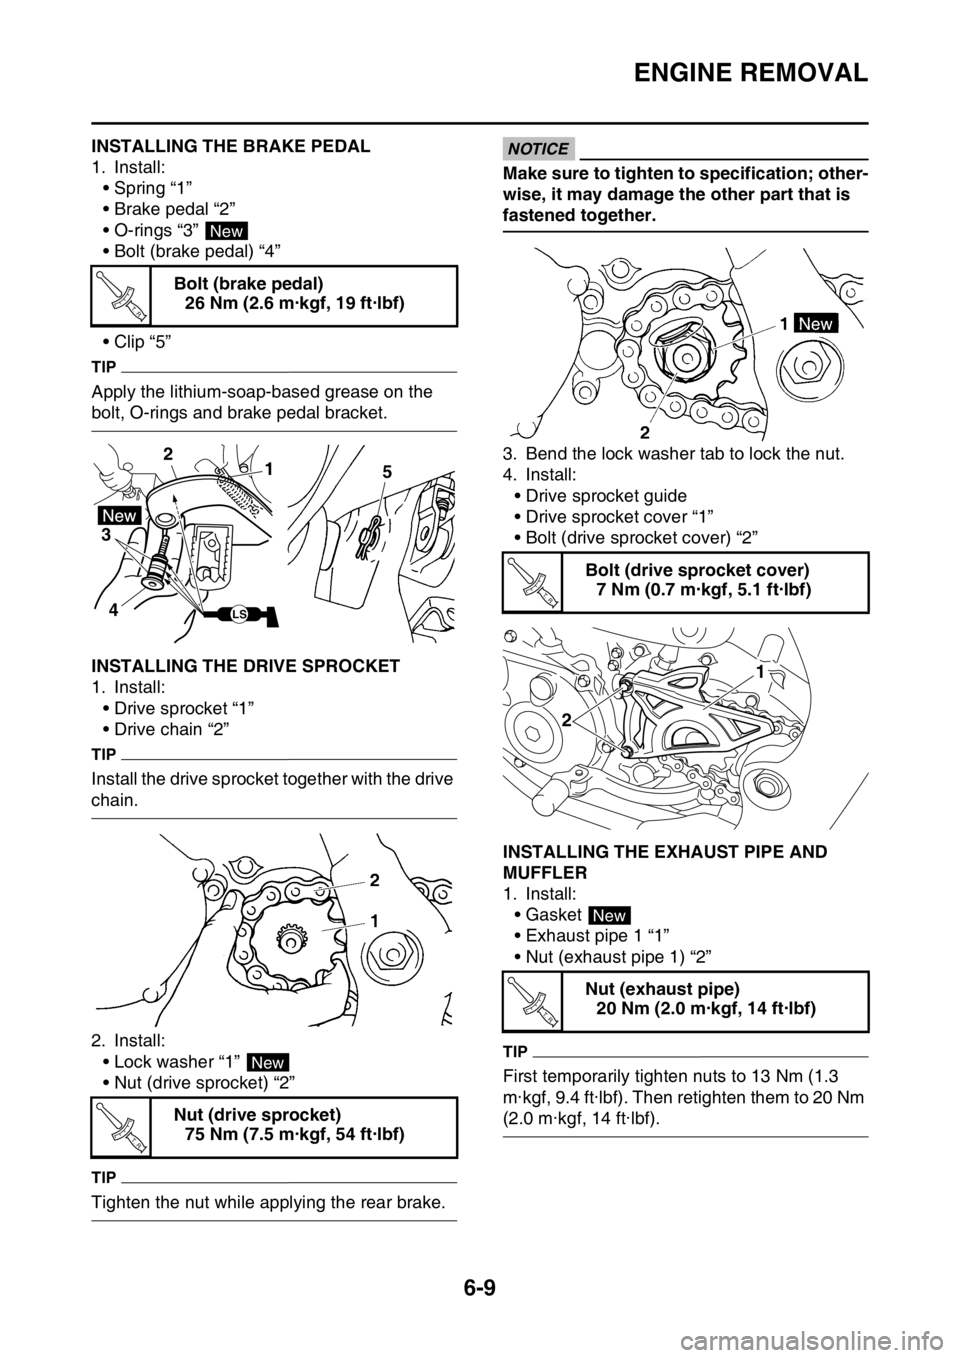
EAS2GB2236INSTALLING THE BRAKE PEDAL
1. Install:
• Spring “1”
• Brake pedal “2”
• O-rings “3”
• Bolt (brake pedal) “4”
•Clip “5”
TIP
Apply the lithium-soap-based grease on the
bolt, O-rings and brake pedal bracket.
EAS2GB2237INSTALLING THE DRIVE SPROCKET
1. Install:
• Drive sprocket “1”
• Drive chain “2”
TIP
Install the drive sprocket together with the drive
chain.
2. Install:
• Lock washer “1”
• Nut (drive sprocket) “2”
TIP
Tighten the nut while applying the rear brake.
ECA
NOTICE
Make sure to tighten to specification; other-
wise, it may damage the other part that is
fastened together.
3. Bend the lock washer tab to lock the nut.
4. Install:
• Drive sprocket guide
• Drive sprocket cover “1”
• Bolt (drive sprocket cover) “2”
EAS2GB2238INSTALLING THE EXHAUST PIPE AND
MUFFLER
1. Install:
•Gasket
• Exhaust pipe 1 “1”
• Nut (exhaust pipe 1) “2”
TIP
First temporarily tighten nuts to 13 Nm (1.3
m·kgf, 9.4 ft·lbf). Then retighten them to 20 Nm
(2.0 m·kgf, 14 ft·lbf). Bolt (brake pedal)
26 Nm (2.6 m·kgf, 19 ft·lbf)
Nut (drive sprocket)
75 Nm (7.5 m·kgf, 54 ft·lbf)
New
T R..
1 2
3
45
LS
New
T R..
Bolt (drive sprocket cover)
7 Nm (0.7 m·kgf, 5.1 ft·lbf)
Nut (exhaust pipe)
20 Nm (2.0 m·kgf, 14 ft·lbf)
T R..
21
New
T R..
Page 244 of 430
CAMSHAFT
6-13
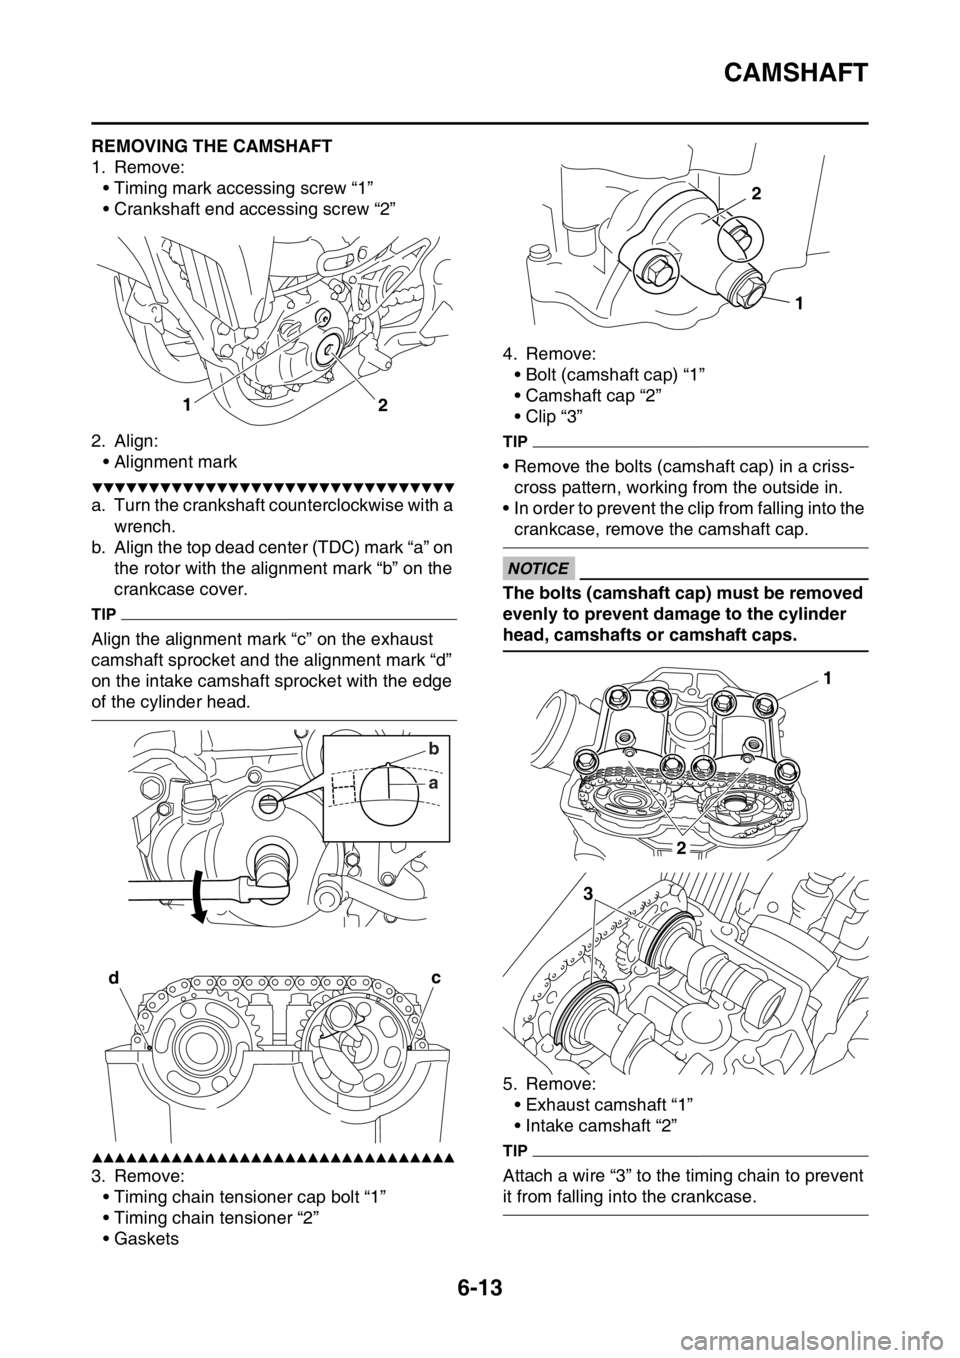
EAS2GB2240REMOVING THE CAMSHAFT
1. Remove:
• Timing mark accessing screw “1”
• Crankshaft end accessing screw “2”
2. Align:
• Alignment mark
▼▼▼▼▼▼▼▼▼▼▼▼▼▼▼▼▼▼▼▼▼▼▼▼▼▼▼▼▼▼▼▼
a. Turn the crankshaft counterclockwise with a
wrench.
b. Align the top dead center (TDC) mark “a” on
the rotor with the alignment mark “b” on the
crankcase cover.
TIP
Align the alignment mark “c” on the exhaust
camshaft sprocket and the alignment mark “d”
on the intake camshaft sprocket with the edge
of the cylinder head.
▲▲▲▲▲▲▲▲▲▲▲▲▲▲▲▲▲▲▲▲▲▲▲▲▲▲▲▲▲▲▲▲
3. Remove:
• Timing chain tensioner cap bolt “1”
• Timing chain tensioner “2”
•Gaskets4. Remove:
• Bolt (camshaft cap) “1”
• Camshaft cap “2”
• Clip “3”
TIP
• Remove the bolts (camshaft cap) in a criss-
cross pattern, working from the outside in.
• In order to prevent the clip from falling into the
crankcase, remove the camshaft cap.
ECA
NOTICE
The bolts (camshaft cap) must be removed
evenly to prevent damage to the cylinder
head, camshafts or camshaft caps.
5. Remove:
• Exhaust camshaft “1”
• Intake camshaft “2”
TIP
Attach a wire “3” to the timing chain to prevent
it from falling into the crankcase.
1
2
ab
dc
1 2
1
2
3
Page 246 of 430
CAMSHAFT
6-15
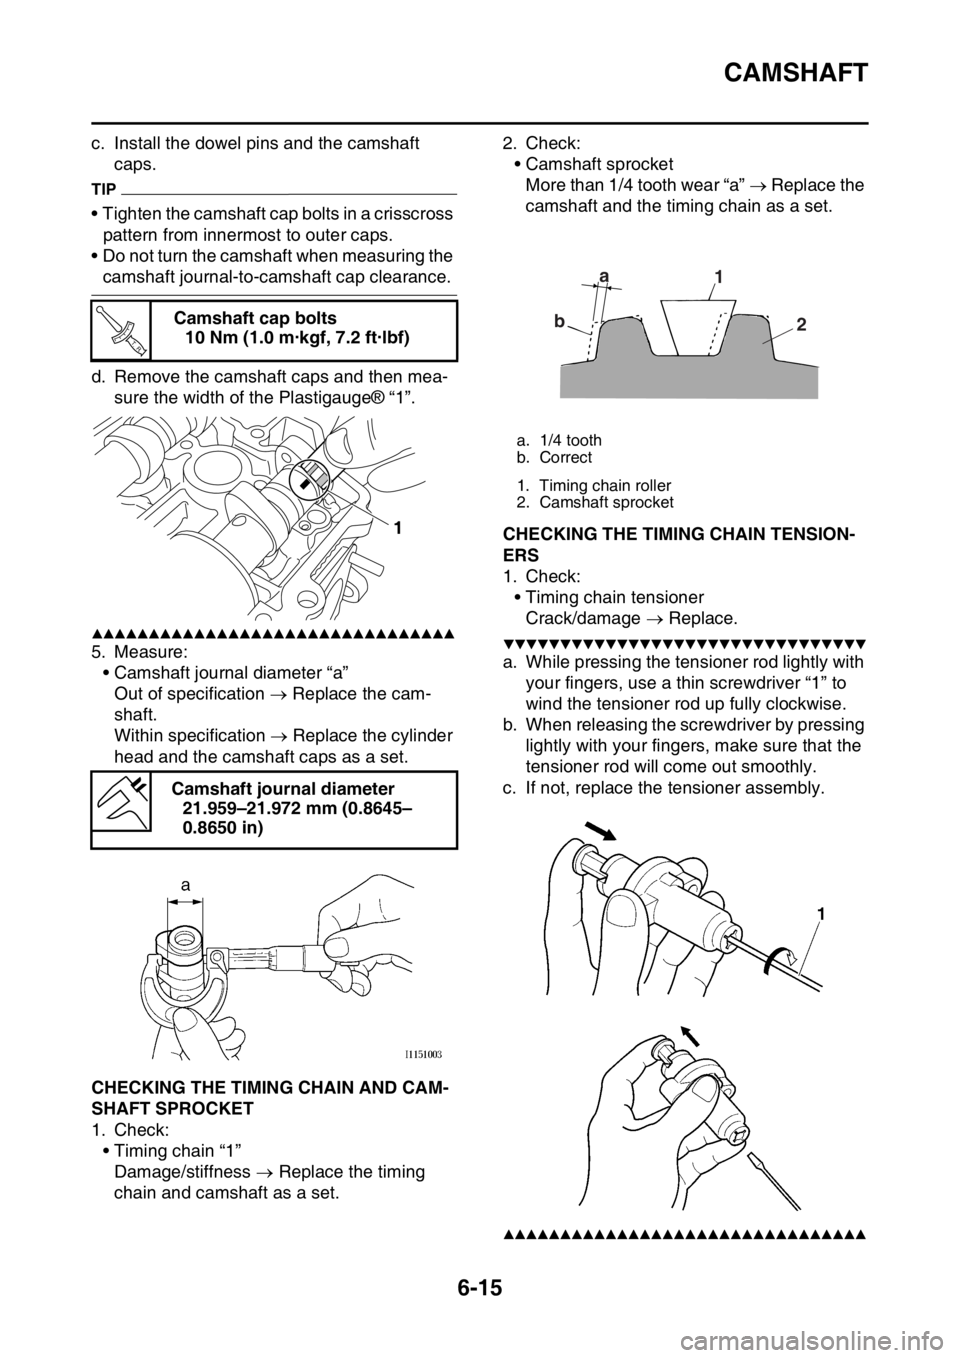
c. Install the dowel pins and the camshaft
caps.
TIP
• Tighten the camshaft cap bolts in a crisscross
pattern from innermost to outer caps.
• Do not turn the camshaft when measuring the
camshaft journal-to-camshaft cap clearance.
d. Remove the camshaft caps and then mea-
sure the width of the Plastigauge® “1”.
▲▲▲▲▲▲▲▲▲▲▲▲▲▲▲▲▲▲▲▲▲▲▲▲▲▲▲▲▲▲▲▲
5. Measure:
• Camshaft journal diameter “a”
Out of specification Replace the cam-
shaft.
Within specification Replace the cylinder
head and the camshaft caps as a set.
EAS2GB2242CHECKING THE TIMING CHAIN AND CAM-
SHAFT SPROCKET
1. Check:
• Timing chain “1”
Damage/stiffness Replace the timing
chain and camshaft as a set.2. Check:
• Camshaft sprocket
More than 1/4 tooth wear “a” Replace the
camshaft and the timing chain as a set.
EAS2GB2243CHECKING THE TIMING CHAIN TENSION-
ERS
1. Check:
• Timing chain tensioner
Crack/damage Replace.
▼▼▼▼▼▼▼▼▼▼▼▼▼▼▼▼▼▼▼▼▼▼▼▼▼▼▼▼▼▼▼▼
a. While pressing the tensioner rod lightly with
your fingers, use a thin screwdriver “1” to
wind the tensioner rod up fully clockwise.
b. When releasing the screwdriver by pressing
lightly with your fingers, make sure that the
tensioner rod will come out smoothly.
c. If not, replace the tensioner assembly.
▲▲▲▲▲▲▲▲▲▲▲▲▲▲▲▲▲▲▲▲▲▲▲▲▲▲▲▲▲▲▲▲
Camshaft cap bolts
10 Nm (1.0 m·kgf, 7.2 ft·lbf)
Camshaft journal diameter
21.959–21.972 mm (0.8645–
0.8650 in)
T R..
1
a. 1/4 tooth
b. Correct
1. Timing chain roller
2. Camshaft sprocket
a
b1
2
Page 247 of 430
CAMSHAFT
6-16
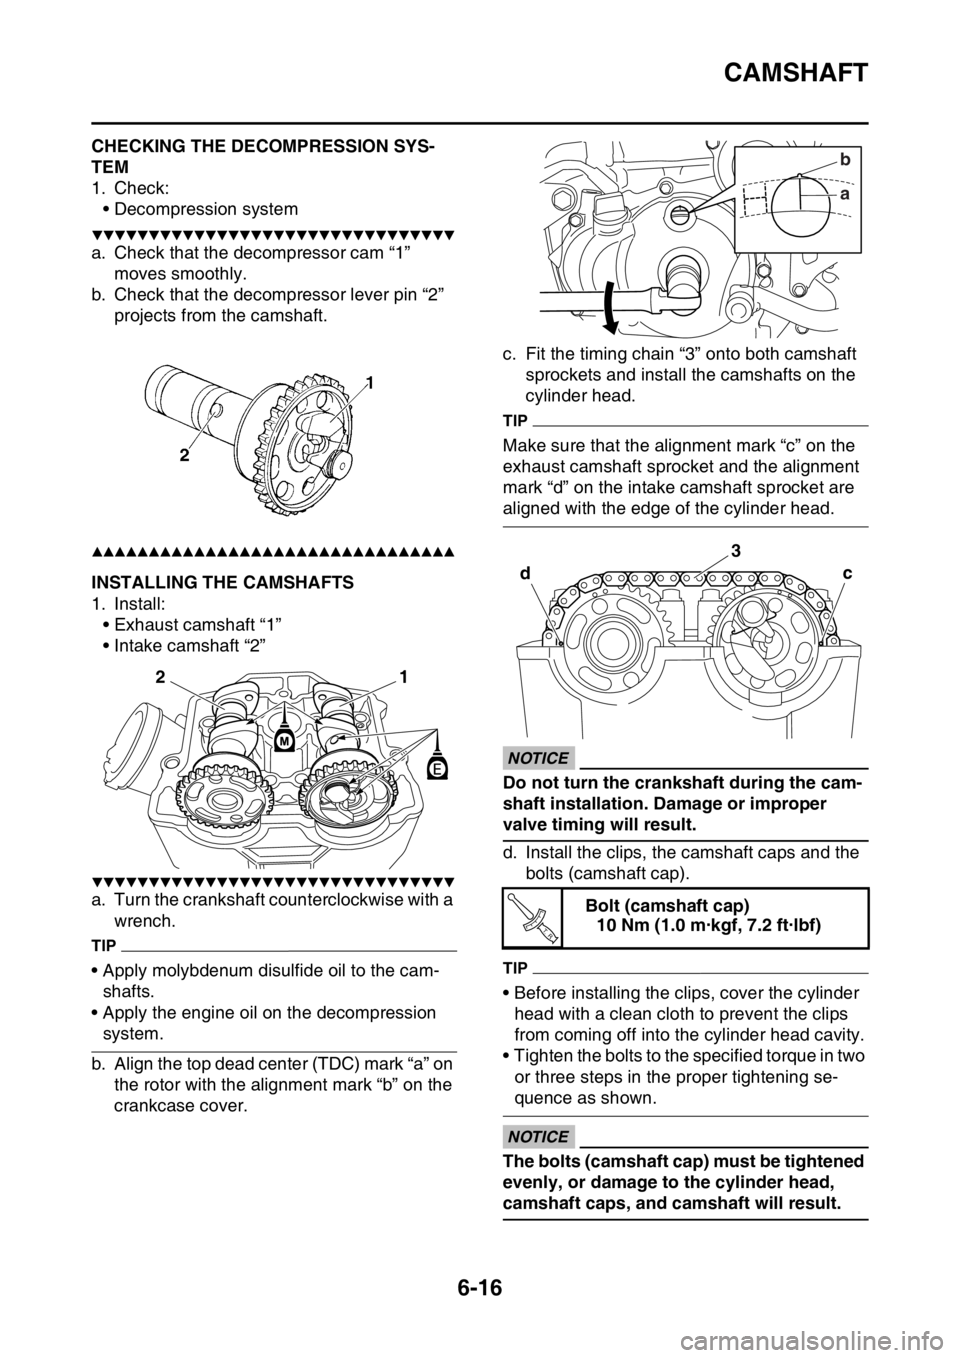
EAS2GB2244CHECKING THE DECOMPRESSION SYS-
TEM
1. Check:
• Decompression system
▼▼▼▼▼▼▼▼▼▼▼▼▼▼▼▼▼▼▼▼▼▼▼▼▼▼▼▼▼▼▼▼
a. Check that the decompressor cam “1”
moves smoothly.
b. Check that the decompressor lever pin “2”
projects from the camshaft.
▲▲▲▲▲▲▲▲▲▲▲▲▲▲▲▲▲▲▲▲▲▲▲▲▲▲▲▲▲▲▲▲
EAS2GB2245INSTALLING THE CAMSHAFTS
1. Install:
• Exhaust camshaft “1”
• Intake camshaft “2”
▼▼▼▼▼▼▼▼▼▼▼▼▼▼▼▼▼▼▼▼▼▼▼▼▼▼▼▼▼▼▼▼
a. Turn the crankshaft counterclockwise with a
wrench.
TIP
• Apply molybdenum disulfide oil to the cam-
shafts.
• Apply the engine oil on the decompression
system.
b. Align the top dead center (TDC) mark “a” on
the rotor with the alignment mark “b” on the
crankcase cover.c. Fit the timing chain “3” onto both camshaft
sprockets and install the camshafts on the
cylinder head.
TIP
Make sure that the alignment mark “c” on the
exhaust camshaft sprocket and the alignment
mark “d” on the intake camshaft sprocket are
aligned with the edge of the cylinder head.
ECA
NOTICE
Do not turn the crankshaft during the cam-
shaft installation. Damage or improper
valve timing will result.
d. Install the clips, the camshaft caps and the
bolts (camshaft cap).
TIP
• Before installing the clips, cover the cylinder
head with a clean cloth to prevent the clips
from coming off into the cylinder head cavity.
• Tighten the bolts to the specified torque in two
or three steps in the proper tightening se-
quence as shown.
ECA
NOTICE
The bolts (camshaft cap) must be tightened
evenly, or damage to the cylinder head,
camshaft caps, and camshaft will result.
1
2
Bolt (camshaft cap)
10 Nm (1.0 m·kgf, 7.2 ft·lbf)
ab
dc
3
T R..
Page 248 of 430
CAMSHAFT
6-17
▲▲▲▲▲▲▲▲▲▲▲▲▲▲▲▲▲▲▲▲▲▲▲▲▲▲▲▲▲▲▲▲
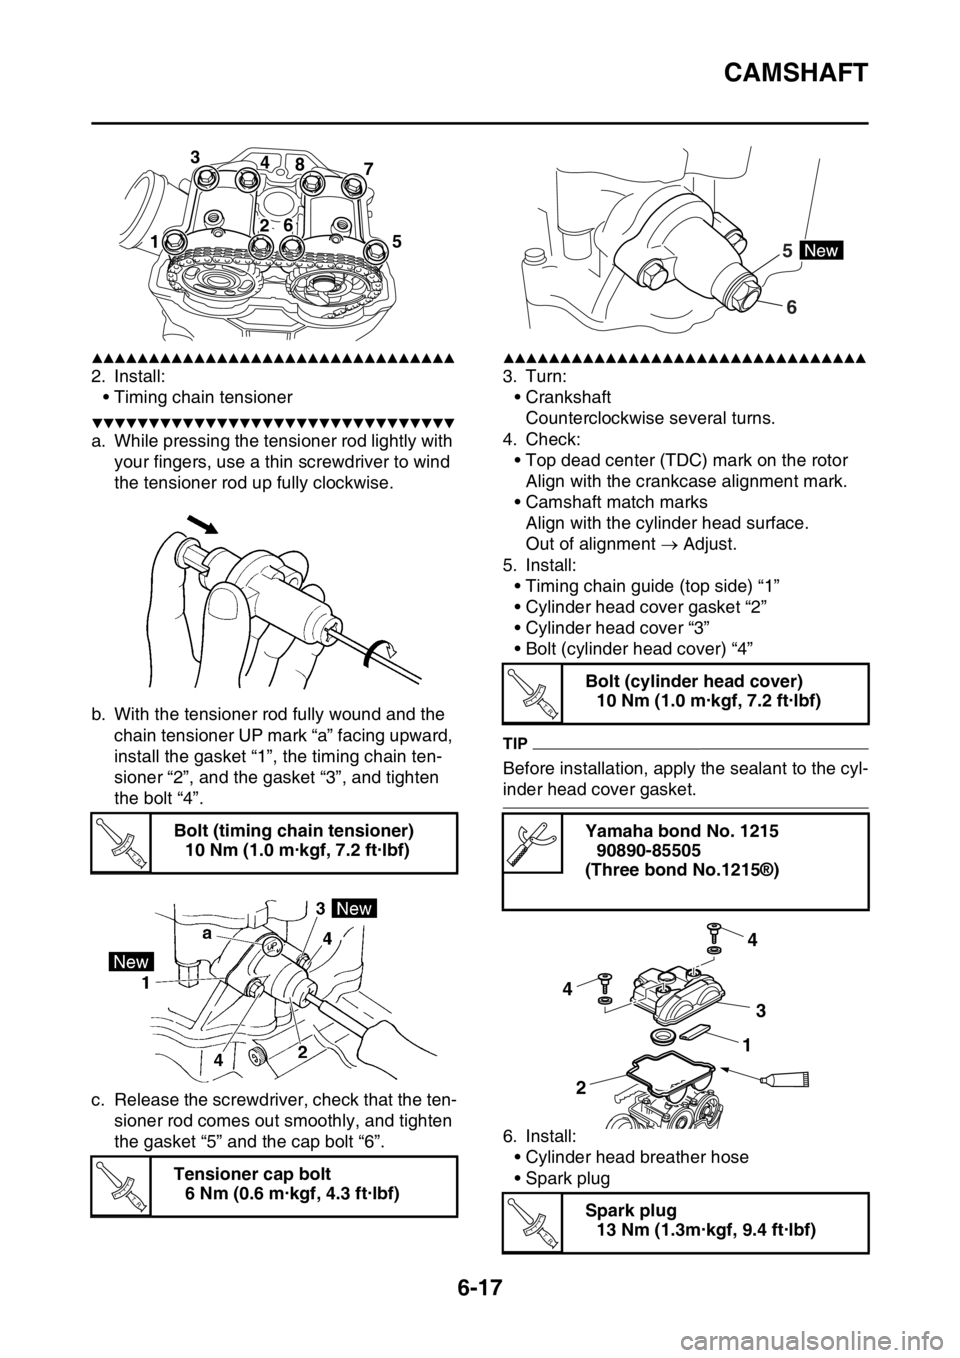
2. Install:
• Timing chain tensioner
▼▼▼▼▼▼▼▼▼▼▼▼▼▼▼▼▼▼▼▼▼▼▼▼▼▼▼▼▼▼▼▼
a. While pressing the tensioner rod lightly with
your fingers, use a thin screwdriver to wind
the tensioner rod up fully clockwise.
b. With the tensioner rod fully wound and the
chain tensioner UP mark “a” facing upward,
install the gasket “1”, the timing chain ten-
sioner “2”, and the gasket “3”, and tighten
the bolt “4”.
c. Release the screwdriver, check that the ten-
sioner rod comes out smoothly, and tighten
the gasket “5” and the cap bolt “6”.
▲▲▲▲▲▲▲▲▲▲▲▲▲▲▲▲▲▲▲▲▲▲▲▲▲▲▲▲▲▲▲▲
3. Turn:
• Crankshaft
Counterclockwise several turns.
4. Check:
• Top dead center (TDC) mark on the rotor
Align with the crankcase alignment mark.
• Camshaft match marks
Align with the cylinder head surface.
Out of alignment Adjust.
5. Install:
• Timing chain guide (top side) “1”
• Cylinder head cover gasket “2”
• Cylinder head cover “3”
• Bolt (cylinder head cover) “4”
TIP
Before installation, apply the sealant to the cyl-
inder head cover gasket.
6. Install:
• Cylinder head breather hose
• Spark plug Bolt (timing chain tensioner)
10 Nm (1.0 m·kgf, 7.2 ft·lbf)
Tensioner cap bolt
6 Nm (0.6 m·kgf, 4.3 ft·lbf)
3
4
8
7
15
26
T R..
T R..
Bolt (cylinder head cover)
10 Nm (1.0 m·kgf, 7.2 ft·lbf)
Yamaha bond No. 1215
90890-85505
(Three bond No.1215®)
Spark plug
13 Nm (1.3m·kgf, 9.4 ft·lbf)
6 5
T R..
4
4
3
21
T R..