ACURA NSX 1997 Service Repair Manual
Manufacturer: ACURA, Model Year: 1997, Model line: NSX, Model: ACURA NSX 1997Pages: 1503, PDF Size: 57.08 MB
Page 771 of 1503
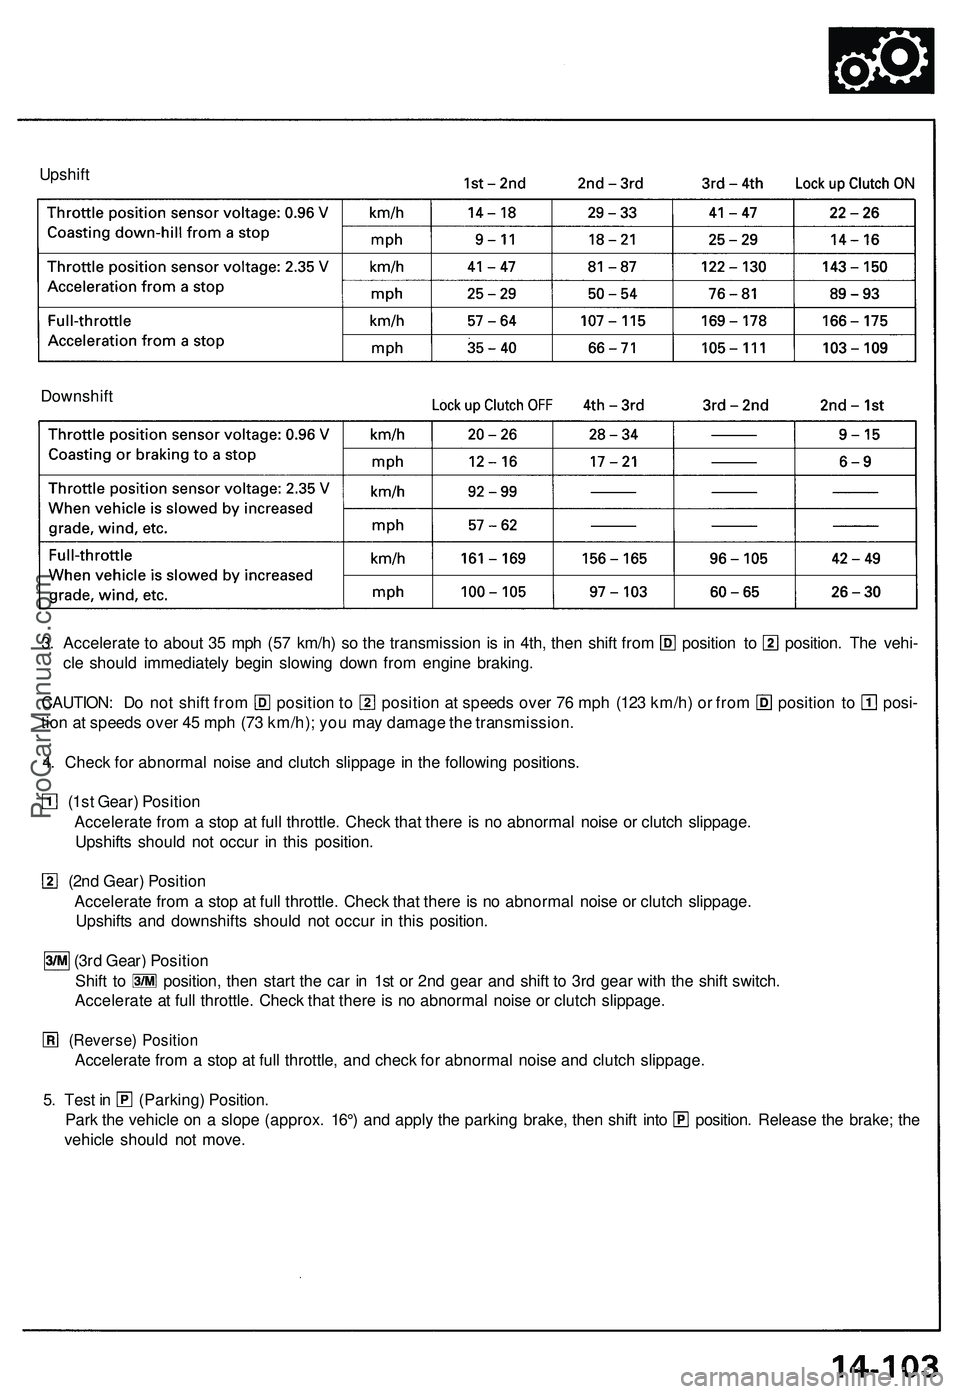
Upshift
Downshift
3. Accelerate to about 35 mph (57 km/h) so the transmission is in 4th, then shift from position to position. The vehi-
cle should immediately begin slowing down from engine braking.
CAUTION: Do not shift from position to position at speeds over 76 mph (123 km/h) or from position to posi-
tion at speeds over 45 mph (73 km/h); you may damage the transmission.
4. Check for abnormal noise and clutch slippage in the following positions.
(1st Gear) Position
Accelerate from a stop at full throttle. Check that there is no abnormal noise or clutch slippage.
Upshifts should not occur in this position.
(2nd Gear) Position
Accelerate from a stop at full throttle. Check that there is no abnormal noise or clutch slippage.
Upshifts and downshifts should not occur in this position.
(3rd Gear) Position
Shift to position, then start the car in 1st or 2nd gear and shift to 3rd gear with the shift switch.
Accelerate at full throttle. Check that there is no abnormal noise or clutch slippage.
(Reverse) Position
Accelerate from a stop at full throttle, and check for abnormal noise and clutch slippage.
5. Test in (Parking) Position.
Park the vehicle on a slope (approx. 16°) and apply the parking brake, then shift into position. Release the brake; the
vehicle should not move.ProCarManuals.com
Page 772 of 1503
Test
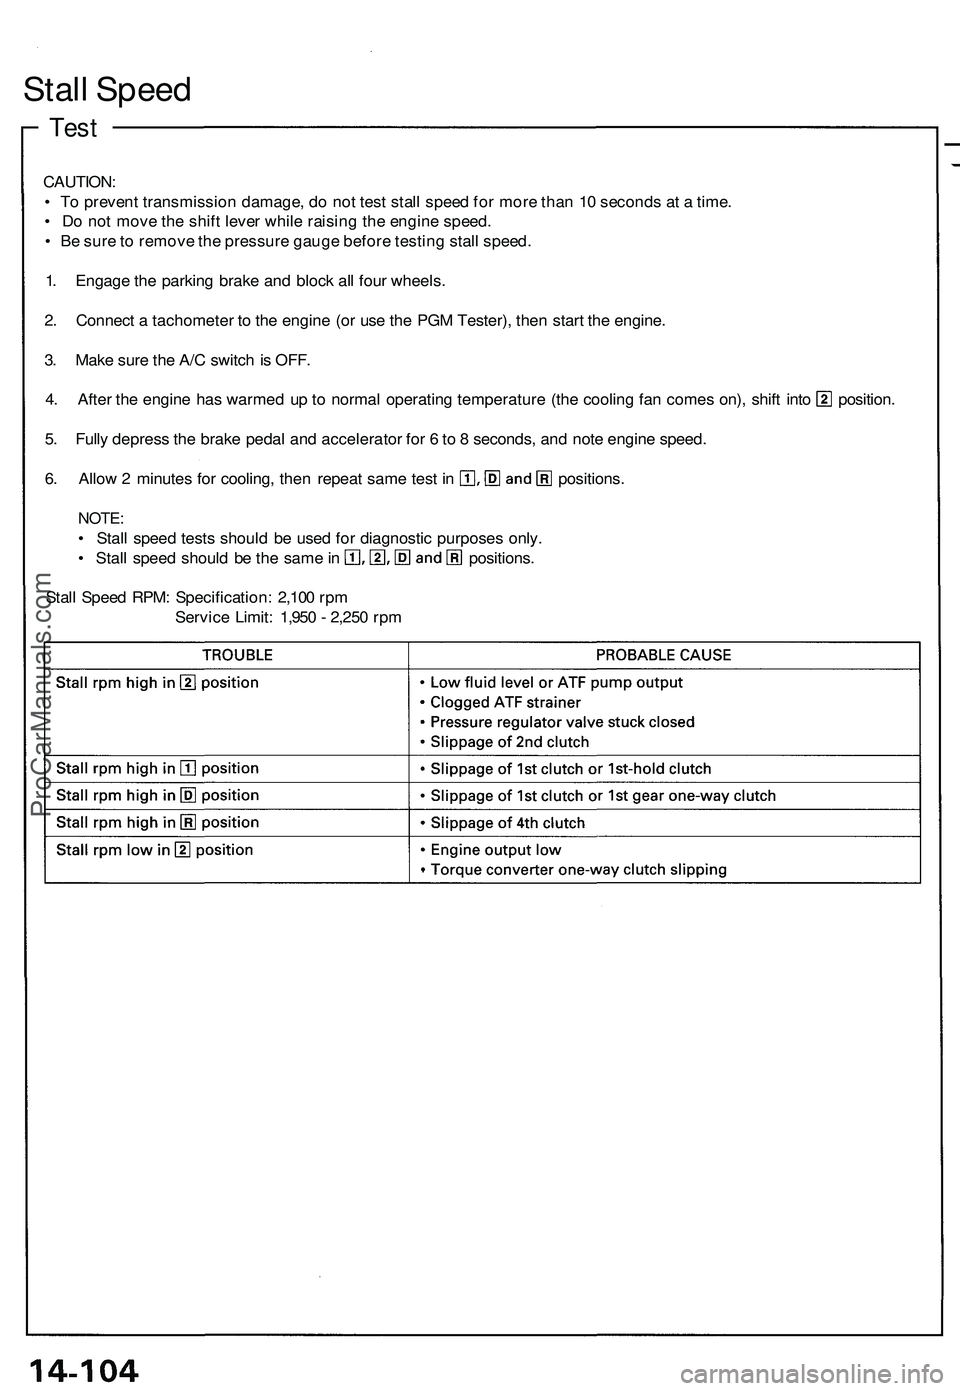
Stal l Spee d
CAUTION :
• T o preven t transmissio n damage , d o no t tes t stal l spee d fo r mor e tha n 1 0 second s a t a time .
• D o no t mov e th e shif t leve r whil e raisin g th e engin e speed .
• B e sur e to remov e th e pressur e gaug e befor e testin g stal l speed .
1 . Engag e th e parkin g brak e an d bloc k al l fou r wheels .
2 . Connec t a tachomete r t o th e engine (or us e th e PG M Tester) , the n star t th e engine .
3 . Mak e sur e th e A/ C switc h is OFF .
4. Afte r th e engin e ha s warme d u p to norma l operatin g temperatur e (th e coolin g fa n come s on) , shif t int o position .
5 . Full y depres s th e brak e peda l an d accelerato r fo r 6 to 8 seconds , an d not e engin e speed .
6. Allo w 2 minute s fo r cooling , the n repea t sam e tes t i n positions .
NOTE:
• Stal l spee d test s shoul d b e use d fo r diagnosti c purpose s only .
• Stal l spee d shoul d b e th e sam e in positions .
Stal l Spee d RPM : Specification : 2,10 0 rp m
Servic e Limit : 1,95 0 - 2,25 0 rp m
ProCarManuals.com
Page 773 of 1503
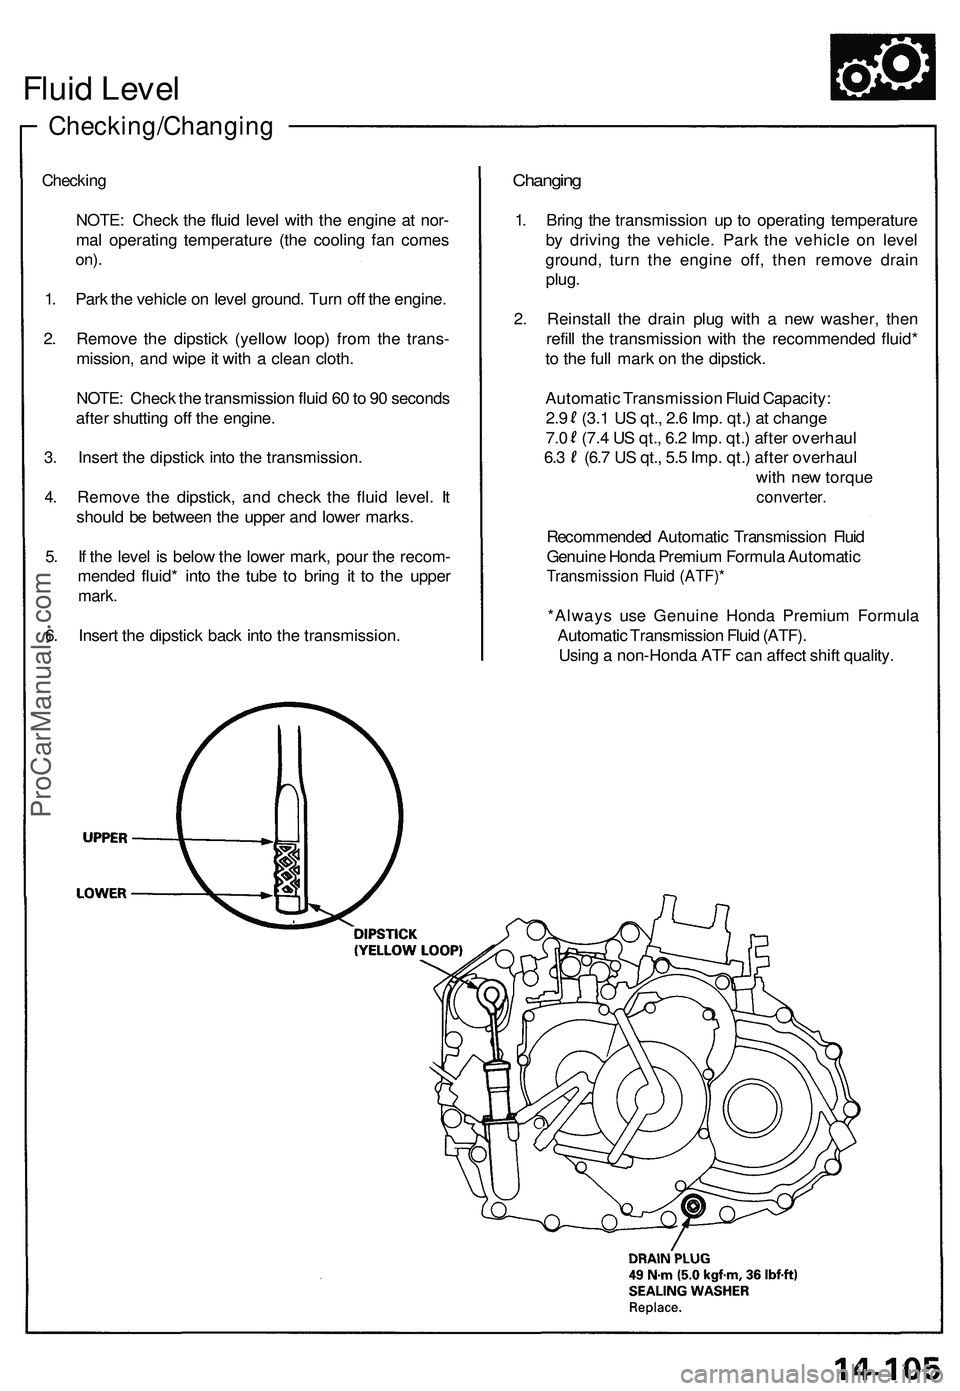
Checking/Changing
Fluid Leve l
Checkin g
NOTE : Chec k th e flui d leve l wit h th e engin e a t nor -
ma l operatin g temperatur e (th e coolin g fa n come s
on).
1. Par k th e vehicl e o n leve l ground . Tur n of f th e engine .
2 . Remov e th e dipstic k (yello w loop ) fro m th e trans -
mission , an d wip e it wit h a clea n cloth .
NOTE : Chec k th e transmissio n flui d 6 0 to 9 0 second s
afte r shuttin g of f th e engine .
3 . Inser t th e dipstic k int o th e transmission .
4 . Remov e th e dipstick , an d chec k th e flui d level . I t
shoul d b e betwee n th e uppe r an d lowe r marks .
5 . I f th e leve l i s belo w th e lowe r mark , pou r th e recom -
mende d fluid * int o th e tub e t o brin g i t t o th e uppe r
mark.
6. Inser t th e dipstic k bac k int o th e transmission .
Changing
1. Brin g th e transmissio n u p t o operatin g temperatur e
b y drivin g th e vehicle . Par k th e vehicl e o n leve l
ground , tur n th e engin e off , the n remov e drai n
plug .
2 . Reinstal l th e drai n plu g wit h a ne w washer , the n
refil l th e transmissio n wit h th e recommende d fluid *
t o th e ful l mar k o n th e dipstick .
Automati c Transmissio n Flui d Capacity :
2. 9 (3. 1 U S qt. , 2. 6 Imp . qt. ) a t chang e
7. 0 (7. 4 U S qt. , 6. 2 Imp . qt. ) afte r overhau l
6.3 (6. 7 U S qt. , 5. 5 Imp . qt. ) afte r overhau l
wit h ne w torqu e
converter .
Recommende d Automati c Transmissio n Fluid
Genuin e Hond a Premiu m Formul a Automati c
Transmissio n Flui d (ATF) *
*Alway s us e Genuin e Hond a Premiu m Formul a
Automati c Transmissio n Flui d (ATF) .
Usin g a non-Hond a AT F ca n affec t shif t quality .
ProCarManuals.com
Page 774 of 1503
• Whil e testing , b e carefu l o f th e rotatin g rea r wheels .
• Mak e sur e lift s ar e place d properl y (se e sectio n 1 ).
CAUTION :
• Befor e testing , b e sur e th e transmissio n flui d is fille d
to th e prope r level .
• War m u p th e engin e befor e testing .
1 . Rais e th e vehicl e (se e sectio n 1 ).
2 . War m u p th e engine , the n sto p th e engin e an d con -
nec t a tachometer .
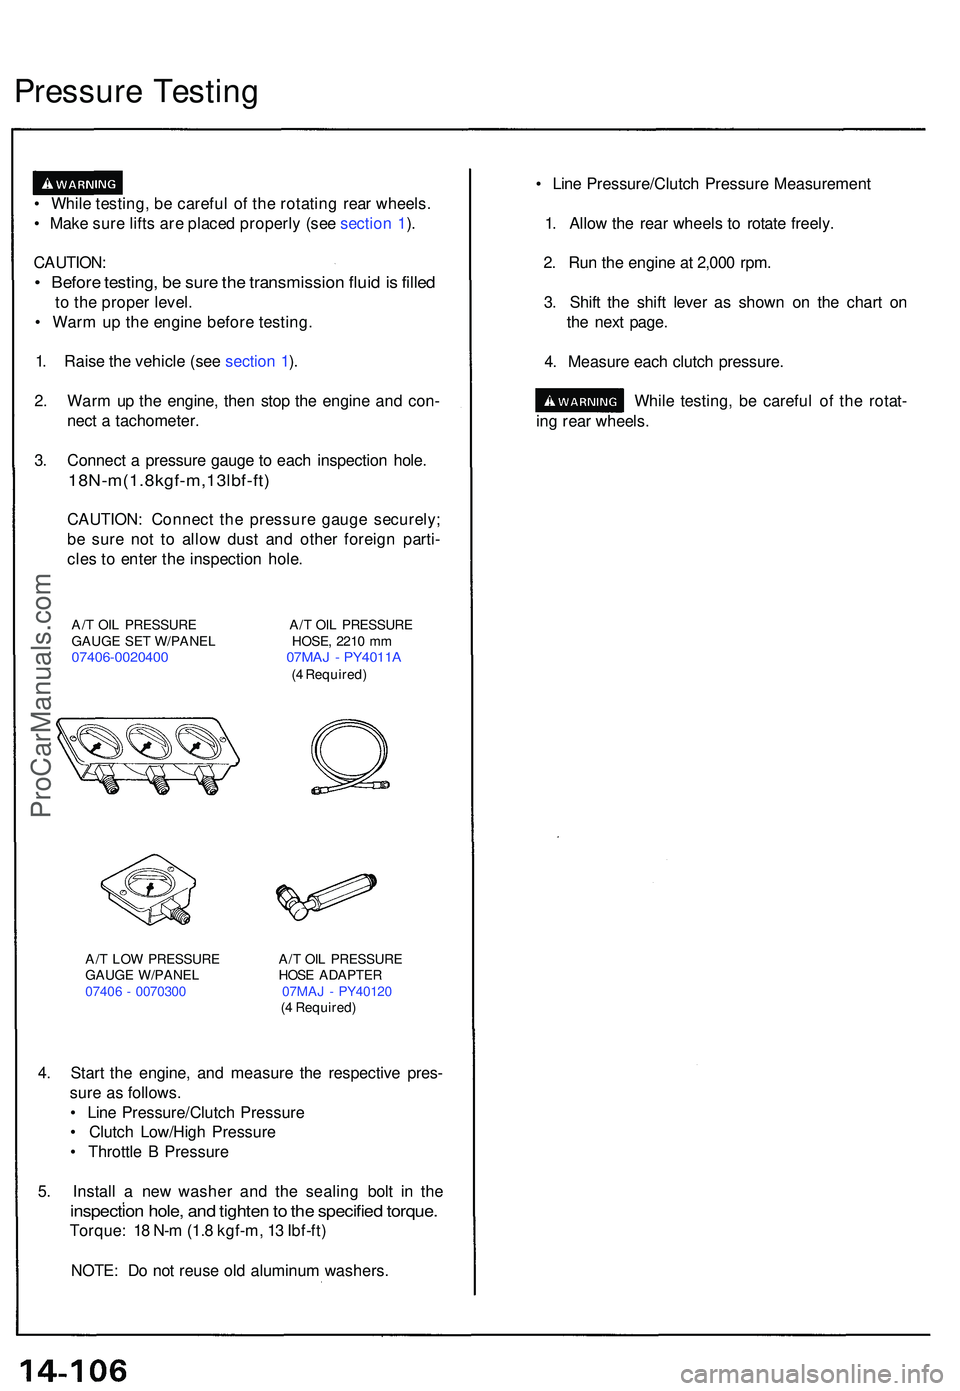
3 . Connec t a pressur e gaug e t o eac h inspectio n hole .
18N-m(1.8kgf-m,13lbf-ft )
CAUTION: Connec t th e pressur e gaug e securely ;
b e sur e no t t o allo w dus t an d othe r foreig n parti -
cle s t o ente r th e inspectio n hole .
A/T OI L PRESSUR E A/ T OI L PRESSUR E
GAUG E SE T W/PANE L HOSE , 221 0 m m
07406-002040 0 07MA J - PY4011 A(4 Required )
A/ T LO W PRESSUR E A/ T OI L PRESSUR E
GAUG E W/PANE L HOS E ADAPTE R
0740 6 - 007030 0 07MA J - PY4012 0
( 4 Required )
4. Star t th e engine , an d measur e th e respectiv e pres -
sur e a s follows .
• Lin e Pressure/Clutc h Pressur e
• Clutc h Low/Hig h Pressur e
• Throttl e B Pressur e
5 . Instal l a ne w washe r an d th e sealin g bol t i n th e
inspectio n hole , an d tighte n to th e specifie d torque .
Torque : 1 8 N- m (1. 8 kgf-m , 1 3 Ibf-ft )
NOTE : D o no t reus e ol d aluminu m washers . •
Lin e Pressure/Clutc h Pressur e Measuremen t
1 . Allo w th e rea r wheel s t o rotat e freely .
2 . Ru n th e engin e a t 2,00 0 rpm .
3 . Shif t th e shif t leve r a s show n o n th e char t o n
th e nex t page .
4 . Measur e eac h clutc h pressure .
While testing , b e carefu l o f th e rotat -
in g rea r wheels .
Pressur e Testin g
ProCarManuals.com
Page 775 of 1503
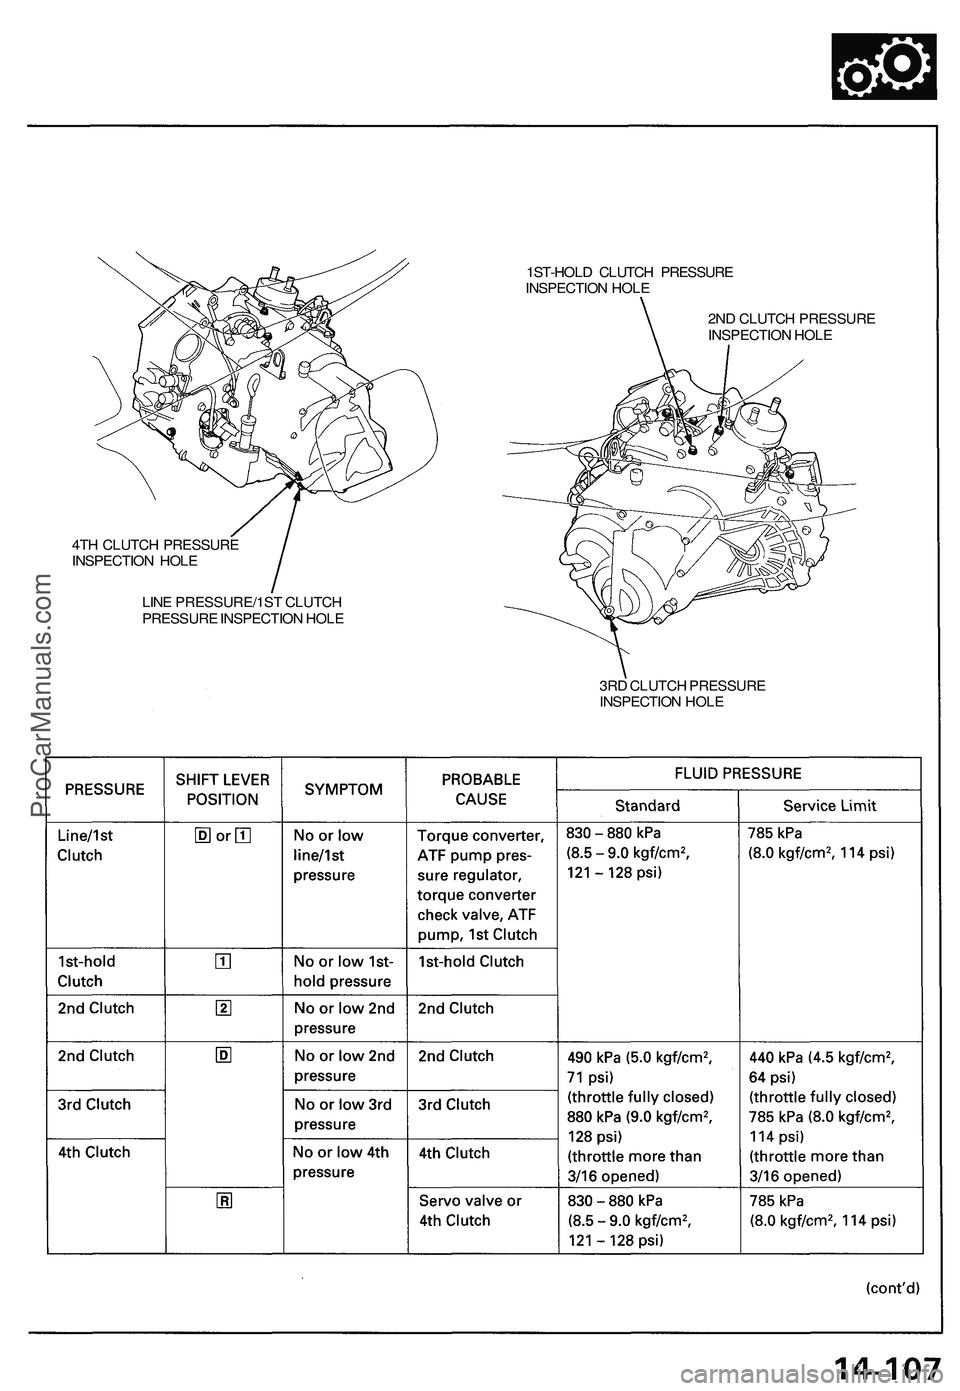
1ST-HOLD CLUTCH PRESSURE
INSPECTION HOLE
4TH CLUTCH PRESSURE
INSPECTION HOLE
LINE PRESSURE/1ST CLUTCH
PRESSURE INSPECTION HOLE
2ND CLUTCH PRESSURE
INSPECTION HOLE
3RD CLUTCH PRESSURE
INSPECTION HOLEProCarManuals.com
Page 776 of 1503
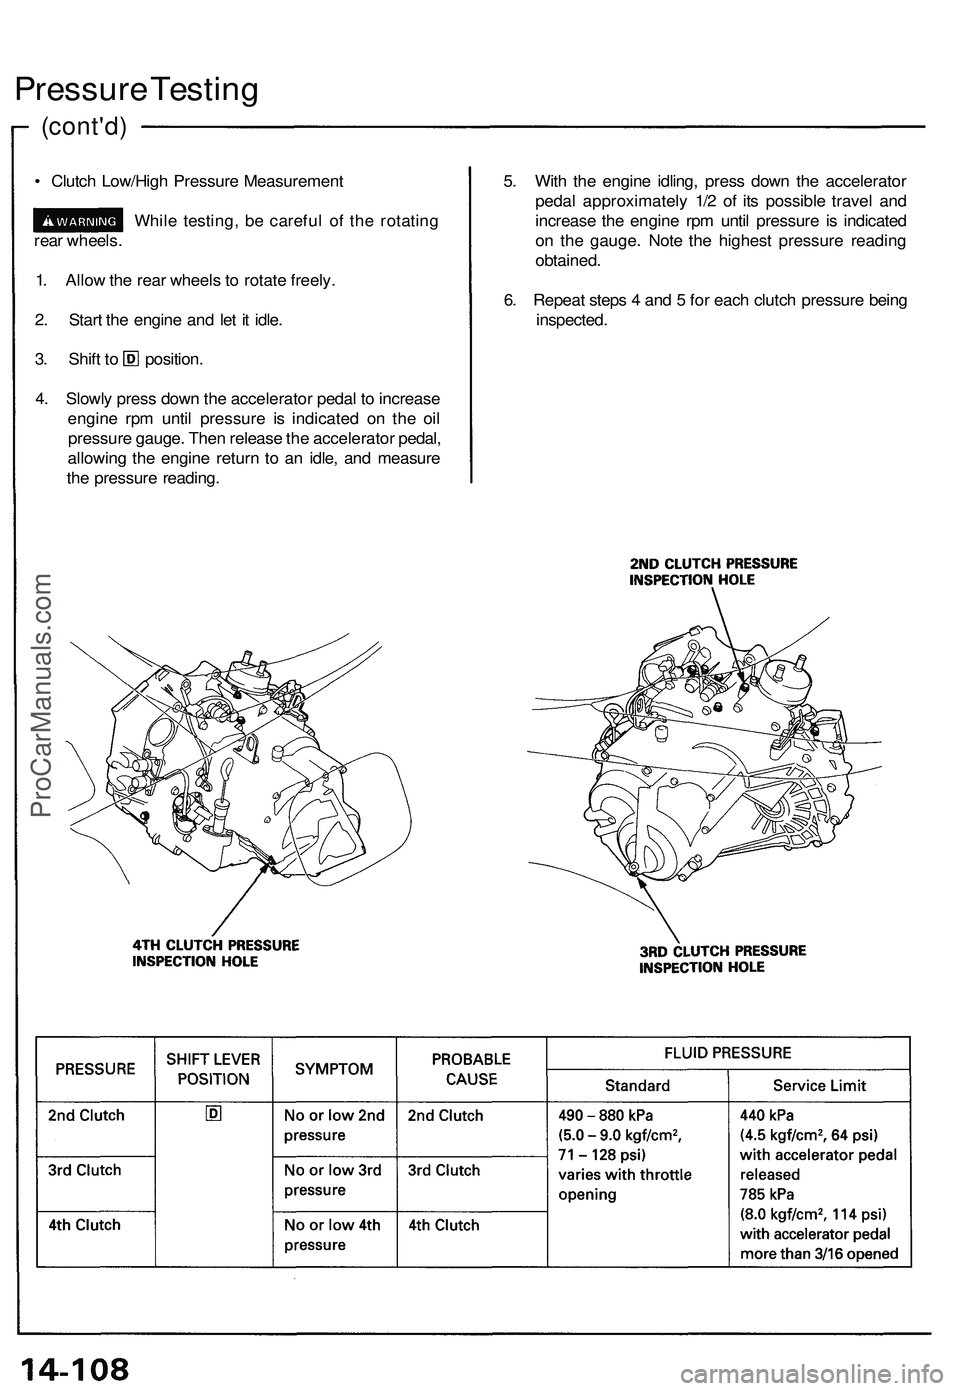
(cont'd)
Pressure Testing
• Clutch Low/High Pressure Measurement
While testing, be careful of the rotating
rear wheels.
1. Allow the rear wheels to rotate freely.
2. Start the engine and let it idle.
3. Shift to position.
4. Slowly press down the accelerator pedal to increase
engine rpm until pressure is indicated on the oil
pressure gauge. Then release the accelerator pedal,
allowing the engine return to an idle, and measure
the pressure reading.
5. With the engine idling, press down the accelerator
pedal approximately 1/2 of its possible travel and
increase the engine rpm until pressure is indicated
on the gauge. Note the highest pressure reading
obtained.
6. Repeat steps 4 and 5 for each clutch pressure being
inspected.ProCarManuals.com
Page 777 of 1503
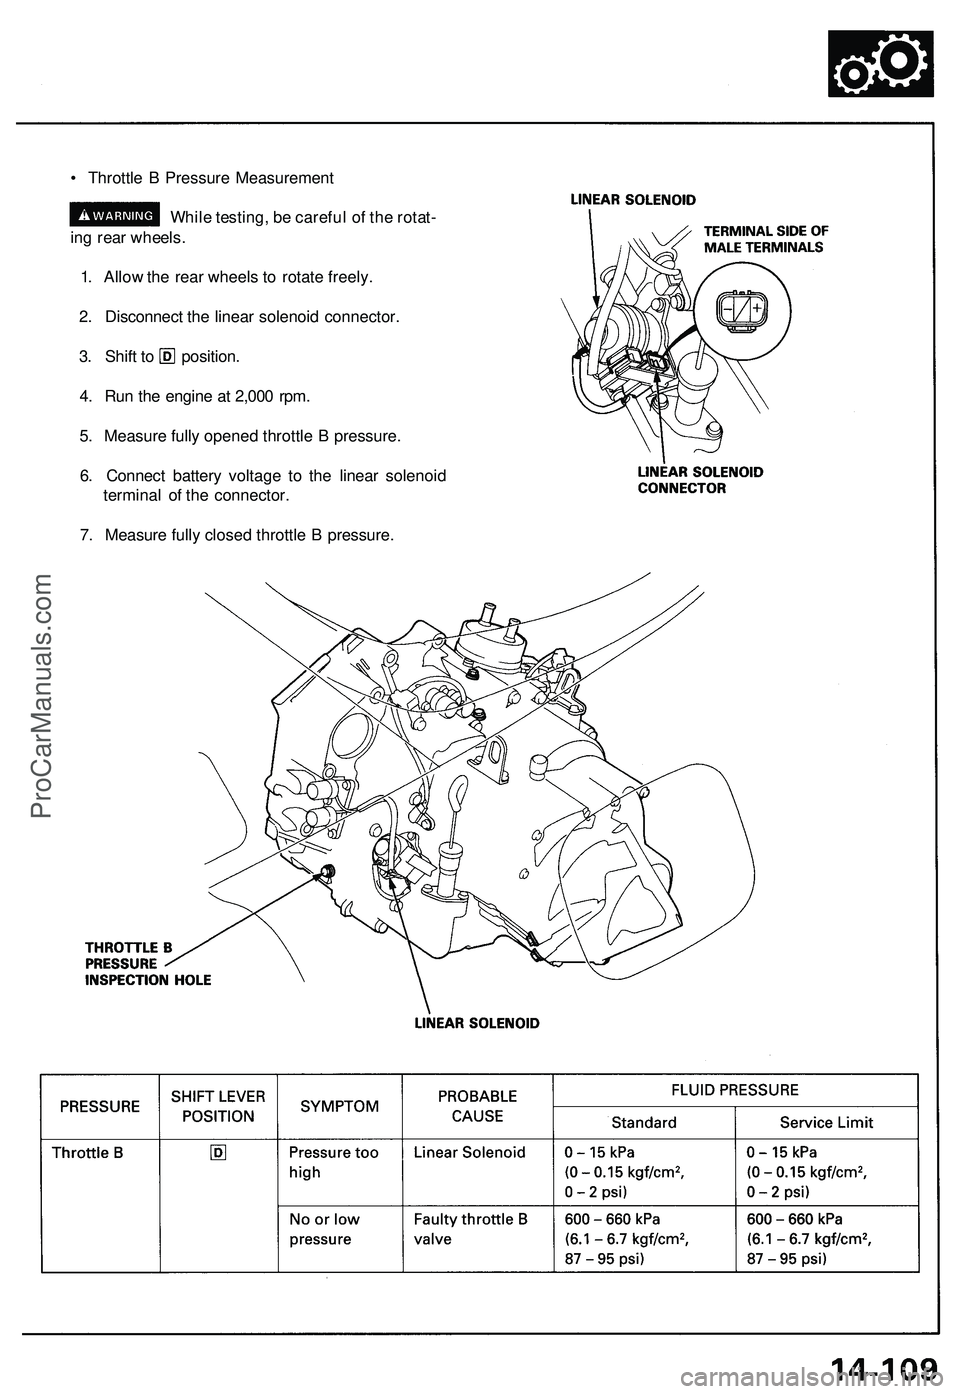
• Throttle B Pressure Measurement
While testing, be careful of the rotat-
ing rear wheels.
1. Allow the rear wheels to rotate freely.
2. Disconnect the linear solenoid connector.
3. Shift to position.
4. Run the engine at 2,000 rpm.
5. Measure fully opened throttle B pressure.
6. Connect battery voltage to the linear solenoid
terminal of the connector.
7. Measure fully closed throttle B pressure.ProCarManuals.com
Page 778 of 1503
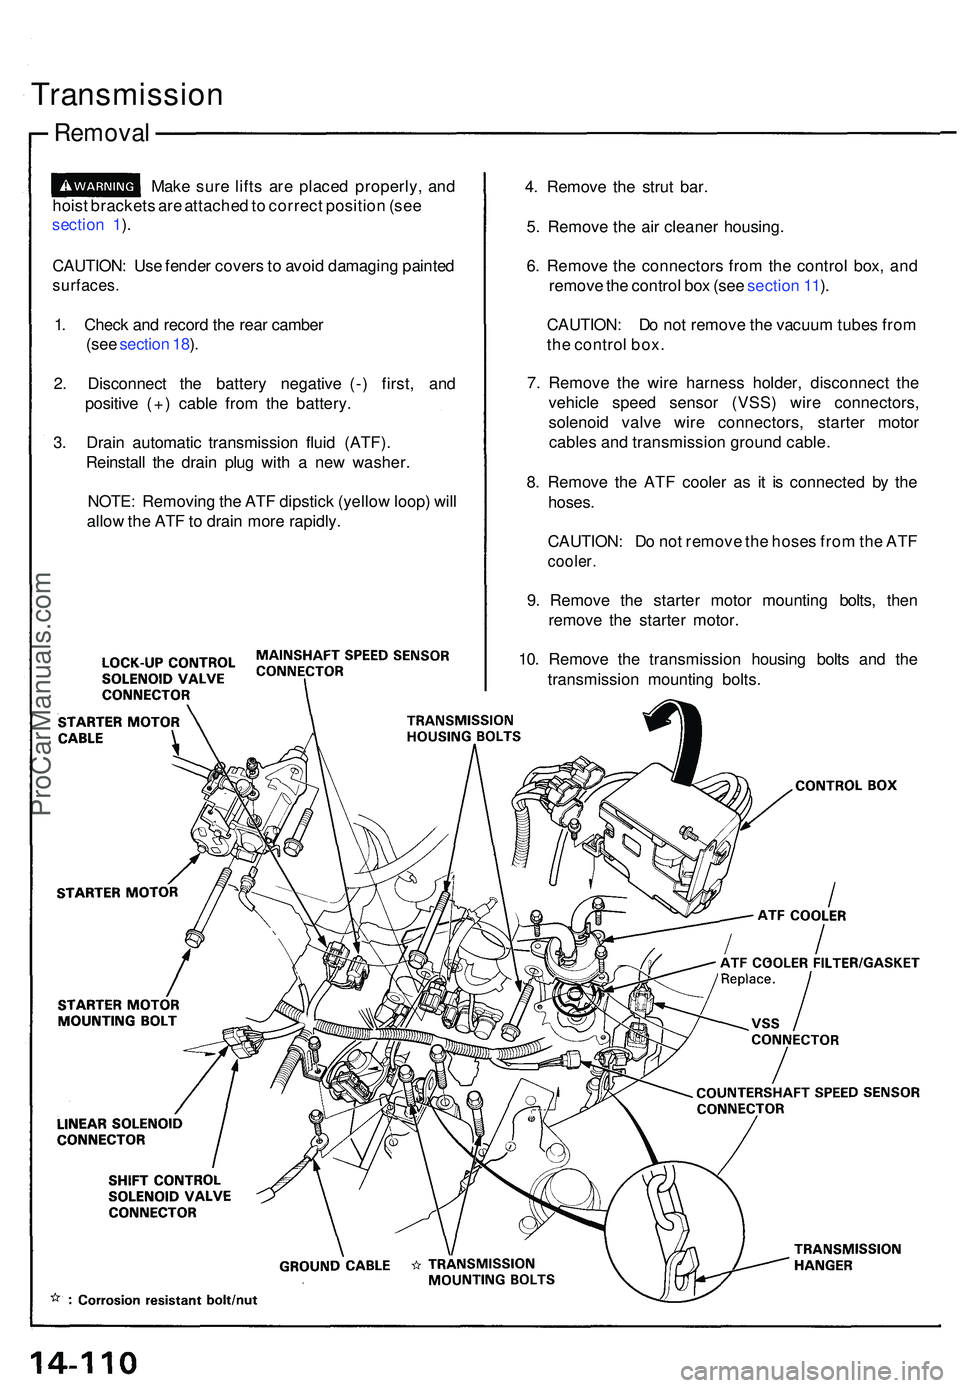
Removal
Transmissio n
Make sur e lift s ar e place d properly , an d
hois t bracket s ar e attache d to correc t positio n (se e
sectio n 1 ).
CAUTION : Us e fende r cover s to avoi d damagin g painte d
surfaces .
1. Chec k an d recor d th e rea r cambe r
(se e sectio n 18 ).
2 . Disconnec t th e batter y negativ e (- ) first , an d
positiv e (+ ) cabl e fro m th e battery .
3 . Drai n automati c transmissio n flui d (ATF) .
Reinstal l th e drai n plu g wit h a ne w washer .
NOTE : Removin g th e AT F dipstic k (yello w loop ) wil l
allo w th e AT F to drai n mor e rapidly . 4
. Remov e th e stru t bar .
5 . Remov e th e ai r cleane r housing .
6 . Remov e th e connector s fro m th e contro l box , an d
remov e th e contro l bo x (se e sectio n 11 ).
CAUTION : D o no t remov e th e vacuu m tube s fro m
th e contro l box .
7 . Remov e th e wir e harnes s holder , disconnec t th e
vehicl e spee d senso r (VSS ) wir e connectors ,
solenoi d valv e wir e connectors , starte r moto r
cable s an d transmissio n groun d cable .
8 . Remov e th e AT F coole r a s i t i s connecte d b y th e
hoses .
CAUTION : D o no t remov e th e hose s fro m th e AT F
cooler .
9. Remov e th e starte r moto r mountin g bolts , the n
remov e th e starte r motor .
10 . Remov e th e transmissio n housin g bolt s an d th e
transmissio n mountin g bolts .
ProCarManuals.com
Page 779 of 1503
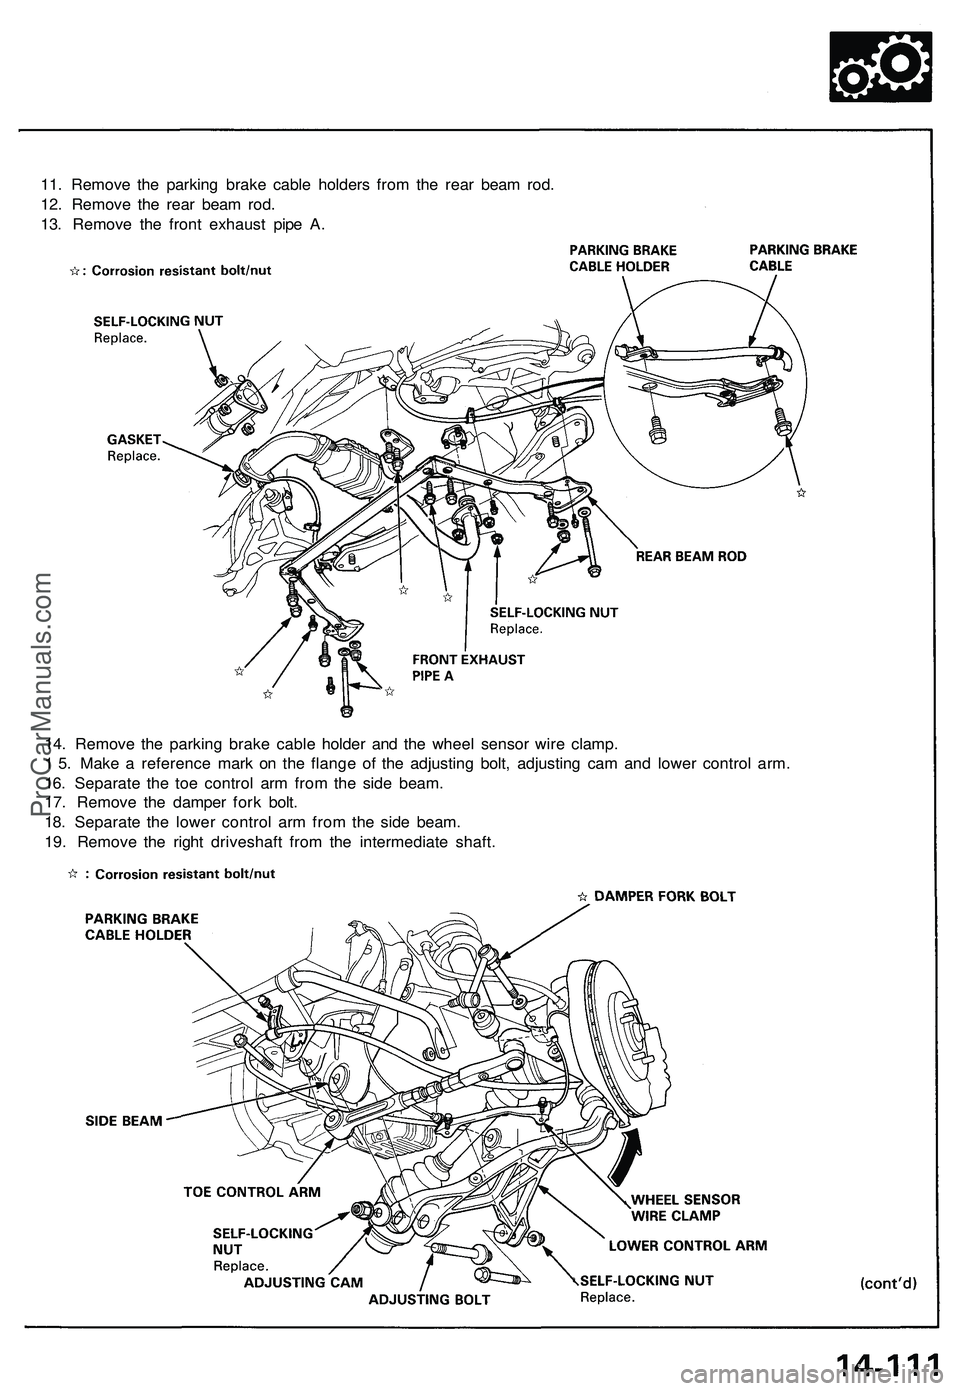
11. Remove the parking brake cable holders from the rear beam rod.
12. Remove the rear beam rod.
13. Remove the front exhaust pipe A.
14. Remove the parking brake cable holder and the wheel sensor wire clamp.
1 5. Make a reference mark on the flange of the adjusting bolt, adjusting cam and lower control arm.
16. Separate the toe control arm from the side beam.
17. Remove the damper fork bolt.
18. Separate the lower control arm from the side beam.
19. Remove the right driveshaft from the intermediate shaft.ProCarManuals.com
Page 780 of 1503

20. Remove the intermediate shaft heat shield cover and the intermediate shaft mounting bolts.
21. Pry the intermediate shaft out of the differential. Pull and remove it.
NOTE:
• Coat all precision finished surfaces with clean engine oil.
• Tie a plastic bag over the intermediate shaft end.
Removal (cont'd)
Transmission
22. Remove the parking brake cable holder and the wheel sensor wire clamp.
23. Make a reference mark on the flange of the adjusting bolt, adjusting cam and lower control arm.
24. Separate the toe control arm from the side beam.
25. Remove the damper fork bolt.
26. Separate the lower control arm from the side beam.
27. Pry the left driveshaft out of the differential. Pull and remove it.
NOTE:
• Coat all precision finished surfaces with clean engine oil.
• Tie a plastic bag over the driveshaft end.ProCarManuals.com