ACURA NSX 1997 Service Repair Manual
Manufacturer: ACURA, Model Year: 1997,
Model line: NSX,
Model: ACURA NSX 1997
Pages: 1503, PDF Size: 57.08 MB
ACURA NSX 1997 Service Repair Manual
NSX 1997
ACURA
ACURA
https://www.carmanualsonline.info/img/32/56989/w960_56989-0.png
ACURA NSX 1997 Service Repair Manual
Trending: manual transmission, steering, compression ratio, engine oil capacity, low beam, differential, headlight bulb
Page 801 of 1503
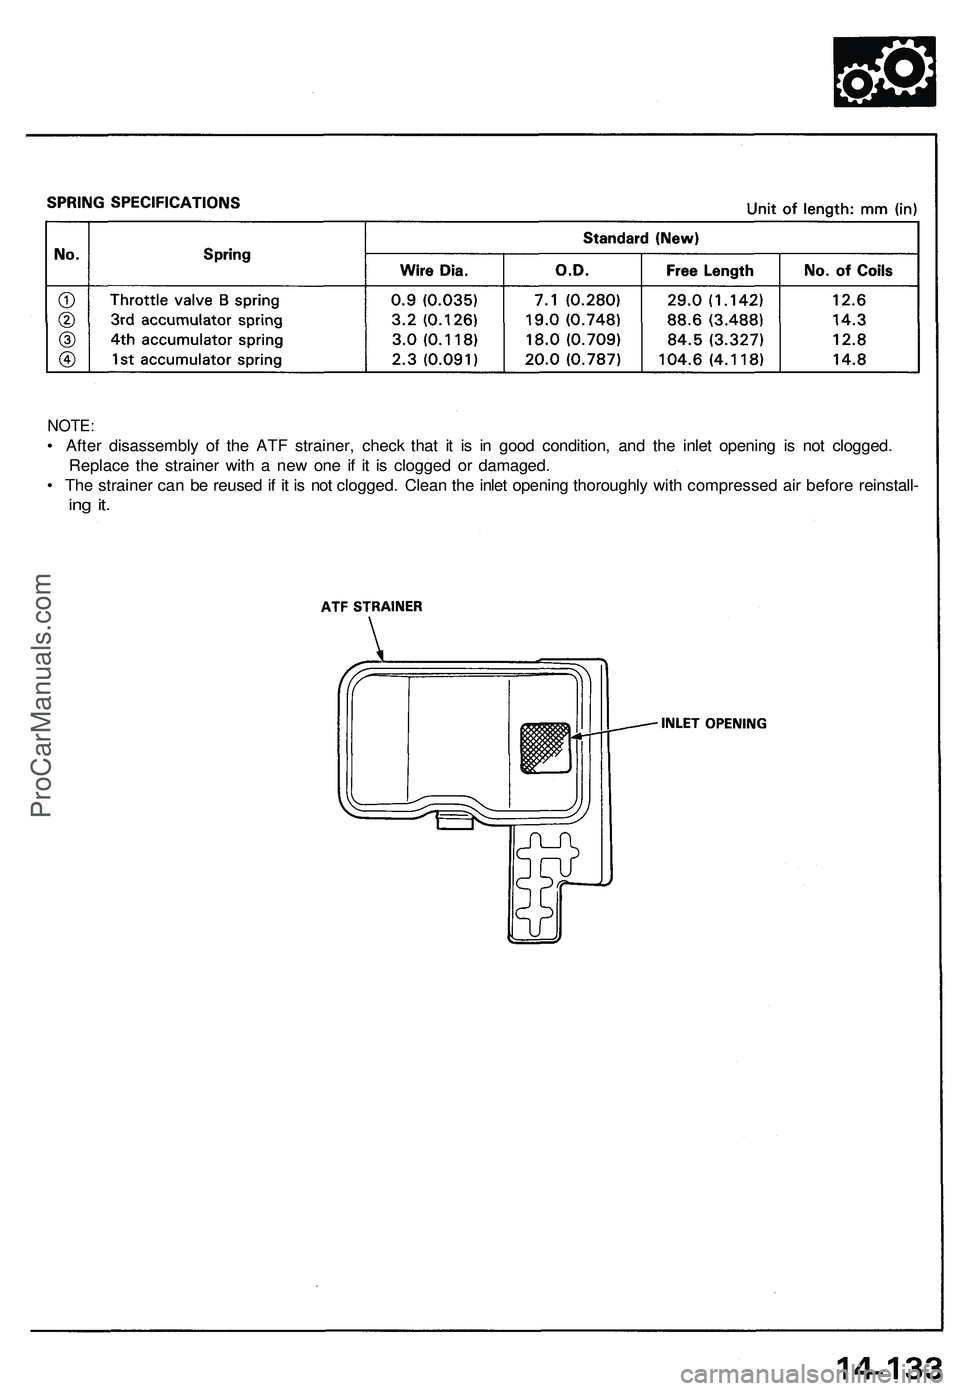
NOTE:
• After disassembly of the ATF strainer, check that it is in good condition, and the inlet opening is not clogged.
Replace the strainer with a new one if it is clogged or damaged.
• The strainer can be reused if it is not clogged. Clean the inlet opening thoroughly with compressed air before reinstall-
ing it.ProCarManuals.com
Page 802 of 1503
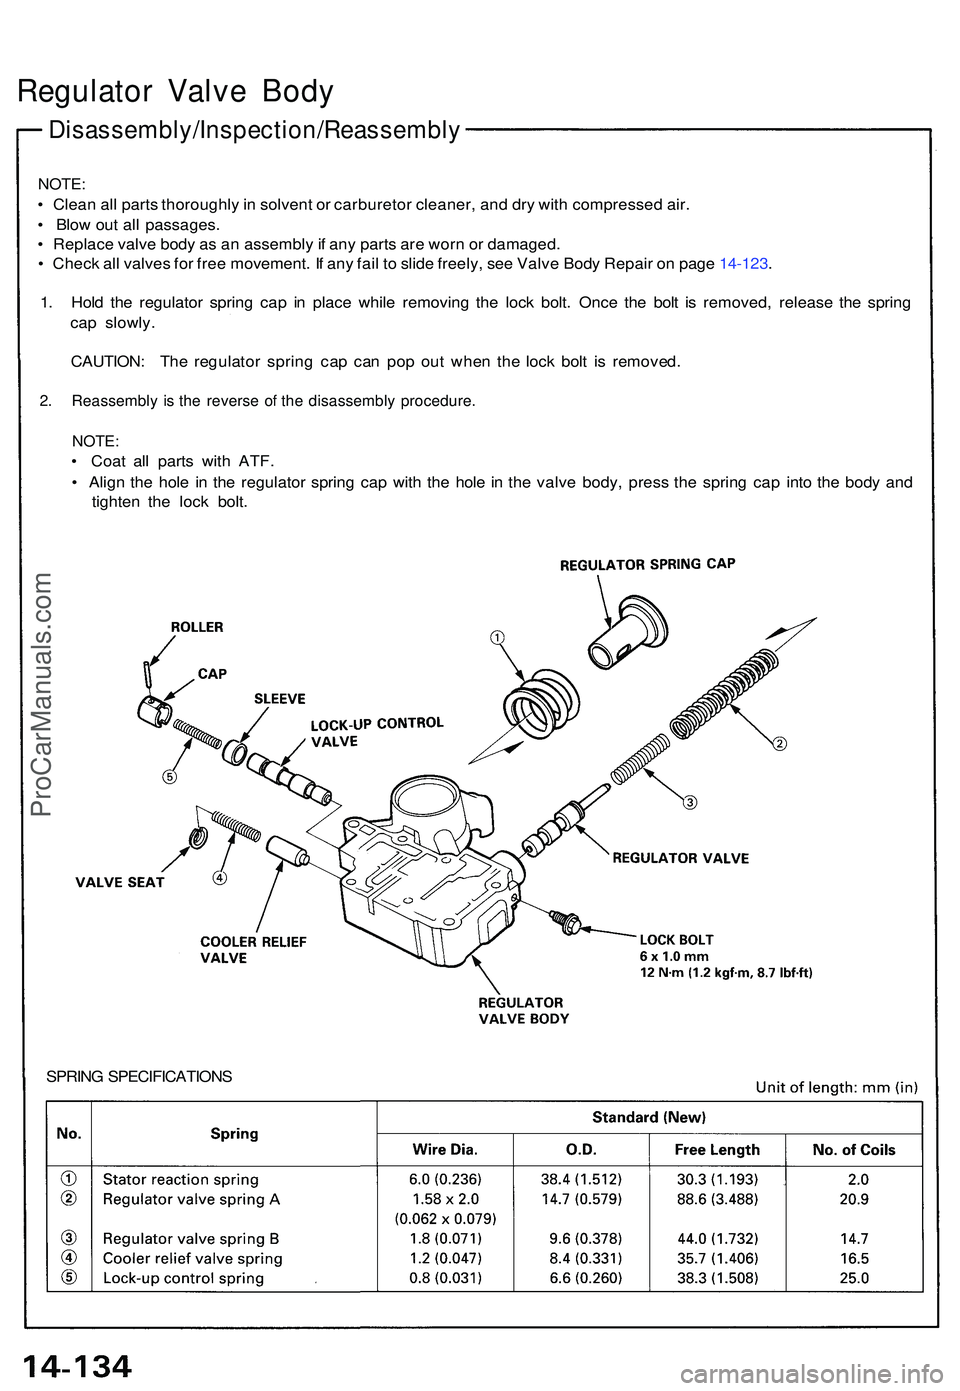
Disassembly/Inspection/Reassembly
Regulator Valv e Bod y
NOTE :
• Clea n al l part s thoroughl y in solven t o r carbureto r cleaner , an d dr y wit h compresse d air .
• Blo w ou t al l passages .
• Replac e valv e bod y a s a n assembl y if an y part s ar e wor n o r damaged .
• Chec k al l valve s fo r fre e movement . I f an y fai l t o slid e freely , se e Valv e Bod y Repai r o n pag e 14-123 .
1 . Hol d th e regulato r sprin g ca p i n plac e whil e removin g th e loc k bolt . Onc e th e bol t i s removed , releas e th e sprin g
ca p slowly .
CAUTION : Th e regulato r sprin g ca p ca n po p ou t whe n th e loc k bol t i s removed .
2. Reassembl y i s th e revers e o f th e disassembl y procedure .
NOTE:
• Coa t al l part s wit h ATF .
• Alig n th e hol e i n th e regulato r sprin g ca p wit h th e hol e in th e valv e body , pres s th e sprin g ca p int o th e bod y an d
tighte n th e loc k bolt .
SPRIN G SPECIFICATION S
ProCarManuals.com
Page 803 of 1503
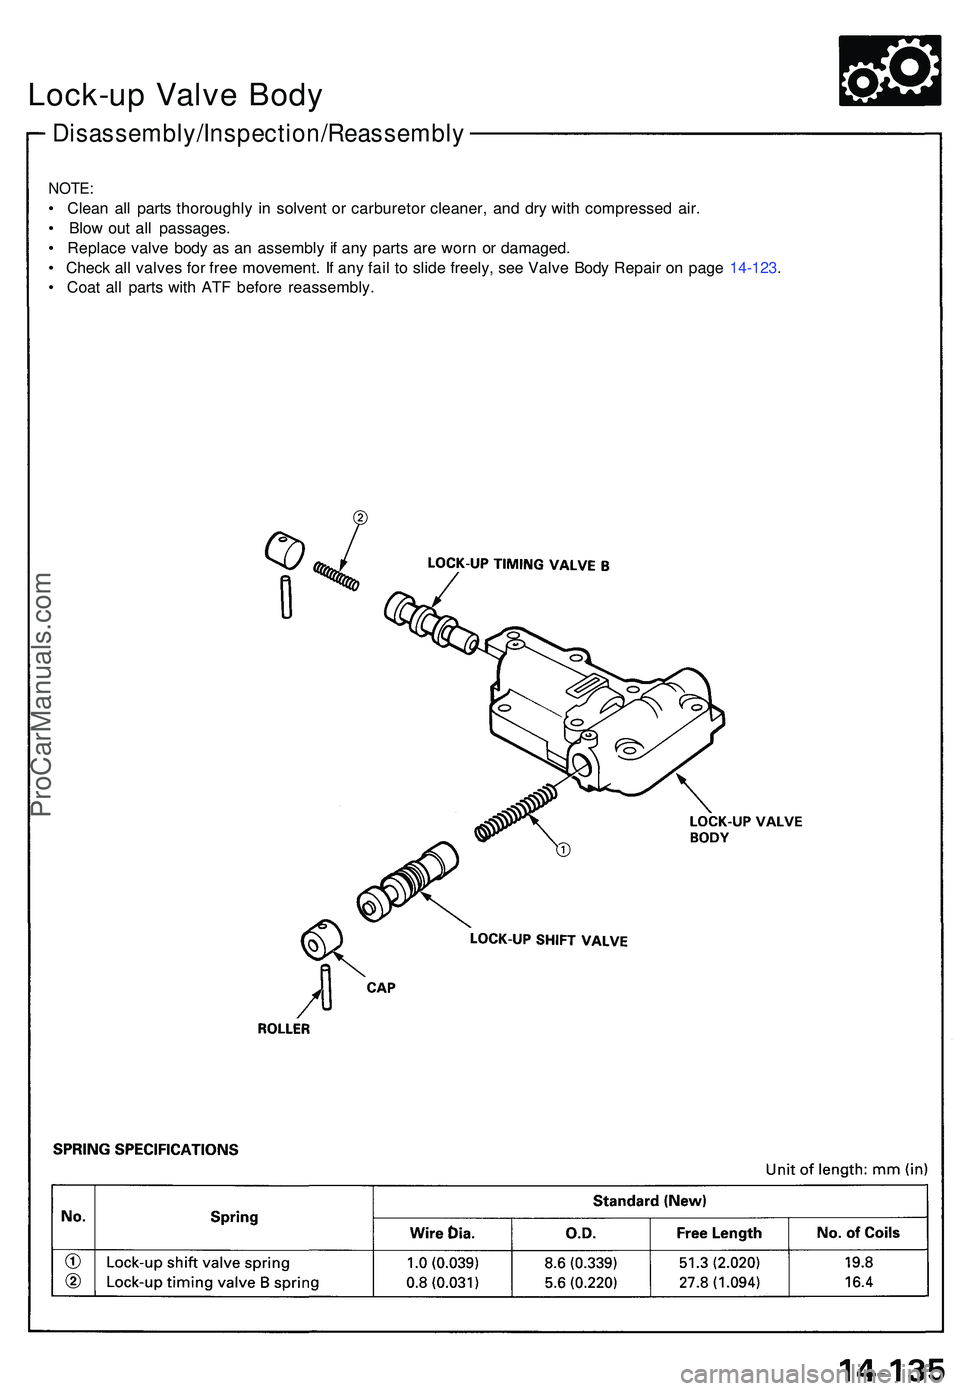
NOTE:
• Clea n al l part s thoroughl y i n solven t o r carbureto r cleaner , an d dr y wit h compresse d air .
• Blo w ou t al l passages .
• Replac e valv e bod y a s a n assembl y i f an y part s ar e wor n o r damaged .
• Chec k al l valve s fo r fre e movement . I f an y fai l t o slid e freely , se e Valv e Bod y Repai r o n pag e 14-123 .
• Coa t al l part s wit h AT F befor e reassembly .
Disassembly/Inspection/Reassembl y
Lock-up Valve Body
ProCarManuals.com
Page 804 of 1503
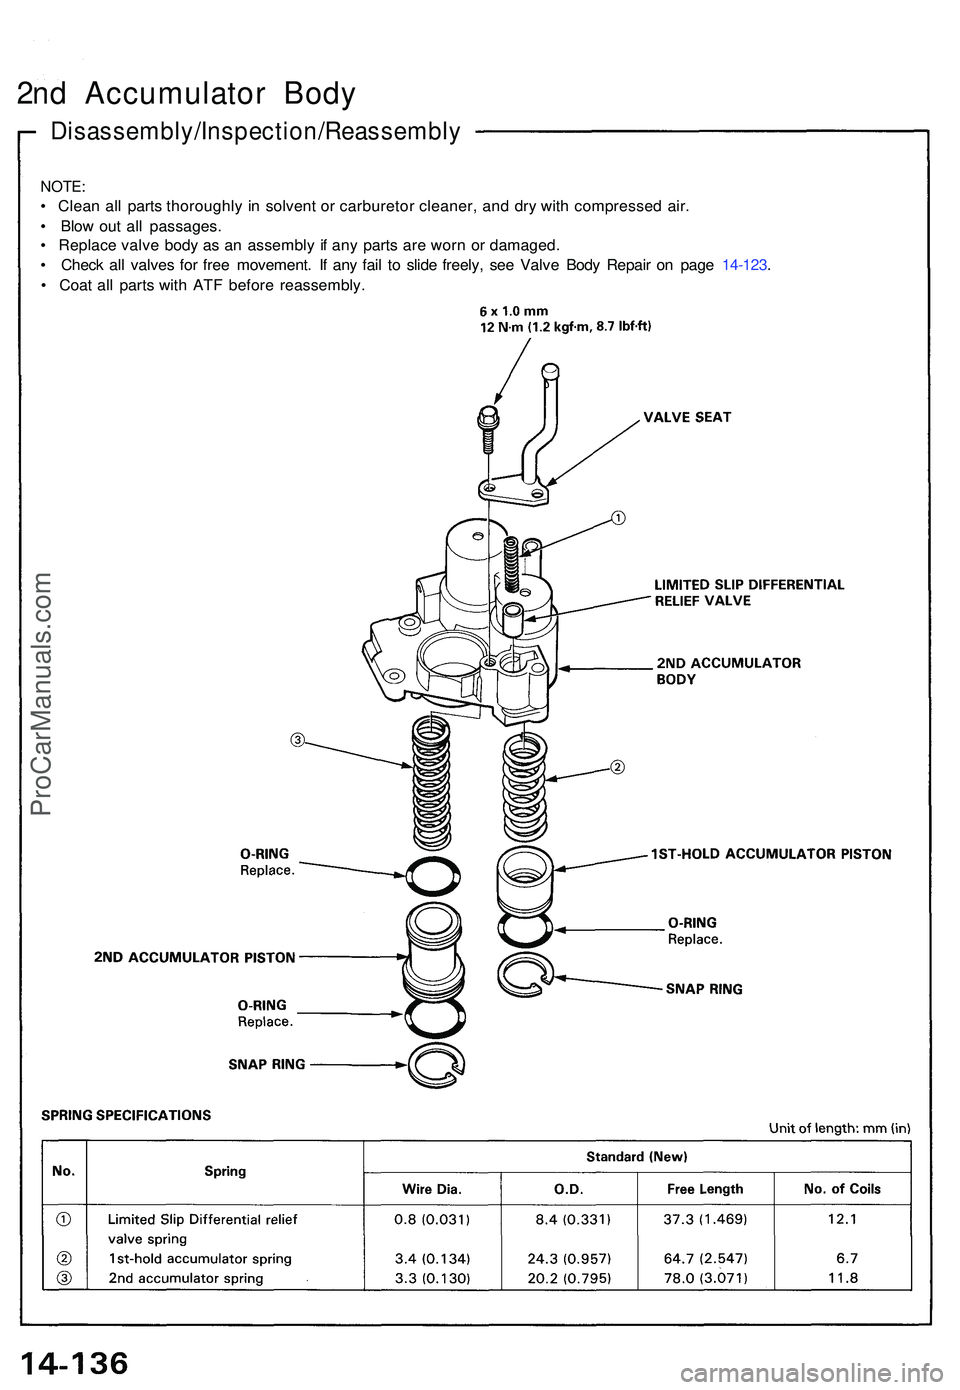
Disassembly/Inspection/Reassembly
NOTE:
• Clea n al l part s thoroughl y i n solven t o r carbureto r cleaner , an d dr y wit h compresse d air .
• Blo w ou t al l passages .
• Replac e valv e bod y a s a n assembl y i f an y part s ar e wor n o r damaged .
• Chec k al l valve s fo r fre e movement . I f an y fai l t o slid e freely , se e Valv e Bod y Repai r o n pag e 14-123 .
• Coa t al l part s wit h AT F befor e reassembly .
2nd Accumulato r Bod y
ProCarManuals.com
Page 805 of 1503
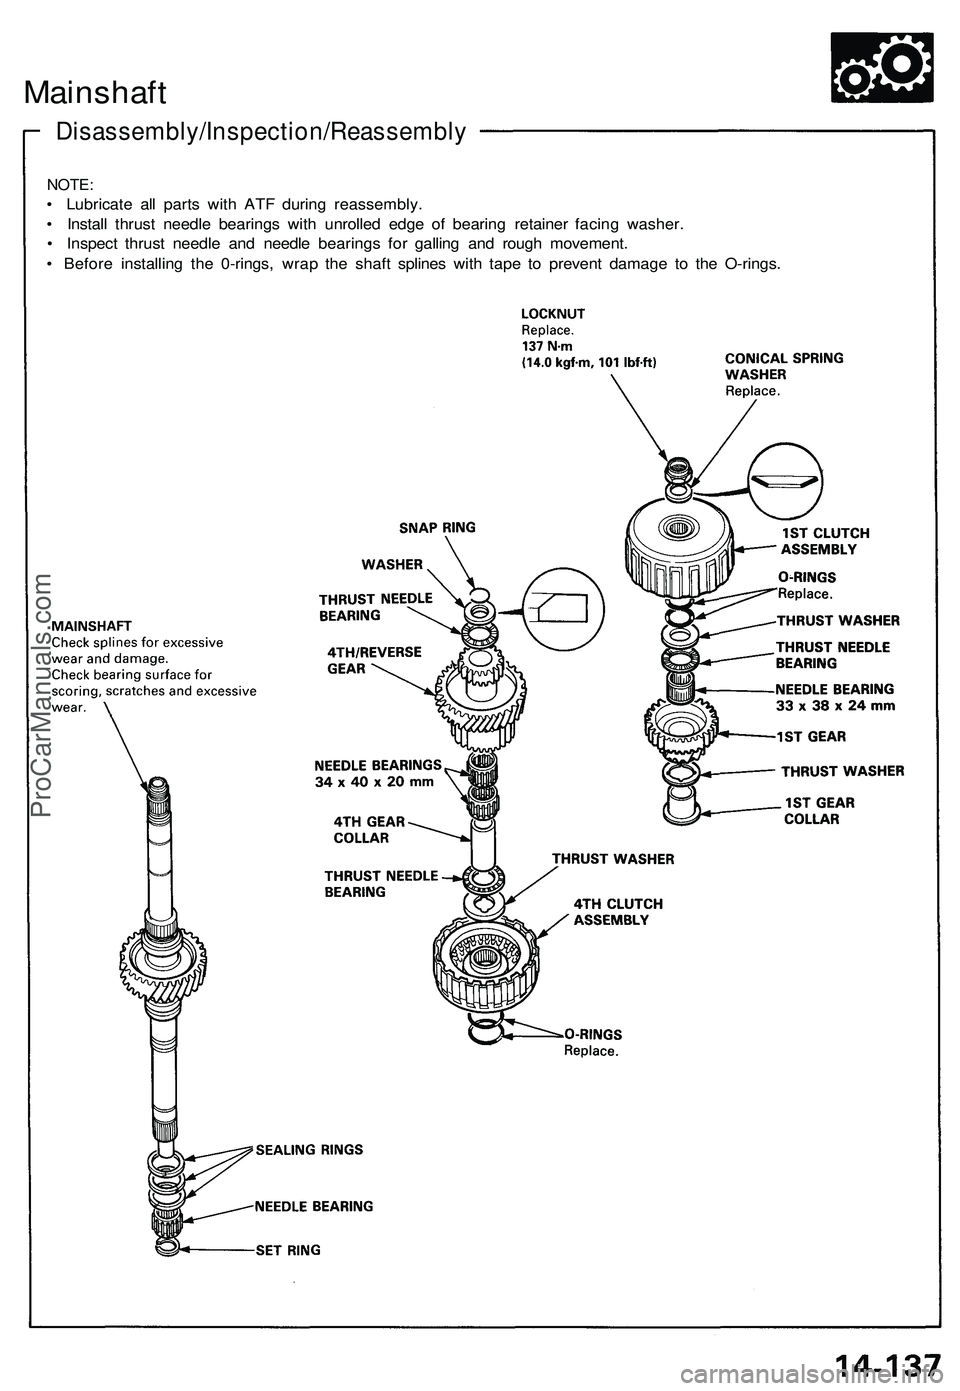
Mainshaft
Disassembly/Inspection/Reassembl y
NOTE:
• Lubricat e al l part s wit h AT F durin g reassembly .
• Instal l thrus t needl e bearing s wit h unrolle d edg e o f bearin g retaine r facin g washer .
• Inspec t thrus t needl e an d needl e bearing s fo r gallin g an d roug h movement .
• Befor e installin g th e 0-rings , wra p th e shaf t spline s wit h tap e t o preven t damag e t o th e O-rings .
ProCarManuals.com
Page 806 of 1503
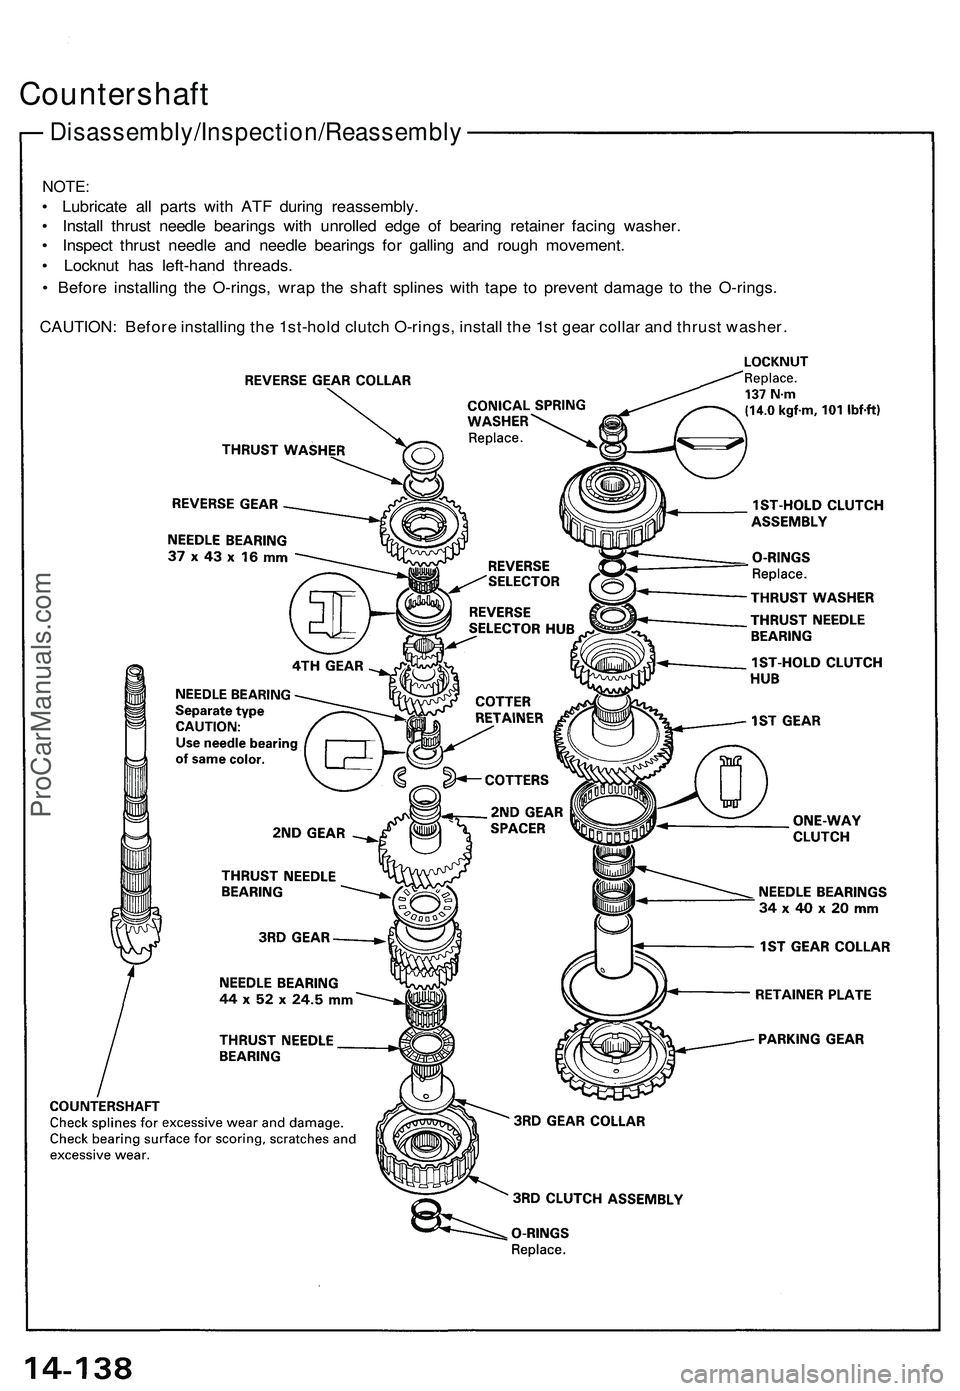
NOTE:
• Lubricat e al l part s wit h AT F durin g reassembly .
• Instal l thrus t needl e bearing s wit h unrolle d edg e o f bearin g retaine r facin g washer .
• Inspec t thrus t needl e an d needl e bearing s fo r gallin g an d roug h movement .
• Locknu t ha s left-han d threads .
• Befor e installin g th e O-rings , wra p th e shaf t spline s wit h tap e t o preven t damag e t o th e O-rings .
CAUTION : Befor e installin g th e 1st-hol d clutc h O-rings , instal l th e 1s t gea r colla r an d thrus t washer .
Disassembly/Inspection/Reassembl y
Countershaft
ProCarManuals.com
Page 807 of 1503
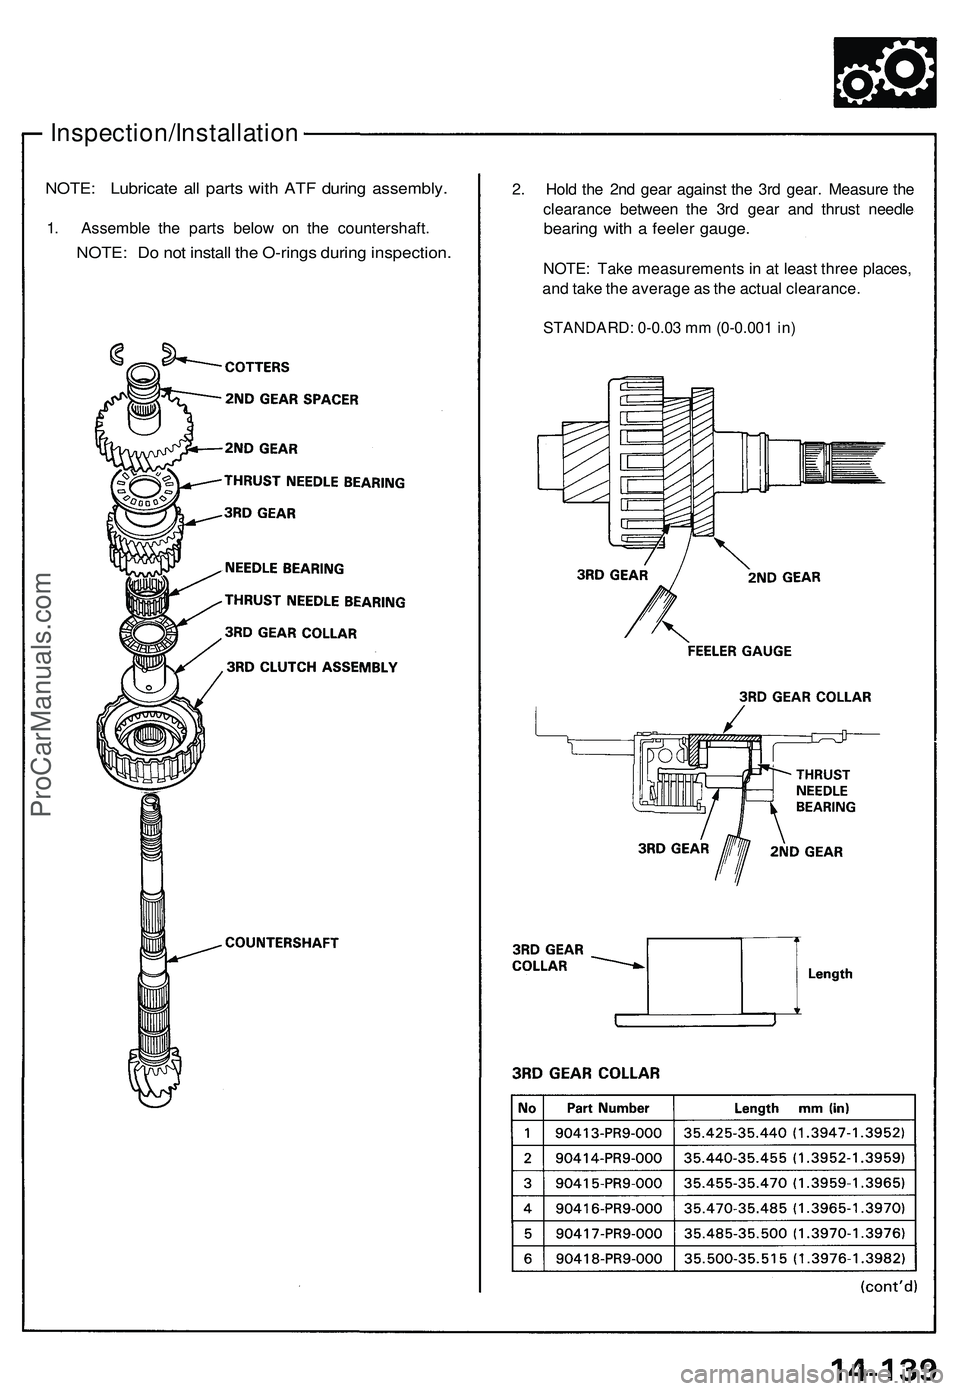
Inspection/Installation
NOTE: Lubricat e al l part s wit h AT F durin g assembly .
1. Assembl e th e part s belo w o n th e countershaft .
NOTE: D o no t instal l th e O-ring s durin g inspection .
2. Hol d th e 2n d gea r agains t th e 3r d gear . Measur e th e
clearanc e betwee n th e 3r d gea r an d thrus t needl e
bearing wit h a feele r gauge .
NOTE: Tak e measurement s i n a t leas t thre e places ,
an d tak e th e averag e a s th e actua l clearance .
STANDARD : 0-0.0 3 m m (0-0.00 1 in )
ProCarManuals.com
Page 808 of 1503
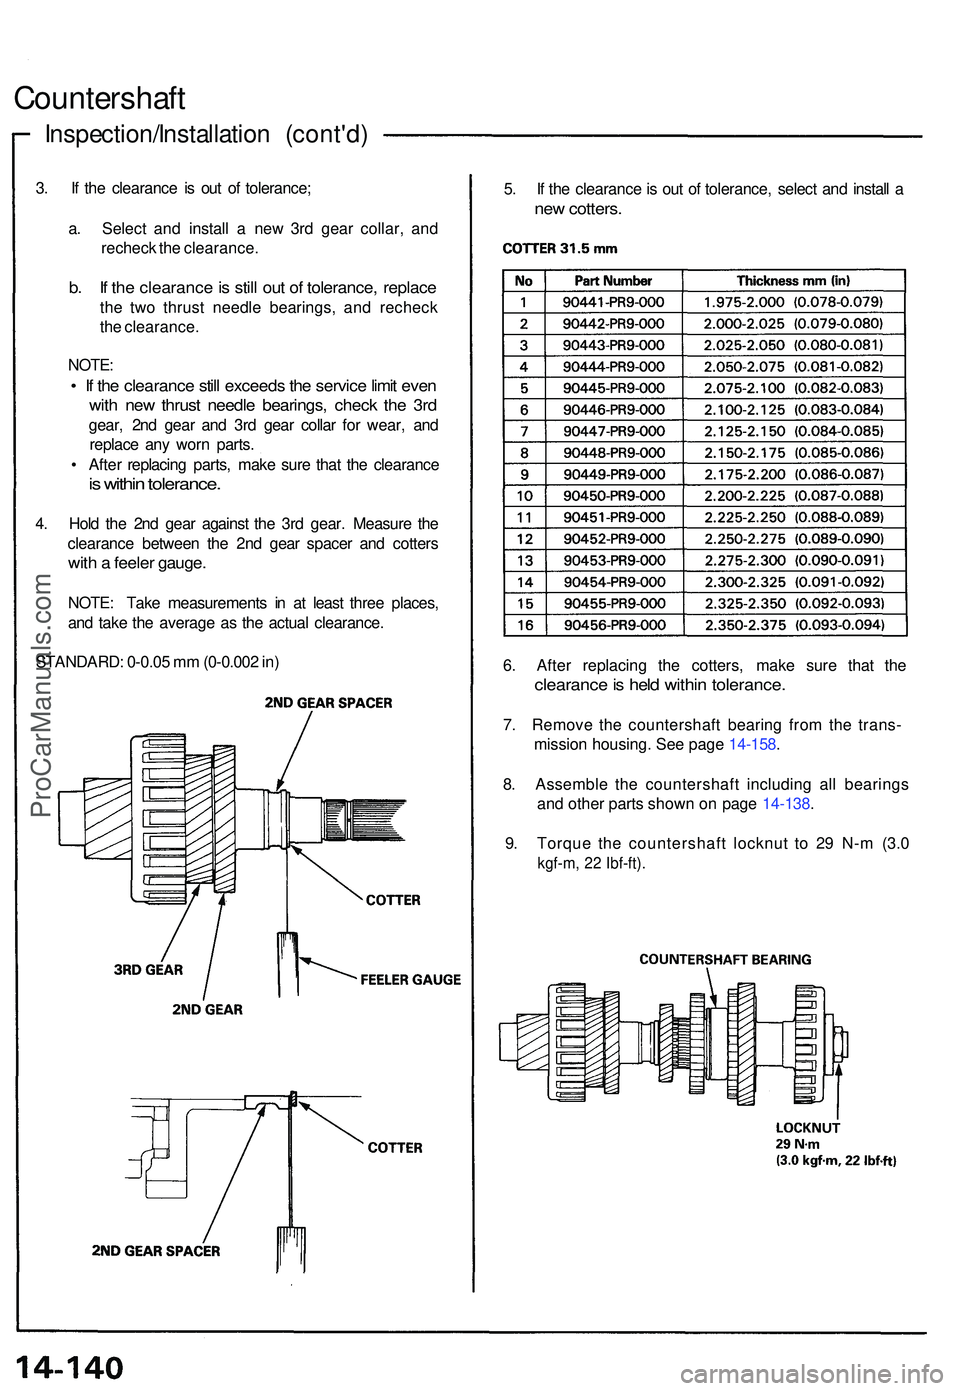
Inspection/Installation (cont'd )
Countershaf t
3. I f th e clearanc e i s ou t o f tolerance ;
a . Selec t an d instal l a ne w 3r d gea r collar , an d
rechec k th e clearance .
b. I f th e clearanc e is stil l ou t o f tolerance , replac e
the tw o thrus t needl e bearings , an d rechec k
th e clearance .
NOTE :
• I f th e clearanc e stil l exceed s th e servic e limi t eve n
with ne w thrus t needl e bearings , chec k th e 3r d
gear , 2n d gea r an d 3r d gea r colla r fo r wear , an d
replac e an y wor n parts .
• Afte r replacin g parts , mak e sur e tha t th e clearanc e
is withi n tolerance .
4. Hol d th e 2n d gea r agains t th e 3r d gear . Measur e th e
clearanc e betwee n th e 2n d gea r space r an d cotter s
with a feele r gauge .
NOTE: Tak e measurement s i n a t leas t thre e places ,
an d tak e th e averag e a s th e actua l clearance .
STANDARD : 0-0.0 5 m m (0-0.00 2 in )6. Afte r replacin g th e cotters , mak e sur e tha t th e
clearanc e is hel d withi n tolerance .
7. Remov e th e countershaf t bearin g fro m th e trans -
missio n housing . Se e pag e 14-158 .
8 . Assembl e th e countershaf t includin g al l bearing s
an d othe r part s show n o n pag e 14-138 .
9 . Torqu e th e countershaf t locknu t t o 2 9 N- m (3. 0
kgf-m , 2 2 Ibf-ft) .
5. I f th e clearanc e is ou t o f tolerance , selec t an d instal l a
ne w cotters .
ProCarManuals.com
Page 809 of 1503
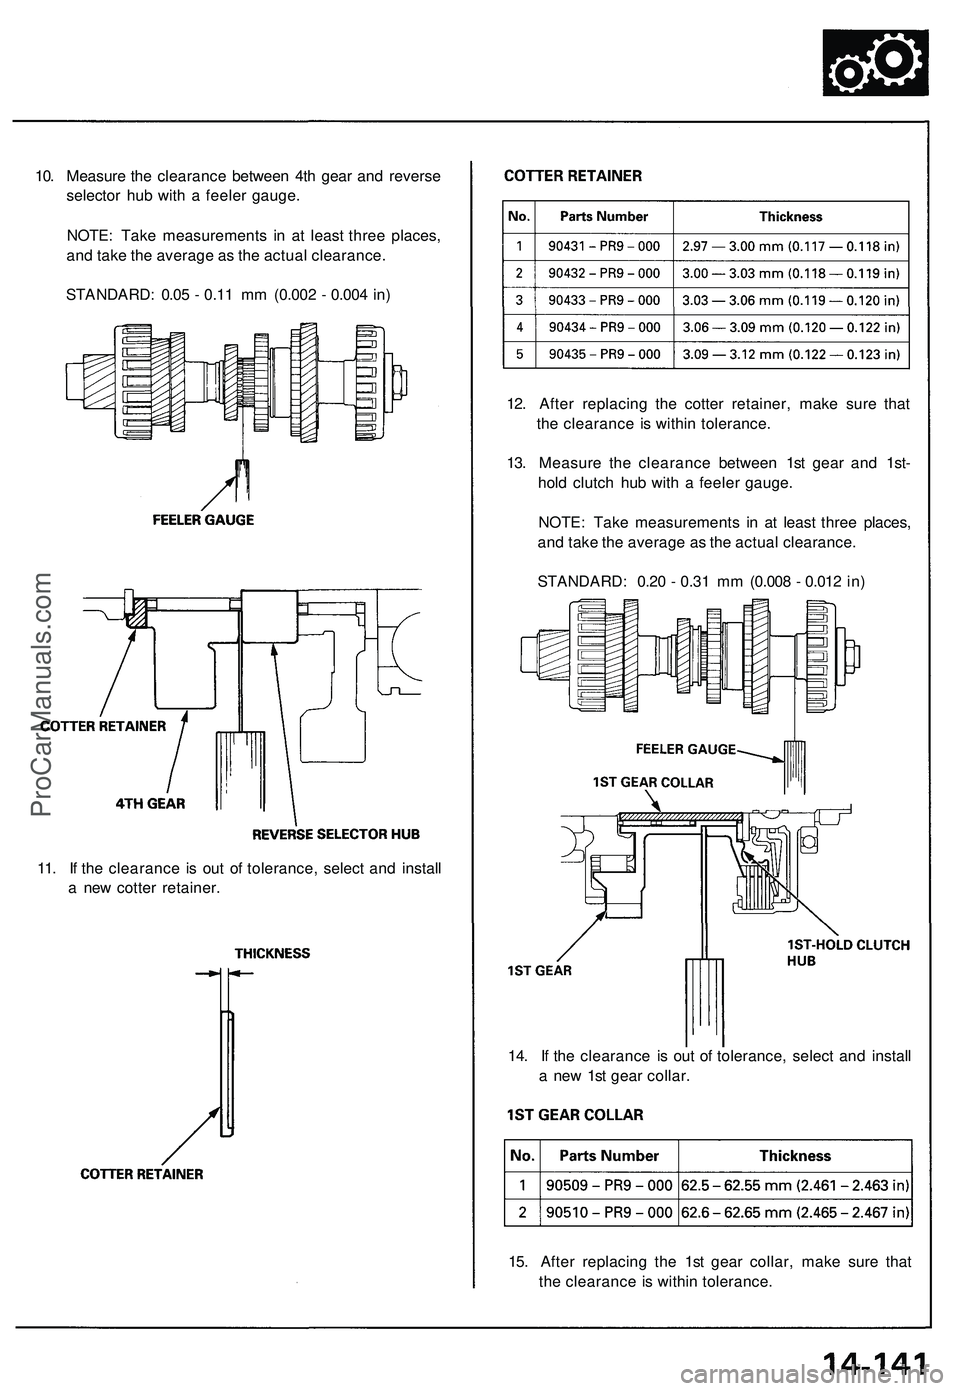
10. Measure the clearance between 4th gear and reverse
selector hub with a feeler gauge.
NOTE: Take measurements in at least three places,
and take the average as the actual clearance.
STANDARD: 0.05 - 0.11 mm (0.002 - 0.004 in)
12. After replacing the cotter retainer, make sure that
the clearance is within tolerance.
13. Measure the clearance between 1st gear and 1st-
hold clutch hub with a feeler gauge.
NOTE: Take measurements in at least three places,
and take the average as the actual clearance.
STANDARD: 0.20 - 0.31 mm (0.008 - 0.012 in)
11. If the clearance is out of tolerance, select and install
a new cotter retainer.
14. If the clearance is out of tolerance, select and install
a new 1st gear collar.
15. After replacing the 1st gear collar, make sure that
the clearance is within tolerance.ProCarManuals.com
Page 810 of 1503
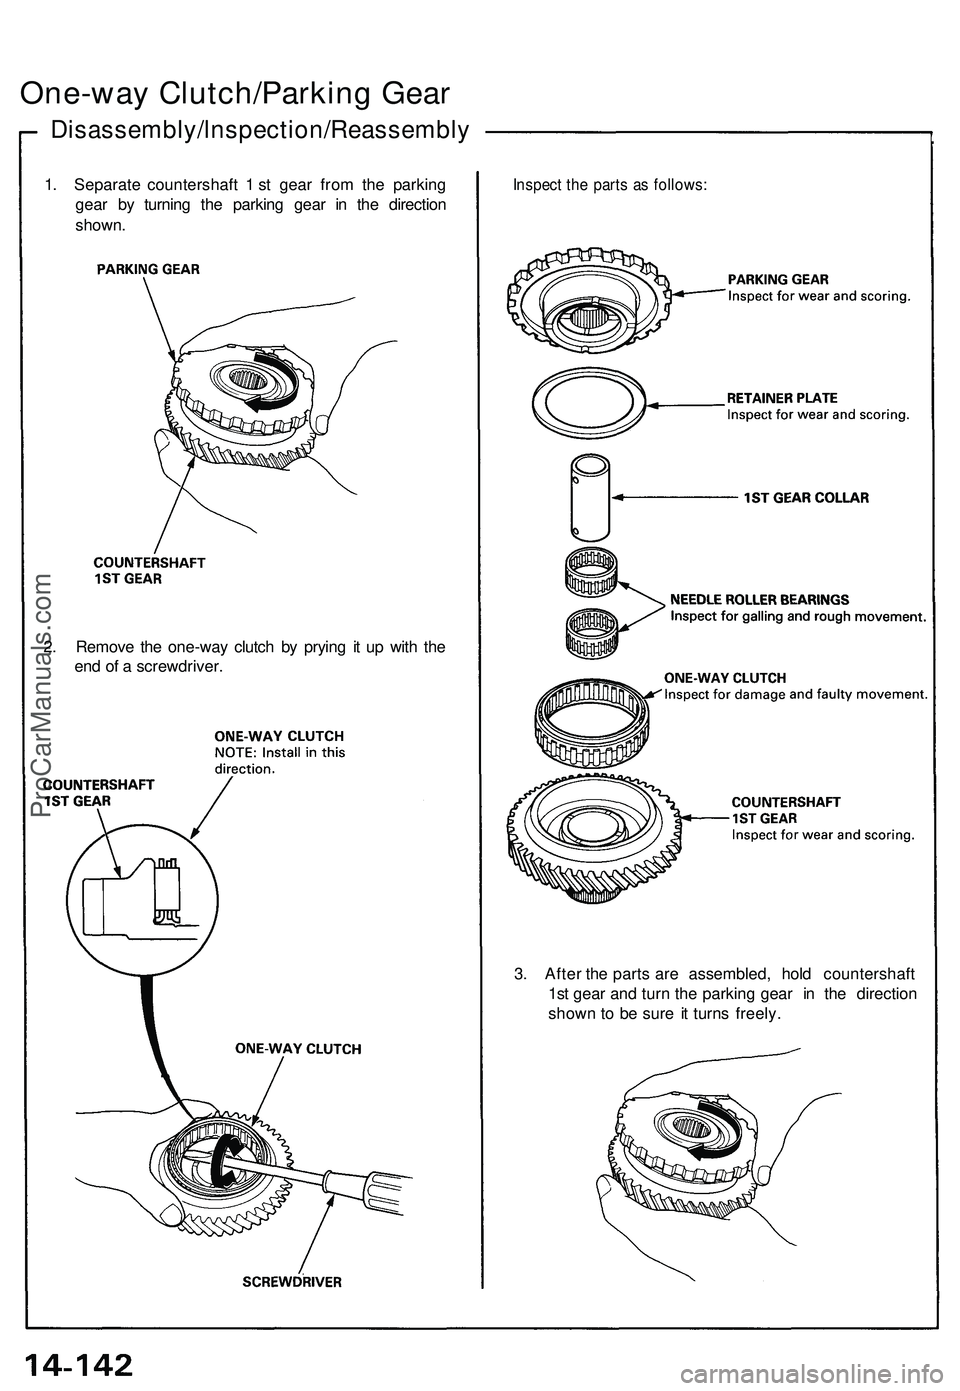
One-way Clutch/Parkin g Gea r
Disassembly/lnspection/Reassembl y
1. Separat e countershaf t 1 st gea r fro m th e parkin g
gea r b y turnin g th e parkin g gea r i n th e directio n
shown .
2 . Remov e th e one-wa y clutc h b y pryin g i t u p wit h th e
en d o f a screwdriver .
3. Afte r th e part s ar e assembled , hol d countershaf t
1s t gea r an d tur n th e parkin g gea r i n th e directio n
show n t o b e sur e i t turn s freely .Inspect th e part s a s follows :
ProCarManuals.com
Trending: trunk release, dimensions, display, radiator, service reset, sensor, dashboard warning lights
