check engine ACURA RL KA9 1996 Service Owner's Guide
[x] Cancel search | Manufacturer: ACURA, Model Year: 1996, Model line: RL KA9, Model: ACURA RL KA9 1996Pages: 1954, PDF Size: 61.44 MB
Page 572 of 1954
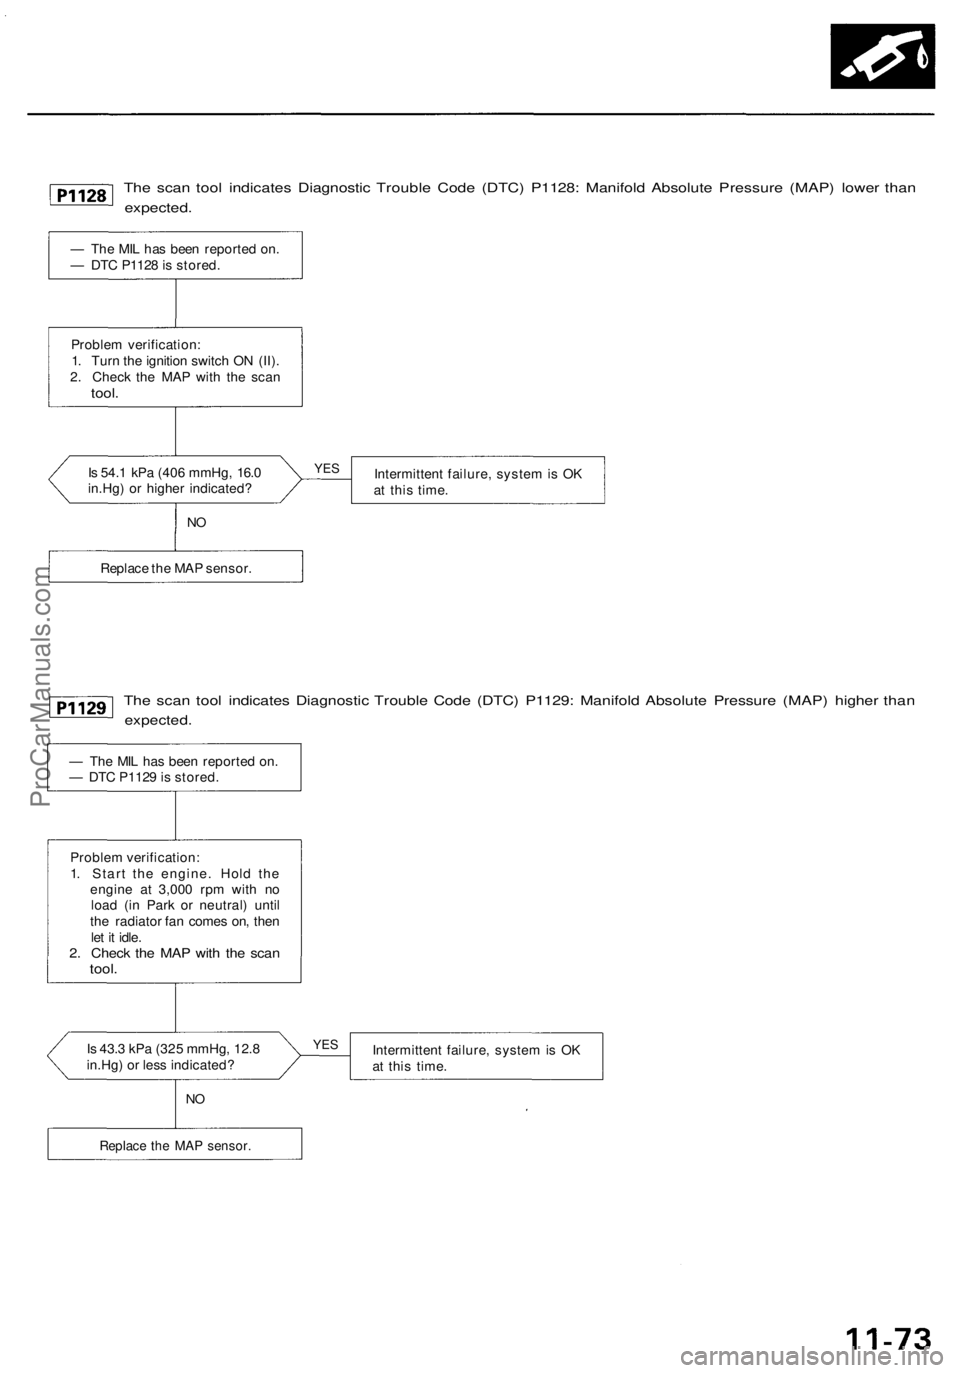
The scan tool indicates Diagnostic Trouble Code (DTC) P1128: Manifold Absolute Pressure (MAP) lower than
expected.
— The MIL has been reported on.
— DTC P1128 is stored.
Problem verification:
1. Turn the ignition switch ON (II).
2. Check the MAP with the scan
tool.
Is 54.1 kPa (406 mmHg, 16.0
in.Hg) or higher indicated?
Intermittent failure, system is OK
at this time.
The scan tool indicates Diagnostic Trouble Code (DTC) P1129: Manifold Absolute Pressure (MAP) higher than
expected.
Is 43.3 kPa (325 mmHg, 12.8
in.Hg) or less indicated?
Intermittent failure, system is OK
at this time.
Replace the MAP sensor.
NO
YES
Problem verification:
1. Start the engine. Hold the
engine at 3,000 rpm with no
load (in Park or neutral) until
the radiator fan comes on, then
let it idle.
2. Check the MAP with the scan
tool.
— The MIL has been reported on.
— DTC P1129 is stored.
Replace the MAP sensor.
NO
YESProCarManuals.com
Page 589 of 1954
PGM-FI System
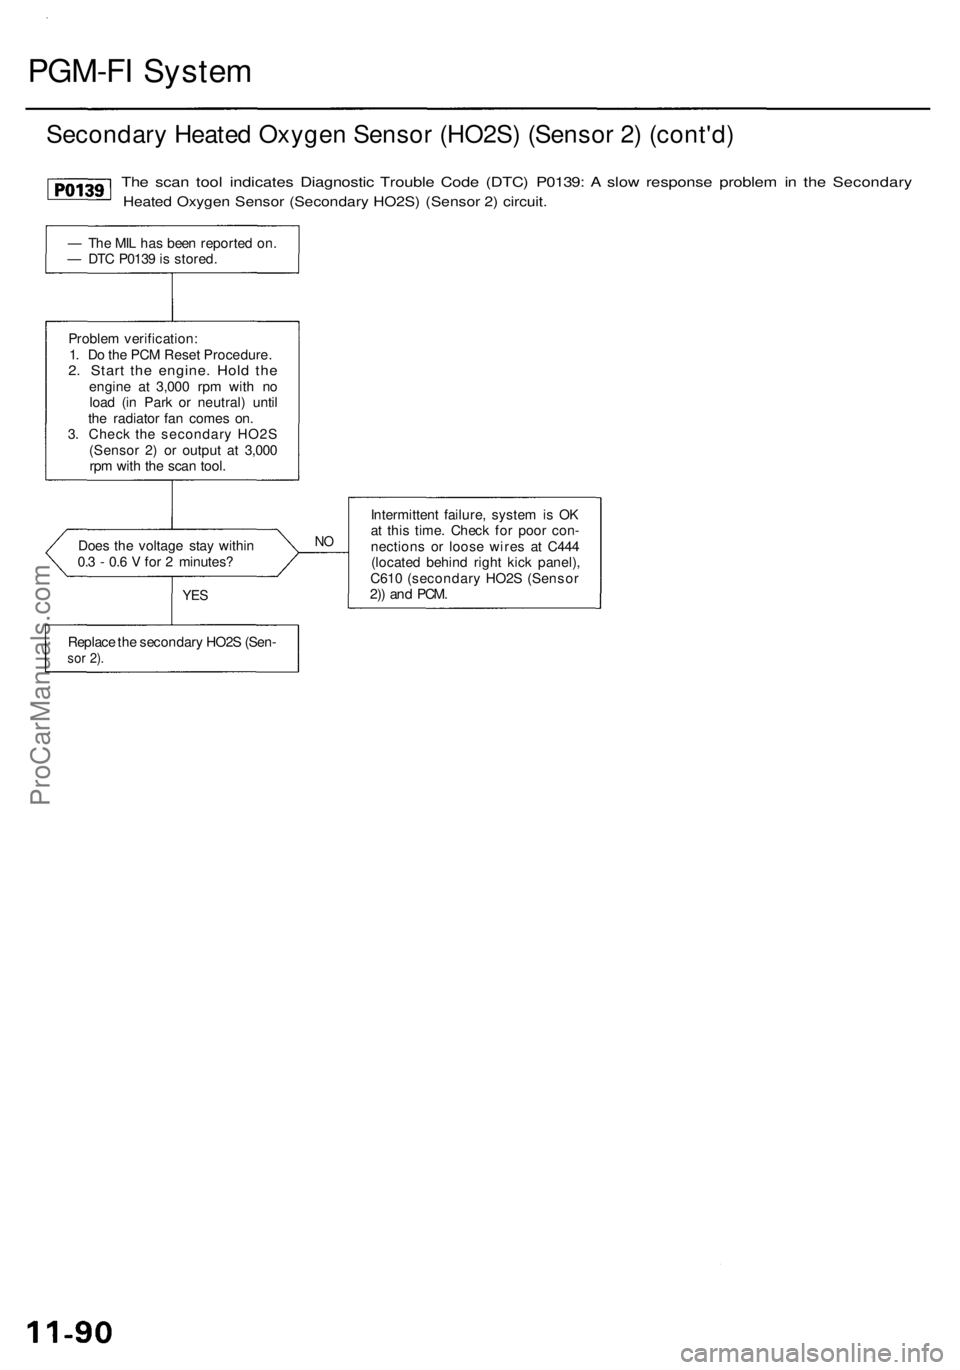
Secondary Heated Oxygen Sensor (HO2S) (Sensor 2) (cont'd)
Does the voltage stay within
0.3 - 0.6 V for 2 minutes?
NO
Intermittent failure, system is OK
at this time. Check for poor con-
nections or loose wires at C444
(located behind right kick panel),
C610 (secondary HO2S (Sensor
2)) and
PCM.
The scan tool indicates Diagnostic Trouble Code (DTC) P0139: A slow response problem in the Secondary
Heated Oxygen Sensor (Secondary HO2S) (Sensor 2) circuit.
— The MIL has been reported on.
— DTC P0139 is stored.
Problem verification:
1. Do the PCM Reset Procedure.
2. Start the engine. Hold the
engine at 3,000 rpm with no
load (in Park or neutral) until
the radiator fan comes on.
3. Check the secondary HO2S
(Sensor 2) or output at 3,000
rpm with the scan tool.
Replace the secondary HO2S (Sen-
sor 2).
YESProCarManuals.com
Page 593 of 1954
PGM-FI System
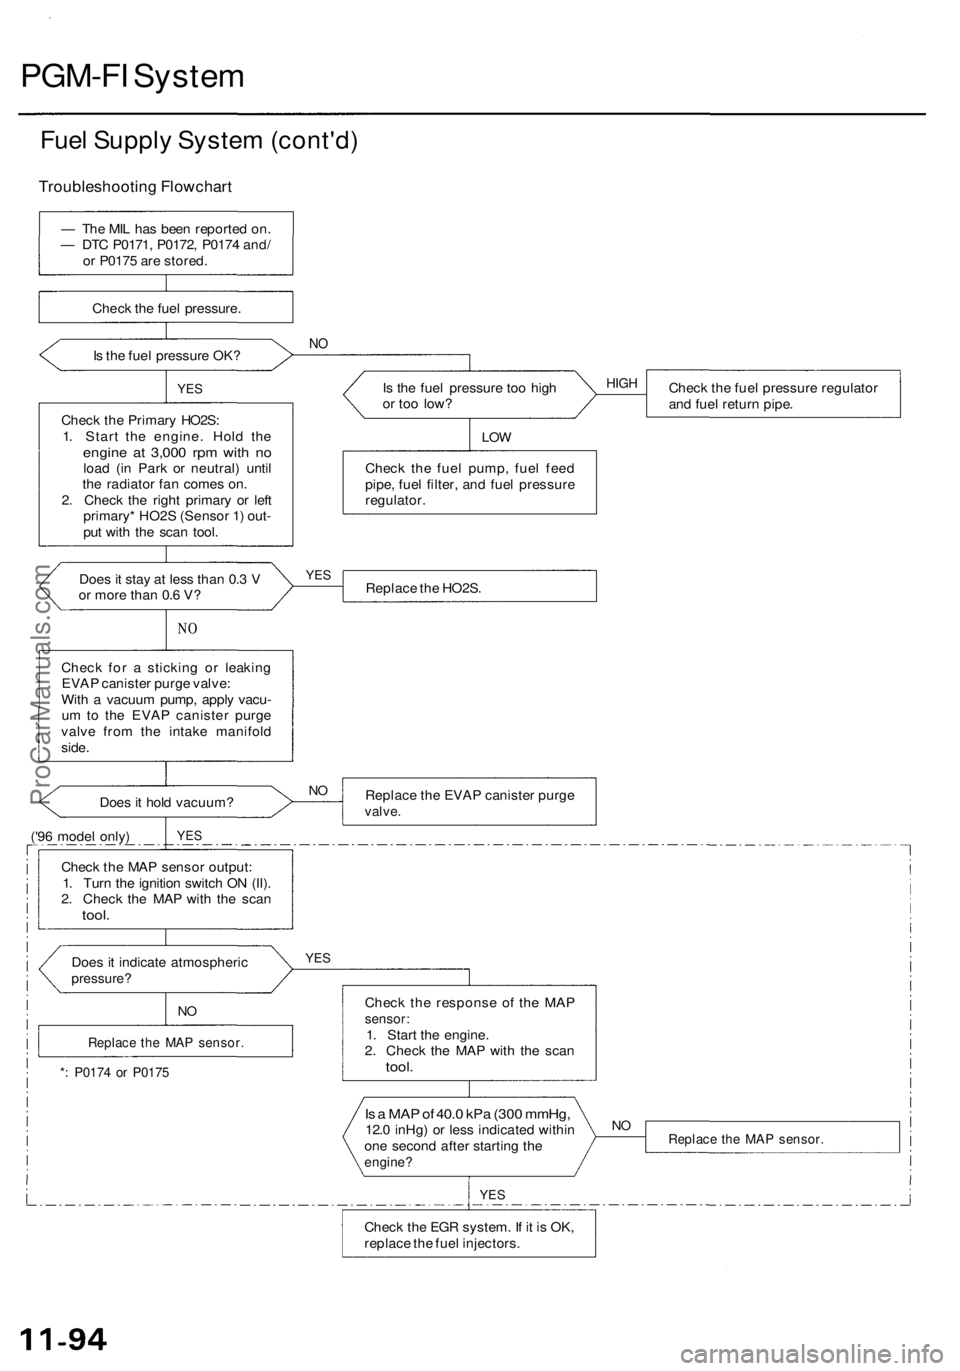
Fuel Supply System (cont'd)
— The MIL has been reported on.
— DTC P0171, P0172, P0174 and/
or P0175 are stored.
Check the fuel pressure.
Is the fuel pressure OK?
NO
YES
Check the Primary HO2S:
1. Start the engine. Hold the
engine at 3,000 rpm with no
load (in Park or neutral) until
the radiator fan comes on.
2. Check the right primary or left
primary* HO2S (Sensor 1) out-
put with the scan tool.
Is the fuel pressure too high
or too low?
Check the fuel pressure regulator
and fuel return pipe.
LOW
Check the fuel pump, fuel feed
pipe, fuel filter, and fuel pressure
regulator.
Does it stay at less than 0.3 V
or more than 0.6 V?
Replace the HO2S.
NO
Check for a sticking or leaking
EVAP canister purge valve:
With a vacuum pump, apply vacu-
um to the EVAP canister purge
valve from the intake manifold
side.
Does it hold vacuum?
('96 model only)
Replace the EVAP canister purge
valve.
YES
Check the MAP sensor output:
1. Turn the ignition switch ON (II).
2. Check the MAP with the scan
tool.
Does it indicate atmospheric
pressure?
YES
*: P0174 or P0175
Check the response of the MAP
sensor:
1. Start the engine.
2. Check the MAP with the scan
tool.
Is a MAP of 40.0 kPa (300 mmHg,
12.0 inHg) or less indicated within
one second after starting the
engine?
Replace the MAP sensor.
YES
Check the EGR system. If it is OK,
replace the fuel injectors.
NO
NO
Replace the MAP sensor.
NO
YES
HIGH
Troubleshooting FlowchartProCarManuals.com
Page 594 of 1954
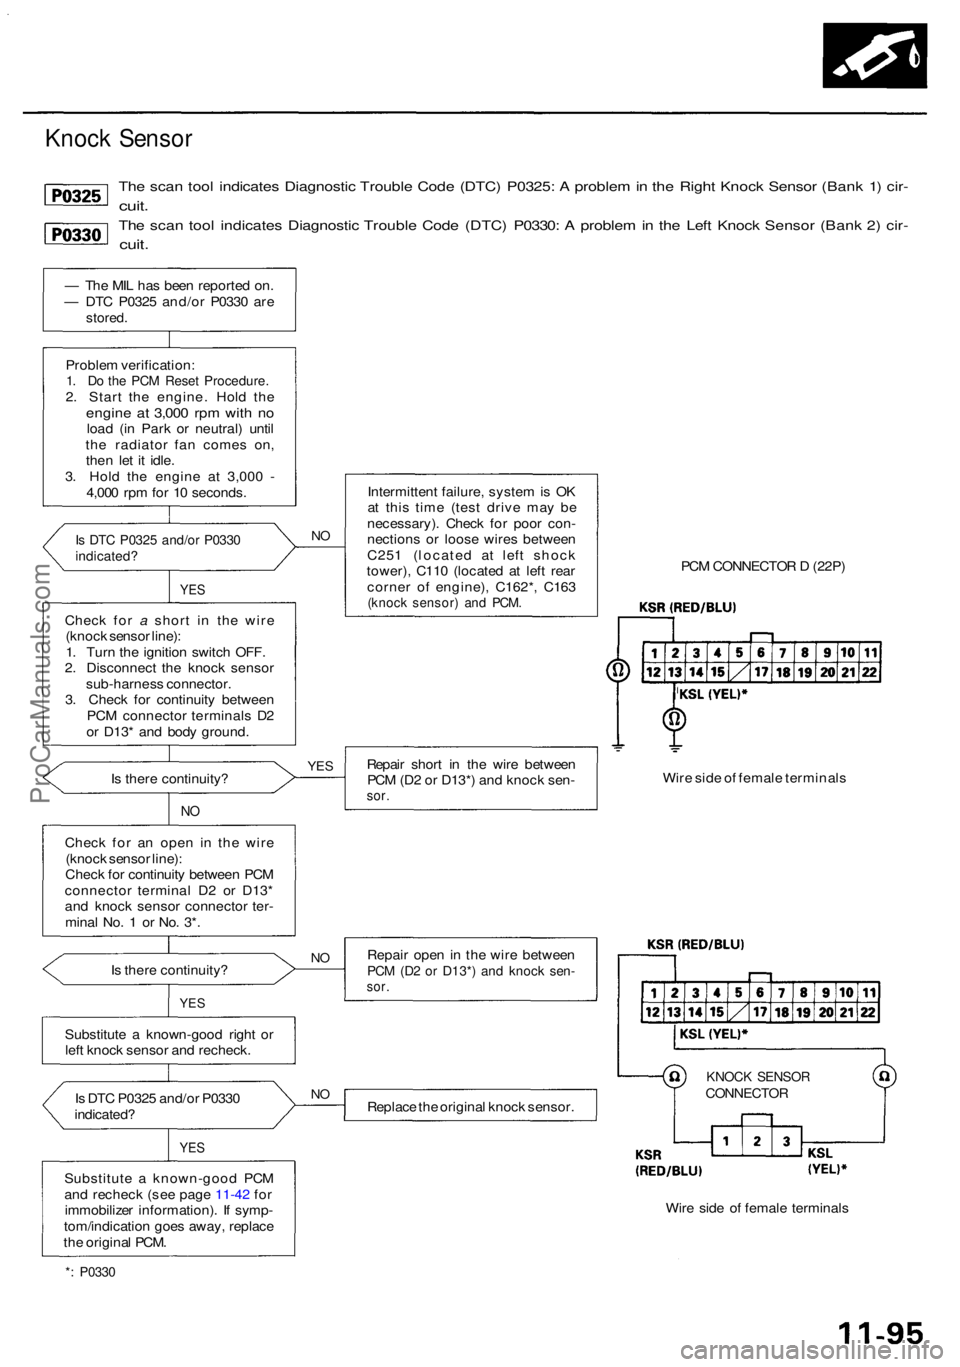
The sca n too l indicate s Diagnosti c Troubl e Cod e (DTC ) P0325 : A proble m in th e Righ t Knoc k Senso r (Ban k 1 ) cir -
cuit .
The sca n too l indicate s Diagnosti c Troubl e Cod e (DTC ) P0330 : A proble m in th e Lef t Knoc k Senso r (Ban k 2 ) cir -
cuit .
— Th e MI L ha s bee n reporte d on .
— DT C P032 5 and/o r P033 0 ar e
stored .
Proble m verification :1. D o th e PC M Rese t Procedure .2. Star t th e engine . Hol d th eengin e a t 3,00 0 rp m wit h n oloa d (i n Par k o r neutral ) unti l
th e radiato r fa n come s on ,
the n le t i t idle .
3 . Hol d th e engin e a t 3,00 0 -
4,00 0 rp m fo r 1 0 seconds .
Is DT C P032 5 and/o r P033 0indicated ?
YES
Chec k fo r a shor t i n th e wir e
(knoc k senso r line) :
1 . Tur n th e ignitio n switc h OFF .
2 . Disconnec t th e knoc k senso r
sub-harnes s connector .
3 . Chec k fo r continuit y betwee n
PC M connecto r terminal s D 2
o r D13 * an d bod y ground .
I s ther e continuity ?
NO
Chec k fo r a n ope n i n th e wir e
(knoc k senso r line) :
Chec k fo r continuit y betwee n PC M
connecto r termina l D 2 o r D13 *
an d knoc k senso r connecto r ter -
mina l No . 1 o r No . 3* .
I s ther e continuity ?
YES
Substitut e a known-goo d righ t o r
lef t knoc k senso r an d recheck .
I s DT C P032 5 and/o r P033 0
indicated ?
YES
Substitut e a known-goo d PC M
an d rechec k (se e pag e 11-42 fo r
immobilize r information) . I f symp -
tom/indicatio n goe s away , replac e
th e origina l PCM .
NO
Intermitten t failure , syste m is O K
a t thi s tim e (tes t driv e ma y b e
necessary) . Chec k fo r poo r con -
nection s o r loos e wire s betwee n
C25 1 (locate d a t lef t shoc k
tower) , C11 0 (locate d a t lef t rea r
corne r o f engine) , C162* , C16 3
(knoc k sensor ) an d PCM .
PCM CONNECTO R D (22P )
Repai r shor t i n th e wir e betwee n
PC M (D 2 o r D13* ) an d knoc k sen -
sor.
Wir e sid e o f femal e terminal s
Repai r ope n in th e wir e betwee n
PCM (D 2 o r D13* ) an d knoc k sen -sor.
KNOC K SENSO RCONNECTO RReplace th e origina l knoc k sensor .
Wire sid e o f femal e terminal s
*: P033 0
NO
N
O
YE S
Knoc k Senso r
ProCarManuals.com
Page 605 of 1954
PGM-FI Syste m
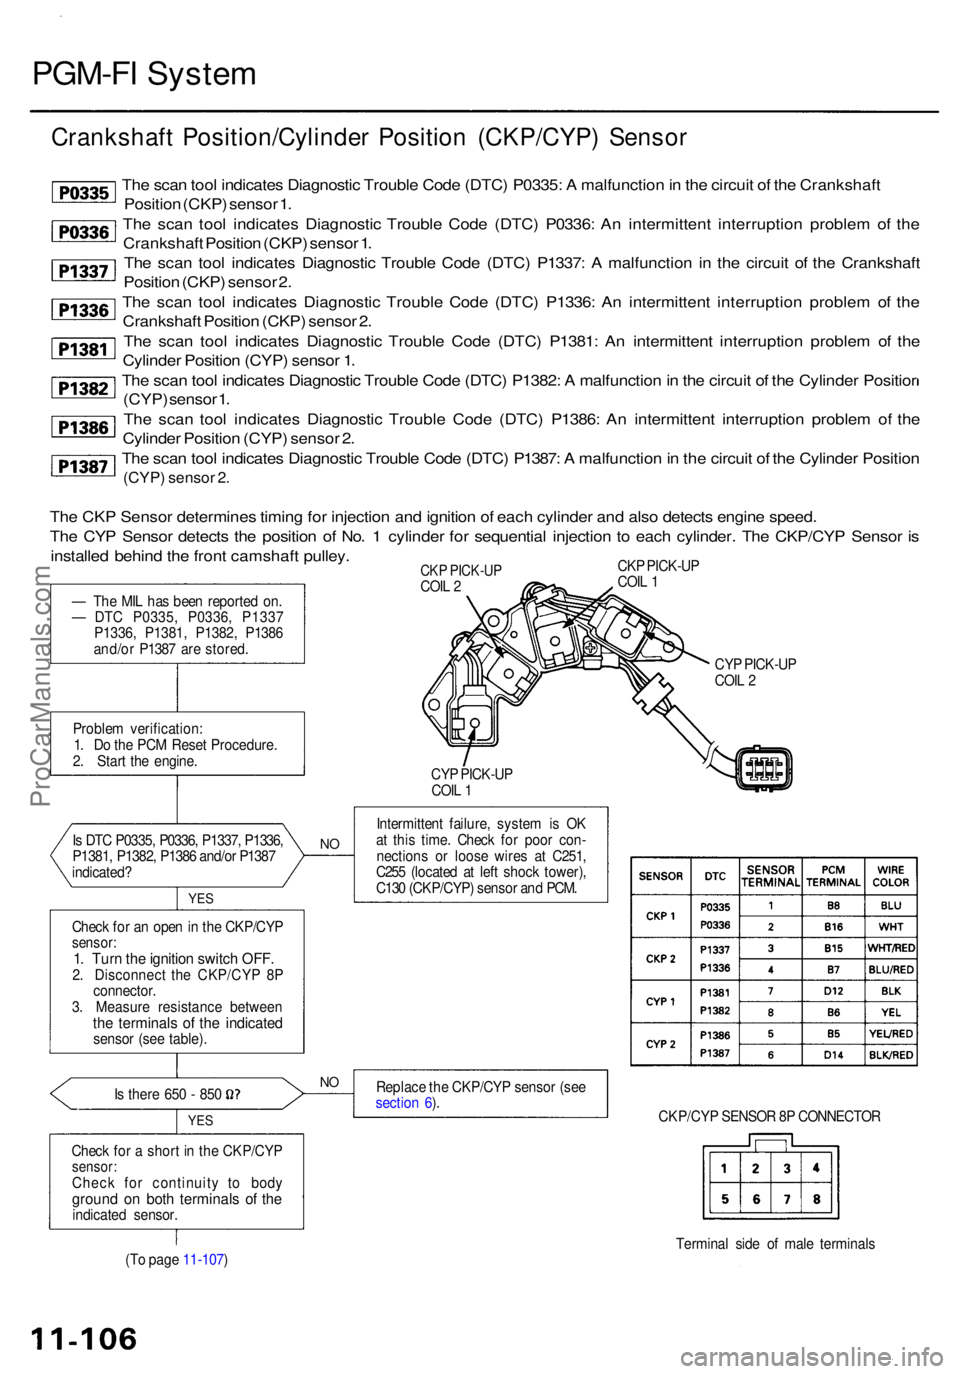
Crankshaf t Position/Cylinde r Positio n (CKP/CYP ) Senso r
The sca n too l indicate s Diagnosti c Troubl e Cod e (DTC ) P0335 : A malfunctio n in th e circui t o f th e Crankshaf t
Positio n (CKP ) senso r 1 .
Th e sca n too l indicate s Diagnosti c Troubl e Cod e (DTC ) P0336 : A n intermitten t interruptio n proble m of the
Crankshaf t Positio n (CKP ) senso r 1 .
Th e sca n too l indicate s Diagnosti c Troubl e Cod e (DTC ) P1337 : A malfunctio n i n th e circui t o f th e Crankshaf t
Positio n (CKP ) senso r 2 .
Th e sca n too l indicate s Diagnosti c Troubl e Cod e (DTC ) P1336 : A n intermitten t interruptio n proble m o f th e
Crankshaf t Positio n (CKP ) senso r 2 .
Th e sca n too l indicate s Diagnosti c Troubl e Cod e (DTC ) P1381 : A n intermitten t interruptio n proble m o f th e
Cylinde r Positio n (CYP ) senso r 1 .
Th e sca n too l indicate s Diagnosti c Troubl e Cod e (DTC ) P1382 : A malfunctio n in th e circui t o f th e Cylinde r Positio r
(CYP ) senso r 1 .
Th e sca n too l indicate s Diagnosti c Troubl e Cod e (DTC ) P1386 : A n intermitten t interruptio n proble m of the
Cylinde r Positio n (CYP ) senso r 2 .
Th e sca n too l indicate s Diagnosti c Troubl e Cod e (DTC ) P1387 : A malfunctio n in th e circui t o f th e Cylinde r Positio n
(CYP) senso r 2 .
Proble m verification :
1 . D o th e PC M Rese t Procedure .
2 . Star t th e engine .
I s DT C P0335 , P0336 , P1337 , P1336 ,
P1381 , P1382 , P138 6 and/o r P138 7
indicated ?
Chec k fo r a n ope n in th e CKP/CY P
sensor:1. Tur n th e ignitio n switc h OFF .2. Disconnec t th e CKP/CY P 8 P
connector .
3 . Measur e resistanc e betwee n
the terminal s o f th e indicate dsensor (se e table) .
I s ther e 65 0 - 85 0
YES
Chec k fo r a shor t i n th e CKP/CY Psensor:Check fo r continuit y t o bod yground o n bot h terminal s o f th eindicate d sensor . CY
P PICK-U P
COI L 2
CY P PICK-U P
COI L 1
Intermitten t failure , syste m is O K
a t thi s time . Chec k fo r poo r con -
nection s o r loos e wire s a t C251 ,
C25 5 (locate d a t lef t shoc k tower) ,
C13 0 (CKP/CYP ) senso r an d PCM .
Replac e th e CKP/CY P senso r (se e
sectio n 6 ).
CKP/CYP SENSO R 8 P CONNECTO R
Termina l sid e o f mal e terminal s
(T o pag e 11-107 )
NO
YE S
NO
CK P PICK-U P
COI L 1CK P PICK-U PCOIL 2
Th e CK P Senso r determine s timin g fo r injectio n an d ignitio n o f eac h cylinde r an d als o detect s engin e speed .
Th e CY P Senso r detect s th e positio n o f No . 1 cylinde r fo r sequentia l injectio n t o eac h cylinder . Th e CKP/CY P Senso r i s
installe d behin d th e fron t camshaf t pulley .
— Th e MI L ha s bee n reporte d on .
— DT C P0335 , P0336 , P133 7
P1336 , P1381 , P1382 , P138 6
and/o r P138 7 ar e stored .
ProCarManuals.com
Page 616 of 1954
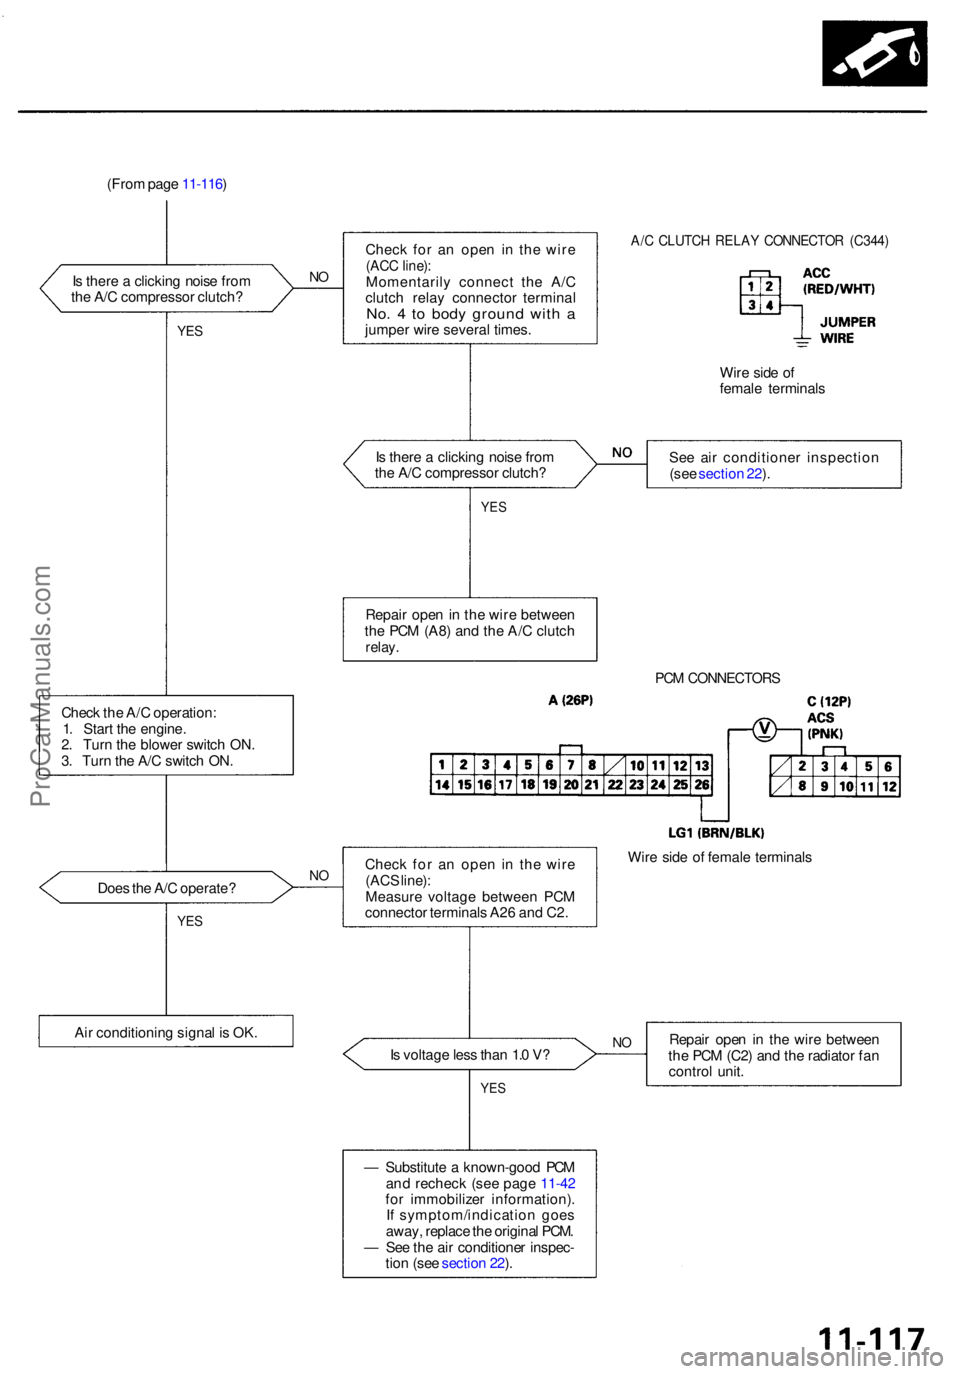
(From pag e 11-116 )
I s ther e a clickin g nois e fro m
th e A/ C compresso r clutch ?
NO
YE S
Chec k fo r a n ope n i n th e wir e(ACC line) :Momentaril y connec t th e A/ C
clutc h rela y connecto r termina l
No. 4 to bod y groun d wit h ajumpe r wir e severa l times .
A/C CLUTC H RELA Y CONNECTO R (C344 )
Wire sid e o f
femal e terminal s
I s ther e a clickin g nois e fro m
th e A/ C compresso r clutch ? Se
e ai r conditione r inspectio n
(se e sectio n 22 ).
YE S
Repai r ope n in th e wir e betwee n
th e PC M (A8 ) an d th e A/ C clutc h
relay.
PCM CONNECTOR S
Check th e A/ C operation :
1 . Star t th e engine .
2 . Tur n th e blowe r switc h ON .
3 . Tur n th e A/ C switc h ON .
Doe s th e A/ C operate ?
YES
Chec k fo r a n ope n i n th e wir e
(AC S line) :
Measur e voltag e betwee n PC M
connecto r terminal s A2 6 an d C2 .
Ai r conditionin g signa l i s OK . Wir
e sid e o f femal e terminal s
I s voltag e les s tha n 1. 0 V ?
YE S
Repai r ope n in th e wir e betwee n
th e PC M (C2 ) an d th e radiato r fa n
contro l unit .
— Substitut e a known-goo d PC M
an d rechec k (se e pag e 11-42
fo r immobilize r information) .
I f symptom/indicatio n goe s
away , replac e th e origina l PCM .
— Se e th e ai r conditione r inspec -
tio n (se e sectio n 22 ).N O
NO
ProCarManuals.com
Page 622 of 1954
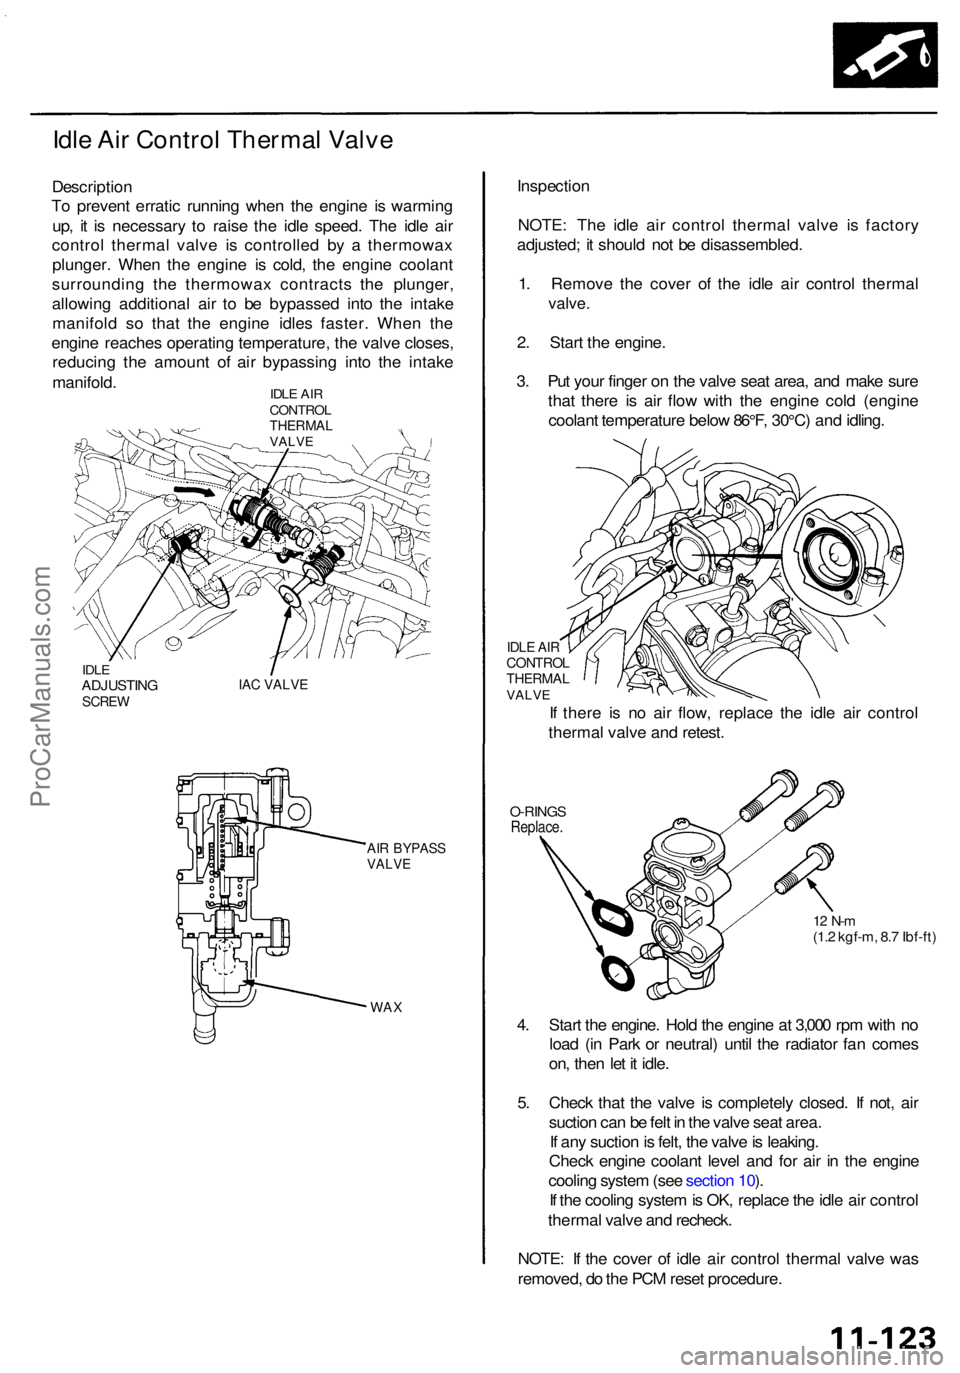
Idle Ai r Contro l Therma l Valv e
Descriptio n
T o preven t errati c runnin g whe n th e engin e i s warmin g
up , i t i s necessar y t o rais e th e idl e speed . Th e idl e ai r
contro l therma l valv e i s controlle d b y a thermowa x
plunger . Whe n th e engin e i s cold , th e engin e coolan t
surroundin g th e thermowa x contract s th e plunger ,
allowin g additiona l ai r t o b e bypasse d int o th e intak e
manifol d s o tha t th e engin e idle s faster . Whe n th e
engin e reache s operatin g temperature , th e valv e closes ,
reducin g th e amoun t o f ai r bypassin g int o th e intak e
manifold .
IDLE AI R
CONTRO L
THERMA LVALVE
IDLEADJUSTIN GSCREWIAC VALV E
AIR BYPAS SVALVE
WAX
Inspectio n
NOTE : Th e idl e ai r contro l therma l valv e i s factor y
adjusted ; i t shoul d no t b e disassembled .
1 . Remov e th e cove r o f th e idl e ai r contro l therma l
valve.
2. Star t th e engine .
3 . Pu t you r finge r o n th e valv e sea t area , an d mak e sur e
tha t ther e i s ai r flo w wit h th e engin e col d (engin e
coolan t temperatur e belo w 86°F , 30°C ) an d idling .
O-RING SReplace .
12 N- m(1.2 kgf-m , 8. 7 Ibf-ft )
4. Star t th e engine . Hol d th e engin e a t 3,00 0 rp m wit h n o
loa d (i n Par k o r neutral ) unti l th e radiato r fa n come s
on , the n le t i t idle .
5 . Chec k tha t th e valv e i s completel y closed . I f not , ai r
suctio n ca n b e fel t i n th e valv e sea t area .
I f an y suctio n is felt , th e valv e is leaking .
Chec k engin e coolan t leve l an d fo r ai r i n th e engin e
coolin g syste m (se e sectio n 10 ).
I f th e coolin g syste m is OK , replac e th e idl e ai r contro l
therma l valv e an d recheck .
NOTE : I f th e cove r o f idl e ai r contro l therma l valv e wa s
removed , d o th e PC M rese t procedure .
IDLE AI RCONTRO LTHERMALVALVE
If ther e i s n o ai r flow , replac e th e idl e ai r contro l
therma l valv e an d retest .
ProCarManuals.com
Page 634 of 1954
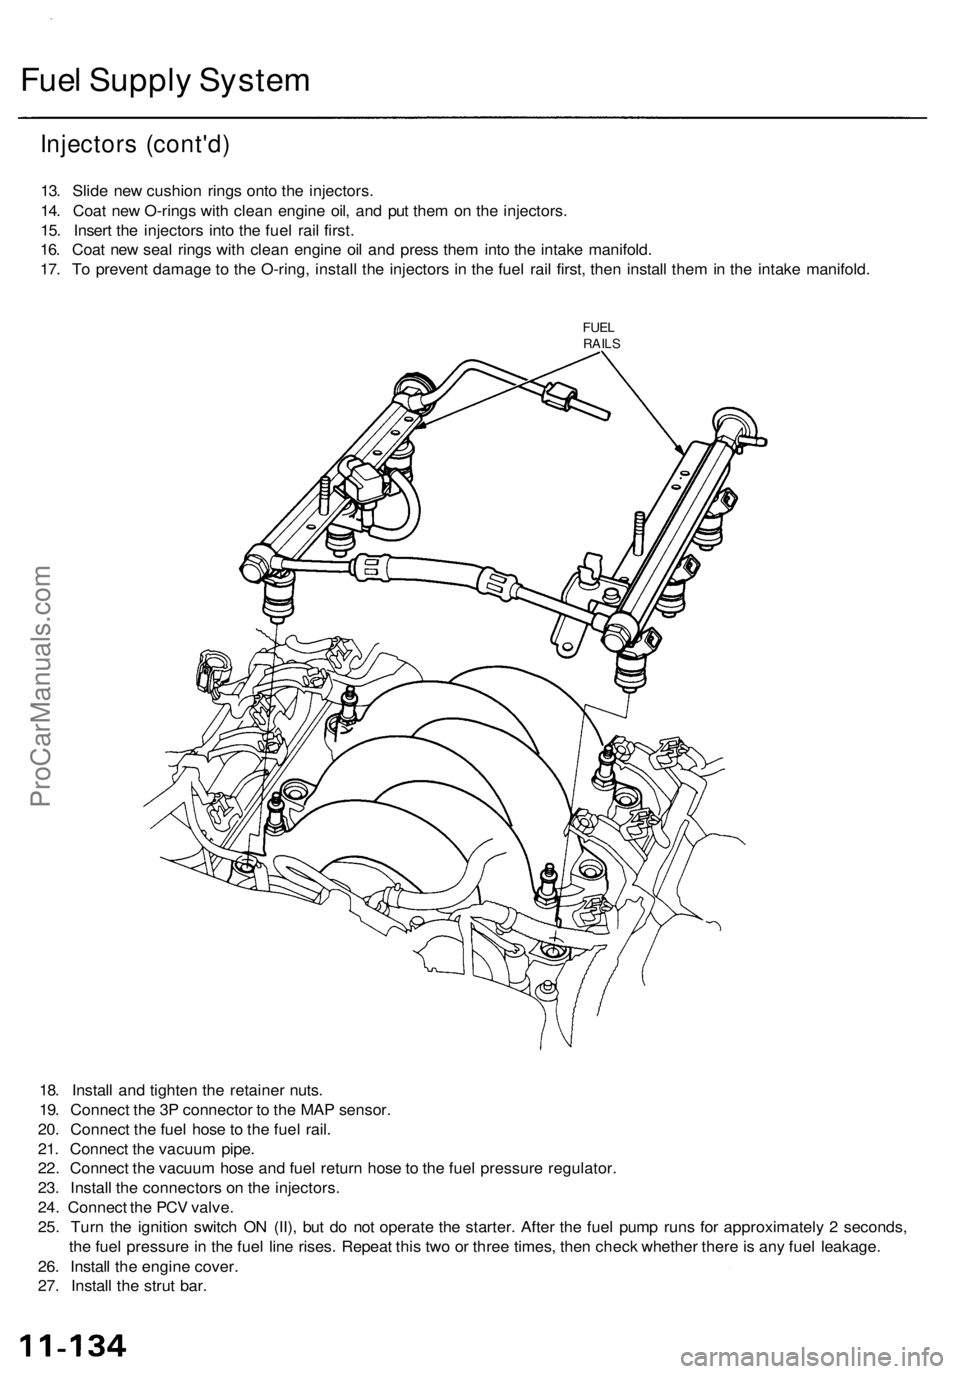
Fuel Supply System
Injectors (cont'd)
13. Slide new cushion rings onto the injectors.
14. Coat new O-rings with clean engine oil, and put them on the injectors.
15. Insert the injectors into the fuel rail first.
16. Coat new seal rings with clean engine oil and press them into the intake manifold.
17. To prevent damage to the O-ring, install the injectors in the fuel rail first, then install them in the intake manifold.
FUEL
RAILS
18. Install and tighten the retainer nuts.
19. Connect the 3P connector to the MAP sensor.
20. Connect the fuel hose to the fuel rail.
21. Connect the vacuum pipe.
22. Connect the vacuum hose and fuel return hose to the fuel pressure regulator.
23. Install the connectors on the injectors.
24. Connect the PCV valve.
25. Turn the ignition switch ON (II), but do not operate the starter. After the fuel pump runs for approximately 2 seconds,
the fuel pressure in the fuel line rises. Repeat this two or three times, then check whether there is any fuel leakage.
26. Install the engine cover.
27. Install the strut bar.ProCarManuals.com
Page 651 of 1954
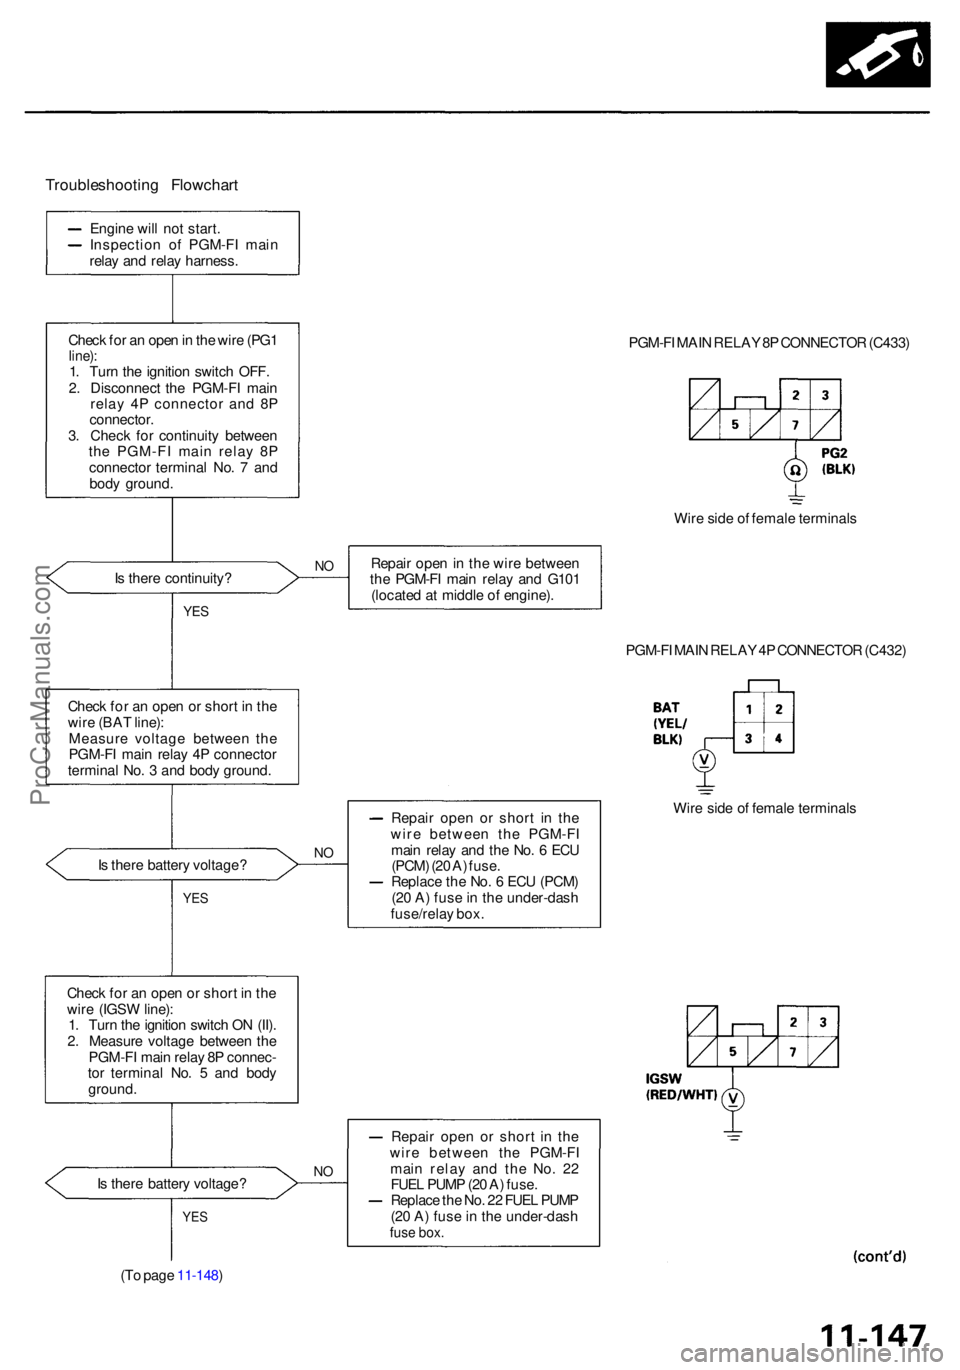
Troubleshooting Flowchar t
Check fo r a n ope n o r shor t i n th e
wir e (BA T line) :
Measur e voltag e betwee n th e
PGM-F I mai n rela y 4 P connecto r
termina l No . 3 an d bod y ground .
I s ther e batter y voltage ?
YES
Chec k fo r a n ope n o r shor t i n th e
wir e (IGS W line) :
1 . Tur n th e ignitio n switc h O N (II) .
2 . Measur e voltag e betwee n th e
PGM-F I mai n rela y 8 P connec -
to r termina l No . 5 an d bod y
ground .
I s ther e batter y voltage ?
YES
(To pag e 11-148 ) PGM-F
I MAI N RELA Y 8P CONNECTO R (C433 )
Wir e sid e o f femal e terminal s
NORepai r ope n in th e wir e betwee n
th e PGM-F I mai n rela y an d G10 1
(locate d a t middl e o f engine) .
NO
Repai r ope n o r shor t i n th e
wir e betwee n th e PGM-F I
mai n rela y an d th e No . 6 EC U
(PCM ) (2 0 A ) fuse .
Replac e th e No . 6 EC U (PCM )
(2 0 A ) fus e in th e under-das h
fuse/rela y box . PGM-F
I MAI N RELA Y 4P CONNECTO R (C432 )
Wir e sid e o f femal e terminal s
NO
Repai r ope n o r shor t i n th e
wir e betwee n th e PGM-F I
mai n rela y an d th e No . 2 2
FUE L PUM P (2 0 A ) fuse .
Replac e th e No . 2 2 FUE L PUM P
(2 0 A ) fus e in th e under-das h
fuse box .
YES
Is ther e continuity ?
Engin
e wil l no t start .
Inspectio n o f PGM-F I mai n
rela y an d rela y harness .
Chec k fo r a n ope n in th e wir e (PG 1
line) :1. Tur n th e ignitio n switc h OFF .
2 . Disconnec t th e PGM-F I mai n
rela y 4 P connecto r an d 8 P
connector .
3 . Chec k fo r continuit y betwee n
th e PGM-F I mai n rela y 8 P
connecto r termina l No . 7 an d
bod y ground .
ProCarManuals.com
Page 656 of 1954
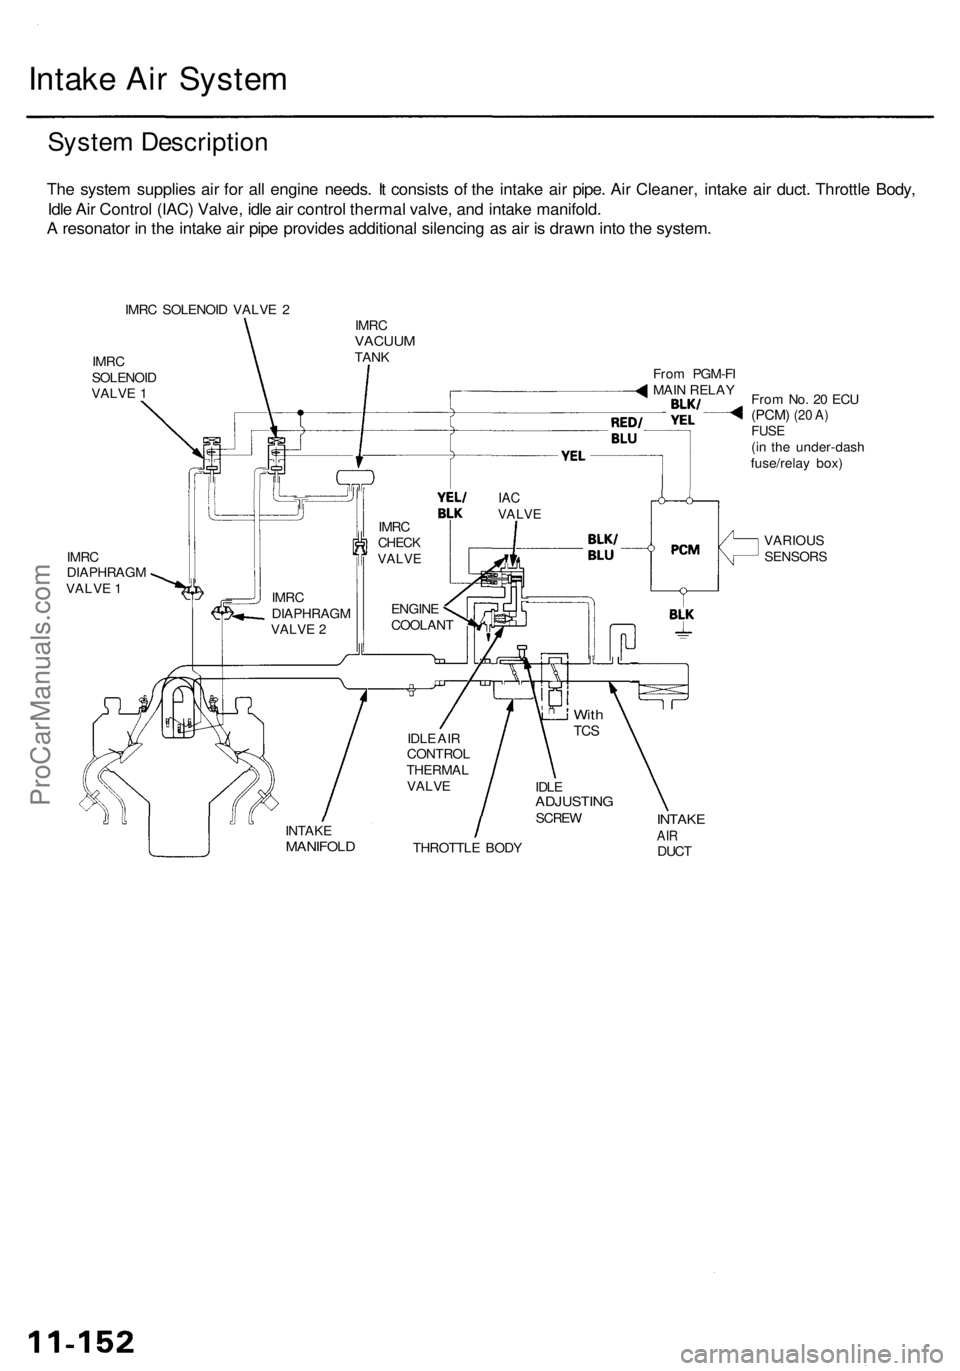
Intake Air System
System Description
The system supplies air for all engine needs. It consists of the intake air pipe. Air Cleaner, intake air duct. Throttle Body,
Idle Air Control (IAC) Valve, idle air control thermal valve, and intake manifold.
A resonator in the intake air pipe provides additional silencing as air is drawn into the system.
IMRC SOLENOID VALVE 2
IMRC
SOLENOID
VALVE 1
IMRC
VACUUM
TANK
From No. 20 ECU
(PCM)
(20 A)
FUSE
(in the under-dash
fuse/relay box)
IMRC
DIAPHRAGM
VALVE 1
VARIOUS
SENSORS
THROTTLE BODY
INTAKE
AIR
DUCT
INTAKE
MANIFOLD
IDLE
ADJUSTING
SCREW
With
TCS
IDLE AIR
CONTROL
THERMAL
VALVE
IAC
VALVE
From PGM-FI
MAIN RELAY
IMRC
DIAPHRAGM
VALVE 2
IMRC
CHECK
VALVE
ENGINE
COOLANTProCarManuals.com