check engine ACURA RL KA9 1996 Service Manual PDF
[x] Cancel search | Manufacturer: ACURA, Model Year: 1996, Model line: RL KA9, Model: ACURA RL KA9 1996Pages: 1954, PDF Size: 61.44 MB
Page 1140 of 1954
Troubleshooting
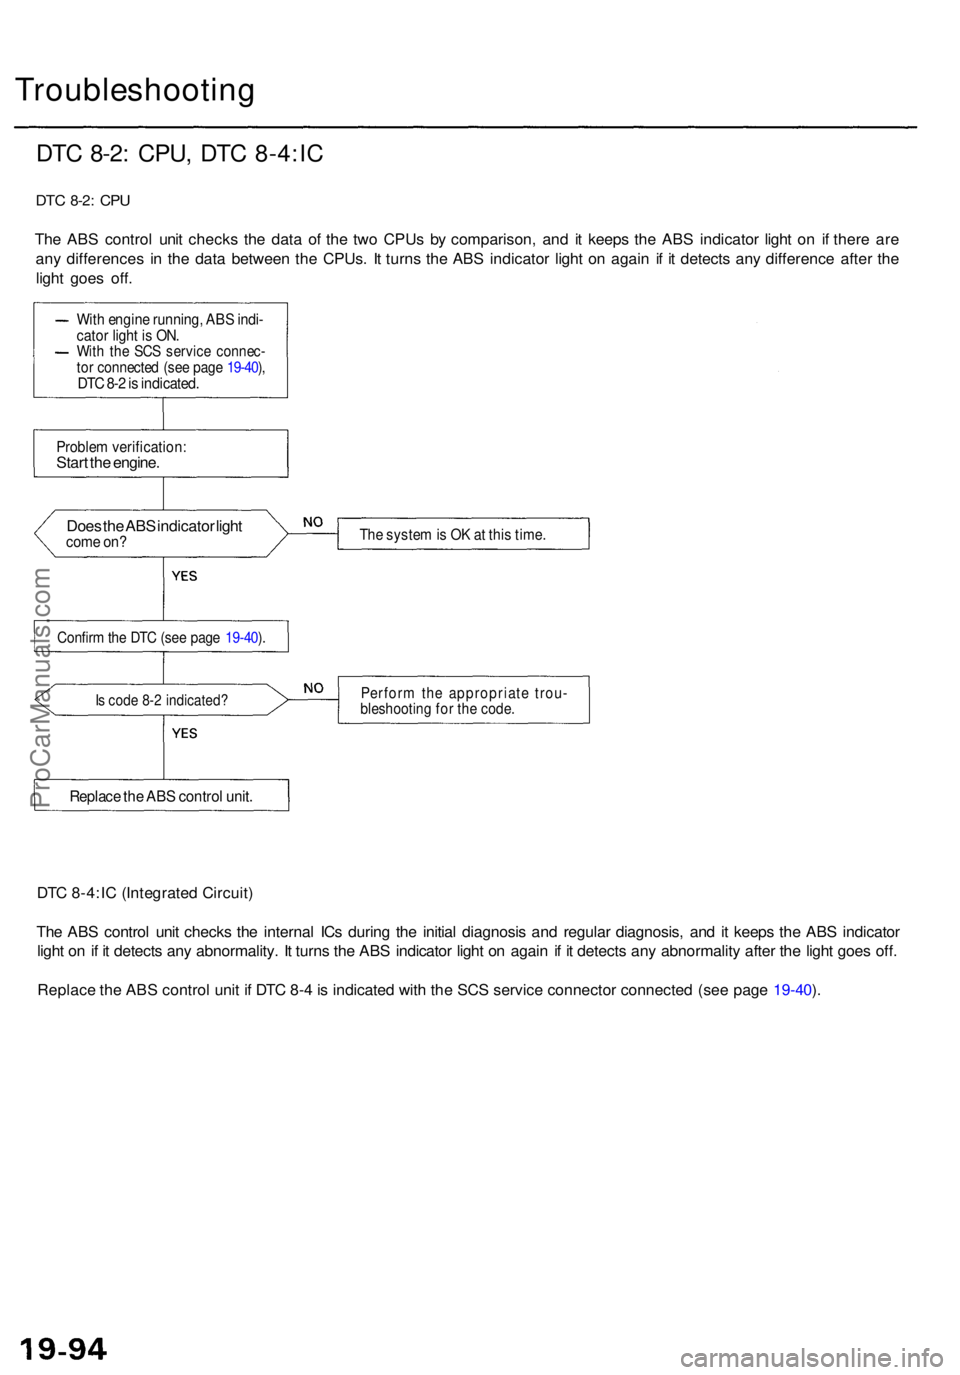
DTC 8-2 : CPU , DT C 8-4:I C
DTC 8-2 : CPU
The AB S contro l uni t check s th e dat a o f th e tw o CPU s b y comparison , an d i t keep s th e AB S indicato r ligh t o n i f ther e ar e
an y difference s i n th e dat a betwee n th e CPUs . I t turn s th e AB S indicato r ligh t o n agai n i f i t detect s an y differenc e afte r th e
ligh t goe s off .
Doe s th e AB S indicato r ligh t
com e on ?
Is cod e 8- 2 indicated ?
The syste m is O K at thi s time .
Perfor m th e appropriat e trou -
bleshootin g fo r th e code .
DTC 8-4:I C (Integrate d Circuit )
Th e AB S contro l uni t check s th e interna l IC s durin g th e initia l diagnosi s an d regula r diagnosis , an d i t keep s th e AB S indicato r
ligh t o n if i t detect s an y abnormality . I t turn s th e AB S indicato r ligh t o n agai n if i t detect s any abnormalit y afte r th e ligh t goe s off .
Replac e th e AB S contro l uni t i f DT C 8- 4 is indicate d wit h th e SC S servic e connecto r connecte d (se e pag e 19-40 ).
Wit h engin e running , AB S indi -cato r ligh t i s ON .With th e SC S servic e connec -
to r connecte d (se e pag e 19-40 ),
DT C 8- 2 is indicated .
Problem verification :Start th e engine .
Confirm th e DT C (se e pag e 19-40 ).
Replac e th e AB S contro l unit .
ProCarManuals.com
Page 1154 of 1954
Self-diagnosis
1. The ABS control unit is equipped with a main CPU and a sub CPU, that check each other for problems.
2. The CPUs check the circuit of the system.
3. Self-diagnosis can be classified into 2 categories.
Initial diagnosis: Performed right after the engine starts and until the ABS indicator goes off.
Regular diagnosis: Performed right after the initial diagnosis until the ignition switch is turned OFF.
4. When a problem is detected by self-diagnosis, the system:
Turns the fail-safe relay OFF
Turns the solenoid valve OFF
Turns the pump motor OFF
Turns the ABS indicator ON
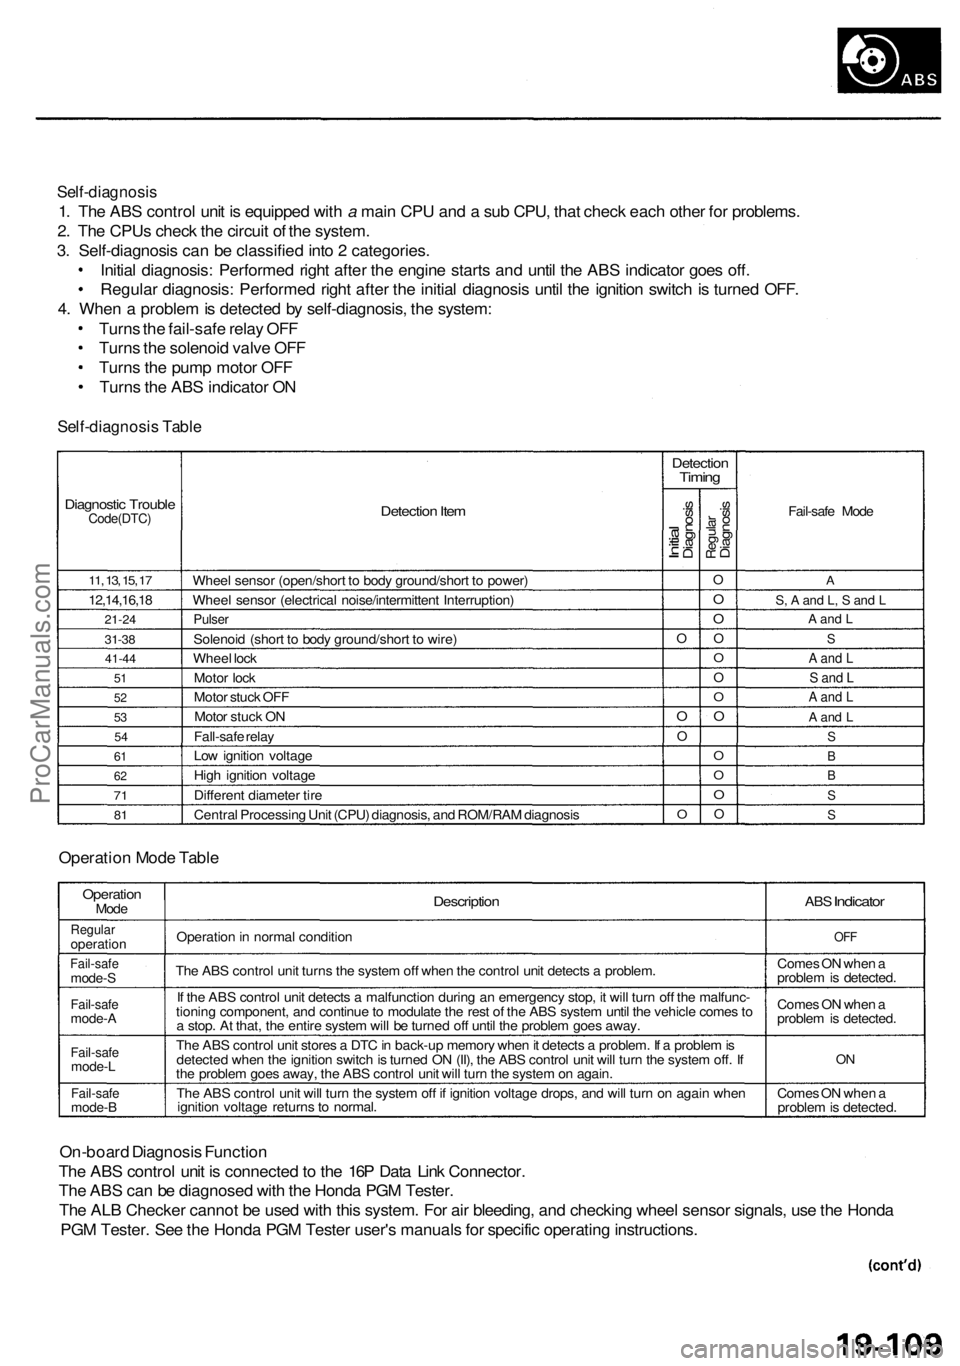
Self-diagnosis Table
Diagnostic Trouble
Code(DTC)
11, 13, 15, 17
12,14,16,18
21-24
31-38
41-44
51
52
53
54
61
62
71
81
Detection Item
Wheel sensor (open/short to body ground/short to power)
Wheel sensor (electrical noise/intermittent Interruption)
Pulser
Solenoid (short to body ground/short to wire)
Wheel lock
Motor lock
Motor stuck OFF
Motor stuck ON
Fall-safe relay
Low ignition voltage
High ignition voltage
Different diameter tire
Central Processing Unit (CPU) diagnosis, and ROM/RAM diagnosis
Detection
Timing
Initial
Diagnosis
O
O
O
O
Regular
Diagnosis
O
O
O
O
O
O
O
O
O
O
O
O
Fail-safe Mode
A
S, A and L, S and L
A and L
S
A and L
S and L
A and L
A and L
S
B
B
S
S
Operation Mode Table
Operation
Mode
Regular
operation
Fail-safe
mode-S
Fail-safe
mode-A
Fail-safe
mode-L
Fail-safe
mode-B
Description
Operation in normal condition
The ABS control unit turns the system off when the control unit detects a problem.
If the ABS control unit detects a malfunction during an emergency stop, it will turn off the malfunc-
tioning component, and continue to modulate the rest of the ABS system until the vehicle comes to
a stop. At that, the entire system will be turned off until the problem goes away.
The ABS control unit stores a DTC in back-up memory when it detects a problem. If a problem is
detected when the ignition switch is turned ON (II), the ABS control unit will turn the system off. If
the problem goes away, the ABS control unit will turn the system on again.
The ABS control unit will turn the system off if ignition voltage drops, and will turn on again when
ignition voltage returns to normal.
ABS
Indicator
OFF
Comes ON when a
problem is detected.
Comes ON when a
problem is detected.
ON
Comes ON when a
problem is detected.
On-board Diagnosis Function
The ABS control unit is connected to the 16P Data Link Connector.
The ABS can be diagnosed with the Honda PGM Tester.
The ALB Checker cannot be used with this system. For air bleeding, and checking wheel sensor signals, use the Honda
PGM Tester. See the Honda PGM Tester user's manuals for specific operating instructions.
ProCarManuals.com
Page 1169 of 1954
Troubleshooting
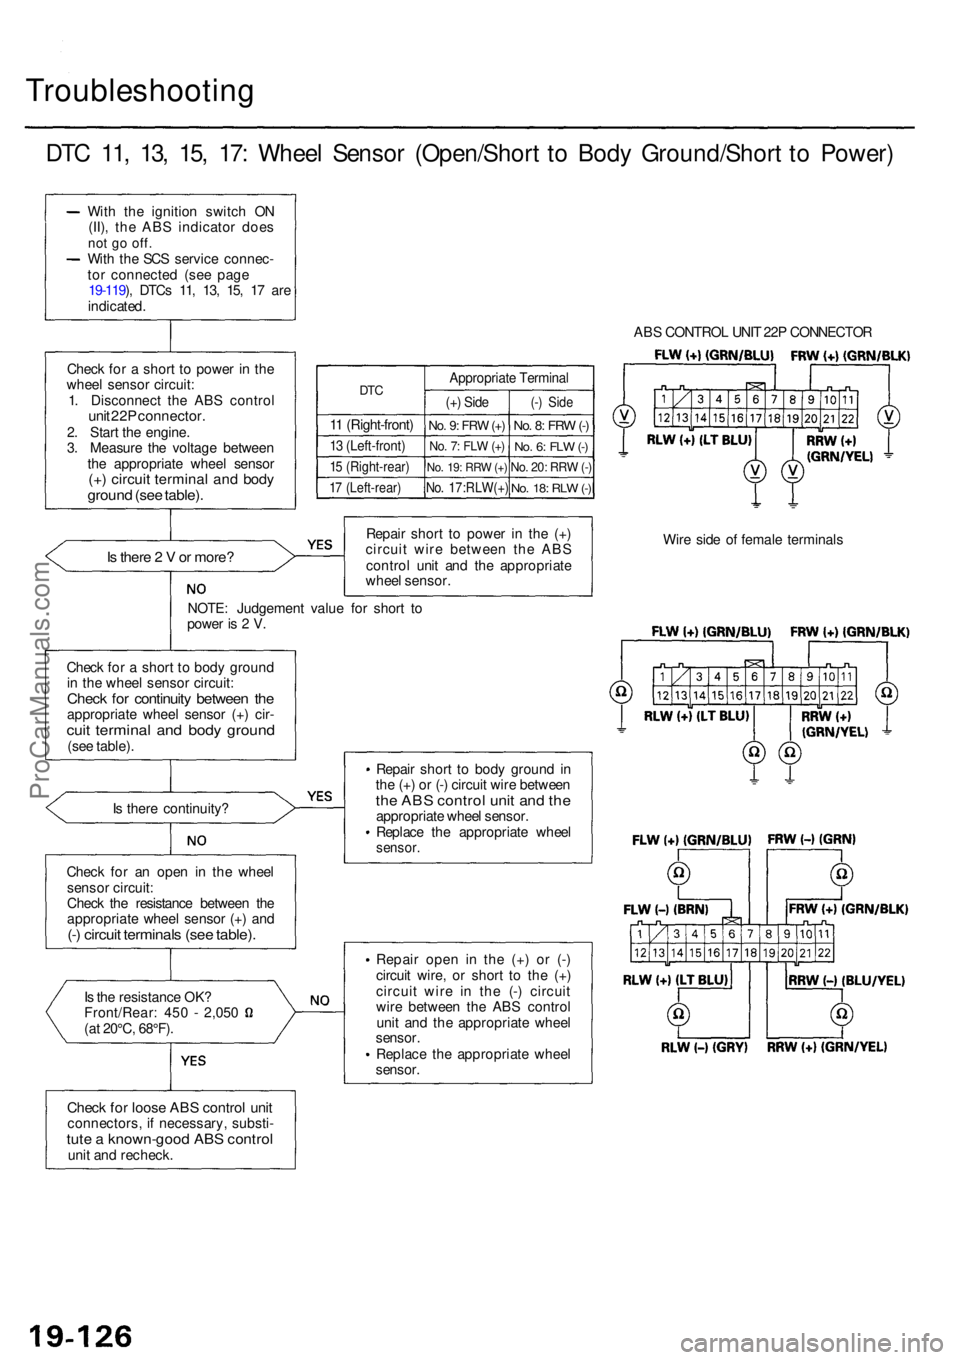
DTC 11 , 13 , 15 , 17 : Whee l Senso r (Open/Shor t t o Bod y Ground/Shor t t o Power )
With th e ignitio n switc h O N
(II) , th e AB S indicato r doe s
not g o off .With th e SC S servic e connec -
to r connecte d (se e pag e
19-119 ), DTC s 11 , 13 , 15 , 1 7 ar e
indicated .
Chec k fo r a shor t t o powe r i n th e
whee l senso r circuit :
1 . Disconnec t th e AB S contro l
unit 22 P connector .2. Star t th e engine .
3 . Measur e th e voltag e betwee n
th e appropriat e whee l senso r
(+) circui t termina l an d bod ygroun d (se e table) .
DTC
11 (Right-front )
13 (Left-front )
15 (Right-rear )
17 (Left-rear )
Appropriat e Termina l
(+) Sid e
No. 9 : FR W (+)
No . 7 : FL W (+ )
No . 19 : RR W (+ )
No . 17:RLW(+ )
(-) Sid e
No. 8 : FR W (-)
No . 6 : FL W (-)
No . 20 : RR W (-)
No . 18 : RL W (-)
Is ther e 2 V or more ?
NOTE : Judgemen t valu e fo r shor t t o
powe r i s 2 V . Repai
r shor t t o powe r i n th e (+ )
circui t wir e betwee n th e AB S
contro l uni t an d th e appropriat e
whee l sensor .
Chec k fo r a shor t t o bod y groun d
i n th e whee l senso r circuit :
Check fo r continuit y betwee n th eappropriat e whee l senso r (+ ) cir -cuit termina l an d bod y groun d(see table) .
I s ther e continuity ?
Chec k fo r a n ope n i n th e whee l
senso r circuit :
Chec k th e resistanc e betwee n th e
appropriat e whee l senso r (+ ) an d
(-) circui t terminal s (se e table) .
Is th e resistanc e OK ?Front/Rear : 45 0 - 2,05 0
(a t 20°C , 68°F) .
Check fo r loos e AB S contro l uni tconnectors , i f necessary , substi -tute a known-goo d AB S contro lunit an d recheck . Repai
r shor t t o bod y groun d in
th e (+ ) o r (- ) circui t wir e betwee n
the AB S contro l uni t an d th eappropriat e whee l sensor .
Replac e th e appropriat e whee l
sensor .
Repair ope n i n the (+) o r (- )
circui t wire , o r shor t t o th e (+ )
circui t wir e i n th e (- ) circui t
wir e betwee n th e AB S contro l
uni t an d th e appropriat e whee l
sensor .
Replac e th e appropriat e whee l
sensor . AB
S CONTRO L UNI T 22 P CONNECTO R
Wir e sid e o f femal e terminal s
ProCarManuals.com
Page 1186 of 1954
Modulator Unit
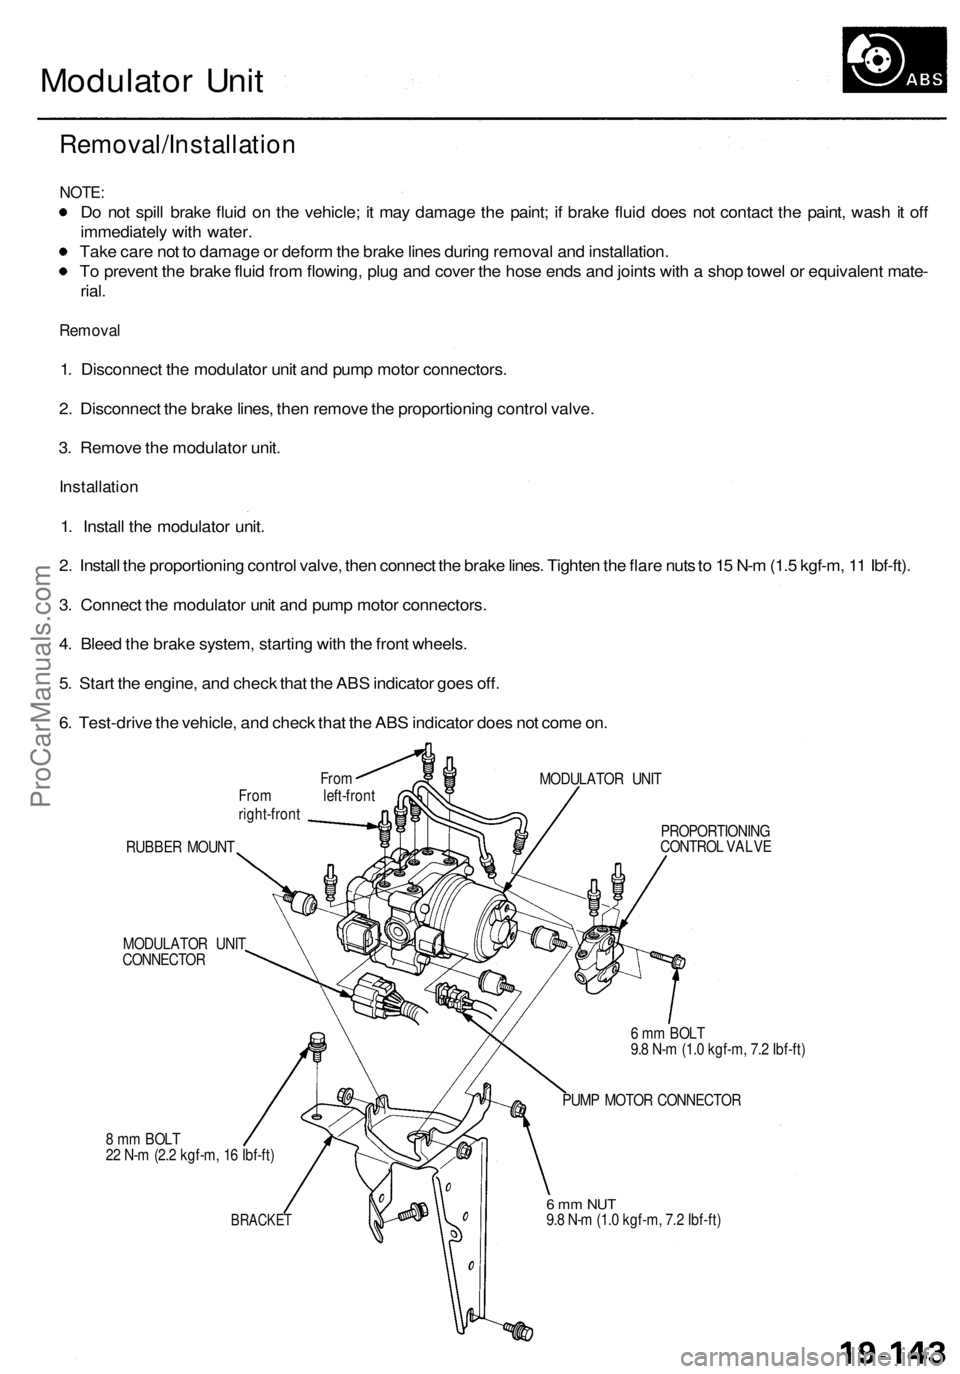
Removal/Installation
NOTE:
Do not spill brake fluid on the vehicle; it may damage the paint; if brake fluid does not contact the paint, wash it off
immediately with water.
Take care not to damage or deform the brake lines during removal and installation.
To prevent the brake fluid from flowing, plug and cover the hose ends and joints with a shop towel or equivalent mate-
rial.
Removal
1. Disconnect the modulator unit and pump motor connectors.
2. Disconnect the brake lines, then remove the proportioning control valve.
3. Remove the modulator unit.
Installation
1. Install the modulator unit.
2. Install the proportioning control valve, then connect the brake lines. Tighten the flare nuts to 15 N-m (1.5 kgf-m, 11 Ibf-ft).
3. Connect the modulator unit and pump motor connectors.
4. Bleed the brake system, starting with the front wheels.
5. Start the engine, and check that the ABS indicator goes off.
6. Test-drive the vehicle, and check that the ABS indicator does not come on.
From
From left-front
right-front
MODULATOR UNIT
RUBBER MOUNT
MODULATOR UNIT
CONNECTOR
8 mm BOLT
22 N-m (2.2 kgf-m, 16 Ibf-ft)
BRACKET
PROPORTIONING
CONTROL VALVE
6 mm BOLT
9.8 N-m (1.0 kgf-m, 7.2 Ibf-ft)
PUMP MOTOR CONNECTOR
6 mm NUT
9.8 N-m (1.0 kgf-m, 7.2 Ibf-ft)ProCarManuals.com
Page 1196 of 1954

TCS CONTROL UNIT 20P CONNECTOR
Wire side of female terminals
VB: Battery Voltage
Terminal
number
1
2
4
5
6
9
10
11
12
13
14
15
16
17
20
Wire
color
BLK/YEL
GRN/RED
BLU
PNK/BLU
BLK/WHT
BLK
BRN/WHT
GRN/WHT
BLU
GRN/ORN
BLK/ORN
BRN/BLK
WHT/BLU
BLU/GRY
GRN
BRN
Terminal sign
(Terminal name)
IG1
(Ignition 1)
PARK
(Parking)
SCS
(Service check
signal)
STR-GND
(Steering ground)
AT-SHIFT
(AT shift)
FSR
(Fail-safe relay)
PMG
(Power motor
Ground)
VPM
(Voltage power
motor)
STOP
(Stop)
NEP (Engine
speed pulse)
BARO
(Barometric)
TC-FC
(Traction control
fuel cut)
LG2
(Logic ground 2)
STR-VCC (Steer-
ing power supply)
WARN2
(Warning 2)
SH-MOT
(Shield motor)
MOT +
(Motor +)
MOT-
(Motor -)
Description
Detects ignition switch
IG1 signal
Detects parking brake
switch signal
Detects service check
connector signal
(Diagnostic trouble
code indication)
Ground for the steering
angle sensor
Detects A/T shift posi-
tion signal
Drives fail-safe relay
Power ground for the
TCS control valve
actuator motor
Power source for the
TCS control valve
actuator motor
Detects brake pedal
position switch signal
Detects engine speed
signal
Detects barometric
sensor signal
TCS Fl, Fuel cut
(torque down) signal
Ground for the logic
circuit
Power source for the
steering angle sensor
Drives TCS indicator light
(The indicator light comes
on by the self-bias)
Shield for the TCS con-
trol valve actuator motor
Drives TCS control
valve actuator motor
Drives TCS control
valve actuator motor
Measurement
terminals
1-GND
2
3-GND
4-GND
5-GND
6-GND
9-GND
10-GND
11-GND
12-GND
13-GND
14-GND
15-GND
16-GND
17-GND
19-20
20-19
Voltage
Conditions
(Ignition Switch ON (II))
Depress the parking
brake pedal.
Release the parking
brake pedal.
SCS service connector
connected.
SCS service connector
disconnected.
Shift the transmission
to position, then
start the engine.
Start the engine.
Start the engine.
Brake pedal depressed.
Brake pedal released.
Engine idling
TCS is functioning,
(maximum fuel cut)
TCS is not functioning.
Indicator light ON
Indicator light OFF
TCS is functioning.
TCS is not functioning.
TCS is functioning.
TCS is not functioning.
Output
voltage
VB
Below 0.6 V
VB
0V
5V
Below 0.3V
About 4V
(5V 0V)
VB
1.5V
Below 0.3 V
0V
VB
VB
0V
About 6V
(12V
0V)
About 3 V
About 1.5V
About 4.5 V
(5 V,
PWM)
Below 0.3V
About 5 V
About 2 V
VB
VB
0V
VB
0VProCarManuals.com
Page 1211 of 1954
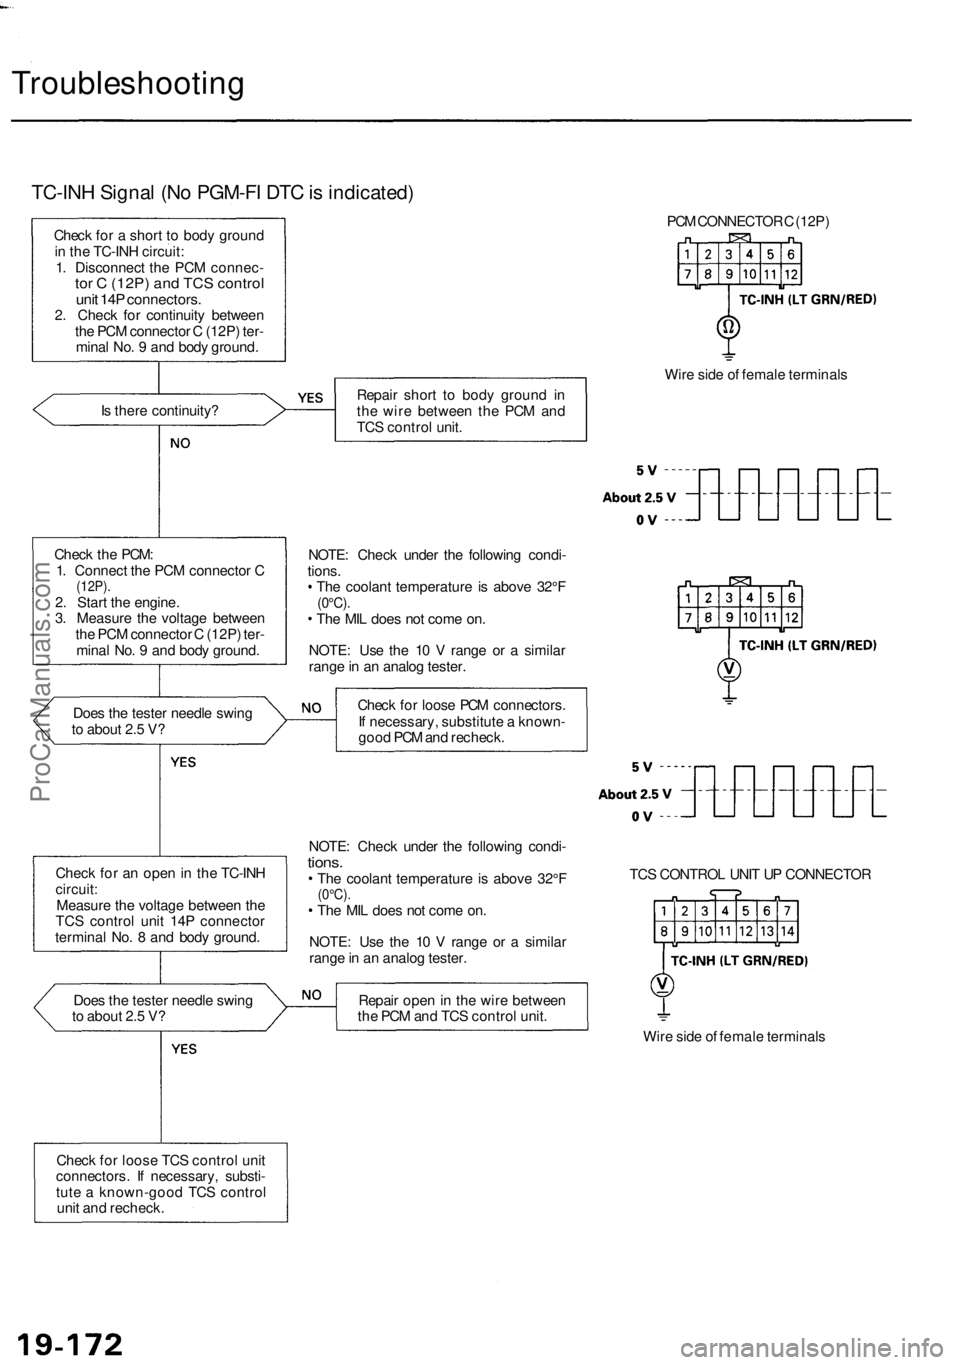
Troubleshooting
TC-INH Signal (No PGM-FI DTC is indicated)
Check for a short to body ground
in the TC-INH circuit:
1. Disconnect the PCM connec-
tor C (12P) and TCS control
unit 14P connectors.
2. Check for continuity between
the PCM connector C (12P) ter-
minal No. 9 and body ground.
Is there continuity?
Check the PCM:
1. Connect the PCM connector C
(12P).
2. Start the engine.
3. Measure the voltage between
the PCM connector C (12P) ter-
minal No. 9 and body ground.
Does the tester needle swing
to about 2.5 V?
Check for an open in the TC-INH
circuit:
Measure the voltage between the
TCS control unit 14P connector
terminal No. 8 and body ground.
Does the tester needle swing
to about 2.5 V?
Check for loose TCS control unit
connectors. If necessary, substi-
tute a known-good TCS control
unit and recheck.
PCM CONNECTOR C (12P)
Repair short to body ground in
the wire between the PCM and
TCS control unit.
Wire side of female terminals
NOTE: Check under the following condi-
tions.
The coolant temperature is above 32°F
(0°C).
The MIL does not come on.
NOTE: Use the 10 V range or a similar
range in an analog tester.
Check for loose PCM connectors.
If necessary, substitute a known-
good PCM and recheck.
NOTE: Check under the following condi-
tions.
The coolant temperature is above 32°F
(0°C).
The MIL does not come on.
NOTE: Use the 10 V range or a similar
range in an analog tester.
TCS CONTROL UNIT UP CONNECTOR
Repair open in the wire between
the PCM and TCS control unit.
Wire side of female terminalsProCarManuals.com
Page 1212 of 1954
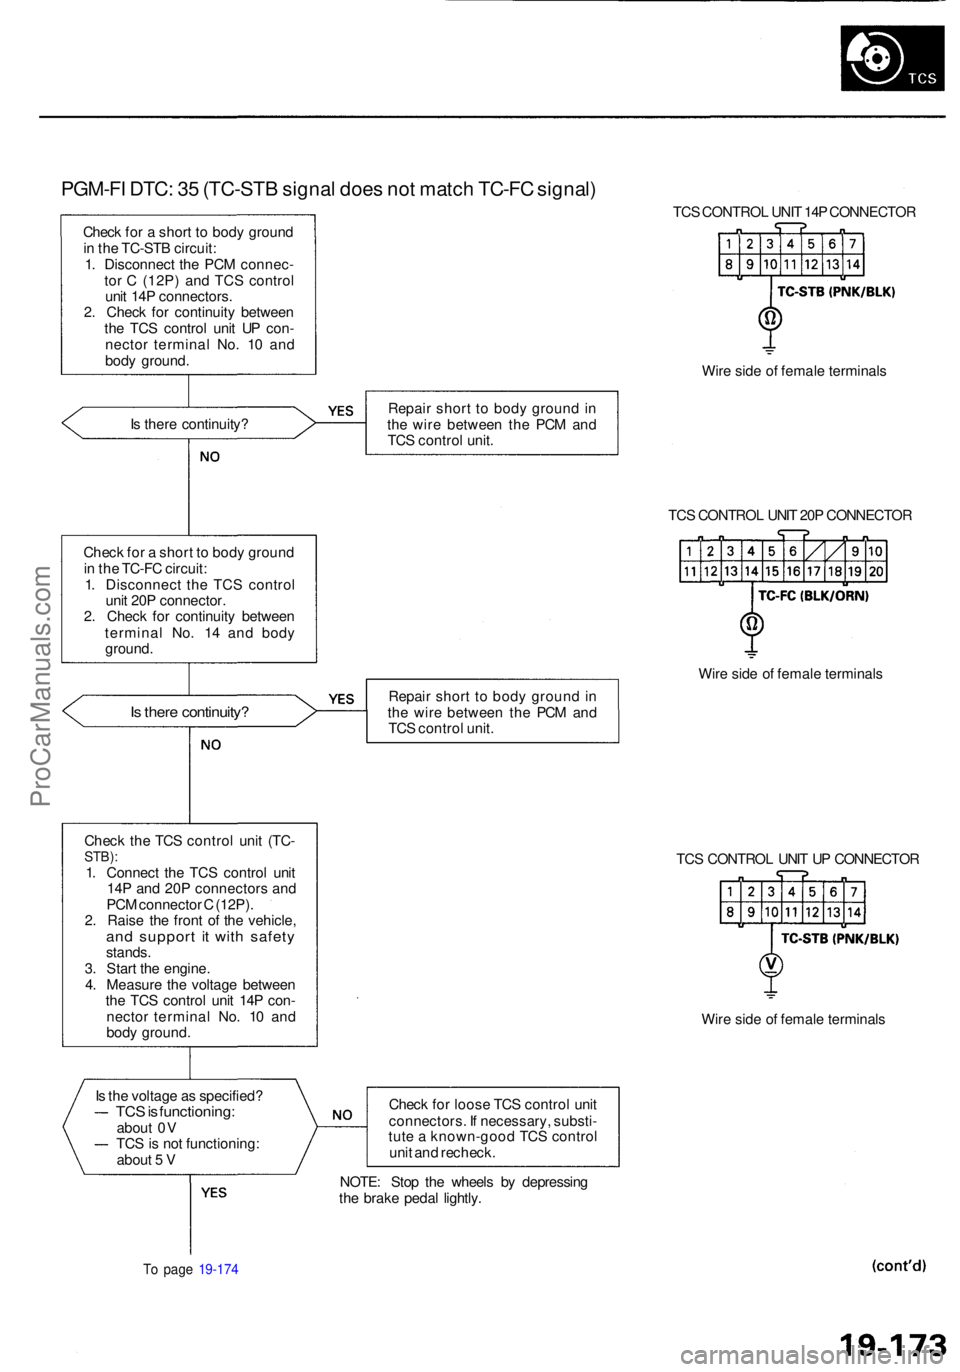
PGM-FI DTC : 3 5 (TC-ST B signa l doe s no t matc h TC-F C signal )
Check fo r a shor t t o bod y groun d
i n th e TC-ST B circuit :
1 . Disconnec t th e PC M connec -
to r C (12P ) an d TC S contro l
uni t 14 P connectors .
2 . Chec k fo r continuit y betwee n
th e TC S contro l uni t U P con -
necto r termina l No . 1 0 an d
bod y ground . TC
S CONTRO L UNI T 14 P CONNECTO R
Wir e sid e o f femal e terminal s
I s ther e continuity ? Repai
r shor t t o bod y groun d in
th e wir e betwee n th e PC M an d
TC S contro l unit .
TCS CONTRO L UNI T 20 P CONNECTO R
Chec k fo r a shor t t o bod y groun d
i n th e TC-F C circuit :
1 . Disconnec t th e TC S contro l
uni t 20 P connector .
2 . Chec k fo r continuit y betwee n
termina l No . 1 4 an d bod y
ground .
Is ther e continuity ?Repair shor t t o bod y groun d in
th e wir e betwee n th e PC M an d
TC S contro l unit . Wir
e sid e o f femal e terminal s
Chec k th e TC S contro l uni t (TC -
STB) :1. Connec t th e TC S contro l uni t
14 P an d 20 P connector s an d
PC M connecto r C (12P) .
2 . Rais e th e fron t o f th e vehicle ,
and suppor t i t wit h safet ystands.
3 . Star t th e engine .
4 . Measur e th e voltag e betwee n
th e TC S contro l uni t 14 P con -
necto r termina l No . 1 0 an d
bod y ground . TC
S CONTRO L UNI T U P CONNECTO R
Wir e sid e o f femal e terminal s
I s th e voltag e a s specified ?
TCS is functioning :about 0 V
TC S is no t functioning :
abou t 5 V Chec
k fo r loos e TC S contro l uni t
connectors . I f necessary , substi -
tut e a known-goo d TC S contro l
uni t an d recheck .
To pag e 19-17 4
NOTE : Sto p th e wheel s b y depressin g
th e brak e peda l lightly .
ProCarManuals.com
Page 1215 of 1954
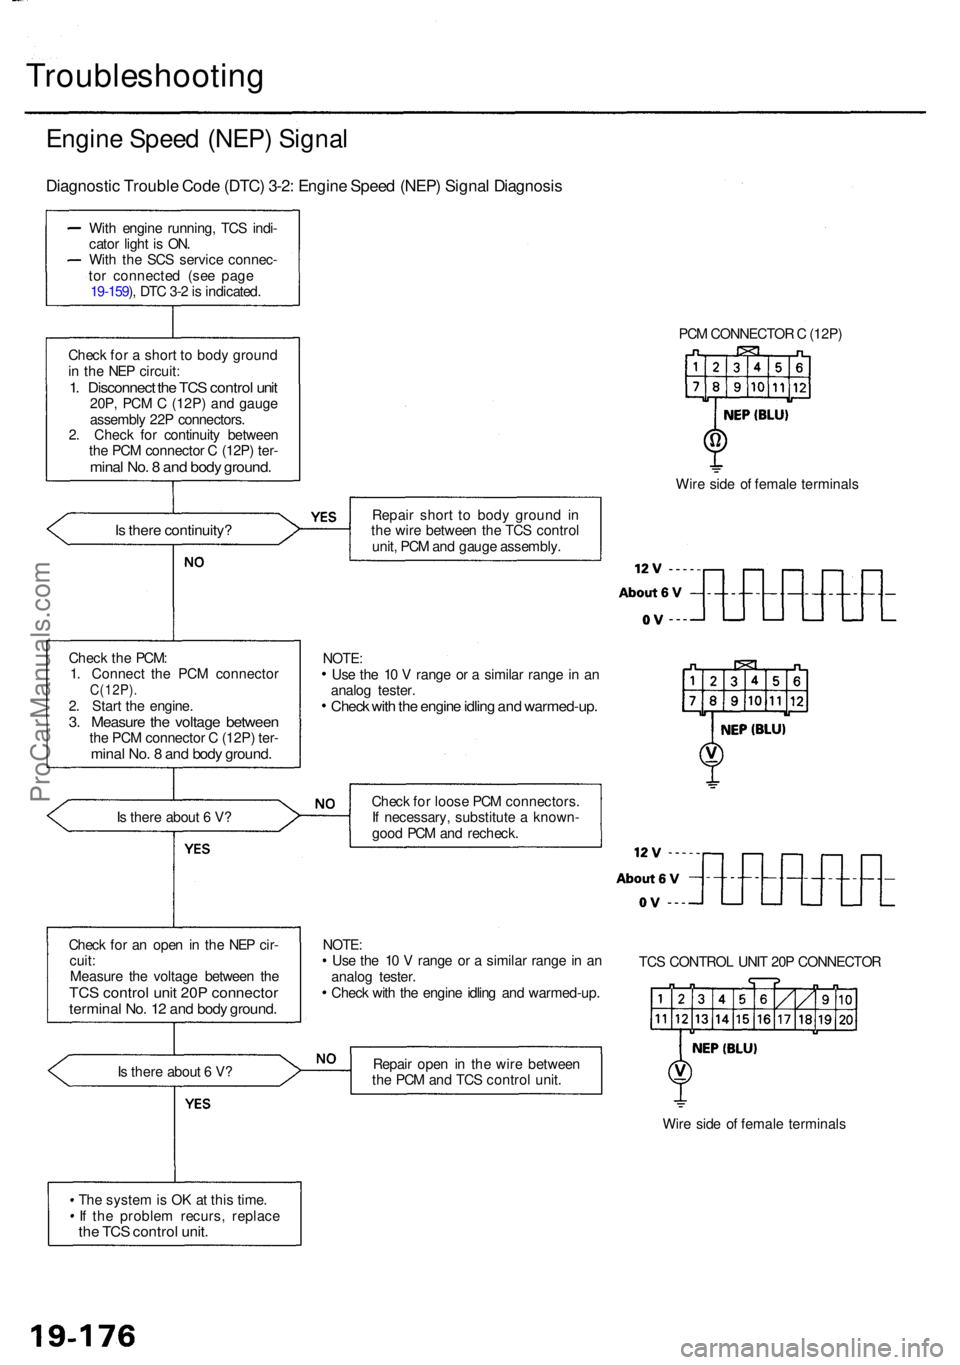
Troubleshooting
Engine Spee d (NEP ) Signa l
Diagnosti c Troubl e Cod e (DTC ) 3-2 : Engin e Spee d (NEP ) Signa l Diagnosi s
With engin e running , TC S indi -
cato r ligh t i s ON .
Wit h th e SC S servic e connec -
to r connecte d (se e pag e
19-159 ), DT C 3- 2 is indicated .
Chec k fo r a shor t t o bod y groun d
i n th e NE P circuit :
1. Disconnec t th e TC S contro l uni t20P , PC M C (12P ) an d gaug e
assembl y 22 P connectors .
2 . Chec k fo r continuit y betwee n
th e PC M connecto r C (12P ) ter -
mina l No . 8 an d bod y ground .
Is ther e continuity ?
Is ther e abou t 6 V ?
Chec k fo r a n ope n in th e NE P cir -
cuit :
Measur e th e voltag e betwee n th e
TC S contro l uni t 20 P connecto rterminal No . 1 2 an d bod y ground .
Is ther e abou t 6 V ?
Th e syste m is O K a t thi s time .
I f th e proble m recurs , replac e
the TC S contro l unit .
PCM CONNECTO R C (12P )
Wir e sid e o f femal e terminal s
Repai r shor t t o bod y groun d i n
th e wir e betwee n th e TC S contro l
unit , PC M an d gaug e assembly .
Chec k fo r loos e PC M connectors .
I f necessary , substitut e a known -
goo d PC M an d recheck .
NOTE :
Us e th e 1 0 V rang e o r a simila r rang e in a n
analo g tester .
Chec k wit h th e engin e idlin g an d warmed-up .TC
S CONTRO L UNI T 20 P CONNECTO R
Repai r ope n in th e wir e betwee n
th e PC M an d TC S contro l unit .
Wire sid e o f femal e terminal s
Chec
k th e PCM :
1 . Connec t th e PC M connecto r
C(12P).2. Star t th e engine .3. Measur e th e voltag e betwee nthe PC M connecto r C (12P ) ter -mina l No . 8 an d bod y ground .
Use th e 1 0 V rang e o r a simila r rang e in a n
analo g tester .
Check wit h th e engin e idlin g an d warmed-up .
NOTE:
ProCarManuals.com
Page 1226 of 1954
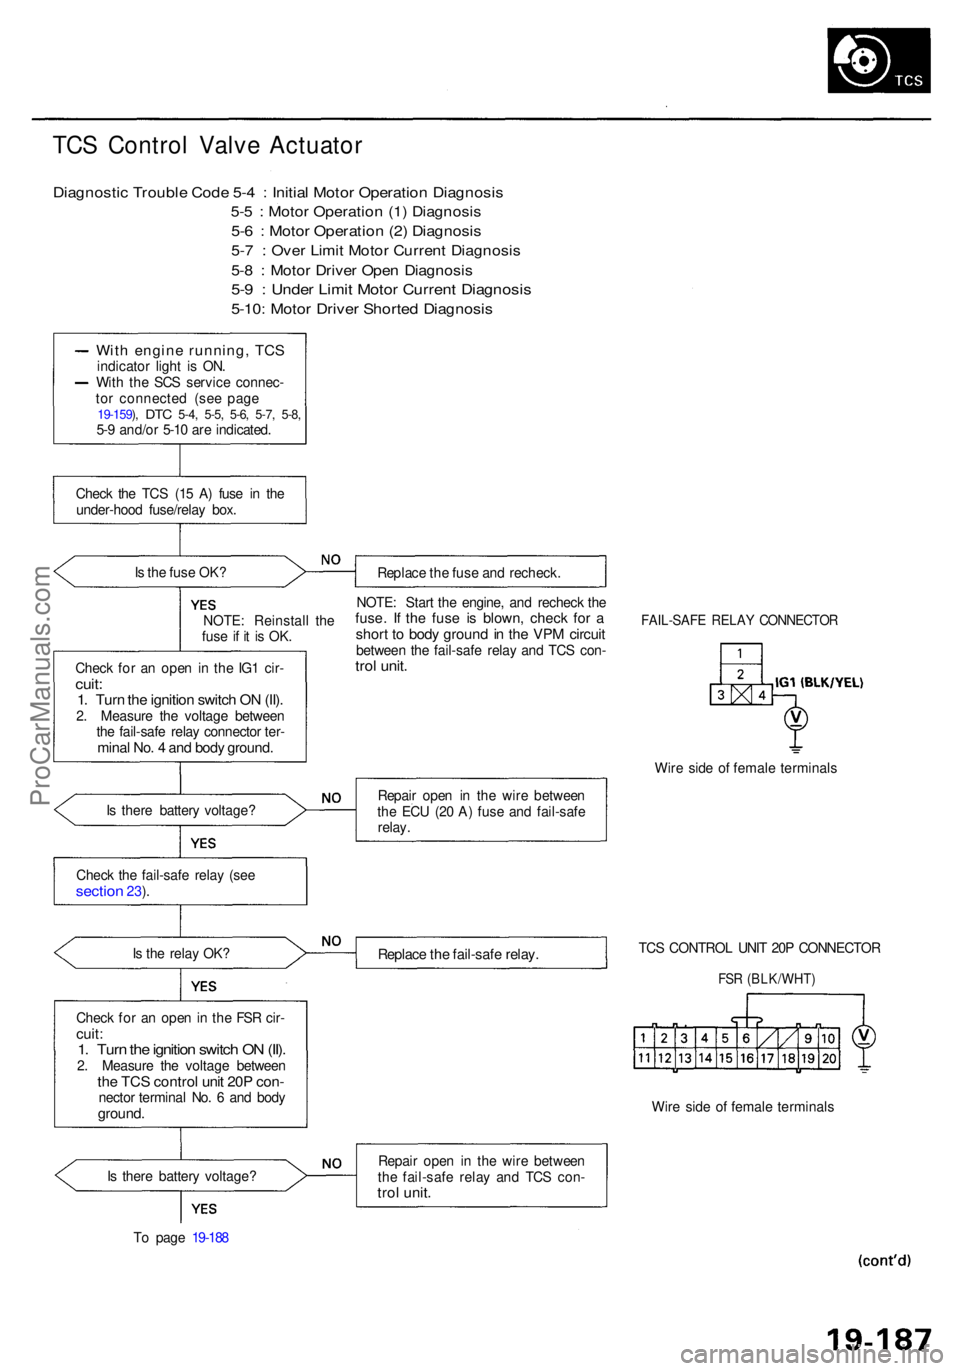
TCS Contro l Valv e Actuato r
Diagnosti c Troubl e Cod e 5- 4 : Initia l Moto r Operatio n Diagnosi s
5-5 : Moto r Operatio n (1 ) Diagnosi s
5-6 : Moto r Operatio n (2 ) Diagnosi s
5-7 : Ove r Limi t Moto r Curren t Diagnosi s
5-8 : Moto r Drive r Ope n Diagnosi s
5-9 : Unde r Limi t Moto r Curren t Diagnosi s
5-10: Moto r Drive r Shorte d Diagnosi s
With engin e running , TC Sindicato r ligh t i s ON .
Wit h th e SC S servic e connec -
to r connecte d (se e pag e
19-159 ), DT C 5-4 , 5-5 , 5-6 , 5-7 , 5-8 ,5-9 and/o r 5-1 0 ar e indicated .
Chec k th e TC S (1 5 A ) fus e i n th e
under-hoo d fuse/rela y box .
I s th e fus e OK ?
Replace th e fus e an d recheck .
NOTE : Reinstal l th e
fus e i f i t i s OK .
Chec k fo r a n ope n i n th e IG 1 cir -
cuit:1. Tur n th e ignitio n switc h O N (II) .2. Measur e th e voltag e betwee n
th e fail-saf e rela y connecto r ter -
mina l No . 4 an d bod y ground .
NOTE: Star t th e engine , an d rechec k th efuse . I f th e fus e i s blown , chec k fo r ashor t t o bod y groun d in th e VP M circui tbetwee n th e fail-saf e rela y an d TC S con -trol unit .
FAIL-SAF E RELA Y CONNECTO R
Wire sid e o f femal e terminal s
I s ther e batter y voltage ? Repai
r ope n i n th e wir e betwee n
th e EC U (2 0 A ) fus e an d fail-saf e
relay .
Chec k th e fail-saf e rela y (se e
sectio n 23).
I s th e rela y OK ?
Replac e th e fail-saf e relay .TCS CONTRO L UNI T 20 P CONNECTO R
FSR (BLK/WHT )
Check fo r a n ope n in th e FS R cir -cuit :1. Tur n th e ignitio n switc h O N (II) .2. Measur e th e voltag e betwee nthe TC S contro l uni t 20 P con -necto r termina l No . 6 an d bod yground .Wire sid e o f femal e terminal s
I s ther e batter y voltage ?
T o pag e 19-18 8 Repai
r ope n i n th e wir e betwee n
th e fail-saf e rela y an d TC S con -
trol unit .
ProCarManuals.com
Page 1230 of 1954
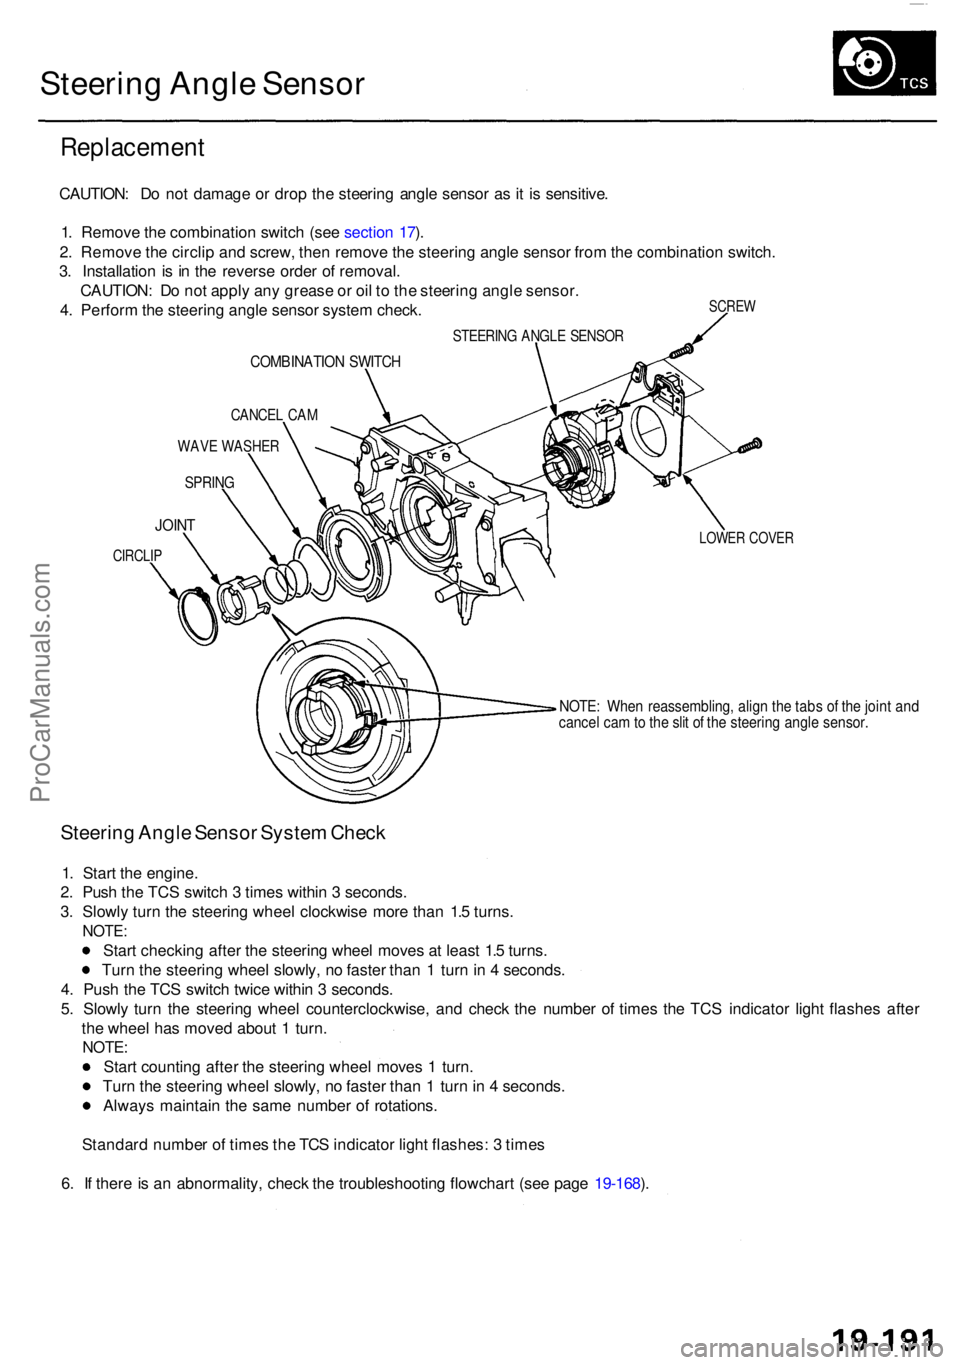
Steering Angl e Senso r
Replacemen t
SCREW
CAUTION : D o no t damag e o r dro p th e steerin g angl e senso r a s it i s sensitive .
1 . Remov e th e combinatio n switc h (se e sectio n 17 ).
2 . Remov e th e circli p an d screw , the n remov e th e steerin g angl e senso r fro m th e combinatio n switch .
3 . Installatio n i s i n th e revers e orde r o f removal .
CAUTION : D o no t appl y an y greas e o r oi l t o th e steerin g angl e sensor .
4 . Perfor m th e steerin g angl e senso r syste m check .
STEERIN G ANGL E SENSO R
COMBINATIO N SWITC H
CANCE L CA M
WAV E WASHE R
SPRING
LOWER COVE RJOINT
CIRCLI P
NOTE: Whe n reassembling , alig n th e tab s o f th e join t an dcance l ca m to th e sli t o f th e steerin g angl e sensor .
Steering Angl e Senso r Syste m Chec k
1. Star t th e engine .
2 . Pus h th e TC S switc h 3 time s withi n 3 seconds .
3 . Slowl y tur n th e steerin g whee l clockwis e mor e tha n 1. 5 turns .
NOTE :
Start checkin g afte r th e steerin g whee l move s a t leas t 1. 5 turns .
Tur n th e steerin g whee l slowly , n o faste r tha n 1 tur n in 4 seconds .
4 . Pus h th e TC S switc h twic e withi n 3 seconds .
5 . Slowl y tur n th e steerin g whee l counterclockwise , an d chec k th e numbe r o f time s th e TC S indicato r ligh t flashe s afte r
th e whee l ha s move d abou t 1 turn .
NOTE :
Start countin g afte r th e steerin g whee l move s 1 turn .
Tur n th e steerin g whee l slowly , n o faste r tha n 1 tur n in 4 seconds .
Alway s maintai n th e sam e numbe r o f rotations .
Standar d numbe r o f time s th e TC S indicato r ligh t flashes : 3 time s
6 . I f ther e is a n abnormality , chec k th e troubleshootin g flowchar t (se e pag e 19-168 ).
ProCarManuals.com