check engine ACURA RL KA9 1996 Service User Guide
[x] Cancel search | Manufacturer: ACURA, Model Year: 1996, Model line: RL KA9, Model: ACURA RL KA9 1996Pages: 1954, PDF Size: 61.44 MB
Page 170 of 1954
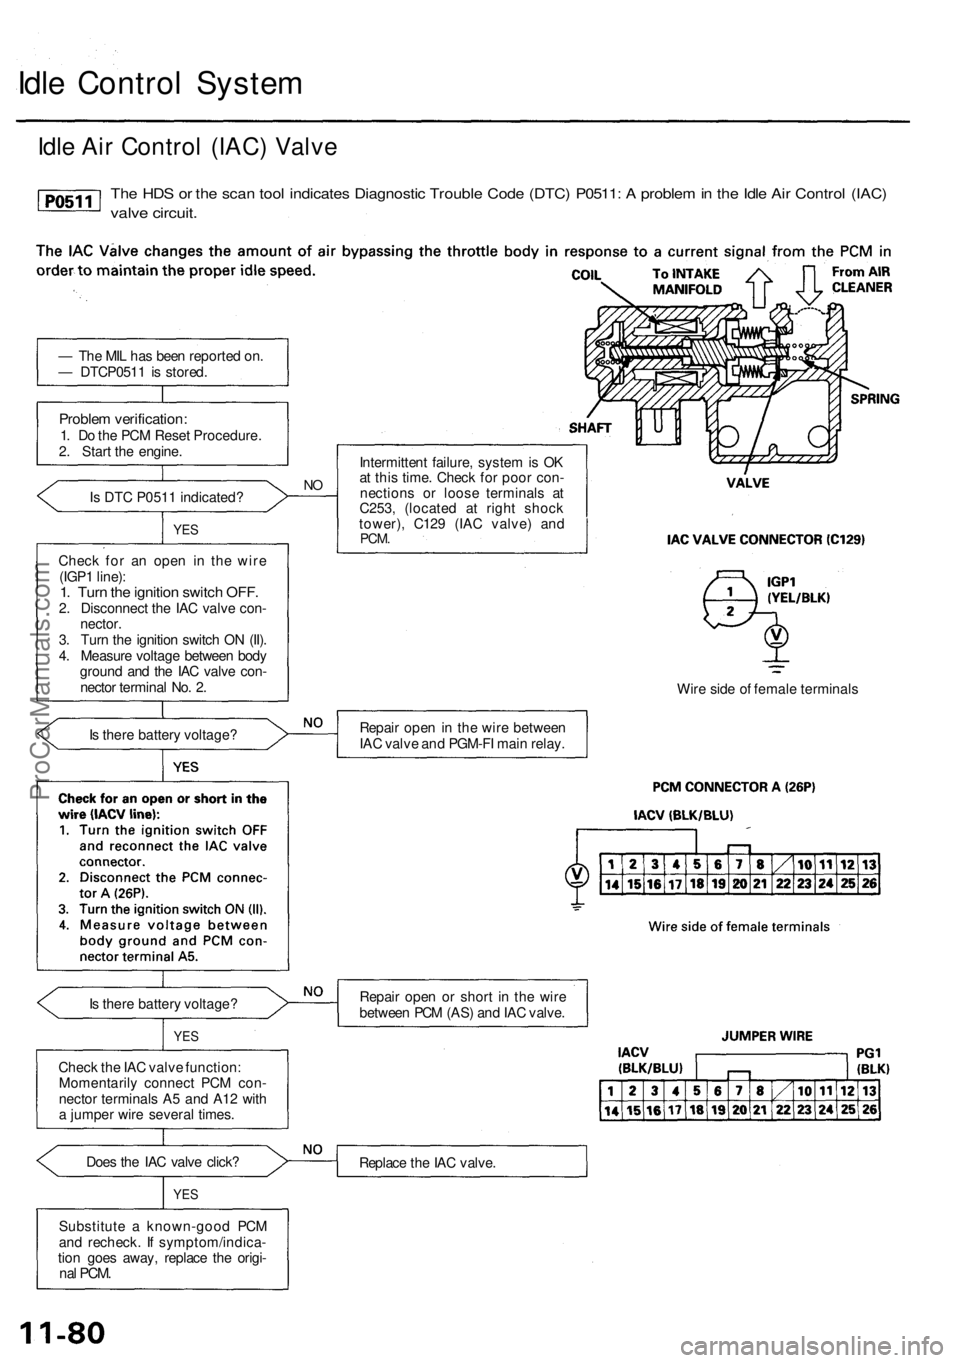
Idle Contro l Syste m
Idle Ai r Contro l (IAC ) Valv e
The HD S o r th e sca n too l indicate s Diagnosti c Troubl e Cod e (DTC ) P0511 : A proble m in th e Idl e Ai r Contro l (IAC )
valve circuit .
— Th e MI L ha s bee n reporte d on .
— DTCP051 1 i s stored .
Problem verification :1. D o th e PC M Rese t Procedure .
2 . Star t th e engine .
Is DTC P0511 indicated?
YES
Chec k fo r a n ope n i n the wir e
(IGP 1 line) :
1. Tur n th e ignitio n switc h OFF .2. Disconnec t th e IA C valv e con -
nector .
3 . Tur n th e ignitio n switc h O N (II) .
4 . Measur e voltag e betwee n bod y
groun d an d th e IA C valv e con -
necto r termina l No . 2 .
I s ther e batter y voltage ?
I s ther e batter y voltage ?
YES
Chec k th e IA C valv e function :
Momentaril y connec t PC M con -
necto r terminal s A 5 an d A1 2 wit h
a jumpe r wir e severa l times .
Doe s th e IA C valv e click ?
YES
Substitut e a known-goo d PC M
an d recheck . I f symptom/indica -
tio n goe s away , replac e th e origi -
nal PCM .
NO
Intermitten t failure , syste m is O K
a t thi s time . Chec k fo r poo r con -
nection s o r loos e terminal s a t
C253 , (locate d a t righ t shoc k
tower) , C12 9 (IA C valve ) an d
PCM .
Repai r ope n in th e wir e betwee n
IA C valv e an d PGM-F I mai n relay . Wir
e sid e o f femal e terminal s
Repai r ope n o r shor t i n th e wir e
betwee n PC M (AS ) an d IA C valve .
Replac e th e IA C valve .
ProCarManuals.com
Page 345 of 1954
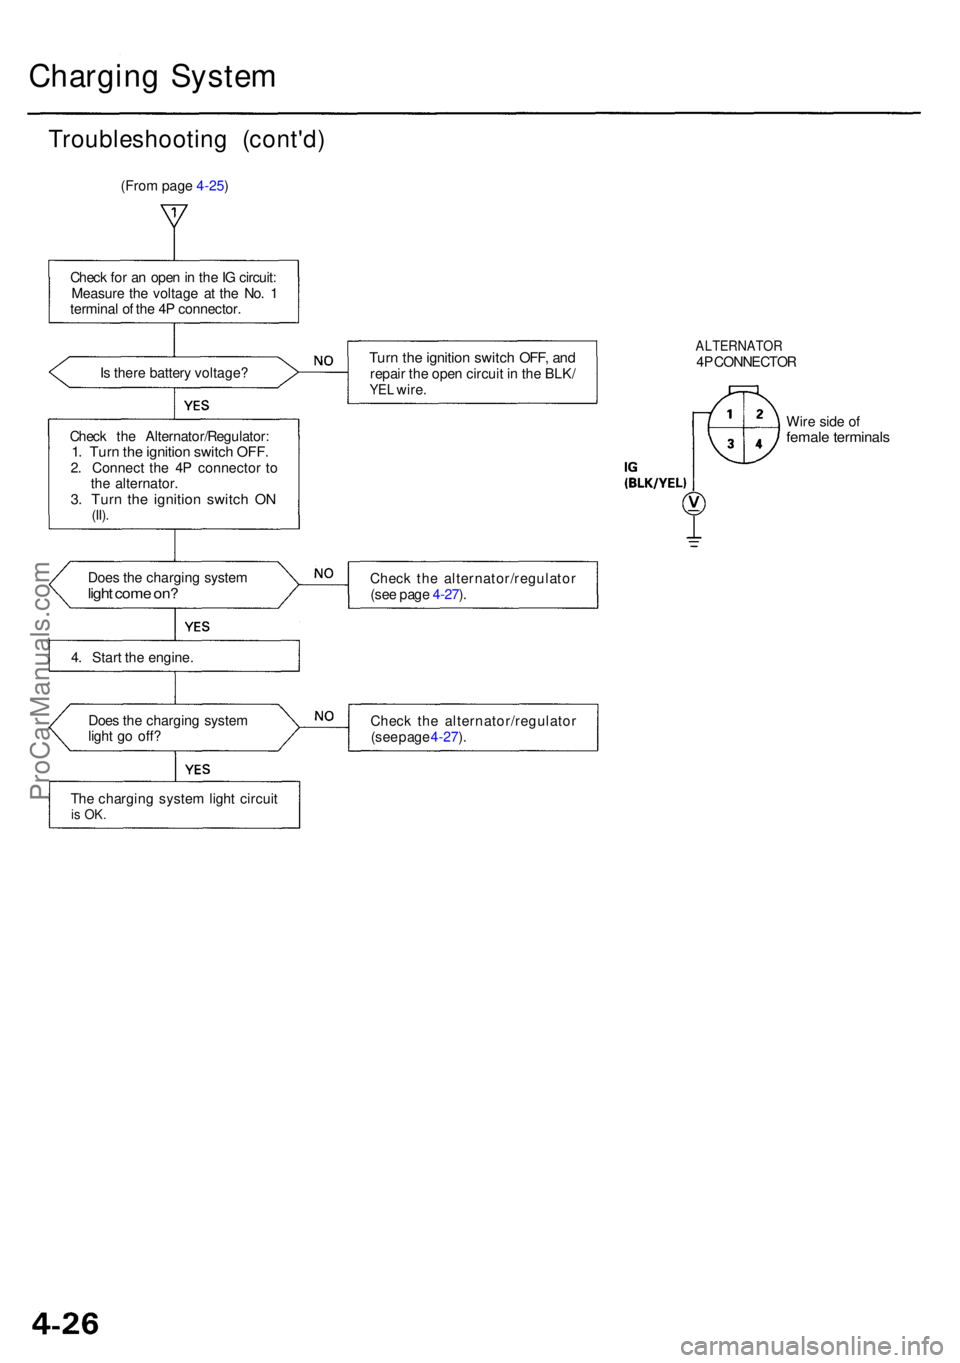
Charging Syste m
Troubleshootin g (cont'd )
(From page 4-25)
Chec k fo r a n ope n in th e IG circuit :
Measur e th e voltag e a t th e No . 1
termina l o f th e 4 P connector .
I s ther e batter y voltage ?
Chec k th e Alternator/Regulator :
1. Tur n th e ignitio n switc h OFF .2. Connec t th e 4 P connecto r t o
th e alternator .
3. Tur n th e ignitio n switc h O N(II).
Doe s th e chargin g syste mlight com e on ?
4. Star t th e engine .
Doe s th e chargin g syste m
ligh t g o off ?
Th e chargin g syste m ligh t circui t
is OK .
Turn th e ignitio n switc h OFF , an drepai r th e ope n circui t i n th e BLK /YEL wire .
ALTERNATO R4P CONNECTO R
Wir e sid e o f
femal e terminal s
Check th e alternator/regulato r
(se e pag e 4-27 ).
Chec k th e alternator/regulato r
(se e pag e 4-27 ).
ProCarManuals.com
Page 363 of 1954
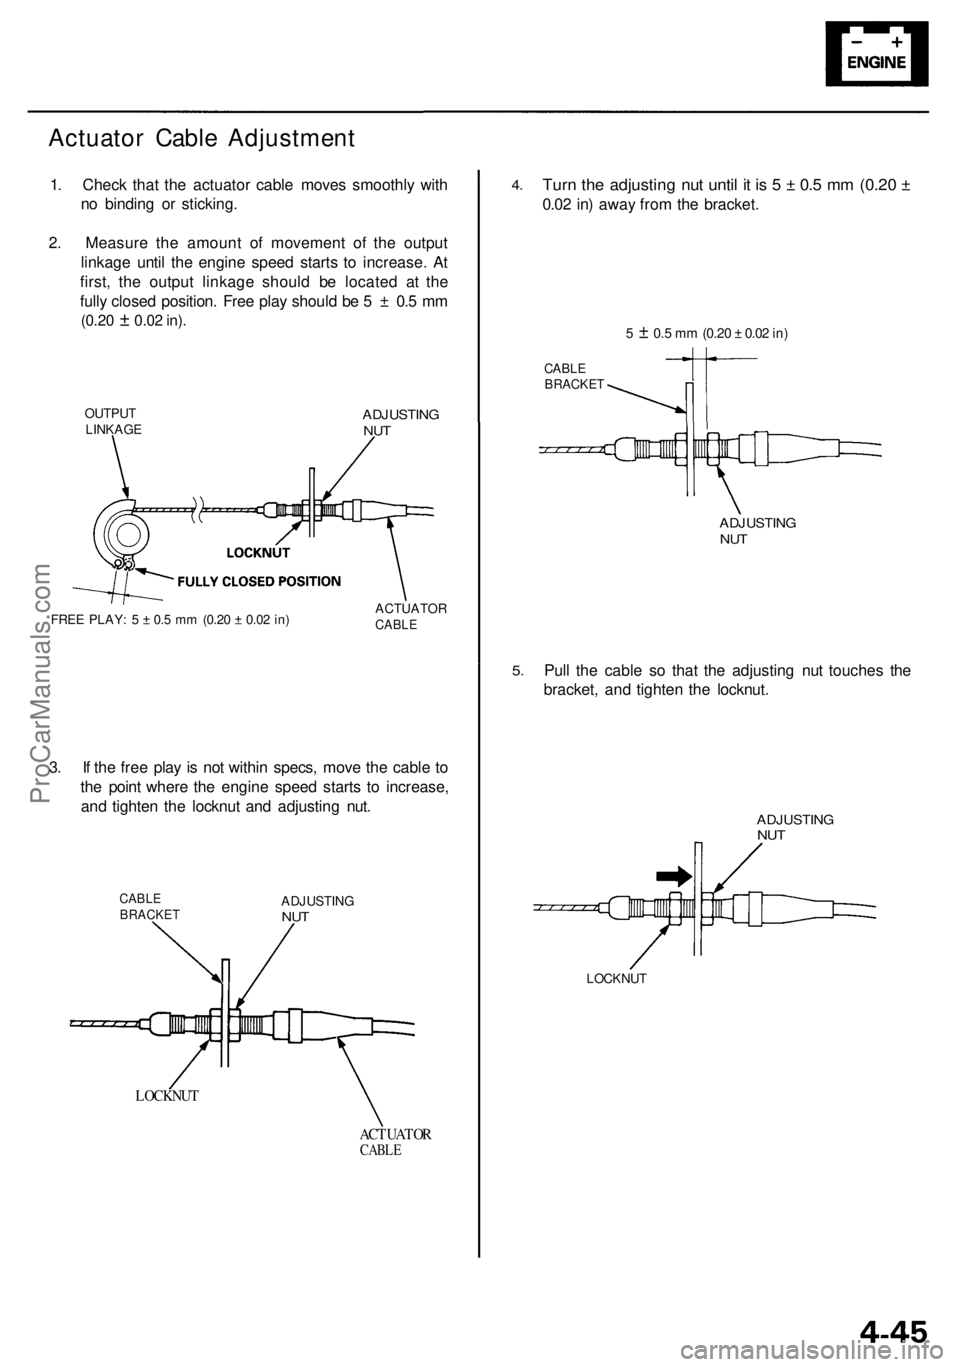
Actuator Cable Adjustment
1. Check that the actuator cable moves smoothly with
no binding or sticking.
2. Measure the amount of movement of the output
linkage until the engine speed starts to increase. At
first, the output linkage should be located at the
fully closed position. Free play should be 5 ± 0.5 mm
(0.20
±
0.02 in).
OUTPUT
LINKAGE
ADJUSTING
NUT
FREE PLAY: 5 ± 0.5 mm (0.20 ± 0.02 in)
ACTUATOR
CABLE
3. If the free play is not within specs, move the cable to
the point where the engine speed starts to increase,
and tighten the locknut and adjusting nut.
CABLE
BRACKET
ADJUSTING
NUT
LOCKNUT
ACTUATOR
CABLE
4.
Turn the adjusting nut until it is 5 ± 0.5 mm (0.20 ±
0.02 in) away from the bracket.
5 ± 0.5 mm
(0.20
±
0.02
in)
CABLE
BRACKET
ADJUSTING
NUT
5.
Pull the cable so that the adjusting nut touches the
bracket, and tighten the locknut.
ADJUSTING
NUT
LOCKNUTProCarManuals.com
Page 375 of 1954
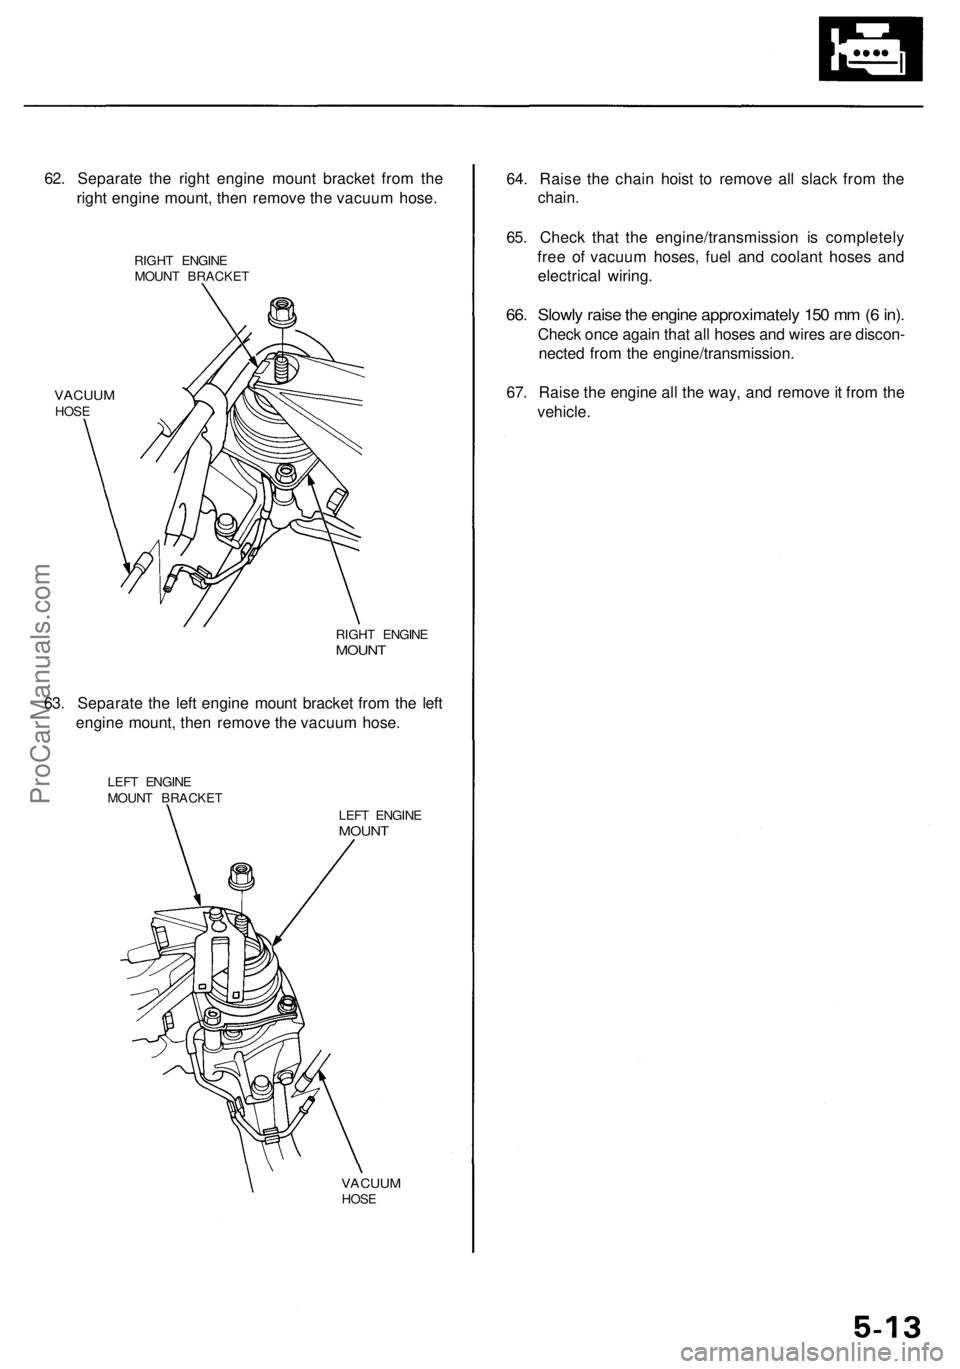
62. Separate the right engine mount bracket from the
right engine mount, then remove the vacuum hose.
RIGHT ENGINE
MOUNT BRACKET
VACUUM
HOSE
RIGHT ENGINE
MOUNT
63. Separate the left engine mount bracket from the left
engine mount, then remove the vacuum hose.
LEFT ENGINE
MOUNT BRACKET
LEFT ENGINE
MOUNT
VACUUM
HOSE
64. Raise the chain hoist to remove all slack from the
chain.
65. Check that the engine/transmission is completely
free of vacuum hoses, fuel and coolant hoses and
electrical wiring.
66. Slowly raise the engine approximately 150 mm (6 in).
Check once again that all hoses and wires are discon-
nected from the engine/transmission.
67. Raise the engine all the way, and remove it from the
vehicle.ProCarManuals.com
Page 378 of 1954
Engine Removal/Installatio n
Installation (cont'd )
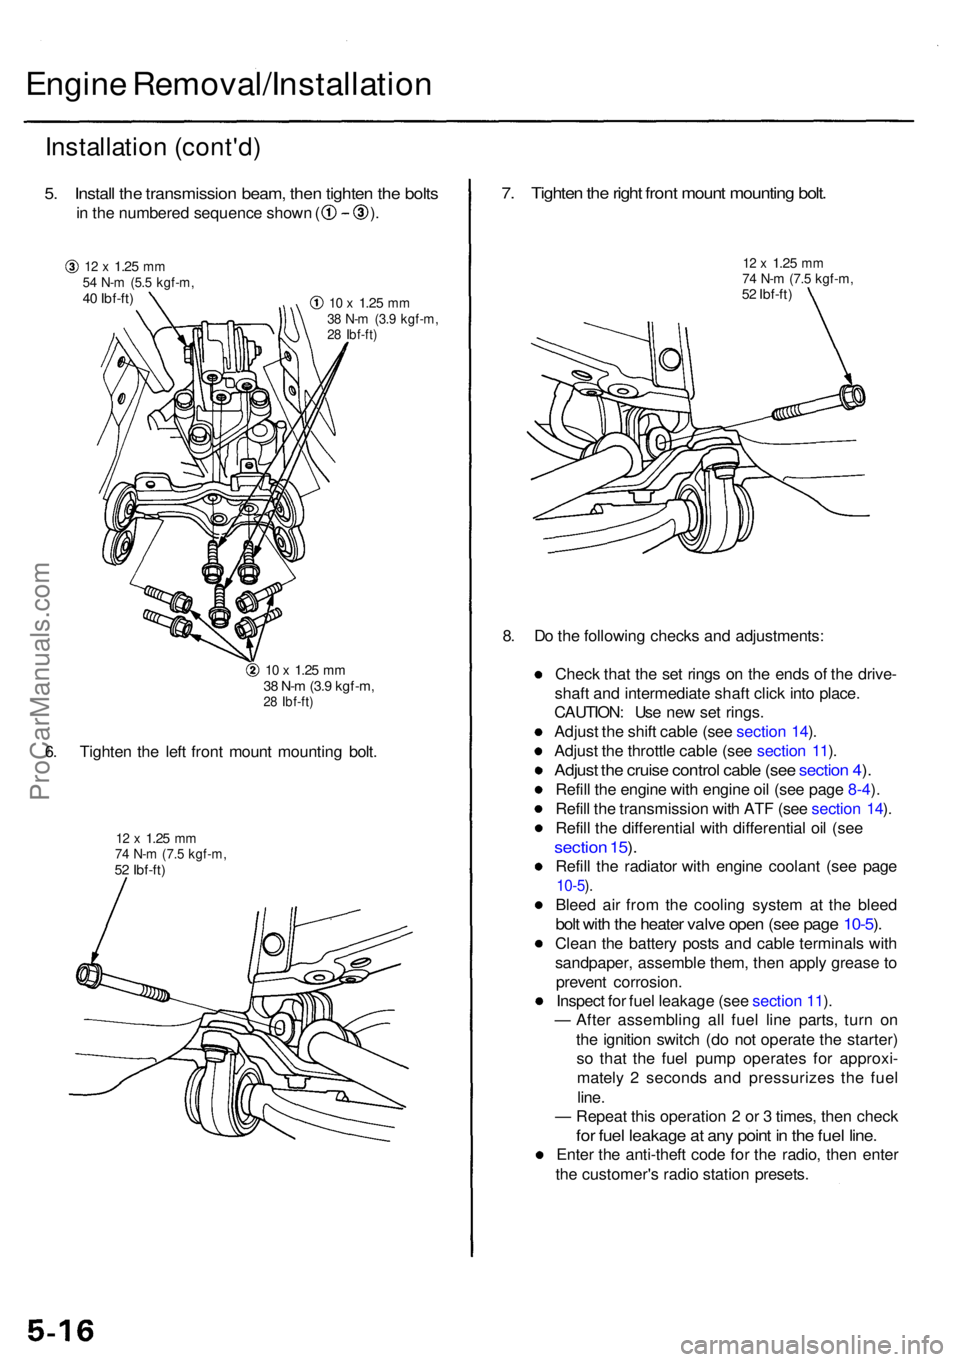
5. Instal l th e transmissio n beam , the n tighte n th e bolt s
in th e numbere d sequenc e show n ( ) .
12 x 1.2 5 mm54 N- m (5. 5 kgf-m ,40 Ibf-ft )10 x 1.2 5 mm38 N- m (3. 9 kgf-m ,28 Ibf-ft )
10 x 1.2 5 mm38 N- m (3. 9 kgf-m ,28 Ibf-ft )
6. Tighte n th e lef t fron t moun t mountin g bolt .
12 x 1.2 5 mm74 N- m (7. 5 kgf-m ,52 Ibf-ft )
7. Tighte n th e righ t fron t moun t mountin g bolt .
12 x 1.2 5 mm74 N- m (7. 5 kgf-m ,52 Ibf-ft )
8. D o th e followin g check s an d adjustments :
Chec k tha t th e se t ring s o n th e end s o f th e drive -
shaf t an d intermediat e shaf t clic k int o place .
CAUTION : Us e ne w se t rings .
Adjus t th e shif t cabl e (se e sectio n 14 ).
Adjus t th e throttl e cabl e (se e sectio n 11 ).
Adjus t th e cruis e contro l cabl e (se e sectio n 4 ).
Refil l th e engin e wit h engin e oi l (se e pag e 8-4 ).
Refil l th e transmissio n wit h AT F (se e sectio n 14 ).
Refil l th e differentia l wit h differentia l oi l (se e
sectio n 15 ).
Refil l th e radiato r wit h engin e coolan t (se e pag e
10-5).
Blee d ai r fro m th e coolin g syste m a t th e blee d
bolt wit h th e heate r valv e ope n (se e pag e 10-5 ).
Clea n th e batter y post s an d cabl e terminal s wit h
sandpaper , assembl e them , the n appl y greas e to
preven t corrosion .
Inspec t fo r fue l leakag e (se e sectio n 11 ).
— Afte r assemblin g al l fue l lin e parts , tur n o n
th e ignitio n switc h (d o no t operat e th e starter )
s o tha t th e fue l pum p operate s fo r approxi -
matel y 2 second s an d pressurize s th e fue l
line .
— Repea t thi s operatio n 2 or 3 times , the n chec k
for fue l leakag e a t an y poin t i n th e fue l line .
Ente r th e anti-thef t cod e fo r th e radio , the n ente r
th e customer' s radi o statio n presets .
ProCarManuals.com
Page 381 of 1954
Engine Moun t Contro l Syste m
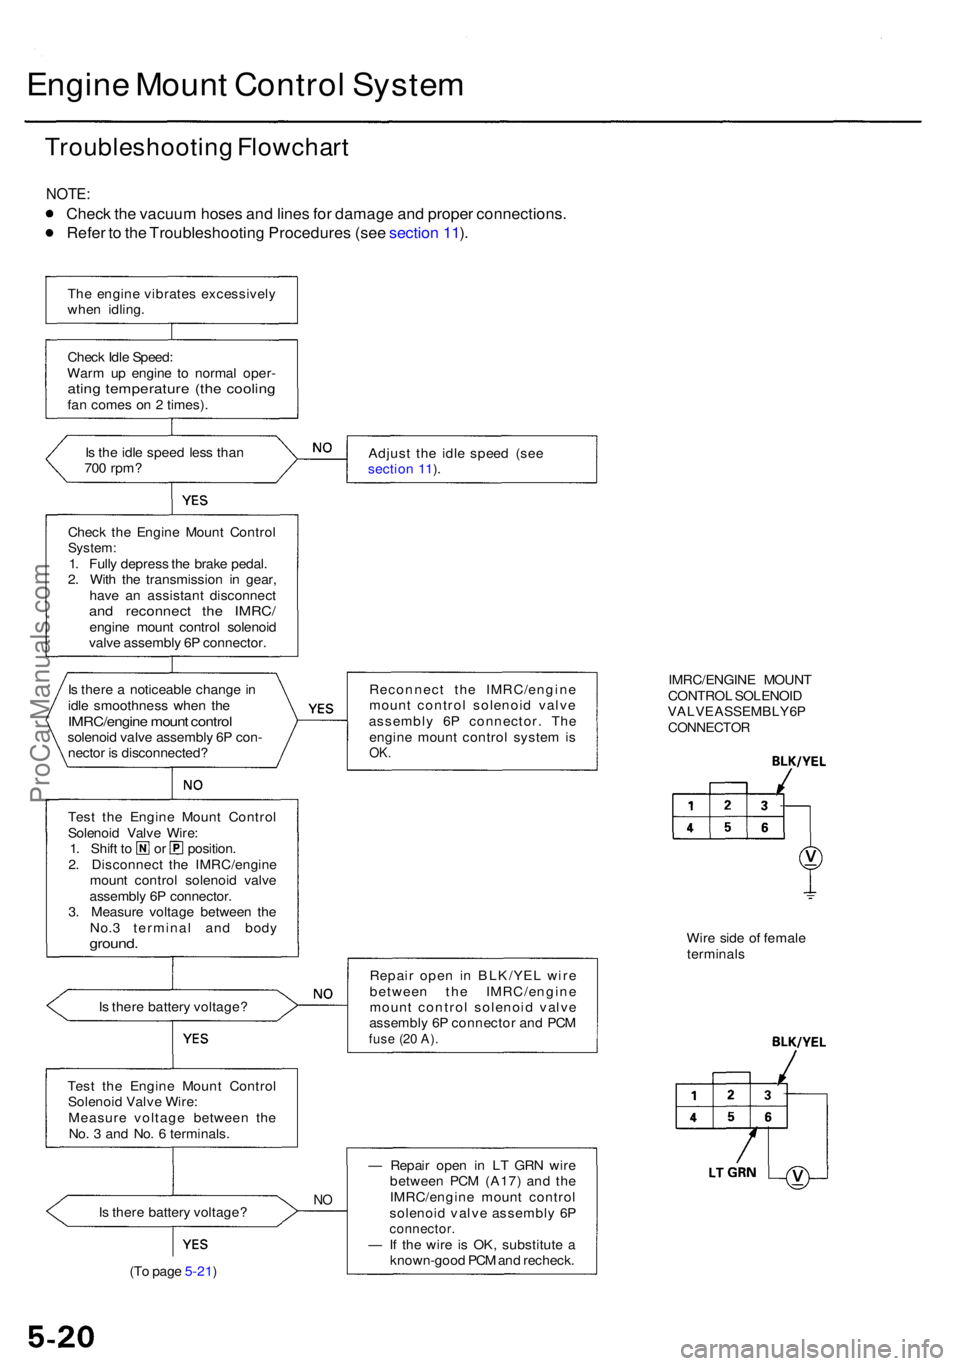
Troubleshootin g Flowchar t
NOTE:
Check th e vacuu m hose s an d line s fo r damag e an d prope r connections .
Refe r t o th e Troubleshootin g Procedure s (se e sectio n 11 ).
Th e engin e vibrate s excessivel y
whe n idling .
Chec k Idl e Speed :
War m u p engin e t o norma l oper -
ating temperatur e (th e coolin gfan come s o n 2 times) .
I s th e idl e spee d les s tha n
70 0 rpm ? Adjus
t th e idl e spee d (se e
sectio n 11 ).
Chec k th e Engin e Moun t Contro l
System:1. Full y depres s th e brak e pedal .
2 . Wit h th e transmissio n i n gear ,
hav e a n assistan t disconnec t
and reconnec t th e IMRC /engine moun t contro l solenoi d
valv e assembl y 6 P connector .
I s ther e a noticeabl e chang e in
idl e smoothnes s whe n th e
IMRC/engin e moun t contro lsolenoi d valv e assembl y 6 P con -
necto r i s disconnected ? Reconnec
t th e IMRC/engin e
moun t contro l solenoi d valv e
assembl y 6 P connector . Th e
engin e moun t contro l syste m isOK .
IMRC/ENGIN E MOUN T
CONTRO L SOLENOI D
VALV E ASSEMBL Y 6P
CONNECTO R
Test th e Engin e Moun t Contro l
Solenoi d Valv e Wire :
1. Shif t t o o r position .
2 . Disconnec t th e IMRC/engin e
moun t contro l solenoi d valv e
assembl y 6 P connector .
3 . Measur e voltag e betwee n th e
No. 3 termina l an d bod y
ground .
Is ther e batter y voltage ? Repai
r ope n i n BLK/YE L wir e
betwee n th e IMRC/engin e
moun t contro l solenoi d valv e
assembl y 6 P connecto r an d PC M
fuse (2 0 A) .
Wir e sid e o f femal e
terminal s
Tes t th e Engin e Moun t Contro l
Solenoi d Valv e Wire :
Measur e voltag e betwee n th e
No . 3 an d No . 6 terminals .
I s ther e batter y voltage ?
NO
(T o pag e 5-21 ) —
Repai r ope n i n L T GR N wir e
betwee n PC M (A17 ) an d th e
IMRC/engin e moun t contro l
solenoi d valv e assembl y 6 P
connector .— If th e wir e i s OK , substitut e a
known-goo d PC M an d recheck .
ProCarManuals.com
Page 422 of 1954
Hydraulic Tappets
Bleeding
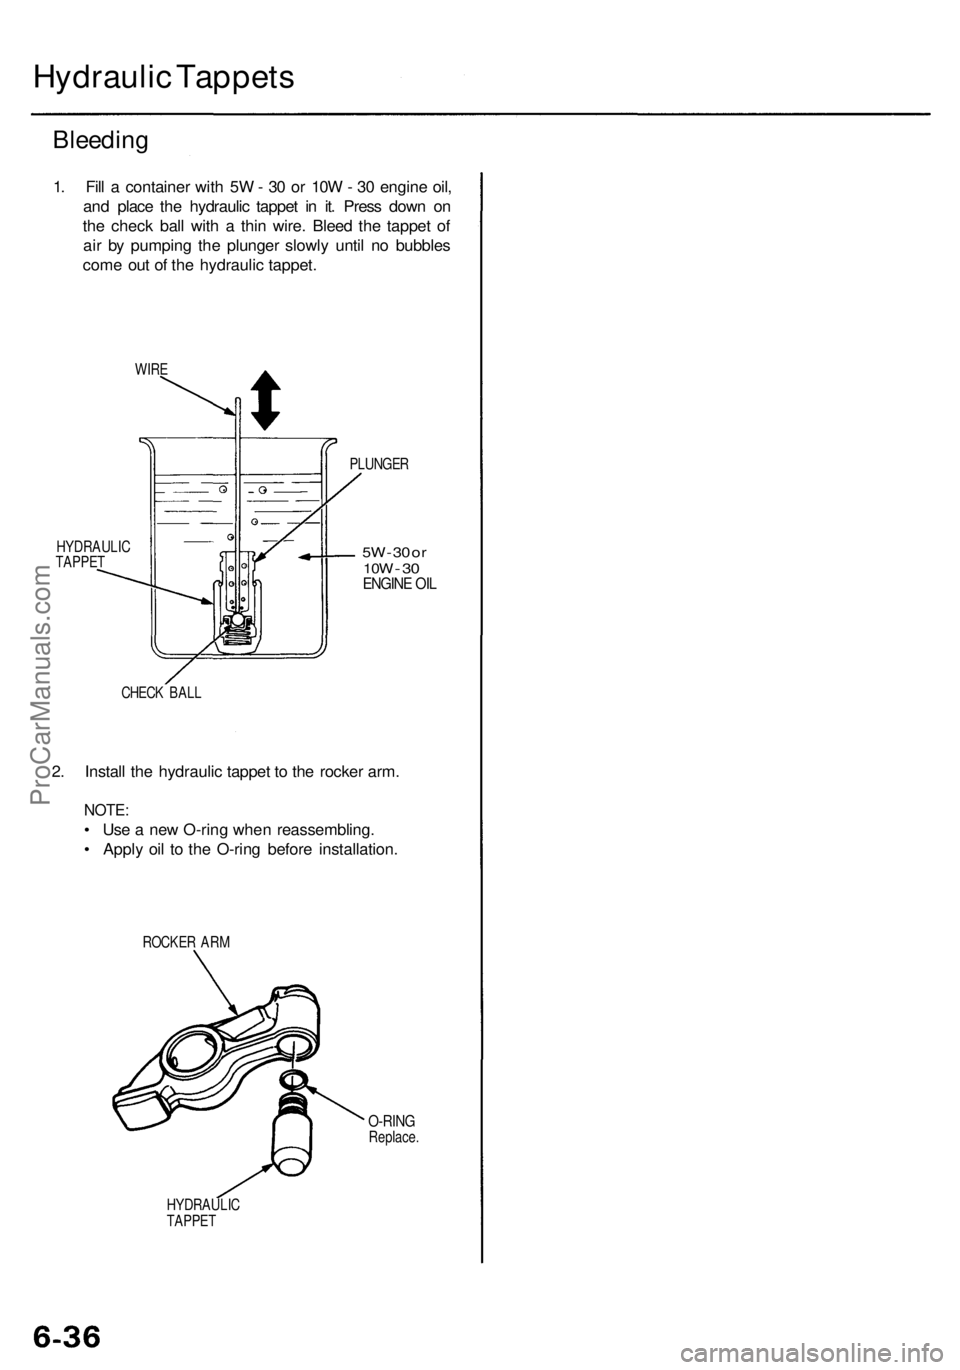
1. Fill a container with 5W - 30 or 10W - 30 engine oil,
and place the hydraulic tappet in it. Press down on
the check ball with a thin wire. Bleed the tappet of
air by pumping the plunger slowly until no bubbles
come out of the hydraulic tappet.
WIRE
HYDRAULIC
TAPPET
PLUNGER
5W
- 30 or
10W
-
30
ENGINE OIL
CHECK BALL
2. Install the hydraulic tappet to the rocker arm.
NOTE:
• Use a new O-ring when reassembling.
• Apply oil to the O-ring before installation.
ROCKER ARM
O-RING
Replace.
HYDRAULIC
TAPPETProCarManuals.com
Page 426 of 1954
Cylinder Heads
Installation (cont'd)
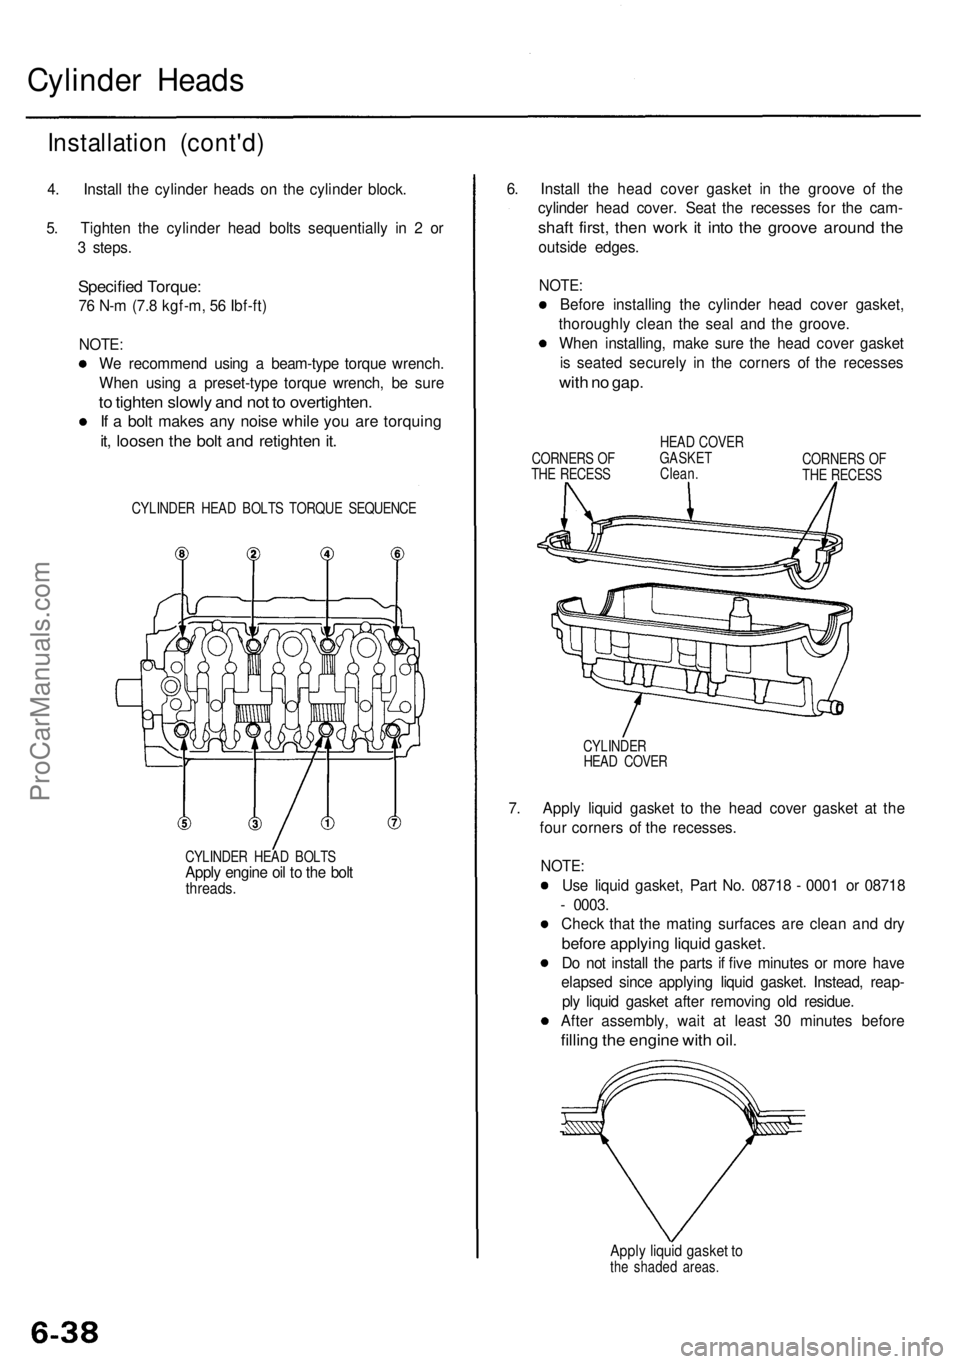
4. Install the cylinder heads on the cylinder block.
5. Tighten the cylinder head bolts sequentially in 2 or
3 steps.
Specified Torque:
76 N-m (7.8 kgf-m, 56 Ibf-ft)
NOTE:
We recommend using a beam-type torque wrench.
When using a preset-type torque wrench, be sure
to tighten slowly and not to overtighten.
If a bolt makes any noise while you are torquing
it, loosen the bolt and retighten it.
CYLINDER HEAD BOLTS TORQUE SEQUENCE
CYLINDER HEAD BOLTS
Apply engine oil to the bolt
threads.
6. Install the head cover gasket in the groove of the
cylinder head cover. Seat the recesses for the cam-
shaft first, then work it into the groove around the
outside edges.
NOTE:
Before installing the cylinder head cover gasket,
thoroughly clean the seal and the groove.
When installing, make sure the head cover gasket
is seated securely in the corners of the recesses
with no gap.
CORNERS OF
THE RECESS
HEAD COVER
GASKET
Clean.
CORNERS OF
THE RECESS
CYLINDER
HEAD COVER
7. Apply liquid gasket to the head cover gasket at the
four corners of the recesses.
NOTE:
Use liquid gasket, Part No. 08718 - 0001 or 08718
- 0003.
Check that the mating surfaces are clean and dry
before applying liquid gasket.
Do not install the parts if five minutes or more have
elapsed since applying liquid gasket. Instead, reap-
ply liquid gasket after removing old residue.
After assembly, wait at least 30 minutes before
filling the engine with oil.
Apply liquid gasket to
the shaded areas.ProCarManuals.com
Page 454 of 1954
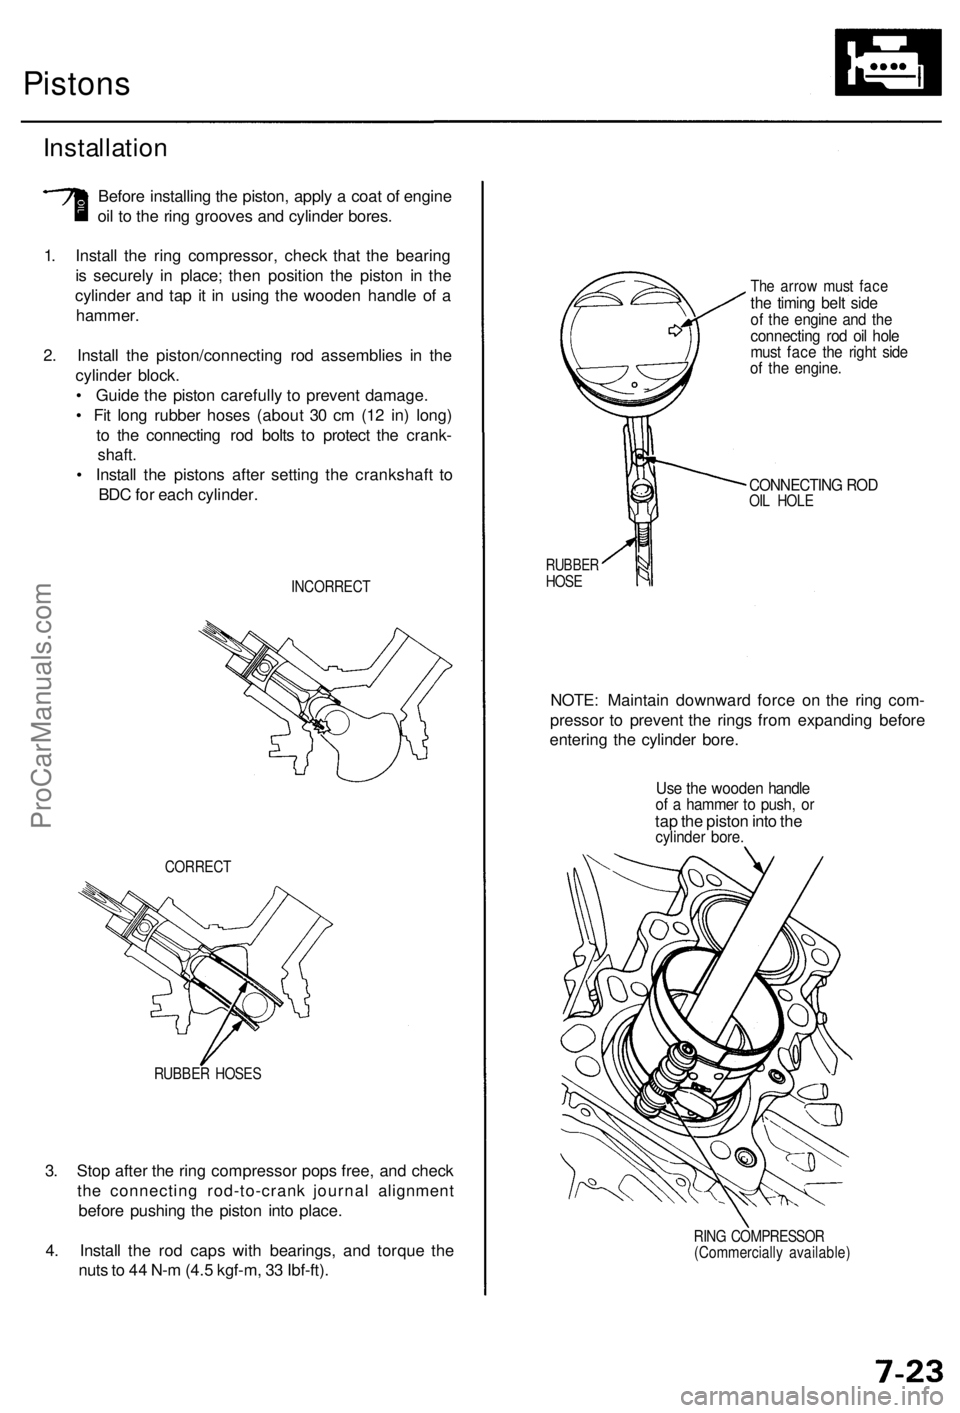
3. Stop after the ring compressor pops free, and check
the connecting rod-to-crank journal alignment
before pushing the piston into place.
4. Install the rod caps with bearings, and torque the
nuts to 44 N-m (4.5 kgf-m, 33 Ibf-ft).
RUBBER HOSES
CORRECT
Pistons
Installation
Before installing the piston, apply a coat of engine
oil to the ring grooves and cylinder bores.
1. Install the ring compressor, check that the bearing
is securely in place; then position the piston in the
cylinder and tap it in using the wooden handle of a
hammer.
2. Install the piston/connecting rod assemblies in the
cylinder block.
• Guide the piston carefully to prevent damage.
• Fit long rubber hoses (about 30 cm (12 in) long)
to the connecting rod bolts to protect the crank-
shaft.
• Install the pistons after setting the crankshaft to
BDC for each cylinder.
INCORRECT
The arrow must face
the timing belt side
of the engine and the
connecting rod oil hole
must face the right side
of the engine.
CONNECTING ROD
OIL HOLE
RUBBER
HOSE
NOTE: Maintain downward force on the ring com-
pressor to prevent the rings from expanding before
entering the cylinder bore.
Use the wooden handle
of a hammer to push, or
tap the piston into the
cylinder bore.
RING COMPRESSOR
(Commercially available)ProCarManuals.com
Page 457 of 1954
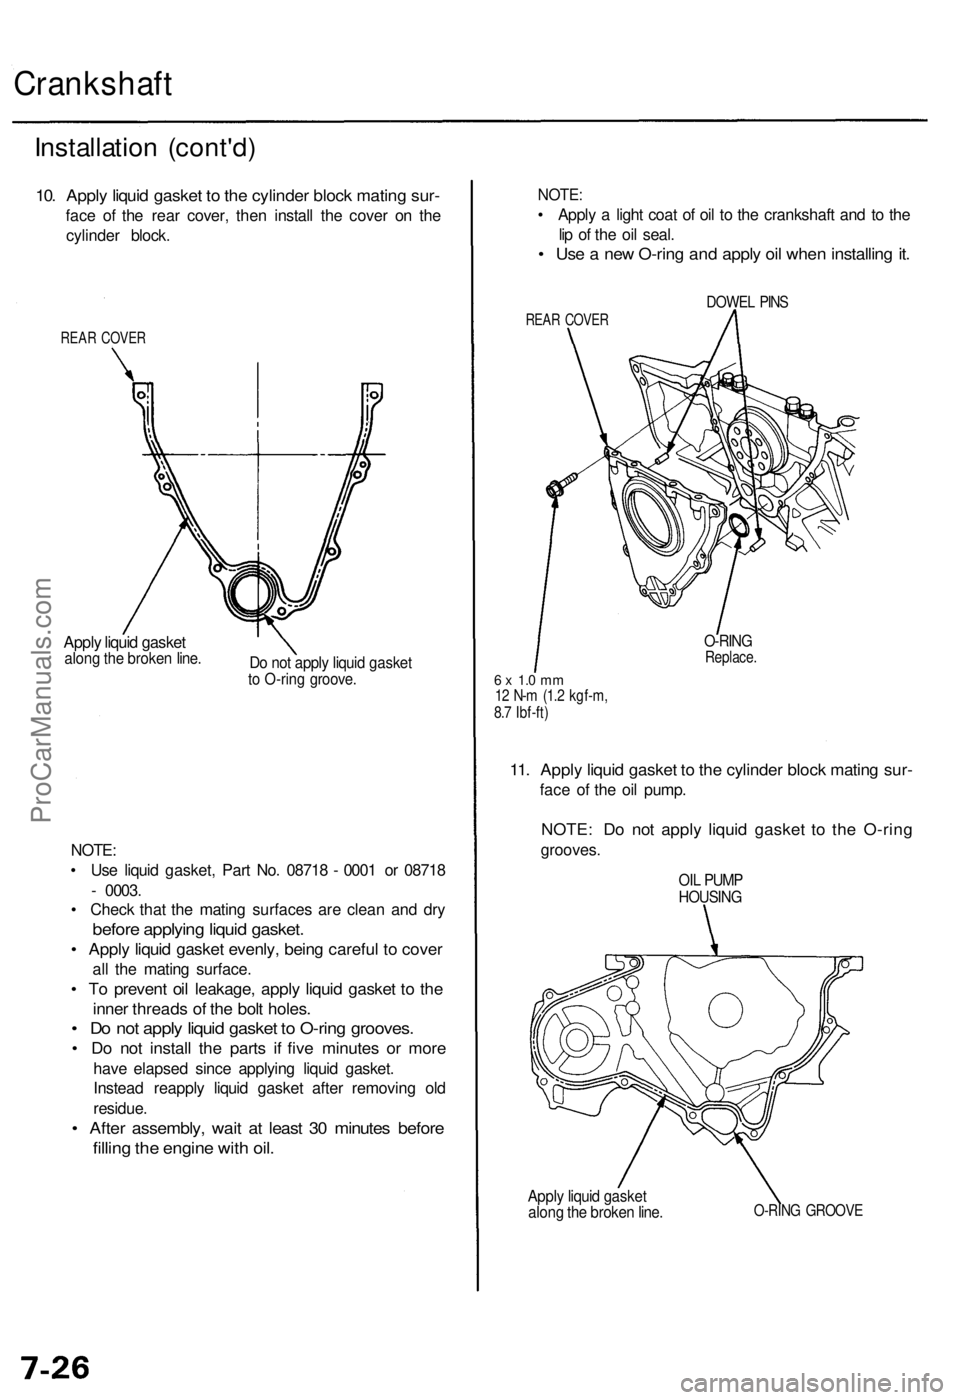
Crankshaft
Installation (cont'd)
10. Apply liquid gasket to the cylinder block mating sur-
face of the rear cover, then install the cover on the
cylinder block.
REAR COVER
Apply liquid gasket
along the broken line.
Do not apply liquid gasket
to O-ring groove.
NOTE:
• Use liquid gasket, Part No. 08718 - 0001 or 08718
- 0003.
• Check that the mating surfaces are clean and dry
before applying liquid gasket.
• Apply liquid gasket evenly, being careful to cover
all the mating surface.
• To prevent oil leakage, apply liquid gasket to the
inner threads of the bolt holes.
• Do not apply liquid gasket to O-ring grooves.
• Do not install the parts if five minutes or more
have elapsed since applying liquid gasket.
Instead reapply liquid gasket after removing old
residue.
• After assembly, wait at least 30 minutes before
filling the engine with oil.
Apply liquid gasket
along the broken line.
O-RING GROOVE
NOTE:
• Apply a light coat of oil to the crankshaft and to the
lip of the oil seal.
• Use a new O-ring and apply oil when installing it.
REAR COVER
DOWEL PINS
6 x 1.0 mm
12 N-m (1.2 kgf-m,
8.7 Ibf-ft)
O-RING
Replace.
11. Apply liquid gasket to the cylinder block mating sur-
face of the oil pump.
NOTE: Do not apply liquid gasket to the O-ring
grooves.
OIL PUMP
HOUSINGProCarManuals.com