AUDI A3 CABRIOLET 2015 Manual PDF
Manufacturer: AUDI, Model Year: 2015, Model line: A3 CABRIOLET, Model: AUDI A3 CABRIOLET 2015Pages: 302, PDF Size: 73.83 MB
Page 71 of 302
....,
N
r--. > co
rl I.O
"' rl
"' rl
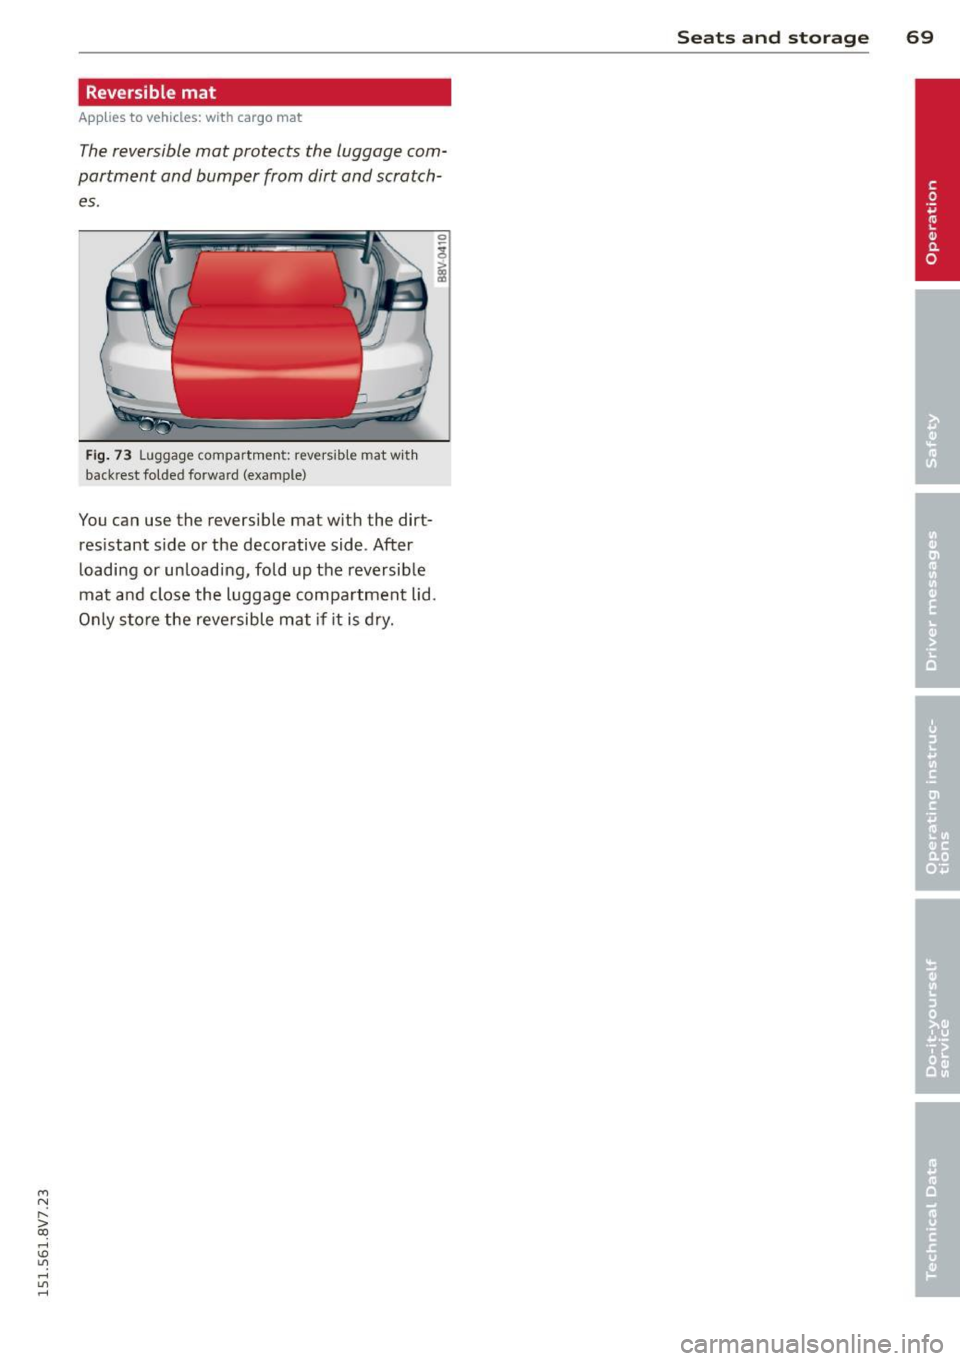
Reversible mat
Applies to vehicles: with cargo mat
The reversible mat protects the luggage com
partment and bumper from dirt and scratch es.
Fig. 73 L uggage compartment: revers ible mat w it h
backres t folded forward (example}
You can use the reversible mat with the dirt
resistant side or the decorative side. After
loading or unloading, fold up the reversible
mat and close the luggage compartment lid.
Only store the reversible mat if it is dry .
Seats and storage 69
Page 72 of 302
70 Warm and cold
Warm and cold Climate control system
Description
Different systems could be installed.
- manual climate control system* or
- automatic climate control system*
The
climate control system* cools and re
moves humidity from the air in the vehicle in
terior. It is the most effective when the win
dows and power top are closed. If there is a
build-up of heat inside the vehicle, ventila tion
can help to speed up the cooling process. Be
cause of this, the windows can be opened
from outside .
~ page 39, Convenience open
ing/closing
Pollutant filter
The pollutant filter removes pollutants such
as dust and pollen from the air .
Key recognition
You can store various settings for the manual
and automatic
climate control system* and
assign them to the key being used .
A WARNING
Poor visibility can lead to accidents.
- For safer driving, keep a ll windows free
of ice, snow and fog.
- Become familiar as quickly as possible
with the correct use and function of the
climate control system, especially with
the defrosting and defogging function .
- When the temperature is below freezing,
only use the windsh ield washer system
after the w indshield has been warmed by the cl
imate control system . The washer
fluid could freeze on the windshield and
impair visibility.
(D Note
- If you suspect that the climate control
system is damaged, switch the system
off to prevent further damage and have
it checked by an authorized Audi dealer
or authorized Audi Service Facility.
- Repairs to the Audi climate control sys
tem require special technical knowledge
and special tools. See an authorized Audi
dealer or authorized Audi Serv ice Facility .
® For the sake of the environment
Reducing the amount of fuel used also re
duces the amount of pollutants that enter
the air.
(D Tips
- To prevent interference with the heating
and cooling output and to prevent the
w indows from fogging over, the air in
take in front of the windshield must be
free of ice, snow or leaves.
- Condensation from the cooling system*
can drip and form a puddle of water un
der the vehicle. This is normal and does
not mean there is a leak.
- T he energy management system may
switch the seat heating* or rear window
defroster off temporari Ly. These systems
are available again as soon as the energy
balance has been restored.
- The flows through the vents under the
rear window. Make sure the openings are
not covered when placing clothing on the
luggage compartment cover.
Page 73 of 302
....,
N
r--. > co
rl I.O
"' rl
"' rl
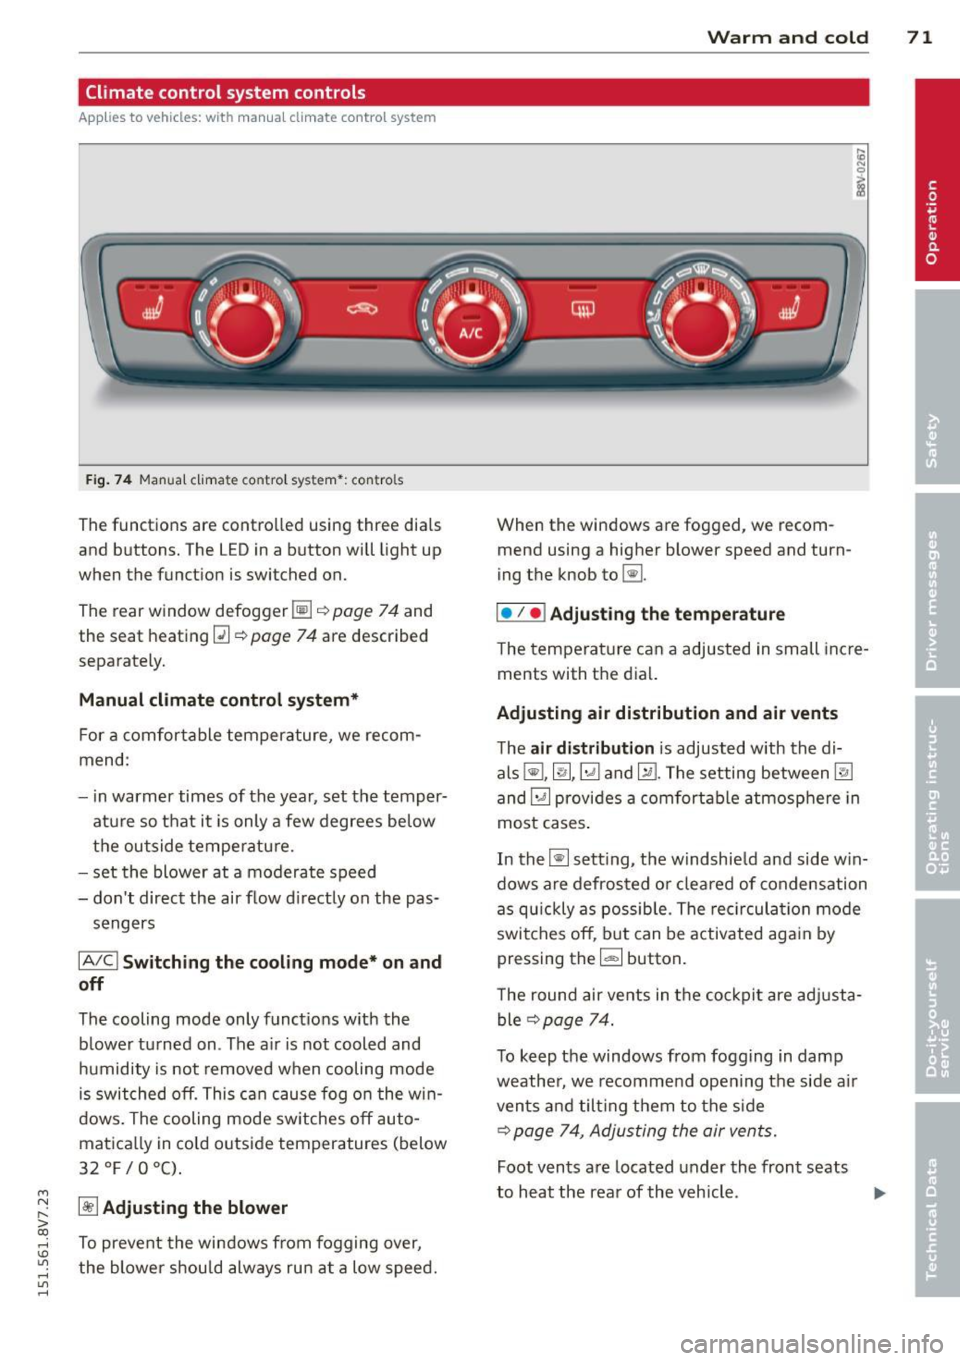
Climate control system controls
App lies to ve hicles: with manu al cl im ate c ontrol syst em
F ig . 7 4 Man ual cl ima te con tro l sy ste m•: con tro ls
The functions are contro lled using three dia ls
and buttons. The L ED in a button will light up
when the function is switched on.
The rear window defogger~¢
page 7 4 and
the seat heating~
c::> page 74 are described
separate ly.
Manual climat e control system*
For a comfortable temperature, we recom
mend :
- in warmer times of the yea r, set the temper
atu re so that it is only a few degrees be low
the outside tempe ratu re.
- set the blower at a moderate speed
- don't direct the air flow d irectly on the pas-
sengers
IA/C l Switching the cooling mode* on and
off
The cooling mode only f unct ions w ith the
b lower turned on . The a ir is not cooled and
h umidity is not removed when cooling mode
i s swit ched off. This c an cause fog o n the w in
dows. The cooling mode sw itches off auto
matica lly in co ld outside temperatures (below
32 °F/0°C) .
~ Adjusting the blower
To prevent the windows from fogging over,
the blower sh ou ld always ru n at a low speed.
W arm and cold 71
When the w indows are fogged , we recom
mend using a h igher blowe r speed and tu rn
ing t he knob to~-
I• I • I Adjusting the temperature
T he tempera ture can a adjusted in small inc re
ments with t he dial.
Adjusting air distribution and air vents
The air di stribution is adjusted with the di
als ~'~ .~ and ~-T he setting between
@J
and~ provides a comf ort abl e atmosphere in
most cases .
In the~ setting, the windshie ld and side w in
dows are defros ted o r cleared of condensation
as q uickly as possib le . The rec ircul ation mode
swi tche s off , bu t can be activated aga in by
pressing the
l d;) I button.
T he round air ve nts in t he coc kpit are adj usta
ble
¢ page 74.
To keep the windows from fogg ing in damp
weathe r, we recomme nd open ing the side a ir
vents and tilt ing them to the s ide
c::> page 7 4, Adjusting the air vents.
Foot vents a re located under the front seats
to h eat the rear of the v eh icle . ...,
Page 74 of 302
7 2 Warm and cold
1- 1 Sw itching r ecircul ation mode on and
off
In recirculation mode, the air inside the vehi
cle is circu lated and filtered. This prevents the
unfiltered air outside the vehicle from enter ing the vehicle inter ior. We recommend
switch ing recirculation mode on when driving
through a tunnel or when sitt ing in traffic
c::> ,& .
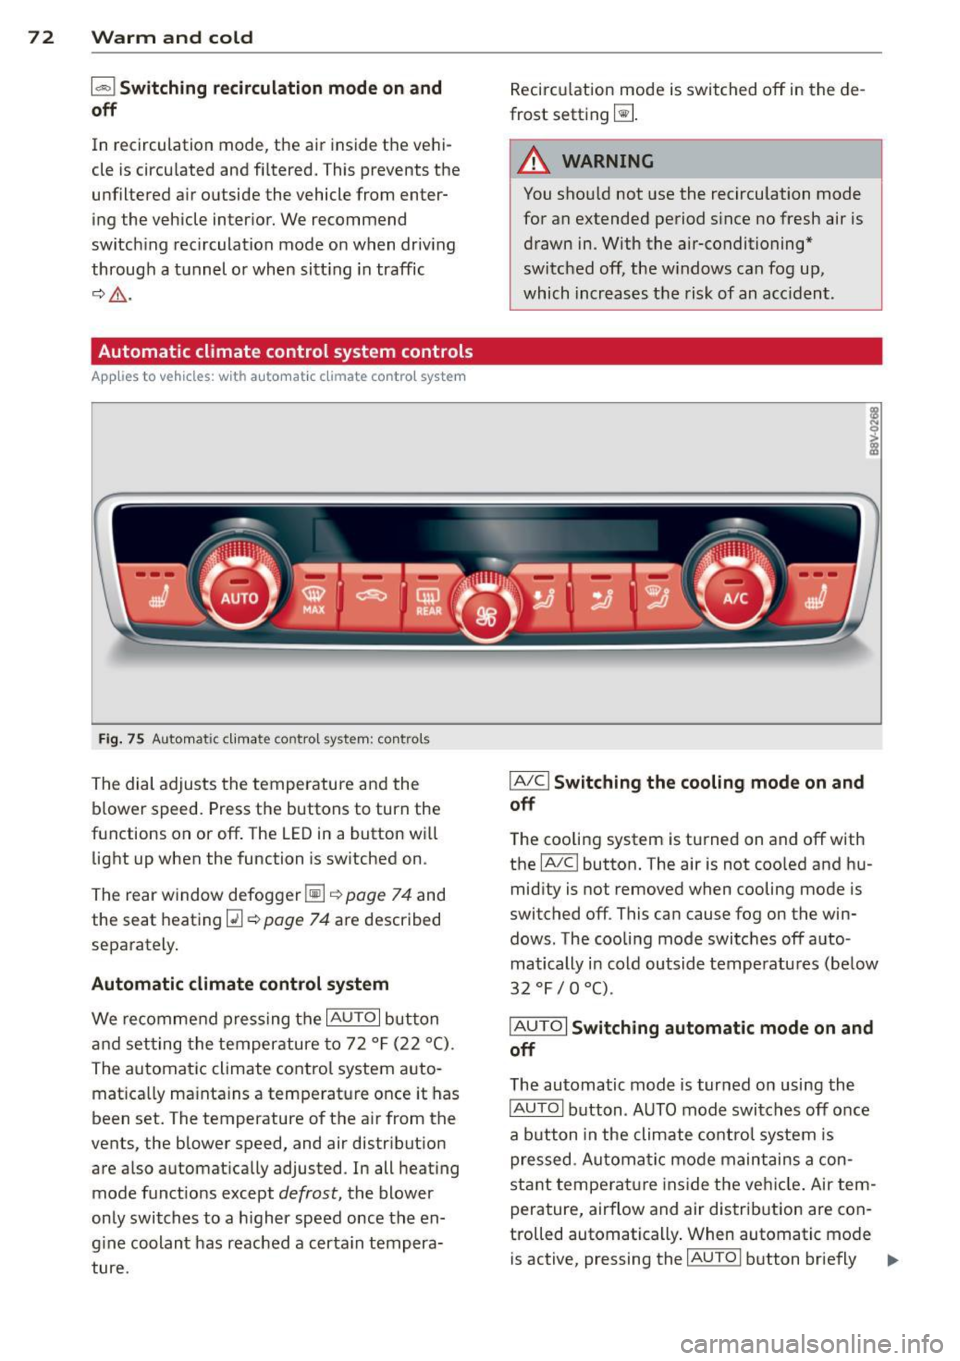
Automatic climate control system controls
App lies to vehicles: with a utomat ic climate contro l system
Fig . 75 A ut oma tic cl ima te co ntro l sy ste m: con trols
The dial adjusts the temperature and the
blower speed. Press the buttons to turn the
functions on or off . T he LED in a button w ill
light up when the function is sw itched on .
The rear window defogger~
c::> page 7 4 and
the seat heating
Q] c::> page 74 are described
separately.
Automatic climate control syst em
We re commend pressing the IAU TO I button
and setting the temperature to 72
°F (22 °() .
The automatic climate control system auto
matica lly ma inta ins a temperature once it has
been set. The temperature of the air from the
vents, the b lower speed, and air distribution
are also automat ically adju sted . In all heat ing
mode funct ions except
defrost, the blower
only switches to a h igher speed once the en
g ine coolant has reached a certa in tempera
ture . Recirculation mode is switched off in the de
frost setting ~-
.&_ WARNING
-You shou ld not use the recirculation mode
for an extended period s ince no fresh air is
drawn in. With the air-conditioning*
switched off, the w indows can fog up,
which increases the risk of an acc ident .
IA/ Cl Switching th e cooling mode on and
off
T he cooling system is turned on and off with
the
IA/C l button. The air is not coo led and hu
mid ity is not removed when cooling mode is
switched off . This can cause fog on the win
dows . The cooli ng mode switches off auto
matically i n cold outside temperatu res (be low
32 °F / 0 °() .
IAUTOI Switch ing automatic mode on and
off
The automatic mode is turned on using the
IAUTOI button . AUTO mode switches off once
a b utton in the climate control system is
pressed. Automatic mode maintains a con
sta nt temperature ins ide the ve hicle . Air tem
perature, airflow and air d istribution are con
trolled automatically . When automatic mode
is active, pressing the
IAU TO I button briefly IJJ,-
Page 75 of 302
M N
" > co ,...., \!) ..,.,
activates the "eco" mode*1>. I n "eco" mode*,
a ll settings are lowered slightly to save fuel.
When in "eco" mode* ,
eco is shown in the dis
play. To ex it "eco" mode*, press the
!AU TO !
button again .
I• I • I S etting the temperatu re
The temperature can be adjusted individually
for the driver and front passenger using the
dials . Temperatu res between 60 °F (+16 °C)
and 84 °F (+28 °C) can be set . Outs ide of this
range,
Lo or Hi will appear in the climate con
trol system display. In both settings, the cli mate control runs with constantly at the max
i mum cooling or heating level. The tempera
ture is not regu lated.
Syn chroni zation: By pressing the !AU TO I but
ton for two seconds , the temperat ure setting
for the driver is transferred to the front pas
senger's side. This applies a temperature
change to the front passenger's side.
~ Adjusting the blower
To prevent the windows from fogging over,
the blower shou ld always run at a low speed.
You ca n adj ust the volume of air generated by
the blower to you r preference. To have the
b lower regu la ted automatically, press the
!AU TO! button.
Adjusting th e air d istribution
The a ir distribution is adjusted with the~, [Ml
and ~ buttons. To have the air d istr ibut io n
r eg ulated automatically, press the
!AUTO ! but
ton .
The ro und air vents in the cockpit are adjusta
b le
~ page 74.
To keep the w indows from fogging in damp
weather, we recommend opening the side air
vents and t ilting them to the side
~ page 7 4, Adjusting the air vents.
Foot vents are located under the front seats
and adjustable vents on the end of the center
console to heat the rear of the vehicle.
,....,
"' l) This func tio n is not ava ilable in a ll coun tri es . ,....,
Warm and c old 73
~ Switching th e defro ster on and off
T he w indshield and side windows are defrost
ed or cleared of condensation as quickly as
poss ible . The maximum amount of air flows
main ly from the vents below the windshield.
Recircu lation mode switches off. The tempera
ture is controlled automatically. In the
[i] set
ting, the
! AIC ! cooling mode sw itches on auto
matically, depending on the outside air tem
perature .
The
! AU TO ! button sw itches the defroster off.
l""'I Sw itching recirculation mode on and
off
The recircu lation mode can be turned on man
ually or automatically* .
- Switching manual recirculation mode on and
off: Press the~ button. The LED light up
when switched on.
- Automatic* recircu lation mode: The recircu
lation mode must be activated in the MMI.
Select: the
I MENU I button >C ar> Sys tems *
contro l bu tton> A C> Auto recirculat ion .
The a ir quality sensor that is des igned for
diesel and gasoline exhaust automatically
sw itches the rec irculat ion mode on or off
depending on the leve l of po llutants in the
outs ide air .
In recirculation mode, the air inside the vehi
cle is circulated and filtered . This prevents the
unfiltered air outs ide the veh icle from e nter
ing the vehi cle interior. We recommend
switching recircu lation mode on when driving
th rough a tunne l or when sitting in traffic
~ .&. .
The 1- 1 button, IAU TO ! or the [i] bu tton
switches rec irculation mode off.
The system switches to recirculation mode
whe n driving in reve rse when the engine is
cold.
•
Page 76 of 302
7 4 Warm and cold
& WARNING
You should not use the rec irculation mode
for an extended per iod since no fresh air is
drawn in . With the ai r-conditioning switch
ed off, the windows can fog up, which in
c reases t he risk of an ac cident.
Adjusting the air vents
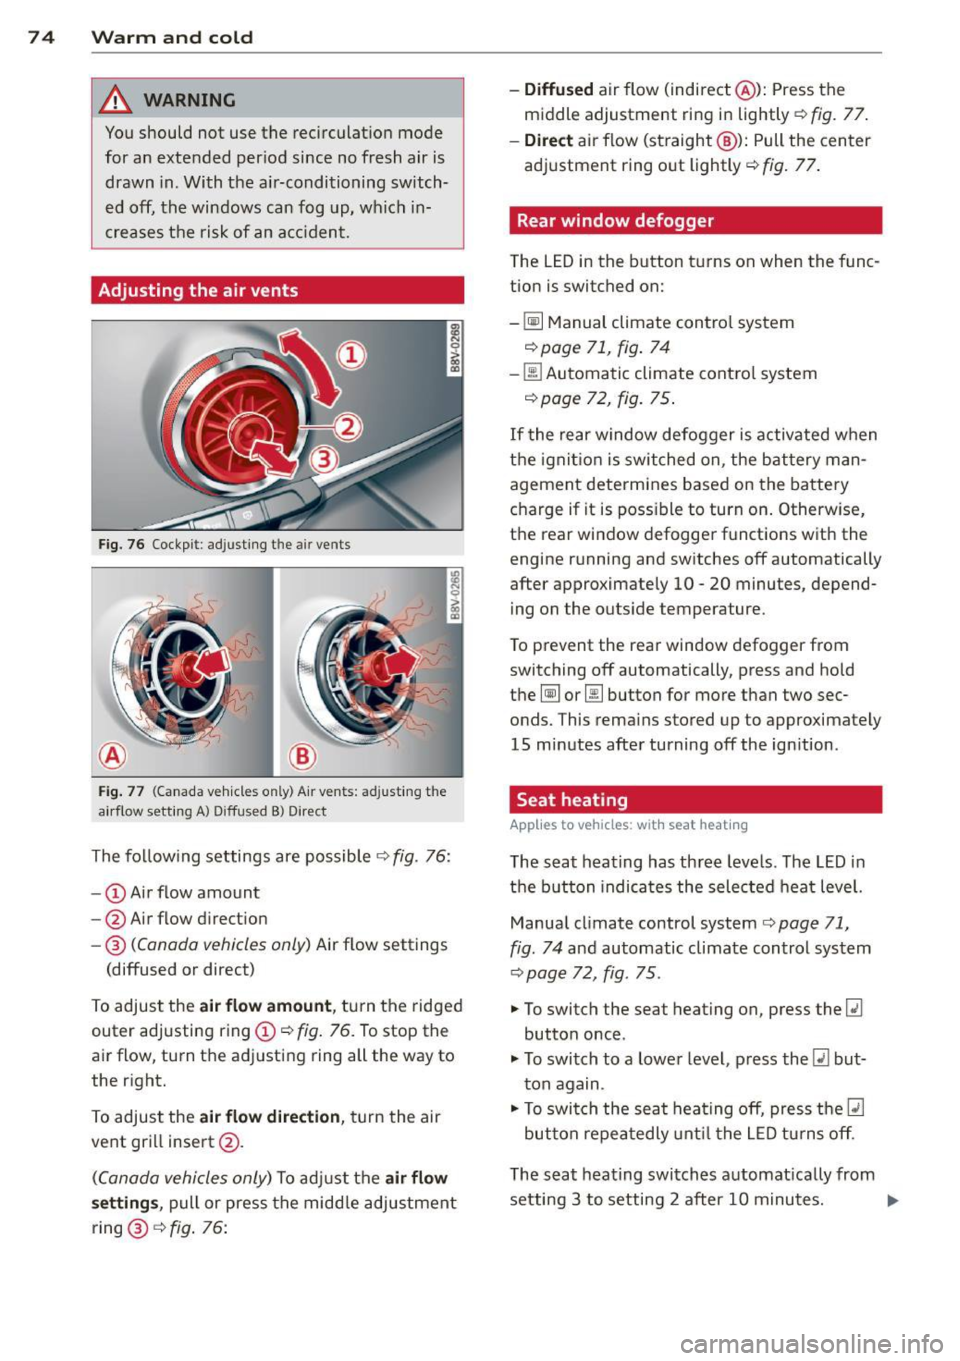
Fig. 76 Cockp it : adjust ing the a ir vents
®
Fi g. 77 (Canada ve hicles o nly) A ir ve nts : ad just ing t he
a irflow sett ing A ) D iffused B ) Direct
The fo llow ing settings are possible ¢ fig. 76:
- © Airflow amount
- @ Air flow d irect ion
- @
(Canada vehicles only) Air f low settings
(diffused or direct)
To adjust the
air flow amount , tu rn the ridged
outer adj usting ring©
c::> fig. 76. To stop the
air flow, turn t he adjusting ring all the way to
the right.
To adjust the
air flow direction , turn the air
ve nt gri ll insert @.
(C anada vehicles only) To ad just the air flow
setting s,
pull or press the midd le adjustment
ring @¢
fig. 76:
-Diffused air flow (indirect @): Press the
middle adjustment ri ng in lightly
c::> fig. 77 .
-Direct air f low (st raight @): Pull the center
ad justment ring o ut lightly ¢
fig. 77.
Rear window defogger
The LED in the button t urns on when the func
tion is switched on:
-
~ M anual climate contro l system
c::> page 71, fig . 74
-00 Automatic climate contro l system
¢ page 72, fig . 75 .
If the rear w indow defogger is activated w hen
t h e igni tion is switched on, the bat tery man
agement determines based on the battery
c h arge if i t is poss ible to turn on . Otherw ise,
the rear window defogge r funct ions w it h the
engine running and switches off automatically
after approximately 10 -20 minutes, depend
i ng on the outs ide temperature .
T o p revent the rear window defogger f rom
switching off automatically, press and hold
t h e
@ii or 00 button for more than two sec
onds. This rema ins stored up to approxima tely
15 minutes afte r turning off the ign ition .
Seat heating
Applies to veh icles : w it h seat heat ing
The seat heating has th ree leve ls. The LED in
the b utt on indica tes the sele cted heat leve l.
Manua l climate control system
c::> page 71,
fig . 74
and automatic climate control system
c::> page 72, fig . 75 .
"'To switch the seat heating on, press the lt:J
button once .
"' To swi tch to a lower level , press the
lt:I but
ton again .
"' To swi tch the sea t heating off, press the
lt:J
but ton re peat edly unt il t he L ED turns off .
T he seat heating swi tches a utomat ica lly from
setting 3 to setting 2 after 10 minutes.
Iii>
Page 77 of 302
M N ,....
> co ,...., \!) 1.1'1 ,...., 1.1'1 ,....,
When seat heating should not be
sw itch ed on
Do not turn the seat heating on under the fol
l owing circumstances:
- T he seat is unoccupied.
- T he seat is covered w ith a seat cover.
- The seat is covered w ith a ch ild seat .
- The seat is damp or wet .
A WARNING
Individuals with reduced sensitivity to pain
or temperatu re could develop burns when
using the seat heating function. To reduce
t he risk of inju ry, these individ uals should
not use seat heating.
(D Note
To avo id damage to the heating elements
in the seats, do not kneel on the seats or
p lace heavy loads on a small area of the
seat.
(D Tips
- The se tti ng fo r the seat heating on the
driver's side is assigned to the key that is
1 n use .
- If the fron t passenger's seat heating is
turned on, it will not turn on again auto
ma tically if more than
1 0 minutes have
passed between switching the ignition
off and switching it on aga in.
Warm and c old 75
•
Page 78 of 302
76 Driving
Driving
Steering
Adjusting the steering wheel position
The steering wheel position is fully adjustable
up and down and forward and bock .
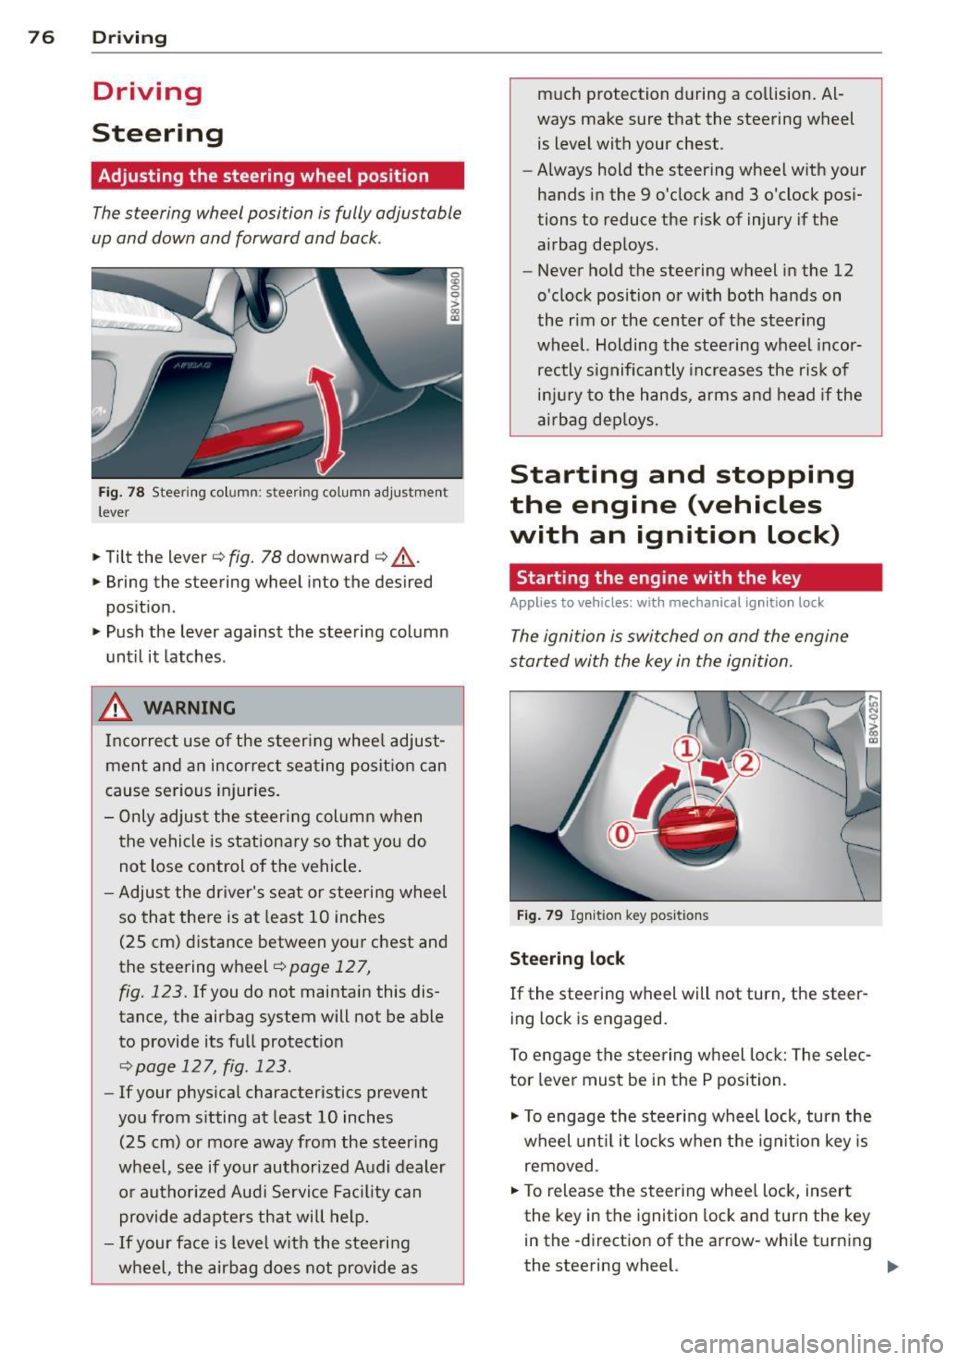
Fig. 78 Steering column: stee ring column adjustmen t
lever
.. Tilt the lever ¢ fig. 78 downward ¢ &_.
.. Bring the steering wheel into the desired
position .
.. Push the lever against the steering column
until it latches .
_& WARNING
Incorrect use of the steer ing whee l adjust
ment and an incorrect seating position can
cause serious injuries.
- Only adjust the steering column when
the vehicle is stationary so that you do
not Lose control of the vehicle.
- Adjust the driver's seat or steering wheel
so that there is at least 10 inches
(25 cm) distance between your chest and
the steering wheel
r=.> page 12 7,
fig. 123. If you do not maintain this dis
tance, the airbag system will not be able
to provide its full protection
<=> page 127, fig. 123.
- If your physical characteristics prevent
you from sitting at least 10 inches
(25 cm) or more away from the steering
wheel, see if your authorized Audi dealer or authorized Audi Service Fac ility can
provide adapters that will help.
- If your face is level with the steering
wheel, the airbag does not provide as much protection during a collision. Al
ways make sure that the steering wheel
is level with your chest .
- Always hold the steering wheel with your
hands in the 9 o'clock and 3 o'clock posi
tions to reduce the risk of injury if the
airbag deploys.
- Never hold the steering wheel in the 12
o'clock position or with both hands on
the rim or the center of the steering
wheel. Holding the steering wheel incor
rectly significantly increases the r isk of
injury to the hands, arms and head if the
airbag deploys.
Starting and stopping
the engine (vehicles
with an ignition lock)
Starting the engine with the key
Applies to vehicles: wit h mechanical ignition loc k
The ignition is switched on and the engine
started with the key in the ignition.
Fig. 79 Ignit ion key positions
Steering lock
If the steering wheel will not turn, the steer
ing lock is engaged.
To engage the steering wheel Lock: The selec
tor lever must be in the P position.
"' To engage the steering wheel lock, turn the
wheel until it locks when the ignition key is
removed .
"' To release the steering wheel Lock, insert
the key in the ignition lock and turn the key
in the -direction of the arrow-whi le turning
the steering wheel. ""
Page 79 of 302
M N ,....
> co ,...., \!) 1.1'1 ,...., 1.1'1 ,....,
Switchin g th e ig nition on /off
"'T o sw itch the ignition on, turn the ignition
key to position
(D .
"'To switch the ignition off, turn the ignition
key to position @.
Starting the engin e
Your vehicle is equipped w ith launch cont ro l.
As soon as you have turned the ign ition key to
position @, the engine will start automatical
l y.
"' Press the brake peda l and move the se lector
lever to the P or N pos it ion.
"'T urn the key briefly to position @. The igni
t ion key automatically r eturns to posit ion
(D . Do not press the accelerator pedal wh en
doing this .
Major electrical equipment switches off tem
porarily when starting the eng ine.
If the engine does not sta rt immedia tely , stop
the starting procedure by turning the ignition key to position @and repeat after 30 sec
onds .
Automatic start m alfunction
If the ~ indicator l ight turns on (gasoline en
g ine) and the message
Engin e start sys te m
m alfu nction. Ple ase contac t Se rvice
appears ,
there is an automatic start ma lfunction.
To start t he eng ine, hold the ignition key in
position @until the engine runs .
Drive to an authorized Aud i dealer or author
ized Audi Service Facility immed iate ly to have
the ma lfunction corrected .
_& WARNING
-Never allow the engine to run in confined
spaces -there is a risk o f asphyxiation.
- Never remove the ign ition key from the
ignition lock whi le the vehicle is moving .
Otherw ise the steering lock wi ll engage
and you will not be able to steer the vehi
cle.
- Please note that the brake booster and
power steering only work when the en-
Dri vin g 77
gine is running. When the engine off, you
must use more force to steer or brake
the vehicle. Because the usual steering
and brak ing capability is not avai lab le,
the risk of accidents or injur ies increases.
- Always take the vehicle key with you
when leaving the vehicle, even for a
short period of time. This applies part ic
ularly when children remain in the veh i
cle. Otherwise the ch ild ren could start
the engine or operate electrical equip
men t such as power w indows.
(D Note
- Avo id h igh engine speed, full throttle,
and heavy eng ine load as long as the en
gine has no t reached operat ing tempera
t u re yet . You could damage the engine.
- T he engine cannot be started by pushi ng
or towing.
(® For the sake of the environment
Do not let the eng ine run w hile pa rked to
warm u p. Begin driv ing immediately . T his
r educes unne cessary emissions.
(D Tips
- If it is d iff icult to turn the key to position
(D , turn the steering wheel back and
forth slightly to release the s teer ing
wheel lock .
- After s tarting a cold engine, there may
be a brief period of inc reased no ise be
cause the oil press ure must first bui ld up
in the hydraulic va lve adj usters . This is
normal and not a cause for concern.
- If the battery is disconnected and recon
nected, you have to hold the ignition key
in posit ion
(D for five seconds for the en
gine to start.
- After sw itching the ignition off, you can
only remove the key when the selector
lever is in the "P" (Park) position. After
that, the selector lever is locked.
•
Page 80 of 302
78 Driving
Stopping the engine with the key
A pplies to vehicles: with mechanical ignit ion lock
Stopp ing the engine
> Bring the vehicle to a ful l stop .
> Turn the key to position @.
Rele asing the steering lock
Requirement : The selector lever must be in
the P pos ition .
> Remove the ignit ion key in position @
Q page 78, fig. 80 Q _&.
> Turn the steering wheel until you hear the
stee ring wheel lock.
The locked steering helps prevent vehicle
theft.
A WARNING
- Never turn off the eng ine before the ve
hicle has come to a complete stop . The
full function of the brake booster and the powe r steering is not guaranteed. You
must use more fo rce to turn or brake, if
necessary. Because you cannot steer and
brake as you usually would, this could
lead to acc idents and se rious injuries.
- Never remove the ign ition key from the
ign ition lock whi le the vehicle is movi ng .
Otherwise, the steering lock co uld sud
denly engage and you would not be able
to steer the vehicle.
- Please note that the brake booster and
power steering only work when the en
gine is runn ing. When the engine off, you
must use more force to steer or brake
the vehicle. Because t he usual steering
and braking capability is not available,
the risk of accidents or injuries increases .
- Always take the vehicle key with you
when leaving the veh icle, even for a
short per iod of time. This applies partic
ularly when chi ldren remain in the vehi
cle. Otherwise the children could start
the engine or operate electrical equip
ment such as power windows .
- For safety reasons, always park the vehi
cle with the selector lever in the P posi- tion. Otherwise, there is the risk t
hat the
veh icle could roll.
- After the engine has been switched off,
the radiator fan can continue to run for
up to 10 minutes -even with the ignition
sw itched off. It can also sw itch on again
after some t ime if the coolant tempera
ture rises as a resu lt of heat buildup or if
the engine compartment is heated by
sunlight and the engine is hot.
(D Note
- If the engine has been under heavy load
for an extended per iod of t i me, heat
builds up in the engine compartment af
ter the engine is switched off - there is a
r isk of damaging the engine . For this
reason, let the engine r un for at id le for
approximately two minutes before shut
ting it off .
Starting and stopping
the engine (vehicles
with a convenience key)
St t· th · ith the
button
Appl ies to vehicles: wit h co nvenience key
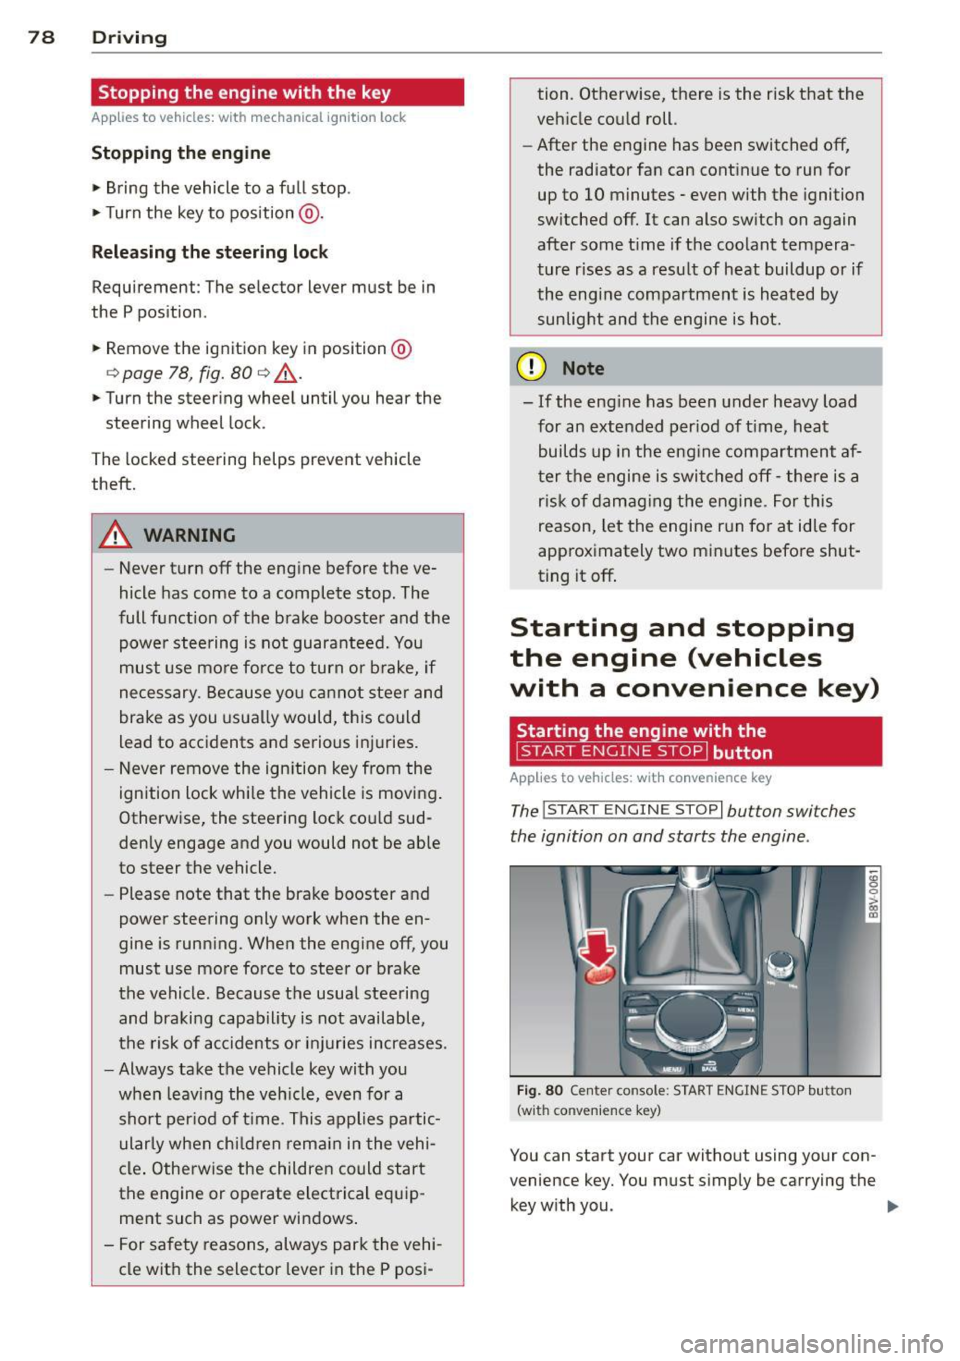
The !START E NGIN E STOPI button switches
the ignition on and starts the engine .
Fig. 80 Center conso le: STAR T ENGIN E STOP bu tton
(w ith co nvenie nce key)
You can start your car without using your con
venience key. You must s imply be carrying the
key with you. .,._