AUDI Q5 2015 Owners Manual
Manufacturer: AUDI, Model Year: 2015, Model line: Q5, Model: AUDI Q5 2015Pages: 302, PDF Size: 75.01 MB
Page 131 of 302

M N
co ~ co
rl I.O
"' N
"' rl
Parking system
Parking system plus with
• rearv1ew camera
Introduction
Appl ies to vehicles: with Audi park in g system p lus w ith rea r·
vi ew ca mera
I
u
Fig. 141 Parking mode 1: Back ing into a parking space
Fig. 1 42 Pa rking mode 2: paral lel park ing
Vehicles w ith the Audi parking system p lus with
rearv iew camera are equ ipped w ith a
r e ar vie w
c amera
in addition to the acoust ic and visual
parking system .
You ca n choose between parking modes to help
you when parking your vehicle. Use "parking mode 1" when park ing in a pa rking space or ga
rage
~ fig. 141. If you are go ing to be para llel
pa rking, use "parking mode 2"
i=:;fig. 142.
Par king system
General Information
App lies to vehic les : with Audi parking sys te m plus with rear
vi ew camera
Fi g. 14 3 Area covered © and area not covered @by t he
r ea rvi ew came ra.
F ig. 144 Rea r lid: Locat ion of t he rearview came ra
Sensors in the bumper
"'
~ a: (0 m
ci: (0 m
Sensors are located in the front and rear bump
ers. If these detect an obstacle, audible and visu
al signals wa rn you. The ra nge at wh ich the sen
sors begin to measu re is app rox ima tely:
side 3
ft (0
.90 m)
front center 4
ft (1.20 m)
side 2
ft (0.60 m)
rear center 5.2 ft (1.60 m)
The close r you get to the obstacle, the shorte r
the interval between the aud ible signals . A con
t inuous tone sounds when the ob stacle is less
than approximate ly 1 foot (0 .30 meters) away.
Do not continue driving farther.
If the distance to an obstacle rema ins constant,
t h e volume of the dista nce warn ing gradually
drops after about fo ur seconds (this does no t ap-
ply in the contin uo us tone range) . .,,_
129
Page 132 of 302
Parkin g sys tem
Rearview camera cover age area
The MM I disp lay shows the area cove red by the
rearview camera
c::> fig . 143 (D. Objects that are
not in the area covered @are not shown on the
MMI disp lay.
We recommend that yo u practice par king with
the rearview camera in a traffic-free location o r
parking lot to become familiar with the system,
the orientation lines, and their f unction . When
doing this, there should be good light and weath
er cond itions.
I n the MMI disp lay, objects or vehicles appear
closer o r further away if:
- yo u are driving in reverse gear from a level su r
face onto an incl ine, or a downward slope,
- you are driving in reverse gear toward protrud
ing obje cts,
- the ve hicl e i s ca rrying too much load in the
rear.
The accuracy of the or ientat ion lines and blue
surfac es dimin ishes if:
- the rearv iew camera does not provide a reliab le
image, for examp le, in poor visibility cond itions
or if the lens is d irty,
- the image on the screen is not visible due to
su n g la re and reflect ion .
Caring for the rearview camera lens
The rearview camera is located above the rear li
cense plate bracket. For the parking system to
operate, the lens
c::> fig. 144 must be kept clean:
- Dampen the lens with a house ho ld alcoho l-
based glass cleaner, and then wipe the lens
clean with a dry cloth
c::> Q) .
-Remove snow with a hand brush and ice pref
erably with a de- ic ing spray
c::> Q).
A WARNING
-The parking system ca nnot rep lace the driv
er's attenti on . T he d rive r alone is responsi
ble fo r parki ng a nd s imilar dr iv ing ma neu
vers.
- Senso rs have b lind spots in which objects
cannot be detected . Pay special atte ntion to
130
sma ll children and an imals beca use the sen
sors cannot always detect them.
- Always keep your eyes on the vehicle 's s ur
round ings, using the rearview mirror as
wel l.
- Do not allow yourself to be distracted from
traffic by the rearview camera pict ures.
- If the position and t he installation angle of
the camera has changed, for e xamp le, after
a rear end collision, do not continue to use
the system for safety reaso ns. Have it
checked by a qualified dealersh ip.
(D Note
- Low obstacles a lready s ignaled by a warn ing
can disappear from the system's detection
range as they are approached and w ill n ot
cont in ue to be signaled. Objects such as
bar rier cha ins, trailer draw ba rs, thi n pa int
ed vert ica l poles or fences may not be de
t e cted by the system, posi ng ris k of dam
a ge.
- N ever use wa rm o r hot wate r to remove
s now or ice from the rea rv iew came ra lens ·
t h is could cause the lens to crac k!
- Whe n cleani ng the len s, neve r use produ cts
th at ar e abra s ive.
Page 133 of 302
M N
co ~ co
rl I.O
"' N
"' rl
Switching on and off
Applies to vehicles: with Audi parking system p lus w ith rear
view came ra
The reorview camera switches on automatically
together with the acoustic and visual park assist
when you put the vehicle in reverse.
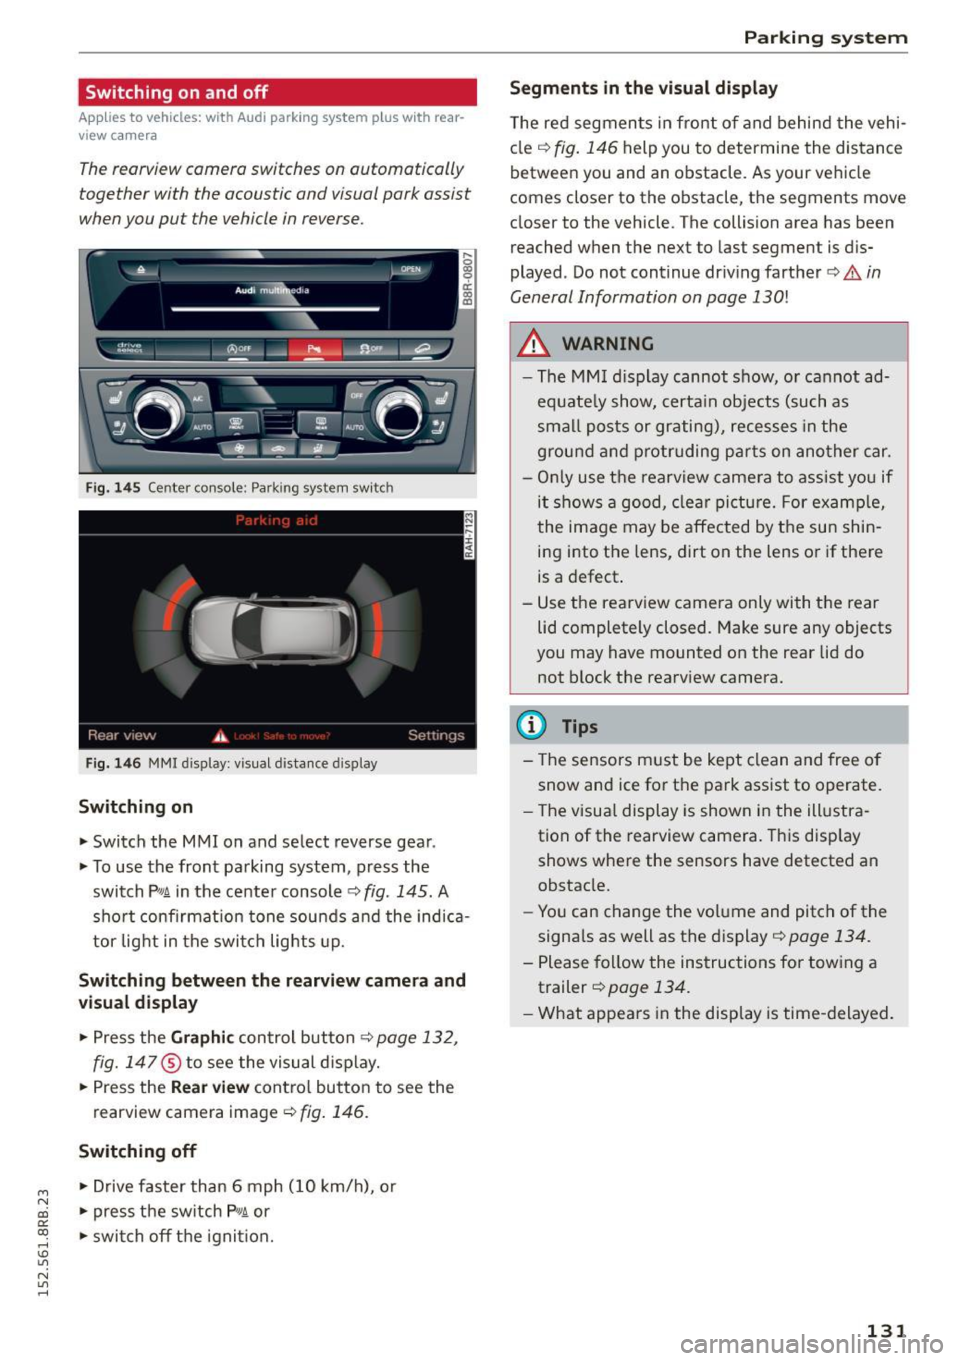
Fig. 145 Center console: Parking system switch
Fig. 1 46 MMI display: visual dista nce display
Switching on
.. Switch the MMI on and select reverse gea r.
.. To use the front parking system, press the
switch
P' "A in the center console c::> fig . 145. A
sho rt confirmat ion tone sou nds a nd the indica
tor light in the switc h lights up.
Switching betwe en th e re arview camera and
v is ual display
.. Press the Gr aphic control button c::> page 132,
fig. 147
® to see the visual d isplay .
.. Press the
Rear view cont ro l button to see the
rearview camera image
c::> fig . 146 .
Switching off
.. Drive faster than 6 mph ( 10 km/h), or
.. press the sw itch P
11JA or
.. swi tch off the ignit ion.
Par king system
Segm ents in th e vi sual display
T he red segmen ts in front of and behind the vehi
cle
c::> fig. 146 help you to determine the distance
between you and an obstacle. As your vehicle
comes closer to the obstacle, the segments move
closer to the vehicle. The collision area has been
reached when the next to last segment is dis
played. Do not continue dr iv ing farther ¢.&.
in
General Information on page 130!
A WARNING
--The MM I display cannot show, or cannot ad-
equate ly show, certa in objects (such as
smal l posts or grating), reces ses in the
ground a nd protr uding p arts on ano ther car.
- Only use t he rearview came ra to ass ist you if
it shows a good, clear picture. For examp le,
the image may be affected by the su n shin
ing into the lens, dirt on the lens or if there
is a defect.
- Use the rearv iew camera only with the rear
lid completely closed. Make sure any objects
you may have mounted on the rear lid do
not block the rearview camera.
(D Tips
-The sensors m ust be kept clean and free o f
snow and ice for t he park assist to operate.
- The visua l display is shown in the ill ustra
tion of the rearview camera. This disp lay
shows whe re the sensors have detected an
obstacle.
- Yo u can change the volume and pitch of the
signa ls as well as the display ¢
page 134.
-Please fo llow the instruc tions for tow ing a
trailer ¢
page 134.
-What appears in the disp lay is time -delayed .
131
Page 134 of 302
Parking syste m
Reverse Parking
App lies to veh icles: w ith Audi park ing system p lus w ith rear
view ca mera
Parking mode 1 can be used when parking in a
garage or into a parking space.
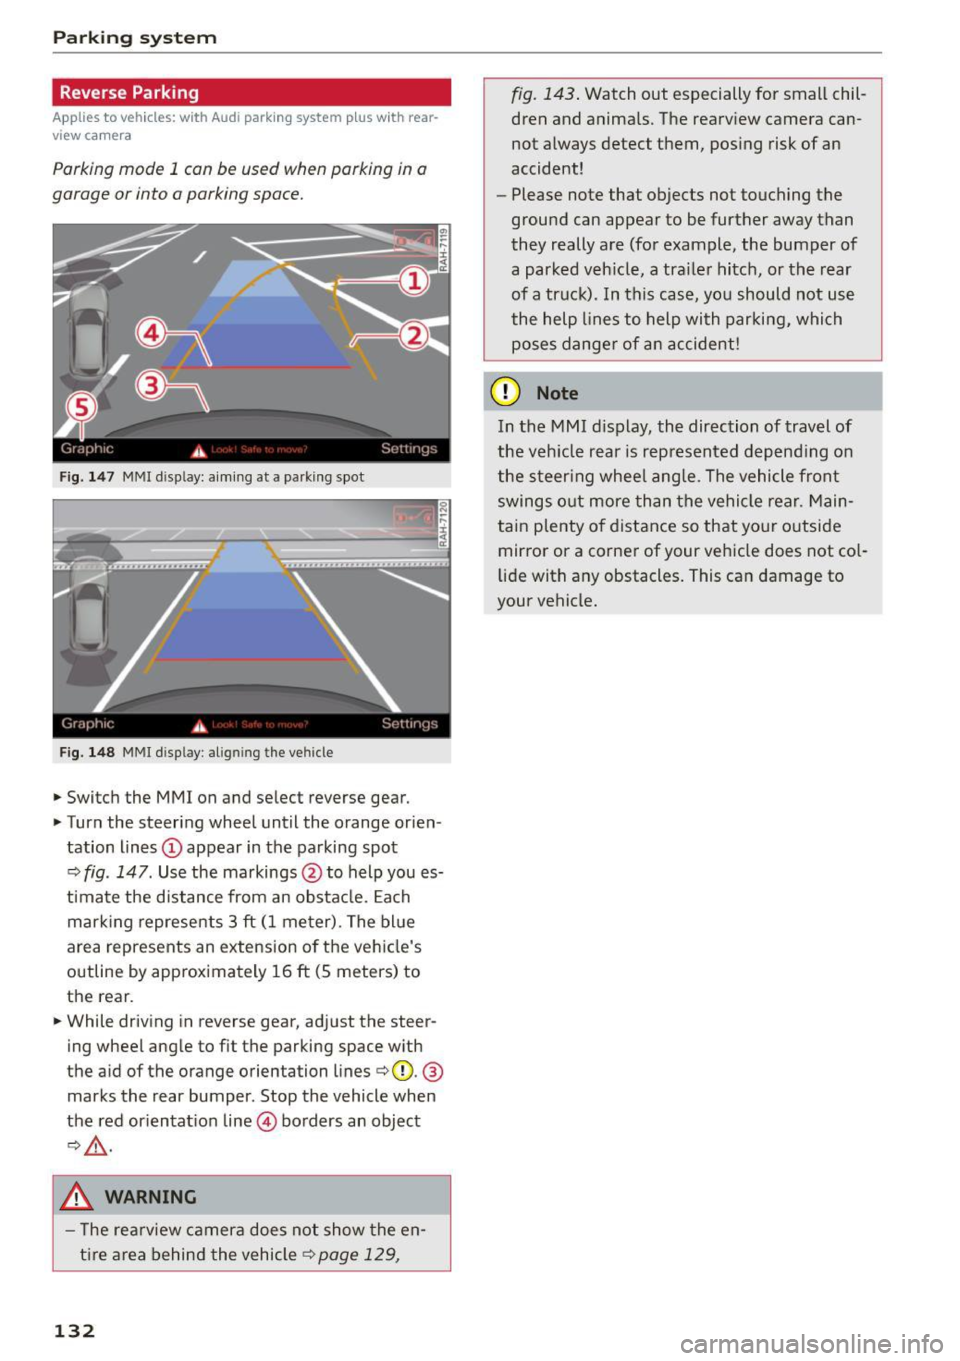
Fig. 147 MMI display: aiming at a parking spot
Fig. 148 MMI d isplay: align ing the vehicle
.,. Switch the MMI on and select reverse gear .
.,. Turn the steering wheel until the orange orien
tation lines
(D appear in the parking spot
c::> fig. 147. Use the markings @to help you es
t imate the d istance from an obsta cle. Each
mar king represents 3
ft (1 meter). The bl ue
area represents an extension o f the ve hicle's
outline by approximately 16
ft (5 meters) to
the rear .
.,. While driving in reverse gear, adjust the steer
ing wheel angle to fit the parking space with
the aid of the orange orientation lines
c::>@. @
marks the rear bumper. Stop the vehicle when
the red or ientat ion line @ borders an object
c::>,&. .
.&_ WARNING
- T he re arview camera does not show the en
t i re area behind the vehicle
c::> page 129,
132
fig. 143 . Watch out especially for small chil
dren and anima ls. The rearview camera can
not always detect them, posing risk of an
accident!
- Please note that objects not touching the
ground can appear to be further away than
they really are (for example, the bumper of
a parked veh icle, a trai ler hitch, or the rear
of a truck). In this case, you should not use
the help lines to help with parking, which
poses dange r of an accident!
(D Note
In the MMI display, the direction of travel of
the veh icle rear is represented depend ing on
the steer ing whee l ang le. The vehicle front
swings o ut more than the vehicle rear. Main
tain plenty o f distance so that yo ur outside
mirror or a corner of your vehicle does not co l
li de with any obstacles. This can damage to
your vehicle.
Page 135 of 302
M N
co ~ co
rl I.O
"'
Parallel Parking
Applies to vehicles: with Audi parking system p lus w ith rear
view came ra
Use parking mode 2 to help you parallel pork
along the side of o street.
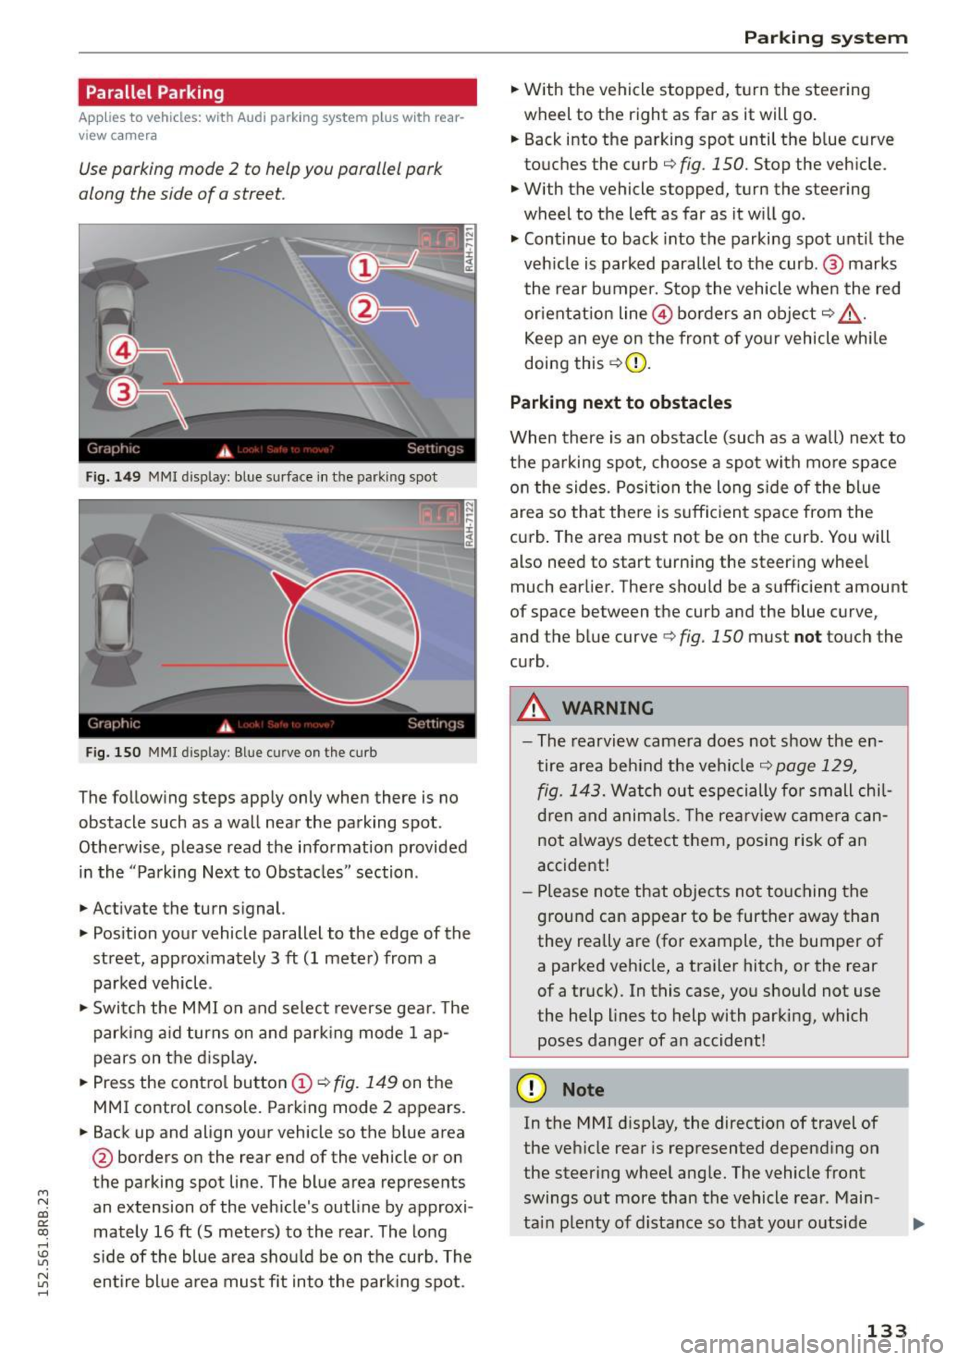
Fig. 149 MMI disp lay: blue surface in th e parking spot
Fig. 150 MMI display: Blue curve on th e curb
The follow ing steps app ly only when there is no
obstacle such as a wall near the parking spot.
Othe rwise, please read the informat ion provided
in the "Parking Next to Obstacles" section .
.,. Activate the turn s ignal.
.,. Position your vehicle parallel to the edge of the
street, approx imately 3 ft (1 meter) from a
parked vehicle .
.,. Swi tch the M MI on and se lect reverse gea r. T he
park ing a id turns on and park ing mode 1 ap
pears on the d isplay .
.,. Press the contro l button (!)¢
fig. 149 on the
MMI control console. Parking mode 2 appears.
.,. Back up and align your vehicle so the b lue area
@ borders on the rear end of the vehicle or on
the parking spot line. The blue area represents
an extension of the vehicle's outline by approxi
mately 16 ft (S meters) to the rear . The long
s ide of the blue area should be on the curb. The
~ entire bl ue a rea mus t fit into the par king spot .
Parking system
.,. With the vehicle stopped, t urn the steering
wheel to the right as far as it will go.
... Back into the parking spot until the b lue curve
to uches the curb
q fig. 150. Stop the vehicle.
.,. With the vehicle stopped, turn the steering
wheel to th e left as far as it w ill go .
.,. Cont inue to back into the parking spot until the
veh icle is parked para llel to the curb .@ marks
the rear bumper. Stop the vehicle when the red
or ientation line@ borders an obje ct
q .&, .
Keep an eye on the front of yo ur vehicle whi le
doing this ¢(D.
Parking next to obstacles
When there is an obstacle (such as a wall) next to
t h e pa rking spot, choose a spot with mo re space
o n the sides. Posi tion the long s ide of the blue
area so tha t the re is suff icient space from the
cu rb . T he area m ust not be on the curb. You will
also need to start t urn ing the steering wheel
much earlier. There should be a sufficient amount
of space between the curb and the blue curve
'
and the blue curve 9 fig. 150 must not touch the
c u rb .
A WARNING
-The rearvi ew camera does no t show the en
tire area be hind the veh icle
q page 129,
fig. 1 43.
Watch out especi ally for small chil
d ren and anima ls. The rearv iew camer a ca n
not always detect t hem, posing risk of a n
accident!
- Pl ease no te that objects no t to uch ing the
g round can appear to be further away than
they really are (for example, the bumper of
a parked vehicle, a traile r hitc h, or the rear
of a truck). In this case, you should not use
the help lines to help with parking, which
poses danger of an accident!
(D Note
In the MMI d isplay, the direction of travel of
the veh icle rear is represented depend ing on
the steer ing whee l ang le. The vehicle front
swings o ut more than the vehicle rear . Main
ta in plenty of d istance so that your o utside
133
Page 136 of 302
Parkin g system
mirror or a corner of yo ur vehicle does not col
lide with any obstacles. This can damage to
your vehicle.
(D Tips
The left or right orientation lines and sur faces
wi ll be displayed, depending on the turn sig
nal being used .
Adjusting the display
and warning tones
A pp lies to veh icles: w ith Audi park ing system p lus w ith rear
view ca mera
The display and warning tones can be adjusted in
the MMI.
~ Select: I CARI function button > Pa rking system .
Or
~ Select: ICARI funct ion button > Car s ystem s*
control button> Driver ass ist > Par king aid .
D is pl ay
- Off -when the parking system is switched on,
only audib le signals are given .
-On -when the parking system is switched on,
either the visual disp lay or the picture from the
rearview camera is disp layed.
Warning tones
- Front volum e -
front sensor volume
- Front frequency -front sensor frequency
-Rea r volume -rear sensor volume
-Rear fre quenc y -rear sensor frequency
- In -ca r entertainment fader /M usic volume
w hile pa rking -
when the parking system is
switched on, the volume of the active audio
source is lowered.
The newly adjusted value is briefly heard from
the signal generator.
(D Tips
- The warning tones can also be adjusted d i
rectly by the visual display or the picture
from the rearview camera. Simply press the
S ett ing s control button.
- Changed settings are activated when park
i ng system is switched on again .
134
-The settings are automatica lly stored and
assigned to the remote contro l key .
Trailer hitch
App lies to vehicles : wi th Audi parking sys te m plus wi th rea r
v iew camera a nd t railer hitch
For vehicles with a factory installed trailer hitch,
o r a trai ler h itch installed accord ing to factory
spec ifications, the parking sys tem rear sensors
do not come on whenever you shift into reverse
gear or when you press the
P" 1A switch. Remem
ber, there is no warning for distances to the rear.
The front sensors remain activated . The visua l
display switches to the trailer towing mode. The
picture from the rearv iew camera w ill not show
the or ientat ion lines nor the blue surfaces.
If you insta ll a hitch yourse lf, this function may
not work.
Error messages
App lies to vehicles: wi th Audi parking sys te m plus with rea r·
v iew camera
There is an error in the system if the LED on the
PwA switch is b linking and you hear a continuous
a larm for a few seconds after switching on the
parking system or when the parking system is al
ready act ivated. Have your authori zed Audi dealer
correct the error.
(D Tips
If the error is not corrected before you switch
off the ignition, when you switch on the park i ng system again, the LED in the
Pw.o. sw itch
will blink.
Page 137 of 302
M N
co
a:
co
Driving safety
Basics
Safe driving habits
Please remember -safety first!
This chapter contains important information,
tips, instructions and warnings that you need to
read and observe for your own safety, the safety
of your passengers and others . We have summar
ized here what you need to know about safety
belts, airbags , chi ld restraints as well as child
safety. Your safety is for us
priority number 1. Al
ways observe the informat ion and warn ings in
this section - for your own safety as well as that
of your passengers .
The information in this section app lies to all
model ve rsions of your vehicle . Some of the fea
tures described in this sections may be standard
equipment on some models, or may be optional
eq uipment on others .
If you are not sure, ask
your authorized Audi dealer.
A WARNING
- Always make sure that you follow the in
struct ions and heed the WARNINGS in this
Manual. It is in your interest and in the in
terest of your passengers.
- Always keep the complete Owne r's Litera
ture in your Aud i when you lend or sell your
vehicle so that this important info rmation
will always be ava ilable to the driver and
passenge rs.
-
- Always keep the Owner's literature handy so
that you can find it easily if you have ques
tions.
Safety equipment
The safety features are part of the occupant re
straint system and work together to help reduce the risk of injury in a wide variety of accident sit
uations.
Your safety and the safety of your passenge rs
should not be left to chance. Advances in tec h-
; nology have made a var iety of fea tures available
~ to help reduce the r isk o f injury in an accident. ,....,
Dr ivin g sa fet y
The following is a list of just a few of the sa fety
features in your A udi:
- sophisticated s afety be lts fo r drive r and a ll pas-
senger seat ing pos itions,
- be lt fo rce limi ters for the front seats,
- belt pretensioners for the seats,
- be lt he ight adjustment for the front seats,
- head restra ints for each seating posit ion,
- front airbags,
- side airbags in the front seats and outer rear
seats *,
- side curtain airbags,
- specia l LATCH anchorages for child rest raints,
- adjustab le steering colum n.
These ind iv idual safety features, can work to
gether as a system to help protect you and your
passengers in a w ide range of accidents . T hese
features cannot work as a system if they are not always cor rect ly adjusted and co rrectly used.
S afet y is ev erybod y's re sponsibil it y !
Important things to do before driving
Safety is everybody 's job! Vehicle and occupant
safety always depends on the informed and care
ful driver .
For your safety and the safety of your passen
gers,
before driv ing alway s:
.,. Make s ure that all lights and signals are operat
ing correctly .
.,. Make sure that the tire pressure is correct .
.,. Make sure that all windows are clean and afford
good vis ibility to the outs ide .
.,. Secure all luggage and other items carefully
Q page 77 .
.,. Ma ke s ure that nothing can inte rfere wi th the
peda ls .
.,. Adjust front seat, head restraint and mirrors
correctly for your height.
.,. Instruct passengers to adjust the head re
straints according to the ir height.
.,. Make sure to use the r ight child restraint cor
rectly to protect ch ildren
Q page 172, Child
safety.
1 3 5
Page 138 of 302
Driving safet y
• Sit properly in your seat and make sure that
your passengers do the same
c:> poge 63,
General information .
• Fasten your safety belt and wear it properly. Al
so instruct your passengers to fasten their safe
ty be lts properly
c:> page 144 .
What impairs driving safety?
Safe driving is directly related to the condition of
the vehicle, the driver os well as the driver 's abili
ty to concentrate on the rood without being dis
tracted .
The driver is responsible for the safety of the ve
hicle and all of its occupants . If your ab ility to
drive is impaired, safety r isks for everybody in the
veh icle increase and you also become a hazard to
eve ryone else on the road
c:> .& . Therefo re:
• Do not let yourself be distracted by passengers
or by us ing a cellular te lephone .
• NEVER drive when your driv ing ability is im
paired (by medicat ions, alcohol, drugs, etc.).
• Observe all traffic laws, ru les of the road and
speed limits and pla in common sense.
• ALWAYS adjust your speed to road, traffic and
weather cond itions.
• Take frequent breaks on long trips. Do not drive
for more than two hours at a stretch .
• Do NOT drive when you are t ired, under pres
sure or when you are stressed.
A WARNING
Impaired d riving safety increases the risk of
ser ious personal inju ry and death whenever a
vehicle is being used.
136
Correct passenger
seating positions
Proper seating position for the drive r
The proper driver seating position is important
for safe, relaxed driving.
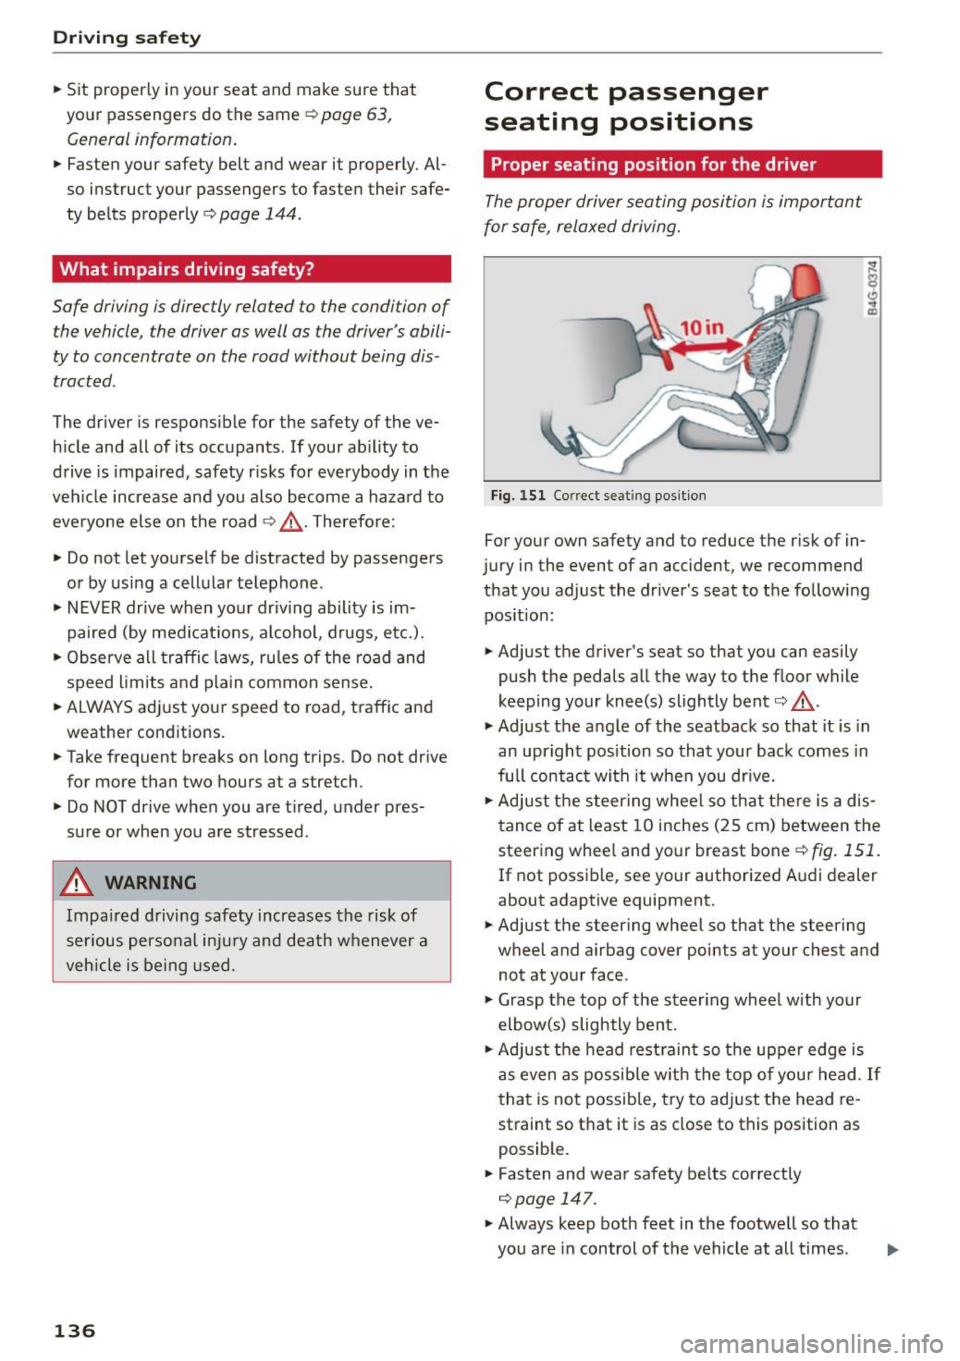
Fig. 151 Co rrect seat ing posit ion
For your own safety and to reduce the risk of in
jury in the event of an accident, we recommend
that you adjust the driver's seat to the following pos ition:
• Adjust the driver 's seat so that you can easily
push the pedals all the way to the floor while
keeping your knee(s) slightly bent
c:> & -
• Adjust the angle of the seatback so that it is in
an upright position so that your back comes in
full contact with it when you dr ive.
• Ad just the steering wheel so th at t here is a dis
tance of at least 10 inches (25 cm) between the
steer ing whee l and your breast bone
c:> fig. 151.
If not possible, see your authorized A udi dealer
about adaptive equipment.
• Adjust the steering wheel so that the steering
wheel and airbag cover points at your chest and
not at your face.
• Grasp the top of the steer ing wheel with your
elbow(s) slightly bent.
• Ad just the head rest rain t so the upper edge is
as even as possib le w ith the top of you r head .
If
that is not possib le, try to adjust the head re
straint so that it is as close to this position as
possible.
• Fasten and wear safety belts correctly
<=>page 147.
• Always keep both feet in the footwell so that
you are in control of the vehicle at all times .
Page 139 of 302
M N
co
a:
co
,...., \!) ..,.,
N ..,., ,....,
For detai led information on how to adjust the
driver's seat, see ¢
page 64.
A WARNING
Drivers who are unbelted, out of position or
too close to the airbag can be ser ious ly in
jured by an airbag as it unfolds. To help re
duce the risk of serious personal injury:
- Always adjust the driver's seat and the
steering wheel so that there are at least
10 inches (25 cm) between your breastbone
and the steering wheel.
- Always hold the steering wheel on the out
side of the steering wheel rim with your
hands at the 9 o'clock and 3 o'clock posi
tions to he lp reduce the risk of personal in
jury if the dr iver's a irbag inflates.
- Never hold the steer ing whee l at the
12 o'cloc k posit ion or with your hands at
other pos it ions inside the steering wheel
rim or on the steering wheel hub. Holding
the steering wheel the wrong way can cause
serious injuries to the hands, arms and head
if the driver's airbag deploys.
- Pointing the steering whee l toward your
face decreases the ability of the supp lemen
tal driver's a irbag to protect you in a colli
sion.
- Always s it in an upright position and never
lean against or place any part of your body
too close to the area where the airbags are located .
- Before driv ing, a lways adjust the front seats
and head restraints properly and make sure
that all passengers are properly restrained.
- Never adjust the seats while the vehicle is
moving . Your seat may move unexpectedly
and you could lose control of the vehicle.
- Never drive with the backrest recl ined or
t ilted far back! The farther the back rests are
t il ted back, the greater the ris k of injury due
to incorrect pos ition ing of the sa fety belt
and improper seating posit ion.
- Children must always ride in child safety
seats¢
page 172 . Special precautions ap
ply when installing a ch ild safe ty seat on the
front passenger seat ¢
page 152.
Drivin g s afet y
Proper seating position for the front
passenger
The proper front passenger seating position is
important for safe, relaxed driving.
Fo r yo ur own safety and to reduce the risk of in
jury in the event of an accident, we recommend
t h at you adjust the sea t for the front passenger
to the fo llow ing pos ition:
"' Adj ust the angle of the seatback so that it is in
an upright position and your back comes in full
contact w ith it wheneve r th e vehi cle is moving.
"' Ad just the head rest ra in t so the upper edge is
as even as possib le w ith the top of your head. If
that is not possib le, try to adj ust the head re
straint so that it is as close to this position as
possible
¢ page 138.
"' Keep both feet flat on the floor in front of the
front passenger seat.
"' Fasten and wear safety belts correct ly
¢ page 147.
For detailed information on how to adjust the
front passenger's seat, see ¢
page 63.
A WARNING
--
Front seat passengers who are unbelted, out
of position or too close to the airbag can be
se riously in ju red o r killed by the a irbag as i t
unfo lds. To help reduce the risk of serious per
sona l injury :
- Passenge rs must always si t in an upright po
sition and never le an aga inst or place any
pa rt of their body too close to the area
where the airbags are located .
- Passengers who are unbelted, ou t of posi
tion or too close to the airbag can be seri
ously injured by an airbag as it unfo lds with
great force in the blink of an eye.
- Always make sure that there are at least
10 inches (25 cm) between the front pas
senger's breastbone and the instrument panel.
- Each passenger must always sit on a seat of
their own and proper ly fasten and wear the
safety belt be long ing to that seat .
- Before driving, always adjust the front pas
senger seat and head restraint properly.
1 37
Page 140 of 302
Driving safety
-Always keep your feet on the floor in front
of the seat. Never rest them on the seat, in
strument panel, out of the window, etc. The airbag system and safety belt will not be
able to protect you properly and can even in
crease the risk of injury in a crash .
- Never drive with the backrest reclined or tilted far back! The farther the backrests are
tilted back, the greater the risk of injury due
to incorrect positioning of the safety belt
and improper seating position.
- Children must always ride in child safety
seats r=;,
page 172. Spec ial precautions ap
ply when installing a child safety seat on the
front passenger seat r=;,
page 152.
Proper seating positions for passengers in
rear seats
Rear seat passengers must sit upright with both
feet on the floor consistent with their physical
size and be properly restrained whenever the ve hicle is in use.
To reduce the risk of injury caused by an incorrect
seating position in the event of a sudden braking
maneuver or an accident, your passengers on the
rear bench seat must always observe the follow
ing:
~ If there is a passenger on the rear center seat
ing position, slide the center head restraint up
ward at least to the next notch r=;,
page 67.
~ Make sure that the seatback is securely latched
in the upright position
r:=:>page 69 .
~ Keep both feet flat in the footwell in front of
the rear seat.
~ Fasten and wear safety belts properly
r:=:> page 147.
~ Make sure that children are always properly re
strained in a child restraint that is appropriate
for their size and age r=;,
page 172.
A WARNING
Passengers who are improperly seated on the
rear seat can be seriously injured in a crash.
- Each passenger must always sit on a seat of their own and properly fasten and wear the
safety belt belonging to that seat.
138
- Safety belts only offer maximum protection
when the seatback is securely latched in the
upright position and the safety belts are properly positioned on the body. By not sit
ting upright, a rear seat passenger increases
the risk of personal injury from improperly
positioned safety belts!
- Always adjust the head restraint properly so
that it can give maximum protection.
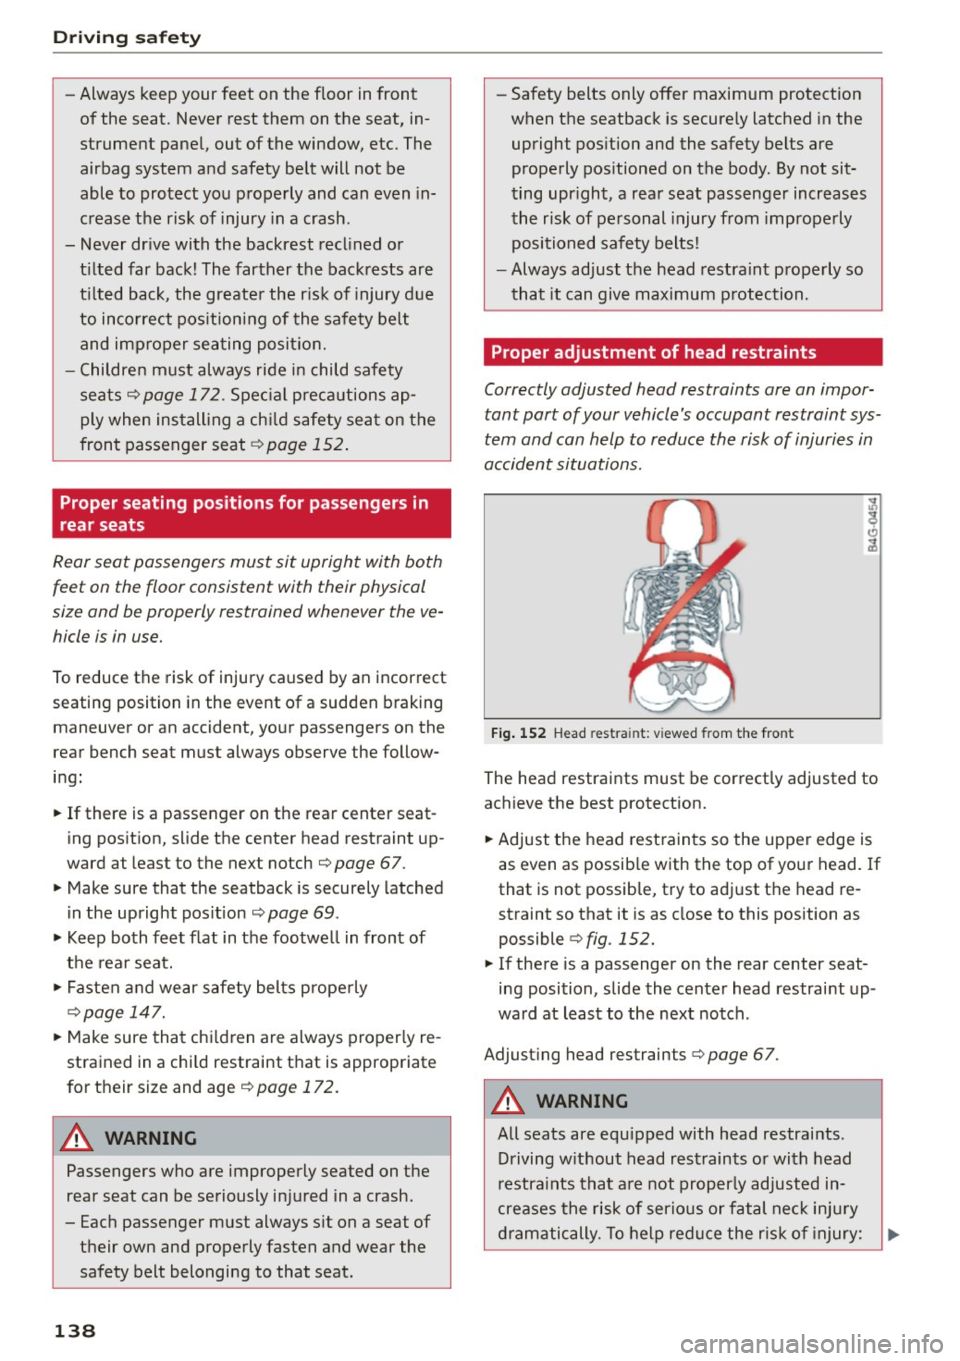
Proper adjustment of head restraints
Correctly adjusted head restraints are an impor
tant part of your vehicle's occupant restraint sys
tem and can help to reduce the risk of injuries in
accident situations.
Fig. 152 Head rest ra in t: v iewed from the fro nt
The head restraints must be correctly adjusted to
achieve the best protection.
~ Adjust the head restraints so the upper edge is
as even as possible with the top of your head. If
that is not possible, try to adjust the head re
straint so that it is as close to this position as
possible r=;,
fig. 152.
~ If there is a passenger on the rear center seat
ing position, slide the center head restraint up
ward at least to the next notch .
Adjus ting head restraints r=;,
page 67.
A WARNING
All seats are equipped with head restraints.
Driving without head restraints or with head
restraints that are not properly adjusted in
creases the risk of serious or fatal neck injury
-
dramatically. To help reduce the risk of injury: ~