AUDI Q7 2009 Owner´s Manual
Manufacturer: AUDI, Model Year: 2009, Model line: Q7, Model: AUDI Q7 2009Pages: 426, PDF Size: 97.13 MB
Page 211 of 426
______________________________________________ A_ d_a ""' p'-- t_iv _ e_ A_ i_r _S_ u_s _,p_ e _ n_s_ i_ o _ n _ ___.9I
- Press the I CARI f unction button . The main menu
Adaptive Air Su spe nsion appears~
page 208, fig. 224 or
~ page 208, fig . 225 .
Select the desired mode by rotating and pressing the
control knob .
Rai sing and l owerin g
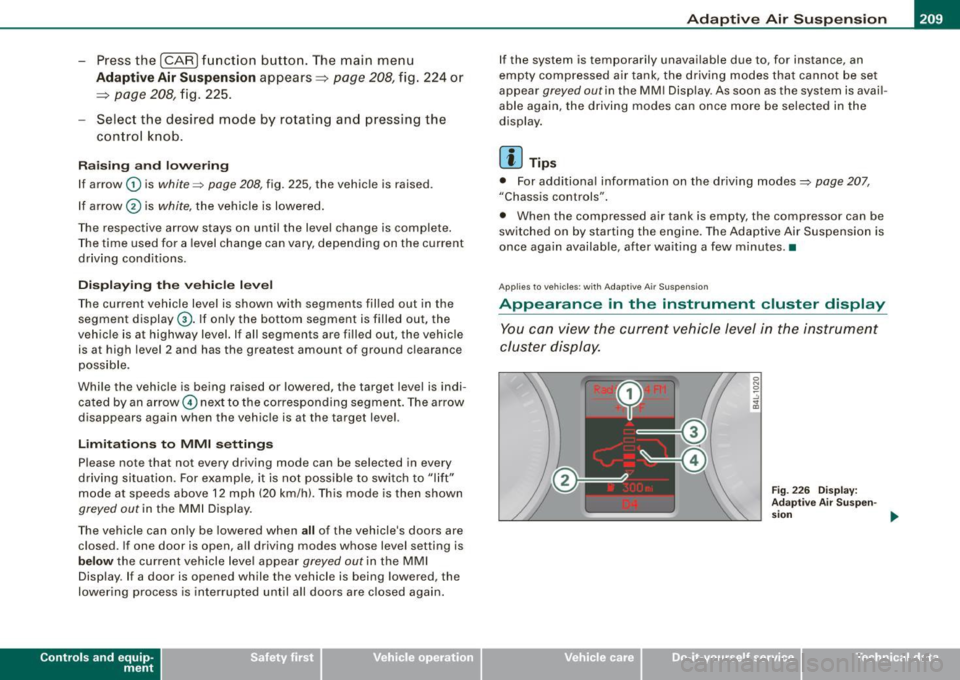
If arrow
G) is white :::::, page 208, fig. 225, the vehicle is raised.
If arrow @ is
white, the vehicle is lowered .
The respective arrow stays on until the !eve.I change is complete.
The time used for a level change can vary, depending on the current
driving conditions.
Di sp la yin g th e ve hicle l eve l
The current vehicle level is shown with segments filled out in the
segment display@. If only the bottom segment is filled out, the
vehicle is at highway level. If all segments are filled out, the vehicle
is at high level 2 and has the greatest amount of ground clearance
poss ible.
While the vehic le is being raised or lowered, the target level is indi
cated by an arrow © next to the corresponding segmen t. The arrow
disappears again when the vehic le is at the target level.
Limita tion s to MMI setting s
Please note that not every driving mode can be selected in every
driving si tuation. For example, it is not possib le to switch to "lift"
mode at speeds above 12 mph (20 km/h). This mode is then shown
greyed out in the MMI Display.
The vehicle can on ly be lowered when all of the vehicle's doors are
closed. If one door is open, a ll driving modes whose level setting is
below the current vehicle leve l appear greyed out in the MMI
Display. If a door is opened while the vehicle is being lowered, the
lowering process is interrupted until all doors are closed again .
Contro ls and eq uip
ment
I f the system is temporarily unavailable due to, for instance, an
empty compressed air tank, the driving modes that cannot be se t
appear
greyed out in the MM I Display. As soon as the system is avai l
able again, the driving modes can once more be selected in the
display.
[ i ] Tips
• For additiona l information on the driving modes:::::, page 207,
"Chassis controls".
• When the compressed air tank is empty, the compressor can be
sw itched on by starting the engine. The Adaptive Air Suspension is
once again availab le, after waiting a few minutes. •
Applies to veh icles: with Adapt ive A ir Suspens ion
Appearance in the instrument cluster display
You can view the current vehicle level in the instrument
cluster display.
Fig . 2 26 D ispla y:
A dap tive Air Sus pen-
s ion
~
Vehicle care I I irechnical data
Page 212 of 426
llffl..__A_ d_ a--=- p_t _iv _ e_ A_ i_ r _ S_ u_ s....; p=--- e_n_ s_ io_ n _____________________________________________ _
Fig . 227 D isp lay:
Ad apti ve Air Suspen
s io n
Repeated, brief tapping of the [R ESET] button on the windshield
wiper lever allows you to select whether information concerning the
trip computer, digital tachometer , navigation* or "Adaptive Air
Suspension" is to appear in the instrument c lu ste r disp lay.
Disp lay of the Adapt ive Air Suspension is automatic when the
off road or lift mode is sel ected, or when the v ehicle is automatically
lowered in lif t mode .
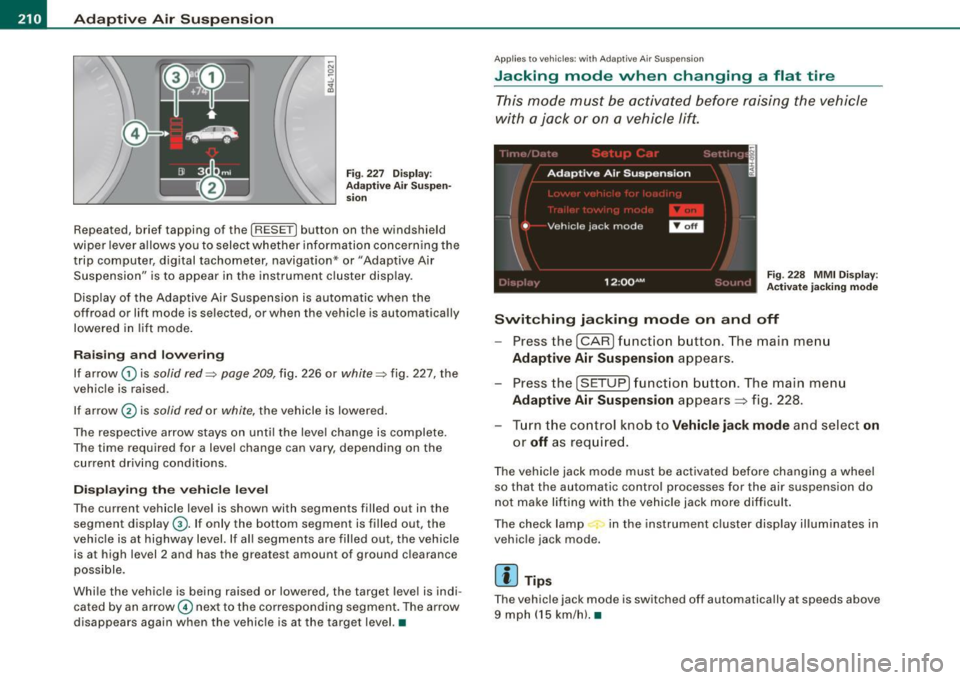
Raising and low ering
If arrow G) is solid red=> page 209, fig. 226 or white => fig. 227, the
vehic le is raised .
If ar row
0 is solid red or white, the vehicle is lowered .
The respective arrow stays on unti l the leve l change is complete.
The time required for a leve l change can vary, depend ing on the
current driv ing cond it ions .
Displ aying the vehicle level
The current vehicle level is shown with segments filled out in the
segment display@. If only the bottom segment is filled out, the
veh ic le is at highway level. If al l segments are filled out, the vehicle
is at high level 2 and has the grea test amount of ground c learance
possible .
Whi le the veh icle is being raised or lowered, the target level is indi
cated by an arrow© nex t to the co rresponding segment . The arrow
d isappears again when the vehic le is at the targe t level. •
Applies to vehi cle s: wi th A daptive Air S uspens ion
Jacking mode when changing a flat tire
T his mode must be activated before raising the vehicle
with a jack or on a vehicle lift.
Fig . 228 MMI Di splay:
A ctivat e jacking mod e
Switching jacking mode on and off
Press the (CAR ) funct ion b utton. The main me nu
Adaptive Air Suspension appears.
Press the (SETUP ) funct ion b utton. The main menu
Adaptive Air Suspension appea rs ~ fig . 228.
- Tur n the control k nob to
Vehicle jack mode and select on
or off as req uired.
The vehicle jack mode must be activated before changing a wheel
so that the au tomatic control processes for the air suspens ion do
not make lifting with the vehic le jack m ore diff icult .
The check lamp in the instrument c luster display illum inates in
vehic le jack mode.
[ i ] Tip s
The vehicl e jack mode is sw itched off automa tically at sp eeds above
9 mph ( 15 km/h). •
Page 213 of 426
___________________________________________ ___:A~d~ a~p~t~iv~ e=-.:A~ir~ S~u~ s ~p~ e~n~ s~io~n ~_ffllll
Applies to vehicles : w it h towi ng h itch and Adapt ive Air Su spens io n
Towing a trailer
Automatic lowering is not desirable when towing a trailer.
Fig . 22 9 MMI D isplay:
T rai le r t ow ing mode
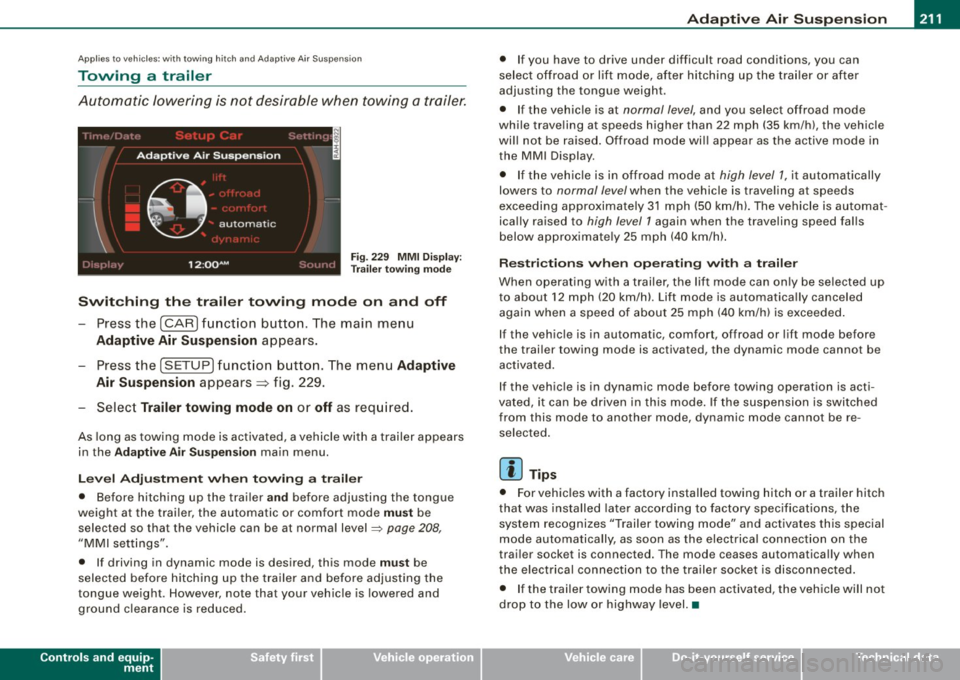
Swi tching th e trail er towing mode on and off
Press the (CARI function button. The main menu
Adaptive Air Su spension appears .
-Press the (SETUP I funct ion button. The menu Adaptiv e
Air Susp ension
appears~ fig. 229.
- Select
Trailer towing mod e on or off as req uired .
As long as towing mode is activated, a vehicle with a trailer appears
in the
Ad apti ve Air Sus pension main menu.
Le ve l Ad jus tm ent w hen t owing a tra ile r
• Before hitching up the trai ler a nd before adjusting the tongue
weight at the trai ler, the automatic or comfort mode
mu st be
selected so that the vehicle can be at normal level
=> page 208 ,
"MMI settings".
• If driving in dynamic mode is desired, this mode
mus t be
selected before hitching up the trailer and before adjusting the
tongue weight . However , note that your vehicle is lowered and
ground clearance is reduced.
Controls and equip
ment
• If you have to drive under difficult road conditions, you can
se lect offroad or lift mode, af ter hitching up the trai ler or after
adjusting the tongue weigh t.
• If the vehic le is at
normal level, and you select offroad mode
while trave ling a t speeds higher than 22 mph (35 km /h) , t he vehicle
wi ll not be raised . Offroad mode wi ll appear as the active mode in
the MMI Display .
• If the vehic le is in offroad mode at
high level 1 , it automatically
lowers to
normal level when the vehicle is trave ling a t speeds
exceeding approxima tely 31 mph (50 km/h). The vehicle is automat
ica lly raised to
high level 1 again when the t raveling speed falls
below approximate ly 25 mph (40 km/h).
R es tric tions when ope ra ti ng w ith a tra iler
When opera ting with a trailer, the lift mode can on ly be se lected up
to about 12 mph (20 km/h). Lift mode is au tomatica lly canceled
again when a speed of about 25 mph (40 km/h) is exceeded .
If the vehicle is in automatic, comfort, offroad or lift mode before
the trai ler towing mode is act iv a te d , the dynamic mod e cannot b e
activated.
If the vehicle is in dynamic mode before tow ing operation is acti
vated, it can be driven in this mode. If the suspension is switched
from this mode to another mode , dynamic mode canno t be re
selected .
[ i ] Tips
• For vehicles with a factory installed towing hitch or a trailer hitch
that was installed later acco rding to factory specificat ions , the
system recognizes "Trailer towing mode" and activates this special
mode automatically, as soon as the electrica l connection on the
trai le r sock et is connected. The mode c eases au tomat ica lly wh en
the electrical connection to the trailer socket is disconnected.
• I f the trailer tow ing mode has been activated, the vehicle w ill not
drop to the low or highway level. •
I • •
Page 214 of 426
-Adaptiv
e Air Suspension "----=-------=--------------
Ap plies to vehicles : wi th Ad aptiv e Air Suspe nsi on
Cargo mode
Th e rear of the vehicle can be lowered to make it easier to
load.
Fig . 23 0 MMI Disp lay:
C ar go mod e
F ig. 23 1 Lugga ge
c omp artmen t detai l:
Cargo m ode sw itch
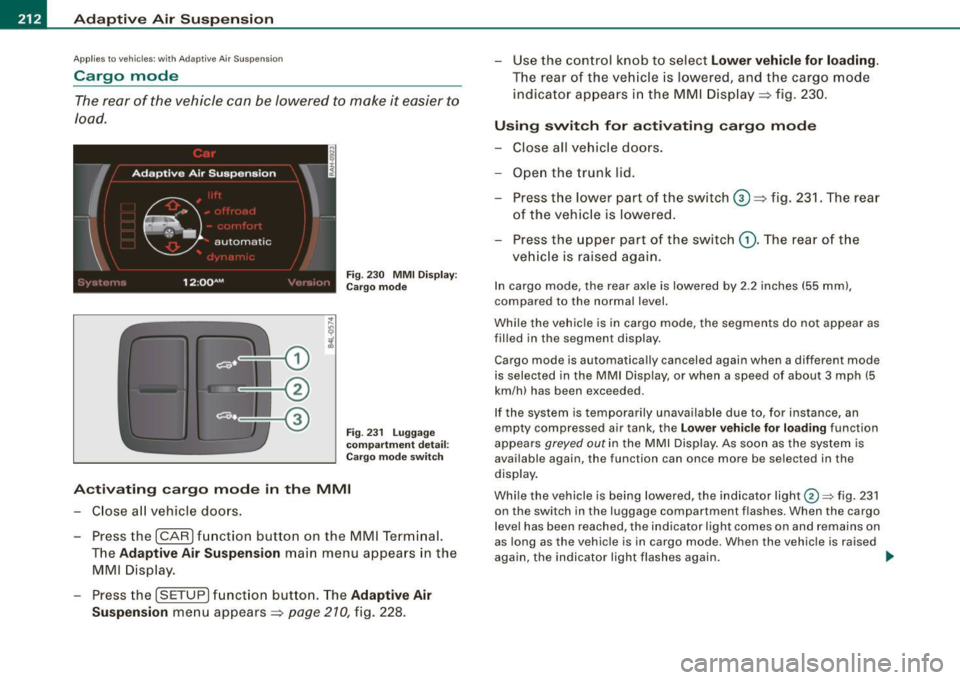
A ctivating cargo mode in the MMI
- Close a ll vehicle doors .
- Press the !CAR) fun ction button on the MM I Term inal.
T he
Adaptive A ir Suspension main menu appea rs in the
MMI Disp lay.
- Press the !SETUP) f unct ion button . The
Adaptive Air
Suspension
men u appears => page 210, fig. 228. - Use the con
trol knob t o select
Lower vehicle for loading.
The rear o f th e veh icle is lower ed, and the cargo mode
indicator appears i n th e MMI Disp lay => fig. 230 .
Using swit ch for a ctiv ating cargo mode
- Close all vehicle doors .
- Open the trunk lid.
- Press the low er par t of th e switch
G) => fig. 231. The r ear
of the veh ic le is lowered.
- Press the upper p art of the switch
(D . The rear of t he
veh icle is raised again.
In cargo mode, the rear axle is lowered by 2 .2 inches (55 mm) ,
compared to the normal level.
Whi le the vehicle is in cargo mode, the segments do not appear as
filled in the segmen t display .
Cargo mode is automatically canceled again when a different mode
is selected in the MMI Display, or when a speed of about 3 mph (5
km/h) has been exceeded.
If the system is te mpo rarily unavailable due to, for instance, an
empty compressed air tank , the
Lo w er vehi cle fo r loading function
appears
greyed out in the MMI Display . As soon as the sys tem is
available again, the function can once more be se lected in the
display .
Whi le the vehicle is being lowered, the indicator light@=> fig . 231
on the switch in the luggage compartment f lashes. When the cargo
l evel has been reached, the indicator light comes on and remains on
as long as the vehicle is in cargo mode . When the vehicle is raised
aga in, the indicator light flashes again.
~
Page 215 of 426
Adaptiv e Air Suspe nsion -
---------------=---.:..--
0 Note
Make sure before canceling cargo mode that there is sufficient
clearance above the vehicle and around the trunk lid, if open.
[ i ] Tip s
• The vehicle will not be lowered if one of the vehicle doors is
open, or if the compressed air tank is empty. The indicator light on
the switch flashes three times.
• When the compressed air tank is empty, it will refill when you
drive at speeds over 25 mph (40 km/h). The vehicle can be lowered
to cargo level when the compressed air tank is adequately fi lled.
• If the vehic le is in lift or offroad mode when you activate cargo
mode, the vehic le will first drop down to normal level. •
Controls and equip
ment
I • •
Page 216 of 426

111....__H_ o_ m _ e _L_i _ n _k _® ____________________________________________________ _
Homelink®
Universal remote control
Applies to vehic les: w ith Home link ® universal remote cont ro l
General information
The HomeLink® fe ature can le arn up to th ree r adio
fre quency codes for m ost c urrent transmitters used for
operating garage doors, es tate gates , home or outdoor
ligh ting sy stems, and other devices .
You m ust first pro gram the H omel in k® trans mitter befor e you can
use the system=>
page 215, "Programm ing th e Homelink® trans
m itter".
In order to pro gram t he Homelink® transmitter fo r devices utilizing
ro lling code, a second person on a ladder who can safe ly reach the
ga rage door o pene r m oto r is rec omm ended . It is also necessa ry to
locate the "learn" button on your garage door opener motor. Refer
to t he op era ting instructions for the opene r, as the loca tion and
co lor of this button may vary by manufacturer .
Y ou can still use the o rigina l remote c ontrol fo r th e dev ice at any
time.
& WARNING
• Never use the Homelinkl1JI transmitter with any garage door
opener that does have not the safety stop and reverse feature as
requ ired by federal safety standards . This in cludes any garage
door opener model manufactured before April 1, 1982.
• A garage door opener which cannot detect an object , signaling
the door to stop and reverse does not meet current federal safety
standards . Using a garage door opener without these features
increases risk of serious injury or death .
& WARNING (continued)
• For safety reasons never release the parking brake or start the
engine while anyone is standing in front of the vehicle.
• A garage door or an estate gate may sometimes be set in
motion when the Homelink ® remote control is being
programmed . If the devi ce is repeatedly activated , this can over
strain motor and damage its electrical components -an over
heated motor is a fire hazard!
• To avoid possible injuries or property damage , please always
make absolutely certain that no persons or objects are located
in
the range of motion of any equipment being operated.
[ i ] Tips
• I f you wou ld l ik e mor e infor mation o n Hom elink®, w here to
purchase the Homelink ® compatib le products, or wou ld li k e to
pu rchase the Homeli nk® Home Ligh ting Package, please call t oll
free: 1 -8 0 0 -355 -3515.
• F or Dec lara tion of Compliance to U nite d Sta tes FCC an d Indu stry
C anada regulations=>
page 404 . •
Page 217 of 426
HomeLink® -_______________ ___.
Applies to vehicles: with Homelin k® un iversal remote contro l
Programming the Homelink ® transmitter
The transmitter is programmed in two phases. For rolling
code transmitters, a third phase is also necessary.
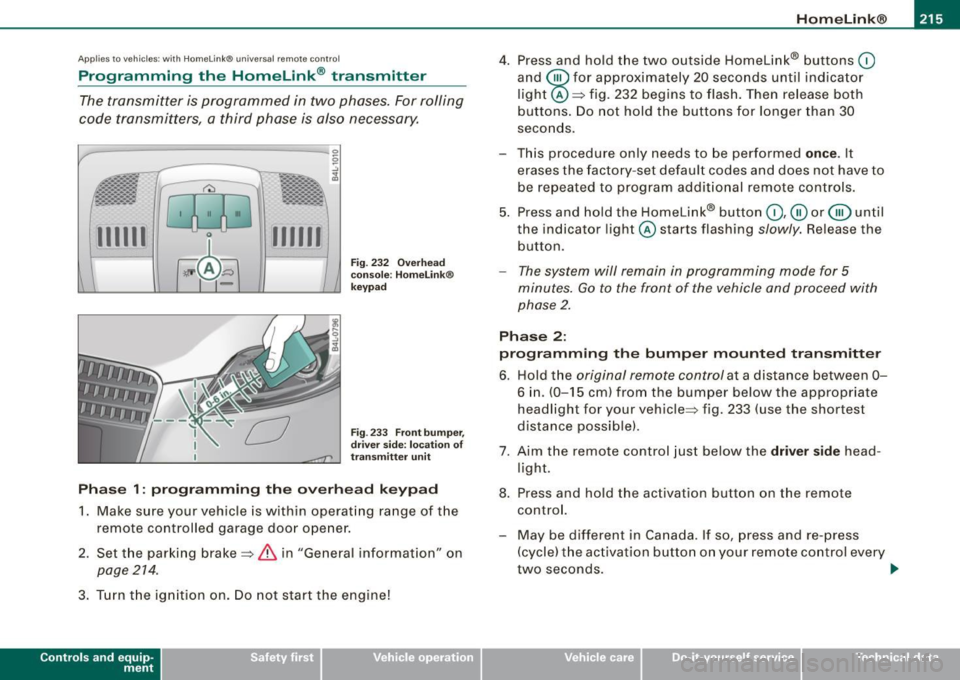
111111 111111
-
Fig . 232 Overhead
console : Homelink®
keypad
Fig . 233 Front bumper,
driver side: location of
transmitter unit
Phase 1: programming the overhead keypad
1. Make sure your vehicle is with in operating range of the
remote controlled garage door opener.
2. Set the parking brake=>
& in "General informat ion" on
page 214 .
3. Turn the ignition on . Do not start the engine!
Contro ls and eq uip
ment
4. Press and hold the two outside Homelink® buttons 0
and @for approximately 20 seconds until indicator
light @=> fig. 232 begins to flash. Then release both
buttons. Do not hold the buttons for longer than 30
seconds.
- This procedure only needs to be performed
once . It
erases the factory-set default codes and does not have to
be repeated to program additional remote controls.
5. Press and hold the Homelink® button
0,@ or @ until
the indicator light @starts flashing
slowly. Release the
button.
- The system will remain in programming mode for 5
minutes.
Go to the front of the vehicle and proceed with
phase 2.
Phase 2:
programming the bumper mounted transmitter
6. Hold the original remote control at a distance between 0-
6 in . (0-15 cm) from the bumper below the appropriate
headlight for your vehicle => fig . 233 (use the shortest
distance possible).
7. Aim the remote control just below the driver side head
light.
8. Press and hold the activation button on the remote control.
- May be different in Canada. If so, press and re-press
(cycle) the activation button on your remote control every
two seconds. .,_
Vehicle care I I irechnical data
Page 218 of 426
ll9..__H_ o_m_ e_ L_ i_ n _k_ @_R __________________________________________________ _
9. The emergency flashers will flash three times (after
about 15-60 seconds) when the programming is
successful. Release the button on the remote control.
- To program more devices, repeat steps 4 to 9.
10. Press and hold the trained Homelink® button and
observe the indicator light@=> page 215, fig. 232.
- If the indicator light is solid/continuous, programming is
complete and your device should activate when you press and release the trained Homelink® button.
- If the indicator light blinks rapidly for 2 seconds and is
then a solid/continuous light, proceed with phase 3 to program a rolling code device.
Phase 3: rolling code programming
- A second person on a ladder who can safely reach the
garage door opener motor is recommended.
11. Locate the "learn" button on the garage door opener
motor (refer to the operating instructions for the opener,
as the location of this button may vary by manufacturer).
12. Press and release the learn button on the garage door
opener motor.
- Note: once the button is pressed, there are 30 seconds in
which to initiate the next step.
13. On the Homelink® keypad inside the vehicle, firmly
press and hold the Homelink® button previously
programmed in phases 1 and 2 for two seconds and
release. Repeat this sequence
twice .
- Some vehicles may require the press/hold/release
sequence up to three times to complete the training
process.
- Homelink® should now activate your rolling code
equipped device.
If the 5 minute time limit is exceeded, the emergency flashers will
flash one time
to indicate that the process has been terminated. In
this case, repeat steps 4 through 9.
If the emergency flashers do not flash
three times (after about 15-
60 seconds), programming was not successful. In this case, repeat
steps 4 through 9 .
Remote control units for garage door openers in Canada are set to
stop transmitting radio frequency signals after two seconds. This
time may not b e sufficient for the Homelink® system to learn the
radio frequency signal. Perform all other steps as described
above. •
Applies to v ehi cles: with Horn e link ® uni versa l re mo te contro l
Operating the HomeLink ® transmitter
The Homelink® transmitter works in the same manner as
the original handheld remote control that came with the
system.
-----------------:c
i
Gl0 0
l
·~ ± b ~ / Fig. 234 Close-up:
Homelink® keypad
...._...._ __ __,..._......__......__...._ ........ ___ ___.__..
111111 111111
Page 219 of 426
___________________________________________________ H_ o_m....:..: e:..; L::. i;,,;. n.;,,; k;,,;. ®.:. R __ III
- Press the appropriate programmed button G),@ or @
to activate the desired remote control function~
& in
"General information" on
page 214. •
Applies t o ve hicl es: wit h Hom elin k® universal re mote co nt ro l
Reprogramming a single button
A Homelink ® button can be reprogrammed individually
without affecting the other button a/locations.
Programming the overhead keypad
- Press the appropriate Homelink® button unt il the indi
cator light begins flashing slowly.
Programming the bumper mounted transmitter
1. Hold the original remote control at a distance between 0-
5 in. (0-13 cm) from the bumper below the appropriate
headlight for your vehicle (use the sho rtest distance
possible) .
2. Aim the remote control just below the
driver side head
light.
3. Press and hold the activation button on the remote control.
4. The emergency flashers will flash
three times (after
about
15-60 seconds) when the programm ing is
successful. Now release the button on the remote
control.
- If the device ut ilizes a rolling code, please follow phase 3
of ~
page 215, "Programming the Homelink® trans
mitter" for rolling code programming.
Controls and equip
ment This procedure
will cause
the existing programming on the
Homelink ® button to be erased! •
App lies t o ve hicles : with Homeli nk® universa l re m ote contro l
Erasing the programming of the Homelink ®
transmitter
When you erase the programming , the programming on
all three of the transmitter channels with be lost!
- Perform steps 1 to 4 as descr ibed on~ page 215, "Phase
1: programm ing the overhead keypad ".
When completed , the Homelin k® system will be in the program
ming mode and is then ready to learn the cod es for remote
controlled devices.
(I) Tips
• Programmed buttons cannot be erased individually.
• For security reasons you ar e advis ed to erase the programming
of the Homelink ® system befo re you sell your vehicle. •
I • •
Page 220 of 426
