Check AUDI Q7 2013 Owner´s Manual
[x] Cancel search | Manufacturer: AUDI, Model Year: 2013, Model line: Q7, Model: AUDI Q7 2013Pages: 348, PDF Size: 87.72 MB
Page 38 of 348
![AUDI Q7 2013 Owner´s Manual 36 Driver in formation d isplay
When this symbo l Ii] il luminates for the first
time, the fuel reserve in your vehicle is sti ll
between
2 .6 and 3 .2 gallons (10- 12 liters) .
Ref](/img/6/40278/w960_40278-37.png "AUDI Q7 2013 Owner´s Manual 36 Driver in formation d isplay
When this symbo l Ii] il luminates for the first
time, the fuel reserve in your vehicle is sti ll
between
2 .6 and 3 .2 gallons (10- 12 liters) .
Ref")
36 Driver in formation d isplay
When this symbo l Ii] il luminates for the first
time, the fuel reserve in your vehicle is sti ll
between
2 .6 and 3 .2 gallons (10- 12 liters) .
Refue l as soon as possib le
¢ page 258.
If the symbol lights up, even when there is
ample fuel in the tank, and the text
T a nk sys
tem malfunction! Cont act wor kshop
appears
in the display, there is a fault in the system.
Contact a qualified workshop to have the fau lt
rectified .
t::l Battery voltage
If the battery's state of charge is not in the
optimal range , the (•) symbo l is shown in the
d isp lay and the dr iver message
Low battery
c harge : battery will be charged while driving
appears.
W hil e this dr iver not ificat io n is displayed, you
have to be p repared for lim ited start ing capa
b ili ty.
Driver m essage appears and goes out
again
I f t his driver message appea rs after the igni
tion is turned o n or wh ile driving and it goes
out again after a while, the battery has been
adequately recharged .
Driver message appears and does not go
out again
If th is driver notification appe ars after the ig
nition is turned on or while driving and does
not go out again, the battery 's state of charge
is not in the opt imal range. Starting capability
is restricted. Have the battery checked by an
authorized Audi dealer as soo n as poss ible.
{0 : Worn brake pads
llJ Brake pads!
If the warn ing light illum inates, immediately
contact your authorized Audi dealer or quali
fied workshop to have all brake pads inspect
ed . On USA models the wa rning lig ht
llJ
l ) - : USA mod els only
comes on together with the warning light
1111 . Both sets of brake pads on an ax le
must a lways be rep laced at the same time.
A WARNING
=
Driving w it h bad brakes can cause a colli-
sion and ser ious personal in jury.
- I f the warn ing light
llJ and the warning
light
11111 ' with the message Brake
pads!
comes o n in the inst rument cluste r
d isp lay, immediately contact your au
thor ized A udi dealer or qualified wo rk
shop to have all b rake pads checked or
re placed if ne cessa ry.
~(i) Headlight range control
fl Headlight rang e control defe ctive !
-
If the symbol illuminates, th e dynamic head
li ght rang e control is no longer work ing prop
erly. Have the system checked and repa ired at
yo ur authorized Aud i dea le r.
~ -Engine oil level
Ill Please check oil level
When the symbol illum inates, check the en
gine o il level a s soon as possible ¢
page 269.
Top off t he oil at your ear liest opportu nity
¢ page 270 .
't::r.~ Engine oil sensor defective
Ill Oil le vel ! Sensor defect ive
If t he symbol illum ina tes, contact yo ur au
thorized Aud i dea le r and have the oil sensor
inspected. Unti l yo u have this done, check t he
oi l level each time you refue l just to be on the
safe s ide
¢ page 269.
! ?')
Engine speed limitation
Applies to vehicles: wit h engine speed limitatio n
(m Do not e xceed ma x. engine speed of
XXXX rpm
Page 39 of 348
The IJI symbol illuminates when there is an
engine control malfunction. The indicator
light
[mi n the instrument cluster also illumi
nates. The engine speed is limited to the
speed d isplayed in the driver information sys
tem. Keep in mind that the engine speed will
not exceed the value displayed in the drive r in
formation system, for example when down
shifting.
Please go to an authorized Aud i dealer or oth
e r qualified workshop to have the malfunction
repaired.
~ Diesel particulate filter clogged
Applies to vehicles: with diesel engine and diesel part icu
late filter
B Particulate filter See owner's manual
When the II symbol illuminates, you can a l
ter your driving style to assist the filter self
cleaning process. Drive for approx imately
15
minutes with the selector lever in the S pos i
tion at a min imum speed of 37 mph (60 km/
h) and an engine speed of approx imately
2,000 RPM. The temperature increase that
will resu lt from this can burn off the soot in
the filter. The symbol wi ll switch off when the
cleaning is successf ul. After a successful
cleaning, there is no need to bring the car to
an author ized dealer or qualified workshop
because this is part of normal vehicle opera
tion .
If the symbo l
II does not switch off, see
your authorized dealer or other qualified
workshop to have the prob lem corrected.
F or more information on the diesel particu
late filter, refer to¢ page
235.
A WARNING
Always adapt yo ur speed to the current
weathe r, road and traffic condit ions. You
should never disobey traffic laws in order
to follow dr iving recommendations.
-
Driver information display 37
~O Adapt ive light defective
Applies to vehicles: with adaptive light
mi adaptive light defective
When this symbol mi illuminates, it means
that adaptive light is defect ive. Go to an au
thorized dea lership to have the headlights or
the control unit for the adaptive light re
paired.
~ Ignition lock malfunction
If them symbo l in the display comes on,
there is a ma lfunction in the e lectronic igni
tion lock. An additional driver message can be
displayed by pressing the
I CHECK! button:
Ignition lock defective
11> Drive to an authorized Audi dealer or quali
fied workshop at your earl iest convenience
t o have the malfunction corrected.
~ Windshield wipers faulty
f?5 Windshield wiper defective
When this symbo1 £-.$ illuminates, it means
that the electronics for the windsh ield wipers
are defective. Please go to an authorized Audi
dealer or qualified workshop to have the
winds hield wiper system repaired.
Page 40 of 348
38 Opening and closing
Opening and closing
Keys
Key set
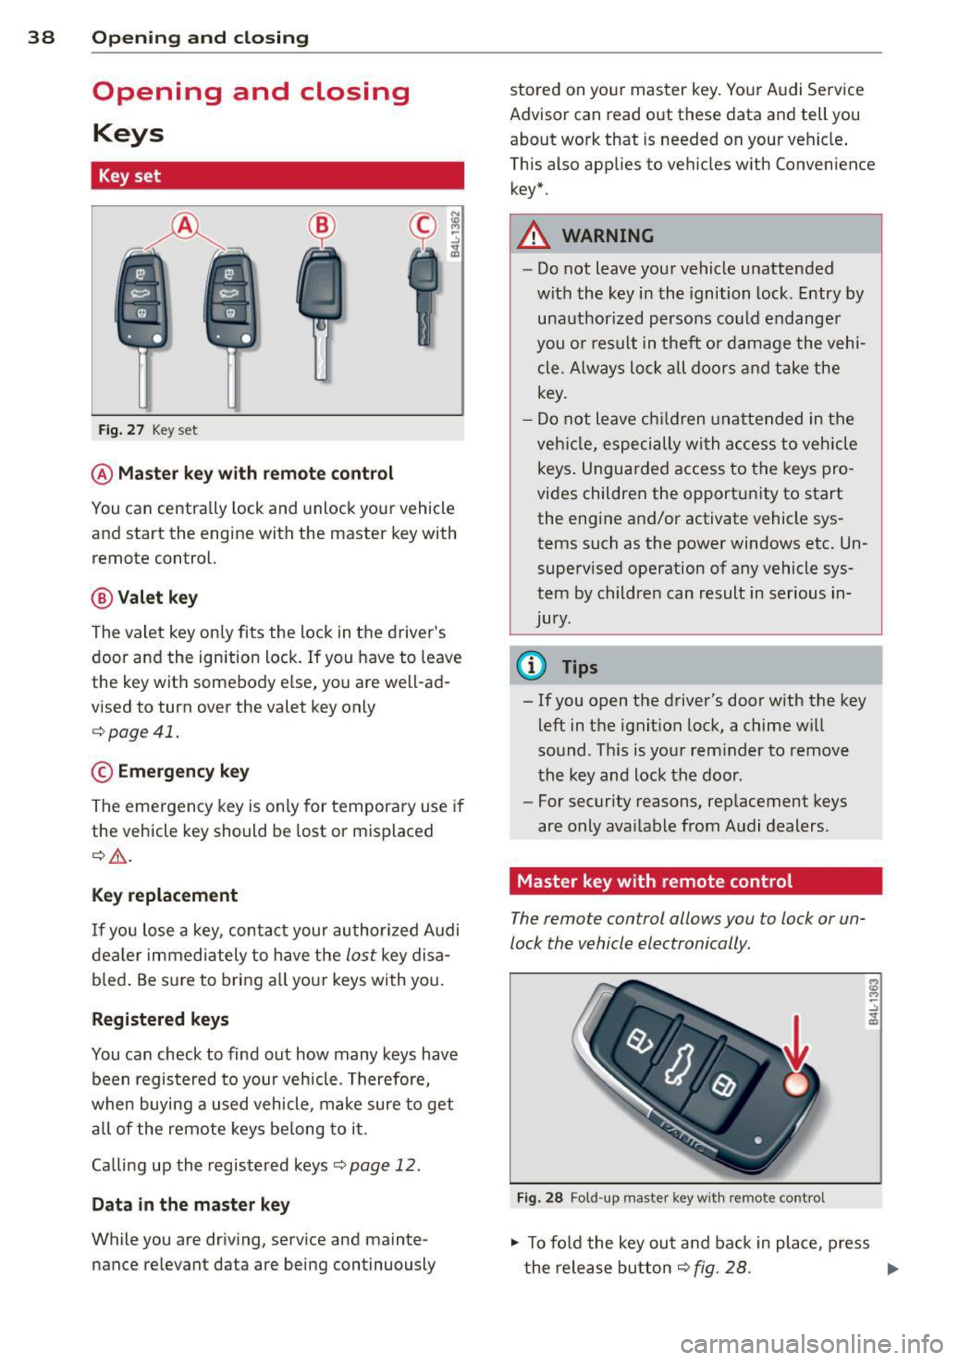
Fig. 27 Key set
@ Master key with remote control
You can centrally lock and unlock your vehicle
and start the engine with the master key with
remote control.
@ Valet key
The valet key only fits the lock in the driver's
door and the ignition lock . If you have to leave
the key with somebody else, you are well-ad
vised to turn over the valet key only
¢ page 41.
© Emergency key
The emergency key is only for temporary use if
the vehicle key should be lost or misplaced
¢ .&. .
Key replacement
If you lose a key, contact your authorized Audi
dealer immediately to have the
lost key disa
b led . Be sure to bring all your keys with you.
Registered keys
You can check to find out how many keys have
been registered to your vehicle. Therefore,
when buying a used vehicle, make sure to get
all of the remote keys be long to it .
Ca lling up the registered keys¢
page 12.
Data in the master key
While you are driving, serv ice and mainte
nance relevant data are being continuously stored on your master key. Your Audi
Service
Advisor can read out these data and tell you
about work that is needed on your vehicle .
This also app lies to vehicles w ith Convenience
key*.
A WARNING
--
- Do not leave your vehicle unattended
with the key in the ignition lock. Entry by
unauthorized persons could endanger
you or result in theft or damage the vehi
cle. A lways lock all doors and take the
key.
- Do not leave children unattended in the
veh icle, especially with access to vehicle
keys . Unguarded access to the keys pro
vides children the opportun ity to start
the engine and/or activate vehicle sys
tems such as the power windows etc. Un
supervised operation of any vehicle sys
tem by children can result in serious in
Jury .
(D Tips
- If you open the driver's door with the key
left in the ignition lock, a chime w ill
sound. T his is your reminder to remove
the key and lock the door.
- For security reasons, replacement keys
are only ava ilable from Audi dealers.
Master key with remote control
The remote control allows you to lock or un
lock the vehicle electronically .
Fig. 28 Fold-up maste r key with remo te control
., To fold the key out and back in place, press
t he release button ¢
fig. 28. .,.
Page 41 of 348
The transmitter and battery a re located in the
head of the remote control. The receiver is lo
cated inside the vehicle. The maxim um effec
tive range depends on several things. Remem
ber, if the battery is weak, the effective range
decrease s.
If you need to replace the remote contro l, or if
you need to have it repaired, you must see
your author ized Audi dealer. Only then can
you use the key again .
Personalizing the ma ster key
When t he ignit ion is t urned off or when the
veh icle is locked, vari ous conven ience settings
are stored automatically and assigned to the
key that was used . The settings that are as
signed to the maste r key are recalled auto
ma ticall y when the veh icle is unlocked, when
the door is opened o r when th e ignition is
sw itched on .
Sett ings are saved for the following systems :
- Climate control
- Central lock ing
-W indows
- Am bien ce light ing*
- Seat memory*
- Steering w heel heat ing*
- Adaptive cruise control*
- Audi side ass ist*
- Pa rking system*
The
Remote control key f unc tion mus t be ac
t iv at ed in t he MMI ¢
page 74, so that the
set tings for the driver 's seat (i ncluding the
settings for the steering co lumn and exter ior
mirrors) are saved on the master key through
the seat memory when the vehicle is locked,
and a re set automatically when the ve hicle is
u nl ocked.
(D Tips
- If
the ignition is sw itched on, t he remote
contr ol system is deact ivated.
- The remote control system can be affec t
ed by other systems operating in the
same frequency range close to the vehi-
Opening and clo sin g 39
cle, such as mo bile telep hones, televi
sion broadcast ing stations, etc .
- F or Declara tion of Com pliance to United
States FCC and In du stry Canada re gula
ti ons¢
page 328 .
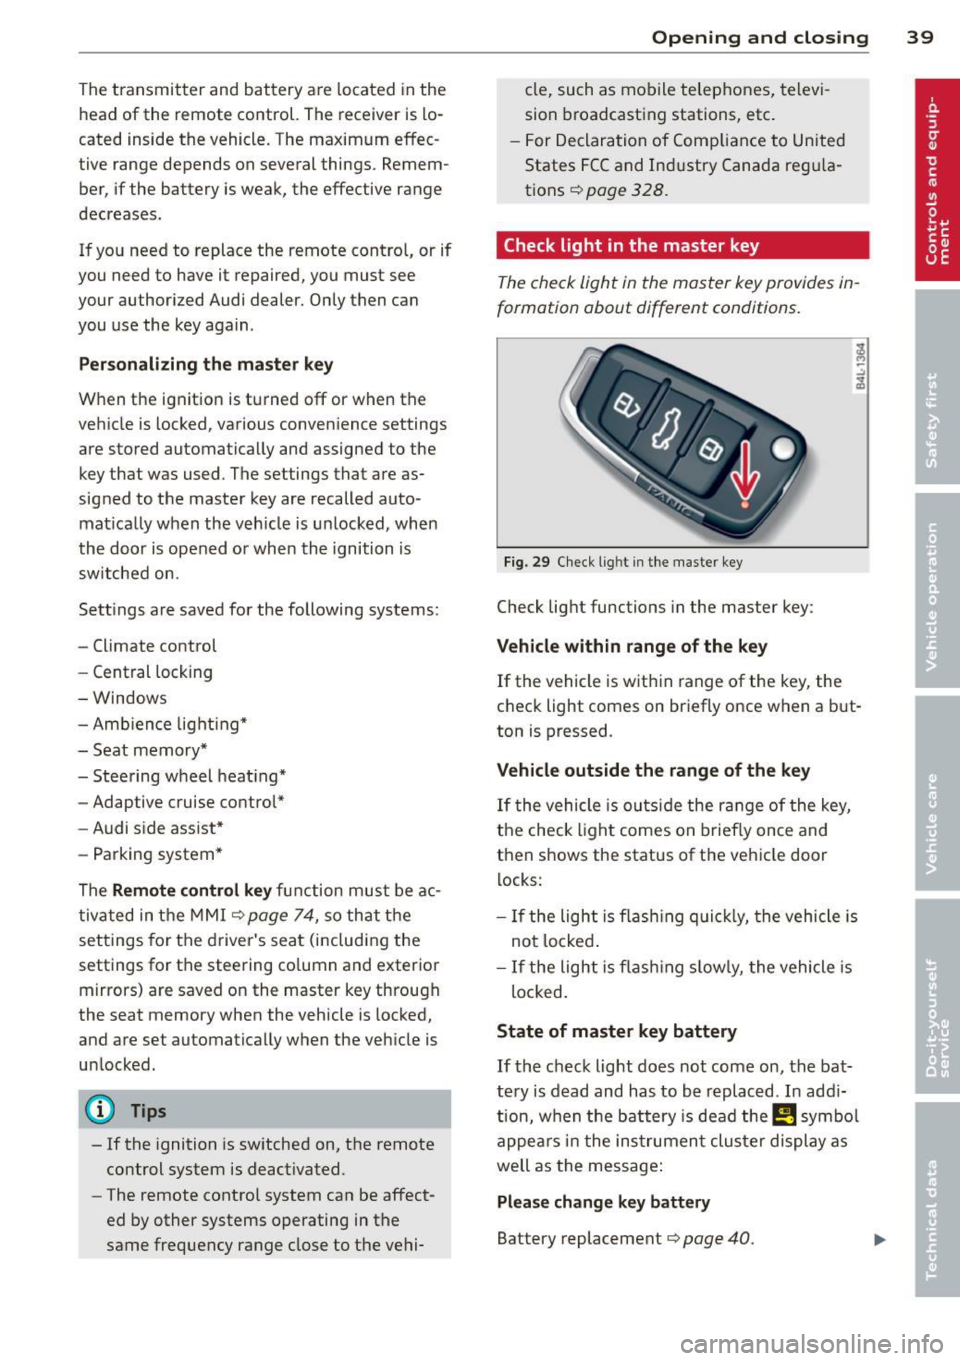
Check light in the master key
The check light in the m aster key provides in
formation about different conditions .
Fig. 29 Ch eck l ig ht in t he m aster key
Check lig ht functions in the master key :
Vehicle within range of the key
If
the vehicle is w it hi n range of the key, the
c heck light comes on br iefly once when a b ut
ton is pressed .
Vehicle outside the range of the key
If
t he vehicle is ou ts id e the r ange of the key,
the check light comes on brie fly once and
then shows the status of the vehicle door l ocks:
- If the ligh t is fla shin g qu ickl y, the vehicle is
no t locke d.
- If the ligh t is f lash ing slow ly, the vehicle is
loc ked .
State of master key battery
If
t h e ch ec k light does not come on, the bat
te ry is d ead and has to b e re pla ced . In ad di
tio n, w hen the b attery is dea d
the m symbo l
appe ars in t he instrumen t clu ster displ ay a s
well as the mess age:
Please change key battery
Battery replacement ¢ page 40.
Page 49 of 348
Clos ing re ar lid /trunk lid
"' Press the close button in the open rear lid
~ fig. 40. T he trunk lid moves to the closed
posit ion by itself and soft close locks it auto
matically ~&_ .
"' The closing process
is stopped immedi atel y
if the clo se button in the rear lid is pressed
again.
"' By pushing the button again, the rear lid is
opened again .
Saving the open ing a ngle of the rear lid
"' Bring the rear lid manua lly or automatic ally
to the desired opening posi tion and leave it
i n th is position .
"' Press the button in the rear lid
~ fig . 40 for
at least four seconds in order to save the de
s ired opening position. The position ca n only
be saved start ing at a certain level.
A WARNING
- Never close the rear lid inattentively or
without checking fi rst . Altho ugh the
closing force of the rear lid is lim ited,
yo u can st ill ser iously injure yourself or
others.
- Always ensure that no one is w ith in
range of the rear lid when it is moving, in
part icu lar close to the hinges and the up
per and lower edges -fingers or hands
can be p inched .
- To help prevent po isonous exhaust gas
from being d rawn into the vehicle, al
ways keep the rear lid closed while driv ing. Never transport objects larger than
those which fit completely into the lug
gage area, because then the rear lid can
not be fully closed.
- Never leave you r vehicle unattended es
pecially with the rea r lid left open . A
child could crawl into the car through the
l u ggage compa rtment and pull the lid
shut, becom ing trapped and unab le to
get out. To reduce the risk of persona l in
jury , never let children p lay in or around
your vehicle . A lways keep the rear lid as
-
Opening and clo sin g 47
well as the vehicle doors closed when not
in use .
- If there is a l uggage rack or bicycle rack
mounted on the rear lid, it may not be
ab le to open completely or an opened
rear lid may close by itself because of the
added weight . So the open rear lid must
be supported or the weight must be re
moved from the luggage rac k first.
@ Tips
- If the rear lid is open or not properly
locked when the ign ition is turned on,
the door and rear lid warning ~
page 22
appears in the instrument cluster dis-
play .
- T he automatic rear lid opening/clos ing
process can be stopped by ho ld in g the
re ar lid w ith your hand. The lid can then
be f urther opened/closed by h and.
- I f there is a mechan ica l problem wit h the
automatic rear lid
opening proces s or
there is an obstruction, the process is
stop ped immediately.
- I f there is a mechan ica l problem wit h au
tomatic closing for the rea r lid or there
is an obstr uction, it opens again slightly
r ight away . Chec k to see why the rear lid
cou ld not be closed before attempting to
close it again .
- If the rear lid on a locked vehicle is un
locked with the midd le button~ on the
remote key, the rear lid is automat ically
locked again immed iate ly after closing .
T his is indicated by the turn signals
blinking.
- The followi ng applies to vehicles equ ip
ped w ith the Convenience key* feature: if
the remote control key is left in the lug
gage compa rtment, l uggage compa rt
ment w ill autom atic ally unlo ck itsel f af
ter yo u lock the vehicle. This preven ts
you from unintentionally locking you r
key in the luggage compartment.
- If the vehicle battery charge drops be low
a certain level, yo u can sti ll open o r close
the rear lid manually, however, you w ill
need to apply more force to close it. ..,.
Page 51 of 348
@ Tips
-In order to activate the chi ld safety lock
on the left and the right side, you have to press the two safety buttons in succes
sion.
- Make certain that the check light comes
on in the corresponding safety sw itch
when the child safety lock is activated.
Convenience key
Description
A pp lies to vehicles: with Convenie nce key
Access and vehicle operation based on: Mas
ter key remains in driver 's pocket .
The Convenience key veh icle authorization
system allows
keyless unlock ing , locking and
starting of the vehicle . You only have to carry
the master key on your pe rson.
It makes no d ifference whether the master
key is in your jacket pocket or in your brief
case . As soon as you approach your vehicle,
the Convenience key recognizes the request
for access, checks for a uthorization and ena
b les the fo llowing functions:
- Unlocking the vehicle~
page 49.
-Locking the vehicle~ page 50.
-Switching on ignition and starting the en -
gine by pressing the
I START! button; the
master key does not have to be in the igni
t ion switch
~page 107.
_& WARNING
-When you lock your vehicle from outside,
nobody- especially ch ildren -should re
main inside the vehicle. Remember,
when you lock the vehicle from the out
side the windows cannot be opened from
the ins ide .
- When you leave the vehicle, always re
move the ignition key and take it with
you. This will prevent passengers (chil
dren, for example) from accidentally be
ing locked in the veh icle should they acci-
Opening and clo sin g 49
dentally press the power locking switch
in the front doors.
- Do not leave chi ldren inside the vehicle
unsupervised. In an emergency it would
be imposs ible to open the doors from
the outside without the key.
(D Tips
- In order for the Convenience key to func
tion, you must a lways carry the master
key with you .
- In order to be able to unlock or lock the
vehicle, the author ized master key must
be within a range of about S feet (l.S
meters) from the door or the rear lid.
- Of course, you can still unlock and lock
your vehicle using the buttons on the
master key . The selector lever must be in
the P position .
- For Declaration of Compliance to United
States FCC and Industry Canada regula
tions ~
page 328.
Unlocking the vehicle
App lies to vehicles : wit h Co nve nience key
The doors and the rear lid can be unlocked
without operating the master key .
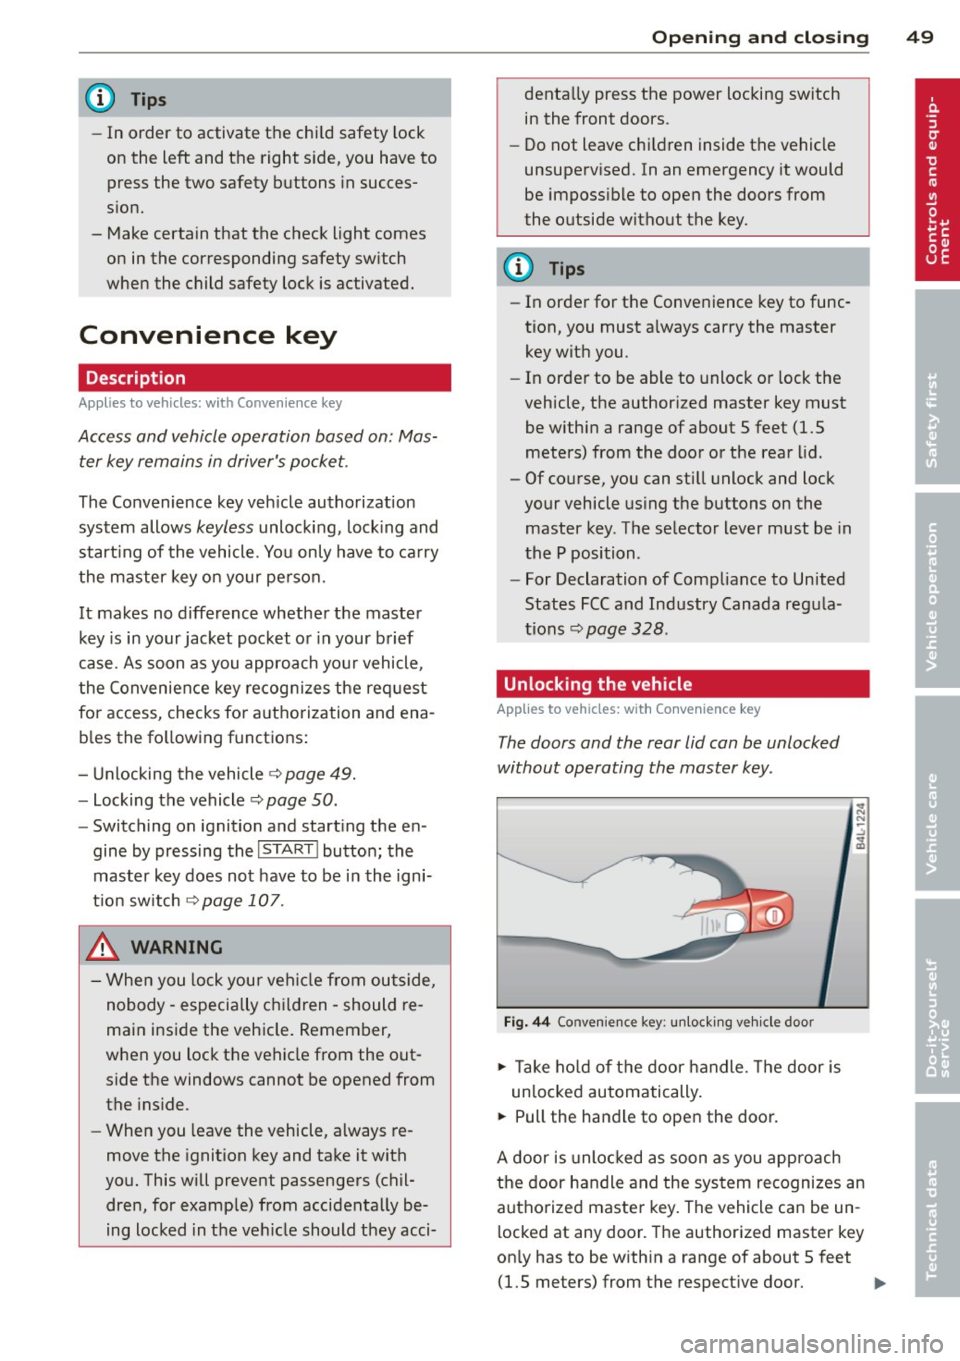
Fig. 44 Convenie nce key : unlocking vehicle door
.,. Ta ke hold of the door handle. The door is
un locked automatically.
.,. Pull the handle to open the door.
A door is unlocked as soon as you approach
the door handle and the system recognizes an
authorized master key. The vehicle can be un
locked at any door. The authorized master key
on ly has to be within a range of about 5 feet
(1.5 meters) from the respective doo r.
II>-
Page 53 of 348
How is the anti-theft alarm system
switched off?
The anti -theft a la rm system is switched off
on ly when you unlock yo ur vehicle. If yo u do
not open a door w ith in 60 seconds after you
have unlocked with the remote control , the
ve hicle w ill lock itse lf again automat ically .
When will the anti-theft alarm sy stem be
triggered?
W hen the ve hicle is locked, the alarm system
mon itors and protects the following parts of
the vehicle:
- engi ne compartment
- lu ggage compartment
- doo rs
- i gnition
When the system is activated, the alarm will be tr iggered if on e of the doo rs, the eng ine
h ood or t he rear lid a re opened, o r if the ig ni
tion is tur ned on. The anti-t heft alarm sys tem
will also go off when the battery is discon
nected .
You can a lso tr igge r the alarm by p re ssing t he
P ANIC button o n your remote con trol. T his
will alert other peop le in case of emergency.
Press the
PANIC b utton again to t urn off the
a larm.
How is the anti-theft alarm switched off
when triggered?
The a larm system is switc hed off when you
un lock the vehicle o r whe n the ignition is
sw itched on. The alarm will also switch itself
off when it comes to the end of its cycle.
Emergency flasher and horn
The emergency flas her wi ll blink brief ly and
the hor n sounds when the doors, engine hood
and rear lid are proper ly closed .
If th e emergen cy fl ashe rs do no t blink , or the
horn does no t sound, check the doors, engine
h ood an d rear lid to make sure they are p rop
erly closed.
If you close a door, t he hood o r
the rear lid w ith the anti-theft alarm sw itched
on, the emergency flashers will b link and the
Opening and clo sin g 51
horn wi ll sou nd on ly afte r you have closed the
door or li d.
(D Tips
For the anti-theft ala rm sys te m to fu n c
tion properly, make sure all ve hicle doors
and win dows are closed before leavi ng t he
vehicle .
Power windows
Controls
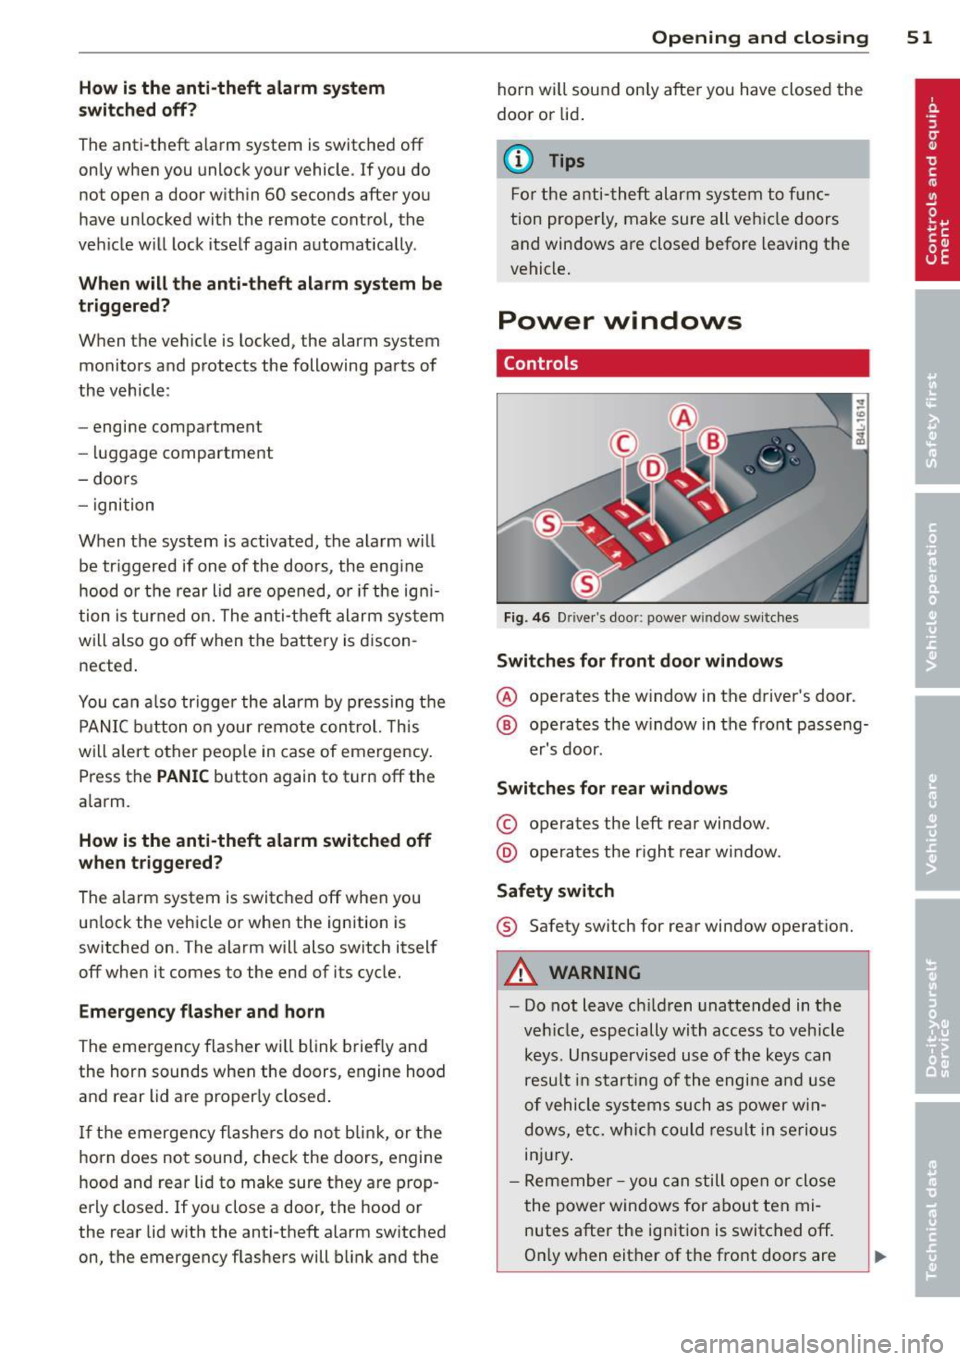
Fig. 4 6 Drive r's doo r: power w indow sw itches
Switches for front door windows
@ o p erates the w indow in the d river's door.
® opera tes the w indow in the front passe ng-
er's door .
Switches for rear windows
© operates the left rear window.
@ operates the r ight rear wi ndow.
Safety switch
® Safety switch for rear window operat ion.
A WARNING
- Do not lea ve c hildren unattended in t he
ve hicle, especially wi th access to veh icle
keys. Unsupervi sed us e of the keys can
resu lt in start ing of the engi ne and use
o f vehicle system s such as po wer w in
dows, etc. w hich co uld res ult in se riou s
in jur y.
- R eme mber -you can s till ope n or close
the powe r win dows for about ten mi
n utes after the ign ition is switc hed off.
O nl y w hen eit her of t he fro nt doors are
Page 54 of 348
52 Openin g and clo sing
opened are the power windows switched
off.
- Be careful when closing the windows .
Check to see that no one is in the way, or
serious injury could result!
- Always remove the ignition key whenever
you leave your vehicle.
- If you lock your vehicle from the outside,
no one, especia lly children, sho uld re
main in the vehicle .
- Do not stick anything on the windows or
the windshield that may interfere with
the driver's fie ld of vision.
In addition to t he switches in the drive r's
door there is a separate switch in each
door for the power window in that door
¢ page 53, fig. 47.
Switches in the driver's door
T he driver can operate all windows.
I f the respective switch is pushed or pulled
the w indow will open or close. The power win
dow switches have a
two -positi on fun ction :
Opening the windows
.. Push the sw itch to the fir st stop and hold it
there unt il the wi ndow has lowered to the
desired position.
.. Push the switch briefly to the
sec ond stop:
the window wi ll automatically open all the
way.
Closing the windows
.. Pu ll the switch up to the fir st stop and ho ld
it there until the window has risen to the de
sired position .
.. Pu ll the switch q uickly to the
second po si
tion :
the w indow w ill automatically close all
t he way ¢
A in Controls on page 5 l.
Activating /deactivating the r ear windows
.. Press the left [!I switch ¢ page 51 , fig. 46 to
deactivate on ly the window regulator in the
left door. The indicator light in the switch i l
luminates.
.. Press the right
[!I switch ¢ page 51, fig. 46
to
d eacti vate only the window regu lator in
the
right door. The ind icator light in the
sw itch illuminates .
.. Press the
[!I sw itch aga in to reactivate the
w indow regu lator . The indicato r light in the
sw itch goes out .
If you press both
[!I switches ® in succession,
the following funct ions are switched off in the
rear of the vehicle:
- The window regulator switches in the rear
doors .
- The buttons for the Panoramic slid ing su n
roof* .
- On veh icles with rear climate control*, oper
ation from the rear is blocked . Dashes" ---"
are show n in the displays for the rear cli
mate cont ro ls, and the rear air-cond ition ing
can only be operated from the climate con
trols in the cabin ¢page 97.
- I f
only th e left [!I sw itch was pressed, the
w indow regu lator in the
left rear do or and
t he buttons in t he rear for the Panoramic
sliding sunroof* are deactivated . In addi
t ion , the door is locked .
- If
o nly the right [!I switch was pressed, the
w indow regu lator in the
right re ar door and
the buttons in the rear for the Panoramic
sliding sunroof* are deactivated . In addi
tion, the door is locked.
T his feature has been provided for the safety
of small children riding in the rear of the ve hi
cle .
(D Tips
- T he windows can sti ll be opened and
closed for about ten minutes after the
ignition has been t urned off . The powe r
w indows are not shut off unt il one of the
front doors is opened.
- In order to act ivate the child safety lock
on the left and the right side, you have to
press the two safety switches in succes
sion . Make certa in that the check light
comes on the correspond ing safety
Page 58 of 348
56 Openin g and clo sing
& WARNING
Be careful when closing the Panoramic
sliding sunroof. Not pay ing attention cou ld
cause you or others to be trapped and in
jured as the Pa noramic s lid ing sunroof
closes.
Opening and closing sunshade
App lies to vehicles: with Pa norami c sli di ng sunroo f
s [:)
o::~ o ..
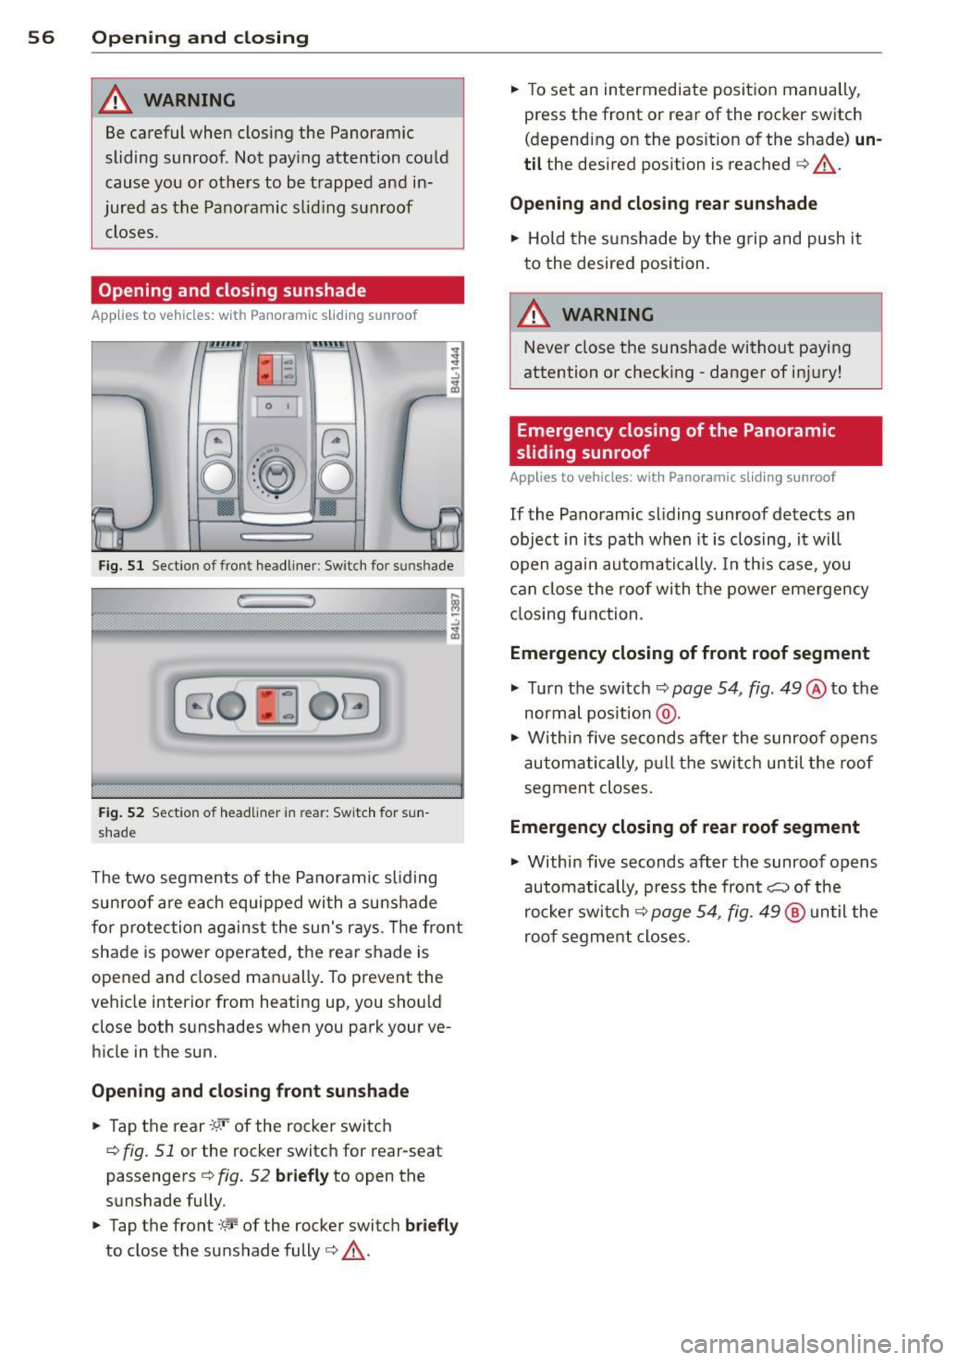
Fig. S l Section of front head liner : Sw itch fo r su nshade
r: ,
B O ~ OG
Fig. 5 2 Section of headliner in rear: Switc h for sun
shade
The two segments of the Pano ramic sliding
sun roof are each equipped with a suns hade
for protection against the sun's r ays. The fro nt
shade is power opera ted, the rear shade is
opened and closed ma nually . To prevent the
vehicle interior from heating up, you should
close both sunshades when you park your ve
hicle in the sun.
Opening and clo sing front sunshade
.,. Tap t he rear -:w· of the rocker switc h
<=> fig. 51 or the rocker switc h for rear-seat
passengers
c:> fig. 52 briefly to open the
sunshade fully .
.,. Tap the front
:y'T-of the rocker switch briefl y
to close the sunshade fully c:> &.-
.,. To set an intermediate position manually,
press the front or rear of the rocker switch
(depending on the pos ition of the shade)
un
til the desired position is reached c:> &.-
Opening and clo sing rea r sun shade
.,. Hold the sunshade by the g rip and push it
to the desired position.
A WARNING
Never close the sunshade without paying
attention or checking - danger of in jury!
· Emergency closing of the Panoramic
sliding sunroof
App lies to vehicles: wit h Pano ramic sli ding su nroof
If the Panoramic sl iding sunroof detects an
object in i ts path when it is closing, it w ill
open again automa tically. In th is case, you
c an close the roof with t he power emergency
cl osing function.
Emergency closing of f ront roof segment
.,. Turn the switch c:> page 54, fig . 49 @to the
normal pos ition @ .
.,. Within five seconds after the sunroo f opens
a utomatically, pu ll the switc h until the roof
segmen t closes .
Emergency closing of rear roof segment
.,. Within five seconds after the sunroof opens
automatically, p ress the front~ of the
rocke r swi tch
c:> page 54, fig. 49 @ until the
roof segme nt closes.
Page 59 of 348
Clear vision Lights
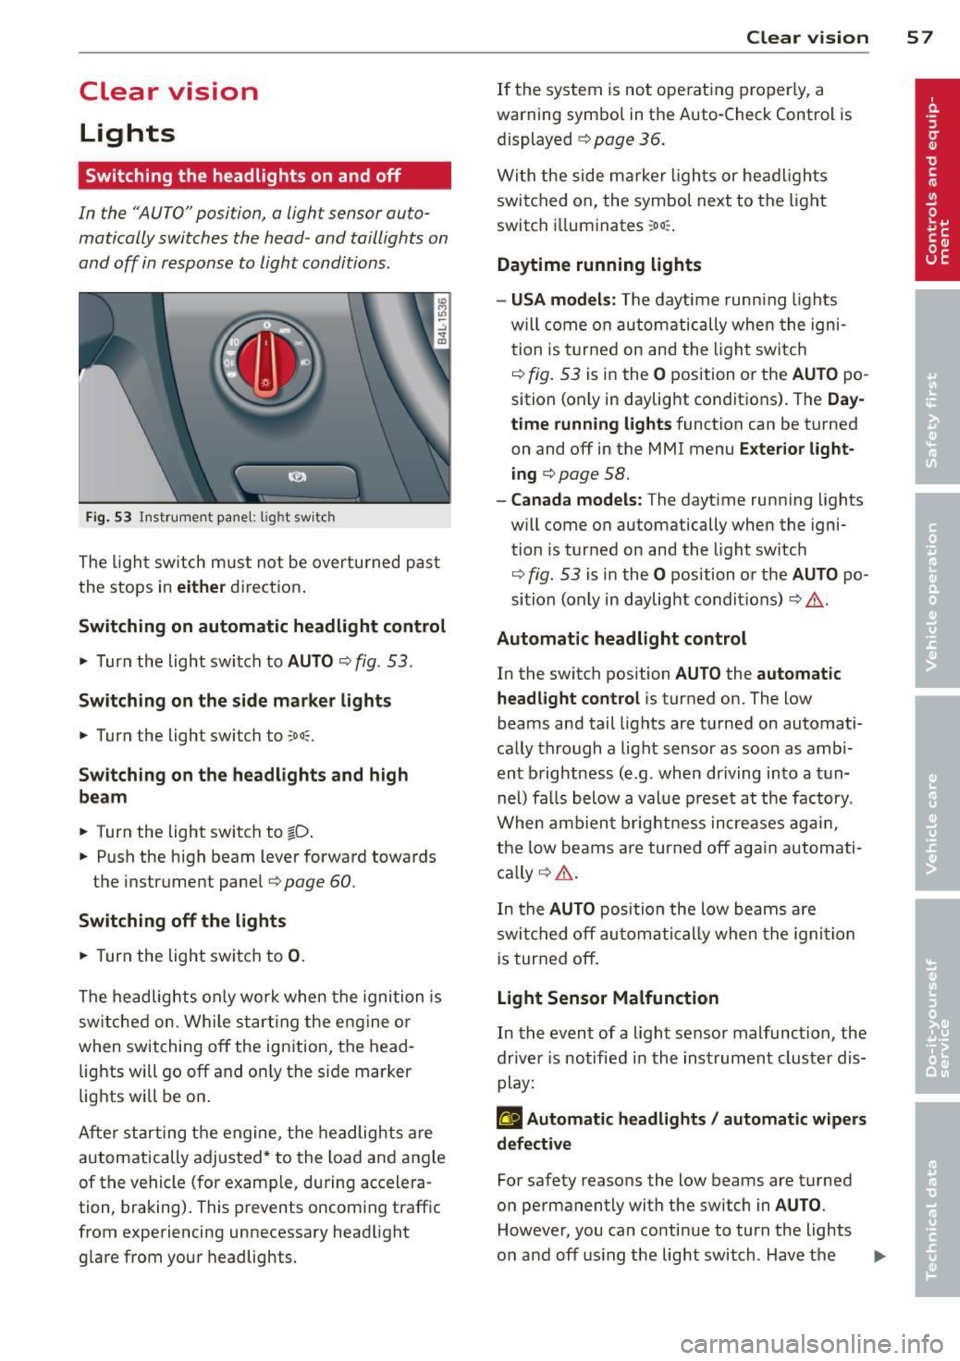
Switching the headlights on and off
In the "AUTO" position, a light sensor auto·
matically switch es t he head· and taillights on
and off in r espons e to light conditions .
Fig. 53 Instrument pane l: lig ht sw itch
The ligh t sw itch m ust not be overturned pas t
the stops in
eit her direct ion .
Sw itching on automatic headlight control
,.. Turn the light switch to AUTO ¢ fig . 53 .
Swi tching on the side m ark e r lights
,.. Turn the light switch to :;oo:;.
Sw itching on the headlights and high
be am
,.. Turn the light switch to io .
,.. Push the high beam lever forward towards
the instrument panel
9 page 60 .
Switching off the light s
,.. Turn the light switch to 0.
The headlights only wo rk when the ignition is
sw itched on. While s tart ing the engine or
when switching
off the ignition, the head ·
lights will go
off and on ly the s ide marker
lights will be on .
Afte r star ting t he engine, the headlights are
automatically adjusted* to the load and angle
of the vehicle (for example, during accelera ·
tion, braking). This prevents oncoming traffic
from experiencing unnecessary headlight glare from your headlights.
Clear vi sion 5 7
If the system is not ope rat ing properly, a
warning symbol in the Auto-Check Control is displayed ¢
page 36.
With the side ma rker ligh ts or he ad ligh ts
switched on, the symbol next to the light
switch i lluminates
:oo :.
Daytime running lights
- USA model s:
The daytime runn ing lights
w il l come on automatically whe n the igni
tion is t urne d on and the l ight sw itch
¢
fig. 53 is in the O position or the AUTO po
sition (only in daylight conditions). The
Day
time running lights
function can be turned
on and
off in the MMI menu E xter ior l ight ·
ing
¢ page 58.
- Canada models: The dayt ime running lights
w ill come on automatically when the igni·
tion is turned on and the light switch
¢
fig. 53 is in the O position o r the AUTO po ·
sition (only in daylight condit ions) ¢ .&. .
Automatic headlight control
In the switch position AUTO the automatic
headlight control
i s turned on. The low
beams and tail lights are turned on automati·
ca lly through a light sensor as soon as amb i
ent b rightness (e.g . when driving into a t un
nel) fa lls below a value p reset a t the factory.
When ambien t brightn ess increases ag ain ,
the low beams are turned
off ag ain automati
ca lly ¢ .&. .
In the
AUTO posi tion the low beams a re
swi tched
off au tom ati cally when the igni tion
is tur ned
off.
Light Sensor Malfunction
In the event of a light sensor malfunction, the
dr ive r is notified in the instrument cluster dis
play:
g Automatic h eadlights / automatic w ipers
defective
For safety reasons the low beams are t urned
o n permanently with the switch in
AUTO .
However, you can conti nue to turn the lights
o n and
off using the light switch . Hav e the II>