Check AUDI Q7 2013 Owner´s Manual
[x] Cancel search | Manufacturer: AUDI, Model Year: 2013, Model line: Q7, Model: AUDI Q7 2013Pages: 348, PDF Size: 87.72 MB
Page 131 of 348
Audi side assist Lane Change Assistant
Description
App lies to vehicles: with side assist
The side assist helps you when changing
lanes .
AUDl Q7
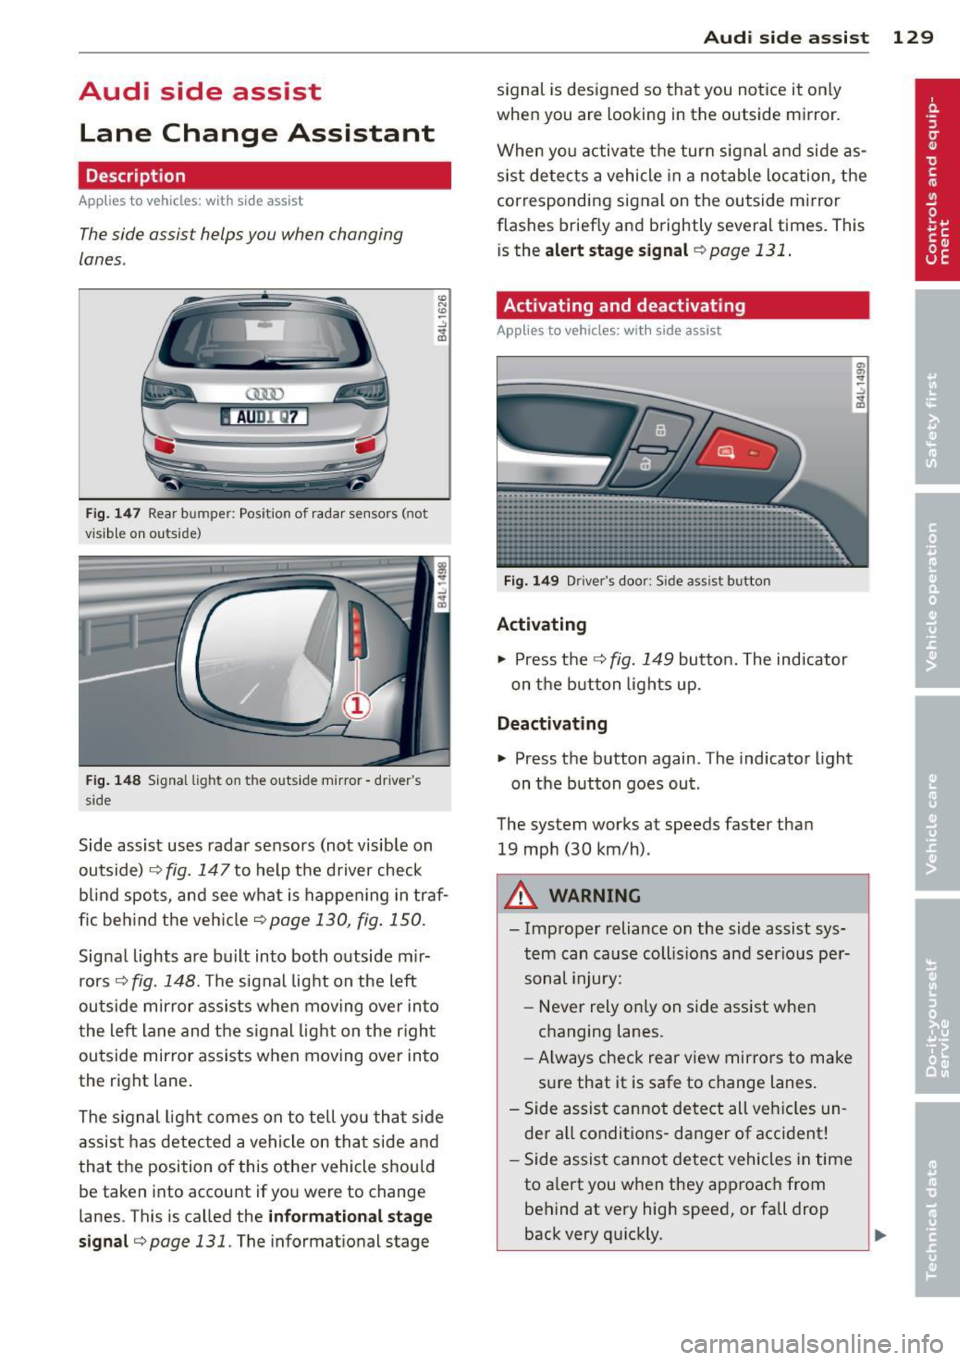
Fig. 147 Rear b umper: Pos it ion of radar sensors (not
v isib le on outside)
Fig . 148 Signal light on the outside mirror -driver 's
s ide
~ -..:, .. (D
Side assist uses radar sensors (not visib le on
outside) ¢
fig. 147 to help the driver check
b lind spots, and see what is happen ing in traf
fic beh ind the veh icle
¢ page 130, fig. 150.
Signal lights are bu ilt into both outside m ir
r ors ¢
fig. 148. The signal light on the left
outside mirror assists when moving over into
the left lane and the signal light on the r igh t
ou tside mirror assists when moving over in to
the right lane .
The s ignal light comes on to tell you that side
assis t has detec ted a vehicle on tha t side and
that t he position of this othe r vehicle should
be taken into account if yo u were to change
lanes . This is called the
informatio nal st age
sign al¢
page 131. The informat ional stage
Aud i side assist 129
signal is designed so that you notice it on ly
when you are looking in the outside mirror.
When yo u activate the turn signal and side as
s ist de tects a vehicle in a no table location, the
corresponding signal on the outside mi rror
flashes briefly and brightly several times. This
is the
a lert stage signal ¢ page 131 .
Activating and deactivating
Applies to vehicles: wit h side assist
Fi g. 14 9 Drive r's doo r: Side assist button
Activating
.,. Press the ¢
fig. 149 button. The ind icator
on the b utton lights up.
Deactivating
.,. Press the button again. The indicator light
on the button goes out .
The system works at speeds faster than
19 mph (30 km/h) .
A WARNING
-Imp roper reliance on the side assist sys
tem can cause collis ions and serio us pe r
sonal injury:
- Never rely on ly on side assist when
changing lanes.
- Always check rear view mirrors to make
su re that it is safe to change lanes.
- Side assist canno t detect all veh icles un
de r all conditions- danger of accident!
- Side assist cannot detect vehicles in time
to a lert you w hen they app roac h from
behind at very hig h speed, or fall drop
back very qu ickly.
~
Page 133 of 348
next to the lane you are using
¢page 135.
Operation
Applies to vehicles: with side assist
Side assist compares the distance and differ
ence in speed of detected vehicles with the
speed of your vehicle . Whenever the differ
ence in speed and d istance is registered as no
table if you were to change lanes, a signal l ight appea rs on the respective mirror.
The signal can light up if you are passed by a
vehicle or if you are pass ing another vehicle.
If you pass another vehicle s lowly (difference
in speed less than 9 mph, or 15 km/h), the
signal light will come on as soon as the other
vehicle is in your blind spot and is detected by
side assist . When the difference in speed is
g reater, the signal light will not come on.
Informational and alert stage signals
Applies to vehicles: with side assist
Side assist has two signal stages:
- the informational stage signal, and
- the alert stage signal.
Side assist he lps you by using the appropriate
signal stage, depending on whether or not
you have activated the turn signal, and thus have indicated that you are or are not chang
in g lanes .
Informational stage signal
As long as you have not activated the turn sig
nal, side assist informs you of detected
vehicles that are registered as being in a nota
b le location if you were to change lanes.
Whenever the detected vehicle's difference in speed and distance is registered by side assist
as notable, the signal light on the respective
mirror produces muted illuminat ion.
The br ightness of the informat ional stage sig
nal is designed not to be as intense, so that it
does not interfere with your view of the road
when yo u are driving and have no intention of
changing lanes. When you look i n the outside
Aud i side assist 131
mirror, you can clearly see the informational
stage signal.
Alert stage signal
When you activate the turn signal, and s ide
ass ist has detected a vehicle in a notable loca
t ion on that part icular s ide, the signa l light on
this side mirror flashes brightly. The repeated
brief and bright flashing of the alert stage
signal reminds you to carefully check traffic to
the rear in the outside mirror and over your
shoulder, so that you can safely complete the lane change
¢ A in Safety tips on page 136 .
@ Tips
The brightness of the signal light on the
outside mirrors can be adjusted with the
MMI ¢page 134.
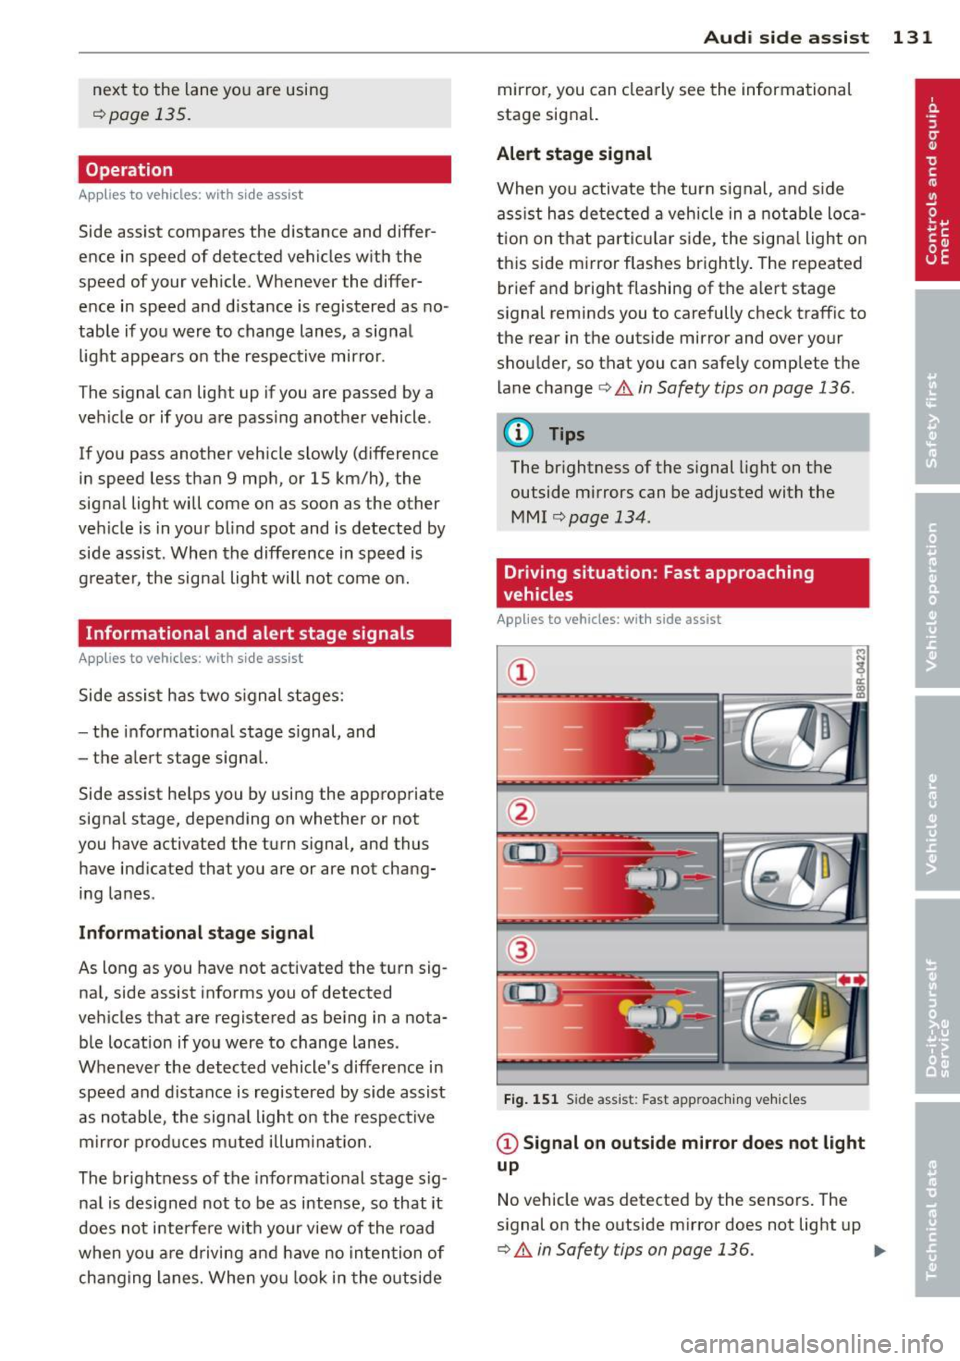
Driving situation: Fast approaching
vehicles
Applies to vehicles: with side assist
Fig. 151 Side assist : Fast app roaching vehicles
@ Signal on outside mirror does not light
up
No vehicle was detected by the sensors. The
signal on the outside mirror does not light up
¢ A in Safety tips on page 136. IJJ,,
Page 137 of 348
Lane width
Applies to vehicles: with side assist
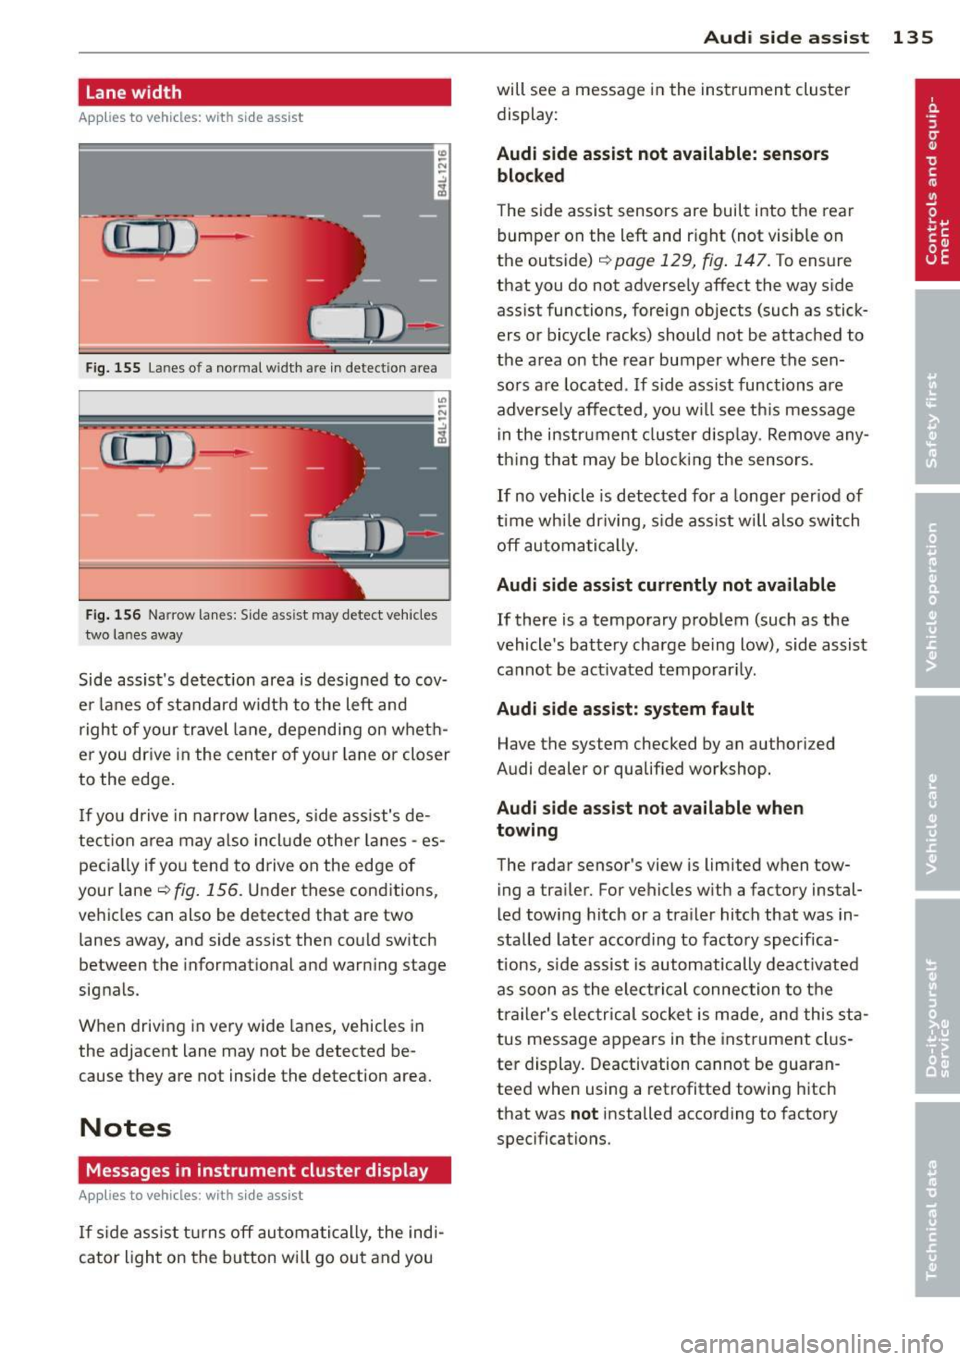
-· Fig. 155 Lan es o f a norma l wid th a re in detect ion area
Fig . 156 Narrow lanes: Side ass ist may detect vehicles
two la nes away
Side assist's detection area is designed to cov
e r l anes of standard w idth to the left and
r ight of your travel lane, depending on wheth
er you dr ive in the center of your lane or closer
to the edge.
I f you drive in narrow lanes, s ide ass ist's de
tec tion a rea may a lso incl ude other lanes -es
pec ia lly if you tend to drive on the edge of
your lane
c:::> fig. 156 . Under these cond it ions,
ve hicles can also be detected that are two
lanes away, and side assist then could switch
between the informat ional and warn ing stage
signals.
When driving in very wide lanes, vehicles in
the adjacent lane may not be detected be
cause they are not inside the detection area.
Notes
Messages in instrument cluster display
Applies to vehicles: with side assist
If s ide ass ist t urns off automa tically, the ind i
cator l igh t on the button wi ll go ou t and you
Aud i side assist 135
will see a message in the instrument cluster
display:
Audi side assist not available: sensors
bloc ked
The side assist sensors are built into the rear
bumper on the left and r ight (not visible on
the outside)
c:::> page 129, fig . 147. To ensure
that you do not adversely affect the way side
ass ist functions, foreign objects (such as stick
ers or bicycle racks) should not be attached to
the area on the rear bumper where the sen
sors a re located . If side ass ist functions are
adverse ly affec ted, you w ill see th is message
in the instrument cluster disp lay . Remove any
th ing t hat may be blocking the sensors.
If no vehicle is detected for a longer per iod of
t ime wh ile dr iv ing, s ide ass ist w ill also switch
off automatically.
Audi s ide as sist cu rrentl y not available
If there is a temporary problem (such as the
vehicle 's battery charge be ing low), side assist
cannot be act ivated temporar ily .
Audi side assis t: sy stem fault
Have the system checked by an author ized
Audi dealer or qualified workshop.
Audi side assist not availabl e when
towing
The radar sensor's view is limited when tow
ing a tra iler. For vehicles with a factory instal
led tow ing hitch or a trailer hitch that was in
stalled later according to facto ry specifica
tions, s ide ass ist is automatically deact ivated
as soon as the ele ctrical connection to the
trailer's e lectrical socke t is made, and this sta
tus message appears in the instrument clus
ter display. Deactivation cannot be guaran
teed when using a retrofitted towing hitch
that was
not installed according to factory
specifications.
Page 138 of 348
136 Audi side a ssis t
Safety tips
App lies to vehicles: wit h side ass ist
The s ide ass ist detect ion may be lim ited when
d riving around narrow street corners , on hilly
streets, and under poor weathe r cond itions.
It is poss ible that the radar sensors may also
detect other objects , such as high or stag
gered guardra ils .
Side assist does not measure actual lane
width . The system assumes a fixed lane w idth .
Detection in the left and r ight lanes is based
on this assumed lane width . When driving on
na rrow roads or when driving to the left or
right of the center of a travel lane , it is possi
b le that vehicles will be detected that are
not
in the lane next to the lane you are using.
A WARNING
- Improper reliance on the s ide assist sys
tem can cause collisions and serious per
sonal injury :
- Never rely only on side assist when
changing lanes .
- Always check rear view mirrors to make
sure that it is safe to change lanes.
- Side ass ist cannot detect a ll vehicles un
der all cond itions- danger of accident!
- Side ass ist cannot detect vehicles in time
to alert you when they approach from beh ind at very h igh speeds or drop back
very quick ly .
- T he radar sensor's
vision can be reduced
or entirely blocked by rain, snow, and
heavy spray. This can result in side assist
not adequately detecting vehicles or, in
some cases, not detecting them at a ll.
Always keep an eye on the direction you are traveling and the relevant area
around the vehicle .
- Please note that side assist indicates
there are approaching vehicles, or
vehicles in your blind spot, only after
your vehicle has reached a driving speed
of at least 19 mph (30 km/h). -
Side assist signa l does not work around
tight corners (turning radius less than
328 feet, or 100 m).
- Side assist is no replacement for the driv
er 's full attention. The driver alone is re
sponsible for lane changes and sim ilar
driving maneuvers. Always keep an eye
on the d irect ion you are traveling and the
re levant area around the vehicle.
(D Note
To ensure that side assist is not adversely
affected, you should not block the area on
the rear bumper where the radar sensors
are located with foreign objects (such as
with stickers or bi cycle racks).
(D Tips
If the pos itions of the radar sensors have
been changed as a result of a rear end-co l
lision, for instance, have s ide assist
checked by an autho rized Aud i dealer for
safety reasons.
Page 145 of 348
Parking systems
General information
App lies to vehicles: with rea r park assis t/Audi park ing sys
tem plus w ith rearview camera/front -and rearview cam
era
Depending on your vehicle's equipment, vari
ous parking aids will help you when parking
and maneuvering.
The
rear park assist is an acoustic park assist
system that will give you a sound warning to let you know there is something
behind the
veh icle ¢page
144 .
The Audi parking system plus with rearview
camera
audibly and visually tells you there is
something
in front of and behind the vehicle .
A rearview camera also shows you what is be
hind the vehicle ¢ page
144 .
The Audi parking system plus with front- and
rearview camera
audibly and visually tells you
there is something
in front of and behind the
veh icle. A front and rearview camera also
shows you what is in front of and behind the
veh icle¢ page
148 .
& WARNING
-Always look for traffic and check the area
around your vehicle by looking at it di
rect ly as well. The parking system cannot
replace the driver's attention. The driver
is a lways responsible for safety during
park ing and for all other maneuvers.
- Please note that some surfaces, such as clothing, are not detected by the system.
- Sensors and cameras have blind spots in
wh ich people and objects cannot be de
tected. Be especially cautious of children
and animals.
- The sensors can be displaced by impacts
or damage to the radiator grille, bumper,
wheel housing and the underbody . The
park ing systems may become impaired
as a resu lt. Have your authorized Audi
dealer or qualified workshop check their
function.
- Make sure the sensors are not covered by
stickers, deposits or any other obstruc-
Parking systems 143
tions as it may impair the sensor func
tion. For informat ion on cleaning, refer
to¢ page
247.
([) Note
-Some objects are not detected by the
system under certain circumstances:
- Objects such as barrier chains, trailer
draw bars, vertical poles or fences
- Objects above the sensors such as wall
extensions
- Objects w ith specific surfaces or struc
tures such as chain link fences or pow
der snow.
- If you continue driving closer to a low-ly
ing object, it may disappear from the
sensor range. Note that you w ill no lon
ger be warned about this obstacle.
@ Tips
-The system may provide a warning even
though there are no obstacles in the cov
erage area in some situations, such as:
- certain road surfaces or for long grass.
- externa l ultrasonic sources e .g . from
cleaning vehicles.
- heavy rain, snow or thick vehicle ex
haust.
- We recommend tha t you practice park
ing in a traff ic-free location or parking
lot to become familiar with the system.
When doing this, there should be good
light and weather cond itions.
- You can change the vo lume and pitch of
the s ignals as well as the disp lay
¢page
153.
- Please refer to the instructions for tow
ing a trailer ¢page
153.
-What appears in the MMI display is
somewhat time-delayed.
Page 151 of 348
-If the position or the installation angle
of a camera was changed, after a colli
sion for example, do not continue to use
the system for safety reasons . Have it
checked by your authorized Audi dealer
ship .
- Use the
Rear mode and the Corner view
(rear)
mode only when the rear lid is
completely closed, otherwise the image
in the display will be inaccurate.
- Objects and obstacles
above the camera
are not displayed.
- Camera lenses enlarge and distort the
field of vision. The objects appear both
altered and inaccurate on the screen.
(0 Note
- Always read and follow the applicable
warnings
o0 in General information on
page 143 .
-The MMI display shows the direction in
which the rear of the vehicle is traveling
based on the steering wheel angle. The
vehicle front swings out more than the
vehicle rear. Maintain plenty of distance
so that your outside mirror or a corner of
your vehicle does not collide with any ob
stacles .
@ Tips
If the rear lid is open, the image in the
rearview camera is displayed without ori
entation lines and without blue surfac es.
Switching on or off
Applies to vehicles: with Audi parking system plus w ith
fro nt- and rearv iew ca mera
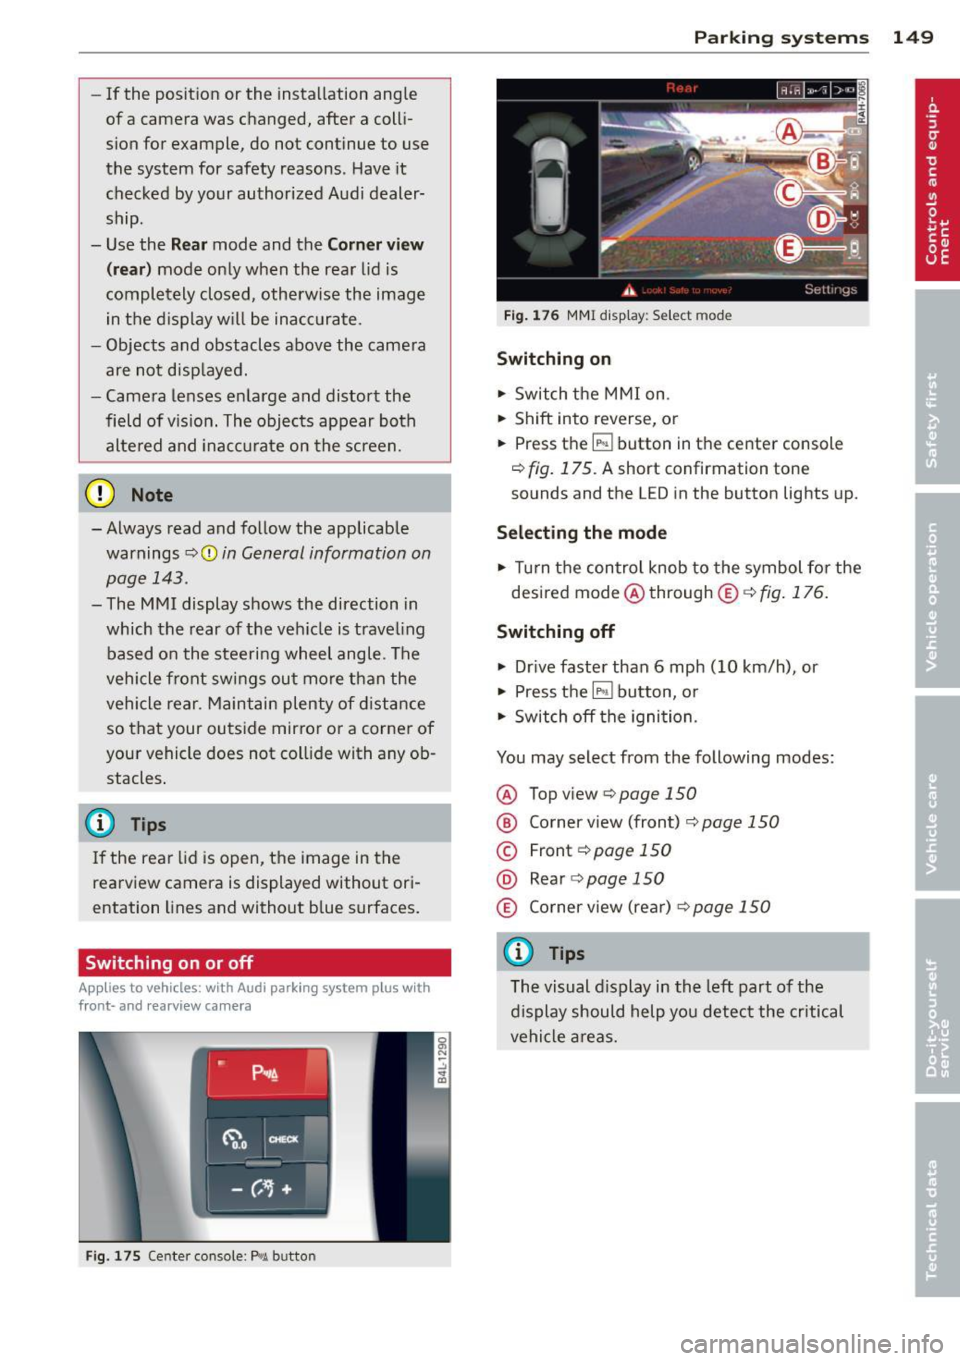
Fig. 175 Center console : P,•A but ton
Parking systems 149
Fig. 176 MMI display: Select mode
Switching on
.,. Switch the MMI on.
.,. Shift into reverse, or
.,. Press the~ button in the center console
o fig. 175. A short confirmation tone
sounds and the LED in the button lights up.
Selecting the mode
.,. Turn the control knob to the symbol for the
desired mode @through
® o fig. 176.
Switching off
.,. Drive faster than 6 mph (10 km/h), or
.,. Press the
IP>11 button, or
.,. Switch off the ignition.
You may select from the following modes:
@ Topview opage150
@ Corner view (front) ¢ page 150
© Front¢ page 150
@ Rear o page 150
® Corner view (rear) o page 150
(D Tips
The visual display in the left part of the
display should help you detect the critical
vehicle areas.
Page 161 of 348

Displaying the vehicle level
The current vehicle leve l is shown with seg
ments fi lled out in the segment disp lay @. If
on ly the bottom segment is filled out, the ve
hicle is at highway leve l. If all segments are
fi lled out, the vehicle is at high level 2 and has
the greatest amount of ground clearance pos
sible.
While the vehicle is being raised or lowered,
the target level is indicated by an arrow @
¢
fig. 189 or a white border @¢ fig. 190. The
arrow/border disappears aga in when the vehi
cle is at the target level.
Jacking mode when changing a flat tire
Applies to vehicles: with Adaptive Air Suspension
This mode must be activated in the MMI be
fore raising the vehicle with a jack or on a ve
hicle lift.
.,. Select: ICARI funct ion button> ! SETUP I
function button > Jacking mode . Or
.,. Select:
I CARI funct ion button > Car sys
tems *
control button > Servicing & checks >
Air susp.: tire change .
The vehicle jack mode must be activated be
fore changing a wheel so that the automatic
control processes fo r the a ir suspension do
not make lift ing with the vehicle jack more dif
ficult.
The check lamp
II in the instrument cluster
d isplay illuminates in vehicle jack mode.
0) Tips
The vehicle jack mode is switched off auto
mat ically at speeds above 9 mph (15 km/
h).
Towing a trailer
Appl ies to vehicles: with towing hitch and Adaptive Air
Suspension
Automatic lowering is not desirable when
towing a trailer.
.,. Se lect: ICARI function button > !SETUP I
function button > Towing mode. Or
Adaptive A ir Suspension 159
.,. Select: I CAR I function button > Car sys
tems*
control button > Vehicle settings >
Air susp.: towing.
As long as towing mode is activated, a vehicle
with a trai ler appears in the
adaptive air sus
pens ion
main menu.
Level Adjustment when towing a trailer
- Before hit ching up the trailer and before ad
jus ting the tongue weight at the trailer, the
automatic or comfort mode
must be se lect
ed so that the ve hicle can be at normal level
¢ page 157, MMI settings.
-If driving in dynamic mode is desired, this
mode
must be selected before hitching up
the trailer and before adjusting the tongue
weight. However, note that your vehicle is lowered and ground clearance is reduced.
- If you have to dr ive under difficult road con
ditions, you can select offroad or lift mode,
after hitch ing up the trailer or after adjust
ing the tongue weight .
- If the veh icle is at
normal level, and you se
lect offroad mode wh ile traveling at speeds
higher than 22 mph (35 km/h), the veh icle
w ill not be ra ised. Offroad mode will appear
as the active mode in the MMI Display.
- If the veh icle is in offroad mode at
high level
1 ,
it automatically lowers to normal level
when the vehicl e is t ravel ing at speeds ex
ceeding approximately 31 mph (SO km/h).
The vehicle is automatical ly raised to
high
level 1
again when the traveling speed falls
be low approx imately 25 mph (40 km/h).
Restrictions when operating with a trailer
When operating w ith a trailer, the lift mode
can only be selected up to about 12 mph (20
km/h) . Lift mode is automatically cance led
again when a speed of about 25 mph (40 km/
h) is exceeded.
If t he vehicle is in automatic, comfort, offroad
or lift mode before the trai ler towing mode is
activated, the dynamic mode cannot be acti
vated .
If t he vehicle is in dynamic mode before tow-
ing operation is activated, it can be driven in
IJI,-
Page 189 of 348
as defined in the electronic control unit
¢ page 195, PASSENGER AIR BAG OFF light .
Always remember, a chi ld safety seat or infant
carrier installed on the front seat may be
struck and knocked out of position by the rap
id ly inflating passenger's airbag in a frontal
coll is ion . The airbag cou ld greatly reduce the
effectiveness of the child restraint and even
seriously injure the child during inflat ion.
F or this reason, and because the back seat is
the safest p lace for children -when properly
restra ined accord ing to their age and si ze - we
strongly recommend that children always sit in the back seat¢
page 205, Child Safety.
A WARNING
A child in a rearward-facing child safety
seat insta lled on the front passenger seat
w ill be seriously injured and can be k illed if
t he fron t airbag inf lates - even with an Ad
vanced Airbag System .
- The inflating a irbag w ill hit the child
sa fety seat or infant carrier w it h great
f orce and w ill smash the ch ild safety seat
and child against the backrest, center
armrest, door or roof.
- Always install rear -facing child sa fety
seats on the rear seat.
- If you mus t install a rearward facing
child safety seat on the front passenger
seat because of exceptional circ umstan
ces and the
PASSENGER AIR BAG O FF
light does not come on and stay on, im
med iately install the rear-facing child
safety seat in a rear seating posit ion and
have the a irbag system inspected by you r
authori zed Aud i dealer.
- Forward-fac ing ch ild safety seats instal
led on the front passenger's seat may in
terfere with the deployment of the air
b ag and cause serious person al injury to
the ch ild .
WARNING
If, in exceptional c ir c umstances, you mus t
install a forwa rd -facing child restra int on
the front passenger's seat:
A irbag system 187
-Always ma ke sure the forward-facing
seat has been designed and certified by its manufacturer for use on a front seat
with a passenger front and s ide a irbag.
- Never put the forward-facing child re
straint up against or very near the instru ment panel.
- Always move the passenger seat into its
rearmost position in t he seat's fore and
aft adj ustment range, as fa r away from
the airbag as possible before installing
the forward-fa cing ch ild restra int. The
backrest mu st be a dju ste d to an upright
posi tion.
- Ma ke sure that the
PASSENGER AIR BAG
OFF
li ght comes on and stays on all the
time wheneve r the ignit ion is swi tched
on.
A WARNING
To reduce the risk of serious injury, make
sure that the
PASSENGER AIR BAG OFF
light wi ll be displayed whenever a child re
straint is installed on the front passenger
seat and the ignition is sw itched on.
- If the
PASSENGER AIR BAG OFF light
does not stay on, perform the checks de
scribed ¢
page 195, Monitoring the Ad
vanced Airbag System .
-Take t he chi ld restraint off the front pas
senger seat and install it properly at one
of the rear seat positions if the
PASSEN
GER AIR BAG OFF
li g ht does not stay on.
- Have the airbag system inspected by
your author ized Audi dealer immed iate
ly.
- Always carefully follow instr uctions from
child r estraint manufa cture rs when in
s tall ing c hild restra ints.
A WARNING
If, in exce ptiona l circumstan ces, you must
ins tall a forward or rearw ard-facing c hild
restra int on the front passenger's seat:
- Imp roper ins tal lation o f ch ild restraints
can reduce their effec tiveness or even
•
•
Page 193 of 348
-Always make sure the forward-facing
seat has been des igned and certified by
its manufacturer for use on a front seat
with a passenger front and side airbag .
- Never put the forward-facing child re
straint up aga inst or very near the instru
ment panel.
- Always move the passenger seat into its
rearmost position in the seat's fore and
aft adjustment range, as far away from
the a irbag as poss ible, before insta lling
the fo rward-facing child restraint . The
b ackres t m ust be adjus ted to an upr ight
posit ion.
- Make su re that the
PASSENGER AIR BAG
OFF
light comes on and s tays on all the
t ime whenever the ignition is switched
on .
Advanced Airbag System components
The front passenger seat in your vehicle has a
l ot of very important parts of the Advanced
Airbag System in it. These parts include the
weight-sens ing mat, sensors, wiring, brack
ets, and more . The function of the system in
the front passenger seat is checked by the
e lectronic control un it when the ignit ion is on .
The control un it mon itors the Advanced Air
bag Sys tem and turn s the a irbag in dica tor
light on when a ma lfunction in t he system
components is detected . The function of the
airbag indicator light is described in greater
deta il below. Because the front passenger
seat contains important parts of the Ad
vanced A irbag System, you must take care to
prevent it from being damaged . Damage to
the seat may p revent the Advanced A irbag for
the front passenger seat from doing its job in
a crash .
The front Advanced Airb ag System
consists of the following:
- Crash sensors in the front of the veh icle that
measu re ve hicle accelera tion/decele ra ti on
to provide inform ation to the Advanced Air
bag System about the severity of the crash.
A irbag system 19 1
-An elect ron ic cont ro l unit, with integrated
crash sensors for front and side impacts .
The control un it "decides" whether to f ire
the front a irbags based on the informat ion
received from the crash sensors. The control
unit also "decides" whether the safety belt
prete nsioners shou ld be act iva ted.
- An Advanced A irbag w it h gas generator for
the driver inside the steering wheel hub .
- An Advanced A irbag w ith gas generator in
side the instrument pa nel for the front pas
senge r.
- A weight-sensing mat under the upholstery
padding of the front passenge r seat cushion
that measures the to tal weight o n the seat.
The informat ion reg iste red is sent continu
ously to the elect ronic con trol u nit to regu
la te deployment of the front Adv anced Air
bag on the passenger side .
- An airbag moni tori ng sys tem and ind ic a tor
light in the instr ument cluster
q page 195.
- The PASSENGER AIR BAG OFF ligh t comes
on and st ays on in the cen ter o f th e instr u
ment panel
q page 195, fig . 212 and tells
you whe n the front Advanced Airbag on the
passenger side has been tu rned
off .
-A sensor below the safety be lt latch fo r the
front seat passenger to measure the tension on the safety be lt . The tension on the safety
be lt and the weight registered by the
weight-sensing mat he lp the control unit
"decide" whether the front a irbag for the
front passenge r seat should be turned
off or
not
q pag e 186, Child restraints on the
front seat -some important things to
know.
- A senso r in the safety belt latch fo r the d riv
er a nd fo r the fro nt sea t passenger tha t
senses w hethe r that safe ty belt is latched or
no t and transmi ts this informa tion to the
electronic control unit.
.&_ WARNING
Damage to the front passenger seat can
prevent the front airbag from work ing
properly.
-
•
•
Page 198 of 348
196 Airbag sys te m
- a car bed has been insta lled on the front
seat, or
- a rearward-facing chi ld restraint has been
installed on the front passenger seat, or
- a fo rward -facing child restraint has been in
sta lled on the front passenger seat, or
- the weight registered on the front passen
ger seat is equa l to or less than the com
bined weight of a typical 1 year -old restrain
ed in one of the rear-facing or forward-fac
ing infant restraints listed in Federal Motor
Vehicle Safety Standard 208 with which the
Advanced Airbag System in your veh icle was
certified.
If the front passenger seat is not occupied,
the front airbag will not deploy, and the
PAS
SENGER AIR BAG OFF
li ght will stay on. Nev
er install a rearward-fac ing c hild restra int on
the front passenger seat, the safest place fo r
a child in any kind of child restraint is at one
of the seat ing positions on the rea r seat
~ page 186, Child restraints on the front seat
- some important things to know
and
~ page 205, Child Safety.
If the PASSENGER AIR BAG OFF light c om es
on
when one of the conditions listed above is
met, be sure to check the light regularly to
make certain that the
PASSENGER AIR BAG
OF F
light stays on cont inuo usly whenever the
ignit ion is on. If the
PA SSENGER AIR BAG
OFF
light does not appear on and does not
stay on all the time, stop as soon as it is safe
to do so and
- react ivate the system by turning the ignition
off and then turning it on again;
- remove and re insta ll the chi ld restraint .
Make sure that the child restraint is properly
installed and that the safety be lt for the
front passenger seat has been correct ly
routed through the child restra int as descri
bed in the chi ld restrai nt manufacturer's in
stru ct ions;
- make sure that the convert ible locking fea
tu re on the safety belt fo r the front passen
ger seat has been a ctivated and that the
sa fe ty belt has been pulled tight. The belt
must not be loose or have loops of slack so that the sensor be
low the sa fe ty belt latch
on the seat can do its job~
page 215.
-ma ke sure that things tha t may increase the
weight of the ch ild and chi ld safety seat a re
not being t ransported on the front passen
ger seat;
- make sure that the safety belt tension sen
sor is not blocked. S hake the safety belt
latch on the front passenger seatback and
forth;
- If a strap or tether is be ing used to tie the
child safety seat to the front passenger
seat, make sure that it is not so tight that it
causes the weight-sensing mat to measure more weight than is act ually on the seat .
If the PAS SENGER AIR BAG OFF light still
does not come on
and does not stay on con
t in uous ly (when the ignition is switched on),
- take the child restraint off the front passen-
ger seat and install it properly at one of the
rear seat positions. Have the airbag system
inspected by your authorized Aud i dealer
immed iately.
- move the child to a rear seat position and
make sure that the ch ild is properly restra in
ed in a ch ild restra int that is app rop riate for
its s ize and age.
The
PASSENGER A IR BAG OFF light should
NOT come on when the ignit ion is on and an
adult is s itting in a proper seating position on
t h e front passenge r seat. If the
PASSENGER
AIR BAG OFF
light comes on and s tays on o r
f lashes fo r about 5 seconds w hile d riving, un
der these ci rcumstances, make sure tha t:
- the adult on the front passenge r seat is
prope rly seated on the cente r of the sea t
cushion wi th his or her back up aga inst the
backrest and the backrest is not recl ined
~ page 166 , Proper occupant seating posi
tions,
- the adult is not taking weight off the seat by
holding on to the passenger assist handle
above the front passenger door or support-
ing their weight on the armrest, .,.