AUDI R8 2007 Owners Manual
Manufacturer: AUDI, Model Year: 2007, Model line: R8, Model: AUDI R8 2007Pages: 210, PDF Size: 8.1 MB
Page 91 of 210
Driving89
Controls
Safety
Driving tips
General maintenance
Self-help
Technical data Sport driving mode
Select the sport setting for performance-oriented suspension char-
acteristics. The diode in the switch
will light up to indicate that the
sport mode is on.
Note
The warning lamp
lights up in the instrument cluster if a malfunc-
tion occurs. Drive to the nearest qualified workshop as soon as
possible and have the fault corrected.
document_0900452a816e6cc9.book Seite 89 Mittwoch, 21. Februar 2007 1:32 13
Page 92 of 210
Automatic gearbox 90Automatic gearboxApplies to vehicles: with R tronicDescriptionR tronic is an automatic sequential-shift gearbox using shift-by-wire
technology to operate the clutch and change the gears.
The gears are engaged manually (the principle is similar to a manual
gearbox) but they can also be shifted automatically. The engine can
be started and stopped in any gear ⇒page 82.
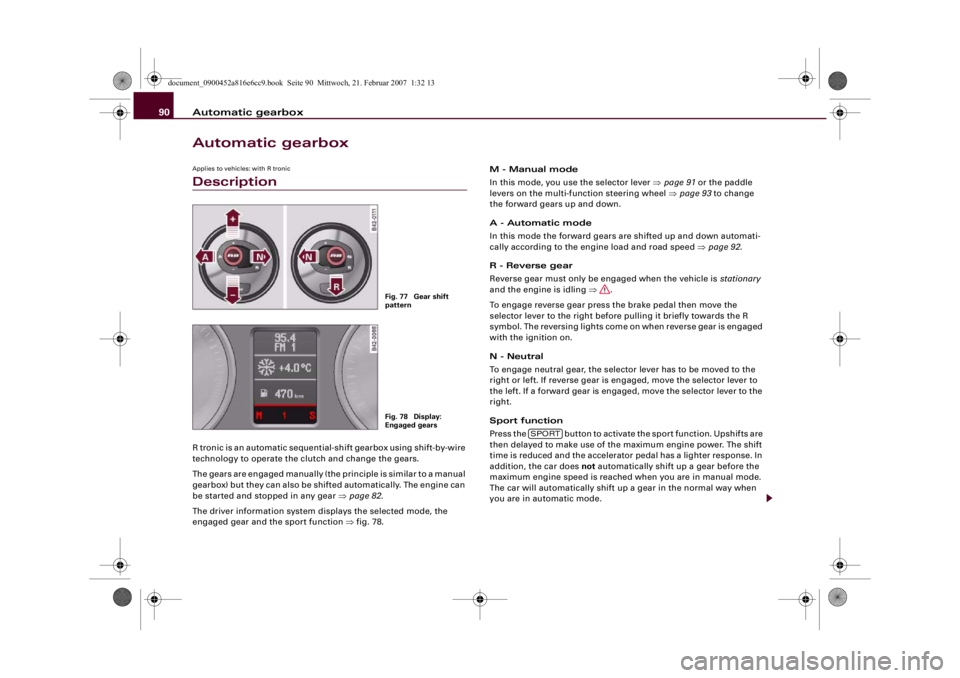
The driver information system displays the selected mode, the
engaged gear and the sport function ⇒fig. 78.M - Manual mode
In this mode, you use the selector lever ⇒page 91 or the paddle
levers on the multi-function steering wheel ⇒page 93 to change
the forward gears up and down.
A - Automatic mode
In this mode the forward gears are shifted up and down automati-
cally according to the engine load and road speed ⇒page 92.
R - Reverse gear
Reverse gear must only be engaged when the vehicle is stationary
and the engine is idling ⇒.
To engage reverse gear press the brake pedal then move the
selector lever to the right before pulling it briefly towards the R
symbol. The reversing lights come on when reverse gear is engaged
with the ignition on.
N - Neutral
To engage neutral gear, the selector lever has to be moved to the
right or left. If reverse gear is engaged, move the selector lever to
the left. If a forward gear is engaged, move the selector lever to the
right.
Sport function
Press the button to activate the sport function. Upshifts are
then delayed to make use of the maximum engine power. The shift
time is reduced and the accelerator pedal has a lighter response. In
addition, the car does not automatically shift up a gear before the
maximum engine speed is reached when you are in manual mode.
The car will automatically shift up a gear in the normal way when
you are in automatic mode.
Fig. 77 Gear shift
patternFig. 78 Display:
Engaged gears
SPORT
document_0900452a816e6cc9.book Seite 90 Mittwoch, 21. Februar 2007 1:32 13
Page 93 of 210

Automatic gearbox91
Controls
Safety
Driving tips
General maintenance
Self-help
Technical data
WARNING
•
The accelerator pedal must on no account be pressed inadvert-
ently when a gear is engaged with the vehicle stationary. If this
were to happen, the vehicle would start to move immediately, and
even a firmly applied handbrake might not restrain it (accident
risk).
•
To avoid accidents, apply the handbrake firmly and select
neutral gear (N) before opening the engine lid and working on the
vehicle with the engine running. Please observe the important
safety warnings ⇒page 155, “Working on components in the
engine compartment”.Note
If you accidentally shift to N when driving, you can engage a gear in
the normal way using the selector lever or paddle levers.Applies to vehicles: with R tronicManual modeR tronic allows the driver to change gears manually.Driving away from a standstill
– Press and hold the brake pedal.
– Move the selector lever to the left.
– Briefly push the selector lever forwards .
– Release the brake and press the accelerator ⇒.
Changing gear
– Briefly push the selector lever forwards to change up
a gear.– Briefly pull the selector lever back to change down a
gear.
Stopping briefly
– Apply the foot brake to hold the vehicle when stationary
(for instance at traffic lights).
– Do not press the accelerator while waiting. Neutral gear
(N) will be engaged automatically and a warning tone will
sound after a certain period if the vehicle is at a standstill
and you do not press the brake pedal or accelerator.
Parking
– Press and hold the brake pedal ⇒.
– Apply the handbrake firmly.
– Engage a gear.
– Switch off the ignition.
Stopping on a slope
–Always apply the footbrake to hold the vehicle and
prevent it “rolling back” down the slope ⇒. Do not try
to stop the vehicle “rolling back” by increasing the
engine speed when a gear is engaged.
– Apply the handbrake firmly.
Driving away on a slope
– Once you have engaged a gear, release the footbrake,
press the accelerator and gradually release the hand-
brake.
When accelerating in 1st, 2nd, 3rd, 4th or 5th gear, the R tronic
gearbox automatically shifts up into the next gear shortly before the
A+A+
A-
document_0900452a816e6cc9.book Seite 91 Mittwoch, 21. Februar 2007 1:32 13
Page 94 of 210
Automatic gearbox 92maximum engine speed is reached, unless you have activated the
sport function ⇒page 90.
If you select a lower gear, the R tronic gearbox will not shift down
until there is no risk of overrevving the engine.
You can change over to automatic mode at any time ⇒page 92.
WARNING
•
The driver should never get out of the vehicle when the engine
is running and a gear is engaged. If you have to leave your vehicle
while the engine is running, you must apply the parking brake and
engage neutral gear (N).
•
If the engine is running and a gear is engaged, you will need to
hold the car with the footbrake.
•
Do not press the accelerator while selecting a gear with the
vehicle stationary and the engine running, as this could cause an
accident.
•
To avoid rolling back on gradients always hold the vehicle with
the footbrake if you have to stop. Never attempt to hold the vehicle
with the clutch when stopping on a gradient. The clutch is disen-
gaged automatically if it is overloaded and becomes too hot - acci-
dent risk! Before the clutch is disengaged, the vehicle will jolt and
the driver information system will display a warning that the
clutch is overloaded.
•
Before you drive down a steep gradient, reduce the speed and
use the R tronic to select a lower gear.
•
Never allow the brake to drag and do not use the brake pedal
too often or for long periods. Constant braking will cause the
brakes to overheat and will considerably reduce the effectiveness
of the brakes. It will increase the braking distance and could cause
the brake system to fail.
Applies to vehicles: with R tronicAutomatic modeThe gearbox changes the forward gears up and down
automatically.Driving away from a standstill
– Press and hold the brake pedal.
– Briefly push the selector lever towards position A.
– Release the brake and press the accelerator ⇒ in
“Manual mode” on page 91.In some situations (such as when driving on mountain roads) it can
be advantageous to switch temporarily to the manual shift
programme ⇒page 91, so that the gear ratios can be selected
manually to suit the driving conditions.Applies to vehicles: with R tronicKick-down featureWhen the accelerator pedal is pressed right down past the point of
resistance at full throttle, the R tronic gearbox will shift down to a
lower gear, depending on road speed and engine speed. The upshift
to the next higher gear is delayed until the engine reaches
maximum rpm. This does not apply if you have activated the sport
function.
WARNING
Please note that if the road surface is slippery or wet, the kick-
down feature could cause the driving wheels to spin, which could
result in skidding.
document_0900452a816e6cc9.book Seite 92 Mittwoch, 21. Februar 2007 1:32 13
Page 95 of 210
Automatic gearbox93
Controls
Safety
Driving tips
General maintenance
Self-help
Technical data
Applies to vehicles: with R tronicLaunch control programmeThe launch control programme enables maximum accel-
eration.– Press the ESP switch once while the engine is running.
The ESP warning lamp
will light up in the driver infor-
mation system display.
– Press and hold the brake pedal with your left foot.
– Engage a gear.
– Press the button.
– Press the accelerator all the way down with your right
foot until the engine reaches a constant rpm speed.
– Take your left foot off the brake ⇒.
WARNING
•
Always adapt your driving style to the traffic conditions.
•
Only use the launch control programme when road and traffic
conditions permit, and make sure your manner of driving and
accelerating the vehicle does not inconvenience or endanger other
road users.
•
Please note that, when the ESP is switched off, the driven
wheels may start to spin, causing the vehicle to lose grip, in partic-
ular on slippery or wet roads - danger of skidding!
•
When acceleration has been completed, the ESP should be
reactivated by pressing the ESP switch.
Note
Accelerating with the launch control programme places a heavy
load on all parts of the vehicle. This can result in increased wear and
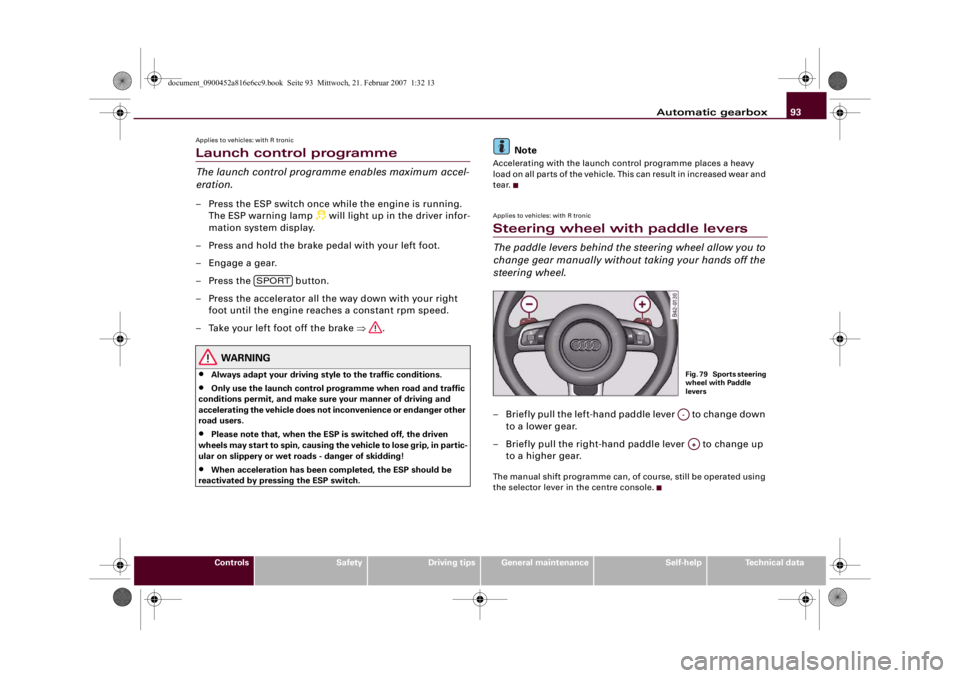
tear.Applies to vehicles: with R tronicSteering wheel with paddle leversThe paddle levers behind the steering wheel allow you to
change gear manually without taking your hands off the
steering wheel.– Briefly pull the left-hand paddle lever to change down
to a lower gear.
– Briefly pull the right-hand paddle lever to change up
to a higher gear.The manual shift programme can, of course, still be operated using
the selector lever in the centre console.
SPORT
Fig. 79 Sports steering
wheel with Paddle
leversA-A+
document_0900452a816e6cc9.book Seite 93 Mittwoch, 21. Februar 2007 1:32 13
Page 96 of 210

Automatic gearbox 94Applies to vehicles: with R tronicBackup programmeA back-up system is in place if a fault should occur in the
control system.The R tronic gearbox switches to the back-up programme if a fault
should occur in the control system. If this happens, a red bar will
light up or flash in the driver information system display.
A permanently lit bar indicates that you can continue driving the
vehicle.
A flashing bar indicates a serious system fault:•
The programme will only move into certain gears.
•
The engine may stall.
•
The engine cannot be started again after it is switched off.
•
The vehicle may be damaged if you continue driving.Caution
If the R tronic gearbox should ever switch to the back-up
programme you should take the vehicle to a workshop as soon as
possible.
document_0900452a816e6cc9.book Seite 94 Mittwoch, 21. Februar 2007 1:32 13
Page 97 of 210
HomeLink95
Controls
Safety
Driving tips
General maintenance
Self-help
Technical data
HomeLinkUniversal transmitterApplies to vehicles: with HomeLinkDescription
The HomeLink universal transmitter can be programmed
to replace the hand-held controls of devices already in
use.The HomeLink universal transmitter allows you to conveniently acti-
vate garage doors, estate gates, security systems, home or office
lighting and other electric devices by means of control buttons
inside your car.
The single remote control unit that HomeLink provides will replace
up to three hand-held transmitters operating existing devices on
your property. This will be possible for most transmitters which
control the drive units for a garage door or external gates, etc.
Programming of the individual hand-held transmitters for your
remote control is done at the centre of the front bumper. This is
where the control unit is located.
To be able to control systems with HomeLink, you need to perform
initial programming on the HomeLink transmitter first. If systems
fail to respond after the initial programming, check whether these
systems work with a "rolling code" (variable security code)
⇒page 97.
WARNING
When you are programming the HomeLink universal transmitter,
make sure that no persons or objects are close to the devices
receiving the transmitter signals. If a gate or door is inadvertently
set into motion during programming, persons might be injured or
other damage caused by moving parts.
Note
•
For additional information on HomeLink® and/or products
compatible with HomeLink®, please call the toll-free HomeLink®
hotline (0) 08000466 35465 (in Germany) or alternatively +49 (0) 6838
907 277, or visit the HomeLink® website at: www.homelink.com
•
HomeLink
® is a registered trademark of Johnson Controls.
Applies to vehicles: with HomeLinkProgramming the universal transmitter
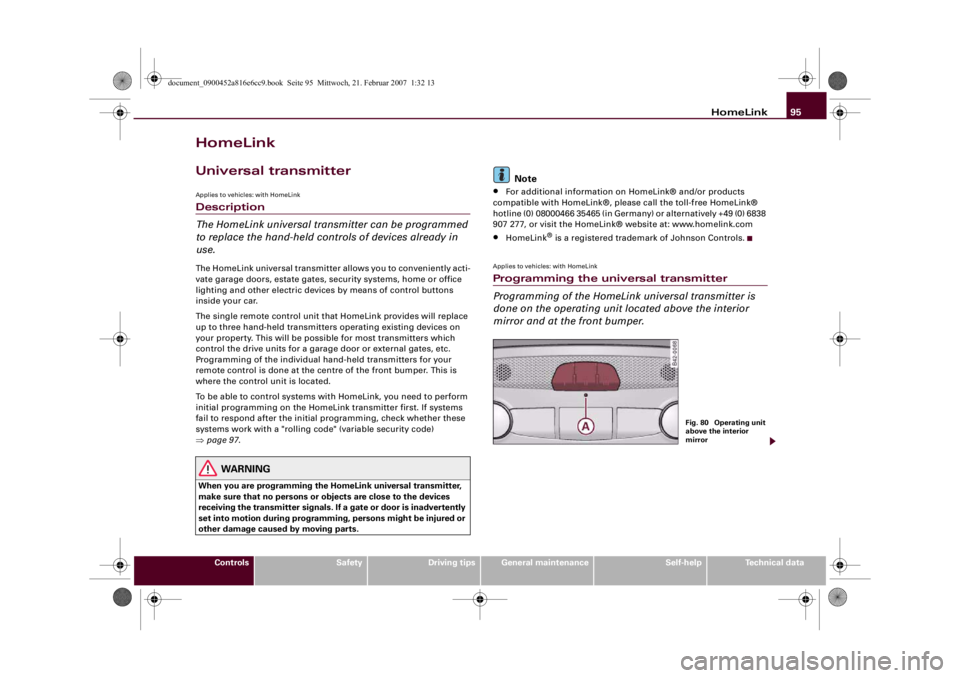
Programming of the HomeLink universal transmitter is
done on the operating unit located above the interior
mirror and at the front bumper.
Fig. 80 Operating unit
above the interior
mirror
document_0900452a816e6cc9.book Seite 95 Mittwoch, 21. Februar 2007 1:32 13
Page 98 of 210
HomeLink 96
At the operating unit
1. Switch on the ignition (do not start the engine).
2. Press and hold down the two outer buttons of the
HomeLink® operating unit ⇒page 95, fig. 80 until the
indicator diode ⇒page 95, fig. 80 begins to flash after
about 20 seconds. This means that all previously stored
data has been deleted.
3. Press the particular HomeLink button which you would
like to program.
4. Wait until the diode ⇒page 95, fig. 80 begins to flash.
The HomeLink module now remains in training mode for
5 minutes.
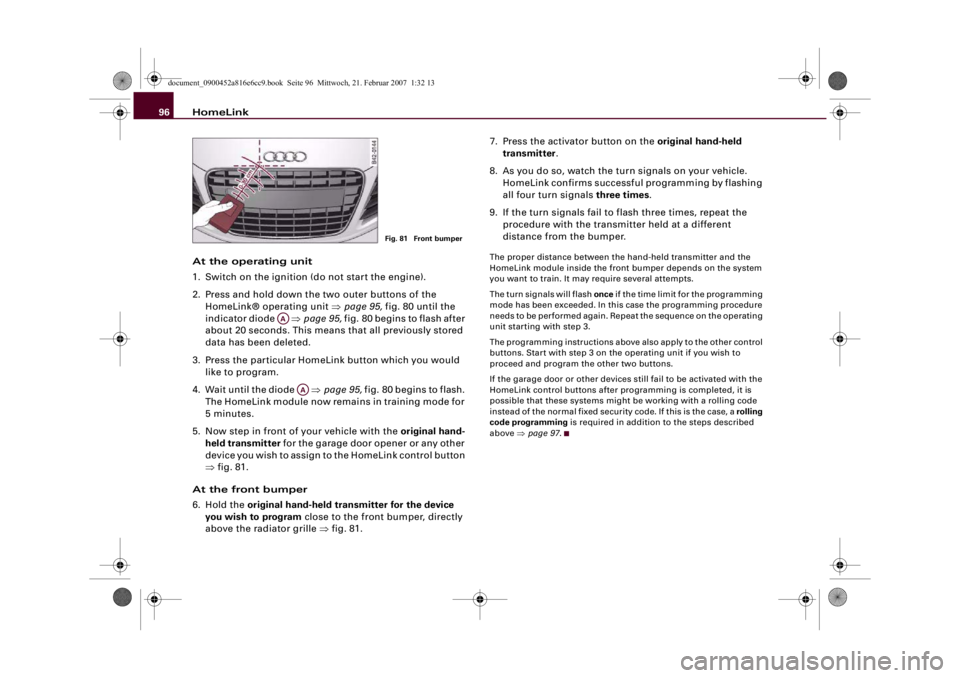
5. Now step in front of your vehicle with the original hand-
held transmitter for the garage door opener or any other
device you wish to assign to the HomeLink control button
⇒fig. 81.
At the front bumper
6. Hold the original hand-held transmitter for the device
you wish to program close to the front bumper, directly
above the radiator grille ⇒fig. 81.7. Press the activator button on the original hand-held
transmitter.
8. As you do so, watch the turn signals on your vehicle.
HomeLink confirms successful programming by flashing
all four turn signals three times.
9. If the turn signals fail to flash three times, repeat the
procedure with the transmitter held at a different
distance from the bumper.
The proper distance between the hand-held transmitter and the
HomeLink module inside the front bumper depends on the system
you want to train. It may require several attempts.
The turn signals will flash once if the time limit for the programming
mode has been exceeded. In this case the programming procedure
needs to be performed again. Repeat the sequence on the operating
unit starting with step 3.
The programming instructions above also apply to the other control
buttons. Start with step 3 on the operating unit if you wish to
proceed and program the other two buttons.
If the garage door or other devices still fail to be activated with the
HomeLink control buttons after programming is completed, it is
possible that these systems might be working with a rolling code
instead of the normal fixed security code. If this is the case, a rolling
code programming is required in addition to the steps described
above ⇒page 97.
Fig. 81 Front bumper
AA
AA
document_0900452a816e6cc9.book Seite 96 Mittwoch, 21. Februar 2007 1:32 13
Page 99 of 210
HomeLink97
Controls
Safety
Driving tips
General maintenance
Self-help
Technical data
Applies to vehicles: with HomeLinkRolling code programming
Some devices require rolling code programming of the
HomeLink universal transmitter.Identifying a rolling code
– Press the already programmed HomeLink button again
and hold it down.
–Watch HomeLink diode ⇒page 95, fig. 80. If the diode
starts flashing rapidly and turns into a constant light
after about 2 seconds, this indicates that the device you
wish to operate (e.g. a garage door opener) is equipped
with a rolling code.
– Program the rolling code as follows:
Activating the garage door opener drive unit
– Locate the programming button on the garage door
drive. The exact location and colour of the button may
vary depending on the type of garage door opener.
– Press the programming button on the door drive unit
(this will normally cause a “programming mode indicator
lamp” on the unit to light up). You now have about 30
seconds to start and complete programming of the
HomeLink control button on the operating unit.
Programming of the operating unit above the
interior mirror
– Press and release the already programmed HomeLink
button.
– Press the HomeLink button again to complete rolling
code programming.
After programming at the operating unit, the garage door opener
should recognise the HomeLink signal and respond when the
HomeLink button is pressed. Now the other control buttons can be
programmed as required.
Note
•
Having a second person assist you makes programming of the
rolling code easier and faster. For some makes of garage door
openers the HomeLink button may have to be pressed a third time
to complete the training sequence.
•
If you encounter problems programming the rolling code you
may find helpful information in the operating instructions of the
garage door opener or other device you wish to operate.
Applies to vehicles: with HomeLinkOperating HomeLink
The programmed devices are activated by means of the
HomeLink control buttons above the interior mirror.– Switch on the ignition (do not start the engine).
– Press the programmed HomeLink button ⇒page 95,
fig. 80. The device assigned to that button (e.g. garage
door) will be activated.The HomeLink indicator diode ⇒page 95, fig. 80 will light up when
you press the button.Applies to vehicles: with HomeLinkErasing the HomeLink® button programming
You can erase the complete HomeLink programming by
pressing the two outer buttons.– Switch on the ignition (do not start the engine).
AA
document_0900452a816e6cc9.book Seite 97 Mittwoch, 21. Februar 2007 1:32 13
Page 100 of 210
HomeLink 98
– Press and hold down the two outer buttons until the indi-
cator diode starts to flash ⇒page 95, fig. 80.
– Then release the buttons.After the programming of the HomeLink® universal transmitter
buttons has been erased, the system will return to the training
mode and is ready to be re-programmed at any time.
Note
•
Programmed buttons cannot be erased individually.
•
For security reasons it is advisable to erase the programming of
the HomeLink buttons prior to selling your vehicle.
Applies to vehicles: with HomeLinkReprogramming a HomeLink® button
A HomeLink button can be re-programmed individually
without affecting the other button allocations.At the operating unit
– Press and hold down the selected HomeLink® button
until the indicator diode ⇒page 95, fig. 80 starts flashing
slowly.
At the front bumper
–Hold the original hand-held transmitter for the garage
door opener or other device close to the front bumper
directly below the right headlight ⇒page 96, fig. 81. The
exact distance depends on the system that you want to
program.
– Press the button on the original hand-held transmitter
for the garage door opener or other device.– As you do so, watch the turn signals on your vehicle.
HomeLink confirms successful programming by flashing
all four turn signals three times.
– If the turn signals fail to flash three times, repeat the
procedure with the transmitter held at a different
distance from the bumper.
When the turn signals have flashed three times, this means the
device previously stored in HomeLink has been erased and the new
system programmed in its place. To activate the new system, press
the HomeLink button that has just been re-programmed.
Note
It may require several attempts before programming is successful.
When programming a new device, keep the button pressed for at
least 15 seconds before trying again with the transmitter in a
different position. Keep watching the turn signals during that
time.Applies to vehicles: with HomeLinkConformity certificationThe HomeLink universal transmitter is registered in the following
countries under the following certification numbers:Country
Certification number
Andorra
16SEP2003
Belgium
RTT/D/X2064
Denmark
98.3142-266
Germany
D800038K
Finland
FI98080106
France
97619 RD
document_0900452a816e6cc9.book Seite 98 Mittwoch, 21. Februar 2007 1:32 13