AUDI TT ROADSTER 2017 Owners Manual
Manufacturer: AUDI, Model Year: 2017, Model line: TT ROADSTER, Model: AUDI TT ROADSTER 2017Pages: 314, PDF Size: 76.54 MB
Page 121 of 314
co
co
.... N
" N .... 0
" "' c:o
-W hen leaving the vehicle, the Bl uetoo th
co nnection to the ce ll phone wi ll automati
ca lly disconnect . Depending on your cell
phone, phone ca lls in progress may be a uto
matically redirected from the MMI to your
ce ll phon e and yo u can cont inue the call on
you r phone .
- The display of an i ncoming phone call in the
Infotainment system d is p lay may still be
v is ible fo r a f ew s eco nd s de pending on the
ce ll phone in use. Using th e
Replace or De·
dine
f unct ions m ay then end the a ctive
p ho ne call.
Favorites
Appl ies to: vehicles with telephone
Up to 50 contacts, in addition to the voicemail
number, can be stored in any order in the favor
ites list.
.. Se le ct: I M ENU I bu tton >Telephone > left con
t rol but ton .
-Storing an existing phone number as a favor ·
ite :
sele ct an d c onfirm Recent calls /Directory .
Select and co nf irm a conta ct or phone num ber
from the list . Select: right cont rol button >
Store as favorite. Enter a name for the favor ite
o r se lect a suggest ion. Select and confirm with
Store .
- Renaming a stored favorite :
select and confirm
Favorites > a favorite from the list. Select the
rig ht cont rol button>
Rename favorite .
- Moving a stored favorite :
select and confirm
Favorites > a favorite from the list. Select the
rig ht cont rol button>
Move favor ite . Se lect
and co nfirm the locat ion of t he se lected favor
it e.
- Deleting a stored favorite : select and confirm
Favorites > a favorit e from the list . Select the
r ig ht cont ro l but ton >
Delete favorite > Delete
this favorite or Delete all favorites .
Telephone
Messages
Text messages
Applies to: cell phones with Bluetooth Message Access Profile
(MAP)
Depending on the cell phone being used and the
cell phone network contract, you can receive and
send text messages using the MMI.
Requirement
A cell pho ne mus t be c onnec ted t o th e MMI via
Bl ue toot h M AP (M essage A ccess Pro fil e)
<=> page 11 4 .
.,. Sele ct: ! M EN UI button> Telephone > left con
t rol button
> Text message (MyPhone )/Text
message (additional phone)* .
lnbox
All received text messages are displayed .
Sent text messages
All sent text messages are displayed.
Outbox
All text messages to be sent a re displ aye d.
(D Tips
- Ple ase not e that you may hav e to activat e
t he receivi ng a nd se nding of te xt messages
in y our c ell pho ne dependin g on th e SI M
c ar d be ing use d (for ex am ple, when using a
M ulti -SIM) . Yo u ca n obtain more info rma
tion from yo ur ce ll phone service p rovider or
from your cell phone user guide.
- For more in format ion on t he suppo rted ce ll
p hones, visit
www.audiusa.com/bluetooth
or contact an a uthorized Audi dea ler or a u
thorized Audi Service Fac ility.
- You need a cell phon e with Message Access
Prof ile that a lso s upports the sen ding func
tion t o be able to se nd te xt messages
t hroug h the MMI.
119
Page 122 of 314
Telephone
Write text message
Applies to: cell phones with Bluetooth Message Access Profile
(MAP)
"' Select : I MENU I button >Telephone > left con
trol button
> Text message (MyPhone)/Text
message (additional phone)*> Inbox
> right
control button.
Write text message
Select and confirm the desired template from
the list . Enter a recipient . Select and confirm
Send .
Reply*
Select and confirm the desired template from
the list. Select and confirm
Send.
Message options
Applies to: cell phones with Bluetooth Message Access Profile
(MAP)
.. Se lect: I MENU I button >Telephone > left con
trol button >
Text message (MyPhone)/Text
message (additional phone)* > Inbox /Sent /
Outbox
> right control button.
The fo llowing options may be ava ilab le depend
ing on the se lected menu.
Reply*
A reply can be sent for the selected message in
the
Inbox.
Forward
The selected text message can be forwarded to a
different recipient.
Send again*
The se lected text message can be resent.
Delete this text message*
The selected text message can be deleted.
Read aloud1>
You can have the MMI read an open text mes
sage.
1> Not availa ble in all l ang uage s.
120
Text messaging settings*
To display when a new text message is received,
activate the
Text message notifications. New
text messages are indicated with an enve lope 121
in the Infotainment system display status line.
Connection manager
See¢ page 176.
Telephone settings
See¢ page 124 .
{!) Tips
Messages that are deleted in the MMI are also
deleted in the cell phone automatically.
' E -mail*
App lies to: ce ll ph ones with Bluetooth Message Access Profile
(MAP)
Depending on the type of cell phone used, you
con receive and send e-mails through the MMI.
Requirement: the Message Access Profile (MAP)
must be activated in the Bluetooth settings on
you r ce ll phone and your cell phone m ust be con
nected to the MMI
¢page 114. You can find out
in your cell phone owner's manual if your cell
phone supports this function .
.. Select:
!MENU I button> Telephone > left con
trol button >
E-mail (MyPhone)/E-mail (addi
tional phone)*.
Write new e-mail
- Using a template :
select and confirm the de-
sired template from the list .
- Enter one or more rec ipients.
- Select and confirm
Send .
Inbox
All received e-mails are displayed.
Sent
All sent e-mails are displayed.
Page 123 of 314
co
co
.... N
" N .... 0
" "' c:o
Outbox
All e-m ails th at w ill be sent are d isplayed.
Drafts
All saved e-mails that have not been sent yet a re
d isp layed.
- Fo r more information on the supported cell
phones, v is it
www.audiusa .com/bluetooth
or contact an author ized A udi dealer or au
thorized Audi Service Facili ty.
- To e nsur e that your se nt e-mails a re re
ce ived, connect yo ur cell phone to the Wi-Fi
h otspo t* in t he vehicle so t hat the appli ca
b le e-mail app on yo ur cell phone con tinues
to have Interne t access . If you a re s till not
r eceivin g e-mails eve n though yo u have a
successful connection, then contact your e
mail service provider o r yo ur cell phone
service provider.
Message options
A pp lies to: ce ll ph ones w it h Bl uetooth Message Access Profil e
(MAP)
... Se lect: IMENUI button> Telephone > left con
t ro l button >
E -mail (MyPhone) /E-mail (addi
tional phone)* > Inbo x/Sent /Outbo x
> right
contro l button.
The fo llow ing options may be avai lab le depend
ing on the se lected menu.
Store as template
Ten e-mail templa tes are stored in the M MI. Yo u
can save up to ten a ddi tional temp lates .
- Create an e-ma il.
- Se lect and co nfirm
Store as templ ate .
Resume last edited e-mail
The last e-mai l in progress can be resumed.
Reply*
A reply can be sen t fo r the selec ted e -mail in t he
Inbox .
l) Not availab le in all la nguages .
Telephone
Reply to all*
A reply can be sent for the se lecte d e-m ail in the
In box and it wi ll be sent to all of the en tered re
c ipients .
Forward
The selec te d e-mail can be forwarded to a d iffe r
en t recipient .
Delete this message*
The selected e-mail can be deleted.
Read aloud1
)
Yo u can have the MMI read an o pen e-mail.
E-mail settings*
T o display when a new e-ma il is receive d, ac tiva te
the
E -mail notifications . New e -m ail s are indi cat
ed wi th an envelope~ in the Infotai nment sys
tem display status line .
Connection manager
See c::> pag e 176.
Telephone settings
See c::> page 124 .
(!) Tips
Messages t hat are de lete d in the MMI are also
a utomat ica lly deleted in the connected ce ll
phone.
Listening to voicemail
App lies to : vehicles wi th telepho ne
... Select: !ME NUI button> Telephone > left con
trol button. Se lect and confirm
Recent calls /Di ·
rectory /Favorites > Voicemail.
- Entering the voicemail number:
enter the de
sired n umber. Select and confirm
OK .
-Dialing the voicemail number : select and con
firm
Voicemail.
121
Page 124 of 314
Telephone
(D Tips
-This service must be set up and activated in
advance by the cell phone service provider.
You can obta in more information from your
cell phone service prov ider.
- The voicemai l number depends on the cell
phone service provider .
Emergency call functions
Appl ies to: ve hicles w ith tele phone
~ Select : I MENU I button >Telephone > left con
trol button >
Enter number > Enter emergency
call number (for example , 911)
> O K.
A WARNING
-
- Beca use your phone works with radio s ig
nals , a connect ion cannot be guaranteed un
der all ci rc u mstances. Do not rely on only
yo ur phone when it comes to essent ial com
mun ication (s uch as a medical eme rgency).
- Always follow the instructions given by the
emergency personnel du ring an emergency
call and only end the call when they instruct
yo u to do so .
(D Tips
Emergency numbers are not the same eve ry
where. Find out which eme rgency number is
used in yo ur current locat ion .
Directory
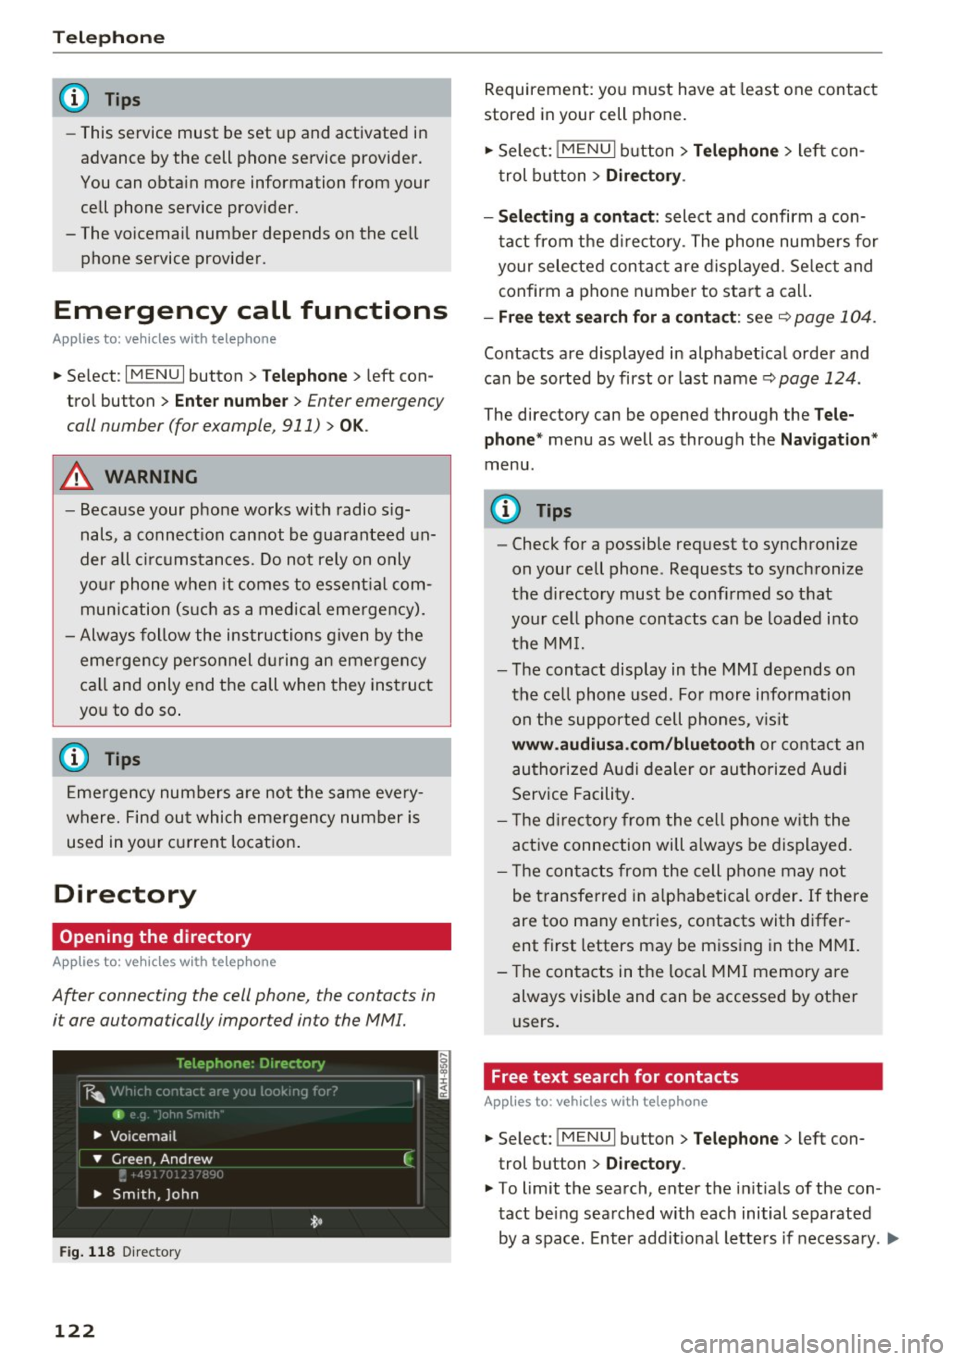
Opening the directory
Appl ies to: ve hicles w ith tele phone
After connecting the cell phone, the contacts in
i t are automatically impor ted in to the MMI.
F ig . 11 8 Direc tory
122
Requirement: yo u must have at least one contact
stored in your cell phone.
~ Select: ! M ENUI button> T el ephone > left con
trol b utton >
Dire ctory .
- Selecting a contact :
select and confirm a con
tact from t he d irectory. The phone numbers for
your selected contact are displayed . Se lect and
confirm a phone n umbe r to sta rt a call .
-Fre e te xt sear ch for a conta ct : see q page 104 .
Contacts a re displayed in alphabet ical order and
can be sorted by first or last name ¢
page 124.
The directo ry can be opened th rough the Tele
phone "
menu as well as through the Navigation "
menu.
(D Tips
-Check for a possible request to synchronize
on your cell phone . Requests to synchronize
the directory must be confirmed so that
your cell phone contacts can be loaded into
the MM I.
- The contact display in the MMI depends on
the ce ll phone used . Fo r more information
on the supported cell phones , vis it
www .audiu sa .com /blu etooth or contact an
authorized Audi dealer or authorized Aud i
Service Facility .
- T he d irecto ry from the cell phone w ith the
active connection will a lways be displayed.
- T he contac ts from the cell phone may not
be transferred in a lphabetical order. If there
are too many entries, contacts with differ
ent first letters may be miss ing in the M MI.
- The contacts in the local MMI memory are
always visible and can be accessed by other
users.
, Free text search for contacts
App lies to : vehicles wi th telepho ne
~ Select: !MENU I button> Telephone > left con
trol button >
Director y.
~ To limit the search , enter the in it ials of the con
tact being searched with each initial separated
by a space. Enter addit iona l letters if necessa ry . .,..
Page 125 of 314
co
co
.... N
" N .... 0
" "' c:o
~ Select and confirm a contact from the di recto
ry. The p ho ne numbers for the selecte d contact
are disp layed .
~ To make t he call, se lect and confi rm a phone
number.
(D Tips
- You can scro ll through long lists quickly by
turning the contro l knob quick ly. The scroll
in g s peed depends on t he nu mbe r of list e n
tries.
- Additional informat io n on free text searches
ca n be found un der
r=> page 104.
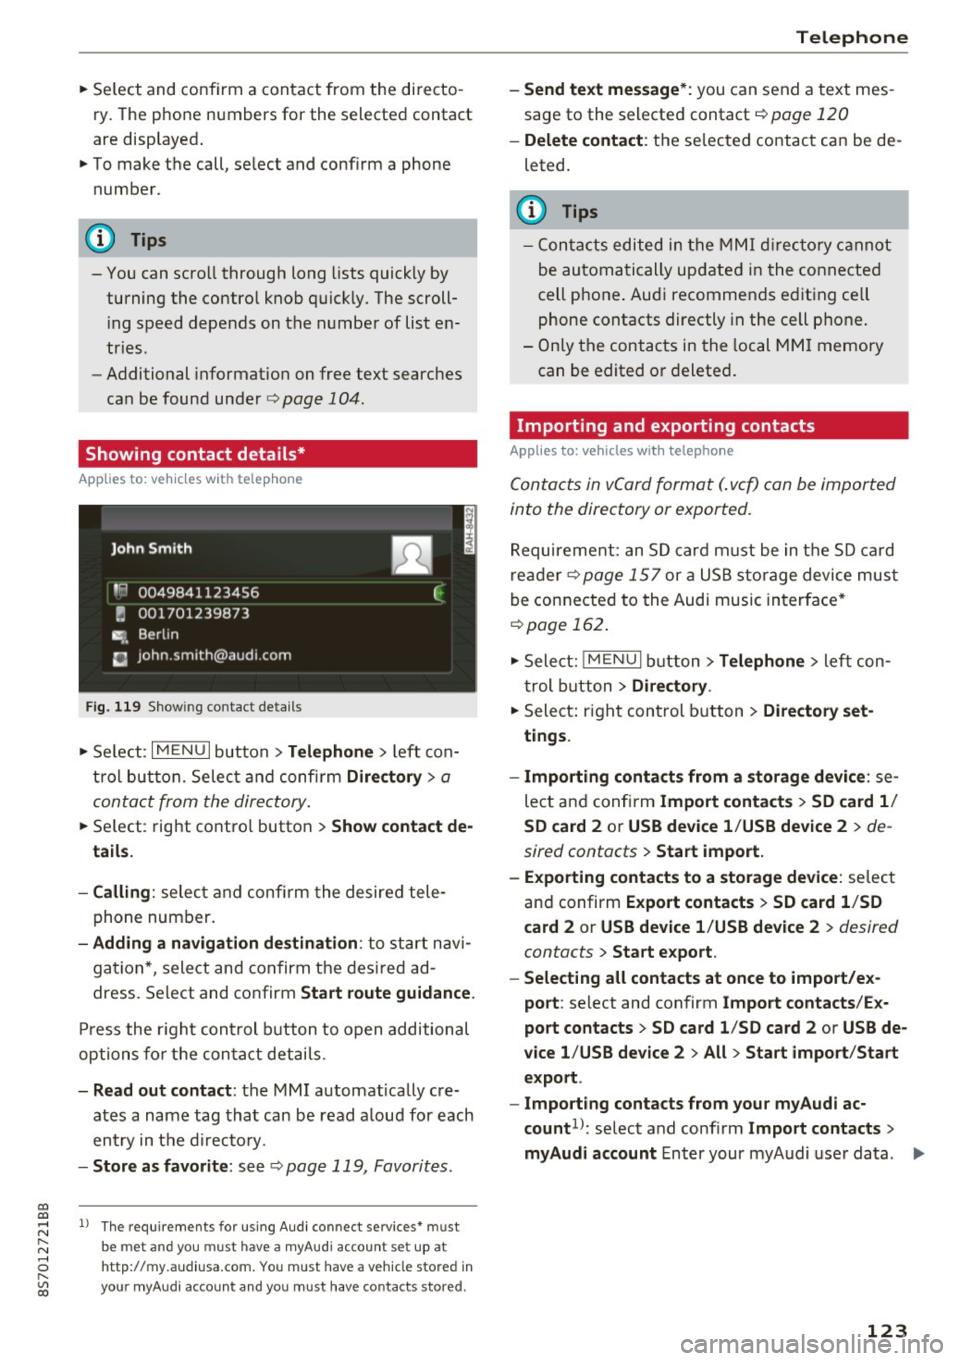
Showing contact details*
App lies to: ve hicles with telep hone
Fig. 119 S h ow ing contact deta ils
~ Se le ct: I M ENU I button> Telephone > left con
t rol butt on. Selec t and confir m
Directory > a
conta ct from the dire ctory .
~ Se lect: rig ht contro l button > Show contact de
tails.
- Calling :
select and con firm the desire d tele
phone number.
- Adding a navigation de stination : to sta rt n avi
ga tion *, sele ct and confirm t he des ire d a d
dress . Select and co nfirm
Start route guidance .
Press the r igh t con trol button to open additional
opti ons fo r the con ta ct det ails.
- Read out contact : the MMI automat ically cre
ates a name tag tha t can be r ead a loud for each
en try in t he dir ecto ry.
- Store as favorite : seer=> page 119, Favorites.
l) Th e requireme nts for using A udi co nn ect services• must
b e met and you must have a myAudi account set up at
ht tp:// my.aud iusa.com . You must have a ve hicle sto red in
your myAud i accou nt and you must have contacts stored .
Telephone
-Send text message *: you can send a text mes
sage to the selecte d contact r=>
page 120
-Delete contact : th e se lec ted co ntac t can be de
leted.
(D Tips
- C ont acts edited in the MMI dir ector y cann ot
be au tom atic ally up date d in t he connected
cell p hone . Aud i recommends e diting ce ll
p hone contacts directly in t he cell p hone .
- Only t he con tacts i n the local M MI memory
can be edited o r deleted .
Importing and exporting contacts
Applies to: vehicles wit h telep hone
Conta cts in vCard format ( . vc f) can be imported
into the directory or expor ted.
R equireme nt: an S D card must be in t he SD c ard
re ad er r=>
page 15 7 or a US B storage device mus t
be connecte d to the Audi music in terface *
r=>page 162.
~ Sele ct: ! ME NUI bu tton> Telephone > left c on
t rol b utton
> Directory .
~ Select: righ t con trol button > Directory set
tings .
- Importing conta cts from a storage device :
se
lect a nd confirm
Import contacts > SD card 1 /
SD card 2
o r USB device 1 /USB de vice 2 > de
sired contacts
> Start import.
- Exporting contacts to a storage device :
selec t
an d confirm
Expo rt cont acts > SD card 1 /SD
c ard 2
or USB device 1 /USB device 2 > desired
contacts
> Start export .
- Selecting all contacts at once to impo rt/ex
port :
select and con firm Import contacts /Ex
port contacts > SD card 1 /SD card 2
or USB de
vice 1 /USB device 2
> All > Start import /Start
export .
- Import ing contacts from your myAudi ac
count 1>:
select and confi rm Import contacts >
myAudi account
E nter your my A udi use r da ta. .,.
123
Page 126 of 314
Telephone
You must have a myAu di account in order to im
port contacts from the account. Entering your
myAudi user data or your myAudi PIN is on ly re
qu ired one time . You w ill receive the myAudi PIN
in your my Audi account once you have reg istered
a vehicle in the account .
(D Tips
- Always read the chapter¢ page 133, About
Audi connect.
- For additional informat ion on the myAudi
account, v is it
www .aud i.com /myaud i.
-The imported contacts are stored in the lo
ca l memory of the directory.
- A maxim um of 1,000 contacts can be im
ported. You can check the memory capacity
for the d irectory at any time¢
page 124.
-Never save important data on memory cards
or USB storage dev ices. Audi is not respons i
ble for damaged or lost files and media.
- Contacts that were downloaded from a cell
phone cannot be exported.
- There should be no other files or folders on
the storage medium conta ining the contacts
to be imported.
Settings
Telephone settings
App lies to: ve hicles with telep hone
... Se lect: I MENU I but ton > Telephone > right con-
tro l button >
Telephone settings .
Call options* Multi -party calling :
can be switched on/off .
R ing tone and volume settings
1>
Using the Mute telephone funct ion, you can
sw itch the ringtone on your MMI on or off . The
ringtones are played using the
R ingtone func
tion . Se lect and confirm an entry from the list .
F or the
Rin gtone volume /Mes sage vo lume set
tings, see ¢
page 179. The Microphone input
l e vel
can be adjus ted during a phone call usi ng
the control knob.
l) Depend s on th e connected cell phone.
124
(D Tips
- Severa l cell phones can be paired to the
MMI, but only two* ce ll phones can be ac
t ively connected.
- To delete a ll paired B luetoot h devices, the
Bluetooth function can be reset to the fac
tory default settings ¢
page 176.
· Additional options
App lies to: vehicles wit h telepho ne
... Select: !ME NUI button> Telephone > right con-
trol b utton .
Connection manager
See c::> page 176.
Bluetooth settings
See¢ page 177.
Online settings *
See ¢page 178.
Wi-Fi settings
See c::> page 131, Wi-Fi hotspot .
Directory settings
Applies to: vehicles wit h telephone
... Select: !MENUI button> Te lephone > left con
trol button >
Director y> right control button >
Direc tory settings .
M emory capacity
Shows the Memory capacit y for the directory.
You can manage up to 1 7,000 co ntacts with the
MM I di rectory. Yo u can load up to 4,000 contacts
from your cell phone into each directory. You can
also import up to 1,000 contacts from a storage
device .
Sort order
You can so rt the contacts in your d irec to ry alpha
betically ac co rding to
Last name or First name . IJ,-
Page 127 of 314
CD
CD
.... N
" N ...... 0
" V, co
Import contact s
See c:> page 123, Importing and exporting con
tacts .
Export contacts
See c:> page 123, Importing and exporting con
tacts.
Download directory
To upd ate the contacts in the MMI, you can man
ually download your cell phone contacts . De
pending on the cell phone , the Bluetooth connec
tion may need to be disconnected and reconnect ed to update the contacts.
Hide contacts w ithout phone number
W hen th is function is sw itched on~, contacts
that do not have any numbers ass igned to them
will be grayed out in the d irectory .
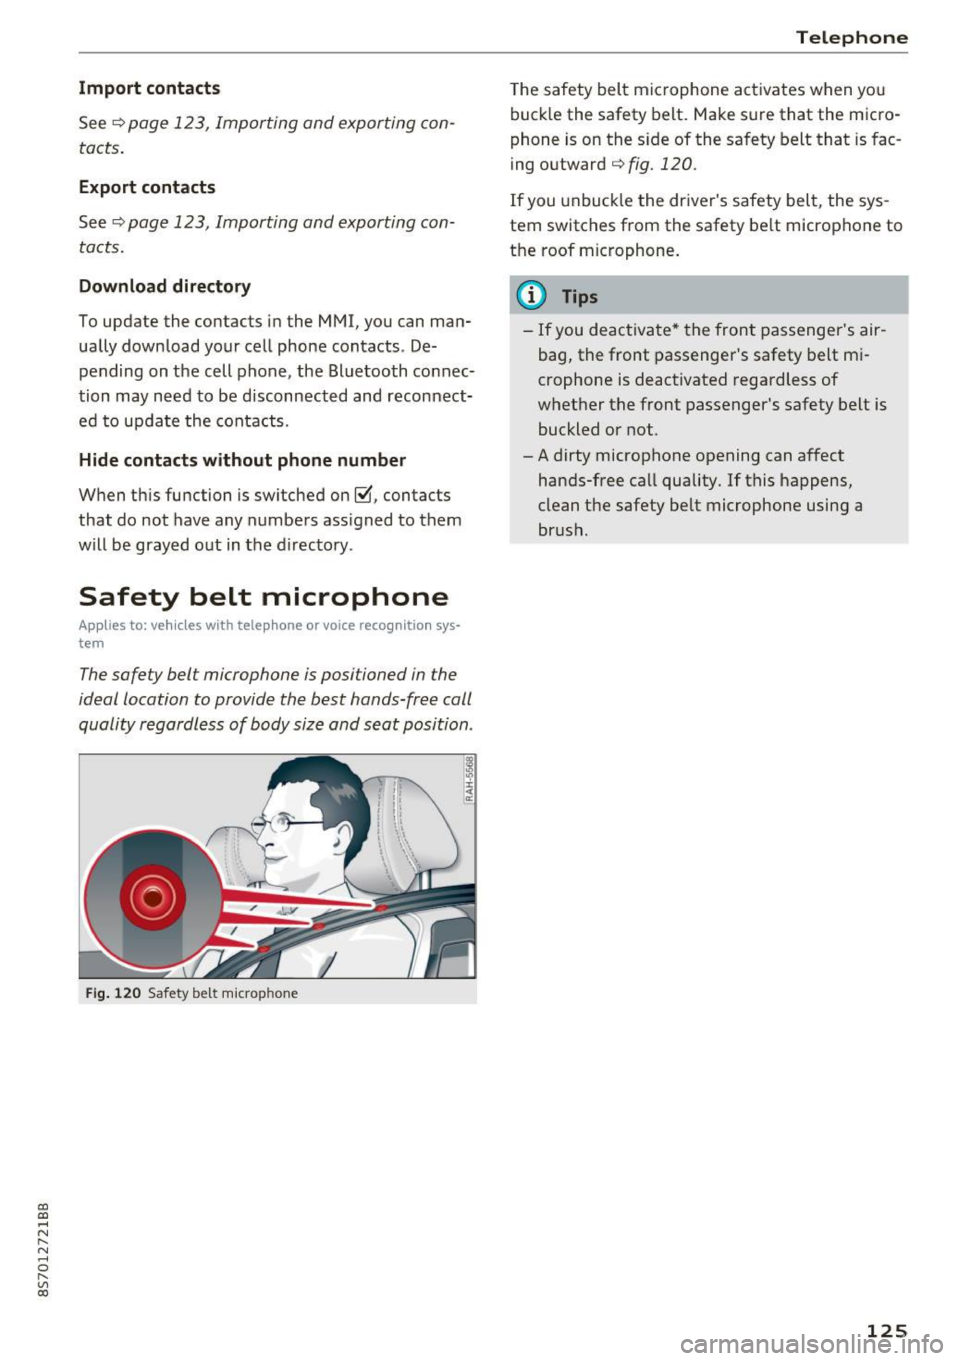
Safety belt microphone
Applies to: vehicles with telephone or voice recognitio n sys
tem
The safety belt microphone is positioned in the
ideal location to provide the best hands-free call
quality regardless of body size and seat position .
Fig. 12 0 Safety bel t mic rop hone
Teleph one
The safety belt mic rophone activates when yo u
buck le the safety belt. Make sure that the micro
phone is on the s ide of the sa fety belt that is fac
ing outward
c:> fig. 120 .
If you unbuck le the dr iver's safety belt, the sys
tem switches from the safety be lt microphone to
the roof microphone.
(D Tips
- If you deactivate * the front passenger's air
bag, the front passenger 's safety belt mi
crophone is deactivated regardless of
whet her the front passenger's safety belt is
buckled or not.
- A dirty microphone opening can affect
hands-free call quality. If this happens,
clean the safety belt microphone using a
br ush .
125
Page 128 of 314
Telephone
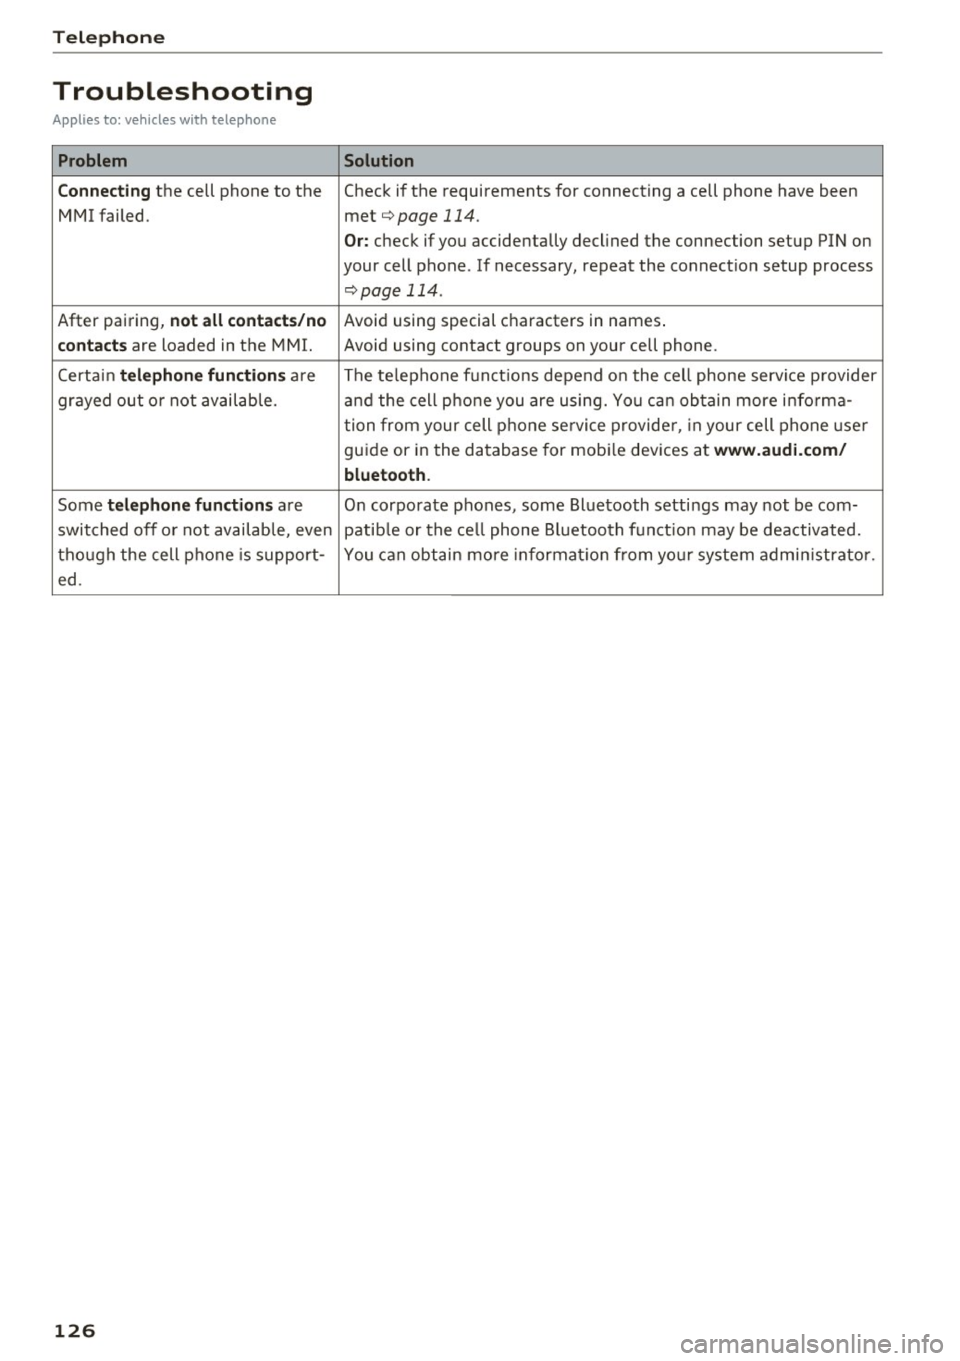
Troubleshooting
Applies to: vehicles with telephone
Problem Solution
C onn ecting
the cell phone to the Check if the requirements for connecting a cell phone have been
MMI failed. met¢
page 114.
Or: check if you accidentally declined the connection setup PIN on
your cell phone . If necessary, repeat the connection setup process
¢ page 114 .
After pairing,
n ot a ll cont act s/ no Avoid using sped.al characters in names .
co ntac ts are loaded in the MMI. Avoid using contact groups on your cell phone .
Certain
t e le ph one func tion s are The te lephone funct ions depend on the cell phone service provider
grayed out o r not availab le. and the cell phone you are using. You can obtain more i nfo rma-
tion from your cell phone se rvice provider, in your cell phone user
gu ide or in the database for mob ile dev ices at
www .audi.c om /
bluetoo th .
Some te le phone functi ons are O n corporate phones, some Bluetooth settings may not be com-
switched off o r not available, even patib le or the ce ll phone Bluetooth funct ion may be deactivated.
though the cell phone is support- You can obtain more informat io n from you r system admin istrato r.
ed .
126
Page 129 of 314
co
co
.... N
" N .... 0
" "' c:o
Audi connect Introduction
A pp lies to: ve hicles with Audi co nnect
With Audi connect services, on line information is
transmitted and integrated direct ly in the vehi
cle.
Using the Wi-Fi hotspot, you can access the In
ternet through a mob ile dev ice when the vehicle
is stationary.
A WARNING
- To reduce the risk of an accident, on ly use
Audi connect services when road and traffic
condit ions perm it. Always read the instruc
t ions in the chapter
c> page 96, Traffic safe
ty information.
- It is only safe to use tablets, laptops, mo
bile devices and othe r similar dev ices when
the vehicle is stationary because, like all loose objects, they could be thrown a round
the ins ide of the vehicle in a crash and cause
ser ious injur ies. S to re t hese types of devi ces
sec urely wh ile driving.
- T o red uce the risk of an accident, o nly use
Audi conne ct serv ices using a Wi- Fi hotspo t
when the veh icle is sta tionary .
Aud i connect is desig ned fo r use only with the
prov ided SIM card. Aud i AG is not liable fo r
t he consequences of using other SI M cards.
(1) Tips
Read this chapter also befo re operati ng
i=> page 133, About Audi connect .
Setup
Audi connect requirements
Applies to: ve hicles with Audi co nnect
An Internet connection is required to use Audi
connect. The following req uirements must be
met to establish a connection:
-
- The Audi connect SIM ca rd must be inserted in
to the S IM card reader for the MMI.
Audi c onn ect
- A data connection must be configured for Audi
connect services .
(D Tips
The data conne ction for Aud i connec t services
i s preconfigured at the factory. You can
change the data connection at any time if you
need to adjust the configu ration
¢ page 132.
Using the SIM card reader
App lies to : vehicles wit h SIM ca rd reade r and Audi conn ect
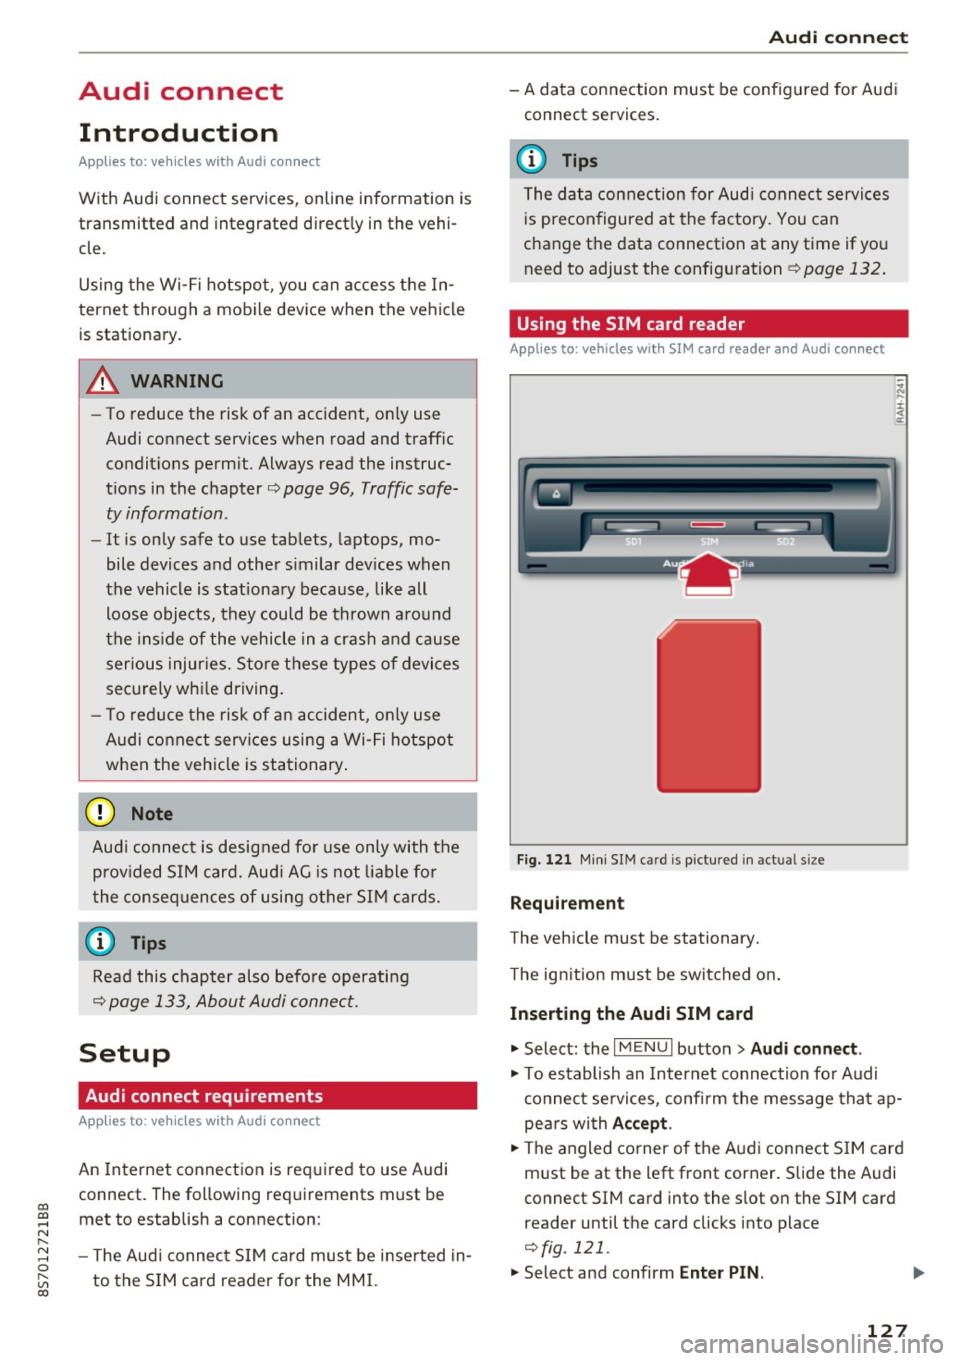
Fig. 121 Min i SIM car d is pictured in act ual size
Requirement
The vehicle must be stationary.
T he ign ition must be switched on .
Inserting th e Audi SIM card
.,. Select: the I MENU I button> Audi conn ect .
.,. To establish an Internet connection fo r Audi
connect services, confirm the message tha t ap
pe ars with
Acc ept .
.,. The angled corner of the Audi connect S IM card
m ust be at the left front corner. Slide the Audi
connect SIM ca rd into the slot on the SIM card
reader until the card clicks into place
i=>fig. 121.
.,. Select and confirm Enter PIN .
127
Page 130 of 314
Audi connect
"'Enter the PIN for your SIM card .
"' Se lect and confirm
OK.
"'To connect to the Internet automatically in the
future, select and then confirm
Yes.
"' Confirm the system prompt asking to connect
to the Internet with either
Yes, connect once or
Yes, always if required.
After connecting successfully
After connecting successfully, the signal strength
and connection type are displayed in the Info
tainment system status line@/@ Qpage
105,
fig . 111.
You can now use Audi connect.
The list of available Audi connect services is dis
p la yed in the Infotainment system display.
Removing the Audi connect SIM card
"' Press on the Audi connect SIM card briefly. The
card is released from the slot. Remove the Audi
connect SIM card.
@ Note
-Audi connect is designed for use only with
the provided Audi connect SIM card. Audi
AG is not liable for the consequences of us
ing other SIM cards.
- If a SIM card of a different size is inserted in
the SIM card reader instead of an Audi con
nect mini SIM card, do not under any cir
cumstances remove this card yourself due
to the risk of damaging the SIM card reader.
Contact your authorized Audi dealer or au
thorized Audi Service Facility.
(D Tips
-You can connect a cell phone with Bluetooth
(handsfree) to make phone calls
Q page 114.
-Audi does not provide support for other SIM
cards. Audi recommends using only the pro
v ided SIM card .
- You can specify when the MMI connects to
the Internet Q
page 132. The Internet con
nection disconnects automatically once the
requested Audi connect service no longer re
quires any data packets.
128
Configuration through
myAudi
Activating/configuring specific Audi
connect services
Applies to: vehicles with Aud i connect
Some Audi connect services must be activated/
configured through your personal myAudi ac
count before using them for the first time .
- If you do not have a personal myAudi account
yet, you can register online at
my.audiusa.com .
-Add your vehicle to your myAudi account.
-Activate/configure the Audi connect services
you would like for your vehicle in your myAudi account.
- For some Audi connect services, you may also
have to enter your myAudi user data or your
myAudi PIN when accessing services in the MMI
to connect your vehicle to myAudi .
For detailed information on configuration, visit
my.audiusa .com.
Logging into myAudi in the vehicle
Applies to: vehicles with Audi connect
To use some Audi connect services (such as Twit
ter*), you must first connect your vehicle with
myAudi to transfer your personal settings from
your myAudi account.
"'S elect: !MENU I button> Audi connect > right
control button >
Log in.
"' Enter your myAudi user data. Or: enter your
eight-dig it myAudi PIN.
"' Confirm your entry w ith
OK .
Then you can open your personal settings from
your myAudi account in your vehicle .
(D Tips
You can receive your myA udi PIN if you have
set up a myAudi account. For additional infor
mation, see
my.audiusa.com .