check engine BMW 528i 1998 E39 Workshop Manual
[x] Cancel search | Manufacturer: BMW, Model Year: 1998, Model line: 528i, Model: BMW 528i 1998 E39Pages: 1002
Page 768 of 1002
Downloaded from www.Manualslib.com manuals search engine
340-6
1 Brakes
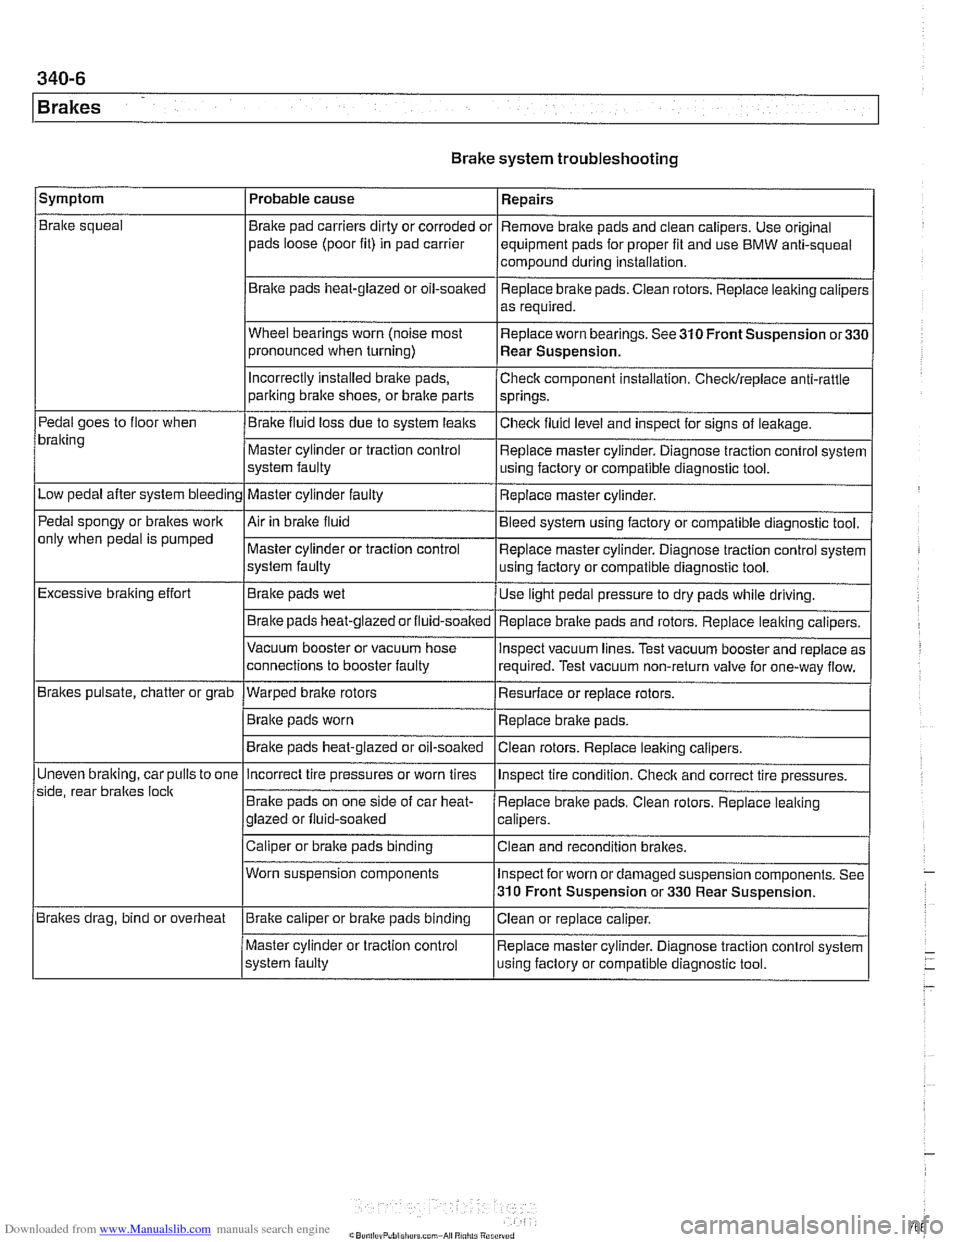
Brake system troubleshooting
/symptom I Probable cause 1 Repairs
Brake squeal
Pedal goes to floor when
bralting
Low pedal after system bleeding
Pedal spongy or brakes work
only when pedal is pumped
Excessive braking effort
Brakes pulsate, chatter or grab
Uneven
bralting, car pulls to one
side, rear braltes
loclt
Brakes drag, bind or overheat Brake
pad carriers dirty or corroded or
pads loose (poor fit) in pad carrier
Braite pads heat-glazed or oil-soaked
Wheel bearings worn (noise most
pronounced when turning)
Incorrectly Installed brake pads,
parking bralte shoes, or bralte parts
Brake fluid loss due to system leaks
Master cylinder or traction control
system faulty
Master cylinder faulty
Air in braite fluid
Master cylinder or traction control
system faulty
Brake pads wet
Brake pads
heat-glazedorfluid-soalted
Vacuum booster or vacuum hose
connections to booster faulty
--- Warped brake rotors
Brake pads worn
Brake pads heat-glazed or oil-soaked Remove
brake pads and clean calipers. Use original
equipment pads for proper fit and use BMW anti-squeal
compound during installation,
Replace brake pads. Ciean rotors. Replace leaking caliper:
as required.
Replace worn bearings. See 310 Front Suspension
or33C
Rear Suspension.
Check component installation. Checldreplace anti-rattle
springs.
Checlt fluid level and inspect for signs of leakage.
Replace master cylinder. Diagnose traction control system
using factory or compatible diagnostic tool.
Replace master cylinder.
Bleed system using factory or compatible diagnostic tool.
Replace master cylinder. Diagnose traction control system
using factory or compatible diagnostic tool.
Use light pedal pressure to dry pads while driving.
Replace
bralte pads and rotors. Replace leaking calipers.
lnspect vacuum lines. Test vacuum booster and replace as
required. Test vacuum non-return valve for one-way flow.
Resurface or replace rotors.
Replace brake pads.
Clean rotors. Replace leaiting calipers.
Incorrect tire pressures or worn tires
Brake pads on one side of car heat-
glazed or fluid-soaked
Caliper or brake pads binding
Worn suspension components
Brake caliper or brake pads binding
Master cylinder or traction control
system faulty lnspect
tire condition. Checlt and correct tire pressures.
Replace brake pads. Clean rotors. Replace leaking
calipers.
Clean and recondition brakes.
Inspect for worn or damaged suspension components. See
310 Front Suspension or 330 Rear Suspension.
Ciean or replace caliper.
Replace master cylinder. Diagnose traction control system
using faclory or compatible diagnostic tool.
Page 772 of 1002
Downloaded from www.Manualslib.com manuals search engine
Brakes
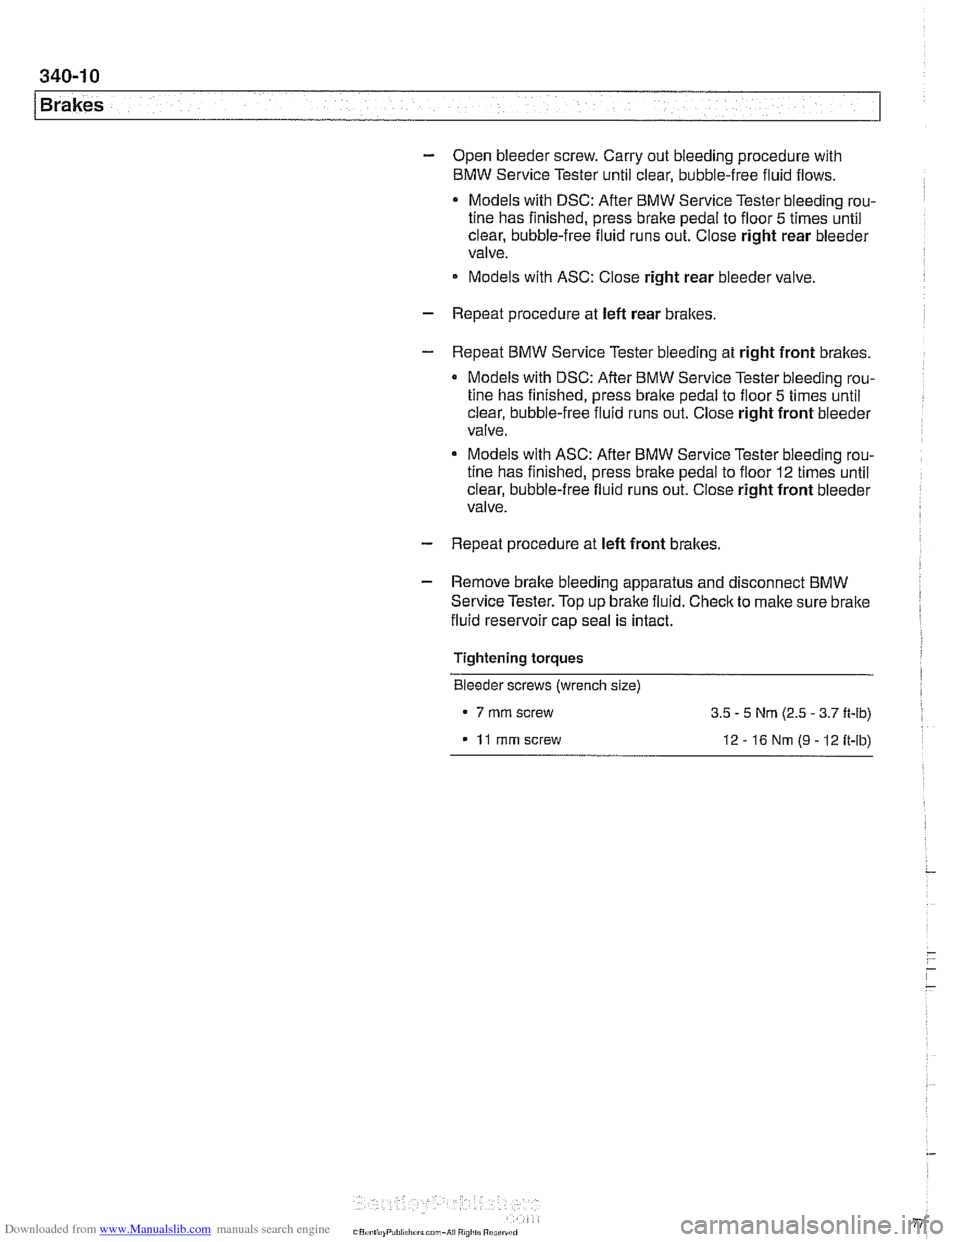
- Open bleeder screw. Carry out bleeding procedure with
BMW Service Tester until clear, bubble-free fluid flows.
Models with DSC: After BMW Service Tester bleeding rou-
tine has finished, press brake pedal to floor
5 times until
clear, bubble-free fluid runs out. Close right rear bleeder
valve.
Models with ASC: Close right rear bleeder valve.
- Repeat procedure at left rear brakes.
- Repeat BMW Service Tester bleeding at right front brakes.
Models with DSC: After
BMW Service Tester bleeding rou-
tine has finished, press brake pedal to floor
5 times until
clear, bubble-free fluid runs out. Close right front bleeder
valve.
Models with ASC: After BMW Service Tester bleeding rou-
tine has finished, press brake pedal to floor
12 times until
clear, bubble-free fluid runs out. Close right front bleeder
valve.
- Repeat procedure at left front brakes.
- Remove brake bleeding apparatus and disconnect BMW
Service Tester. Top up brake fluid. Check to make sure
brake 1
fluid reservoir cap seal is intact.
Tightening torques Bleeder screws (wrench size)
- 7 rnrn screw
3.5 - 5 Nrn (2.5 - 3.7 ft-lb)
11 rnrn screw 12-16Nrn(9-12ft-lb)
Page 774 of 1002
Downloaded from www.Manualslib.com manuals search engine
340-1 2
Brakes Brake pads, checking and replacing
Brake pads can be replaced without disconnecting the brake
fluid hose from the caliper or having to bleed the brakes. The
rotors can be replaced without disassembling wheel hub and
bearing. Always machine or replace rotors in pairs. Replace
pads in sets.
Front and rear brake pad replacement procedures are identical.
WARNING -
* Altllough semi-metallic andmetallic brale friction materials
in brake pads or shoes no longer contain asbestos, they
produce dangerous dust.
Treat all
brale dust as a hazardous material.
Do not create dust by grinding, sanding, or cleaning
brake friction surfaces with compressed air.
CAUTION--
Pressing caliper piston in may cause brake fluid reservoir to
overflow To prevent this, use a clean syringe to first remove
some fluid
from reservoir.
Raise car and remove wheels,
WARNING-
Make sure that the car is firmly supported on jack stands de-
signed for the purpose. Place jack stands beneath structural
chassis points. Do not place jack stands under suspension
parts.
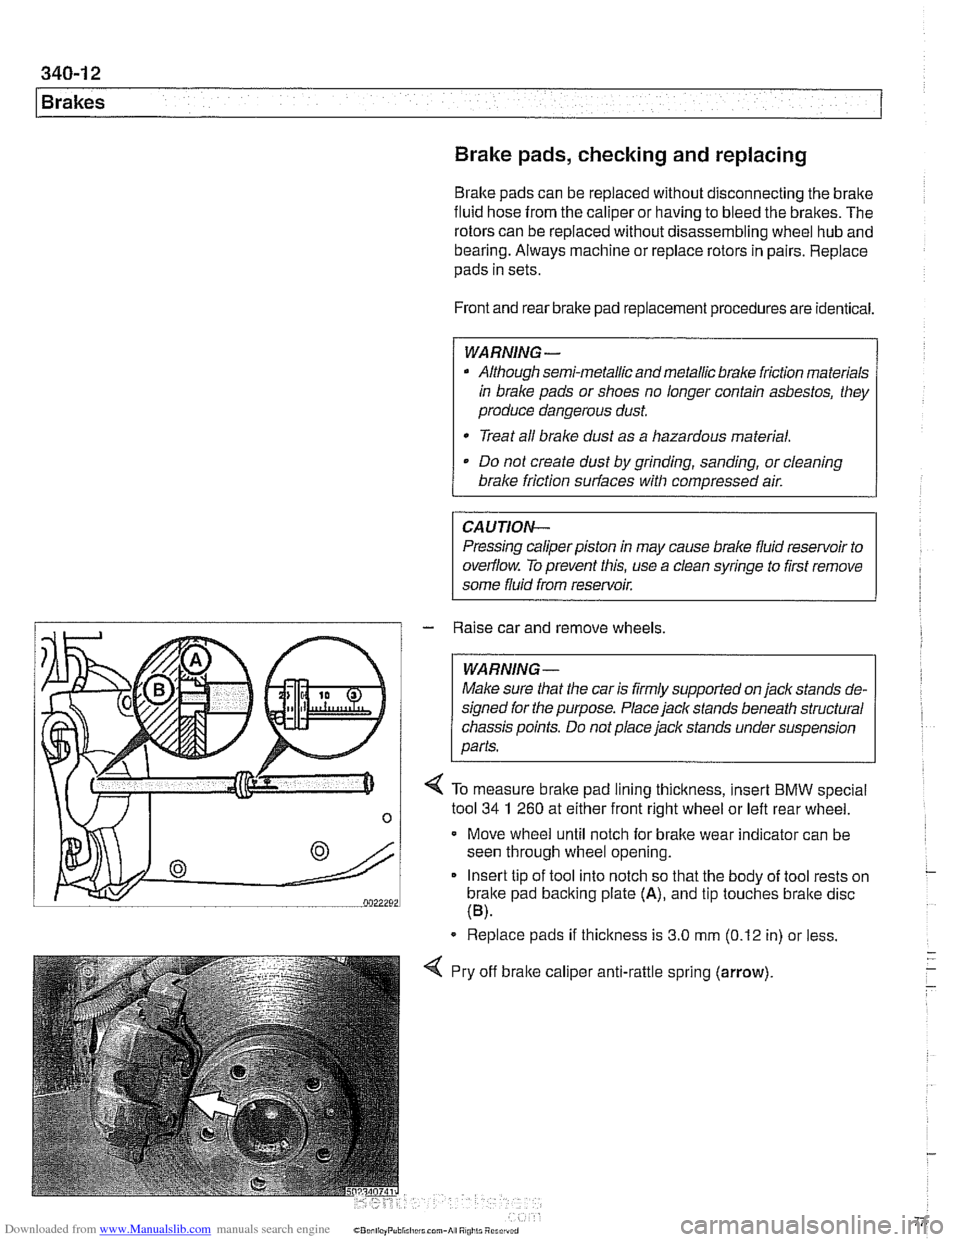
/ 4 To measure brake pad lining thickness, insert BMW special
n 1 tool 34 1 260 at either frontilght wheel or left rear wheel -
Move wheel until notch for brake wear indicator can be
seen through wheel opening.
Insert tip of tool into notch so that the body of tool rests on
brake pad backing plate
(A), and tip touches bralte disc
(B).
Replace pads if thickness is 3.0 mm (0.12 in) or less.
Pry off
bralte calipe~ , anti-rattle spring (arrow).
Page 775 of 1002
Downloaded from www.Manualslib.com manuals search engine
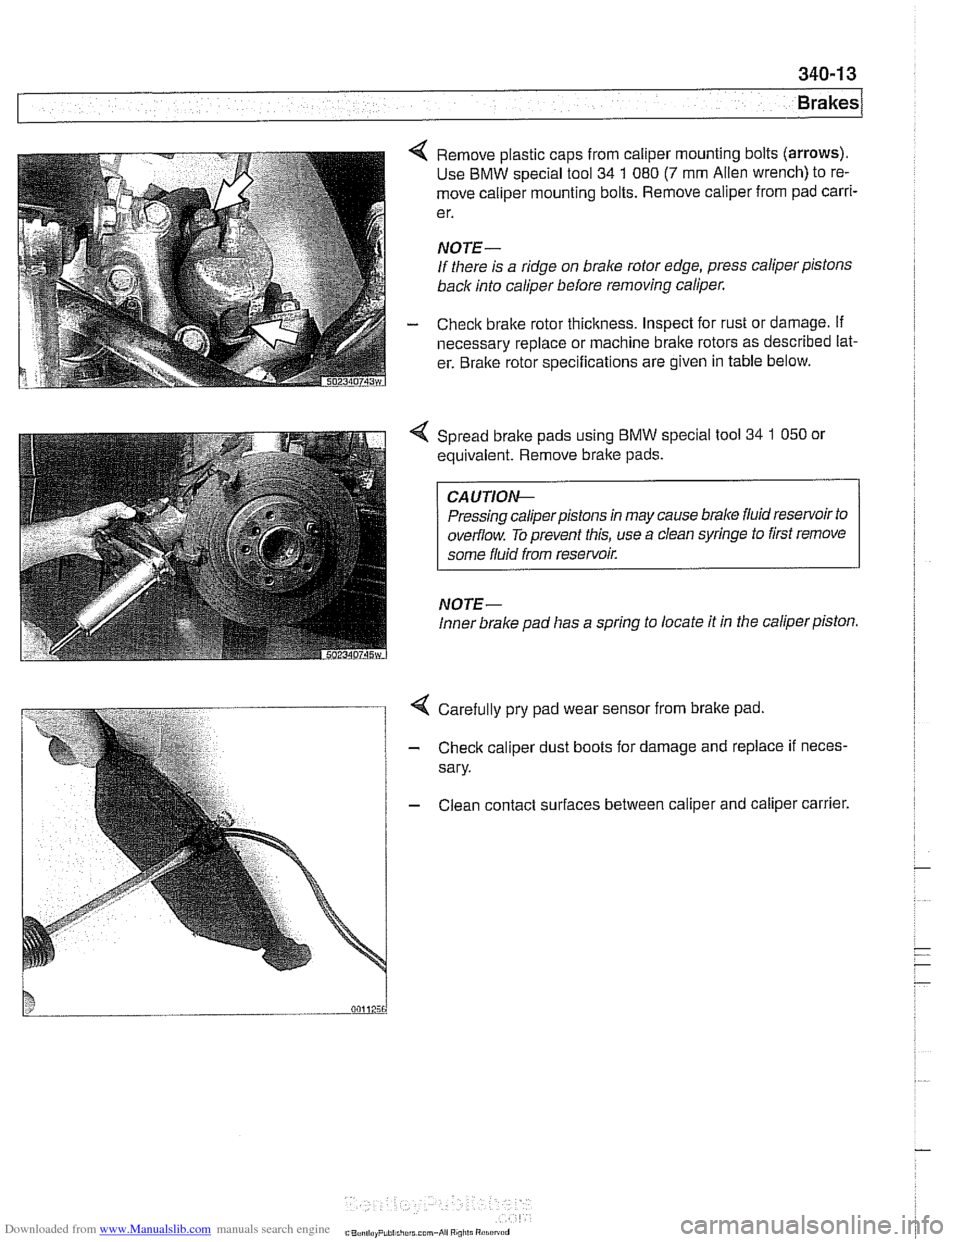
4 Remove plastic caps from caliper mounting bolts (arrows).
Use BMW special tool 34 1 080 (7 mm Alien wrench) to re-
move caliper mounting bolts. Remove caliper from pad
carri-
e r.
NOTE-
If there is a ridge on brake rotor edge, press caliper pistons
back into caliper before removing caliper.
- Check brake rotor thickness. Inspect for rust or damage. if
necessary replace or machine brake rotors as described lat-
er. Bralte rotor specifications are given in table below.
Spread bralte pads using BMW special tool
34 1 050 or
equivalent. Remove brake pads.
CA UTIOG
Pressing caliperpistons in may cause brake fluid reservoir to
overflow. To prevent this, use a clean syringe to first remove
some fluid from reservoir.
NOTE-
Inner brake pad lias a spring to locate it in the caliper piston.
4 Carefully pry pad wear sensor from brake pad
- Check caliper dust boots for damage and replace if neces-
sary.
- Clean contact surfaces between caliper and caliper carrier.
C"..., I,.. P,hi..,,,.r.. mm-*ii Ai"i,li "1.i"~"d
Page 777 of 1002
Downloaded from www.Manualslib.com manuals search engine
340-1 5
Brakes
- Remainder of installation is reverse of removal.
- Clean brake caliper mounting bolts (7 mm Allen). Replace
ones which are not in perfect condition. Do not grease.
Top up brake fluid to MAX marking.
- Before driving car, pump bralte pedal several times so that
brake pads contact brake rotors.
Check that brake fluid level is correct. Top up if necessary.
Hold ignition key for at least
30 seconds in accessory po-
sition without starting engine. This clears any fault codes in
memory and turns off brake pad warning light.
Tightening torques Brake caliper to pad carrier
(7 mm Allen)
Front caliper
30 Nm (22 It-lb)
- Rear caliper 28 Nm (21 It-lb)
Road wheel to hub
120i 10 Nm (89i7 ft-lb)
Brake rotors, removing and installing
- Raise car and remove wheels
WARNING-
Male sure that the car is firmly supported on jack stands de-
signed for the purpose. Place jack stands beneath structural
chassis points. Do not place jack stands under suspension
parts.
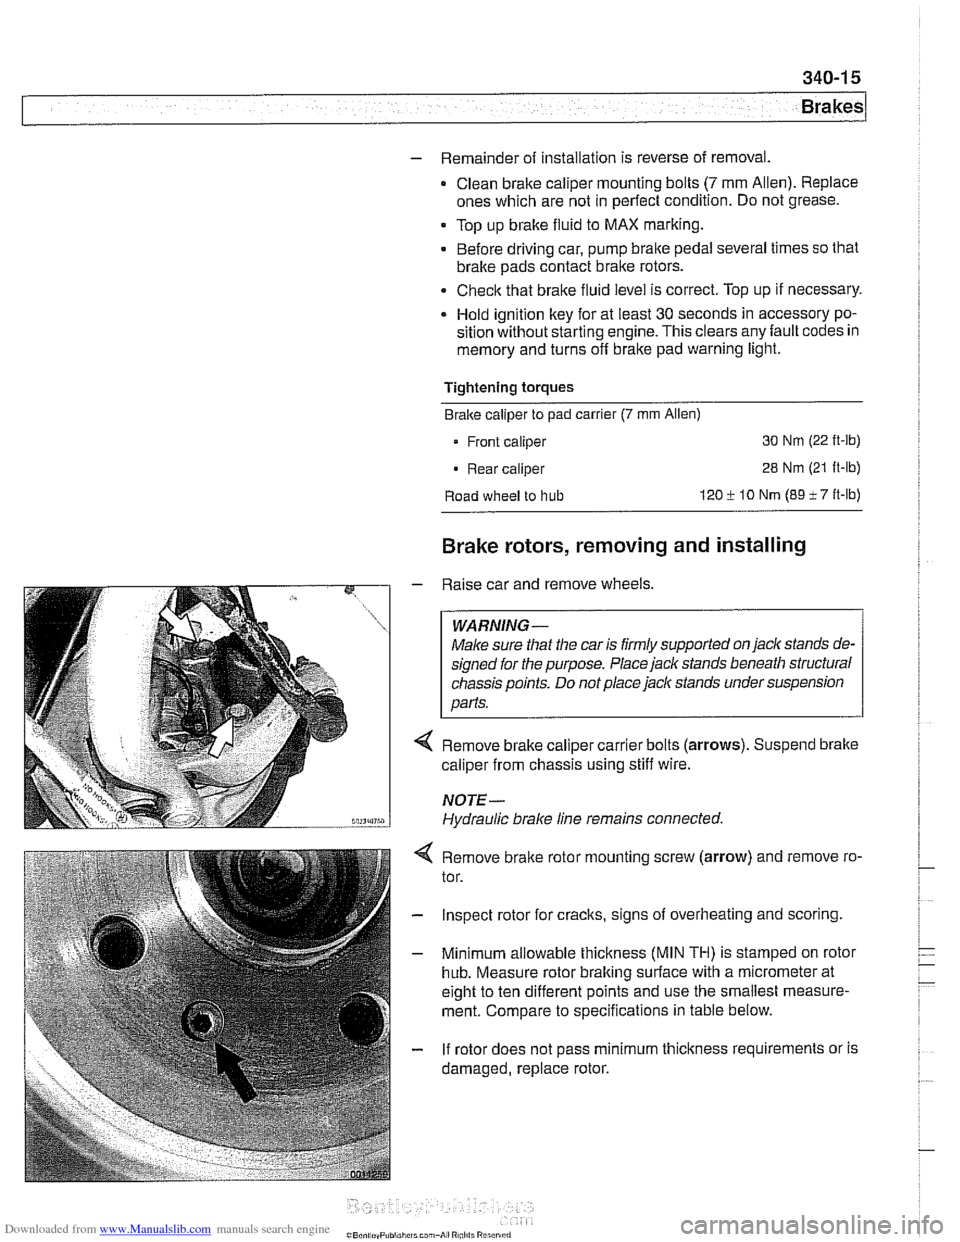
Remove brake caliper carrier bolts (arrows). Suspend brake
caliper from chassis using stiff wire.
NOTE-
Hydraulic brake line remains connected.
4 Remove bralte rotor mounting screw (arrow) and remove ro-
tor.
- Inspect rotor for cracks, signs of overheating and scoring.
- Minimum allowable thickness (MIN TH) is stamped on rotor
hub. Measure rotor braking surface with a micrometer at
eight to ten different points and use the smallest measure-
ment. Compare to specifications in table below.
- If rotor does not pass minimum thickness requirements or is
damaged, replace rotor.
Page 781 of 1002
Downloaded from www.Manualslib.com manuals search engine
Brakes
The brake booster is mounted to the bulkhead on driver's side
of the engine compartment, directly behind the brake master
cylinder. Intake manifold vacuum acts on a large diaphragm
in the brake booster to reduce brake pedal effort.
Brake booster check valve
The checlc valve in the bralte booster vacuum line prevents
contamination from engine backfires and other sources from
entering the bralte booster.
Location of
check valve varies, depending on year and mod-
el.
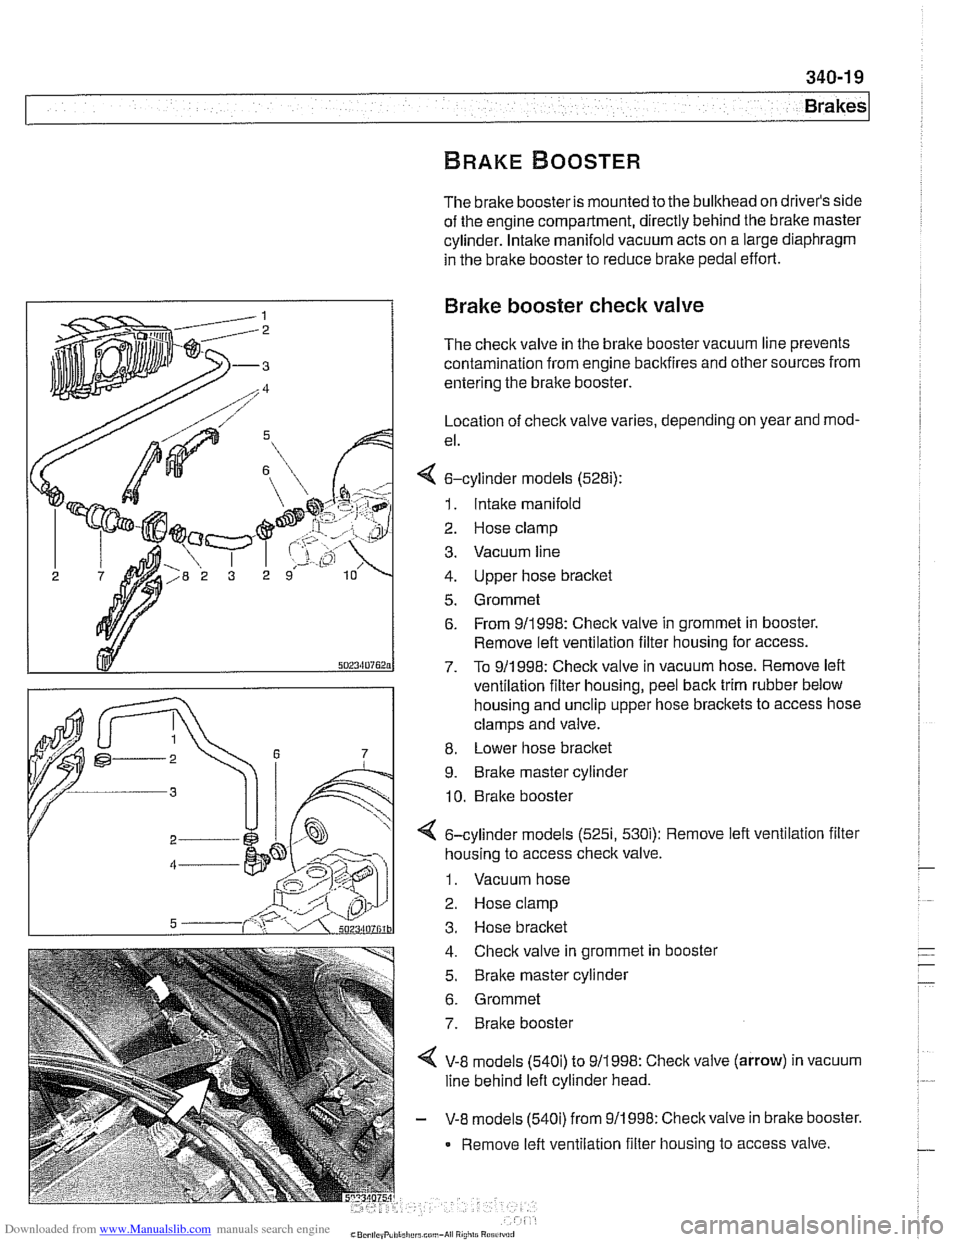
4 6-cylinder models (528i):
1. Intake manifold
2 Hose clamp
3. Vacuum line
4. Upper hose bracket
5. Grommet 6. From 911998: Check valve in grommet in booster.
Remove left ventilation filter housing for access.
7. To 911 998: Check valve in vacuum hose. Remove left
ventilation filter housing, peel back trim rubber below
housing and
unclip upper hose brackets to access hose
clamps and valve.
8. Lower hose
bracket
9. Brake master cylinder
10. Brake booster
< 6-cylinder models (525i, 530i): Remove left ventilation filter
housing to access
checlc valve.
1. Vacuum hose
2. Hose clamp
3. Hose bracket
4. Check valve in grommet in booster
5.
Braite master cylinder
6. Grommet
7. Brake booster
4 V-8 models (540i) to 911998: Check valve (arrow) in vacuum
line behind left cylinder head.
- V-8 models (540i) from 911998: Checkvalve in brake booster.
Remove left ventilation filter housing to access valve.
Page 782 of 1002
Downloaded from www.Manualslib.com manuals search engine
Brakes
- Pump brake pedal a few times to reduce vacuum in brake
booster. This makes removal of
check valve easier.
- Remove or loosen hose clamp(s) at check valve.
- Disconnect hoses. Remove valve to test or replace.
NOTE-
If valve is pressed into grommet in vacuum booster, pry it out
carefully.
- Reinstall valve using new hose clamps
NOTE-
Install the valve so that the molded arrow is pointing toward
the intake manifold.
Brake booster, removing and installing
CAUTIO&
All E39 vehicles sold in the USA are equipped with Antiloclc
Braking System (ABS) and either Automatic Stability Control
(ASC) or Dynamic Stability Control (DSC). In order for the
bralchg and stability controls to work properk if brake fluid
lines are disconnected and reconnected,
male sure that the
brake system is bled by an authorized BMW dealer or other
qualified repair facility using the BMW Service Tester: See
Brake Bleeding earlier in this group.
- Disconnect negative (-) cable from battery.
I CAUTION- I
Prior to disconnecting the battery read the battery discon-
nection cautions given in
001 General Cautions and
I Warnings. I
- Remove bralte master cylinder as described earlier.
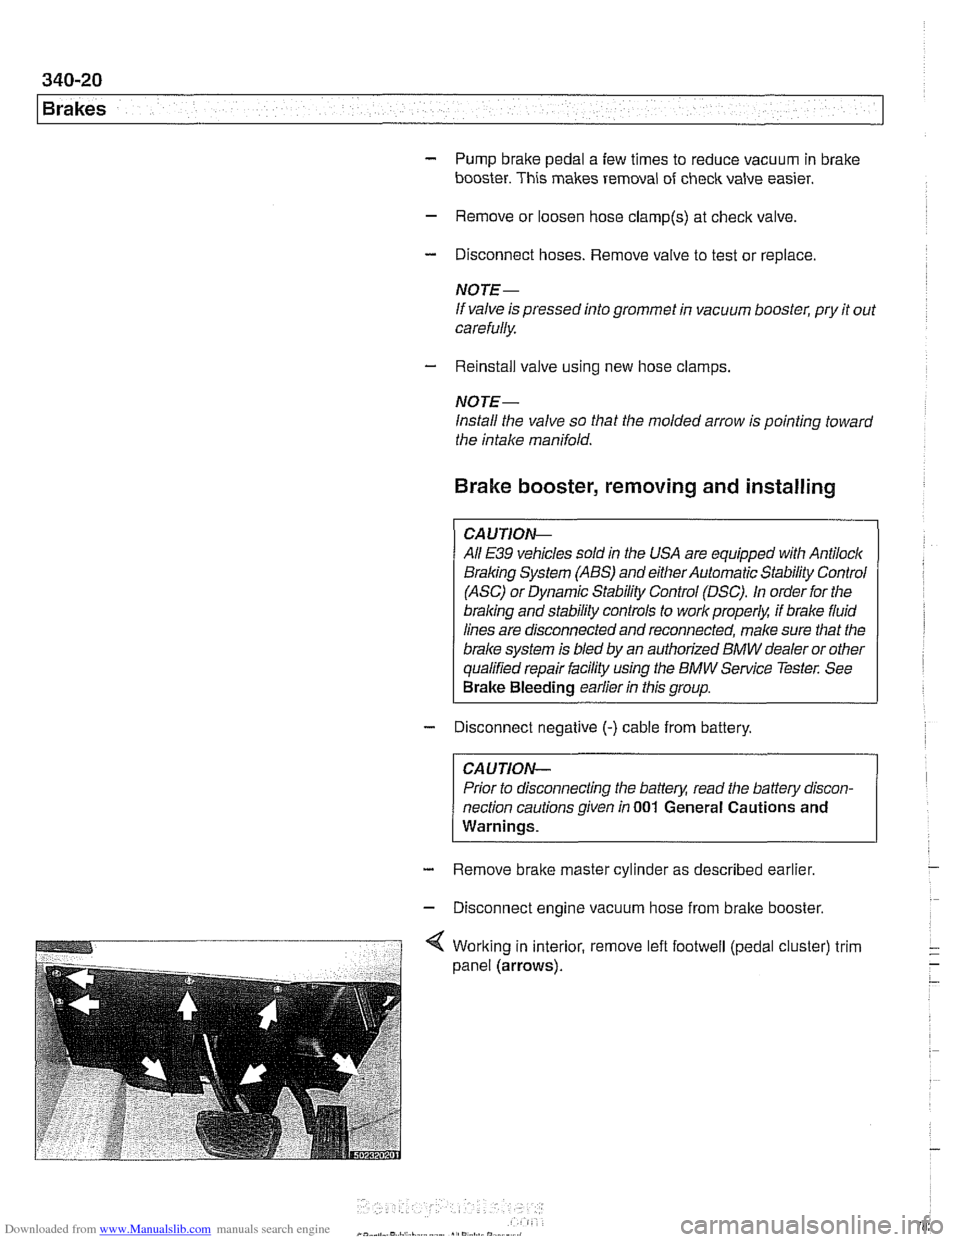
- Disconnect engine vacuum hose from bralte booster.
Page 783 of 1002
Downloaded from www.Manualslib.com manuals search engine
1 Brakes
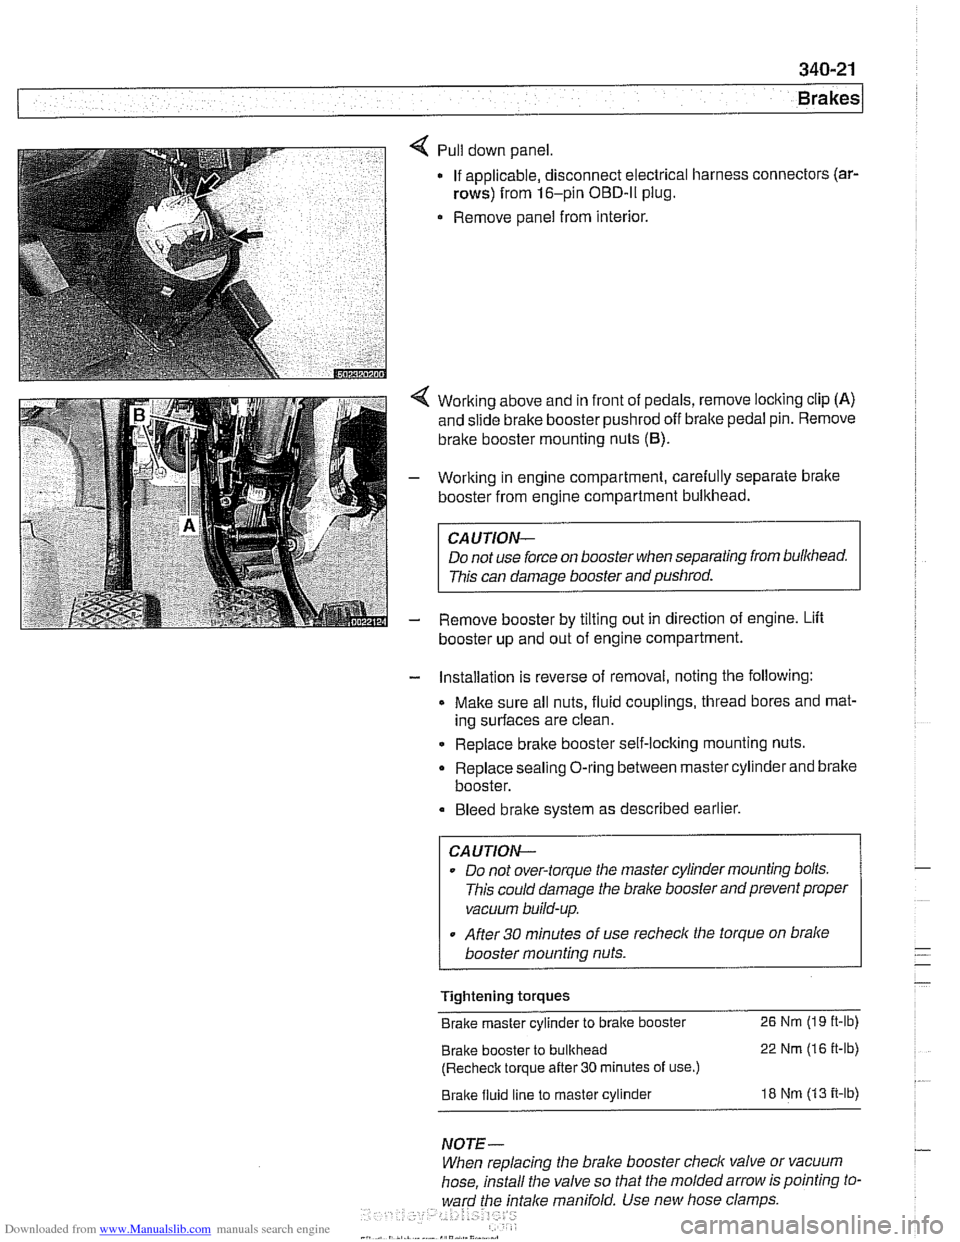
Pull down panel
If applicable, disconnect electrical harness
rows) from 16-pin OBD-ll plug.
Remove panel from interior. connectors
(ar-
Working
above and in front of pedals, remove locking clip (A)
and slide brake booster pushrod off bralte pedal pin. Remove
brake booster mounting nuts
(6).
Working in engine compartment, carefully separate bralte
booster from engine compartment bulkhead.
CAUTION-
Do not use force on booster when separating from bulkhead.
This can damage booster and pushrod.
Remove booster by tilting out in direction of engine. Lift
booster up and out of engine compartment.
- Installation is reverse of removal, noting the following:
Make sure all nuts, fluid couplings, thread bores and mat-
ing surfaces are clean.
Replace bralte booster self-locking mounting nuts.
Replace sealing O-ring between master cylinder and bralte
booster.
Bleed bralte system as described earlier.
CAUTION--
Do not over-torque tlie master cylinder mounting bolts.
This could damage the
bralce booster and prevent proper
vacuum build-up.
After
30 minutes of use recheclc the torque on bralce
booster mounting nuts.
Tightening torques
Brake master cylinder to brake booster
26 Nm (19 it-lb)
Brake booster to bulkhead 22 Nm (16 it-lb)
(Recheck torque after
30 minutes of use.)
Brake fluid line to master cylinder 18 Nm (13 it-lb)
NOTE-
When replacing the brake booster check valve or vacuum
hose, install the valve so that the molded arrow is pointing to-
ward the
fntalce manifold. Use new hose clamps
Page 792 of 1002
Downloaded from www.Manualslib.com manuals search engine
1 Brakes
- Remove precharge pump mounting bracket fasteners and re-
move pump.
- Installation is reverse of removal, noting the following:
Be sure to replace rubber pump mounts if damaged
01
worn.
Bleed brakes as described earlier.
Tightening torque Brake line
to precharge pump 18 Nrn (13 ft-lb)
DSC pressure sensor (1 999 - 2002 models)
On 1999 and later DSC systems, the DSC pressure sensor is
screwed into the DSC hydraulic unit (right rear of engine com-
partment).
WARNING-
* €39 cars require special BMW service equipment to prop-
erly bleed the brakes. Removal of the
DSCpressure sensor
is not recommended unless this equipment is available. For
safety reasons, the brake system on cars with ABS must be
bled using the procedures described in this repair group.
Switch off ignition and remove
key to male sure brake
system cannot be activated.
- Disconnect electrical harness connector at switch.
- Use BMW special tool 34 5 160 to remove and install sensor.
Inspect threads and sealing surfaces for damage.
* Work quicltly to avoid excessive brake fluid leakage.
Tightening torque
Pressure sensor
to hydraulic 19 Nrn (14ft-lb)
unit
- Reconnect harness connector
- Bleed front brakes as described earlier.
- Press on brakes and check for leaks at sensor.
- Turn on ignition and firmly depress brake pedal. Check that
DSC warning light does not come on.
Page 794 of 1002
Downloaded from www.Manualslib.com manuals search engine
340-32
Brakes
The procedure for removing the ABS I ASC or ABS I DSC hy-
draulic unit is similar for all models. The unit is located at the
right rear of the engine compartment.
- Using a clean syringe, empty brake fluid reservoir.
CAUTION-
Brake fluid is highly corrosive and dangerous to the environ-
ment. Dispose of it
properiw
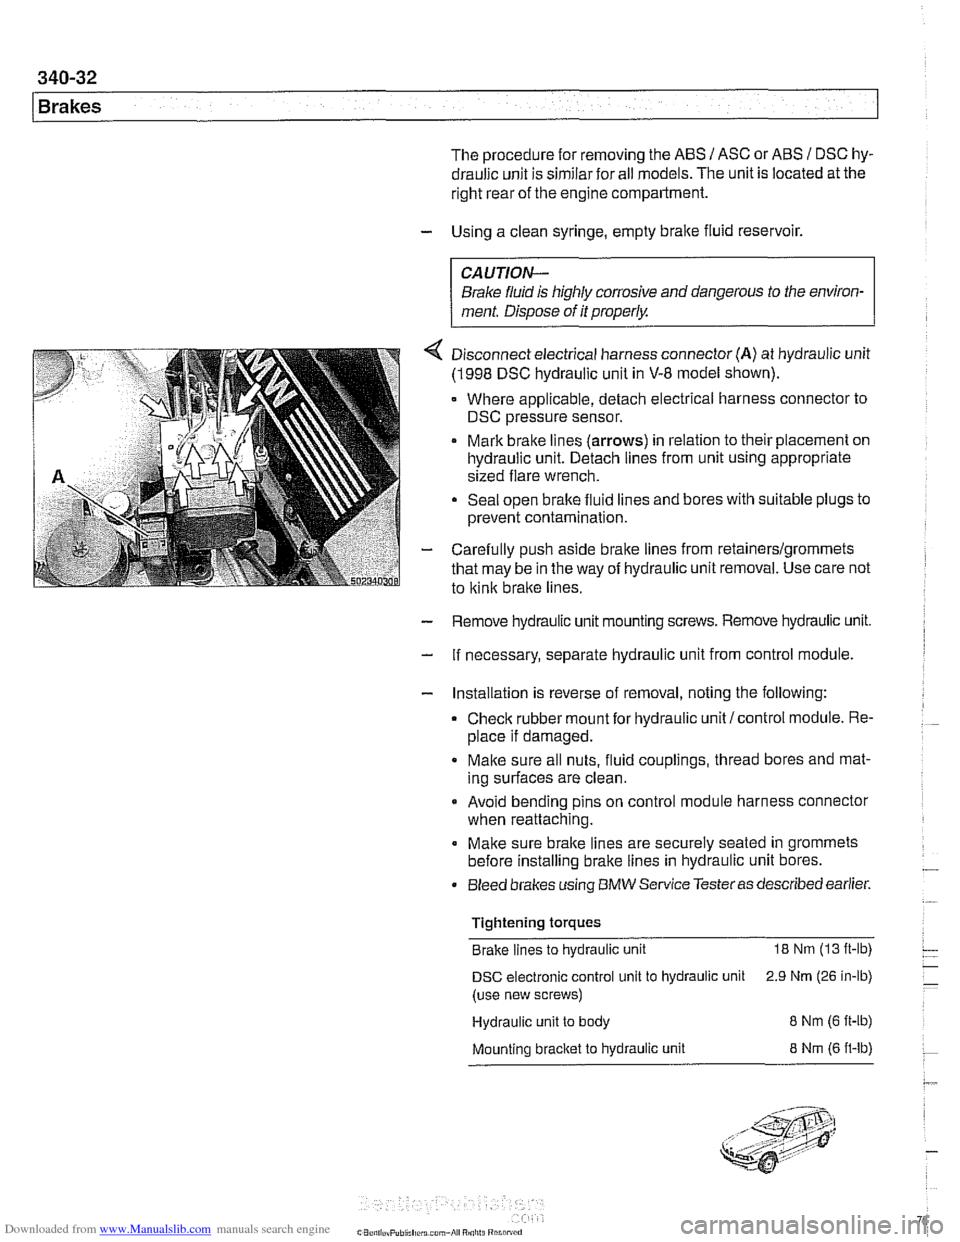
4 Disconnect electrical harness connector (A) at hydraulic unit
(1998 DSC hydraulic unit in V-8 model shown).
Where applicable, detach electrical harness connector to
DSC pressure sensor.
Mark brake lines
(arrows) in relation to their placement on
hydraulic unit. Detach lines from unit using appropriate
sized flare wrench.
Seal open brake fluid lines and bores with suitable plugs to
prevent contamination.
- Carefully push aside brake lines from retainerslgrommets
that may be in the way of hydraulic unit removal. Use care not
to
kink brake lines.
- Remove hydraulic unit mounting screws. Remove hydraulic unit.
- If necessary, separate hydraulic unit from control module.
- Installation is reverse of removal, noting the following:
Check rubber mount for hydraulic unit/control module. Re-
place if damaged.
Make sure all nuts, fluid couplings, thread bores and mat-
ing surfaces are clean.
Avoid bending pins on control module harness connector
when reattaching.
Make sure brake lines are securely seated in grommets
before installing brake lines in hydraulic unit bores.
Bleed brakes using
BMW Service Testeras described earlier.
Tightening torques Brake lines to hydraulic unit
18 Nm (13 ft-lb)
DSC electronic control unit to hydraulic unit 2.9 Nrn (26 in-lb)
(use new screws)
Hydraulic unit to body
8 Nm (6 ft-ib)
Mounting bracket to hydraulic unit 8 Nrn (6 ft-lb)