BMW MOTORRAD K 1200 R 2004 Rider's Manual (in English)
Manufacturer: BMW MOTORRAD, Model Year: 2004, Model line: K 1200 R, Model: BMW MOTORRAD K 1200 R 2004Pages: 168, PDF Size: 2.02 MB
Page 111 of 168
6109
Maintenance
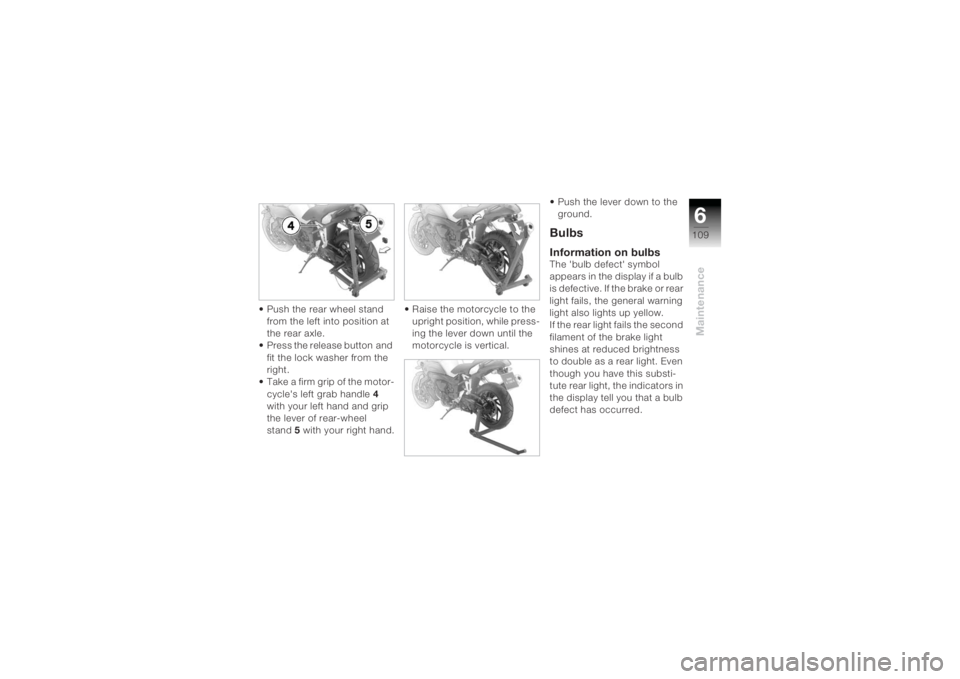
• Push the rear wheel stand from the left into position at
the rear axle.
• Press the release button and
fit the lock washer from the
right.
• Take a firm grip of the motor- cycle's left grab handle 4
with your left hand and grip
the lever of rear-wheel
stand 5 with your right hand. • Raise the motorcycle to the
upright position, while press-
ing the lever down until the
motorcycle is vertical. • Push the lever down to the
ground.
BulbsInformation on bulbsThe 'bulb defect' symbol
appears in the display if a bulb
is defective. If the brake or rear
light fails, the general warning
light also lights up yellow.
If the rear light fails the second
filament of the brake light
shines at reduced brightness
to double as a rear light. Even
though you have this substi-
tute rear light, the indicators in
the display tell you that a bulb
defect has occurred.
Page 112 of 168
Maintenance6110
A defective bulb places
your safety at risk be-
cause it is easier for other road
users to oversee you and your
motorcycle.
Replace defective bulbs as
soon as possible; always carry
a complete set of spare bulbs
if possible. c
The types of bulb used
are listed on (
b
139). c
Do not touch the glass of
new bulbs with your fin-
gers. Use a clean, dry cloth to
hold the bulbs when handling
them. Dirt deposits, in particu-
lar oil and grease, interfere
with heat radiation from the
bulb. This leads to overheating
and shortens the bulb’s oper-
ating life. c The types of threaded
fastener used are listed
on (
b
128). c
Replacing low-beam
headlight bulb
If it is not standing firmly,
the motorcycle could
topple in the course of the
operations described below.
Make sure that the motorcycle
is steady on its stand. c
The bulb is pressurised
and can cause injury if
damaged.
Wear protective goggles and
gloves when changing
bulbs. c
Turn the handlebars to
the right to facilitate
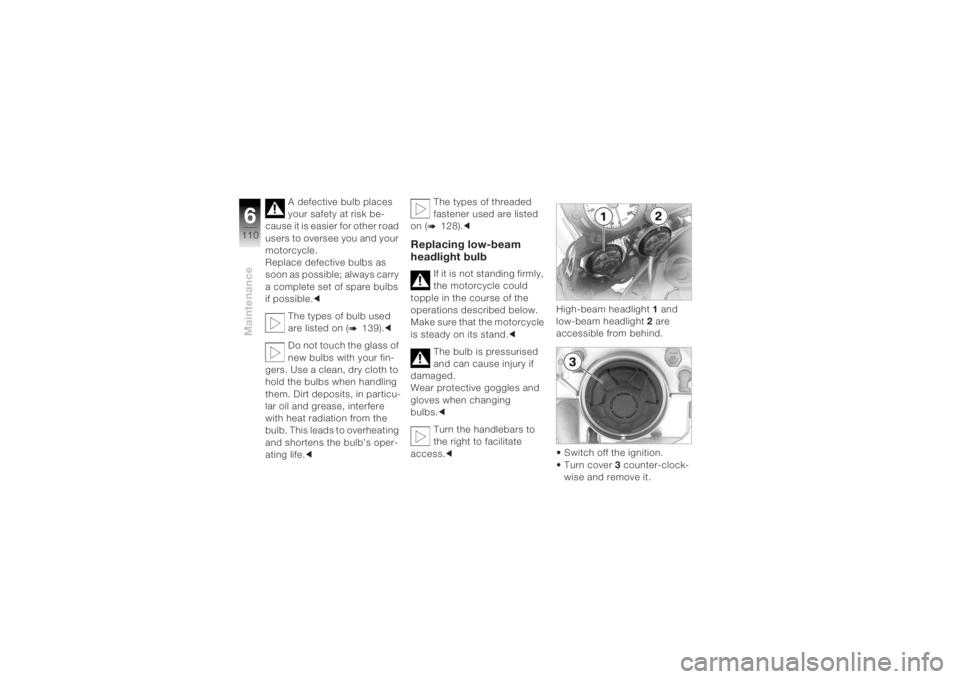
access. c High-beam headlight
1 and
low-beam headlight 2 are
accessible from behind.
• Switch off the ignition.
•Turn cover 3 counter-clock-
wise and remove it.
Page 113 of 168
6111
Maintenance
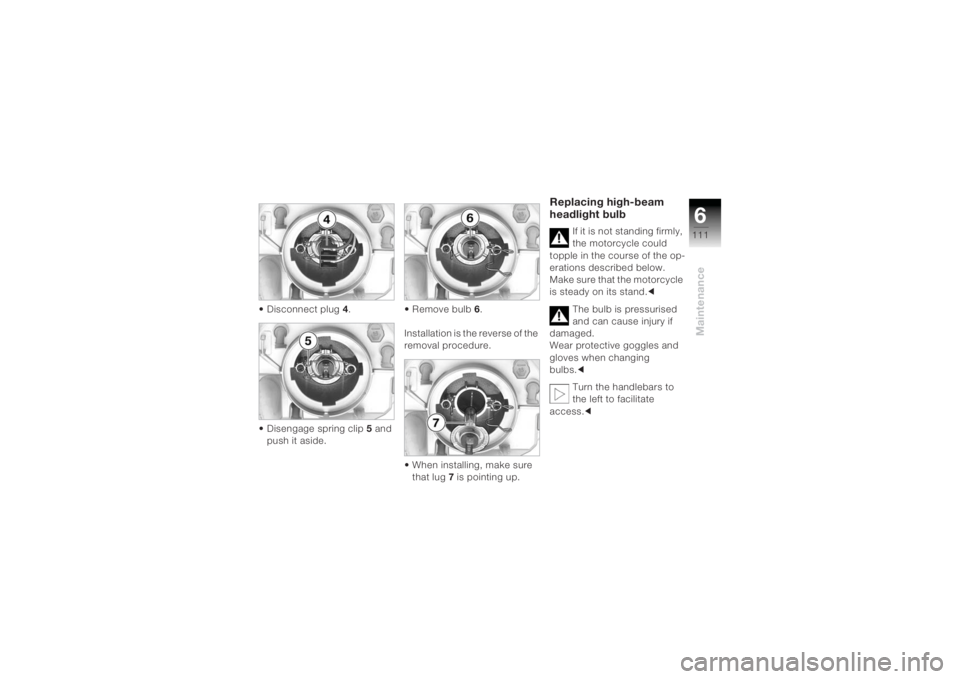
• Disconnect plug 4.
• Disengage spring clip 5 and
push it aside. • Remove bulb
6.
Installation is the reverse of the
removal procedure.
• When installing, make sure that lug 7 is pointing up.
Replacing high-beam
headlight bulb
If it is not standing firmly,
the motorcycle could
topple in the course of the op-
erations described below.
Make sure that the motorcycle
is steady on its stand. c
The bulb is pressurised
and can cause injury if
damaged.
Wear protective goggles and
gloves when changing
bulbs.c
Turn the handlebars to
the left to facilitate
access. c
Page 114 of 168
Maintenance6112
• The procedure for changing the high-beam headlight
bulb is the same as that for
the low-beam bulb. Note,
however, that the high-beam
headlight bulb is held in
place by a single-leg, vertical
spring clip.Replacing parking light
If it is not standing firmly,
the motorcycle could
topple in the course of the
operations described below.
Make sure that the motorcycle
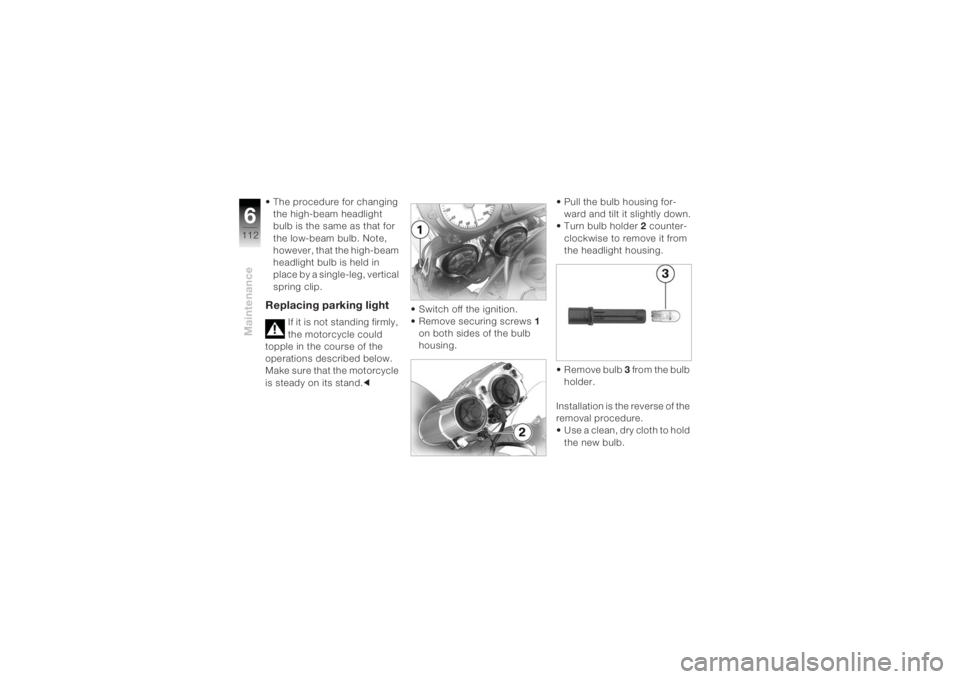
is steady on its stand. c• Switch off the ignition.
• Remove securing screws
1
on both sides of the bulb
housing. • Pull the bulb housing for-
ward and tilt it slightly down.
• Turn bulb holder 2 counter-
clockwise to remove it from
the headlight housing.
• Remove bulb 3 from the bulb
holder.
Installation is the reverse of the
removal procedure.
• Use a clean, dry cloth to hold the new bulb.
Page 115 of 168
6113
Maintenance
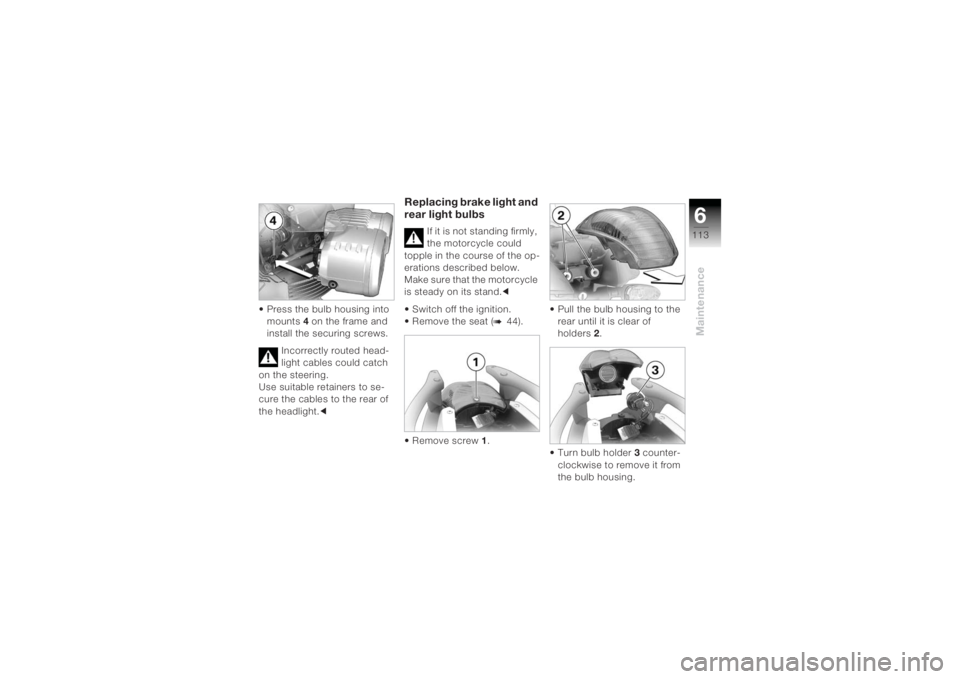
• Press the bulb housing into mounts 4 on the frame and
install the securing screws.
Incorrectly routed head-
light cables could catch
on the steering.
Use suitable retainers to se-
cure the cables to the rear of
the headlight. c
Replacing brake light and
rear light bulbs
If it is not standing firmly,
the motorcycle could
topple in the course of the op-
erations described below.
Make sure that the motorcycle
is steady on its stand. c
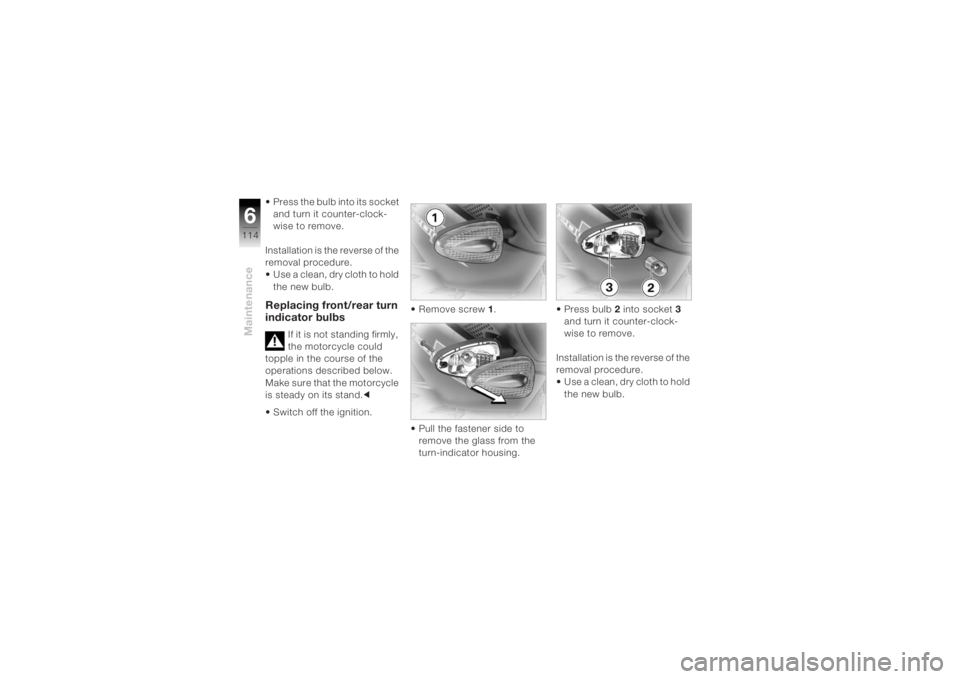
• Switch off the ignition.
• Remove the seat (
b
44).
• Remove screw 1. • Pull the bulb housing to the
rear until it is clear of
holders 2.
• Turn bulb holder 3 counter-
clockwise to remove it from
the bulb housing.
Page 116 of 168
Maintenance6114
• Press the bulb into its socket and turn it counter-clock-
wise to remove.
Installation is the reverse of the
removal procedure.
• Use a clean, dry cloth to hold the new bulb.Replacing front/rear turn
indicator bulbs
If it is not standing firmly,
the motorcycle could
topple in the course of the
operations described below.
Make sure that the motorcycle
is steady on its stand. c
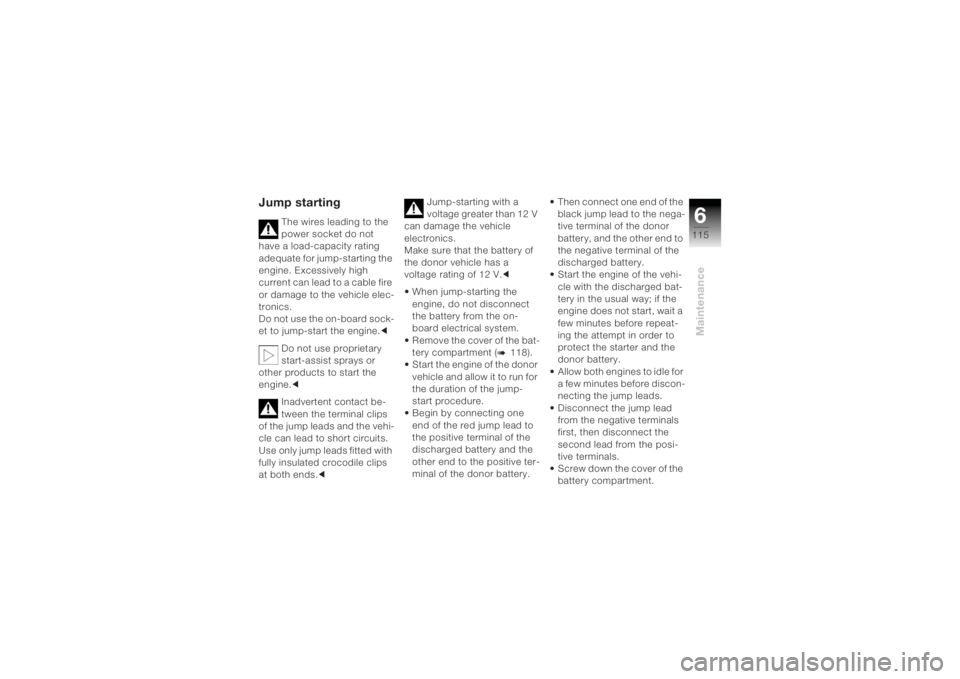
• Switch off the ignition. • Remove screw
1.
• Pull the fastener side to remove the glass from the
turn-indicator housing. • Press bulb
2 into socket 3
and turn it counter-clock-
wise to remove.
Installation is the reverse of the
removal procedure.
• Use a clean, dry cloth to hold the new bulb.
Page 117 of 168
6115
Maintenance
Jump starting
The wires leading to the
power socket do not
have a load-capacity rating
adequate for jump-starting the
engine. Excessively high
current can lead to a cable fire
or damage to the vehicle elec-
tronics.
Do not use the on-board sock-
et to jump-start the engine. c
Do not use proprietary
start-assist sprays or
other products to start the
engine. c
Inadvertent contact be-
tween the terminal clips
of the jump leads and the vehi-
cle can lead to short circuits.
Use only jump leads fitted with
fully insulated crocodile clips
at both ends. c Jump-starting with a
voltage greater than 12 V
can damage the vehicle
electronics.
Make sure that the battery of
the donor vehicle has a
voltage rating of 12 V. c
• When jump-starting the engine, do not disconnect
the battery from the on-
board electrical system.
• Remove the cover of the bat- tery compartment (
b
118).
• Start the engine of the donor vehicle and allow it to run for
the duration of the jump-
start procedure.
• Begin by connecting one
end of the red jump lead to
the positive terminal of the
discharged battery and the
other end to the positive ter-
minal of the donor battery. • Then connect one end of the
black jump lead to the nega-
tive terminal of the donor
battery, and the other end to
the negative terminal of the
discharged battery.
• Start the engine of the vehi-
cle with the discharged bat-
tery in the usual way; if the
engine does not start, wait a
few minutes before repeat-
ing the attempt in order to
protect the starter and the
donor battery.
• Allow both engines to idle for a few minutes before discon-
necting the jump leads.
• Disconnect the jump lead from the negative terminals
first, then disconnect the
second lead from the posi-
tive terminals.
• Screw down the cover of the battery compartment.
Page 118 of 168
Maintenance6116
Touching live parts of the
ignition system with the
engine running can lead to
electric shocks.
Do not touch parts of the igni-
tion system when the engine is
running. c
BatteryMaintenance instructionsYour motorcycle is supplied
with a maintenance-free
battery.
Correct upkeep, recharging
and storage will prolong the
life of the battery and are
essential if warranty claims are
to be considered.
Compliance with the points
below is important in order to
maximise battery life: – Keep the surface of the bat-
tery clean and dry.
– Do not open the battery.
– Do not top up with water.
– Be sure to read and comply with the instructions for
charging the battery on the
following pages.
– Do not turn the battery upside down.
If the battery is not dis-
connected, the on-board
electronics (clock, etc.) will
drain the battery. This can
cause the battery to run flat. If
this happens, warranty claims
will not be accepted.
If the motorcycle is to be out of
use for more than two months,
disconnect the battery or con-
nect a suitable trickle charger
to the battery. c BMW Motorrad has de-
veloped a trickle-charger
specially designed for
compatibility with the electron-
ics of your motorcycle. Using
this charger, you can keep the
battery charged during long
periods of disuse, without hav-
ing to disconnect the battery
from the motorcycle's on-
board systems.
More information is available
on request from your
authorised BMW motorcycle
dealer. c
Charging the battery
when connected If the telltale lights do not light
up and the multifunction dis-
play remains blank when you
switch on the ignition, the bat-
tery is completely flat.
Page 119 of 168
6117
Maintenance
• Charge the disconnected battery via the power socket.
• Comply with the operating instructions of the charger.
Attempting to charge a
completely flat battery via
the on-board socket can
cause damage to the motorcy-
cle's electronics. If the battery
is completely flat it must al-
ways be recharged directly at
the terminals. c
• Do not attempt to recharge a completely flat battery via
the on-board socket;
instead, disconnect the bat-
tery from the on-board sys-
tem and connect the charger
directly to the battery
terminals.
• Comply with the operating instructions of the charger. Your authorised BMW
motorcycle dealer will be
happy to provide information
on suitable chargers. c
If the battery is only partially
discharged, it can be re-
charged via the on-board
socket.
• If electrical accessories are connected to an additional
on-board socket
OA, discon-
nect them before connecting
the charger.
• Switch on the ignition.
• Plug the charger into the on-
board socket. Comply with
the operating instructions of
the charger.
• Switch off the ignition. The motorcycle's on-
board electronics know
when the battery is fully
charged. The on-board socket
is switched off when this
happens. c
If you are unable to
charge the battery via the
power socket, you may be us-
ing a charger that is not com-
patible with your motorcycle's
electronics. If this happens,
disconnect the battery from
the on-board systems and
connect the charger directly to
the battery. c
Page 120 of 168
Maintenance6118
Charging the battery
when disconnected
The battery has to be re-
charged at regular inter-
vals in the course of a lengthy
period of disuse.
See the instructions for caring
for your battery. Always fully
recharge the battery before
restoring it to use. c
• Charge the battery using a suitable charger.
• Comply with the operating instructions of the charger.
• Once the battery is fully charged, disconnect the
charger terminal clips from
the battery terminals.
Removing battery
The types of screw used
are listed on (
b
128). c
If it is not standing firmly,
the motorcycle could
topple in the course of the
operations described below.
Make sure that the motorcycle
is steady on its stand. c
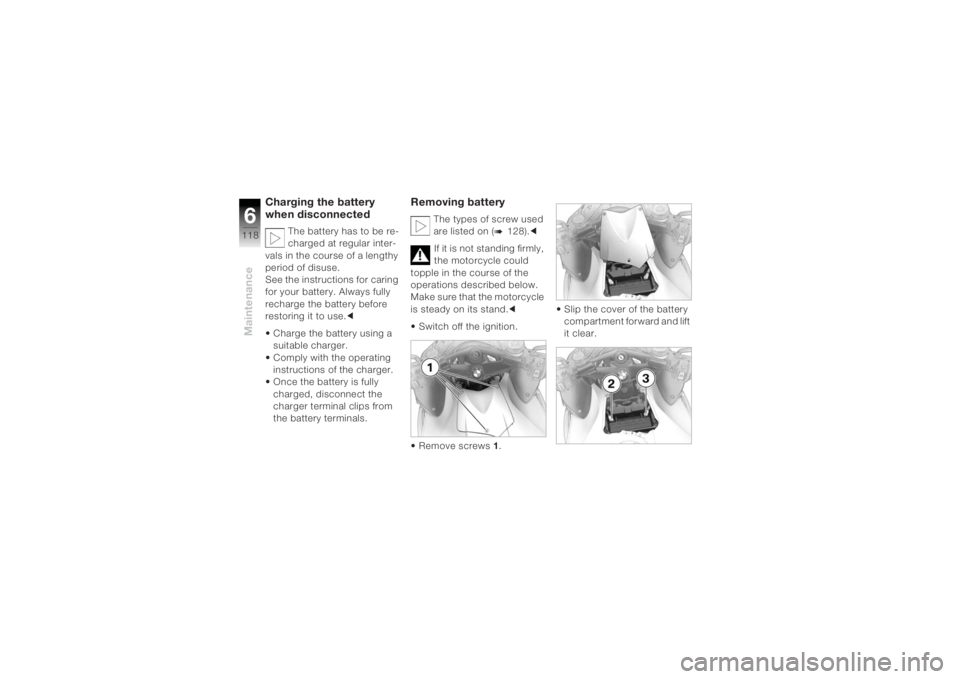
• Switch off the ignition.
• Remove screws 1. • Slip the cover of the battery
compartment forward and lift
it clear.