CADILLAC ESCALADE 2010 3.G Owners Manual
Manufacturer: CADILLAC, Model Year: 2010, Model line: ESCALADE, Model: CADILLAC ESCALADE 2010 3.GPages: 616, PDF Size: 39.41 MB
Page 301 of 616
Section 5 Navigation System
Overview. . . . . . . . . . . . . . . . . . . . . . . . . . . . . . . . . . . . . . . . . . . 5-2Navigation System Overview . . . . . . . . . . . . . . . . . . . . 5-2Getting Started . . . . . . . . . . . . . . . . . . . . . . . . . . . . . . . . . . 5-4Cleaning the Display . . . . . . . . . . . . . . . . . . . . . . . . . . . 5-11
Features and Controls. . . . . . . . . . . . . . . . . . . . . . . . . . . 5-12Using the Navigation System . . . . . . . . . . . . . . . . . . 5-12Maps . . . . . . . . . . . . . . . . . . . . . . . . . . . . . . . . . . . . . . . . . . 5-14Symbols . . . . . . . . . . . . . . . . . . . . . . . . . . . . . . . . . . . . . . . 5-17Destination . . . . . . . . . . . . . . . . . . . . . . . . . . . . . . . . . . . . 5-24Configure Menu . . . . . . . . . . . . . . . . . . . . . . . . . . . . . . . 5-42Global Positioning System (GPS) . . . . . . . . . . . . . . 5-57
Vehicle Positioning . . . . . . . . . . . . . . . . . . . . . . . . . . . . 5-57Problems with Route Guidance . . . . . . . . . . . . . . . . 5-58If the System Needs Service . . . . . . . . . . . . . . . . . . . 5-59Ordering Map DVDs . . . . . . . . . . . . . . . . . . . . . . . . . . . 5-59Database Coverage Explanations . . . . . . . . . . . . . 5-59
Navigation Audio System. . . . . . . . . . . . . . . . . . . . . . . . 5-60CD Player . . . . . . . . . . . . . . . . . . . . . . . . . . . . . . . . . . . . . 5-68DVD Player . . . . . . . . . . . . . . . . . . . . . . . . . . . . . . . . . . . . 5-75Care of Your CDs and DVDs . . . . . . . . . . . . . . . . . . . 5-84Auxiliary Devices . . . . . . . . . . . . . . . . . . . . . . . . . . . . . . 5-85
Voice Recognition. . . . . . . . . . . . . . . . . . . . . . . . . . . . . . . . 5-86
5-1
Page 302 of 616
Overview
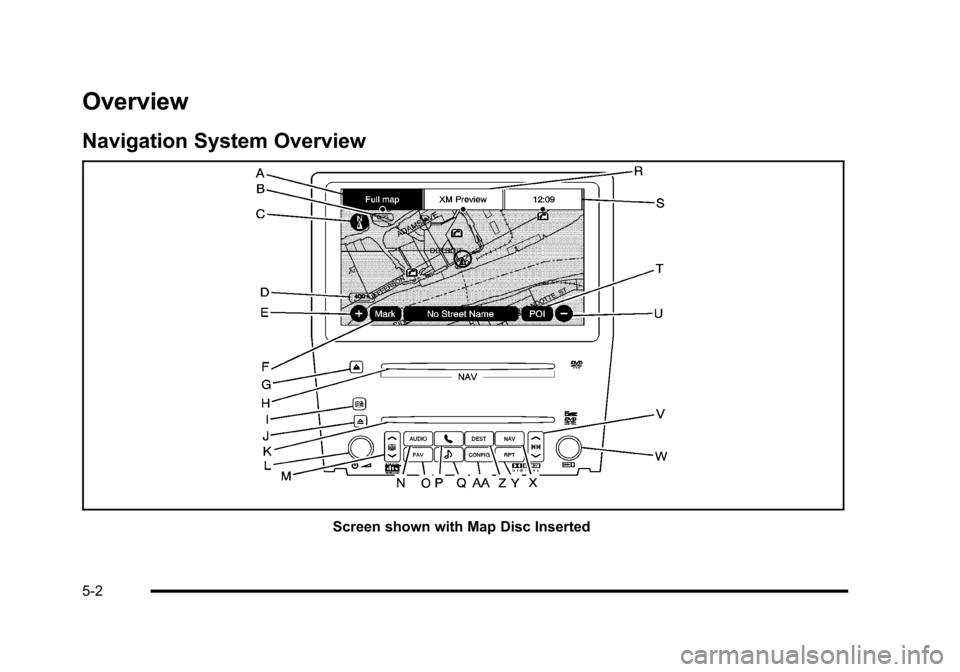
Navigation System Overview
Screen shown with Map Disc Inserted
5-2
Page 303 of 616

A. FULL MAP Touch Screen Button. See“NAV”under“Hard Keys”underUsing the Navigation Systemon page 5!12for more information.
B. No GPS Symbol. SeeSymbolson page 5!17formore information.
C. North Up/Heading Up Symbol. SeeSymbolsonpage 5!17for more information.
D. Map Scale. See“Map Scales”underMapsonpage 5!14for more information.
E.0(Zoom In) Touch Screen Button. See“Map
Scales”underMapson page 5!14for moreinformation.
F. Mark Touch Screen Button. See“AddingDestinations to the Address Book”underDestinationon page 5!24for more information.
G.Z(DVD Map Disc Eject) Key. SeeMapson
page 5!14for more information.
H. Map DVD Slot. See“Installing the Map DVD”underMapson page 5!14for information on how toinstall and eject a map DVD.
I.M(Load) Key. SeeCD Playeron page 5!68or
DVD Playeron page 5!75for more information.
J.Z(CD/DVD Video/Audio Eject) Key. SeeCD
Playeron page 5!68orDVD Playeron page 5!75for more information.
K. CD/DVD Video/Audio Slot. SeeCD Playeronpage 5!68orDVD Playeron page 5!75formore information.
L.O/n(Power/Volume) Knob. SeeNavigation
Audio Systemon page 5!60for more information.
M.M(Disc Up/Down) Key. See“Hard Keys”under
Using the Navigation Systemon page 5!12formore information.
N. AUDIO Key. SeeNavigation Audio Systemonpage 5!60for more information.
O. FAV (Favorite) Key. See“Storing Radio StationPresets”underNavigation Audio Systemonpage 5!60for more information.
P.5(Phone) Key. See the OnStar®owner guide and
Bluetooth®on page 4!67for more information.
Q.e(Sound) Key. See“Sound Menu”under
Navigation Audio Systemon page 5!60formore information.
R. Source (AM, FM, XM, CD, etc.) Touch ScreenButton. SeeNavigation Audio Systemonpage 5!60for more information.
S. Clock Touch Screen Button. See“Setting theClock”underConfigure Menuon page 5!42formore information.
5-3
Page 304 of 616
T. POI (Point of Interest) Touch Screen Button. See“Displaying Points of Interest (POI) on the MapScreen”underSymbolson page 5!17for moreinformation.
U.1(Zoom Out) Touch Screen Button. See“Map
Scales”underMapson page 5!14for moreinformation.
V.y © ¨ z(Seek) Key (Previous/Next). See
Navigation Audio Systemon page 5!60for moreinformation.
W.w(Tune) Knob. SeeNavigation Audio System
on page 5!60for more information.
X. NAV (Navigation) Key. See“Hard Keys”underUsing the Navigation Systemon page 5!12formore information.
Y. RPT (Repeat) Key. See“Hard Keys”underUsingthe Navigation Systemon page 5!12for moreinformation.
Z. DEST (Destination) Key. SeeDestinationonpage 5!24for more information.
AA. CONFIG (Configure) Key. SeeConfigure Menuonpage 5!42for more information.
Getting Started
Read this manual thoroughly to become familiarwith how the navigation system operates.
The navigation system includes navigation andaudio functions.
While entering the vehicle or when turning the vehicleoff, some DVD Map Disc noise is normal.
Keeping your eyes on the road and your mind onthe drive is important for safe driving. The navigationsystem has built-in features intended to help keep youreyes on the road and mind on the drive. Some featuresmay be disabled while driving. Note that these functionswill be grayed-out. A grayed-out function indicates it isnot available when the vehicle is moving.
All functions are available when the vehicle is parked.Do the following before driving:
.Become familiar with the navigation systemoperation, hard keys on the faceplate, andtouch-sensitive screen buttons of thenavigation system.
.Set up the audio by presetting favorite stations,setting the tone, and adjusting the speakers.
5-4
Page 305 of 616
.Set up the navigation features before beginningdriving, such as entering an address or a presetdestination.
.Set up your phone numbers in advance so theycan be called easily with the press of a singlebutton or a single voice command (for navigationsystems equipped with phone capability).
{WARNING:
Taking your eyes off the road too long or too often
while using the navigation system could cause a
crash resulting in injury or death to you or others.
Focus your attention on driving.
{WARNING:
Avoid looking too long or too often at the moving
map on the navigation screen. This could cause a
crash and you or others can be injured or killed.
Use the turn-by-turn voice guidance directions
whenever possible.
Use the navigation system to:
.Plan a route.
.Select a destination using various methodsand choices.
.Follow turn-by-turn route and map guidance withvoice prompts, only if permitted by traffic laws,controls, and conditions.
You should always be alert and obey traffic androadway laws and instructions, regardless of theguidance from the navigation system. Because thenavigation system uses street map information thatdoes not include all traffic restrictions or the latest roadchanges, it may suggest using a road that is now closedfor construction or a turn that is prohibited by signs atthe intersection. Because the system uses limitedinformation, you must always evaluate whetherfollowing the system's directions is safe and legal forthe current conditions.
When the navigation system is turned on, a screen mayappear with the information below, and you must readand acknowledge the information it contains.
5-5
Page 306 of 616
{WARNING:
Taking your eyes off the road for extended periods
could cause a crash resulting in injury or death to
you or others.
To help avoid a crash in which you or others couldbe killed:
.Always concentrate on your driving first by keepingyour eyes and mind on the road, and your handson the wheel.
.Follow system directions only if permitted by trafficlaws, controls, and conditions.
.Before using this system, read the owner manualand learn how it operates.
.Some system controls cannot be used the whenvehicle is moving.
After you acknowledge the start up information you willbe able to access the NAV (navigation) and DEST(destination) functions. Once accessed, you can enteror delete information in the navigation system or accessother functions. See instructions later in this section.
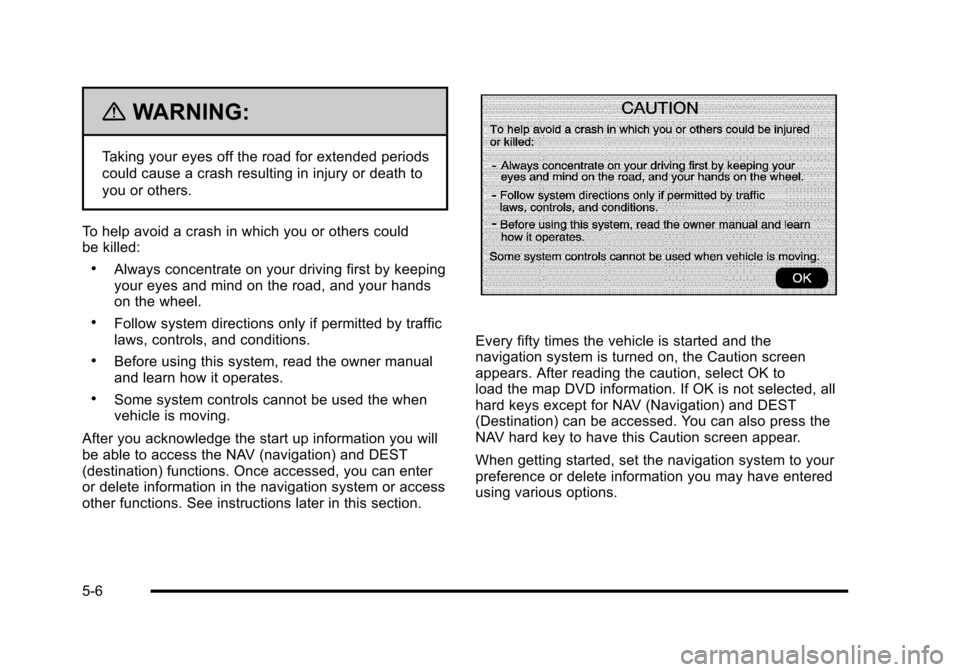
Every fifty times the vehicle is started and thenavigation system is turned on, the Caution screenappears. After reading the caution, select OK toload the map DVD information. If OK is not selected, allhard keys except for NAV (Navigation) and DEST(Destination) can be accessed. You can also press theNAV hard key to have this Caution screen appear.
When getting started, set the navigation system to yourpreference or delete information you may have enteredusing various options.
5-6
Page 307 of 616
Language—English/Metric
To change the language of the navigation screens, seeDriver Information Center (DIC)on page 4!41for moreinformation.
To change the navigation screens from English ormetric, seeDIC Operation and Displayson page 4!41for more information.
Deleting Personal Information
This navigation system can record and store personalinformation such as names and addresses. Delete thisinformation when selling your vehicle or returning aleased vehicle. See“Edit Address Book—Edit/View”underConfigure Menuon page 5!42for deletinginformation from the address book.
Limit Features While Driving
The navigation system may have this feature.
Touch the Limit Features While Driving screen button toturn the ability to limit functions on and off while driving.When this screen button is highlighted, the followingfunctions are limited while driving:
.Music Navigator Scrolling
.Radio Category Scrolling
.Navigation Menu Scrolling and some functions
See“Category”underNavigation Audio Systemonpage 5!60for more information. See“From Map”underDestinationon page 5!24for more information.
Some functions will remain limited regardless of thesetting.
Storing Radio Station Presets
To set preset radio stations, do the following:
1. PressOto turn the system on.
2. Press the AUDIO hard key and select the desiredband (AM, FM, or XM (if equipped)).
3. Use thew(tuning) knob or the SEEK arrows to
tune to the desired station.
4. Press and hold one of the five preset screenbuttons, at the bottom of the screen, until a beep isheard or if the station displays on the selectedpreset button.
5. Repeat the steps for each preset.
See“Storing Radio Station Presets”underNavigationAudio Systemon page 5!60for more information.
5-7
Page 308 of 616

Setting the Clock
The navigation system time and the analog clockoperate independently. Changing the time through thenavigation system does not change the time on theanalog clock. SeeAnalog Clockon page 4!20tochange the analog clock time.
To set the time for the navigation system:
1. Press the CONFIG key to enter the configuremenu options, then press the CONFIG keyrepeatedly until the time is selected or touch thetime screen button.
2. Press the Hours and Minutes!(minus) and+ (plus) signs to decrease or to increase the time.
See“Setting the Clock”underConfigure Menuonpage 5!42for more information.
Entering an Address and Point of
Interest, and Storing Preset
Destinations
Entering an Address
Enter a destination by inputting the city name first:
1. If the radio is already on with a map disc inserted,skip to Step 5.
2. PressOto turn the system on.
3. Insert the DVD map disc. See“Installing theMap DVD”underMapson page 5!14for moreinformation.
4. A caution may appear. Touch the OK screen buttonto proceed.
5. Press the DEST hard key.
6. Press the2Address Entry screen button.
5-8
Page 309 of 616
7. Select the state/province screen button, if needed,to change the current state or province. A list of allof the available states and provinces appear.Select the state or province.
8. Once a state or province has been selectedthe City name category is automatically selectedfor entry.
If five or less names are available, a list displays.If more than five are available, the List screenbutton displays a number. This number representsthe number of available cities. Select this button toview the list and select a city.
9. Once a city has been selected the Street namecategory is automatically selected for entry.
If five or less streets are available for the selectedcity, the system displays the list of streets. If morethan five streets are available the system displaysthe alpha keyboard. Start entering the street name.If five or less names are available, a list displays.If more than five are available, the List screenbutton displays a number. This button representsthe number of available streets. Select this buttonto view the list and select a street.
10. Once a street has been selected, select theHouse # screen button to enter the house number.The system displays the house number range thatis available for the street.
11. Select the Go screen button. A map screen, withthe destination marked appears.
12. Select the route preference (Fastest, Shortest,or Other). The system calculates and highlightsthe route.
13. Select the Start Guidance screen button. You arenow ready to start your route.
See“Address Entry”underDestinationon page 5!24for more information.
Entering a Point of Interest (POI)
To set a destination by entering a Point of Interest(POI), do the following:
1. If the radio is already on with a map disc inserted,skip to Step 5.
2. PressOto turn the system on.
3. Insert the DVD map disc. See“Installing the MapDVD”underMapson page 5!14for moreinformation.
4. A caution may appear. Touch the OK screen buttonto proceed.
5. Press the DEST hard key.
6. Press theiPoint of Interest screen button.
5-9
Page 310 of 616

7. Select the state/province screen button, if needed,to change the current state or province. A list of allof the available states and provinces appear.Select the state or province.
8. Enter the specific title of the POI in the POI namespace (e.g. Washington Monument).
If five or less names are available, a list displays.If more than five are available, the List screenbutton displays a number. This button representsthe number of available POIs. Select this button toview the list.
9. Select the Go screen button next to the POI.A map screen, with the destination markedappears.
10. Select the route preference (Fastest, Shortest,or Other). The system calculates and highlightsthe route.
11. Select the Start Guidance screen button. The routeis now ready to be started.
See“Point of Interest (POI)”underDestinationonpage 5!24for more information.
Storing Preset Destinations
1. If the radio is already on with a map disc inserted,skip to Step 5.
2. PressOto turn the system on.
3. Insert the DVD map disc. See“Installing theMap DVD”underMapson page 5!14for moreinformation.
4. A caution may appear. Touch the OK screen buttonto proceed.
5. Press the DEST hard key.
Enter a destination. SeeDestinationon page 5!24for more information on how to enter a destination.
6. Press the DEST hard key, the Route screendisplays. Press the Final Destination or Stopoverscreen button. The information screen displays forthat location. Press the Add to Address Bookscreen button. The address book screen appears.
7. Select the Name screen button. An alpha-keyboarddisplays. Enter the name. Select the Back screenbutton.
8. Press and hold one of the screen buttons at thebottom of the screen until the name appears in thescreen button on the display.
The name appears in that preset destinationscreen button and is now available to select fromthe Destination Entry screen. See“Using YourStored Preset Destinations”next in this section toselect it as a destination.
See“Adding or Changing Preset Destinations”underDestinationon page 5!24for moreinformation on how to add preset destinations.
5-10