CHERY TIGGO 2009 Service Repair Manual
Manufacturer: CHERY, Model Year: 2009, Model line: TIGGO, Model: CHERY TIGGO 2009Pages: 1903, PDF Size: 33.38 MB
Page 211 of 1903
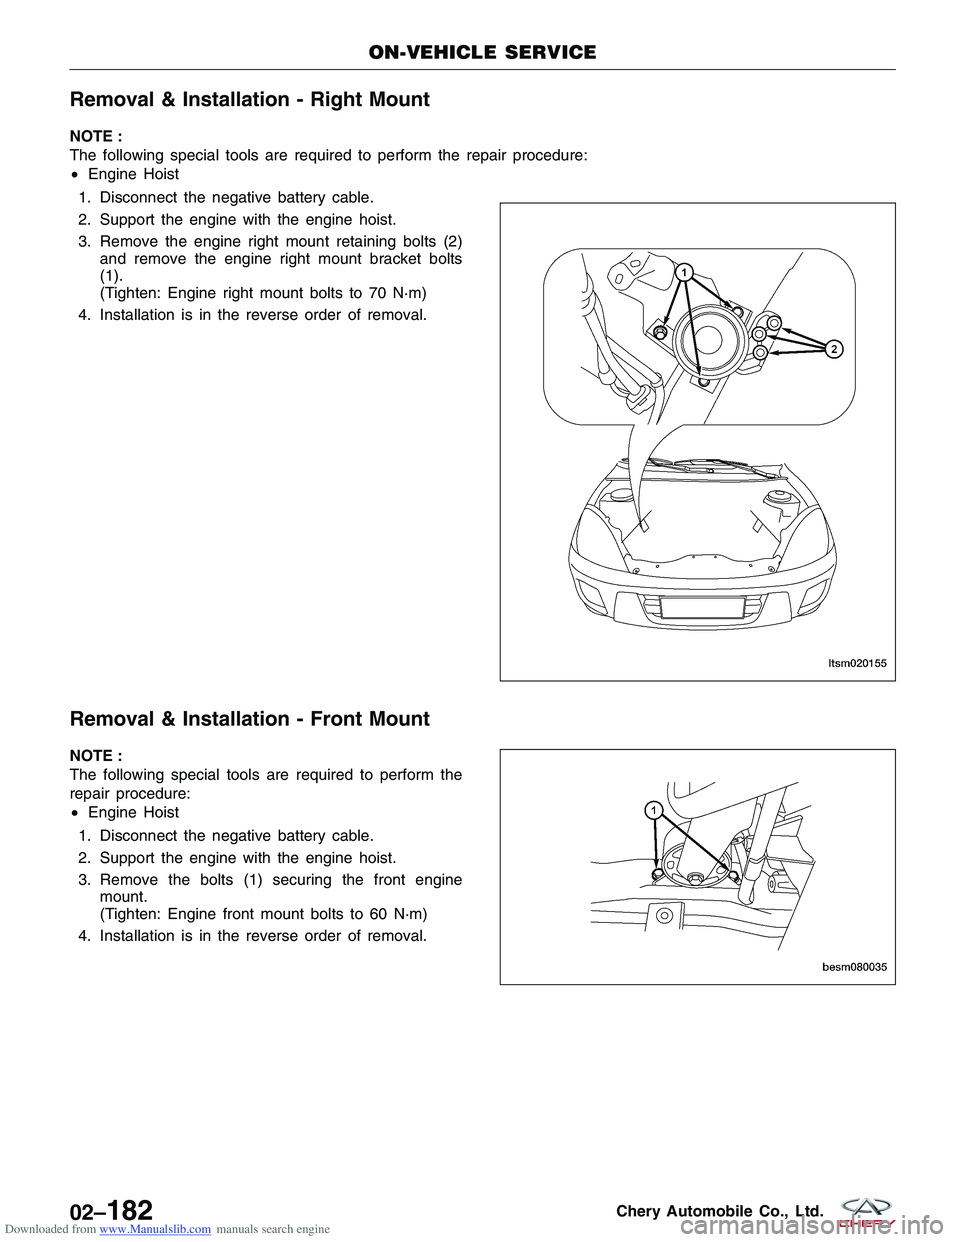
Downloaded from www.Manualslib.com manuals search engine Removal & Installation - Right Mount
NOTE :
The following special tools are required to perform the repair procedure:
•Engine Hoist
1. Disconnect the negative battery cable.
2. Support the engine with the engine hoist.
3. Remove the engine right mount retaining bolts (2) and remove the engine right mount bracket bolts
(1).
(Tighten: Engine right mount bolts to 70 N·m)
4. Installation is in the reverse order of removal.
Removal & Installation - Front Mount
NOTE :
The following special tools are required to perform the
repair procedure:
• Engine Hoist
1. Disconnect the negative battery cable.
2. Support the engine with the engine hoist.
3. Remove the bolts (1) securing the front engine mount.
(Tighten: Engine front mount bolts to 60 N·m)
4. Installation is in the reverse order of removal.
ON-VEHICLE SERVICE
LTSM020155
BESM080035
02–182Chery Automobile Co., Ltd.
Page 212 of 1903
Downloaded from www.Manualslib.com manuals search engine Removal & Installation - Rear Mount
NOTE :
The following special tools are required to perform the
repair procedure:
•Engine Hoist
1. Disconnect the negative battery cable.
2. Support the engine with the engine hoist.
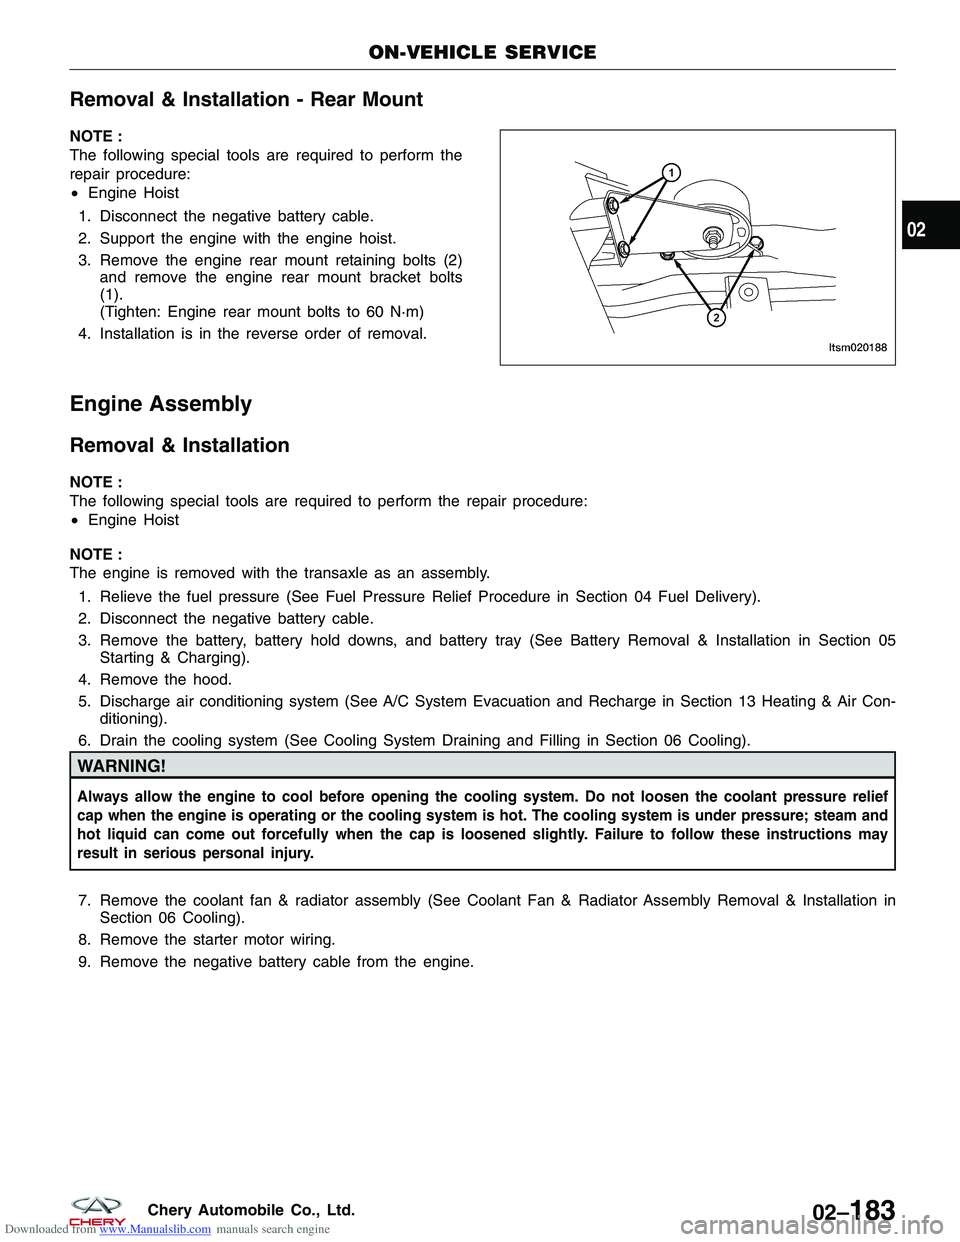
3. Remove the engine rear mount retaining bolts (2) and remove the engine rear mount bracket bolts
(1).
(Tighten: Engine rear mount bolts to 60 N·m)
4. Installation is in the reverse order of removal.
Engine Assembly
Removal & Installation
NOTE :
The following special tools are required to perform the repair procedure:
• Engine Hoist
NOTE :
The engine is removed with the transaxle as an assembly. 1. Relieve the fuel pressure (See Fuel Pressure Relief Procedure in Section 04 Fuel Delivery).
2. Disconnect the negative battery cable.
3. Remove the battery, battery hold downs, and battery tray (See Battery Removal & Installation in Section 05 Starting & Charging).
4. Remove the hood.
5. Discharge air conditioning system (See A/C System Evacuation and Recharge in Section 13 Heating & Air Con- ditioning).
6. Drain the cooling system (See Cooling System Draining and Filling in Section 06 Cooling).
WARNING!
Always allow the engine to cool before opening the cooling system. Do not loosen the coolant pressure relief
cap when the engine is operating or the cooling system is hot. The cooling system is under pressure; steam and
hot liquid can come out forcefully when the cap is loosened slightly. Failure to follow these instructions may
result in serious personal injury.
7. Remove the coolant fan & radiator assembly (See Coolant Fan & Radiator Assembly Removal & Installation in Section 06 Cooling).
8. Remove the starter motor wiring.
9. Remove the negative battery cable from the engine.
ON-VEHICLE SERVICE
LTSM020188
02
02–183Chery Automobile Co., Ltd.
Page 213 of 1903
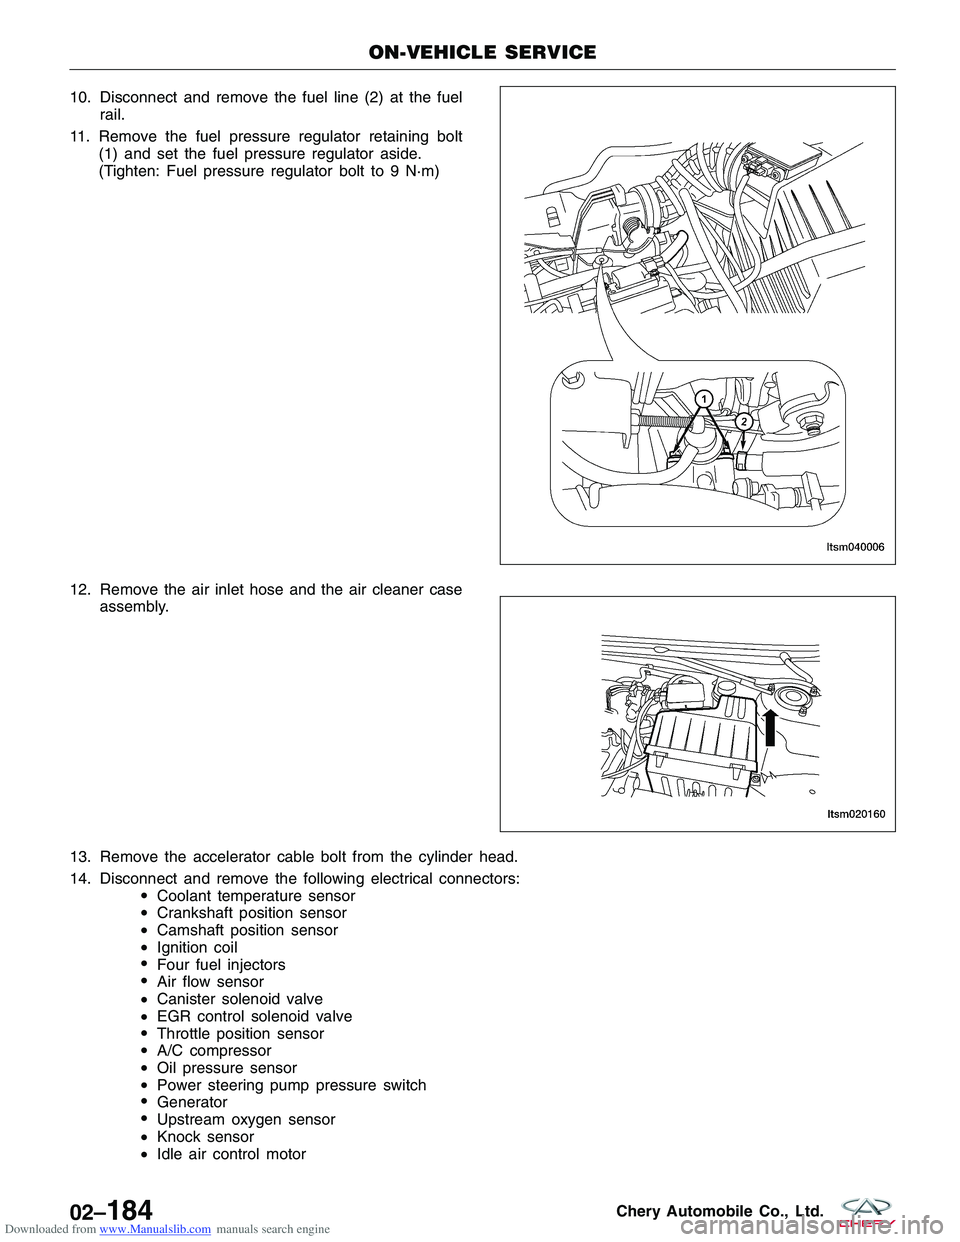
Downloaded from www.Manualslib.com manuals search engine 10.Disconnectandremovethefuelline(2)atthefuel
rail.
11.Removethefuelpressureregulatorretainingbolt
(1)andsetthefuelpressureregulatoraside.
(Tighten:Fuelpressureregulatorboltto9N·m)
12.Removetheairinlethoseandtheaircleanercase
assembly.
13.Removetheacceleratorcableboltfromthecylinderhead.
14.Disconnectandremovethefollowingelectricalconnectors:
Coolanttemperaturesensor
Crankshaftpositionsensor
Camshaftpositionsensor
Ignitioncoil
Fourfuelinjectors
Airflowsensor
Canistersolenoidvalve
EGRcontrolsolenoidvalve
Throttlepositionsensor
A/Ccompressor
Oilpressuresensor
Powersteeringpumppressureswitch
Generator
Upstreamoxygensensor
Knocksensor
Idleaircontrolmotor
ON-VEHICLESERVICE
LTSM040006
LTSM020160
02–184CheryAutomobileCo.,Ltd.
Page 214 of 1903
Downloaded from www.Manualslib.com manuals search engine 15. Remove the pipe from the canister control valve.
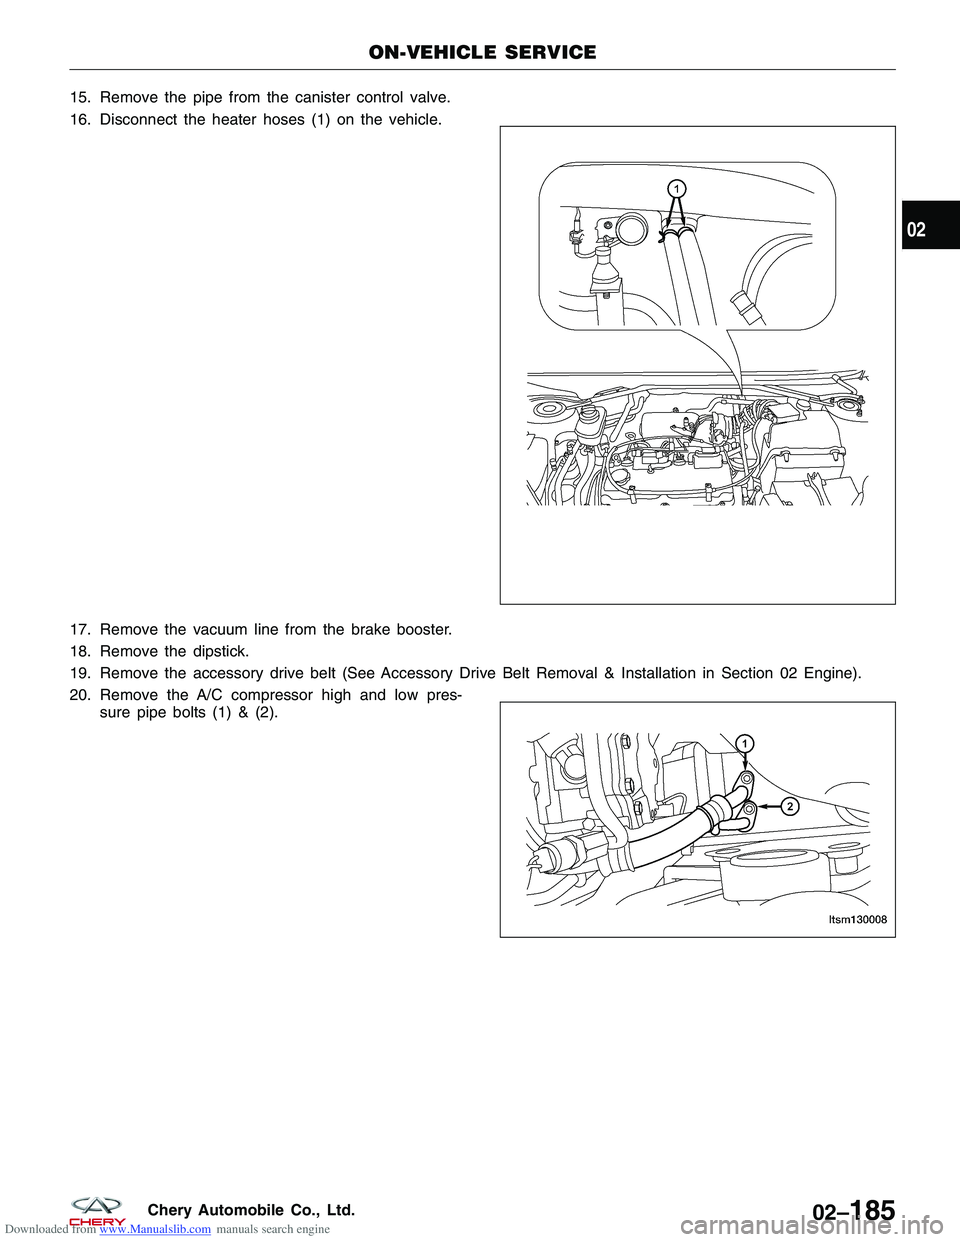
16. Disconnect the heater hoses (1) on the vehicle.
17. Remove the vacuum line from the brake booster.
18. Remove the dipstick.
19. Remove the accessory drive belt (See Accessory Drive Belt Removal & Installation in Section 02 Engine).
20. Remove the A/C compressor high and low pres-sure pipe bolts (1) & (2).
ON-VEHICLE SERVICE
LTSM130010
LTSM130008
02
02–185Chery Automobile Co., Ltd.
Page 215 of 1903
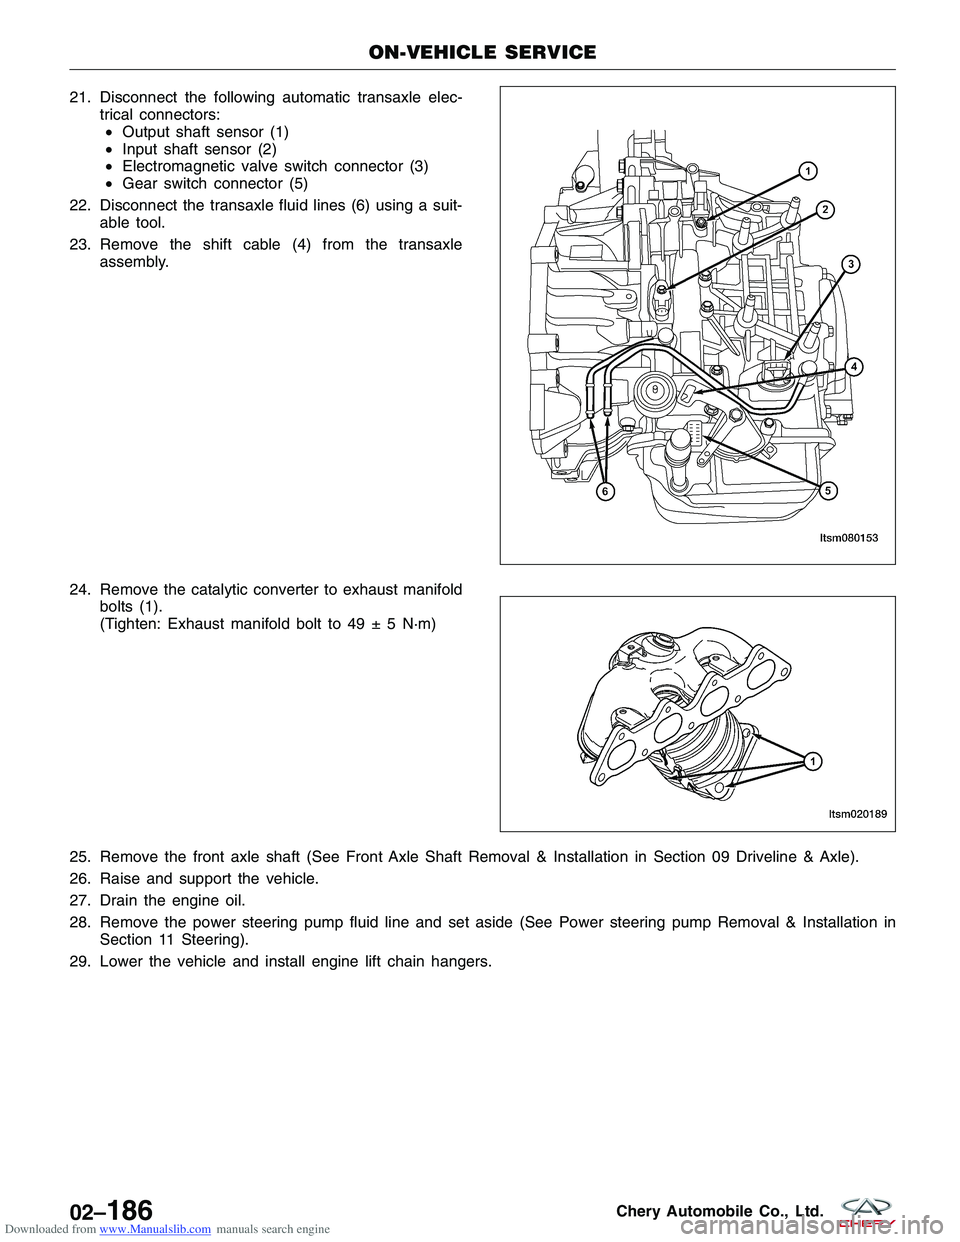
Downloaded from www.Manualslib.com manuals search engine 21. Disconnect the following automatic transaxle elec-trical connectors:• Output shaft sensor (1)
• Input shaft sensor (2)
• Electromagnetic valve switch connector (3)
• Gear switch connector (5)
22. Disconnect the transaxle fluid lines (6) using a suit- able tool.
23. Remove the shift cable (4) from the transaxle assembly.
24. Remove the catalytic converter to exhaust manifold bolts (1).
(Tighten: Exhaust manifold bolt to 49 ± 5 N·m)
25. Remove the front axle shaft (See Front Axle Shaft Removal & Installation in Section 09 Driveline & Axle).
26. Raise and support the vehicle.
27. Drain the engine oil.
28. Remove the power steering pump fluid line and set aside (See Power steering pump Removal & Installation in Section 11 Steering).
29. Lower the vehicle and install engine lift chain hangers.
ON-VEHICLE SERVICE
LTSM080153
LTSM020189
02–186Chery Automobile Co., Ltd.
Page 216 of 1903
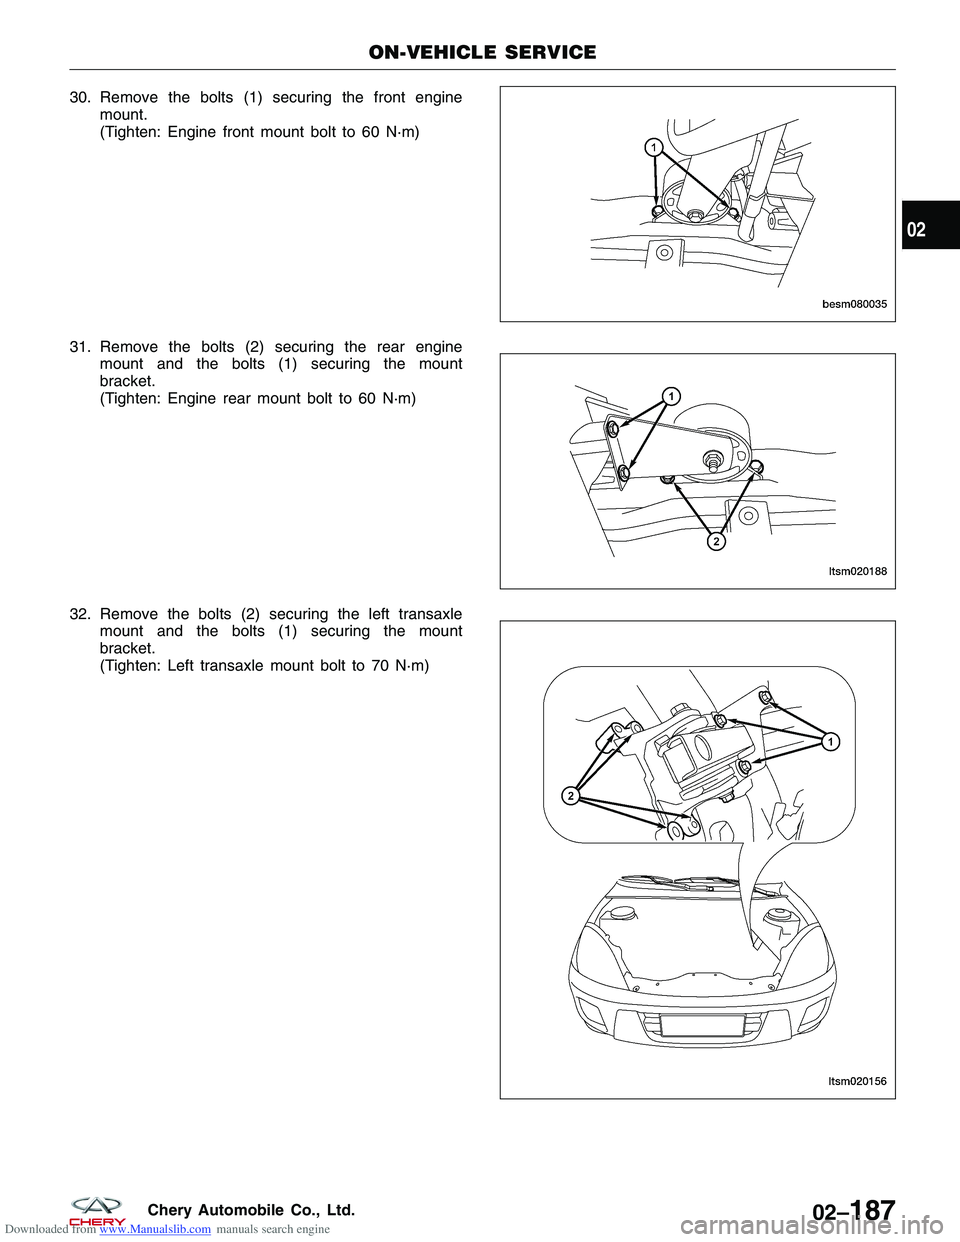
Downloaded from www.Manualslib.com manuals search engine 30. Remove the bolts (1) securing the front enginemount.
(Tighten: Engine front mount bolt to 60 N·m)
31. Remove the bolts (2) securing the rear engine mount and the bolts (1) securing the mount
bracket.
(Tighten: Engine rear mount bolt to 60 N·m)
32. Remove the bolts (2) securing the left transaxle mount and the bolts (1) securing the mount
bracket.
(Tighten: Left transaxle mount bolt to 70 N·m)
ON-VEHICLE SERVICE
BESM080035
LTSM020188
LTSM020156
02
02–187Chery Automobile Co., Ltd.
Page 217 of 1903
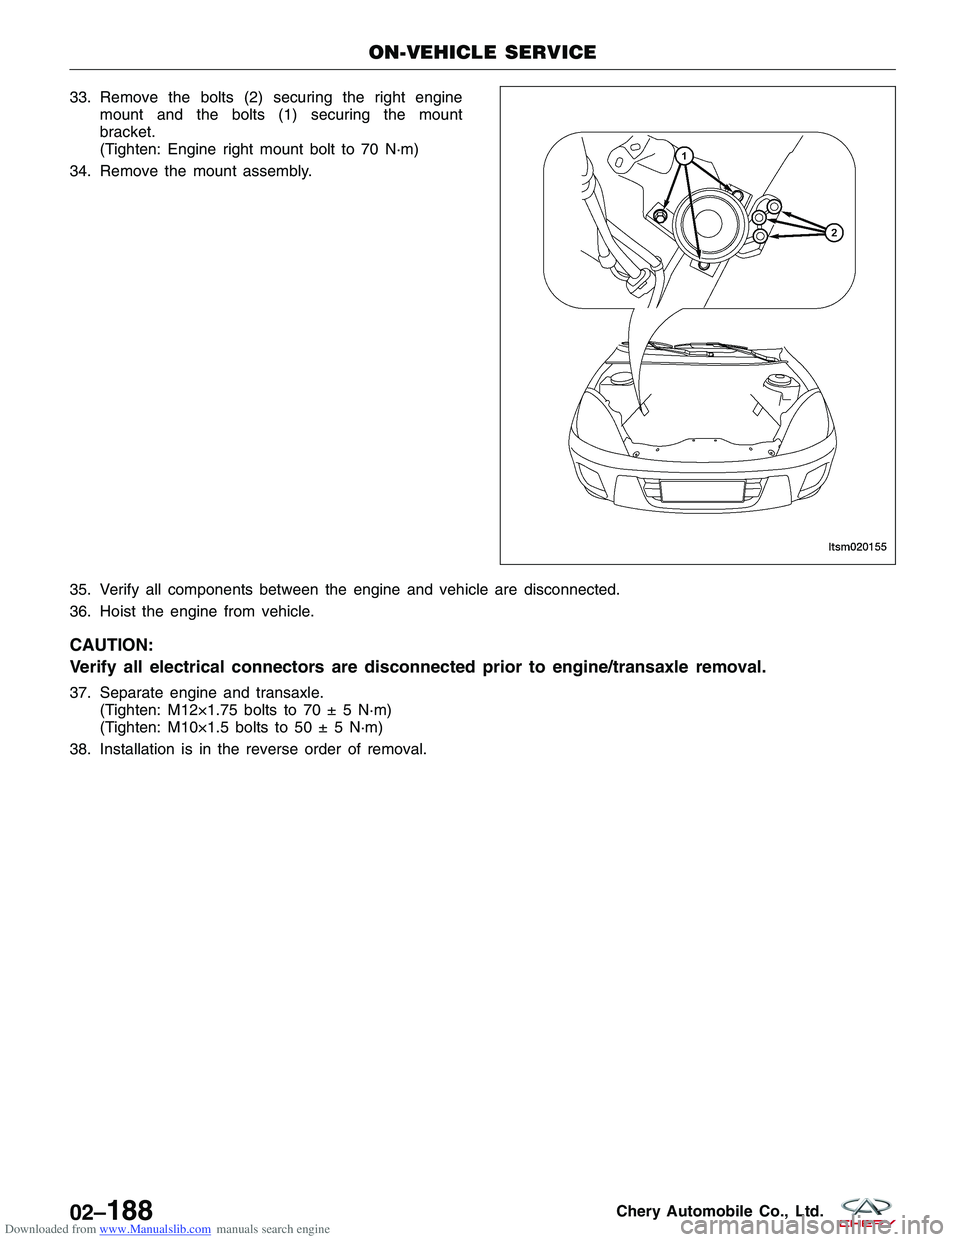
Downloaded from www.Manualslib.com manuals search engine 33. Remove the bolts (2) securing the right enginemount and the bolts (1) securing the mount
bracket.
(Tighten: Engine right mount bolt to 70 N·m)
34. Remove the mount assembly.
35. Verify all components between the engine and vehicle are disconnected.
36. Hoist the engine from vehicle.
CAUTION:
Verify all electrical connectors are disconnected prior to engine/transaxle removal.
37. Separate engine and transaxle. (Tighten: M12×1.75 bolts to 70 ± 5 N·m)
(Tighten: M10×1.5 bolts to 50 ± 5 N·m)
38. Installation is in the reverse order of removal.
ON-VEHICLE SERVICE
LTSM020155
02–188Chery Automobile Co., Ltd.
Page 218 of 1903
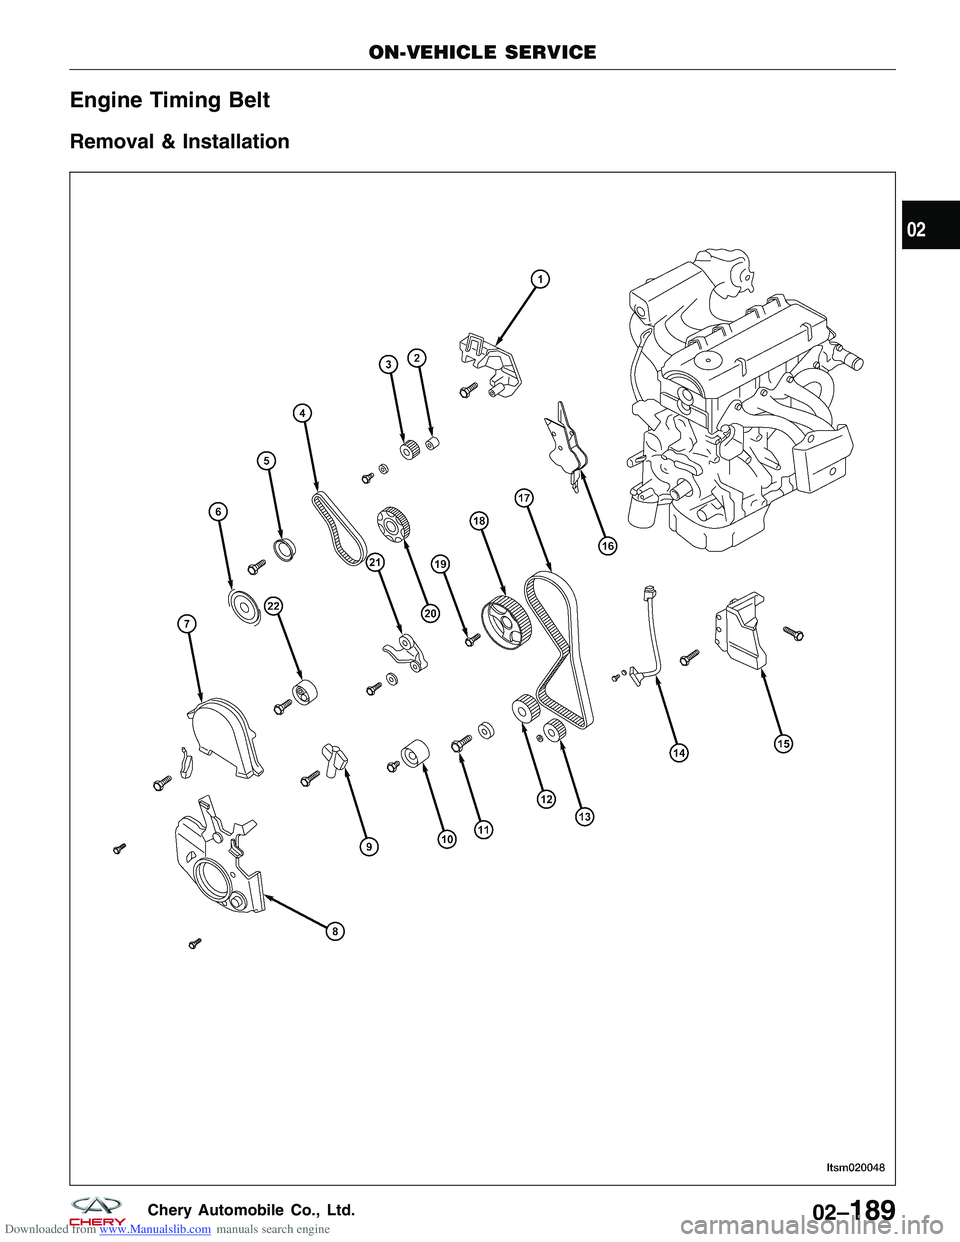
Downloaded from www.Manualslib.com manuals search engine Engine Timing Belt
Removal & Installation
ON-VEHICLE SERVICE
LTSM020048
02
02–189Chery Automobile Co., Ltd.
Page 219 of 1903

Downloaded from www.Manualslib.com manuals search engine NOTE :
The following special tools are required to perform the repair procedure:
•MB-990767 - Timing Belt Spanner Wrench
• MD-998785 - Timing Belt Gear Holder
• MD-998767 - Automatic Tensioner Socket
1. Drain the cooling system (See Cooling System Draining and Filling in Section 06 Cooling).
WARNING!
Always allow the engine to cool before opening the cooling system. Do not loosen the coolant pressure relief
cap when the engine is operating or the cooling system is hot. The cooling system is under pressure; steam and
hot liquid can come out forcefully when the cap is loosened slightly. Failure to follow these instructions may
result in serious personal injury.
2. Attach an engine hoist to the engine.
3. Raise the engine with the engine hoist, just enough to support the engine.
1 - Right Engine Mounting Bracket
2 - Spacer
3 - Upper Balance Shaft Pulley
4 - Upper Balance Shaft Timing Belt
5 - Upper Balance Shaft Timing Belt Tensioner
6 - Crankshaft Sensing Blade
7 - Upper Timing Belt Cover
8 - Lower Timing Belt Cover
9 - Timing Belt Automatic Tensioner
10 - Idler Pulley
11 - Crankshaft Bolt12 - Crankshaft Timing Belt Pulley
13 - Lower Balance Shaft Pulley
14 - Crankshaft Position Sensor
15 - Power Steering Bracket
16 - Timing Belt Rear Cover
17 - Timing Belt
18 - Camshaft Timing Pulley
19 - Camshaft Pulley Bolt
20 - Crankshaft Upper Balance Shaft Pulley
21 - Tensioner Arm
22 - Tensioner Pulley
ON-VEHICLE SERVICE
LTSM020048
02–190Chery Automobile Co., Ltd.
Page 220 of 1903
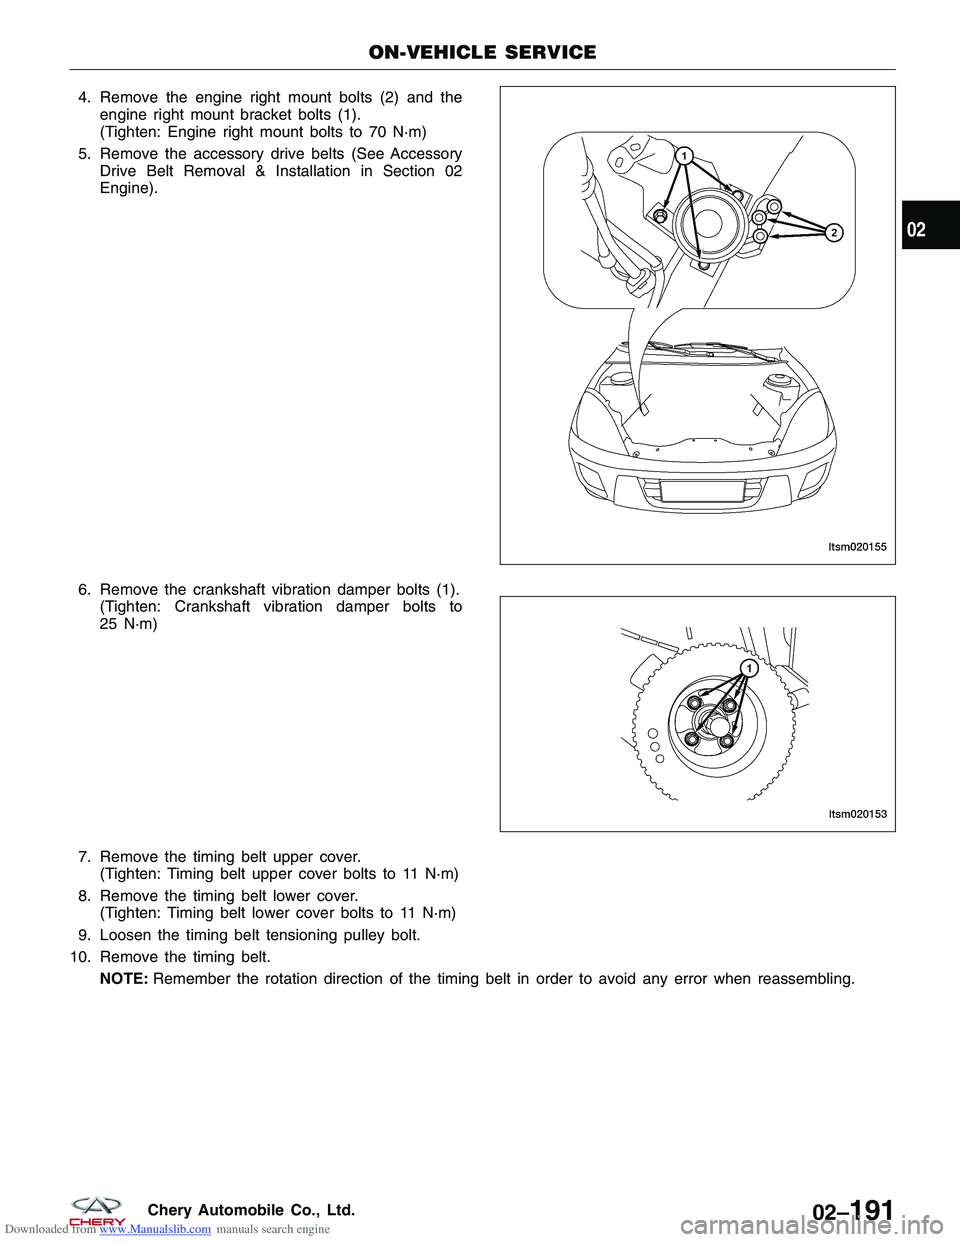
Downloaded from www.Manualslib.com manuals search engine 4. Remove the engine right mount bolts (2) and theengine right mount bracket bolts (1).
(Tighten: Engine right mount bolts to 70 N·m)
5. Remove the accessory drive belts (See Accessory Drive Belt Removal & Installation in Section 02
Engine).
6. Remove the crankshaft vibration damper bolts (1). (Tighten: Crankshaft vibration damper bolts to
25 N·m)
7. Remove the timing belt upper cover. (Tighten: Timing belt upper cover bolts to 11 N·m)
8. Remove the timing belt lower cover. (Tighten: Timing belt lower cover bolts to 11 N·m)
9. Loosen the timing belt tensioning pulley bolt.
10. Remove the timing belt. NOTE: Remember the rotation direction of the timing belt in order to avoid any error when reassembling.
ON-VEHICLE SERVICE
LTSM020155
LTSM020153
02
02–191Chery Automobile Co., Ltd.