CHERY TIGGO 2009 Service Repair Manual
Manufacturer: CHERY, Model Year: 2009, Model line: TIGGO, Model: CHERY TIGGO 2009Pages: 1903, PDF Size: 33.38 MB
Page 251 of 1903
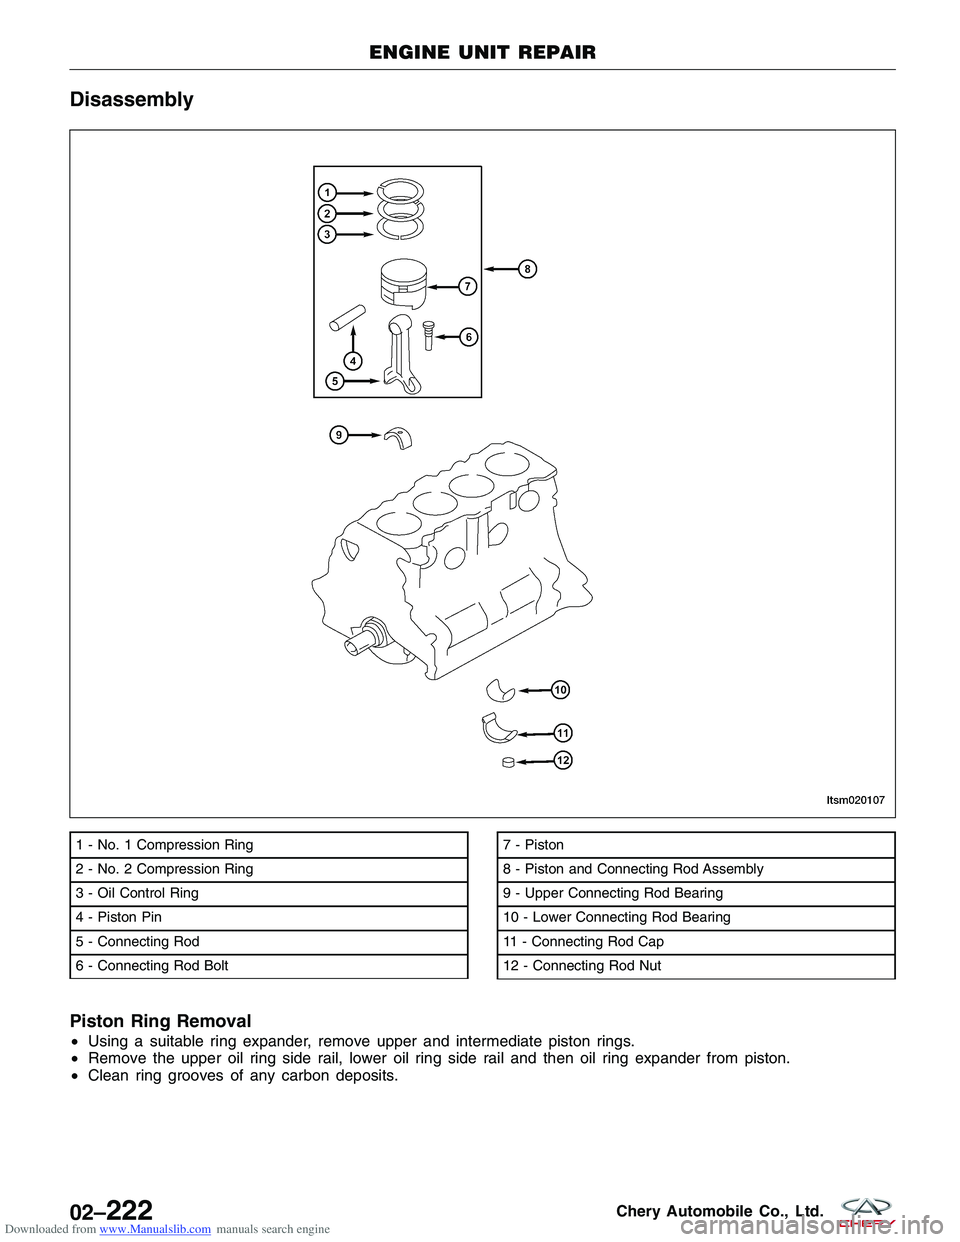
Downloaded from www.Manualslib.com manuals search engine Disassembly
Piston Ring Removal
•Using a suitable ring expander, remove upper and intermediate piston rings.
• Remove the upper oil ring side rail, lower oil ring side rail and then oil ring expander from piston.
• Clean ring grooves of any carbon deposits.
1 - No. 1 Compression Ring
2 - No. 2 Compression Ring
3 - Oil Control Ring
4 - Piston Pin
5 - Connecting Rod
6 - Connecting Rod Bolt7 - Piston
8 - Piston and Connecting Rod Assembly
9 - Upper Connecting Rod Bearing
10 - Lower Connecting Rod Bearing
11 - Connecting Rod Cap
12 - Connecting Rod Nut
ENGINE UNIT REPAIR
LTSM020107
02–222Chery Automobile Co., Ltd.
Page 252 of 1903
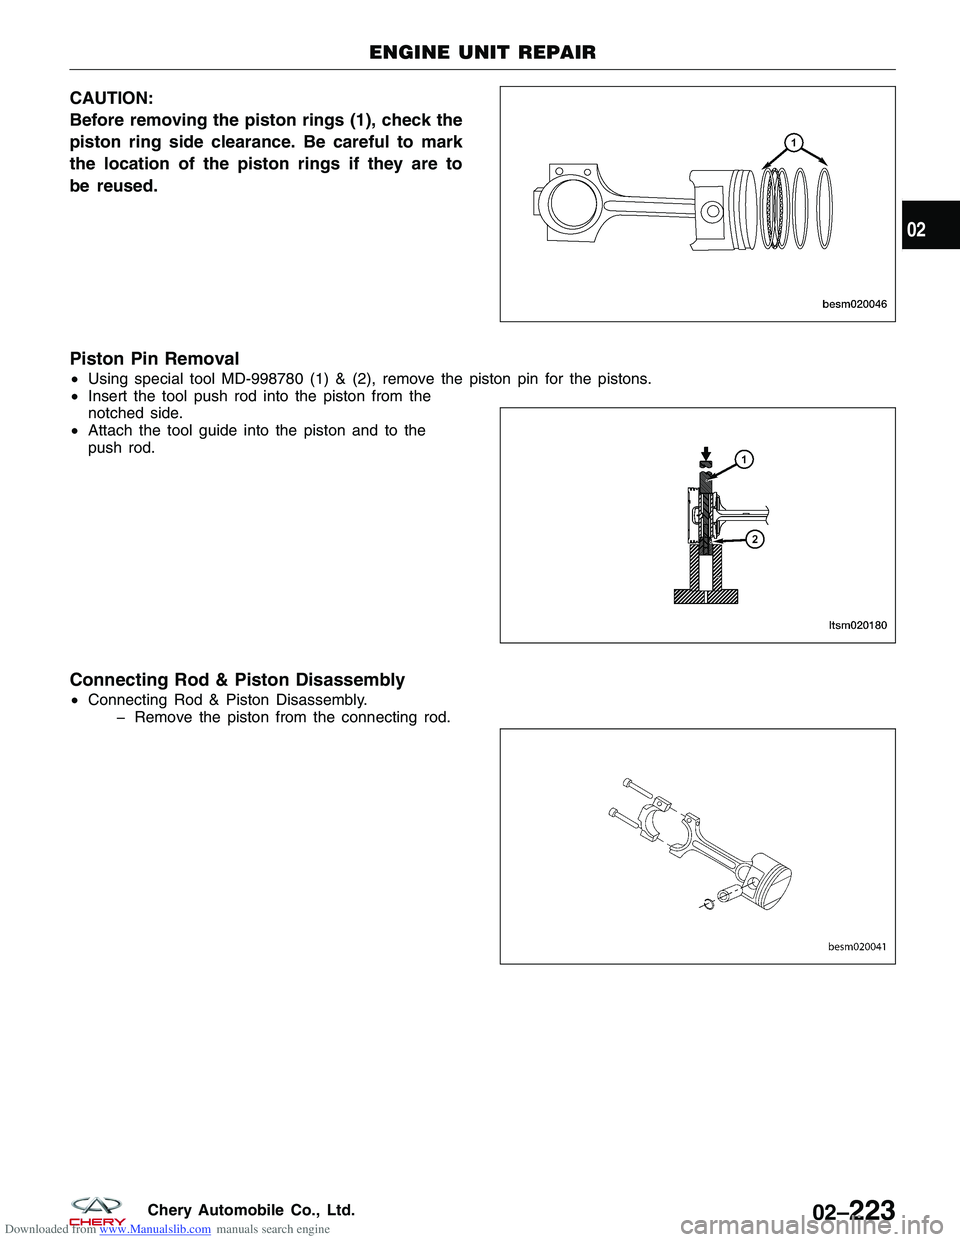
Downloaded from www.Manualslib.com manuals search engine CAUTION:
Before removing the piston rings (1), check the
piston ring side clearance. Be careful to mark
the location of the piston rings if they are to
be reused.
Piston Pin Removal
•Using special tool MD-998780 (1) & (2), remove the piston pin for the pistons.
• Insert the tool push rod into the piston from the
notched side.
• Attach the tool guide into the piston and to the
push rod.
Connecting Rod & Piston Disassembly
•Connecting Rod & Piston Disassembly.
� Remove the piston from the connecting rod.
ENGINE UNIT REPAIR
BESM020046
LTSM020180
BESM020041
02
02–223Chery Automobile Co., Ltd.
Page 253 of 1903
Downloaded from www.Manualslib.com manuals search engine Inspection
Cylinder Bore
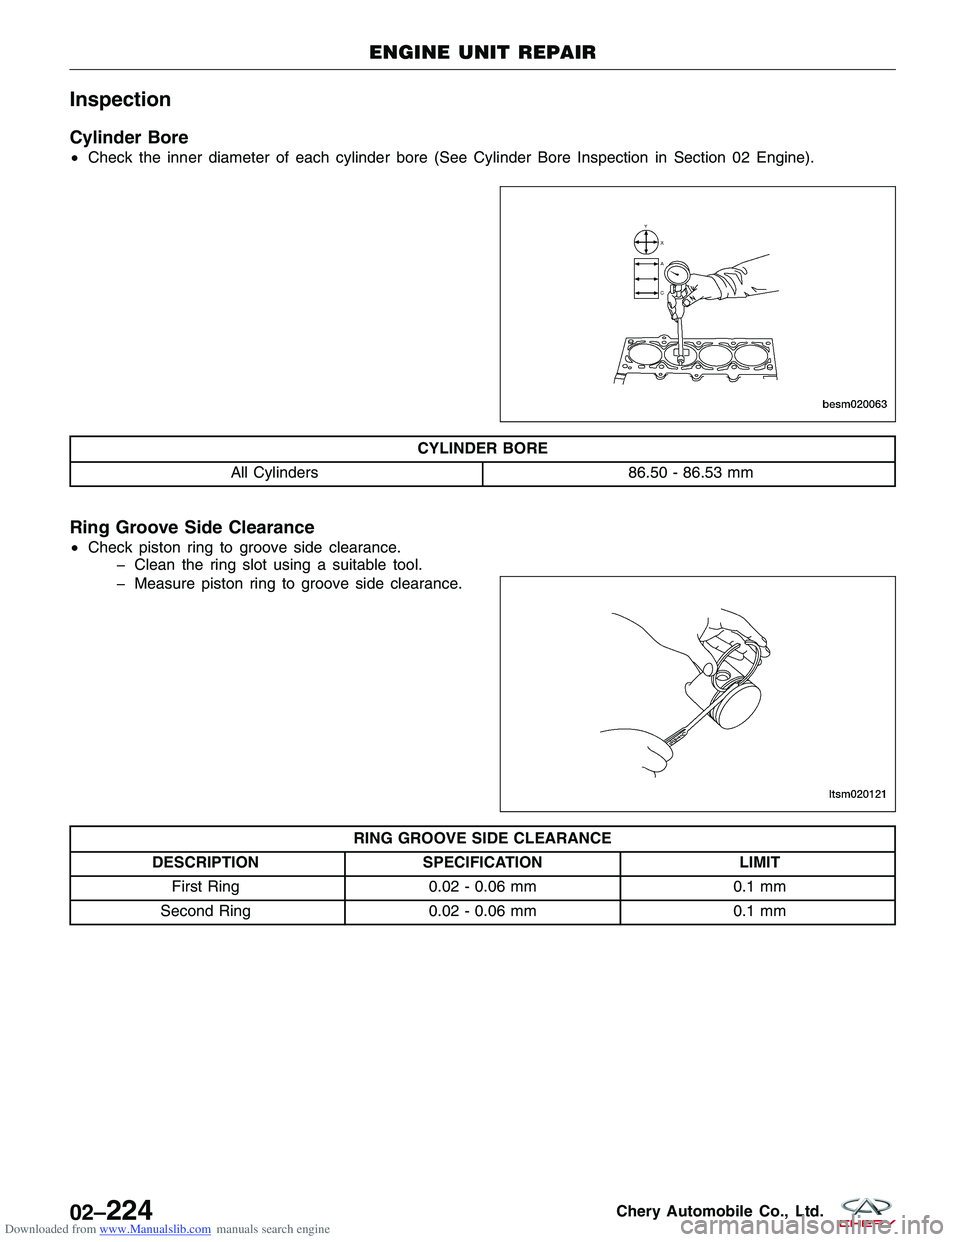
•Check the inner diameter of each cylinder bore (See Cylinder Bore Inspection in Section 02 Engine).
CYLINDER BORE
All Cylinders 86.50 - 86.53 mm
Ring Groove Side Clearance
•Check piston ring to groove side clearance.
� Clean the ring slot using a suitable tool.
� Measure piston ring to groove side clearance.
RING GROOVE SIDE CLEARANCE
DESCRIPTION SPECIFICATION LIMIT
First Ring 0.02 - 0.06 mm 0.1 mm
Second Ring 0.02 - 0.06 mm 0.1 mm
ENGINE UNIT REPAIR
BESM020063
LTSM020121
02–224Chery Automobile Co., Ltd.
Page 254 of 1903
Downloaded from www.Manualslib.com manuals search engine Ring End Gap
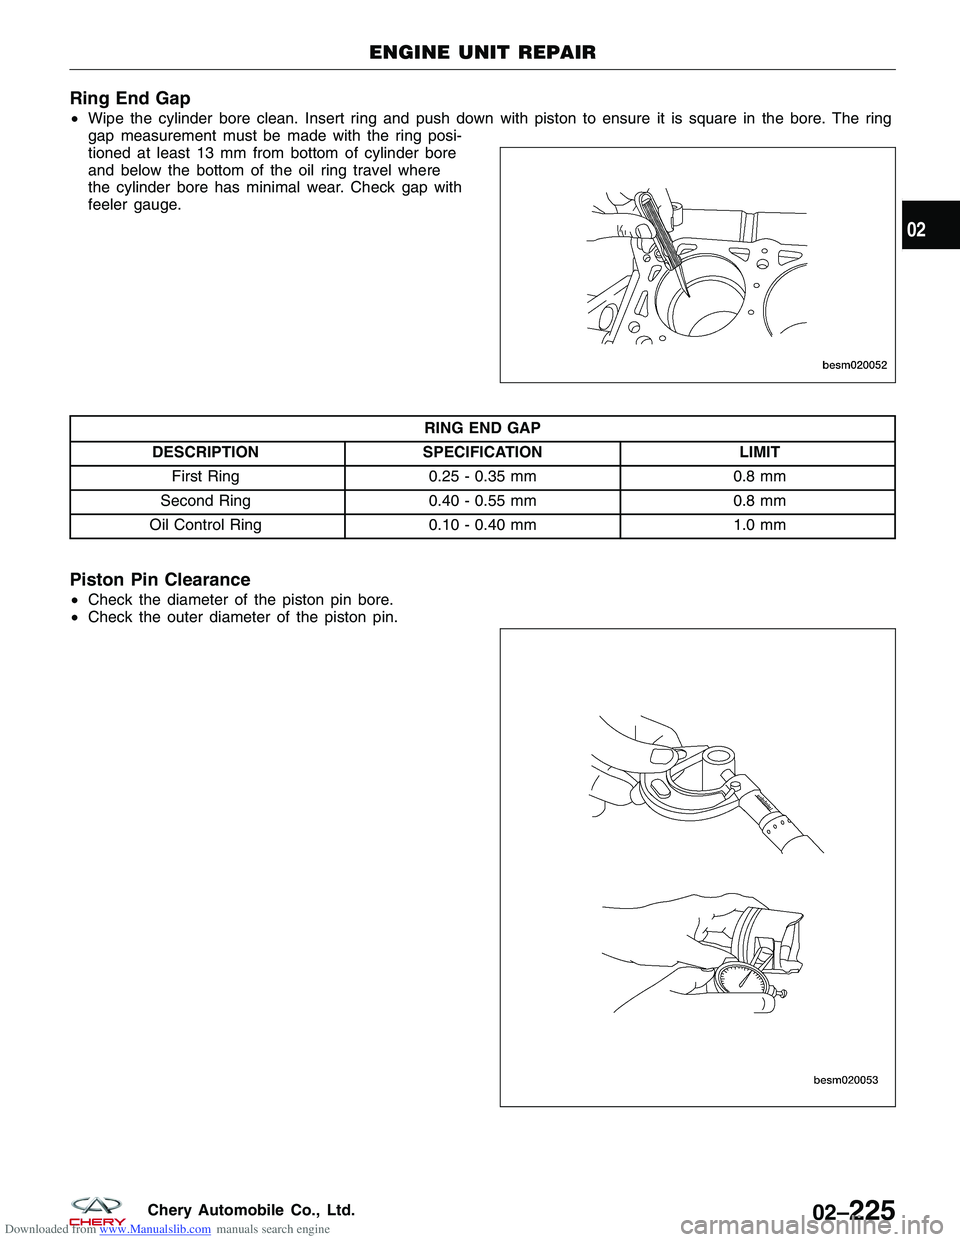
•Wipe the cylinder bore clean. Insert ring and push down with piston to ensure it is square in the bore. The ring
gap measurement must be made with the ring posi-
tioned at least 13 mm from bottom of cylinder bore
and below the bottom of the oil ring travel where
the cylinder bore has minimal wear. Check gap with
feeler gauge.
RING END GAP
DESCRIPTION SPECIFICATION LIMIT
First Ring 0.25 - 0.35 mm 0.8 mm
Second Ring 0.40 - 0.55 mm 0.8 mm
Oil Control Ring 0.10 - 0.40 mm 1.0 mm
Piston Pin Clearance
•Check the diameter of the piston pin bore.
• Check the outer diameter of the piston pin.
ENGINE UNIT REPAIR
BESM020052
BESM020053
02
02–225Chery Automobile Co., Ltd.
Page 255 of 1903
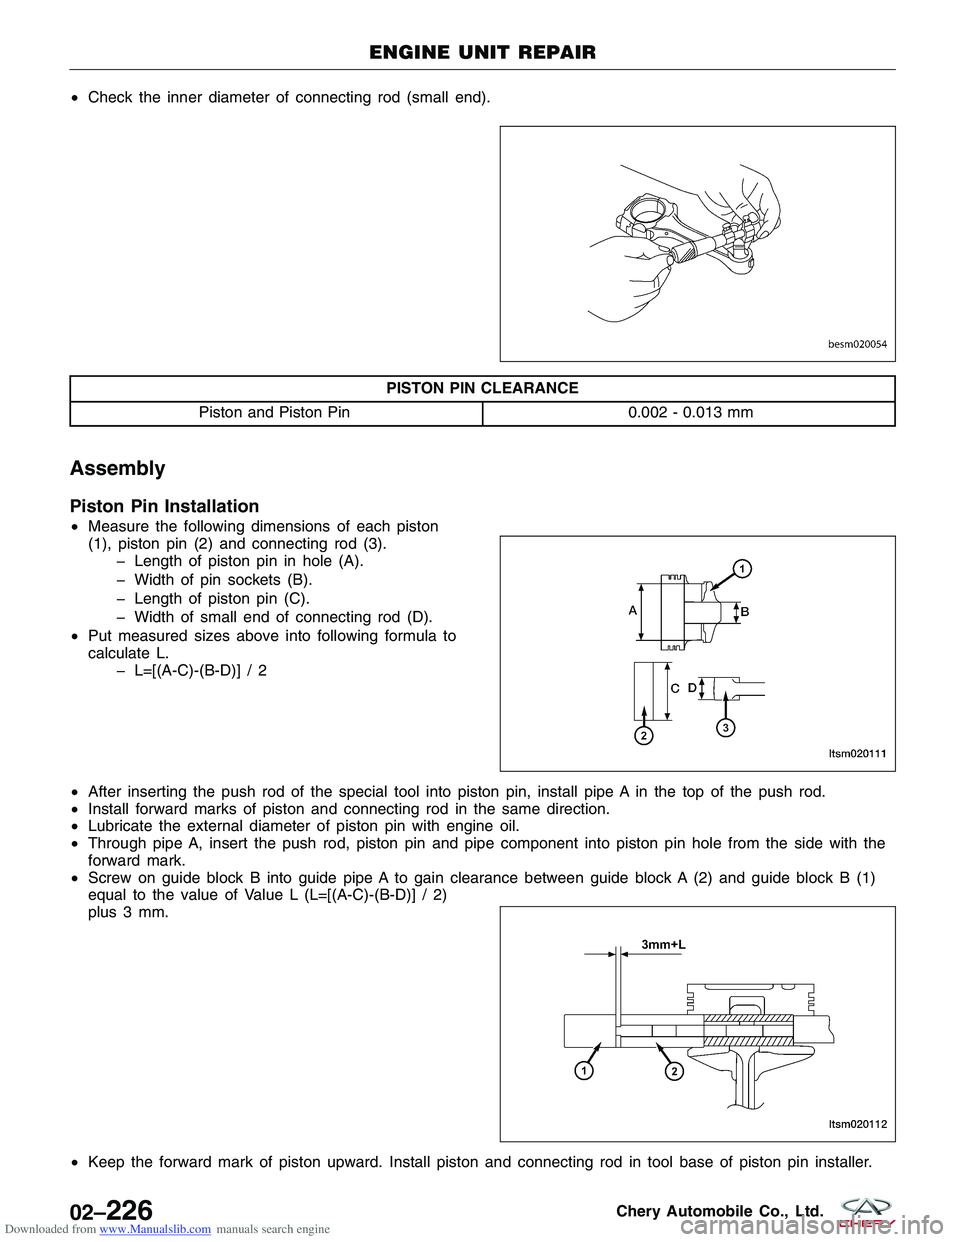
Downloaded from www.Manualslib.com manuals search engine •Check the inner diameter of connecting rod (small end).
PISTON PIN CLEARANCE
Piston and Piston Pin 0.002 - 0.013 mm
Assembly
Piston Pin Installation
•Measure the following dimensions of each piston
(1), piston pin (2) and connecting rod (3).
� Length of piston pin in hole (A).
� Width of pin sockets (B).
� Length of piston pin (C).
� Width of small end of connecting rod (D).
• Put measured sizes above into following formula to
calculate L.
� L=[(A-C)-(B-D)] / 2
• After inserting the push rod of the special tool into piston pin, install pipe A in the top of the push rod.
• Install forward marks of piston and connecting rod in the same direction.
• Lubricate the external diameter of piston pin with engine oil.
• Through pipe A, insert the push rod, piston pin and pipe component into piston pin hole from the side with the
forward mark.
• Screw on guide block B into guide pipe A to gain clearance between guide block A (2) and guide block B (1)
equal to the value of Value L (L=[(A-C)-(B-D)] / 2)
plus 3 mm.
• Keep the forward mark of piston upward. Install piston and connecting rod in tool base of piston pin installer.
ENGINE UNIT REPAIR
BESM020054
LTSM020111
LTSM020112
02–226Chery Automobile Co., Ltd.
Page 256 of 1903
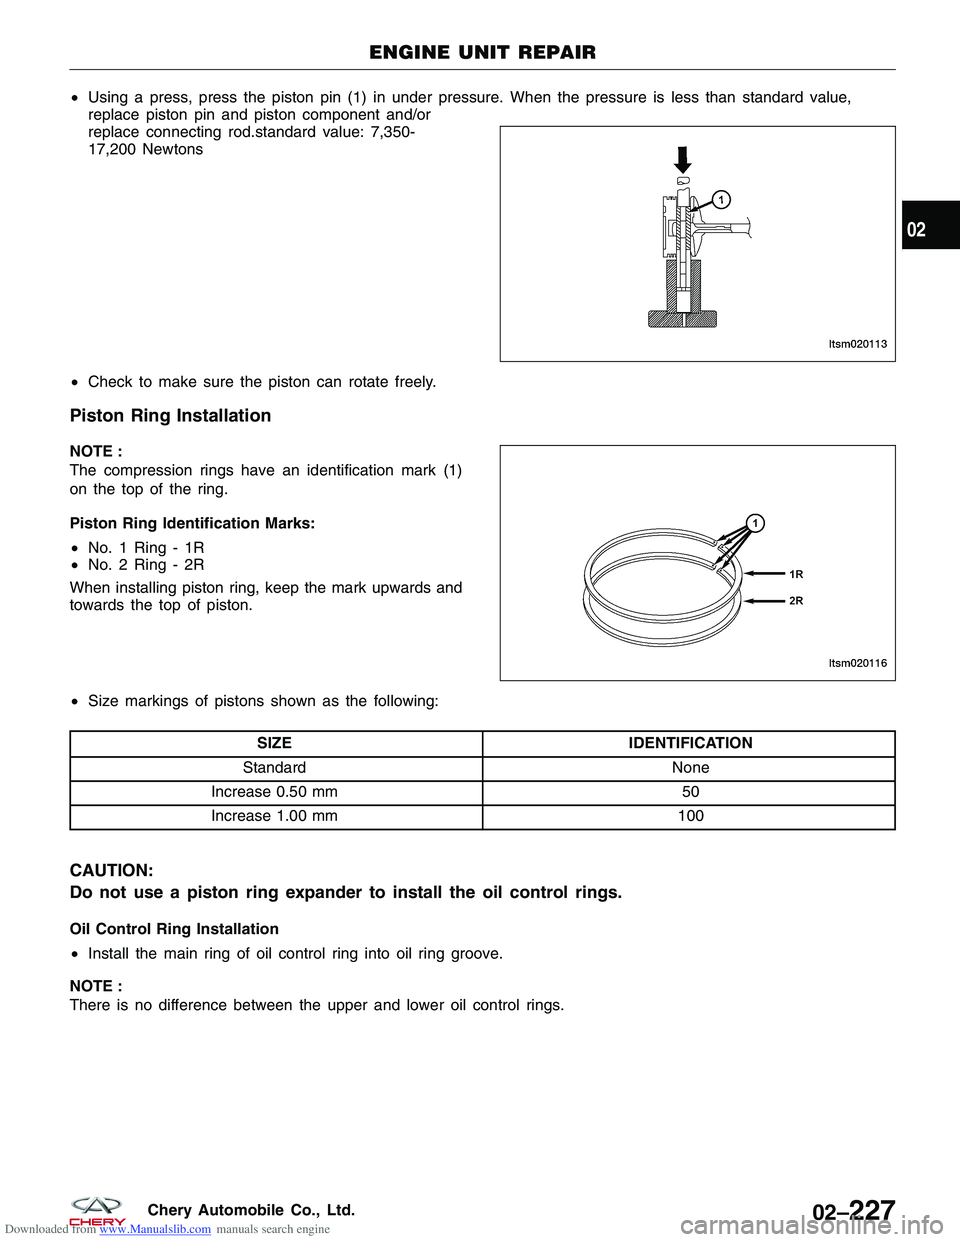
Downloaded from www.Manualslib.com manuals search engine •Using a press, press the piston pin (1) in under pressure. When the pressure is less than standard value,
replace piston pin and piston component and/or
replace connecting rod.standard value: 7,350-
17,200 Newtons
• Check to make sure the piston can rotate freely.
Piston Ring Installation
NOTE :
The compression rings have an identification mark (1)
on the top of the ring.
Piston Ring Identification Marks:
•No. 1 Ring - 1R
• No. 2 Ring - 2R
When installing piston ring, keep the mark upwards and
towards the top of piston.
• Size markings of pistons shown as the following:
SIZE IDENTIFICATION
Standard None
Increase 0.50 mm 50
Increase 1.00 mm 100
CAUTION:
Do not use a piston ring expander to install the oil control rings.
Oil Control Ring Installation
•Install the main ring of oil control ring into oil ring groove.
NOTE :
There is no difference between the upper and lower oil control rings.
ENGINE UNIT REPAIR
LTSM020113
LTSM020116
02
02–227Chery Automobile Co., Ltd.
Page 257 of 1903
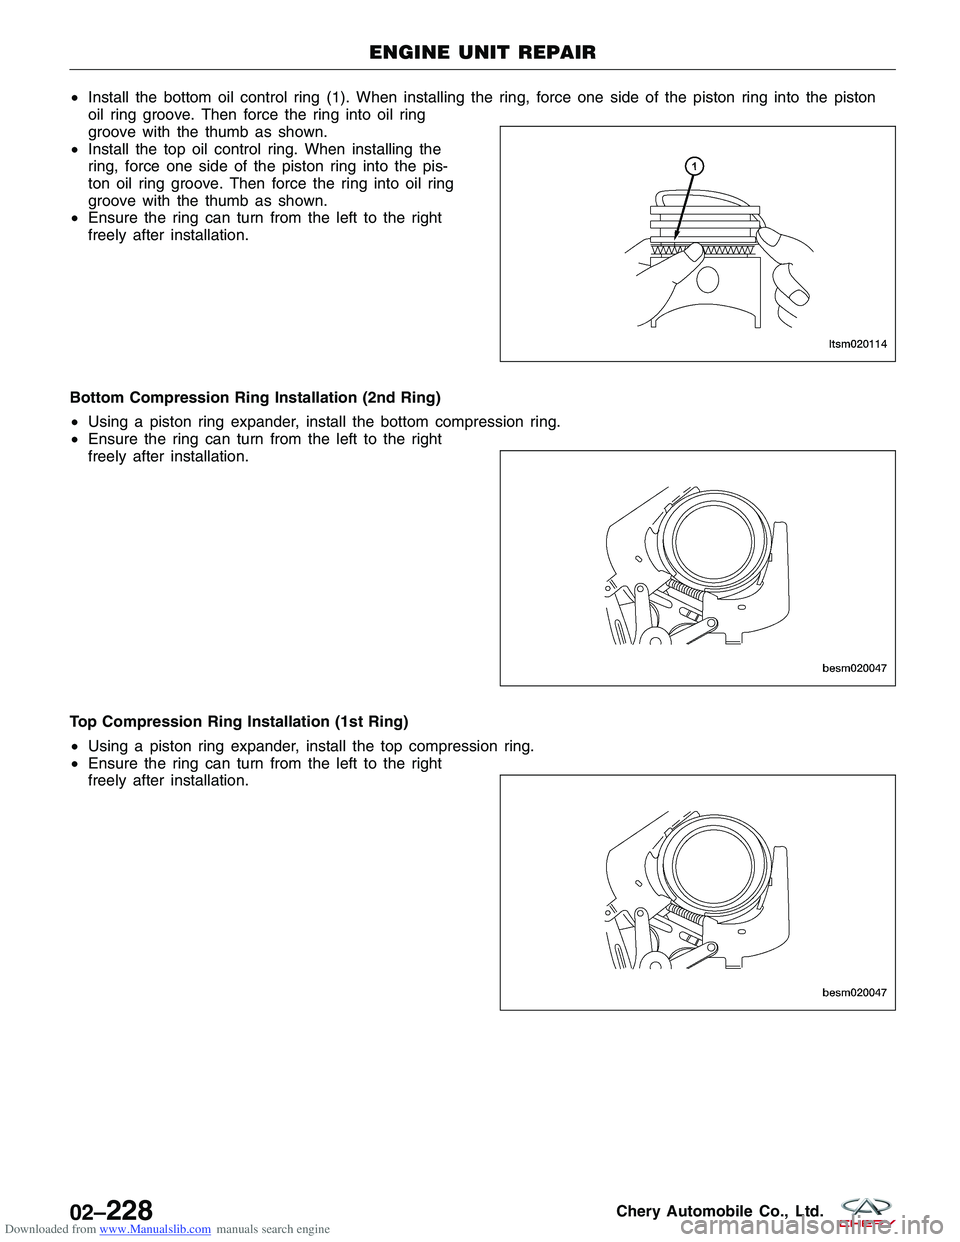
Downloaded from www.Manualslib.com manuals search engine •Install the bottom oil control ring (1). When installing the ring, force one side of the piston ring into the piston
oil ring groove. Then force the ring into oil ring
groove with the thumb as shown.
• Install the top oil control ring. When installing the
ring, force one side of the piston ring into the pis-
ton oil ring groove. Then force the ring into oil ring
groove with the thumb as shown.
• Ensure the ring can turn from the left to the right
freely after installation.
Bottom Compression Ring Installation (2nd Ring)
• Using a piston ring expander, install the bottom compression ring.
• Ensure the ring can turn from the left to the right
freely after installation.
Top Compression Ring Installation (1st Ring)
• Using a piston ring expander, install the top compression ring.
• Ensure the ring can turn from the left to the right
freely after installation.
ENGINE UNIT REPAIR
LTSM020114
BESM020047
BESM020047
02–228Chery Automobile Co., Ltd.
Page 258 of 1903
Downloaded from www.Manualslib.com manuals search engine Connecting Rods
Specifications
Torque Specifications
DESCRIPTIONTORQUE (N·m)
Connecting Rod Nuts 1st Step: Tighten the nuts to 20 N·m
2nd Step: Tighten the nuts an additional 90°-100°
Clearance Specifications
DESCRIPTION SPECIFICATION (mm)
Connecting Rod Radial Clearance 0.016 - 0.051
Connecting Rod Axial Clearance 0.002 - 0.013
Disassembly
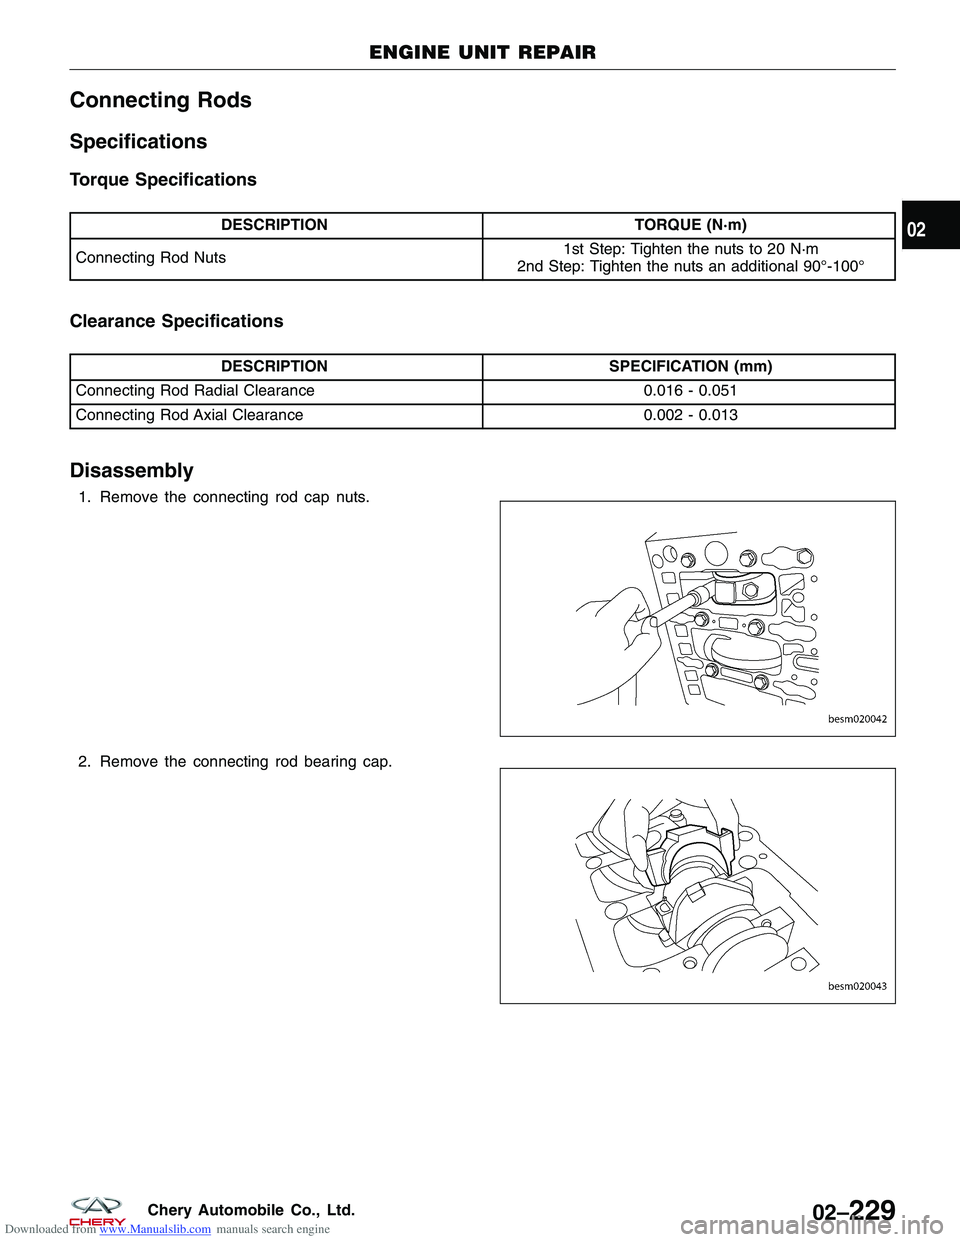
1. Remove the connecting rod cap nuts.
2. Remove the connecting rod bearing cap.
ENGINE UNIT REPAIR
BESM020042
BESM020043
02
02–229Chery Automobile Co., Ltd.
Page 259 of 1903
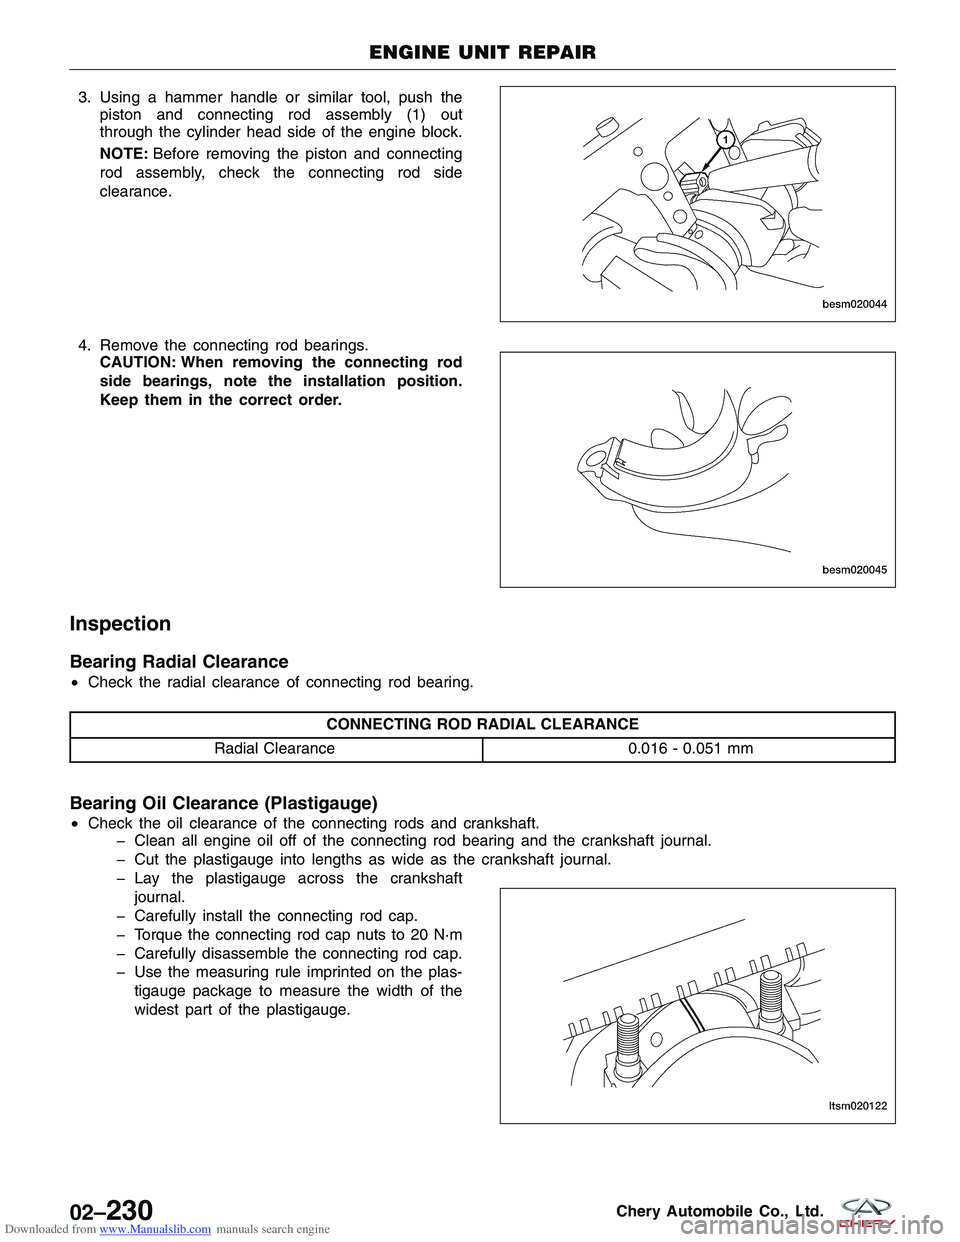
Downloaded from www.Manualslib.com manuals search engine 3. Using a hammer handle or similar tool, push thepiston and connecting rod assembly (1) out
through the cylinder head side of the engine block.
NOTE: Before removing the piston and connecting
rod assembly, check the connecting rod side
clearance.
4. Remove the connecting rod bearings. CAUTION: When removing the connecting rod
side bearings, note the installation position.
Keep them in the correct order.
Inspection
Bearing Radial Clearance
•Check the radial clearance of connecting rod bearing.
CONNECTING ROD RADIAL CLEARANCE
Radial Clearance 0.016 - 0.051 mm
Bearing Oil Clearance (Plastigauge)
•Check the oil clearance of the connecting rods and crankshaft.
� Clean all engine oil off of the connecting rod bearing and the crankshaft journal.
� Cut the plastigauge into lengths as wide as the crankshaft journal.
� Lay the plastigauge across the crankshaft
journal.
� Carefully install the connecting rod cap.
� Torque the connecting rod cap nuts to 20 N·m
� Carefully disassemble the connecting rod cap.
� Use the measuring rule imprinted on the plas- tigauge package to measure the width of the
widest part of the plastigauge.
ENGINE UNIT REPAIR
BESM020044
BESM020045
LTSM020122
02–230Chery Automobile Co., Ltd.
Page 260 of 1903
Downloaded from www.Manualslib.com manuals search engine CONNECTING ROD BEARING OIL CLEARANCE
Standard Clearance 0.02 - 0.05 mm
Maximum Clearance 0.1 mm
Assembly
NOTE :
•The connecting rod bolts should NOT be reused.
• Before installing the NEW rod bolts, apply clean engine oil to the threads and under the bolt heads.
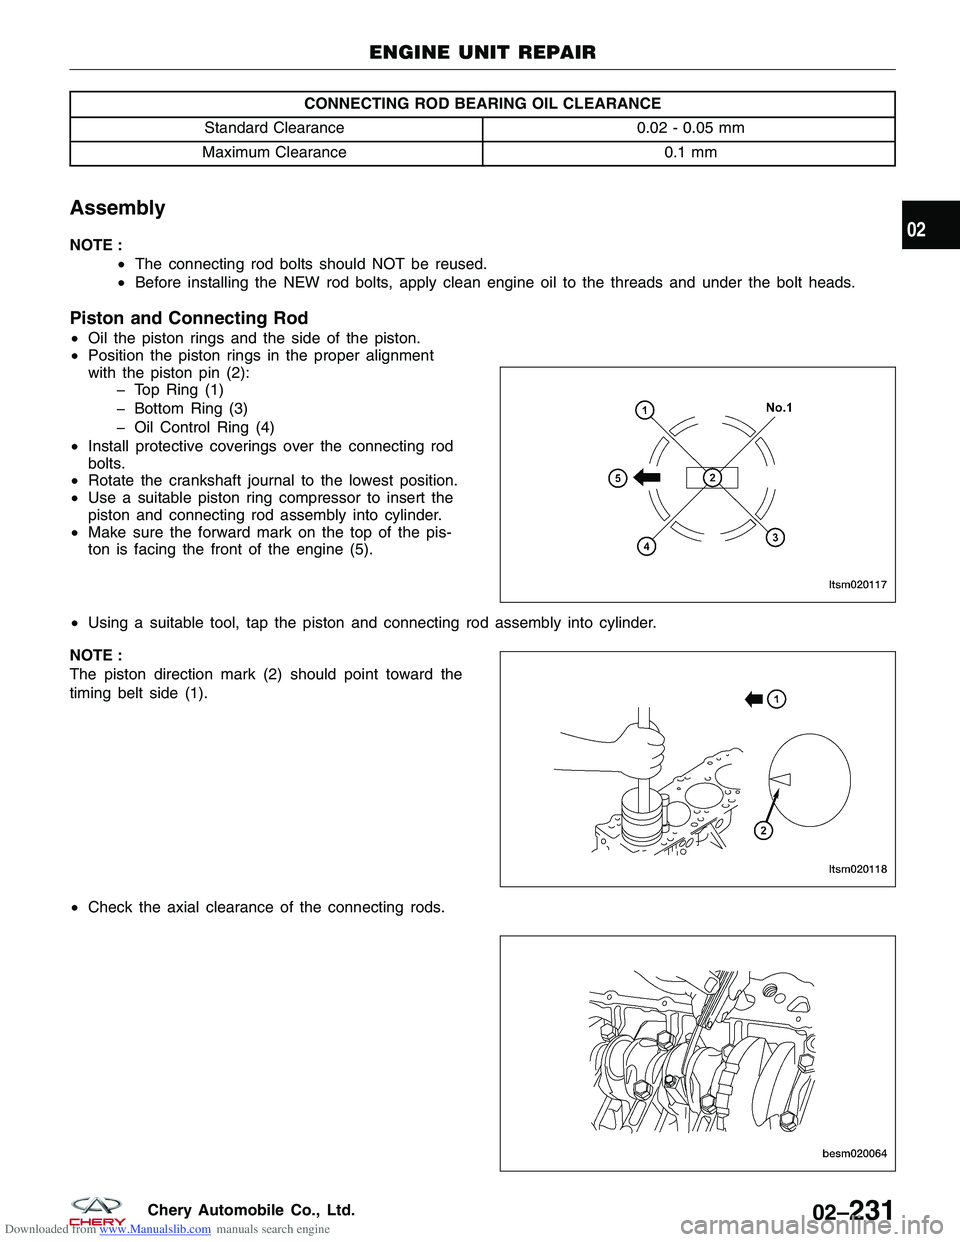
Piston and Connecting Rod
•Oil the piston rings and the side of the piston.
• Position the piston rings in the proper alignment
with the piston pin (2):
� Top Ring (1)
� Bottom Ring (3)
� Oil Control Ring (4)
• Install protective coverings over the connecting rod
bolts.
• Rotate the crankshaft journal to the lowest position.
• Use a suitable piston ring compressor to insert the
piston and connecting rod assembly into cylinder.
• Make sure the forward mark on the top of the pis-
ton is facing the front of the engine (5).
• Using a suitable tool, tap the piston and connecting rod assembly into cylinder.
NOTE :
The piston direction mark (2) should point toward the
timing belt side (1).
• Check the axial clearance of the connecting rods.
ENGINE UNIT REPAIR
LTSM020117
LTSM020118
BESM020064
02
02–231Chery Automobile Co., Ltd.