CHERY TIGGO 2009 Service Repair Manual
Manufacturer: CHERY, Model Year: 2009, Model line: TIGGO, Model: CHERY TIGGO 2009Pages: 1903, PDF Size: 33.38 MB
Page 261 of 1903
Downloaded from www.Manualslib.com manuals search engine CONNECTING ROD AXIAL CLEARANCE
DESCRIPTION SPECIFICATION LIMIT
Connecting Rods 0.10 - 0.25 mm 0.4 mm
Connecting Rod Bearings
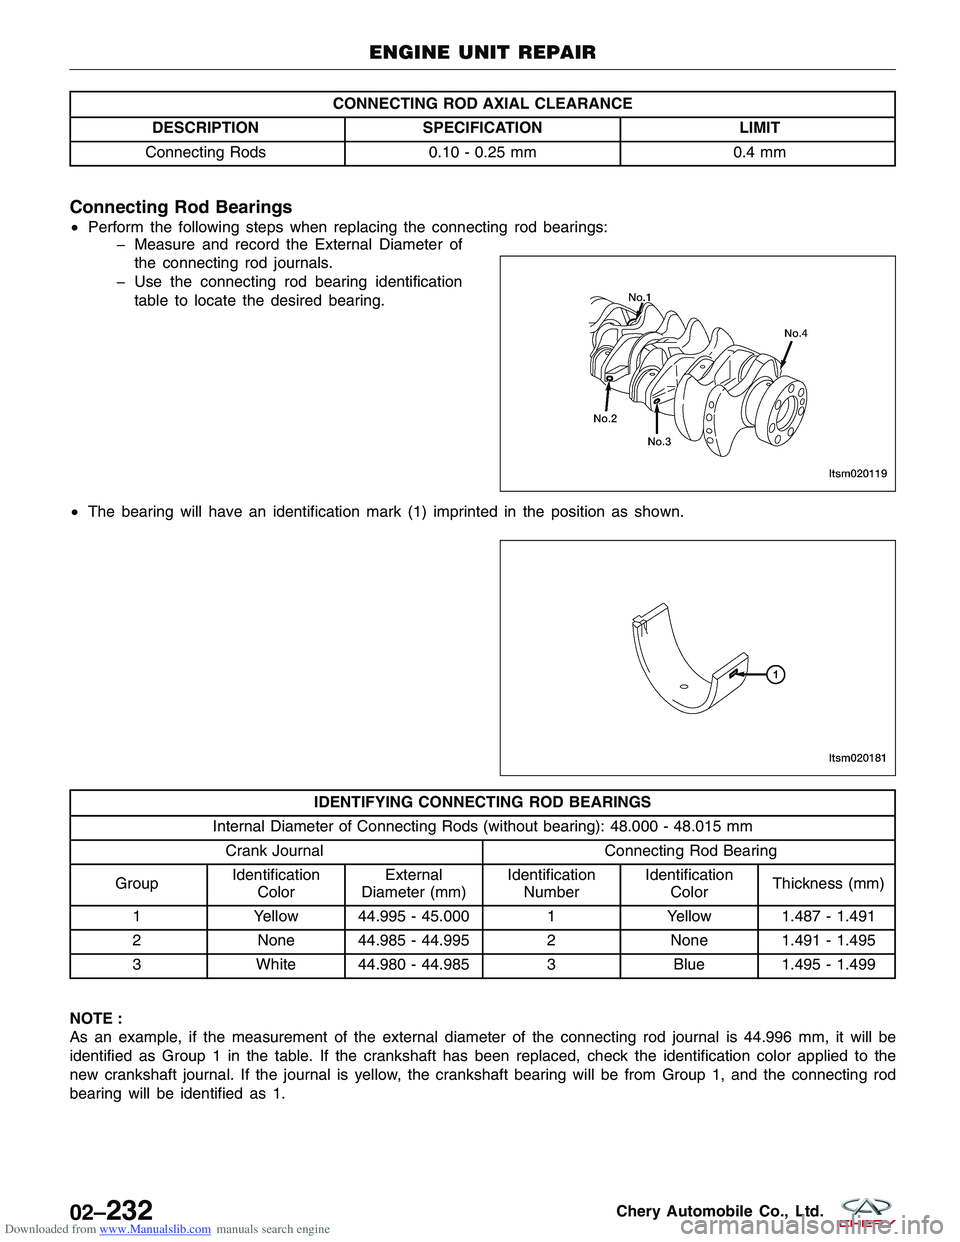
•Perform the following steps when replacing the connecting rod bearings:
� Measure and record the External Diameter of
the connecting rod journals.
� Use the connecting rod bearing identification table to locate the desired bearing.
• The bearing will have an identification mark (1) imprinted in the position as shown.
IDENTIFYING CONNECTING ROD BEARINGS
Internal Diameter of Connecting Rods (without bearing): 48.000 - 48.015 mm Crank Journal Connecting Rod Bearing
Group Identification
Color External
Diameter (mm) Identification
Number Identification
Color Thickness (mm)
1 Yellow 44.995 - 45.000 1 Yellow 1.487 - 1.491
2 None 44.985 - 44.995 2 None 1.491 - 1.495
3 White 44.980 - 44.985 3 Blue 1.495 - 1.499
NOTE :
As an example, if the measurement of the external diameter of the connecting rod journal is 44.996 mm, it will be
identified as Group 1 in the table. If the crankshaft has been replaced, check the identification color applied to the
new crankshaft journal. If the journal is yellow, the crankshaft bearing will be from Group 1, and the connecting rod
bearing will be identified as 1.
ENGINE UNIT REPAIR
LTSM020119
LTSM020181
02–232Chery Automobile Co., Ltd.
Page 262 of 1903
Downloaded from www.Manualslib.com manuals search engine Connecting Rod Cap Nuts
•Apply engine oil to the connecting rod bolts.
• Install each connecting rod nut finger tight, then
alternately tighten each nut to assemble the cap
properly.
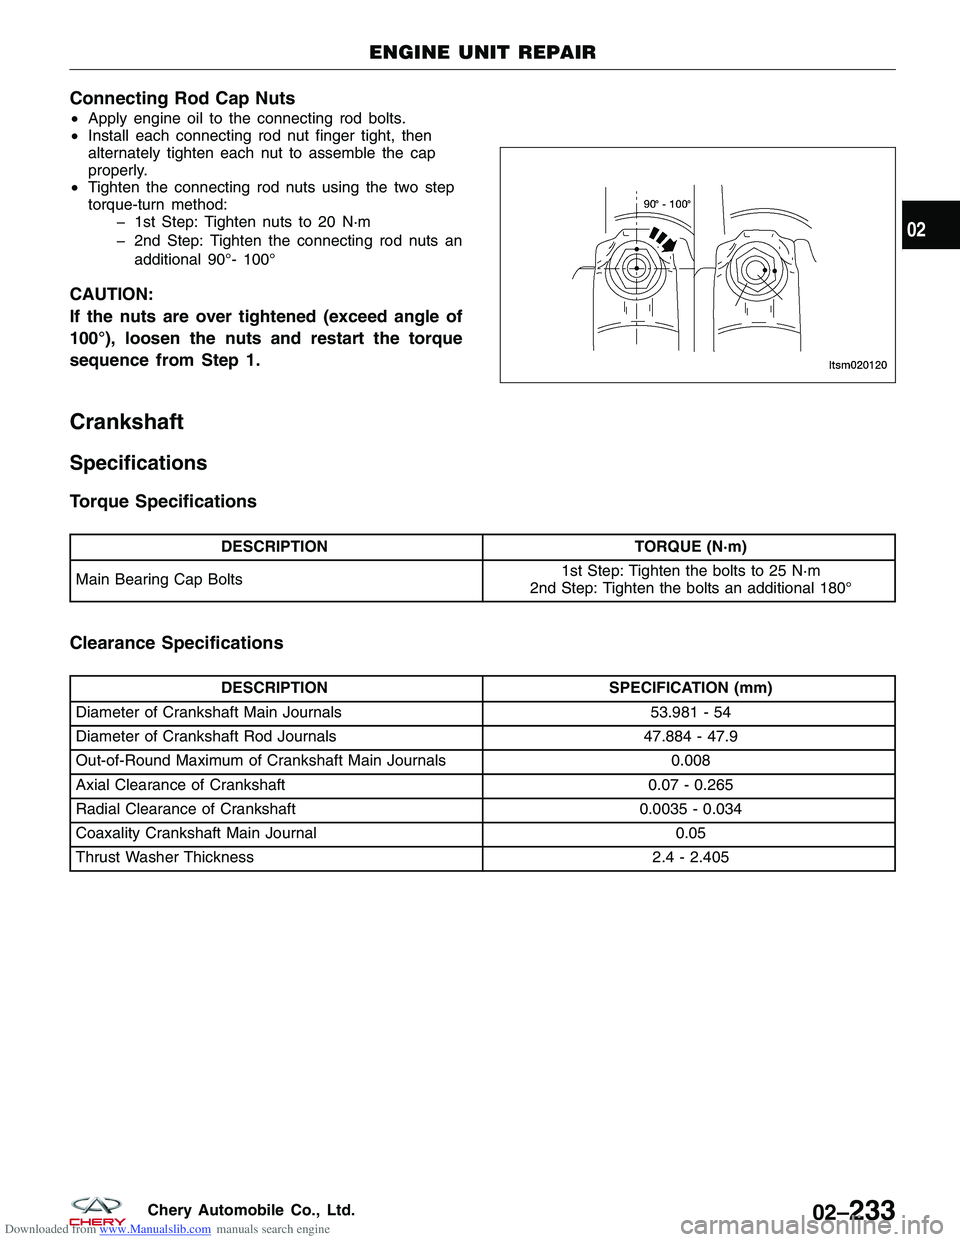
• Tighten the connecting rod nuts using the two step
torque-turn method:
� 1st Step: Tighten nuts to 20 N·m
� 2nd Step: Tighten the connecting rod nuts an
additional 90°- 100°
CAUTION:
If the nuts are over tightened (exceed angle of
100°), loosen the nuts and restart the torque
sequence from Step 1.
Crankshaft
Specifications
Torque Specifications
DESCRIPTION TORQUE (N·m)
Main Bearing Cap Bolts 1st Step: Tighten the bolts to 25 N·m
2nd Step: Tighten the bolts an additional 180°
Clearance Specifications
DESCRIPTION SPECIFICATION (mm)
Diameter of Crankshaft Main Journals 53.981 - 54
Diameter of Crankshaft Rod Journals 47.884 - 47.9
Out-of-Round Maximum of Crankshaft Main Journals 0.008
Axial Clearance of Crankshaft 0.07 - 0.265
Radial Clearance of Crankshaft 0.0035 - 0.034
Coaxality Crankshaft Main Journal 0.05
Thrust Washer Thickness 2.4 - 2.405
ENGINE UNIT REPAIR
LTSM020120
02
02–233Chery Automobile Co., Ltd.
Page 263 of 1903
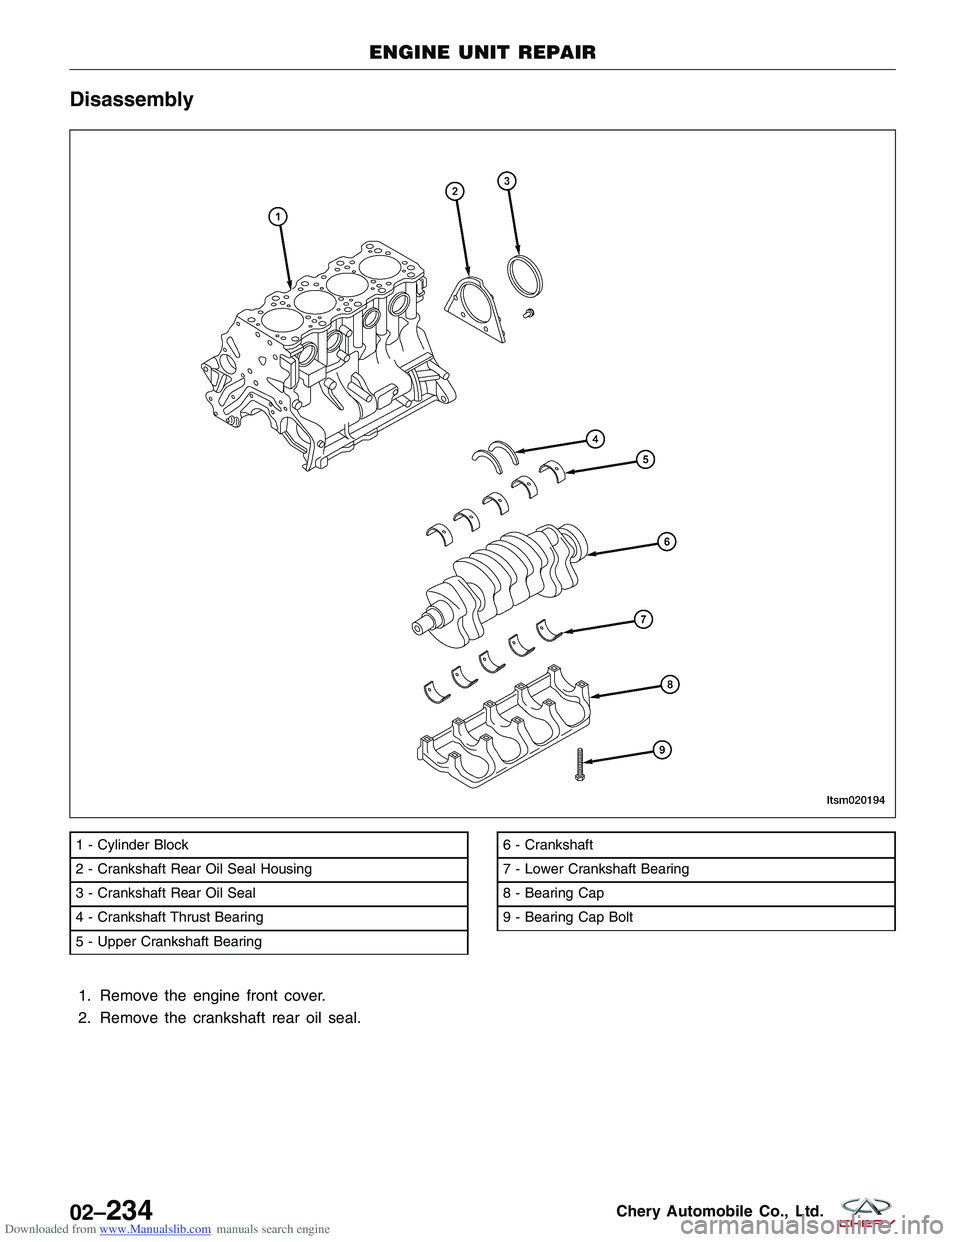
Downloaded from www.Manualslib.com manuals search engine Disassembly
1. Remove the engine front cover.
2. Remove the crankshaft rear oil seal.
1 - Cylinder Block
2 - Crankshaft Rear Oil Seal Housing
3 - Crankshaft Rear Oil Seal
4 - Crankshaft Thrust Bearing
5 - Upper Crankshaft Bearing6 - Crankshaft
7 - Lower Crankshaft Bearing
8 - Bearing Cap
9 - Bearing Cap Bolt
ENGINE UNIT REPAIR
LTSM020194
02–234Chery Automobile Co., Ltd.
Page 264 of 1903
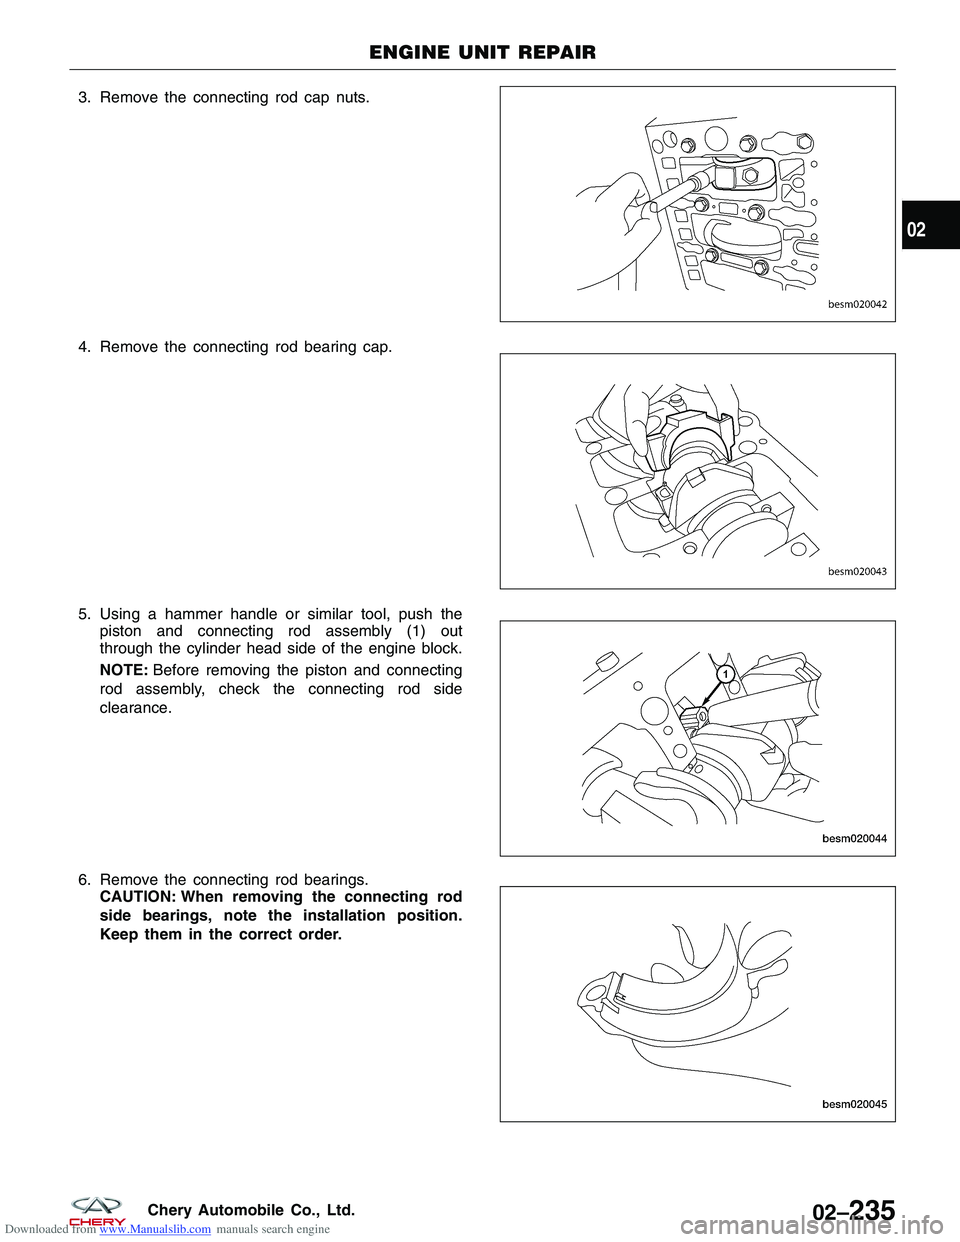
Downloaded from www.Manualslib.com manuals search engine 3. Remove the connecting rod cap nuts.
4. Remove the connecting rod bearing cap.
5. Using a hammer handle or similar tool, push thepiston and connecting rod assembly (1) out
through the cylinder head side of the engine block.
NOTE: Before removing the piston and connecting
rod assembly, check the connecting rod side
clearance.
6. Remove the connecting rod bearings. CAUTION: When removing the connecting rod
side bearings, note the installation position.
Keep them in the correct order.
ENGINE UNIT REPAIR
BESM020042
BESM020043
BESM020044
BESM020045
02
02–235Chery Automobile Co., Ltd.
Page 265 of 1903
Downloaded from www.Manualslib.com manuals search engine Inspection
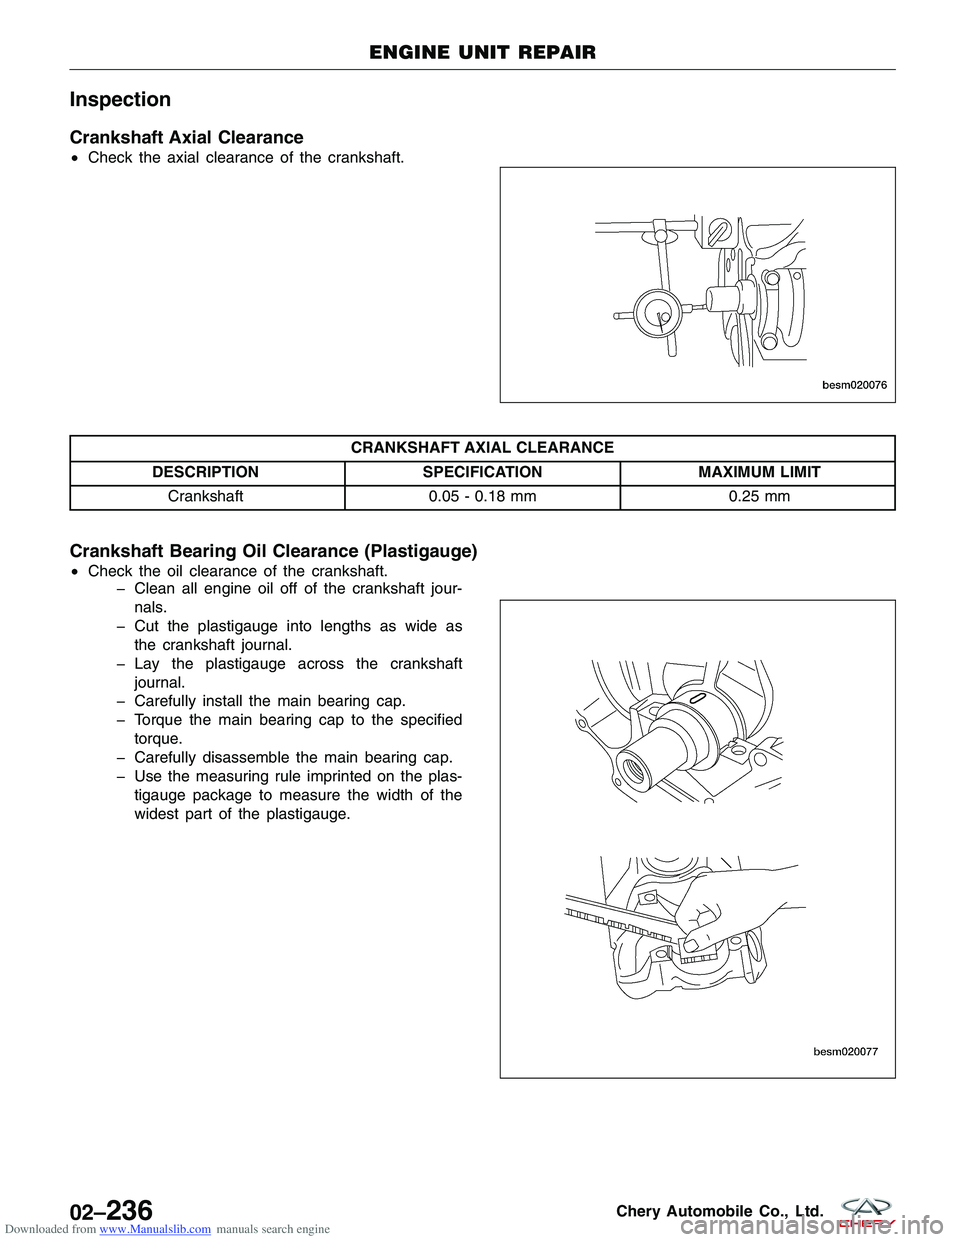
Crankshaft Axial Clearance
•Check the axial clearance of the crankshaft.
CRANKSHAFT AXIAL CLEARANCE
DESCRIPTION SPECIFICATION MAXIMUM LIMIT
Crankshaft 0.05 - 0.18 mm 0.25 mm
Crankshaft Bearing Oil Clearance (Plastigauge)
•Check the oil clearance of the crankshaft.
� Clean all engine oil off of the crankshaft jour-
nals.
� Cut the plastigauge into lengths as wide as the crankshaft journal.
� Lay the plastigauge across the crankshaft journal.
� Carefully install the main bearing cap.
� Torque the main bearing cap to the specified torque.
� Carefully disassemble the main bearing cap.
� Use the measuring rule imprinted on the plas- tigauge package to measure the width of the
widest part of the plastigauge.
ENGINE UNIT REPAIR
BESM020076
BESM020077
02–236Chery Automobile Co., Ltd.
Page 266 of 1903
Downloaded from www.Manualslib.com manuals search engine CRANKSHAFT BEARING OIL CLEARANCE
Standard Clearance 0.02 - 0.04 mm
Maximum Clearance 0.1 mm
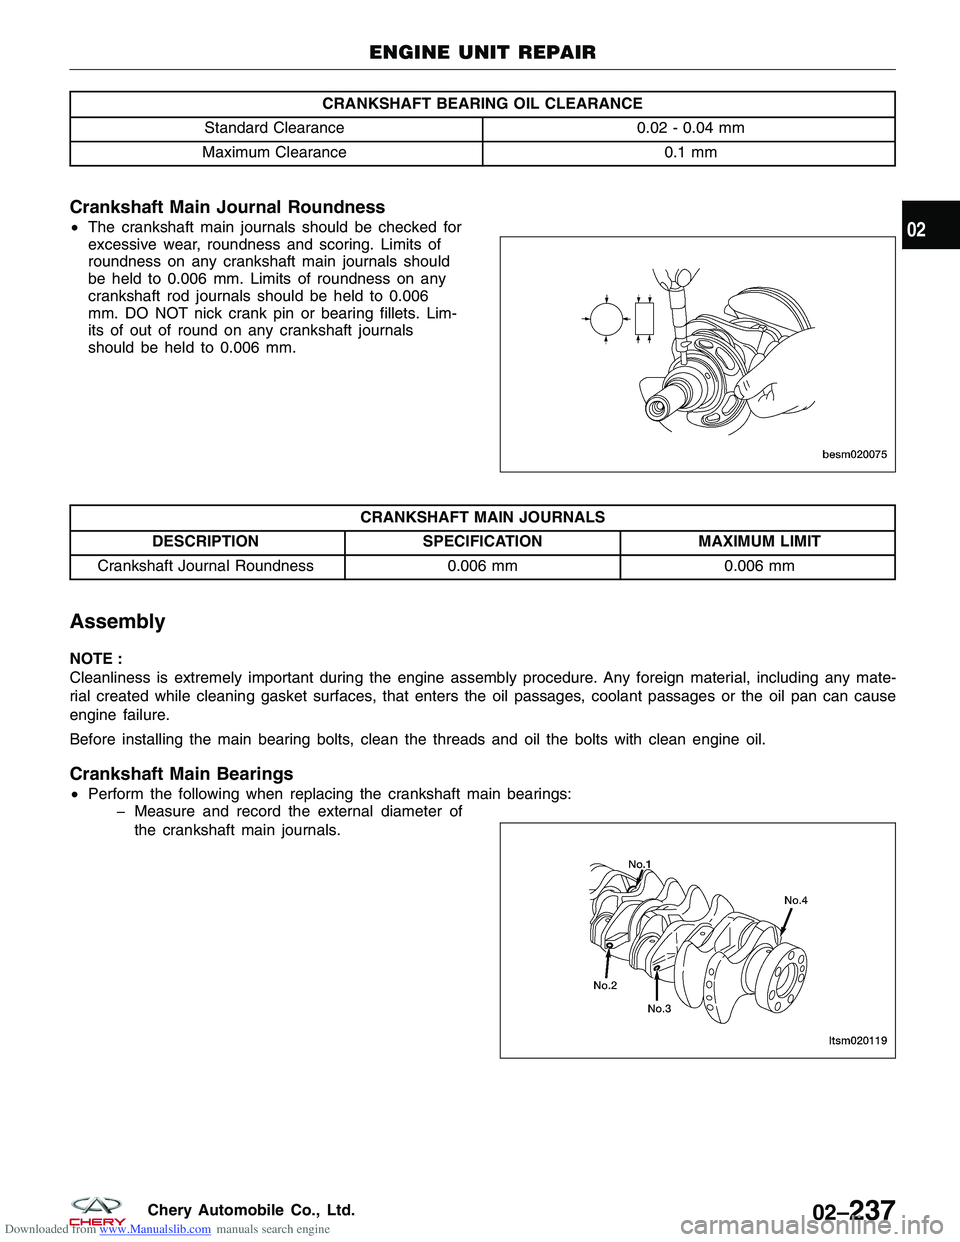
Crankshaft Main Journal Roundness
•The crankshaft main journals should be checked for
excessive wear, roundness and scoring. Limits of
roundness on any crankshaft main journals should
be held to 0.006 mm. Limits of roundness on any
crankshaft rod journals should be held to 0.006
mm. DO NOT nick crank pin or bearing fillets. Lim-
its of out of round on any crankshaft journals
should be held to 0.006 mm.
CRANKSHAFT MAIN JOURNALS
DESCRIPTION SPECIFICATION MAXIMUM LIMIT
Crankshaft Journal Roundness 0.006 mm0.006 mm
Assembly
NOTE :
Cleanliness is extremely important during the engine assembly procedure. Any foreign material, including any mate-
rial created while cleaning gasket surfaces, that enters the oil passages, coolant passages or the oil pan can cause
engine failure.
Before installing the main bearing bolts, clean the threads and oil the bolts with clean engine oil.
Crankshaft Main Bearings
•Perform the following when replacing the crankshaft main bearings:
� Measure and record the external diameter of
the crankshaft main journals.
ENGINE UNIT REPAIR
BESM020075
LTSM020119
02
02–237Chery Automobile Co., Ltd.
Page 267 of 1903
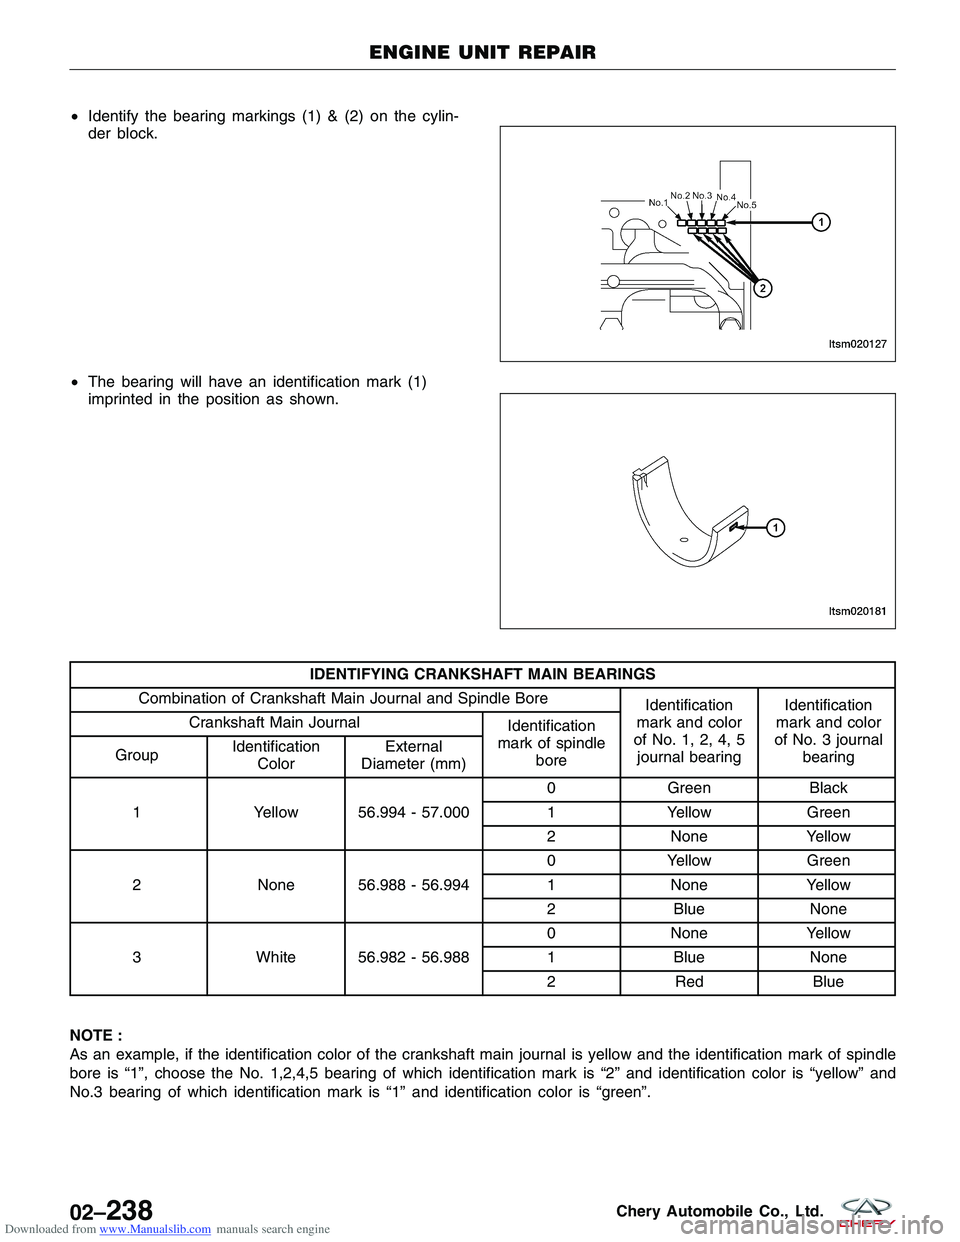
Downloaded from www.Manualslib.com manuals search engine •Identify the bearing markings (1) & (2) on the cylin-
der block.
• The bearing will have an identification mark (1)
imprinted in the position as shown.
IDENTIFYING CRANKSHAFT MAIN BEARINGS
Combination of Crankshaft Main Journal and Spindle Bore Identification
mark and color
of No. 1, 2, 4, 5 journal bearing Identification
mark and color
of No. 3 journal bearing
Crankshaft Main Journal
Identification
mark of spindle bore
Group Identification
Color External
Diameter (mm)
1 Yellow 56.994 - 57.000 0
Green Black
1 Yellow Green
2 None Yellow
2 None 56.988 - 56.994 0
Yellow Green
1 None Yellow
2 Blue None
3 White 56.982 - 56.988 0
None Yellow
1 Blue None
2 Red Blue
NOTE :
As an example, if the identification color of the crankshaft main journal is yellow and the identification mark of spindle
bore is “1”, choose the No. 1,2,4,5 bearing of which identification mark is “2” and identification color is “yellow” and
No.3 bearing of which identification mark is “1” and identification color is “green”.
ENGINE UNIT REPAIR
LTSM020127
LTSM020181
02–238Chery Automobile Co., Ltd.
Page 268 of 1903
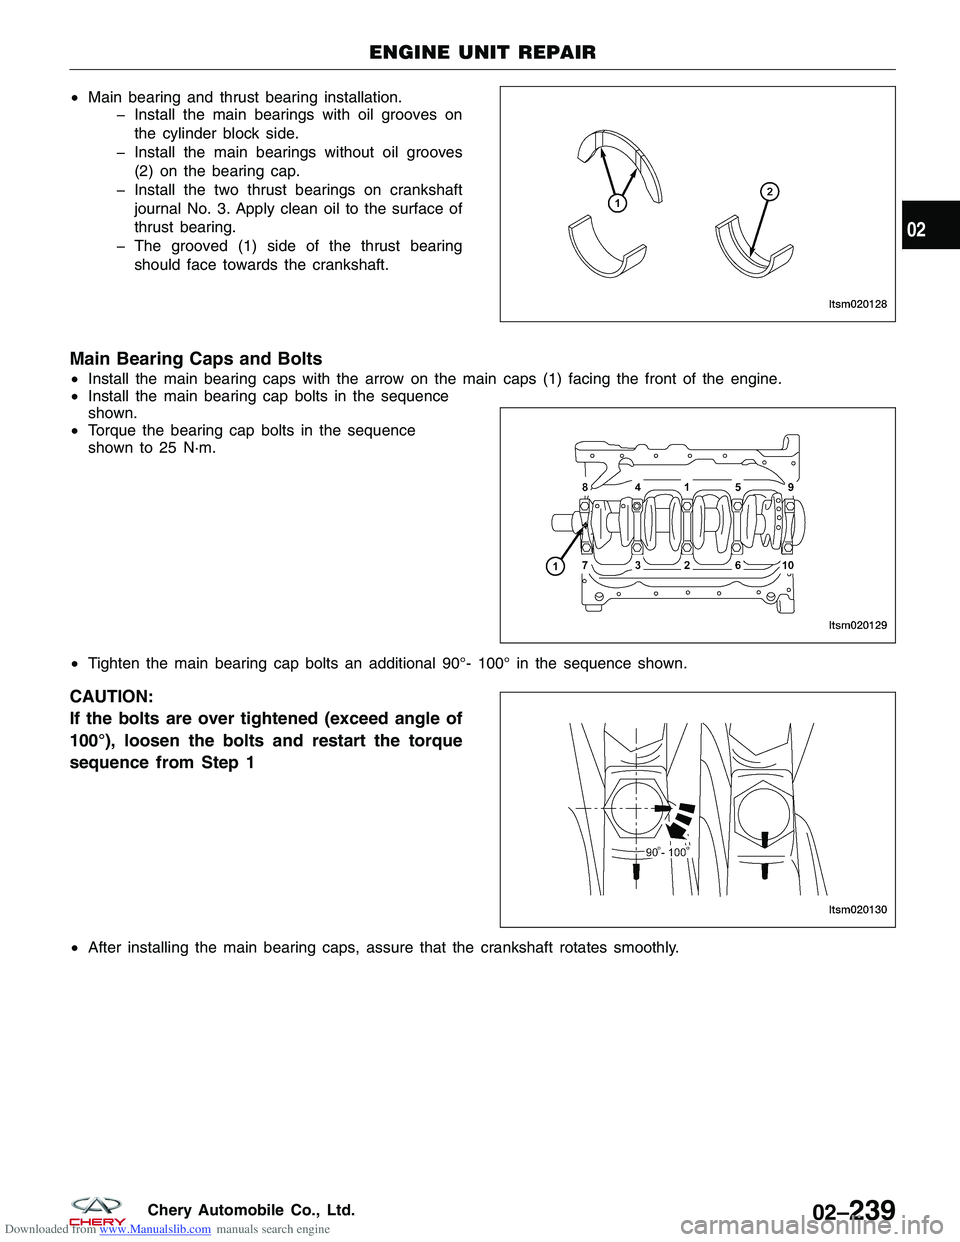
Downloaded from www.Manualslib.com manuals search engine •Main bearing and thrust bearing installation.
� Install the main bearings with oil grooves on
the cylinder block side.
� Install the main bearings without oil grooves (2) on the bearing cap.
� Install the two thrust bearings on crankshaft journal No. 3. Apply clean oil to the surface of
thrust bearing.
� The grooved (1) side of the thrust bearing should face towards the crankshaft.
Main Bearing Caps and Bolts
• Install the main bearing caps with the arrow on the main caps (1) facing the front of the engine.
• Install the main bearing cap bolts in the sequence
shown.
• Torque the bearing cap bolts in the sequence
shown to 25 N·m.
• Tighten the main bearing cap bolts an additional 90°- 100° in the sequence shown.
CAUTION:
If the bolts are over tightened (exceed angle of
100°), loosen the bolts and restart the torque
sequence from Step 1
•After installing the main bearing caps, assure that the crankshaft rotates smoothly.
ENGINE UNIT REPAIR
LTSM020128
LTSM020129
LTSM020130
02
02–239Chery Automobile Co., Ltd.
Page 269 of 1903
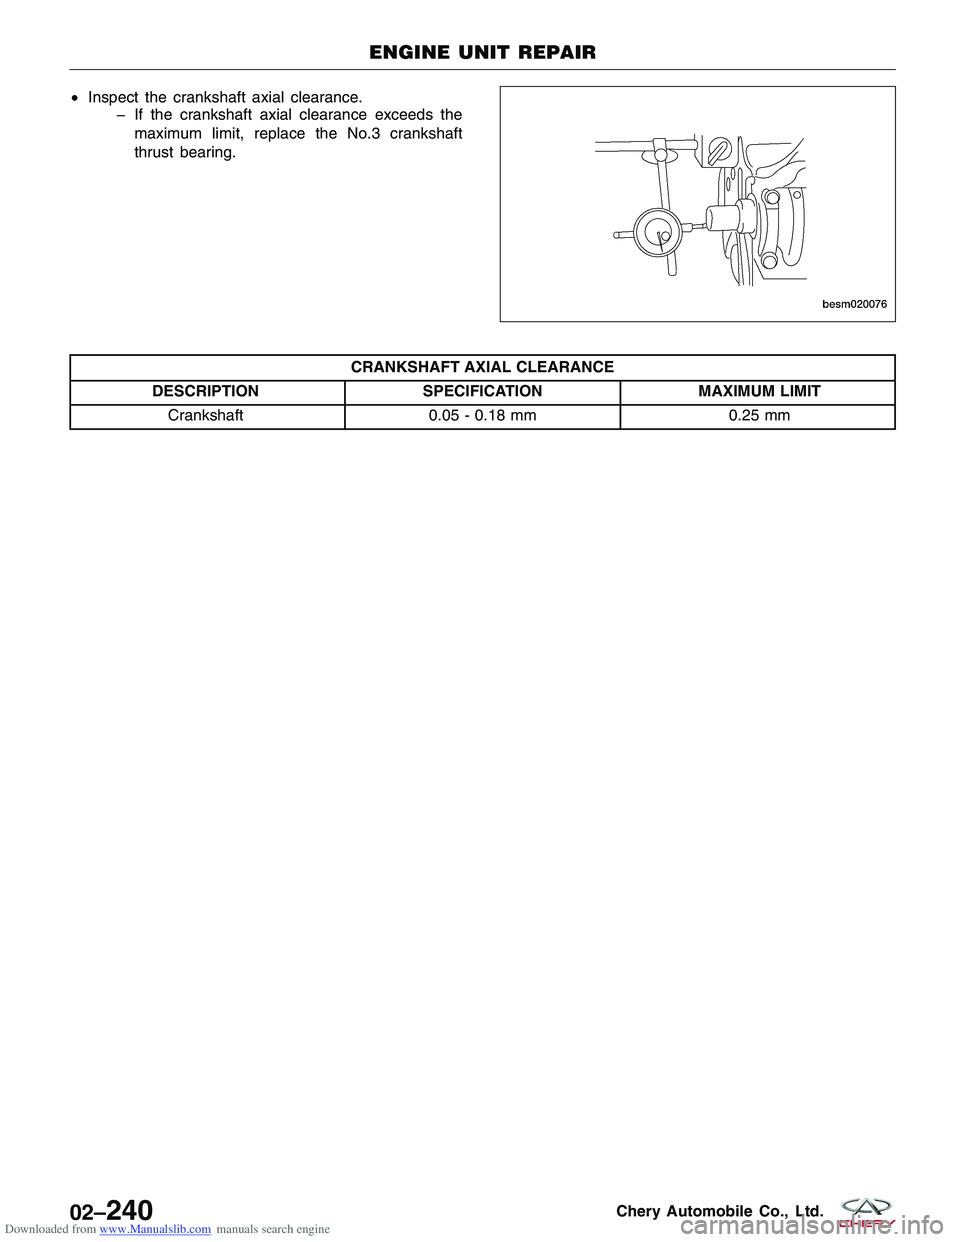
Downloaded from www.Manualslib.com manuals search engine •Inspect the crankshaft axial clearance.
� If the crankshaft axial clearance exceeds the
maximum limit, replace the No.3 crankshaft
thrust bearing.
CRANKSHAFT AXIAL CLEARANCE
DESCRIPTION SPECIFICATION MAXIMUM LIMIT
Crankshaft 0.05 - 0.18 mm 0.25 mm
ENGINE UNIT REPAIR
BESM020076
02–240Chery Automobile Co., Ltd.
Page 270 of 1903
Downloaded from www.Manualslib.com manuals search engine CYLINDER HEAD UNIT REPAIR
Cylinder Head
Specifications
Torque Specifications
DESCRIPTIONTORQUE (N·m)
Cylinder Head Bolts 1st Step: Tighten the bolt to 78 N·m
2nd Step: Completely loosen the bolt
3rd Step: Retighten the bolt to 20 N·m
4th Step: Tighten the bolt an additional 90°
5th Step: Finish tightening the bolt an additional 90°
Cylinder Head Cover Bolts 11 N·m
Clearance Specifications
DESCRIPTIONSPECIFICATION (mm)
Cylinder Head Flatness 0.03
Intake Valve Deflection 0.02
Exhaust Valve Deflection 0.04
Spring Height 51
Disassembly
NOTE :
The following special tools are required to perform the repair procedure:
•MD-998772 - Valve Spring Compressor
• MD-998774 - Valve Oil Seal Installer
NOTE :
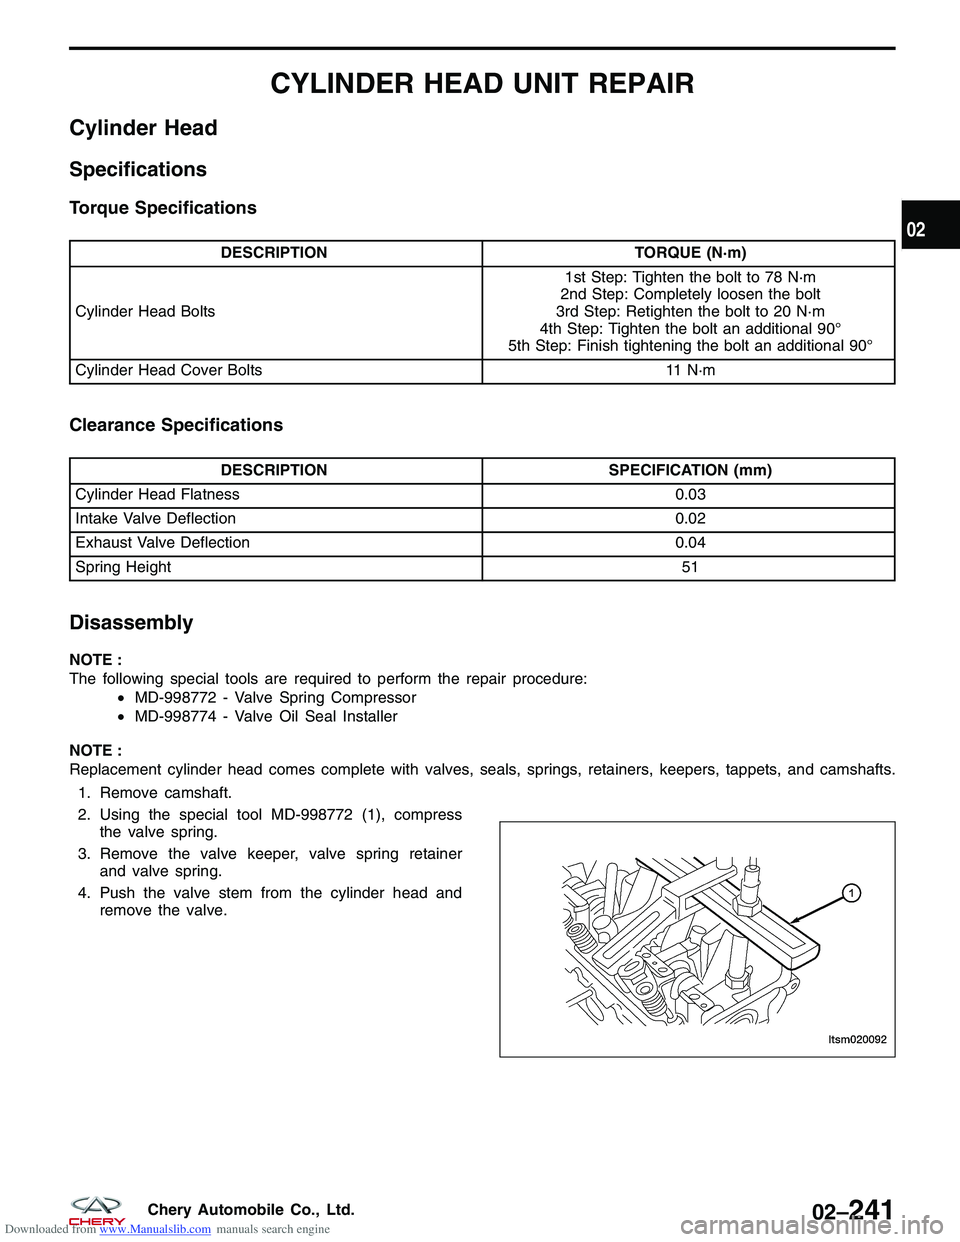
Replacement cylinder head comes complete with valves, seals, springs, retainers, keepers, tappets, and camshafts. 1. Remove camshaft.
2. Using the special tool MD-998772 (1), compress the valve spring.
3. Remove the valve keeper, valve spring retainer and valve spring.
4. Push the valve stem from the cylinder head and remove the valve.
LTSM020092
02
02–241Chery Automobile Co., Ltd.