CHEVROLET CAMARO 1967 1.G Chassis Workshop Manual
Manufacturer: CHEVROLET, Model Year: 1967, Model line: CAMARO, Model: CHEVROLET CAMARO 1967 1.GPages: 659, PDF Size: 114.24 MB
Page 551 of 659

17-
VIEW A
Fig.
53 - Instrument Panel Wiring Harness
1.
To Glove Box Light
2.
To Heater Control
3. Heater Control Lamp
4. To Cigarette Lighter
5. To Ignition Switch
6. To Instrument Cluster
7. To Wiper Switch
8. To Light Switch
9.
To Directional Signal Switch
10.
To Stop Lamp Switch
11.
To Backing Lamp Switch
12.
Fuse Panel
13.
To Dimmer Switch
14.
To Fisher Body Connector
15.
To Directional Signal Flasher
16.
To Heater Resistor
17.
Directional Signal Flasher
Page 552 of 659
ELECTRICAL-BODY AND CHASSIS 12-40
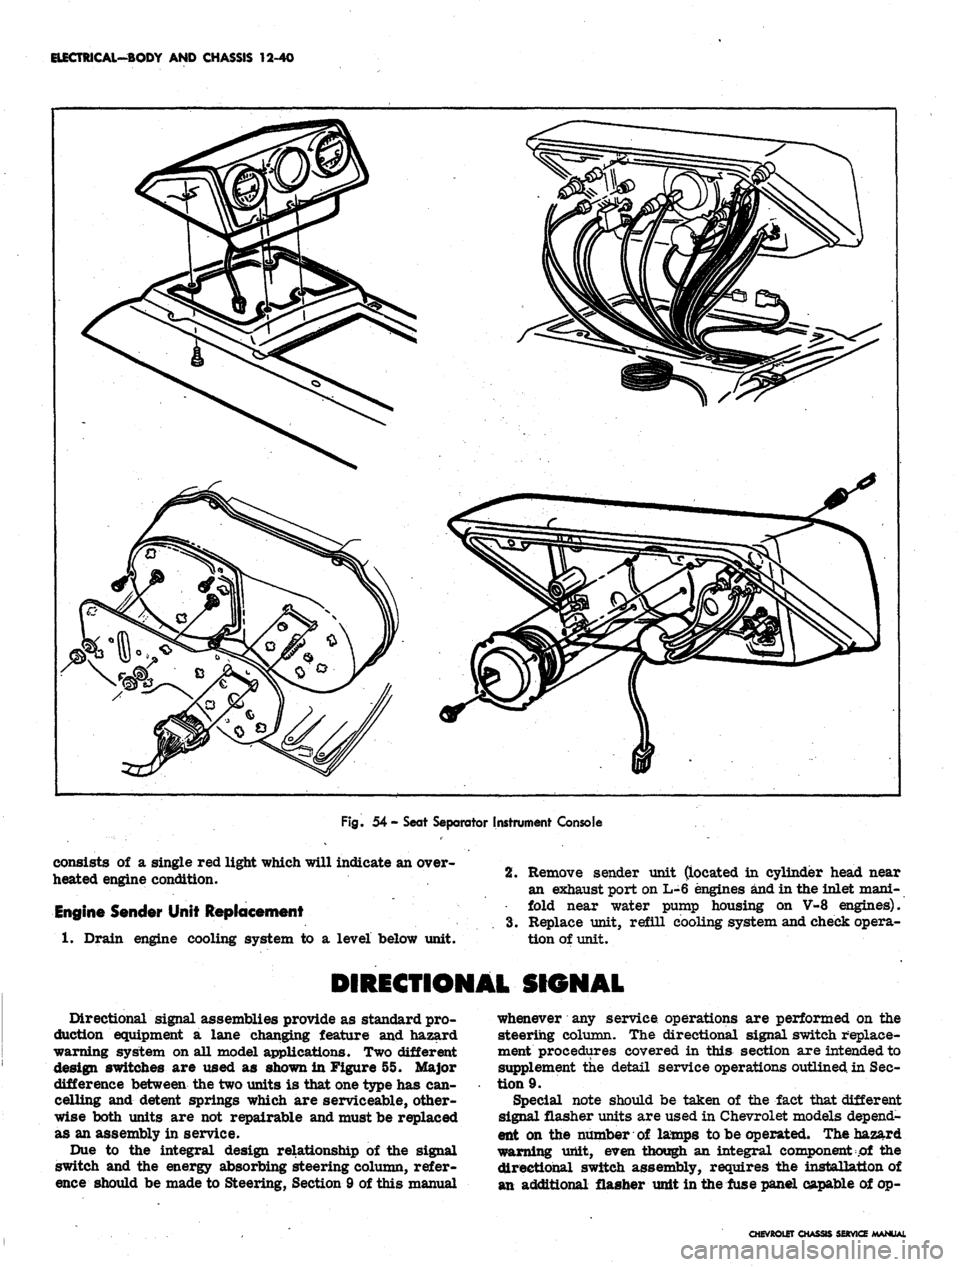
Fig.
54 - Seat Separator Instrument Console
consists of a single red light which will indicate an over-
heated engine condition.
Engine Sender Unit Replacement
1.
Drain engine cooling system to a level below unit.
2.
Remove sender unit (located in cylinder head near
an exhaust port on L-6 engines and in the inlet mani-
fold near water pump housing on V-8 engines).
3.
Replace unit, refill cooling system and check opera-
tion of unit.
DIRECTIONAL SIGNAL
Directional signal assemblies provide as standard pro-
duction equipment a lane changing feature and hazard
warning system on all model applications. Two different
design switches are used as shown in Figure 55. Major
difference between the two units is that one type has can-
celling and detent springs which are serviceable, other-
wise both units are not repairable and must be replaced
as an assembly in service.
Due to the integral design relationship of the signal
switch and the energy absorbing steering column, refer-
ence should be made to Steering, Section 9 of this manual
whenever any service operations are performed on the
steering column. The directional signal switch replace-
ment procedures covered in this section are intended to
supplement the detail service operations outlined in Sec-
tion 9.
Special note should be taken of the fact that different
signal flasher units are used in Chevrolet models depend-
ent on the number of lamps to be operated. The hazard
warning unit, even though an integral component of the
directional switch assembly, requires the installation of
an additional flasher unit in the fuse panel capable of op-
CHEVROtET CHASSIS SERVICE MANUAL
Page 553 of 659

ELECTRICAL-BODY AND CHASSIS 12-41
HAZARD WARNING
SWITCHES
Fig.
55- Directional Signal Switches
erating six to eight lamps simultaneously depending ve-
hicle series and model.
DIRECTIONAL SIGNAL SWITCH REPLACEMENT
All steering columns except tilt and telescoping.
Chevrolet, Chevelle, Chevy II and Camaro (Fig. 56)
1.
Disconnect battery ground cable.
2.
Disconnect signal switch wiring from chassis har-
ness at multiple connector under instrument panel.
3.
Remove steering wheel assembly as outlined in Sec-
tion 9, Steering.
4.
Remove shift lever roll pin and shift lever from
column (if applicable).
5. Push in hazard warning switch knob and unscrew
knob.
Remove switch lever arm.
6. On Chevy U and Camaro models equipped with auto-
matic transmission remove column mounted dial in-
dicator housing and lamp assembly (if applicable).
7. Remove mast jacket lower trim cover retaining
screws and remove trim cover(s).
8. On Chevrolet and Chevelle models equipped with
automatic transmission loosen set screw and remove
quadrant dial pointer (if applicable).
9. Remove retaining
"C"
ring from upper steering shaft
using snap ring remover Tool J-22569 (Refer to
Steering, Section 9). Slide thrust and wave washers
from steering shaft.
10.
Loosen three signal switch mounting screws until
assembly can be rotated counterclockwise.
NOTE:
Do not remove three screws from as-
sembly until unit is on the bench.
11.
Rotate switch assembly counterclockwise and pull
unit from top of mast jacket. Allow unit to hang
from end of column.
Fig.
56 - Standard Steering Column
CHEVROLET CHASSIS SERVICE
Page 554 of 659
ELECTRICAL-BODY AND CHASSIS 12-42
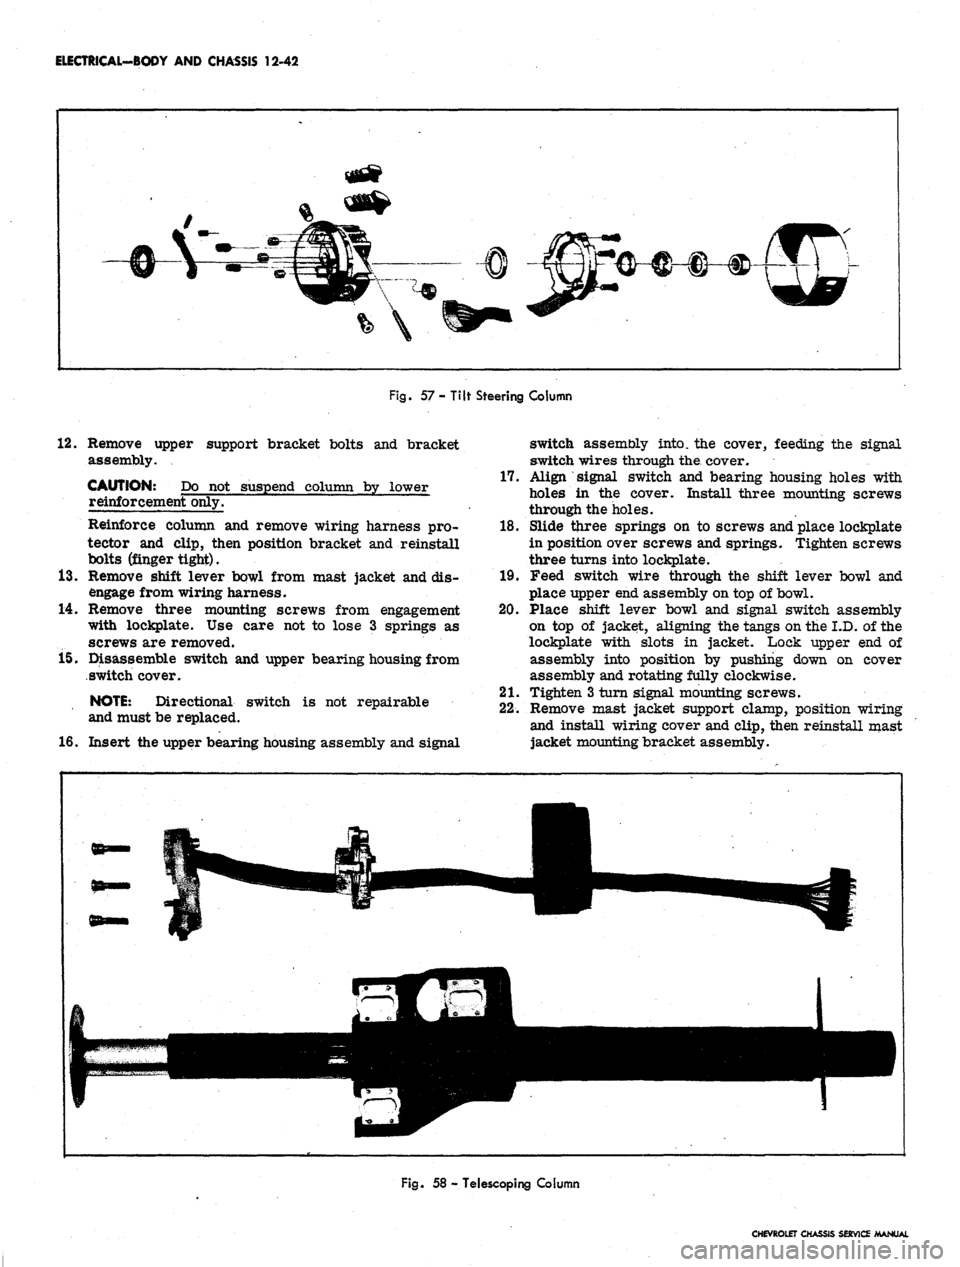
Fig.
57 - Tilt Steering Column
12.
Remove upper support bracket bolts and bracket
assembly.
CAUTION: Do not suspend column by lower
reinforcement only.
Reinforce column and remove wiring harness pro-
tector and clip, then position bracket and reinstall
bolts (finger tight).
13.
Remove shift lever bowl from mast jacket and dis-
engage from wiring harness.
14.
Remove three mounting screws from engagement
with lockplate. Use care not to lose 3 springs as
screws are removed.
15.
Disassemble switch and upper bearing housing from
switch cover.
NOTE:
Directional switch is not repairable
and must be replaced.
16.
Insert the upper bearing housing assembly and signal
switch assembly into, the cover, feeding the signal
switch wires through the. cover.
17.
Align signal switch and bearing housing holes with
holes in the cover. Install three mounting screws
through the holes.
18.
Slide three springs on to screws and place lockplate
in position over screws and springs. Tighten screws
three turns into lockplate.
19.
Feed switch wire through the shift lever bowl and
place upper end assembly on top of bowl.
20.
Place shift lever bowl and signal switch assembly
on top of jacket, aligning the tangs on the I.D. of the
lockplate with slots in jacket. Lock upper end of
assembly into position by pushing down on cover
assembly and rotating fully clockwise.
21.
Tighten 3 turn signal mounting screws.
22.
Remove mast jacket support clamp, position wiring
and install wiring cover and clip, then reinstall mast
jacket mounting bracket assembly.
Fig.
58 - Telescoping Column
CHEVROLET CHASSIS SERVICE MANUAL
Page 555 of 659
ELECTRICAL-BODY AND CHASSIS 12-43
23.
Install
MCtT
ring over steering shaft using snap ring
installer J-22659 (refer to Section 9).
NOTE: Be sure retaining ring is completely
seated into groove.
24.
Install dial pointer on Chevrolet and Chevelle models
equipped with automatic transmission (if applicable).
25.
Install dial indicator and lamp assembly on Camaro
and Chevy n models equipped with automatic
transmission.
26.
Install mast jacket lower trim covers (if applicable).
27.
Install hazard warning knob and turn signal lever.
28.
Install shift lever.
29.
Install steering wheel.
30.
Install multiple connector to switch wiring using old
harness for wire color guide and connect to body
harness connector.
31.
Connect battery ground cable and check operation of
assembly.
Tilt Steering Column (Fig. 57)
Chevrolet, Chevelle and Camaro
1.
Disconnect battery ground cable.
2.
Disconnect directional switch wiring harness from
body harness at multiple connector under instrument
panel.
3.
Remove steering wheel assembly (refer to Steering,
Section 9).
4.
Remove preload spring and cancelling cam from end
of shaft.
5.
Remove shift lever pin and lever from steering col-
umn (except floor shift).
6. Remove directional le*ver screw and lever.
7.
Push in hazard warning knob and unscrew knob.
8. On Camaro models equipped with automatic trans-
mission, remove quadrant dial and lamp assembly
from column.
9. Remove mast jacket trim cover
(s).
10.
On Chevrolet and Chevelle models with automatic
transmission, loosen set screw and remove quadrant
dial pointer.
11.
Assemble slide hammer Tool J-6585-1 to turn signal
cover remover Tool J-21486. Place cover remover
over turn signal cover, tighten clamp, and pull cover
from end of column with slide hammer (Refer to
Steering, Section 9).
12.
Remove three switch mounting screws, noting short
length of top screw.
13.
Cut multiple connector from switch wiring and slide
switch from end of column.
14.
To install new switch, feed wiring through the bear-
ing housing, around support, and through shift bowl
and shroud.
15.
Feed through wiring protector. If clearance is not
sufficient loosen mast jacket bracket retaining bolts.
16.
Insert switch wiring terminals in multiple connector.
Use old connector
and
wiring for color guide.
17.
Position switch and install three mounting screws
with short screw in top position.
18.
Be sure hazard warning switch is pushed in, then
install turn signal cover using special Tool J-21853.
On automatic columns align key in cover with keyway
in bearing housing.
19.
Install turn signal lever, hazard warning knob and
tilt lever.
20.
Install shift lever and roll pin (where applicable).
21.
Install dial pointer on Chevrolet and Chevelle. On
Camaro install dial indicator and lamp assembly.
22.
Install trim covers and retaining screws.
23.
Install cancelling cam and preload spring.
24.
Install steering wheel (Refer to Section 9).
25.
Connect switch wiring to body harness under instru-
ment panel.
26.
Connect battery ground cable and check operation of
unit.
Standard and Telescoping Steering Column
Corvette (Fig. 58)
1.
Disconnect battery ground cable.
2.
Disconnect signal switch harness wiring from chas-
sis wiring harness at multiple connector under in-
strument panel.
3.
Remove steering wheel assembly as outlined in
Steering, Section 9.
4.
Remove preload spring and cancelling cam.
5.
Remove directional signal lever screw and lever.
6. Push in hazard warning knob, unscrew and remove
knob.
7.
Remove lower trim cover retaining screws and
cover.
8. Remove retaining ring, thrust and wave washers
from upper end of shaft.
9. Cut wiring above connector.
10.
Remove three switch mounting screws, slide switch,
cover and upper bearing housing from column, pull-
ing wire through protector and escutcheon.
11.
To install replacement switch, assemble upper bear-
ing housing and turn signal switch into switch cover,
then feed wiring through escutcheon and protector
until switch can be positioned on mast jacket.
12.
With switch positioned on mast jacket, install three
switch mounting screws.
13.
Install thrust and wave washers and snap lock ring
in place.
14.
Install turn signal lever and hazard warning knob.
15.
Install cancelling cam and upper bearing preload
spring on steering shaft.
16.
Install steering wheel assembly.
NOTE:
Be sure directional signal switch is in
neutral position before installing wheel.
17.
Install connector on directional signal wiring har-
ness and connect to body harness connector.
CHEVROLET CHASSIS SERVICE
Page 556 of 659
ELECTRICAL-BODY AND CHASSIS 12-44
WINDSHIELD WIPERS AND WASHERS
INDEX
Page
Wiper Transmission Assembly 12-44
Removal and Installation 12-44
Wiper Motor Assembly . 12-45
Removal and Installation . 12-45
Non-Depressed Park Wiper 12-46
Wiper Motor Assembly 12-47
Disassembly ....... 12-47
Inspection *...... 12-48
Assembly .. . .. . 12-48
Washer Pump Unit , 12-48
Removal and Installation 12-49
Disassembly and Assembly 12-49
Depressed Park 2-Speed Wiper - Chevrolet 12-49
Motor Section 12-51
WIPER TRANSMISSION ASSEMBLY
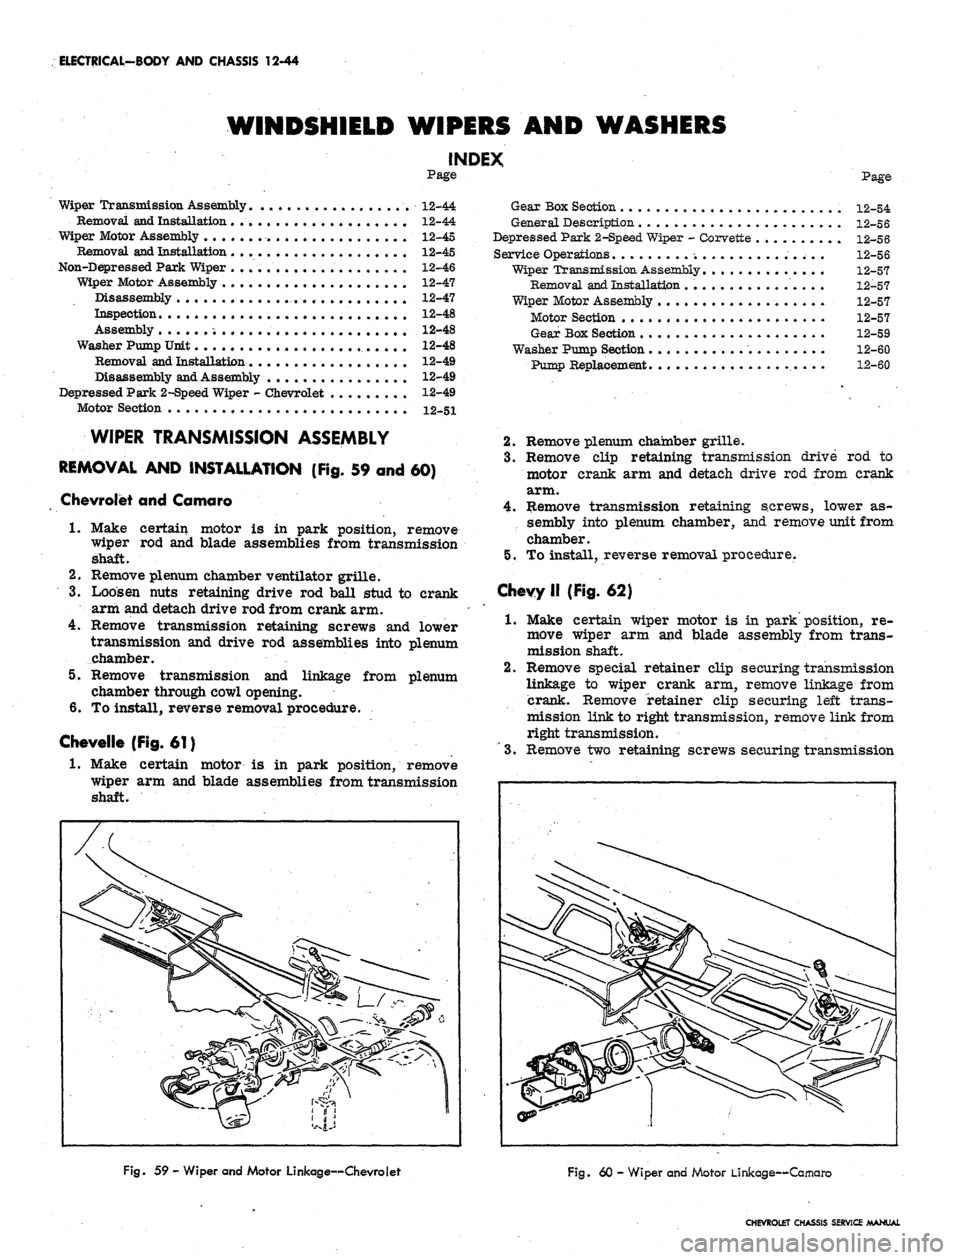
REMOVAL AND INSTALLATION (Fig. 59 and 60)
Chevrolet and Camaro
1.
Make certain motor is in park position, remove
wiper rod and blade assemblies from transmission
shaft.
2.
Remove plenum chamber ventilator grille.
3.
Loosen nuts retaining drive rod ball stud to crank
arm and detach drive rod from crank arm.
4.
Remove transmission retaining screws and lower
transmission and drive rod assemblies into plenum
chamber.
5. Remove transmission and linkage from plenum
chamber through cowl opening.
6. To install, reverse removal procedure.
Chevelle (Fig. 61)
1.
Make certain motor is in park position, remove
wiper arm and blade assemblies from transmission
shaft.
Gear Box Section . . 12-54
General Description. . . . , 12-56
Depressed Park 2-Speed Wiper - Corvette . 12-56
Service Operations
Wiper Trans-mission Assembly,
Removal and Installation . . ,
Wiper Motor Assembly ......
Motor Section .........
Gear Box Section
Washer Pump Section......
Pump Replacement ......
12-56
12-57
12-57
12-57
12-57
12-59
12-60
12-60
2.
Remove plenum chamber grille.
3.
Remove clip retaining transmission drive rod to
motor crank arm and detach drive rod from crank
arm.
4.
Remove transmission retaining screws, lower as-
sembly into plenum chamber, and remove unit from
chamber.
5. To install, reverse removal procedure.
Chevy II (Fig. 62)
1.
Make certain wiper motor is in park position, re-
move wiper arm and blade assembly from trans-
mission shaft.
2.
Remove special retainer clip securing transmission
linkage to wiper crank arm, remove linkage from
crank. Remove retainer clip securing left trans-
mission link to right transmission, remove link from
right transmission.
"
3. Remove two retaining screws securing transmission
Fig. 59 - Wiper and Motor Linkage—Chevrolet
Fig. 60 - Wiper and Motor Linkage—Camaro
CHEVROLET CHASSIS SERVICE MANUAL
Page 557 of 659
ELECTRICAL-BODY AND CHASSIS 12-45
Fig.
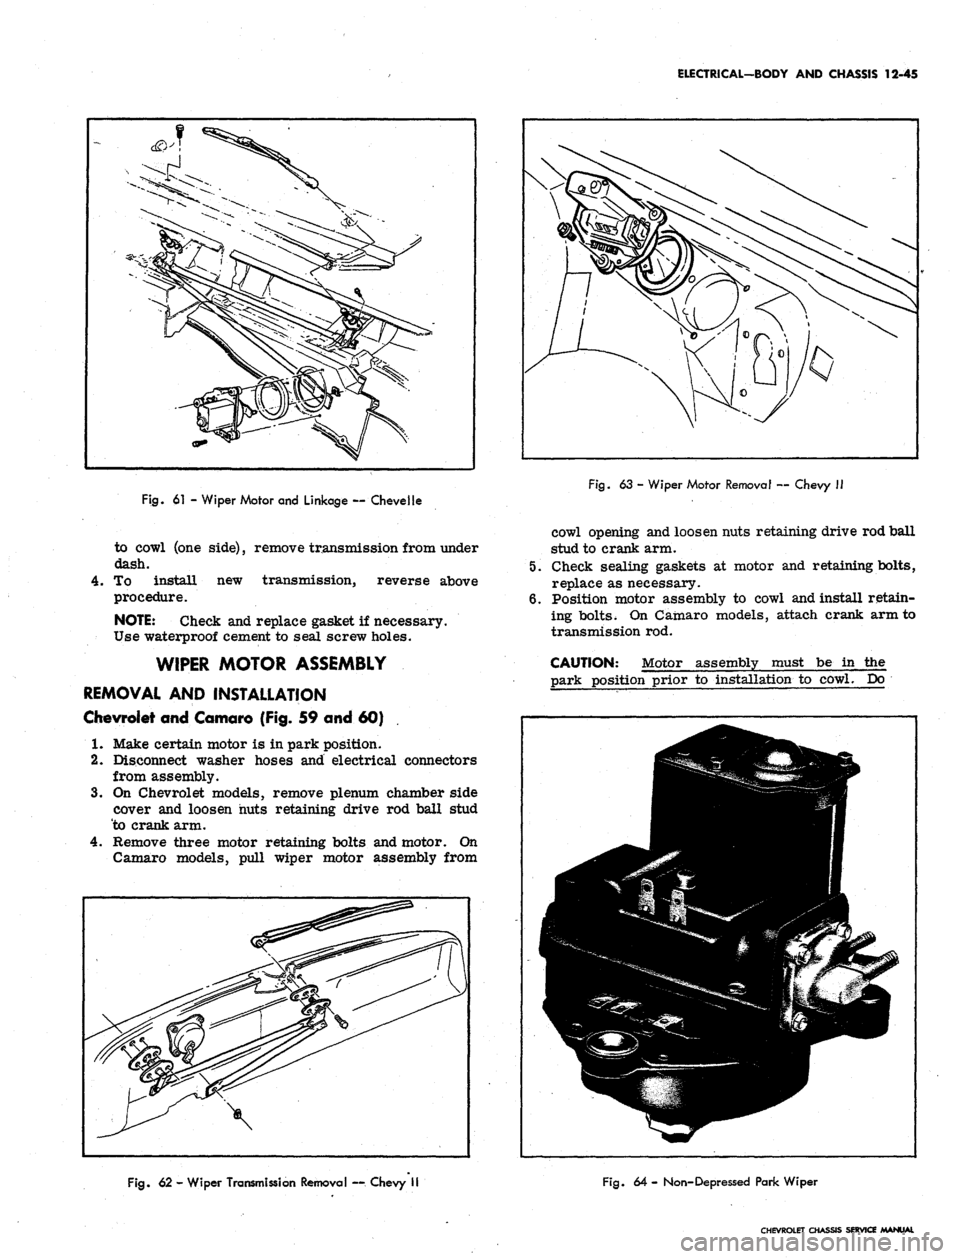
61 - Wiper Motor and Linkage — Chevelle
to cowl (one side), remove transmission from under
dash.
4.
To install new transmission, reverse above
procedure.
NOTE:
Check and replace gasket if necessary.
Use waterproof cement to seal screw holes.
WIPER MOTOR ASSEMBLY
REMOVAL AND INSTALLATION
Chevrolet and Comoro (Fig. 59 and 60) .
1.
Make certain motor is in park position.
2.
Disconnect washer hoses and electrical connectors
from assembly.
3.
On Chevrolet models, remove plenum chamber side
cover and loosen huts retaining drive rod ball stud
to crank arm.
4.
Remove three motor retaining bolts and motor. On
Camaro models, pull wiper motor assembly from
Fig.
63 - Wiper Motor Removal — Chevy II
cowl opening and loosen nuts retaining drive rod ball
stud to crank arm.
5. Check sealing gaskets at motor and retaining bolts,
replace as necessary.
6. Position motor assembly to cowl and install retain-
ing bolts. On Camaro models, attach crank arm to
transmission rod.
CAUTION: Motor assembly must be in the
park position prior to installation to cowl. Do
Fig.
62 - Wiper Transmission Removal --. Chevy II
Fig.
64 - Non-Depressed Park Wiper
CHEVROLET CHASSIS SERVICE MANUAL
Page 558 of 659
ELECTRICAL-BODY AND CHASSIS 12-46
Fig.
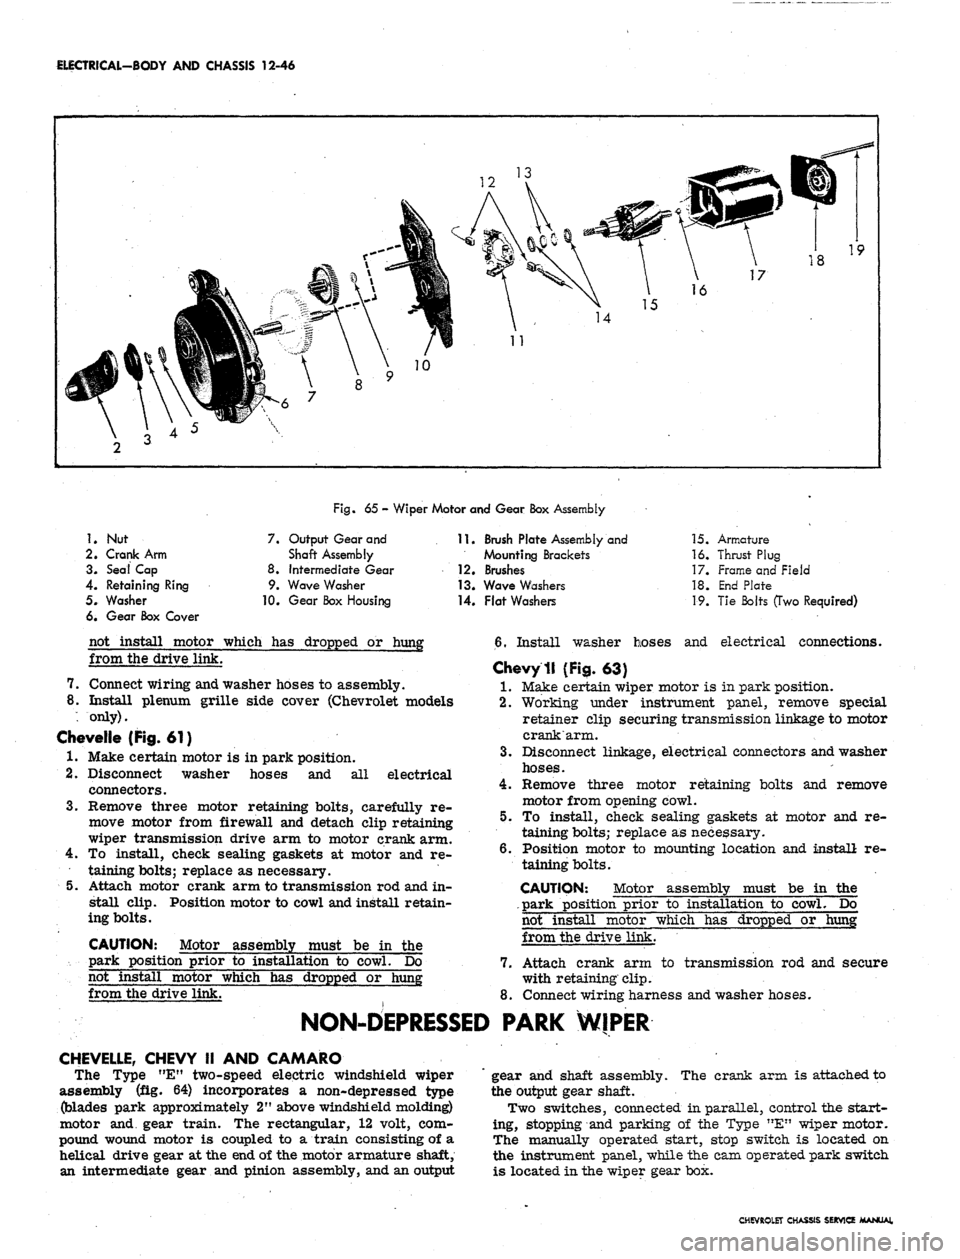
65 - Wiper Motor and Gear Box Assembly
1.
2.
3.
4.
5.
6.
Nut
Crank Arm
Seal Cap
Retaining Ring
Washer
Gear Box Cover
7.
8.
9.
Output Gear and
Shaft Assembly
Intermediate Gear
Wave Washer
10.
Gear Box Housing
11.
Brush Plate Assembly and
Mounting Brackets
12.
Brushes
13.
Wave Washers
14.
Flat Washers
15.
Armature
16.
Thrust Plug
17.
Frame and Field
18.
End Plate
19.
Tie Bolts (Two Required)
not install motor which has dropped or hung
from the drive link.
7.
Connect wiring and washer hoses to assembly.
8. Install plenum grille side cover (Chevrolet models
. only).
CheveKe (Fig, 61)
1.
Make certain motor is in park position.
2.
Disconnect washer hoses and all electrical
connectors.
3.
Remove three motor retaining bolts, carefully re-
move motor from firewall and detach clip retaining
wiper transmission drive arm to motor crank arm.
4.
To install, check sealing gaskets at motor and re-
taining bolts; replace as necessary.
5.
Attach motor crank arm to transmission rod and in-
stall clip. Position motor to cowl and install retain-
ing bolts.
CAUTION: Motor assembly must be in the
park position prior to installation to cowl. Do
not install motor which has dropped or hung
from the drive link.
6. Install washer hoses and electrical connections.
Chevy
II (Fig. 63)
1.
Make certain wiper motor is in park position.
2.
Working under instrument panel, remove special
retainer clip securing transmission linkage to motor
crank arm.
3.
Disconnect linkage, electrical connectors and washer
hoses.
4.
Remove three motor retaining bolts and remove
motor from opening cowl.
5.
To install, check sealing gaskets at motor and re-
taining bolts; replace as necessary.
6. Position motor to mounting location and install re-
taining bolts.
CAUTION: Motor assembly must be in the
.park position prior to installation to cowl. Do
not install motor which has dropped or hung
from the drive link.
7.
Attach crank arm to transmission rod and secure
with retaining clip.
8. Connect wiring harness and washer hoses.
NON-DEPRESSED PARK WIPER
CHEVELLE, CHEVY II AND CAMARO
The Type "E" two-speed electric windshield wiper
assembly (fig. 64) incorporates a non-depressed type
(blades park approximately 2" above windshield molding)
motor and gear train. The rectangular, 12 volt, com-
pound wound motor is coupled to a train consisting of a
helical drive gear at the end of the motor armature shaft,
an intermediate gear and pinion assembly, and an output
gear and shaft assembly. The crank arm is attached to
the output gear shaft.
Two switches, connected in parallel, control the start-
ing, stopping and parking of the Type "E" wiper motor.
The manually operated start, stop switch is located on
the instrument panel, while the cam operated park switch
is located in the wiper gear box.
CHEVROLET CHASSIS SEKV1CE MANUAL
Page 559 of 659
ELECTRICAL-BODY AND CHASSIS 12-47
1
1
Fig.
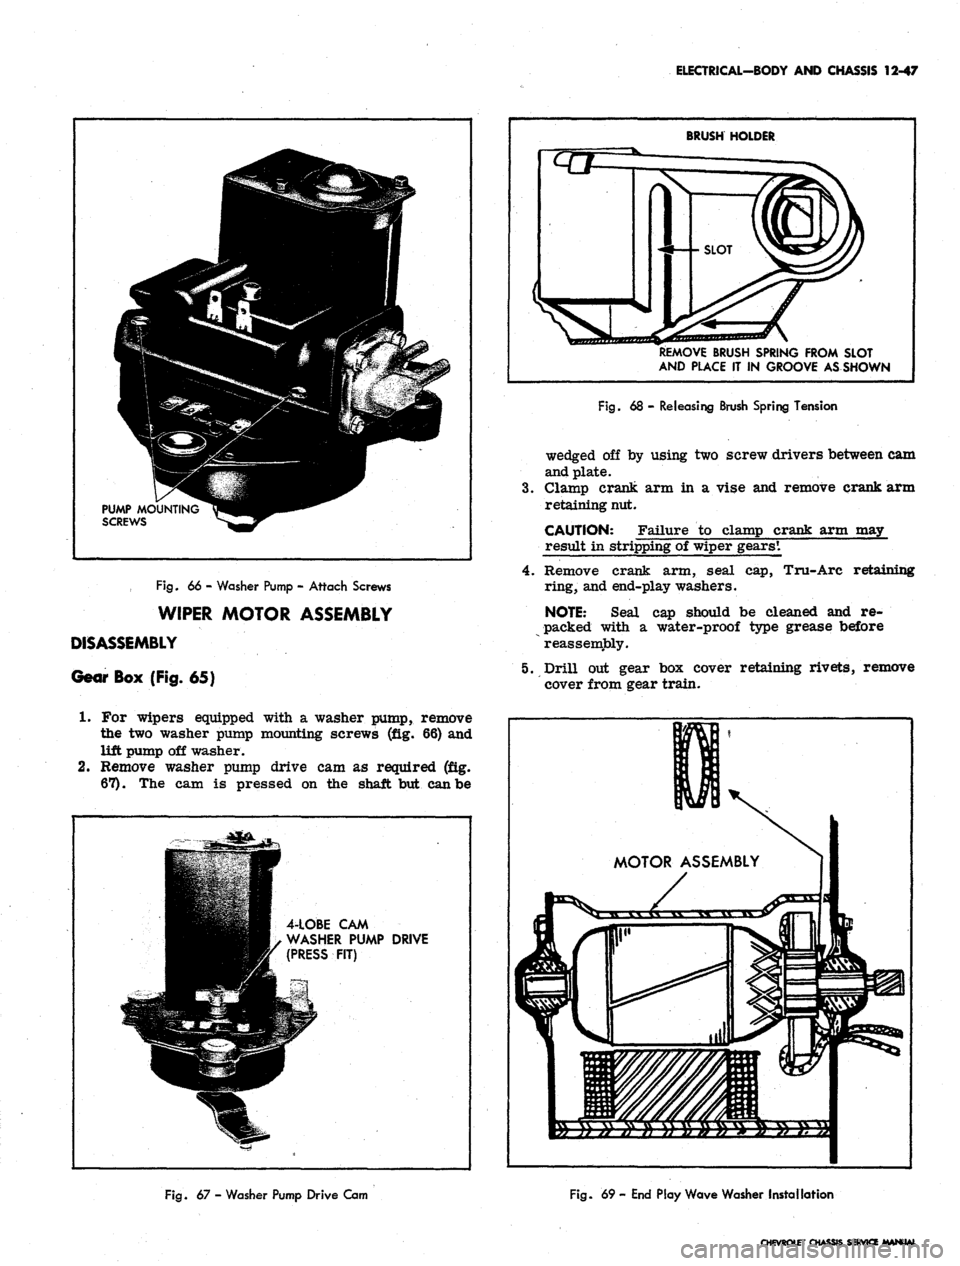
66 - Washer Pump - Attach Screws
WIPER MOTOR ASSEMBLY
DISASSEMBLY
Gear Box (Fig. 65}
1.
For wipers equipped with a washer pump, remove
the two washer pump mounting screws (fig. 66) and
lift pump off washer.
2.
Remove washer pump drive cam as required (fig.
67).
The cam is pressed on the shaft but can be
4-LOBE CAM
WASHER PUMP DRIVE
(PRESS FIT)
BRUSH HOLDER
REMOVE BRUSH SPRING FROM SLOT
AND PUCE IT IN GROOVE ASSHOWN
Fig.
68 - Releasing Brush Spring Tension
wedged off by using two screw drivers between cam
and plate.
3.
Clamp crank arm in a vise and remove crank arm
retaining nut.
CAUTION: Failure to clamp crank arm may
result in stripping of wiper gears*.
4.
Remove crank arm, seal cap, Tru-Arc retaining
ring, and end-play washers.
NOTE:
Seal cap should be cleaned and re-
packed with a water-proof type grease before
reassembly.
5. Drill out gear box cover retaining rivets, remove
cover from gear train.
Fig.
67 - Washer Pump Drive Cam
Fig.
69- End Play Wave Washer Installation
CHEVROLET CHASSIS SERVICE MANUAL
Page 560 of 659
ELECTRICAL-BODY
AND CHASSIS 12-48
NOTE:
Screws, nuts and lock washers for re-
assembling cover to wiper are contained in a
service repair package.
6. Remove output gear and shaft assembly, then slide
,
intermediate gear and pinion assembly off shaft.
7. If necessary, remove terminal board and park switch
assembly as follows:
a. Unsolder motor leads from terminals. Coding of
motor leads is not necessary on single-speed
wipers.
b.
Drill out rivets securing terminal board and park
switch ground strap to mounting plate.
NOTE:
Screws, nuts and washers for attaching
a replacement terminal board-park switch as-
sembly are included with the replacement
assembly.
Motor
(Fig. 65)
1.
Follow Steps 1 through 7b under gear box
disassembly.
2.
Remove, motor through bolts, tap motor frame
lightly, and remove motor from mounting plate.
3.
Remove brush spring tension (fig. 68), slide arma-
ture and end plate from motor frame. Pull end
plate from armature.
NOTE:
Thrust plug located between armature
shaft and end plate.
4.
Remove end play adjusting washers from armature,
noting arrangement for proper reinstallation.
INSPECTION
Check and inspect all parts for serviceability, replace
as necessary. All parts can be replaced individually
except motor frame and field, which is serviced as an
assembly. Service kits also provide screws, nuts and
washers to replace gear cpver and terminal board rivets.
ASSEMBLY
Refer to Figure 65 for exploded view of motor and gear
train.
Motor
Reassemble motor using reverse of disassembly
procedures.
NOTE:
Armature end play is controlled by end
play washers. See Figure 69 for proper assem-
bly of end play washers. Lubricate armature
shaft bushings with light machine oil.
Gear Box
1.
Assemble gear box using reverse of disassembly
procedure.
NOTE:
Lubricate gear teeth with Delco Cam
and Ball Bearing lubricant or equivalent. Be
sure cover is properly located over dowel pins
and be sure to reinstall ground strap.
2.
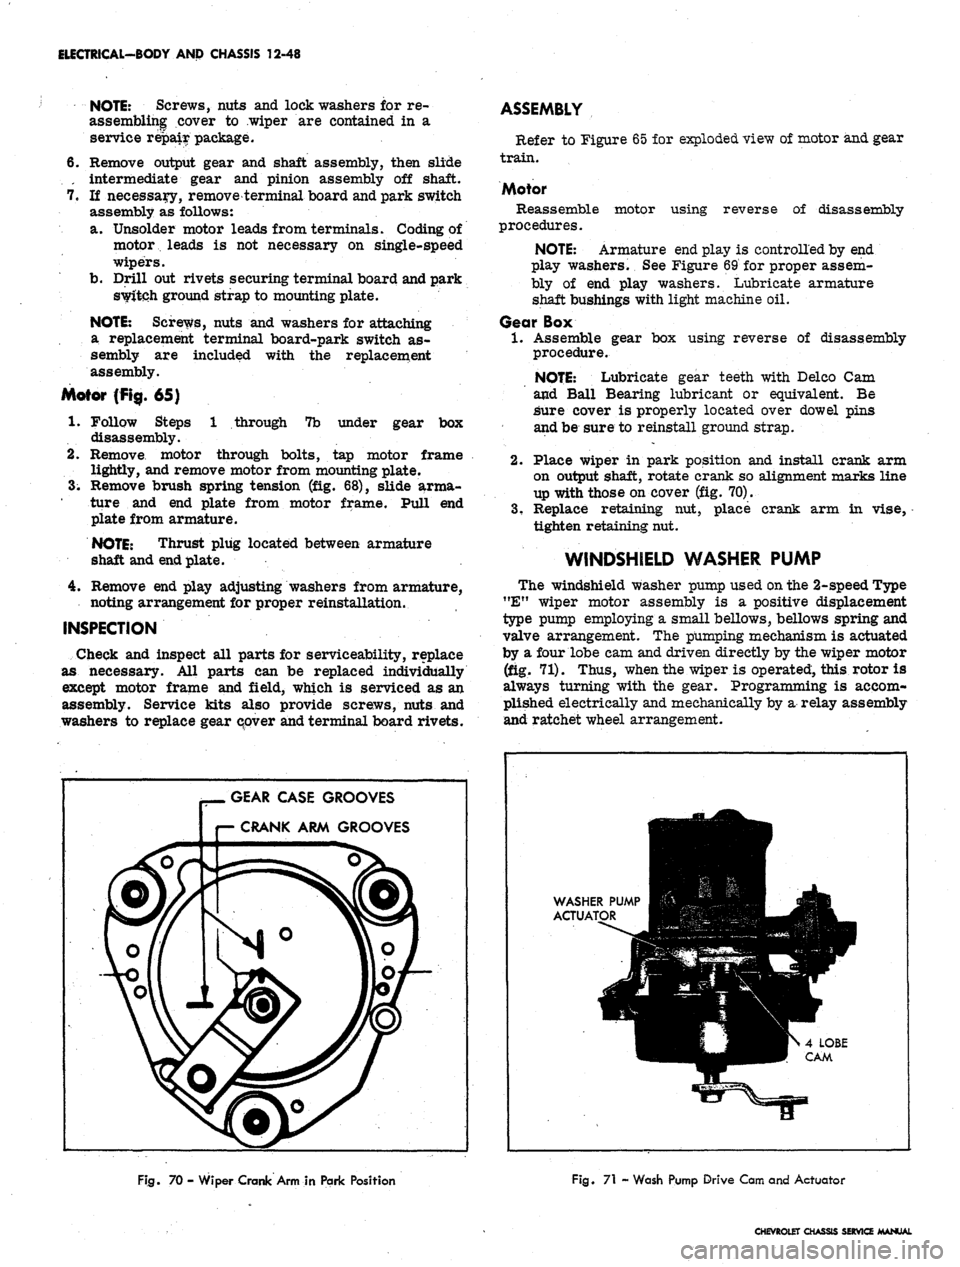
Place wiper in park position and install crank arm
on output shaft, rotate crank so alignment marks line
up with those on cover (fig. 70).
3.
Replace retaining nut, place crank arm in vise,
tighten retaining nut.
WINDSHIELD
WASHER PUMP
The windshield washer pump used on the 2-speed Type
"E"
wiper motor assembly is a positive displacement
type pump employing a small bellows, bellows spring and
valve arrangement. The pumping mechanism is actuated
by a four lobe cam and driven directly by the wiper motor
(fig. 71). Thus, when the wiper is operated, this rotor is
always turning with the gear. Programming is accom-
plished electrically and mechanically by a relay assembly
and ratchet wheel arrangement.
GEAR
CASE GROOVES
r— CRANK ARM GROOVES
WASHER PUMP
Ha
ACTUATOR
IB
•
^^HTS4LOBE
•MMBW
CAM
Fig.
70 - Wiper Crank Arm in Park Position
Fig.
71 - Wash Pump Drive Cam and Actuator
CHEVROLET
CHASSIS SERVICE MANUAL