CHEVROLET CITATION 1980 1.G Owner's Manual
Manufacturer: CHEVROLET, Model Year: 1980, Model line: CITATION, Model: CHEVROLET CITATION 1980 1.GPages: 95, PDF Size: 21.48 MB
Page 21 of 95
Downloaded from www.Manualslib.com manuals search engine Tires
If you plan to use your vehicle in countries where speeds over 75 mph (120 kmlh) are allowed. see Item 3 on page 5-12.
IMPORTANT FACTS YOU SHOULD KNOW ABOUT FUEL
ECONOMY AND HOW TO IMPROVE IT
How you drive . where you drive and when you drive an affect how many
mileslkilometers you can get from a gallon/liter of fuel. The careful attention you give your vehicle as far as maintenance and repairs 'are concerned 'will also help fuel economy. .
Fuel Selection
Use only unle8;ded gasoline meeting the octane ratings given under "Fuel Requirements" in "Starting and Operating," Section 2 of this manual. Unleaded
gasoline must be used for the, emission control system to operate properly. Its use will also reduce spark plug fouling , exhaust system corrosio n and engine oil
deterioration . Using leaded gasoline can damage the emission control system and could result in IO$S of emission warranty coverage.
"Jackrabbit" Starts
You can save fuel (and prolong engine and tire life) by avoiding fast starts away
from lights and stop Signs. . '
Stop-And·Start Driving
Frequent stops and starts while driving cut down on your miJesper gaUon
(kilometers per liter). Plan even your short shopping trips to take advantage of
through streets to avoid traffic lights. Pace your driving like the expert drivers
to avoid unneeded stops _and braking.
Sudden Stops
Sudden stops can also waste fuel; instead of moving the vehicle , the energy of fuel
is wasted as, heal in braking. Ene'rg'y in the form of fuel is also needed to accelerate
back to driving speed~
Excessive Idling
An idling engine uses fuel, too. If you're faced with more than a minute wait, and
you're not i,n traffic, it may be better to tum, off the engine and start again later.
Lubricants
A well~lubricated vehicle means less friction between moving parts. See the
Maintenan ce Schedule folder for
the_ proper lubrication intervals.
Air Cleane.r
Your vehicle receives its power from a mixture of gasoline and air. The air enters
the engine through the air cleaner. A-dirty air cleaner element lessens engine
performance and can waste
fuel. So, it's important to -replace the air cleaner
element (filter) at required intervals. (See the Maintenance Schedule -folder.)
2-4
Page 22 of 95
Downloaded from www.Manualslib.com manuals search engine Air Conditioner
If your vehicle has an optional air cOnditioner , use the "Economy;' (" Vent" or
"Heater") position s whenever possible, The air conditioner compr essor is not on in these positions and the reduced engine load can improve fuel eco nomy.
Engine Maintenance
An engine that is properly maintained wjJl provide better fuel economy than .one
thai is not . One misfirin g spa rk plu g will cut fuel economy quite a bit , and will
make a difference in the amount of pollution _emitted fro m your vehicle .
Excess Weight
Fuel economy is related to the work the engine must do. The heavier the load,
the more fuel
it takes to run your vehicle. Keep weight to a minimum by taking o~t any luggage or cargo when it is not needed. .
Tire Inflation
Underinflation not only causes needLess wear of the tires, but can also waste fuel. It's a good idea to check tire pressures often and, for the best fuel econ omy, keep
your tires inflated to the highest
pr~suresshown on the Tire Placard on'the left
front doo r of your car.
Wheel Alignment
Improper toe alignment will cause the tires to roll at an angle, which will result
in faster tire wear.
It takes power to ove rcome this improper alignment which,
in tum, wastes fuel.
STEERING COLUMN CONTROLS
ANTI-THEFT STEERING COLUMN LOCK
The anti-theft lock (ignition) on the right side of the steering column has five
positi on
s:
TO REMOVE KEY, DEPRESS KEY \&!;;>. RELEASE LEVER
-~ I
~~~ --WHILE TURNING KEY TO LOCK POSITION
.. ~'-KEY RELEASE "..~ LEVER
• Accessory -You ca n use some elec trical a ccessories when the e ngin e is not
running.
To engage this position, push in the square-head key and tum the
top of the key towards you.
• Lock -Norm al parking position. It 'locks the ignition and prev en ts normal
use
of the steering wheel on all models, and the shift controls on automatic
transaxl e model
s. The ignition key canno t be turned to "Lock" and removed
until the shift lever is mo ved to "P "( Park) on automatic transaxle mode1s .
If you have a manual transaxle model, the ignition key cannot be turned to
"Lock" without pressing down the key release leve r.
2-5
Page 23 of 95
Downloaded from www.Manualslib.com manuals search engine • Off· You can turn off the engine without loc king the steering ,wheel and shirt control s o'n aut omatic tranSaxle models. or steering -wh eel only on
mariual transaxle models.
• Run· Normal operating position.
• Start -Cranks the engine:
If you have trouble turning the key to unlock the ignition. first be sure the key
i s pushed in all the way. Then try to turn the ste ering wheel as hard as you can
in the _di rec tion the Wheels are turned. At th e same time, turn the ignition key
with
as mu ch effort as you can apply with your ha nd. Do not try to use a tool
of any kind to
a_pply more force on 'the lock knob. as this could bre ak the kn.ob.
CAUTION: .on manual tranS8xle cars. if you need to turn off the engina while the car is moving. turn the key onlv to ".off." DO NOT press down on the key release lever while turning the ignition off. This will result in locking the steering wheel and If'S8 of steering control.
NOTICE: Do_.oot drive through . idle or park your vehicle over combustible materials. such as grass or lC!'aves. They could touch the hot exhaust system and Ignite.
Parking
When leaving your car unatte nded :
• Firml y appl y the park ing brake. Do n o t use th e tran saxle a 's a substitut e for (he parking brake.
• Mov e the automatic transaxle shift lever to "P"(Park) ("Rever se" for man ual
tran saxle ).
• 'Turn the key to "Lock ," On manualtransaxle cars, press,down the key release
lever a
nd turn the key to "Lock. "
•
Close all windows.
• Remove the key (the buzzer is designed to remind you).
• Lock ,,'n doors.
TURN SIGNAL AND MULTI-FUNCTION LEVER
The I urn signa l-lever on th e left side of the ste erin g column also co ntr ols headlight
l ow -beam
or high·beam. and the windshield wiper/washer .
• Turn Signal -Move the lever up to t he second stop to signal a right tum.
Move it do wn 10 the seco nd stop to sig nal a left turn . When the turn is
compleled, the signal will cancel and the lever will return to' h o rizont al.
• Lane Change Signal. In some turns. such as ch an ging lanes, the steering wheel is not turned far enou gh 10 ca nce l th e turn signal. Fo r convenience.
you
can flash Ihe turn signal by moving the lever part way (to t-he first stop) and h olding it there. The lever will re turn to horizo ntal when 'You release it.
Tw o green lights_ o n the instrum ent panel are des igned to nas h 10 tell you that
th e front and rear turn
sign al light s are working. If the light stays on, but does
not flash, check for bur ned- out turn signal bulbs. If Ihe green light does not com e
all when yo u m ove the leve r. c _h ec k the fuse and indicator . bulb. However, iryou
ordered a ,tra iler towing optio n in which extra wiring waS added to attach the
trailer lighting, a different type
of flasher was installed . In this case , the gree n light will co ntinu e 10 flas h even if a turn sig nal bulb burns out. Therefore, you must
regularly look at the front and
rear turn signal light s 10 be sure they are working.
2-6
Page 24 of 95
Downloaded from www.Manualslib.com manuals search engine TURN SIGNAL
• MOVE
UPWARD -R.H. TURN
• MOVE DOWNWARD -L.H. TURN
ANE CHANGE
• MOVE UPWARD TO 1ST STOP·CHANGE
FROM LEFT TO RIGHT LANE
• MOVE DOWNWARD TO 1 ST STOP-CHANGE
FROM RIGHT TO LEFT LANE
• Headlight Baam Changer -With the headlights on, pull the lever toward you until you hear a click" then release· it. The lights will change from
low-beam to high-beam
or from high-beam to. low-heam. When the high-beams are on, a blue light will appear on the instrument panel.
HEADLIGHT BEAM CHANGER
(HEADLIGHTS ON)
PULL LEVER
TOWARD YOU
•
Standard Windshield Wiper - The standard windshield wiper system
controls are on the end of the tum signal lever.
• For a single wiping cycle,' tum the top of the knob toward you~ Hold
it there until· the wipers begin wiping, then release it. The wipers will stop after one cycle. For several cycles, hold the knob in place as long
as needed.
• For steady wiping at low speed, tum the top of the knob away from you to the first stop. For high-speed wiping, turn the knob to the next stop.
Turn the knob back to "ofr' to turn off the wipers.
• Pulse Windshield Wiper -The optional pulse windshield wiper system
lets you vary the wiper speed from a 25-second delay between sweeps up to
the normal
low and high speeds of the standard wiper.
• The pulse wipers work the same as the standard wipers, except for the
delay feature. To use the wipers with a delay between sweeps, turn the
top of the turn signal knob away from you to the first stop. Then, turn
the "Wipe Delay" knob on the instrument panel to control the amount
of delay.
• Turn the "Wipe Delay" knob to the left to increase the amount of delay
between sweeps. Tum it fully to the right for steady wiping at low. speed.
• Windshield Washer -To spray washer fluid on the windshield, push in the end of the tum signal knob. (This will also turn on the low-speed wipers.)
The spray will continue as long as you hold
in the knob.
After using the windshield washer, turn the knob back to
"off" to turn ofT the
wipers.
With the pulse wiper system, the wipers
will automatically stop (or return to the
action for which they were set) after completing the wash cycle.
2-7
Page 25 of 95
![CHEVROLET CITATION 1980 1.G Owners Manual Downloaded from www.Manualslib.com manuals search engine SINGLE WIPE
LOW SPEED (PULSE WIPER)
HIGH
SPEED
• Check the washer fluid levelregu]arly. Do it often when the weather
is bad.
• U CHEVROLET CITATION 1980 1.G Owners Manual Downloaded from www.Manualslib.com manuals search engine SINGLE WIPE
LOW SPEED (PULSE WIPER)
HIGH
SPEED
• Check the washer fluid levelregu]arly. Do it often when the weather
is bad.
• U](/img/24/8083/w960_8083-24.png)
Downloaded from www.Manualslib.com manuals search engine SINGLE WIPE
LOW SPEED (PULSE WIPER)
HIGH
SPEED
• Check the washer fluid levelregu]arly. Do it often when the weather
is bad.
• Use a nuid such as OM Optikleen to help prevent freezing damage, and for better cleaning.
• Do not use radiator antifreeze in the 'windshield washer; ifcould cause
paint damage .
• In cold weather, warm the windshield with the defroster before using the washer-to help prevent Icing that my block
the driver's vision.
STARTING THE ENGINE
I.
2.
Apply the parking brake. . .
Automatic Trl!nsaxl..: Move the transaxle shift lever to "P"(Park) or "N" (Neutral) "P" Preferred). A starter safety device is
designed to keep the starter from operating if the shift lever is in any drive position. (If you need to fe-start the engine while the car is moving . move
the shift lever to "N.")
Manuel Transaxle· Press the clutch pedal to the floor and shift the transaxle to Neutral. Hold the clutch pedal to the floor while you are s tarting ,the engine. A starter safety device l,s d esigned to keep the starter
from operating if the clutch pedal is not fully depres sed.
3. Sta'rt the engine as outlined below for different conditions.
NOTICE: 00 not crenk the engil'. for more than 15 seconds at e time. Walt 10 to 15 seconds before trYiog agein.
• COLD ENGINE:
•
L·4 Engine Press the accelerator pedal to the floor and ·i slowly release It. With your foot off the pedal; crank the engine
by turning the ignition key to "Start ." Release the key when the engine
sta rts.
If the engine starts, but fails to run, repeat this procedure. •
• V-6 Engine: Press the accelerator pedal to the floor twice and slowly release it. With your foot off the pedal. crank the engine by turning the ignition key to 'Stan". Release key when engine
s tarts.
If the engine starts, but fails to run, repeat this procedure but press
the accelerat or pedal only
ONCE to the floor . :When the e ngine is
running smoothly (about 30 seconds), you_ can reduce the engine idle speecf by press ing down slightly on the accelerator pedal. then slowly
releasing it.
2-8
Page 26 of 95
Downloaded from www.Manualslib.com manuals search engine NOTICE: If the engine runs for a long time (5 minute. or more) without pressing down the accelerator pedal. overheeting cOuld calise damage to the engine end exhaust system.
Do not INve your car unattend4Mt with the engine running . If the engine shoukt overheat you would not be there to react to the temperature warning light or gage. This could r.sult in costly damage to your car and its contents.
• WARM ENGINE -Be ,sur e to follow the instructi ons which apply to your engine . (The Engine Code is 'th e 5th digit on the YIN plate at the lower left
sid e o f yo
ur windshield . (See "Specifications," Secti o n 7 for more details .)
• Engine Code 5 • Press down the accelerator pedal to 1/3 of
its travel and hold. Crank the engine by turnin g the igniti on ke y to "Star .. " Rel ease the key and accelerator pedal when the _ engine s tart s.
• Engine Code 7 . Do not press down the accelerator pedal.
With your foot off the pedal. crank th e engine by turning the
ignition key to ·'Start." If t he engine does no t start after 3 seconds ,o f
. c ranking, press'
down the accelerator pedal to 1/3 of its travel while
c ranking. Release the key ,(ap.d accelerator pedal) when the engine starts .
• Very Cold Weather (Below·' B OC or O °F Or After Car Has Been
Standing Idle Several Days) - Befor e crankin g th e en gine , fully depress
and release the acce le rat or pedal one or two times more than slated fo r your
engine under "Cold Engine" s ta rt ing . Then . with your foot off the accelerator pedal,-cra nk the engine -b y-turnin g the ig nit io n key to "St art ."
Rdease the key when the e ngin e s tarts.
4 . Appl y th e regular brakes and shift into the prop
er g~r. Release the parkin g
b ra k e a nd drive off.
," '. ."
If Engine Fails To Start
t. Fully depr ess and release the acce le rat or pedal severa l times~ then tak e your
foo t ofT th e peda _' and cra nk the e ngine by turnin g the key to ··St art."
2. If th e e ng in e still does not sta rt, press the accele ra to r peda l to the floo r an d
h old it ther e while cra nkin g the· e ng ine. -Thi s sh ould clear the eng in e i f it is
floode d.
3. If th e en gine has been floode d' with too much fuel , it m ay start to run but
n ot h ave enough power to keep running.
In that case, continue cranking with
th e accel erator pedal all th e way to the floor until t he e ngin e clears itsel f of
excess ' gaso line an d run s sm oo thly.
TRANSAXlE
CAUTION: Before going down ,e steep of'long grade . reduce speed and shift the transa.xle into a lower gear or lower g.ar range to control vehicle speed . (Do this with either 8n automatic or a manual ,transaxle).Try not to hold the brakcl pedal down too long or too often. This could,cause the brakes to get hO,t and not work as well.
Driving on Slippery Surfaces
Take ca re w he n speedin g up . or when shiftin g into a l ower gear, or lower gea r
r a n
ge w hile drivin g o n slippe ry surf aces. Sudde n acce le ra tio n or en gine bra kin g
a c tion (du e to shifting
to a lower gear) could -ca use the f ron t wheels to s kid .
N orm al
skid correction and cautio us :dr iving are call ed for at these times .
2·9
Page 27 of 95
Downloaded from www.Manualslib.com manuals search engine AUTOMATIC TRANSAXLES
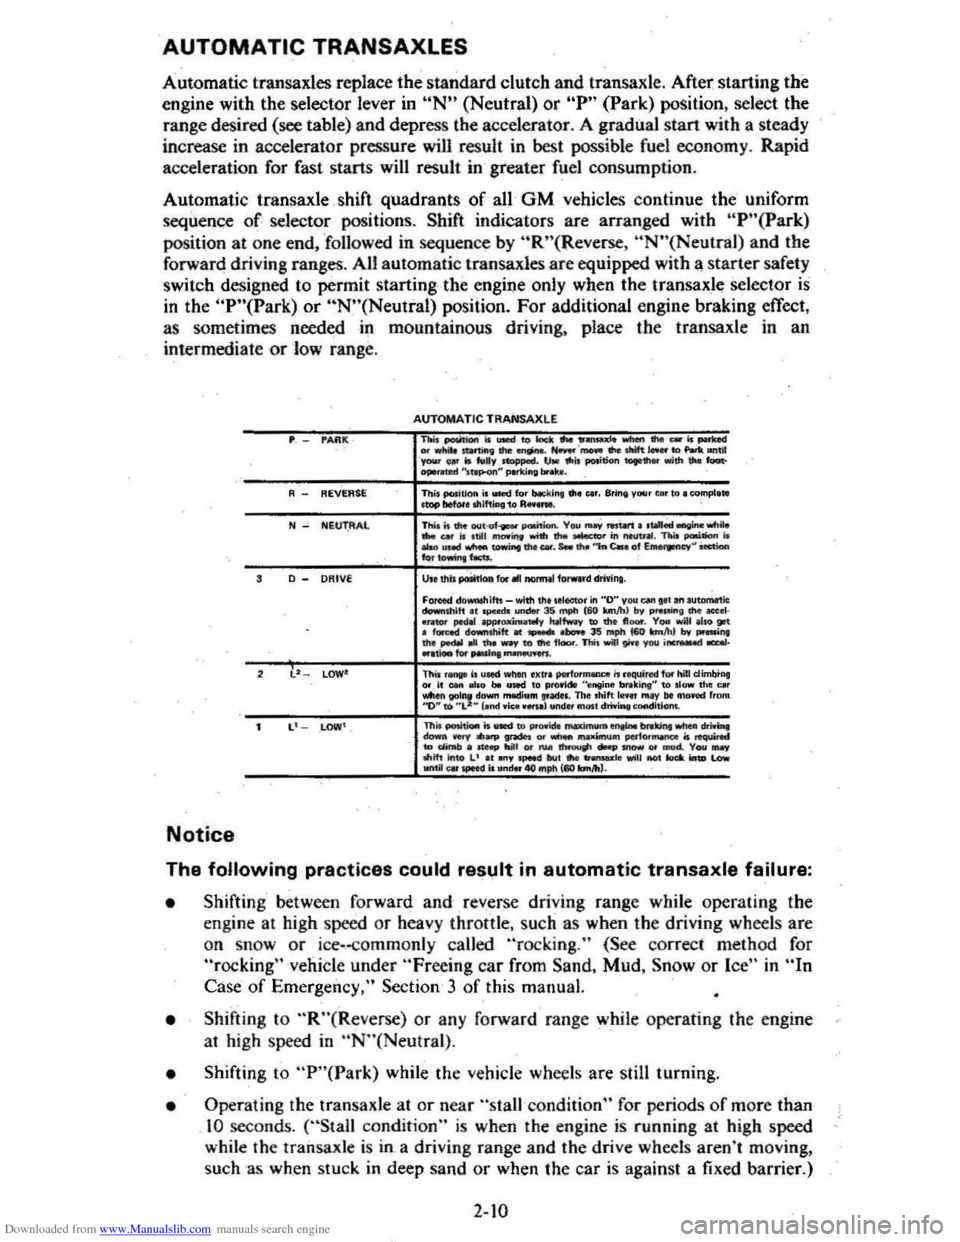
Automatic transaxles replace the standard clutch and transaxlc. After starting the
engine with the selector lever in
uN" (Neutral) or "P" (Park) position, select the
rang e desired (see table) and depress the accelerator. A gradual start with a steady
increase in accelerator pressure will resuh in best possible fuel economy. Rapid
acceleration for fast starts will result in greater fuel consumption.
Automatic transaxle
. shift quadrants of all· GM vehicles continue the' u nifo rm sequence of selector positions. Shift indicators are arranged with "P"(Park)
position at one end . "followed in sequen ce by "R"(Reverse . "N"(Neutral) and the
forward driving ranges. All automatic transaxles are equipped with a starter safety
s witch designed to permit
starting -the engine only when the transaxle selector is in the "P"(Park) or "N"(Neutral) posiiion. For additional engine braking effect,
as sometimes needed in mountainous driving, place the transaxle in an
intermediate
or low range.
"Afll(
REVf.AU
N NEUT.AAl
D _ DRIVE
l' lOW'
Notice
AUTOMATIC TRAHSA XlE TIoit PMitIotn Is ..... to> Iudc ... 11...-10 _ ... _ is ....-....... ~II'e..,.;.,a.'""'·_ ... tItif ...... "' ........ 1iI _ \@ Is .... v """""",. IJM Ito;, pooition .......... "';111 Oo to«-ope...ud "'hp<>n~ pMkiftll br .....
Th .. ,....ltIon i ...... for bocl\lft. III. Clr. Sring y .... r elf to. complnl mop bel .... mifting 1" 1'1,,"_ Thi.o;' die _"' __ paoi'I ..... V .... ..., .... W1 •.......... wItiIo .... "" 10 ,till _irlti ..... !he ....... in ",,",II. TN ...--. is _ uMCI_.--. .... _. s.. .... ',,",c.. "I E~~ Oect;oa ..... owW>e , ......
U .. thl . ~OII for III""nnai f{orwud driYinl. Foroecl do...w.ifto _ .. ith.1'>o III ........ in "D" you ....... ' ."au_ic ......... "'111 ... pcodo undw 35 mpIo (60 konlll) try P .... inl .... _01· ... 101' peOoI _-V Io.fI"...., to .... n_. V .... wiN aloo go! o fur-.cl "-shit! till .-IlooooI 3S .-ph 160 """"'. Iry ......... "",..... .... .....,. ....... ,'-.n.n ..... pyoui __ ,,"Iiooo ............ "'-'"". This ,_ I, u"" .. hili Ixtr. PtrfDfrnonce it roqui red lothill dimbin, .,.. I. _ 01'0 bo U"" '0 pro.l ... "'''IIio& mking" to .Iow tho Clr ~n.r.!rt~~;::: =~':.~::~. ~:~::.::"!=I=.~O_ frDIW
TIl. ~ is ........... 00i6t....,.;,-. ....... ""' ..... _ ....... ...... ...., ... _..-. ... _ --..... .... '.,.._ ir. __ "' ..... _ ....... ""' .............. ..-... .-d. Yow_ ""if! iftlO L' It....,"-" kI' .... -'e "'""..o! .... ionD ~ ___ ~ it """', "I) mph 1110 .... ", •.
The following practices could result in automatic transaxle failure:
• Shifting ' between forward and reverse driving range while operating the
engine at high speed or heav y throttle . such as when the driving wheels are
on
snOw or ice-
• Shifting to "R"(Reverse) or any forwa rd range while operating the engin e
al high speed in "N"(Neulral) .
• Shifting to "P"(Park) while the vehicle wheels are still turning.
• Oper ating the transaxle at or near "stall condition" for periods of more than 10 seconds. ("Stall condition" is when the engine is runnin g at high speed
while the
trailsaxle is in a driving range and the drive wheels aren't moving,
such
as when stuck in deep sand or when the car is against a fixed barrier.)
2-10
Page 28 of 95
Downloaded from www.Manualslib.com manuals search engine • Holding. vehicle on an upgrade with the accelerator pedal. (Use the regular
brakes to hold car on an uphill grade.)
Column Shift Lever
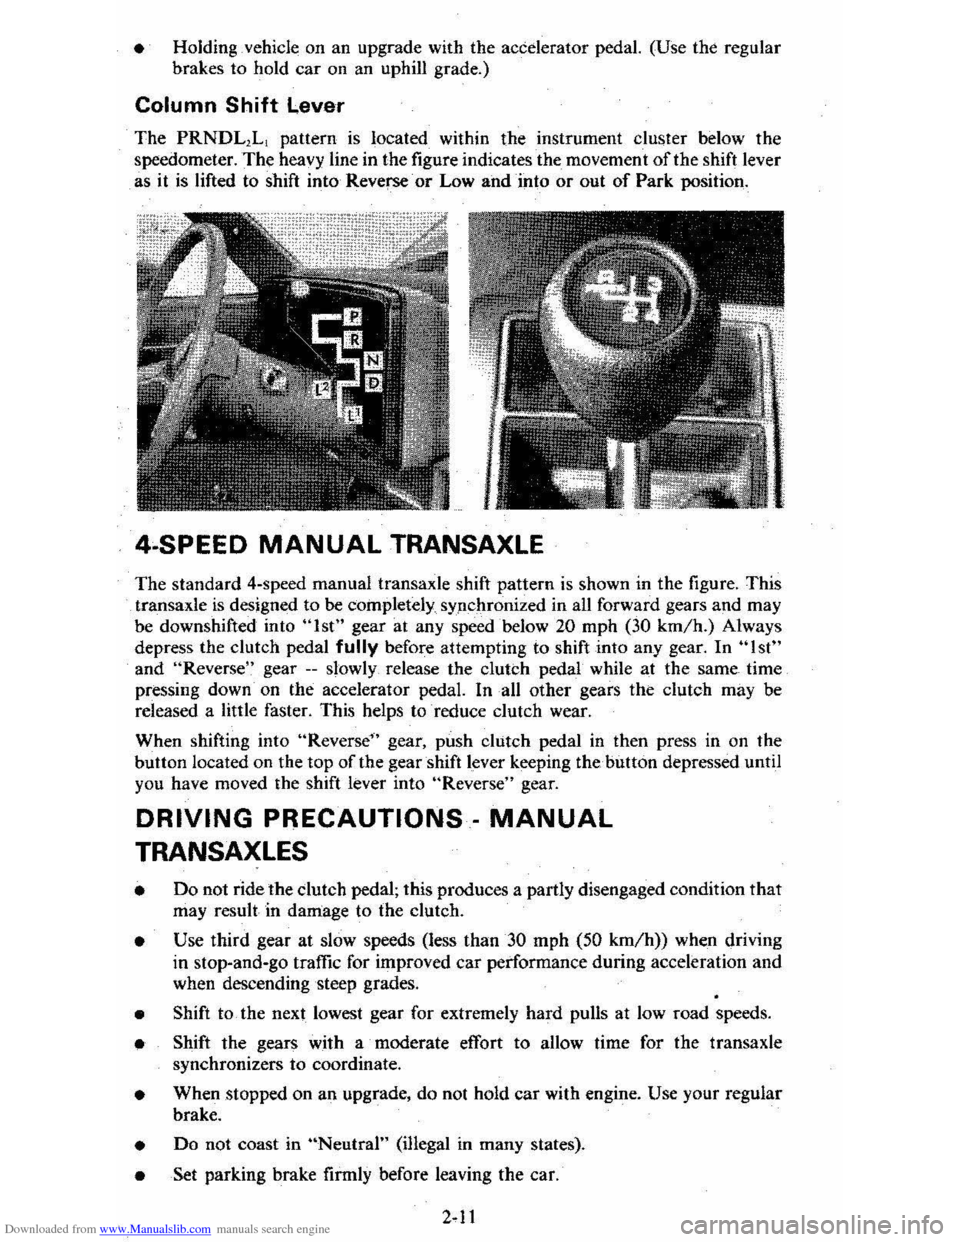
The PRNDL1L1 pattern is located within the instrument cluster below the
speedometer.
The heavy line in the figure indicates the movement of the shift lever
as it
is lifted to shift into Reverse or Low and into or out of Park position.
4·SPEED MANUAL TRANSAXLE
The standard 4-speed manual transaxle shift pattern is shown in the figure. This
transaxle
is designed to be cOinpletely sypchronized in all forward gears and may
be downshifted into "1st" gear at any speed below 20 mph (30 km/h.) Always
depress the clutch pedal
fully before attempting to shift into any gear. In "1st"
and "Reverse " gear --slowly release the clutch pedal while at the same time
pressing down· on the accelerator pedal. In all other gears the clutch may be
released a little faster. This helps to reduce clutch wear.
When shifting into
"Reverse" gear, push clutch pedal in then press in on the
button located on the top of the gearshift lever keeping thehutton depressed until
you have moved the shift
lever into "Reverse" gear.
DRIVING PRECAUTIONS· MANUAL
TRANSAXLES
• Do not ride the dutch pedal; this produces a partly disengaged condition that may result in damage to the clutch.
• Use third gear at slow speeds (less than 30 mph (50 km/h)) when driving
in stop-and-go traffic for improved
car performance during acceleration and
when descending steep grades.
• Shift to the next lowest gear for extremely hard pulls at low road speeds.
• Shift the gears with a moderate effort to allow time for the transaxle
synchronizers to coordinate.
• When stopped on an upgrade, do not hold car with engine. Use your regular
brake.
• Do not coast in "Neutral" (i1legal in many states).
• Set parking brake firmly before leaving the car.
Page 29 of 95
Downloaded from www.Manualslib.com manuals search engine Proper Shift Points for Manual Transaxle
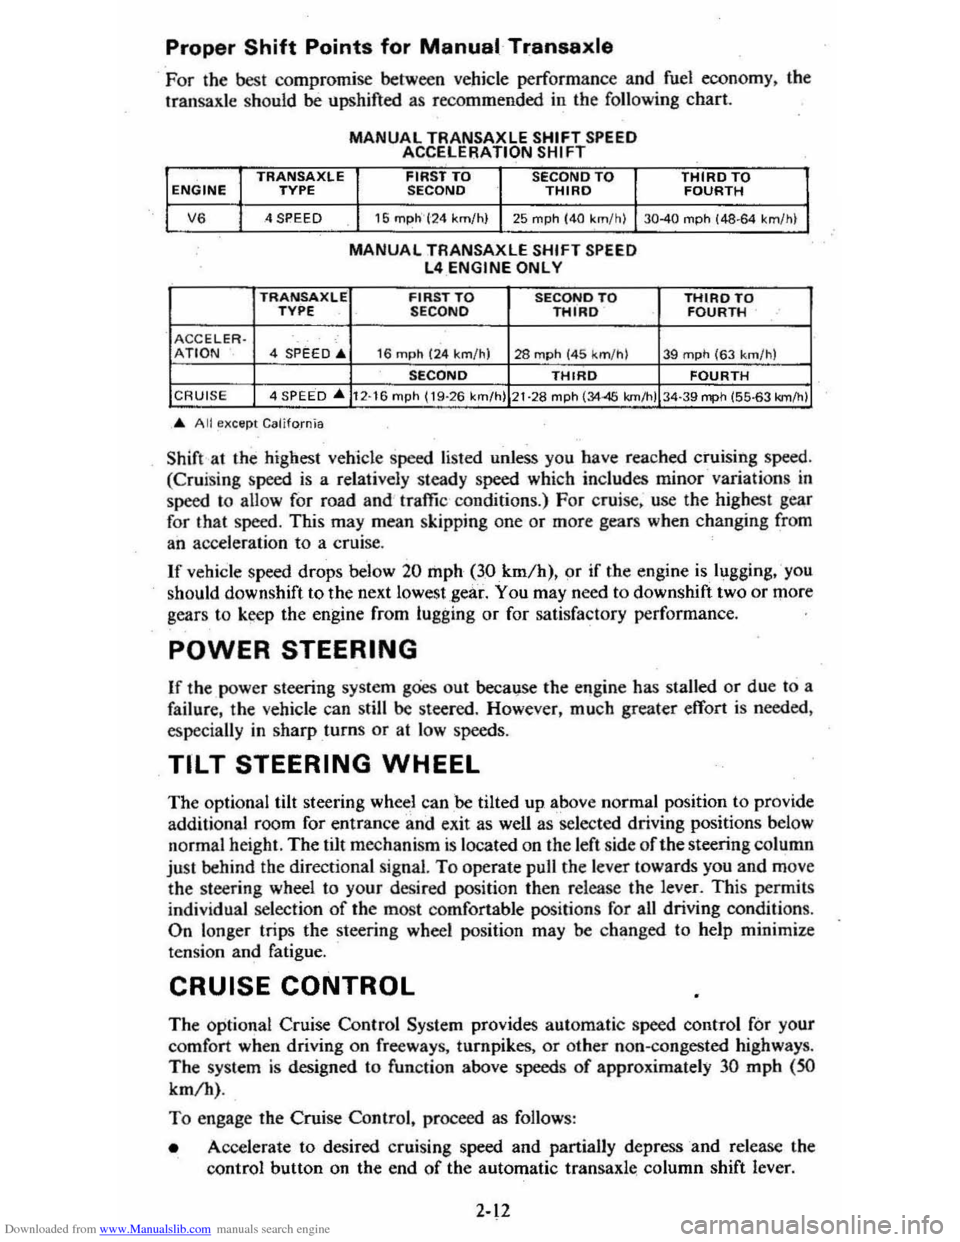
For the best compromise between vehicle performance and fuel economy . the Iransaxle should be upshifted as recommended in the following chart.
TRANSAXLE ENGINE TYPE
V6 4 SPEED
TRANSAXlE TVPE .
ACCELER · 4 ;PEED:" AnON
MANUAL TRANSAXLE SHIFT SPEED ACCELERATION SHIFT
FIRST TO
SECOND TO SECOND THIRD
16 mph" ('24 km/h) 25 mph (40 km/h)
MANUAL TAANSAXLE SHIFT SPEED L4 ENGINE ONL Y
FIRST TO SECQNOTO SECOND THIRD
16 mph (24 km/h) 28 mph (45 k m/h)
SECOND THIRD
THIRD TO FOURTH
30-40 mph (48·64 11m/h)
THIRD TO FOURTH
39 mph (63 km/h)
FOURTH CRUIS E 4 SPEED ... 12·16 mph (19-26 km/h) 21 ·28 mph (3445 km/h) 34·39 mph (55·63 km/h)
... All except California
Shift at the highest vehicle speed listed unless you have reached cruising speed.
(Cruising speed is a relatively steady speed which includes minor variations in
speed
to allow for road and traffic conditions.) For cruise. use the highest gear
for that speed. This may mean skipping one or more gears when changing from
an acceleration to a cruise.
If vehicle speed drops below 20 mph (30km/h). pr if the engine islugging,'you
should downshift to the next lowest ,gear.
You may need to downshift two or more
gears to k~p the engine from lugging or for satisfactory performance.
POWER STEERING
If the power steering system goes out becalj,se the engine has stalled or due to a
failure . the vehicle can still
be steered. However, much greater effort is needed.
especially in sharp
turns or at low speeds.
TILT STEERING WHEEL
The optional tilt steering wheel can be tilted up above normal position to provide
additional room for entrance and exit as well as selected driving positions below
normal height. The tilt mechanism
is located on the left side of the steering column
just behind the directional signal. To operate pull the lever towards you and move
the sleering wheel to your desired position then release the level". This permits
individual selection
of the most comfortable positions for all driving conditions. On longer trips the steering wheel position may be changed to help minimize
tension and fatigue.
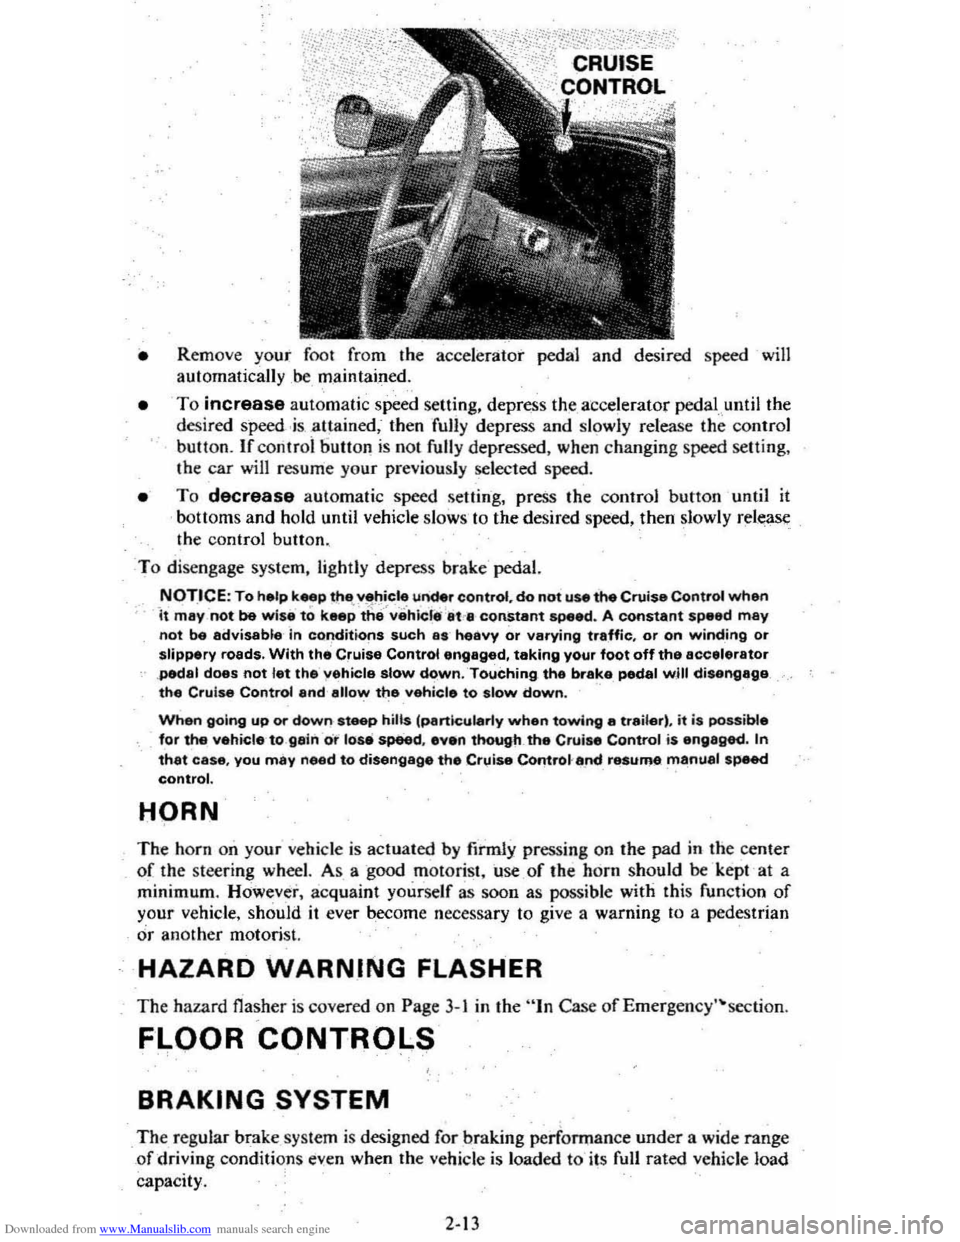
CRUISE CONTROL
The optional Cruise Control System provides automatic speed control for your
comfort when driving on freeways, turnpikes.
or other non-congested highways.
The system is designed to function above speeds of approximately 30 mph (SO
km/h).
To engage the Cruise Control, proceed as follows:
• Accelerate to desired cruising speed and partially depress and release the
control button on the end
of the automatic transaxle: column shift lever.
2-12
Page 30 of 95
Downloaded from www.Manualslib.com manuals search engine • Rem ove yo ur foo t f rom the accelerat or ped al and desir ed speed will
auto matically ,be, maintained .
• To increase autom atic speed setting , depress the a' ccelerator pedal.,until the
desi re d speed .i s atta ined , then full y depres s and slo wly releas e the co ntrol butt on. If co nlr oi 6 ullon is no t fully depressed , when ch angin g speed se tting.
the ca r will resum e yo ur previ ously selected speed.
• To decrease aut omatic speed se llin ·g. press the control button until it
b o tt oms and ho ld until vehicle slo w s' to the desir ed speed, then slowly release
t h e c ontrol button.
T o dise n
gage system, lightly depr ess brak epedal.
.NOT.ICE: To help k~p thlt~f}.~C.,! under controf, do not use the Cruise Controf when It may not be wise to keep the vehier.· at'. constant speed . A constant speed may not be advisable 'in conditions such as heavy or varying traffic, or on winding or slippery roads. With the Cruise Control engaged, taking yOur foot off the accelerator ,pedal does not let the yahicla slow down. 'Touching. the b rake pedal will disengage the Cru ise Controf and allow the vehicle to slow down.
When going up or down steep h ills fpa"~ularly when towing a tr ailer) , it is possible for the vehicle·to ga in o r lose speed .• ven though. the Cruise Control is engaged. In that case , you may need to disengage the Cruise Control'~.nd resume manual speed control.
HORN
The ho rn on your vehicl e is ac tuated by firml y pressing o n the pad in the c ent er
of th e stee ring wheel. As a good m otorist. use .of the ho rn should be k ept 'at a
minimum . However, ac quaint yourself as soon as possible with this f u nct io n of
you r ve hicle, should it ever becom e necess ary to give a warning to a pede strian
or anot her motorist.
HAZARD WARNING FLASHER
Th e haza rd fla sher is covered on P age 3-1 in the "In Cas e of Emerg ency·~section.
FLOOR CONTROLS
BRAKING SYSTEM
The reg ular brake syste m i s desig ned fo r bra king perfonnanc e und er a wide range
o f
driving conditi ons even when the vehicle is load ed to its full rated veh icl e lo ad
capac ity.
2-13