CHEVROLET COLORADO 2021 Duramax Diesel Supplement
Manufacturer: CHEVROLET, Model Year: 2021, Model line: COLORADO, Model: CHEVROLET COLORADO 2021Pages: 89, PDF Size: 1.9 MB
Page 31 of 89
Chevrolet/GMC 2.8L Duramax Diesel Engine Supplement (GMNA-Localizing-
U.S./Canada-14465442) - 2021 - CRC - 2/3/20
30 Driving and Operating
The system is not harmed by air in the fuel
lines; however, the engine and/or the FOH
may not start until the fuel system is
primed and the air is removed.
Priming the Fuel System
There is an electric priming pump that will
bring fuel to the engine and eliminate air in
the fuel lines. To prime the engine:1. Correct any condition that caused the loss of prime.
2. Turn the ignition on for 30 seconds. Do not start the engine. The fuel pump will
start priming.
3. Turn the ignition off, then back to start, and crank the engine for 15 seconds.
4. If the engine does not start, repeat Steps 2 and 3 until the engine starts.
If the engine does not start after
repeating Steps 2 and 3 three times, turn
the ignition key off for 60 seconds.
5. Repeat the above steps until the engine starts.
6. If the engine starts, but does not run smoothly, increase the engine speed
slightly. 7. If the engine starts and runs but stalls
again, turn the ignition off for
60 seconds.
8. When the engine starts, let it idle for a few minutes and check the filter for any
leaks.
To Prime the Fuel Operated Heater (FOH)
Fuel Lines (Van Models)
See your dealer or qualified technician if the
FOH fuel lines need to be primed.
Running Out of Fuel
If the engine has stalled due to running out
of fuel, try to restart it: 1. If parked on a level surface, add at least 3.8 L (1 gal) of fuel. Up to 18.9 L (5 gal)
may be needed if parked on a slope.
2. Follow the vehicle fuel system priming procedure earlier in this section to
re-prime the system and restart the
engine.
If the check engine light comes on due to
running out of fuel, it may take a few drive
cycles to clear.
On van models only, the Fuel Operated
Heater (FOH) stops automatically when the
fuel tank volume is less than or equal to 10% of the total tank. The FOH fuel lines
will not need to be primed if the vehicle
runs out of fuel.
Fuel Filter Replacement
Van Models
{Warning
Diesel fuel is flammable. It could start a
fire if something ignites it, and people
could be burned. Do not let it get on hot
engine parts, and keep matches or other
ignition sources away.
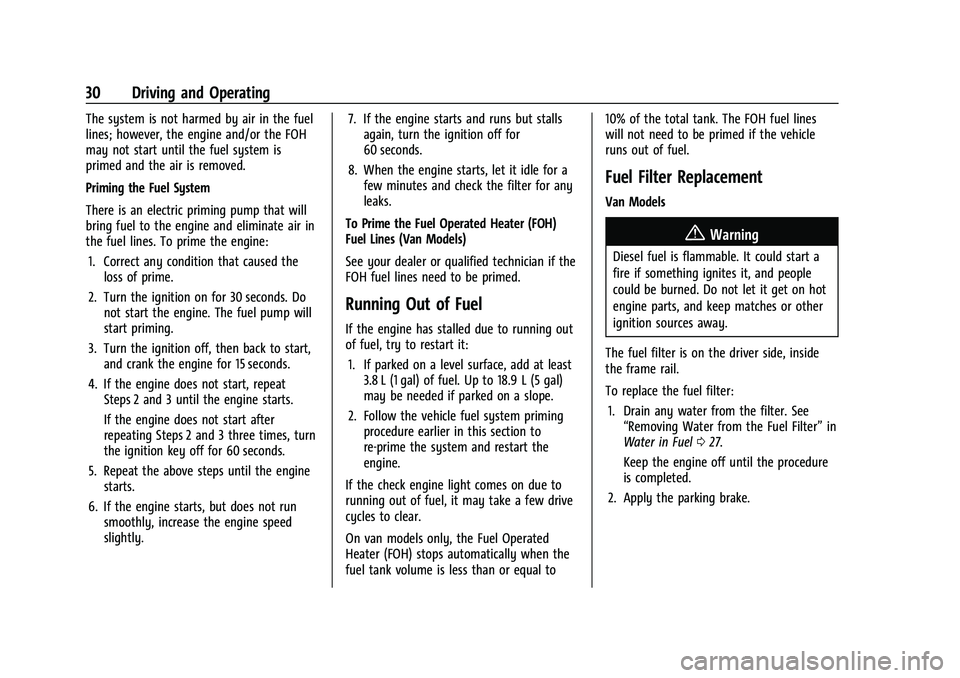
The fuel filter is on the driver side, inside
the frame rail.
To replace the fuel filter: 1. Drain any water from the filter. See “Removing Water from the Fuel Filter” in
Water in Fuel 027.
Keep the engine off until the procedure
is completed.
2. Apply the parking brake.
Page 32 of 89
Chevrolet/GMC 2.8L Duramax Diesel Engine Supplement (GMNA-Localizing-
U.S./Canada-14465442) - 2021 - CRC - 2/3/20
Driving and Operating 31
3. Remove the filter element cap by turningit counterclockwise.
4. Remove the filter element. If there is any dirt on the filter sealing surface, clean
it off.
5. Install the new filter element and o-ring.
6. Reinstall and tighten the filter cap to the housing.
7. Use the fuel filter priming procedure to prime the fuel filter. See “Fuel Priming”
in Water in Fuel 027.
8. Start the engine and let it idle for five minutes. Check the fuel filter and air
bleed valve for leaks.
9. Reset the fuel filter monitor. See Driver
Information Center (DIC) 010. If the van Fuel Operated Heater (FOH) (if
equipped) is not working, the FOH line
requires priming. See your dealer for service.
See
Fuel Operated Heater (FOH) (Van Models
Only) 019.
Pickup Models
{Warning
Diesel fuel is flammable. It could start a
fire if something ignites it, and people
could be burned. Do not let it get on hot
engine parts, and keep matches or other
ignition sources away.
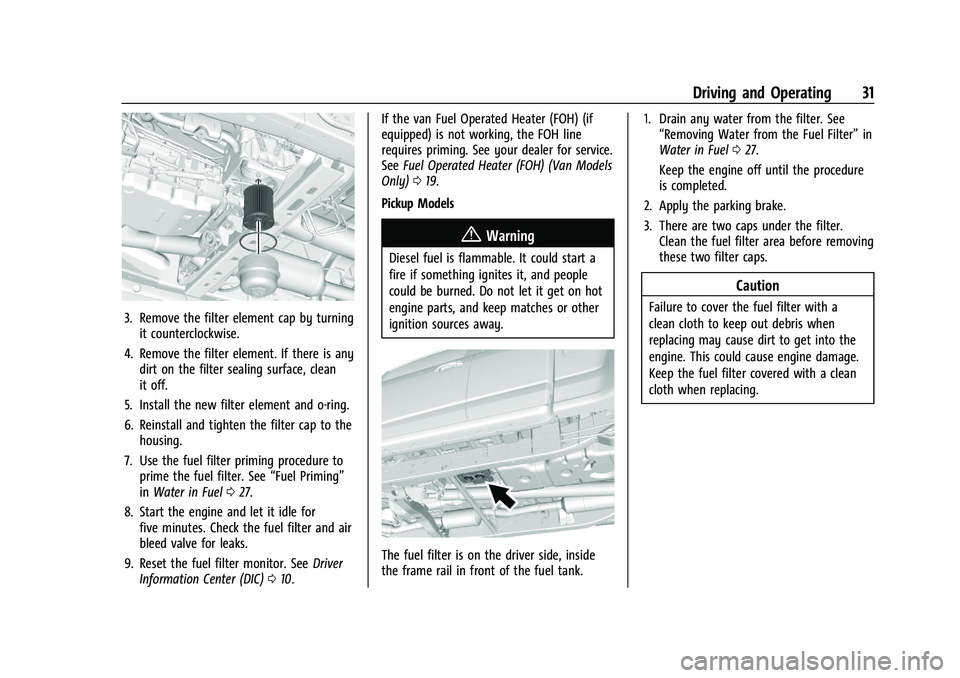
The fuel filter is on the driver side, inside
the frame rail in front of the fuel tank. 1. Drain any water from the filter. See
“Removing Water from the Fuel Filter” in
Water in Fuel 027.
Keep the engine off until the procedure
is completed.
2. Apply the parking brake.
3. There are two caps under the filter. Clean the fuel filter area before removing
these two filter caps.
Caution
Failure to cover the fuel filter with a
clean cloth to keep out debris when
replacing may cause dirt to get into the
engine. This could cause engine damage.
Keep the fuel filter covered with a clean
cloth when replacing.
Page 33 of 89
Chevrolet/GMC 2.8L Duramax Diesel Engine Supplement (GMNA-Localizing-
U.S./Canada-14465442) - 2021 - CRC - 2/3/20
32 Driving and Operating
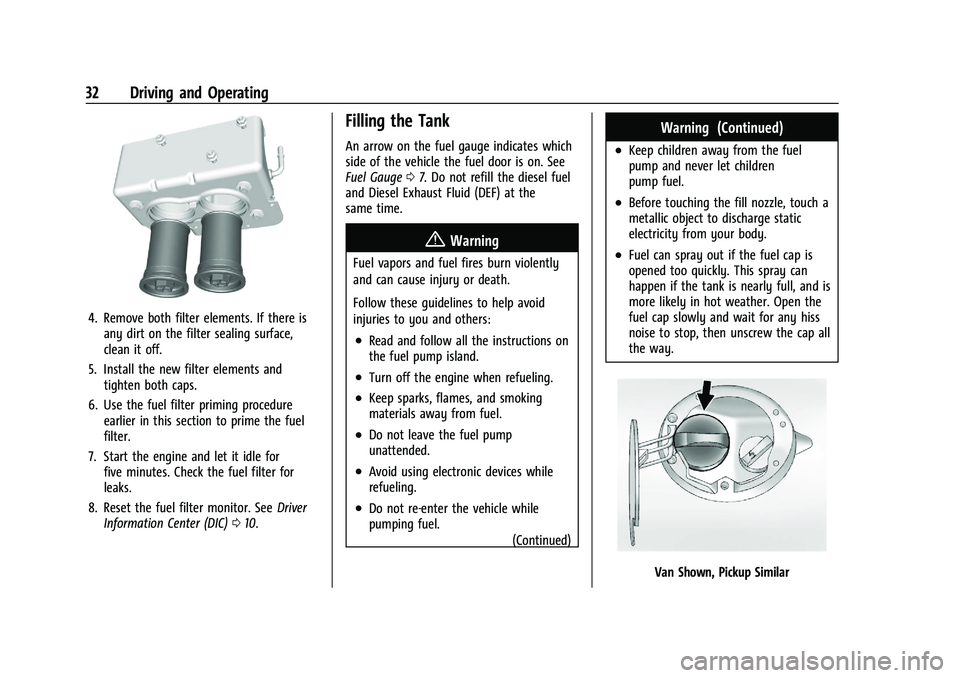
4. Remove both filter elements. If there isany dirt on the filter sealing surface,
clean it off.
5. Install the new filter elements and tighten both caps.
6. Use the fuel filter priming procedure earlier in this section to prime the fuel
filter.
7. Start the engine and let it idle for five minutes. Check the fuel filter for
leaks.
8. Reset the fuel filter monitor. See Driver
Information Center (DIC) 010.
Filling the Tank
An arrow on the fuel gauge indicates which
side of the vehicle the fuel door is on. See
Fuel Gauge 07. Do not refill the diesel fuel
and Diesel Exhaust Fluid (DEF) at the
same time.
{Warning
Fuel vapors and fuel fires burn violently
and can cause injury or death.
Follow these guidelines to help avoid
injuries to you and others:
.Read and follow all the instructions on
the fuel pump island.
.Turn off the engine when refueling.
.Keep sparks, flames, and smoking
materials away from fuel.
.Do not leave the fuel pump
unattended.
.Avoid using electronic devices while
refueling.
.Do not re-enter the vehicle while
pumping fuel.
(Continued)
Warning (Continued)
.Keep children away from the fuel
pump and never let children
pump fuel.
.Before touching the fill nozzle, touch a
metallic object to discharge static
electricity from your body.
.Fuel can spray out if the fuel cap is
opened too quickly. This spray can
happen if the tank is nearly full, and is
more likely in hot weather. Open the
fuel cap slowly and wait for any hiss
noise to stop, then unscrew the cap all
the way.
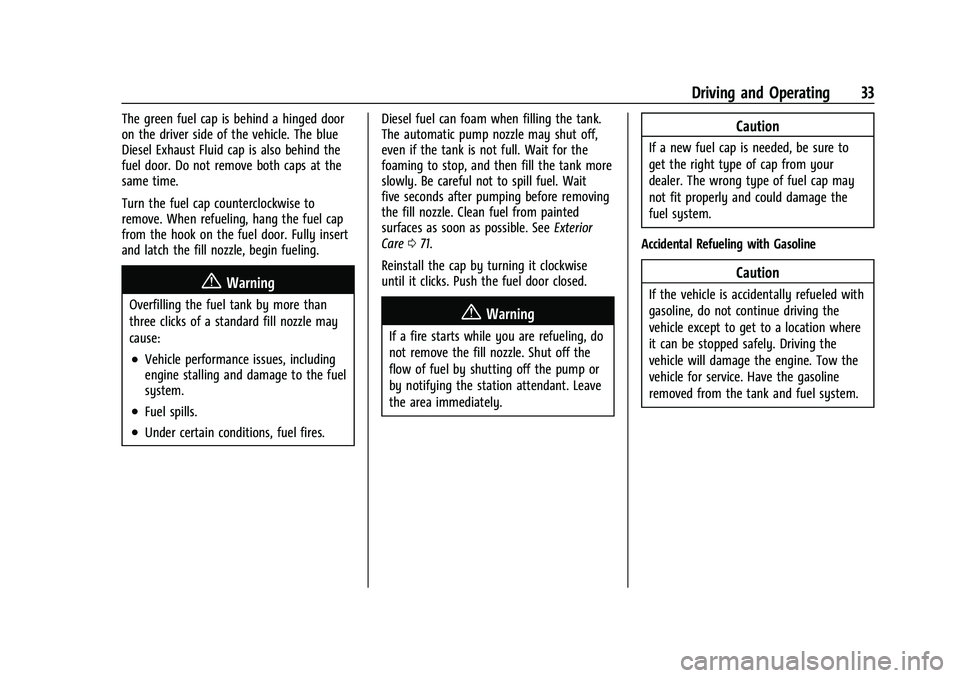
Van Shown, Pickup Similar
Page 34 of 89
Chevrolet/GMC 2.8L Duramax Diesel Engine Supplement (GMNA-Localizing-
U.S./Canada-14465442) - 2021 - CRC - 2/3/20
Driving and Operating 33
The green fuel cap is behind a hinged door
on the driver side of the vehicle. The blue
Diesel Exhaust Fluid cap is also behind the
fuel door. Do not remove both caps at the
same time.
Turn the fuel cap counterclockwise to
remove. When refueling, hang the fuel cap
from the hook on the fuel door. Fully insert
and latch the fill nozzle, begin fueling.
{Warning
Overfilling the fuel tank by more than
three clicks of a standard fill nozzle may
cause:
.Vehicle performance issues, including
engine stalling and damage to the fuel
system.
.Fuel spills.
.Under certain conditions, fuel fires.Diesel fuel can foam when filling the tank.
The automatic pump nozzle may shut off,
even if the tank is not full. Wait for the
foaming to stop, and then fill the tank more
slowly. Be careful not to spill fuel. Wait
five seconds after pumping before removing
the fill nozzle. Clean fuel from painted
surfaces as soon as possible. See
Exterior
Care 071.
Reinstall the cap by turning it clockwise
until it clicks. Push the fuel door closed.
{Warning
If a fire starts while you are refueling, do
not remove the fill nozzle. Shut off the
flow of fuel by shutting off the pump or
by notifying the station attendant. Leave
the area immediately.
Caution
If a new fuel cap is needed, be sure to
get the right type of cap from your
dealer. The wrong type of fuel cap may
not fit properly and could damage the
fuel system.
Accidental Refueling with Gasoline
Caution
If the vehicle is accidentally refueled with
gasoline, do not continue driving the
vehicle except to get to a location where
it can be stopped safely. Driving the
vehicle will damage the engine. Tow the
vehicle for service. Have the gasoline
removed from the tank and fuel system.
Page 35 of 89
Chevrolet/GMC 2.8L Duramax Diesel Engine Supplement (GMNA-Localizing-
U.S./Canada-14465442) - 2021 - CRC - 2/3/20
34 Driving and Operating
Filling a Portable Fuel Container
{Warning
Never fill a portable fuel container while
it is in the vehicle. Static electricity
discharge from the container can ignite
the fuel vapor. You or others could be
badly burned and the vehicle could be
damaged. To help avoid injury to you
and others:
.Dispense fuel only into approved
containers.
.Do not fill a container while it is
inside a vehicle, in a vehicle's trunk, in
a pickup bed, or on any surface other
than the ground.
.Bring the fill nozzle in contact with
the inside of the fill opening before
operating the nozzle. Maintain contact
until filling is complete.(Continued)
Warning (Continued)
.Keep sparks, flames, and smoking
materials away from fuel.
.Avoid using electronic devices while
pumping fuel.
Trailer Towing
When towing at high elevation on steep
uphill grades, consider the following:
Engine coolant at higher elevation will boil
at a lower temperature than at or near sea
level. If the engine is turned off immediately
after towing at high elevation on steep
uphill grades, the vehicle may show signs
similar to engine overheating. To avoid this,
let the engine run while parked (preferably
on level ground) with the transmission in
P (Park) and the parking brake applied for at
least five minutes before turning the engine
off. If the overheat warning comes on, see
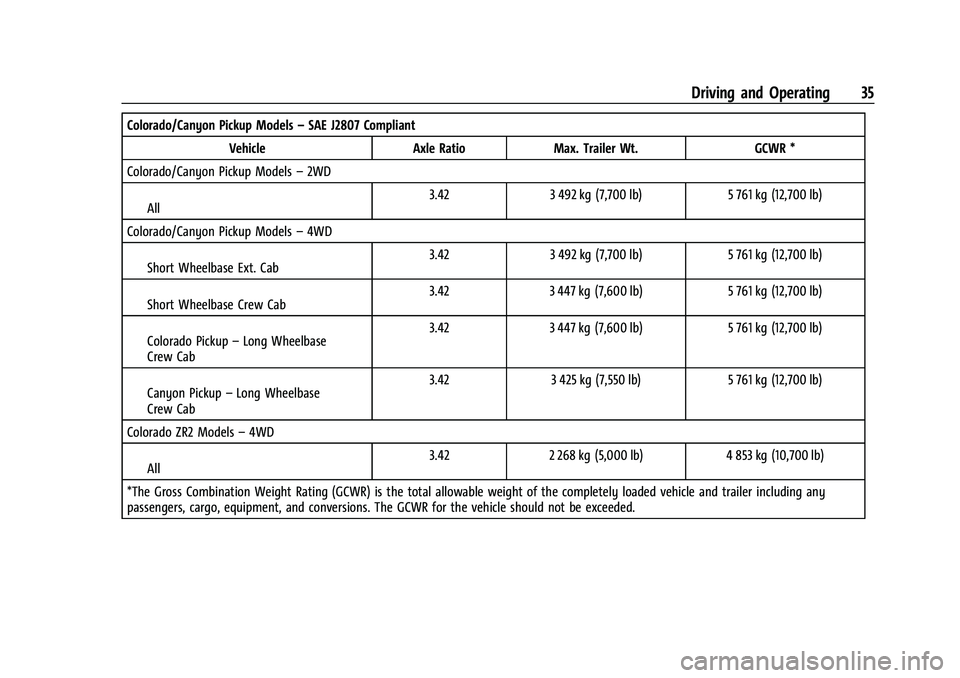
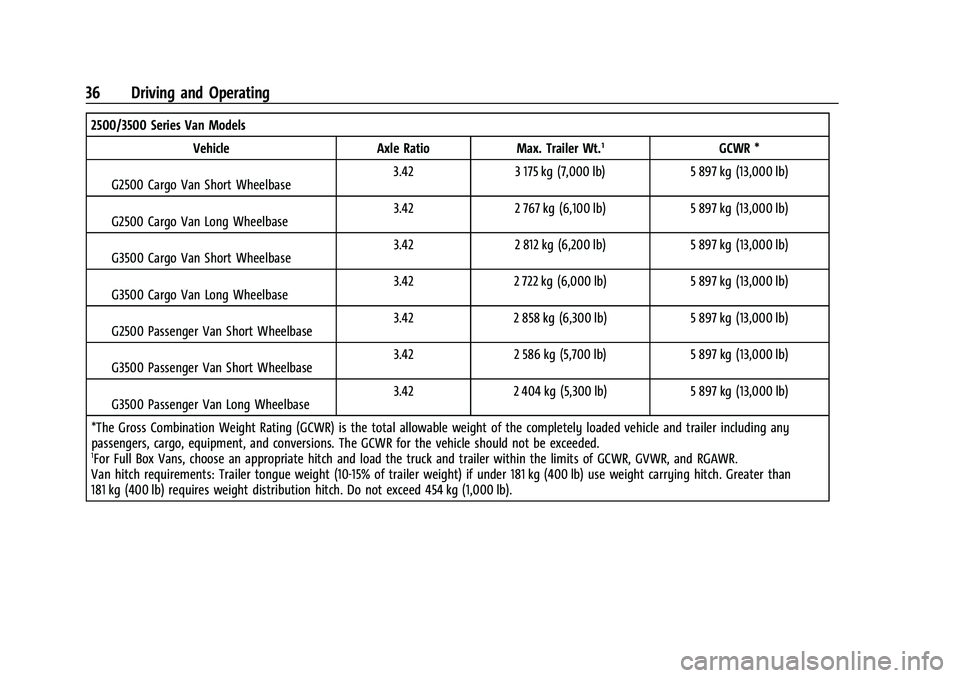
Engine Overheating062. Use the following chart to determine the
maximum the trailer can weigh, based upon
your vehicle model and options.
All axles of the trailer must be equipped
with brakes adequate for the intended use.
Trailer braking equipment conforming to
Canadian Standards Association (CSA)
requirement CAN3-D313, or its equivalent, is
recommended.
Page 36 of 89
Chevrolet/GMC 2.8L Duramax Diesel Engine Supplement (GMNA-Localizing-
U.S./Canada-14465442) - 2021 - CRC - 2/3/20
Driving and Operating 35
Colorado/Canyon Pickup Models–SAE J2807 Compliant
Vehicle Axle Ratio Max. Trailer Wt. GCWR *
Colorado/Canyon Pickup Models –2WD
All 3.42
3 492 kg (7,700 lb) 5 761 kg (12,700 lb)
Colorado/Canyon Pickup Models –4WD
Short Wheelbase Ext. Cab 3.42
3 492 kg (7,700 lb) 5 761 kg (12,700 lb)
Short Wheelbase Crew Cab 3.42
3 447 kg (7,600 lb) 5 761 kg (12,700 lb)
Colorado Pickup –Long Wheelbase
Crew Cab 3.42
3 447 kg (7,600 lb) 5 761 kg (12,700 lb)
Canyon Pickup –Long Wheelbase
Crew Cab 3.42
3 425 kg (7,550 lb) 5 761 kg (12,700 lb)
Colorado ZR2 Models –4WD
All 3.42
2 268 kg (5,000 lb) 4 853 kg (10,700 lb)
*The Gross Combination Weight Rating (GCWR) is the total allowable weight of the completely loaded vehicle and trailer including any
passengers, cargo, equipment, and conversions. The GCWR for the vehicle should not be exceeded.
Page 37 of 89
Chevrolet/GMC 2.8L Duramax Diesel Engine Supplement (GMNA-Localizing-
U.S./Canada-14465442) - 2021 - CRC - 2/3/20
36 Driving and Operating
2500/3500 Series Van ModelsVehicle Axle Ratio Max. Trailer Wt.
1GCWR *
G2500 Cargo Van Short Wheelbase 3.42
3 175 kg (7,000 lb) 5 897 kg (13,000 lb)
G2500 Cargo Van Long Wheelbase 3.42
2 767 kg (6,100 lb) 5 897 kg (13,000 lb)
G3500 Cargo Van Short Wheelbase 3.42
2 812 kg (6,200 lb) 5 897 kg (13,000 lb)
G3500 Cargo Van Long Wheelbase 3.42
2 722 kg (6,000 lb) 5 897 kg (13,000 lb)
G2500 Passenger Van Short Wheelbase 3.42
2 858 kg (6,300 lb) 5 897 kg (13,000 lb)
G3500 Passenger Van Short Wheelbase 3.42
2 586 kg (5,700 lb) 5 897 kg (13,000 lb)
G3500 Passenger Van Long Wheelbase 3.42
2 404 kg (5,300 lb) 5 897 kg (13,000 lb)
*The Gross Combination Weight Rating (GCWR) is the total allowable weight of the completely loaded vehicle and trailer including any
passengers, cargo, equipment, and conversions. The GCWR for the vehicle should not be exceeded.
1For Full Box Vans, choose an appropriate hitch and load the truck and trailer within the limits of GCWR, GVWR, and RGAWR.
Van hitch requirements: Trailer tongue weight (10-15% of trailer weight) if under 181 kg (400 lb) use weight carrying hitch. Greater than
181 kg (400 lb) requires weight distribution hitch. Do not exceed 454 kg (1,000 lb).
Page 38 of 89
Chevrolet/GMC 2.8L Duramax Diesel Engine Supplement (GMNA-Localizing-
U.S./Canada-14465442) - 2021 - CRC - 2/3/20
Driving and Operating 37
See“Trailer Towing” in the owner’s manual
for kingpin weight and trailer tongue weight
information.
Weight of the Trailer Tongue
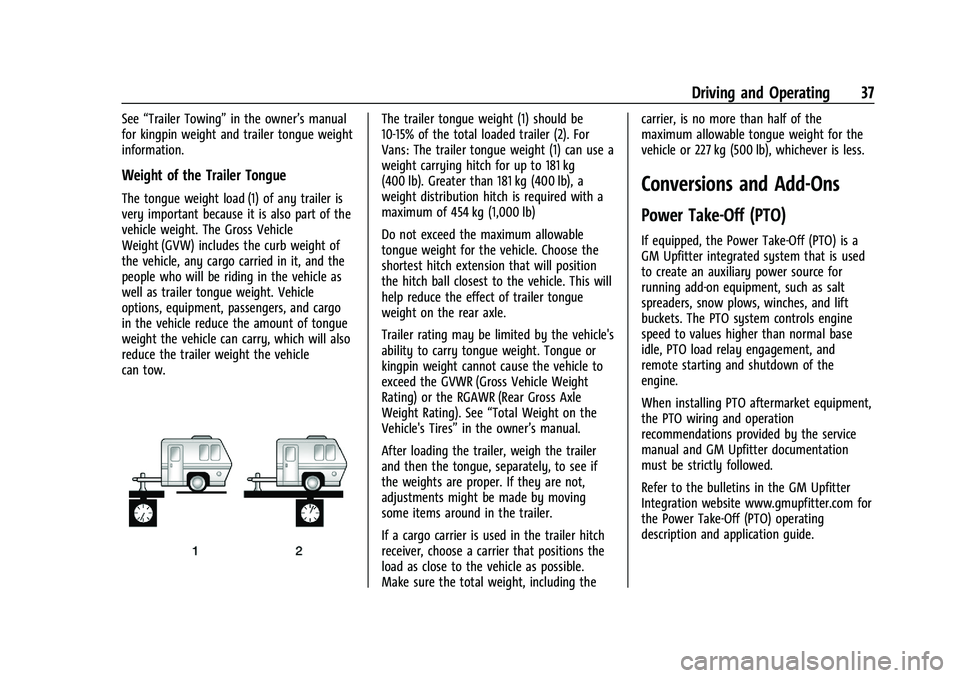
The tongue weight load (1) of any trailer is
very important because it is also part of the
vehicle weight. The Gross Vehicle
Weight (GVW) includes the curb weight of
the vehicle, any cargo carried in it, and the
people who will be riding in the vehicle as
well as trailer tongue weight. Vehicle
options, equipment, passengers, and cargo
in the vehicle reduce the amount of tongue
weight the vehicle can carry, which will also
reduce the trailer weight the vehicle
can tow.
The trailer tongue weight (1) should be
10-15% of the total loaded trailer (2). For
Vans: The trailer tongue weight (1) can use a
weight carrying hitch for up to 181 kg
(400 lb). Greater than 181 kg (400 lb), a
weight distribution hitch is required with a
maximum of 454 kg (1,000 lb)
Do not exceed the maximum allowable
tongue weight for the vehicle. Choose the
shortest hitch extension that will position
the hitch ball closest to the vehicle. This will
help reduce the effect of trailer tongue
weight on the rear axle.
Trailer rating may be limited by the vehicle's
ability to carry tongue weight. Tongue or
kingpin weight cannot cause the vehicle to
exceed the GVWR (Gross Vehicle Weight
Rating) or the RGAWR (Rear Gross Axle
Weight Rating). See “Total Weight on the
Vehicle's Tires” in the owner’s manual.
After loading the trailer, weigh the trailer
and then the tongue, separately, to see if
the weights are proper. If they are not,
adjustments might be made by moving
some items around in the trailer.
If a cargo carrier is used in the trailer hitch
receiver, choose a carrier that positions the
load as close to the vehicle as possible.
Make sure the total weight, including the carrier, is no more than half of the
maximum allowable tongue weight for the
vehicle or 227 kg (500 lb), whichever is less.
Conversions and Add-Ons
Power Take-Off (PTO)
If equipped, the Power Take-Off (PTO) is a
GM Upfitter integrated system that is used
to create an auxiliary power source for
running add-on equipment, such as salt
spreaders, snow plows, winches, and lift
buckets. The PTO system controls engine
speed to values higher than normal base
idle, PTO load relay engagement, and
remote starting and shutdown of the
engine.
When installing PTO aftermarket equipment,
the PTO wiring and operation
recommendations provided by the service
manual and GM Upfitter documentation
must be strictly followed.
Refer to the bulletins in the GM Upfitter
Integration website www.gmupfitter.com for
the Power Take-Off (PTO) operating
description and application guide.
Page 39 of 89
Chevrolet/GMC 2.8L Duramax Diesel Engine Supplement (GMNA-Localizing-
U.S./Canada-14465442) - 2021 - CRC - 2/3/20
38 Driving and Operating
{Warning
Engine exhaust contains Carbon
Monoxide (CO), which cannot be seen or
smelled. Exposure to CO can cause
unconsciousness or even death. Never
operate PTO in an enclosed area such as
a garage or building that has no fresh air
ventilation. See“Engine Exhaust” in the
owner’s manual.
Caution
If the key is in the ignition during
Remote PTO operation, the vehicle can be
shifted out of P (Park). Even though PTO
will be disengaged, depending on PTO
Upfitter application, personal injury or
property damage may result from vehicle
movement. Always remove the key from
the ignition before operating
Remote PTO.
Primary PTO Operating Modes
PTO modes of operation are:
.Preset
Stationary operation only: In-cab control
is standard, remote control is available.
.Variable
Stationary operation only: In-cab control
is standard, remote control is available.
.Mobile
In-cab control only.
.Operator Selectable In-Cab Mode (OSIM)
OSIM is for in-cab operation only.
OSIM is for vehicles that require both
stationary and mobile modes. OSIM is
available via the GM Service Tool only.
During the configuration of OSIM, two
modes must be paired. The options for
pairing are: stationary preset and mobile,
or stationary variable and mobile. During
activation of OSIM, the operator must
select one of the two modes within the
pre-configured pairing. If an OSIM mode is
not selected, PTO will not operate.
OSIM modes of operation are:
‐ Stationary
For stationary mode, the configuration
may be stationary preset or stationary
variable.
‐ Mobile
For mobile mode, the configuration is
variable only. Selection between OSIM pairings is not
available.
Remote modes are not available.
The factory default programming enables
in-cab control. For stationary modes, a GM
Service Tool can reprogram the system to
allow for remote control and disable the
in-cab control.
All PTO modes provide for engine rpm
control and PTO load relay control.
All PTO modes provide for safety interlocks
for PTO load disengagement.
Remote PTO modes provide for remote
engine starting and shutdown.
Stationary in-cab and Remote PTO modes
provide for engine shutdown due to critical
engine conditions, as well as a timed engine
shutdown feature.
Preset PTO
Preset Enable Conditions –In-Cab Operation
To enable PTO: 1. With the engine running, shift the vehicle into P (Park) and set the parking
brake. Do not press the brake pedal.
2. Confirm that cruise control is off.
Page 40 of 89
Chevrolet/GMC 2.8L Duramax Diesel Engine Supplement (GMNA-Localizing-
U.S./Canada-14465442) - 2021 - CRC - 2/3/20
Driving and Operating 39
3. Press and release the PTO in-cab switchbelow the climate controls in the center
stack. The PTO indicator light will blink
rapidly until the PTO load relay becomes
engaged and will then be on steady. The
engine will advance to the PTO Standby
Speed.
4. Once the PTO Standby Speed is reached, use SET− and +RES on the cruise control
to reach the Set 1 or Set 2 PTO engine
speeds.
The accelerator pedal is disabled and
cannot be used to override the PTO
preset speeds.
Factory Default PTO Engine Speeds
Standby 900 rpm
Set 1 (SET−) 1200 rpm
Set 2 (+RES) 1900 rpm
The first time a vehicle is used for PTO: 1. The PTO Control setting on the GM Service Tool is programmed to Interior
Mode PTO Switch.
2. Check the correct operation of the default PTO preset stationary mode to
observe the three idle up speeds. The
PTO function should be confirmed before any wiring modifications are done or any
reprogramming is attempted. See your
dealer if the default presets are not
functioning properly.
3. The PTO indicator light will not initially reflect the status of the PTO load until
the PTO load relay is wired into the
system. The PTO load relay output is
enabled as a factory default. When the
PTO indicator light is either blinking or
on solid, the PTO relay output will be
activated.
Preset Enable Conditions –Remote
Operation
This requires programming with the GM
Service Tool and remote switch panel
provided by GM Upfitter.
1. Confirm that cruise control is off.
2. Set the parking brake and shift the transmission into P (Park).
3. Turn the engine off. Remove or place the key in the ignition off position. Lock the
vehicle, if desired.
4. Confirm the hood is closed.
5. From outside the vehicle, press and release the Remote PTO Arm switch. 6. Within five seconds, open and close the
Remote PTO Engine Start/Shutdown
switch.
7. The horn will chirp, and then engine starting will be automatically initiated.
The PTO system will then elevate engine
rpm to PTO Standby Speed and engage
the PTO load relay.
8. The Remote PTO Set switch can now be used to accomplish the PTO Set 1 and
Set 2 engine speeds.
The accelerator pedal is disabled when
Remote PTO operation is selected.
Preset Enable Conditions –Remote
Operation In-Cab Enable
This requires programming with the GM
Service Tool and remote switch panel
provided by GM Upfitter.
Starting remote operation in-cab:
1. With the engine running, shift the vehicle into P (Park), release the brake
pedal, and set the parking brake.
2. Confirm that cruise control is off.
3. Confirm the hood is closed.
4. Press and release the in-cab PTO switch.